How to Make React VR Apps
React VR is a great framework from Oculus that lets you build virtual reality web apps. You can use it, and some JavaScript, to make your own tours and user interfaces.
Join the DZone community and get the full member experience.
Join For FreeWith the React VR framework, you are now able to build VR web apps. WebVR is an experimental API enabling the creation and viewing of VR experiences in your browser. The goal of this new technology by Oculus is granting access to virtual reality to everybody regardless of the devices at hand.
The only thing you need to make a React VR app is a headset and a compatible browser. No need even for a headset when you are just viewing a web VR application. React VR is a great framework to build VR websites or apps on JavaScript. It utilizes the same design as React Native and lets you make virtual reality tours and user interfaces with the provided components.
Setting Up the Development Environment
Before getting started with React VR, a setup is required for the dependencies that will be used to build and manage a React VR app. These are Node.js and the React VR CLI.
With Node.js installed, ensure that the latest version (at least 6.0) is used. If not, do the following:
- MacOS: install Node.js using Homebrew
- Windows: install it from the nodejs.org downloads
- Linux: use sudo apt-get install nodejs command
Then we have to install the React VR CLI using npm:
npm install -g react-vr-cli.
And check if you have root permissions to install it globally.
Creating the Project
Navigate to the directory where you wish to create a new project and run thereact-vr init MyFirstReactVR command.
Change the directory name to something like MyFirstReactVR and run npm start.
Open the following address http://localhost:8081/vr/index.html in your browser, and in few seconds, you should see similar animation:
Click and try to drag your cursor around. Also, in browsers that support WebVR, you'll be able to explore this VR environment with a headset in full virtual reality mode.
VR Tour Sample Using React VR
Now let's make a VR tour with a few scenes and navigations in them. First of all, we need to prepare the architecture. In our example, we'll make buttons within each scene for navigations and declare this in the constructor of a React component named index.js.vr:
constructor(props) {
    super(props);
    scenes: [{
        scene_image: 'initial.jpg',
        step: 1,
        navigations: [{
            step: 2,
            translate: [0.73, -0.15, 0.66],
            rotation: [0, 36, 0]
        }]
    }, {
        scene_image: 'step1.jpg',
        step: 2,
        navigations: [{
            step: 3,
            translate: [-0.43, -0.01, 0.9],
            rotation: [0, 140, 0]
        }]
    }, {
        scene_image: 'step2.jpg',
        step: 3,
        navigations: [{
            step: 4,
            translate: [-0.4, 0.05, -0.9],
            rotation: [0, 0, 0]
        }]
    }, {
        scene_image: 'step3.jpg',
        step: 4,
        navigations: [{
            step: 5,
            translate: [-0.55, -0.03, -0.8],
            rotation: [0, 32, 0]
        }]
    }, {
        scene_image: 'step4.jpg',
        step: 5,
        navigations: [{
            step: 1,
            translate: [0.2, -0.03, -1],
            rotation: [0, 20, 0]
        }]
    }]
}
Also, we declare current_scene in the state in the constructor:
constructor(props) {
        this.state = {
            ...
            current_scene: {}
                ...
        }
For rendering, we change the render() method, as seen below:
render() {
return ( < View >
< Pano source = {
asset(this.state.current_scene['scene_image'])
}
style = {
{
transform: [{
translate: [0, 0, 0]
}]
}
}
/> {
this.state.current_scene['navigations'].map(function(item, i) {
return <Mesh key = {
i
}
style = {
{
layoutOrigin: [0.5, 0.5],
transform: [{
translate: item['translate']
}, {
rotateX: item['rotation'][0]
}, {
rotateY: item['rotation'][1]
}, {
rotateZ: item['rotation'][2]
}]
}
} >
< VrButton
style = {
{
width: 0.15,
height: 0.15,
borderRadius: 50,
backgroundColor: 'blue'
}
} >
< /VrButton> < /Mesh>
})
} < /View>
)
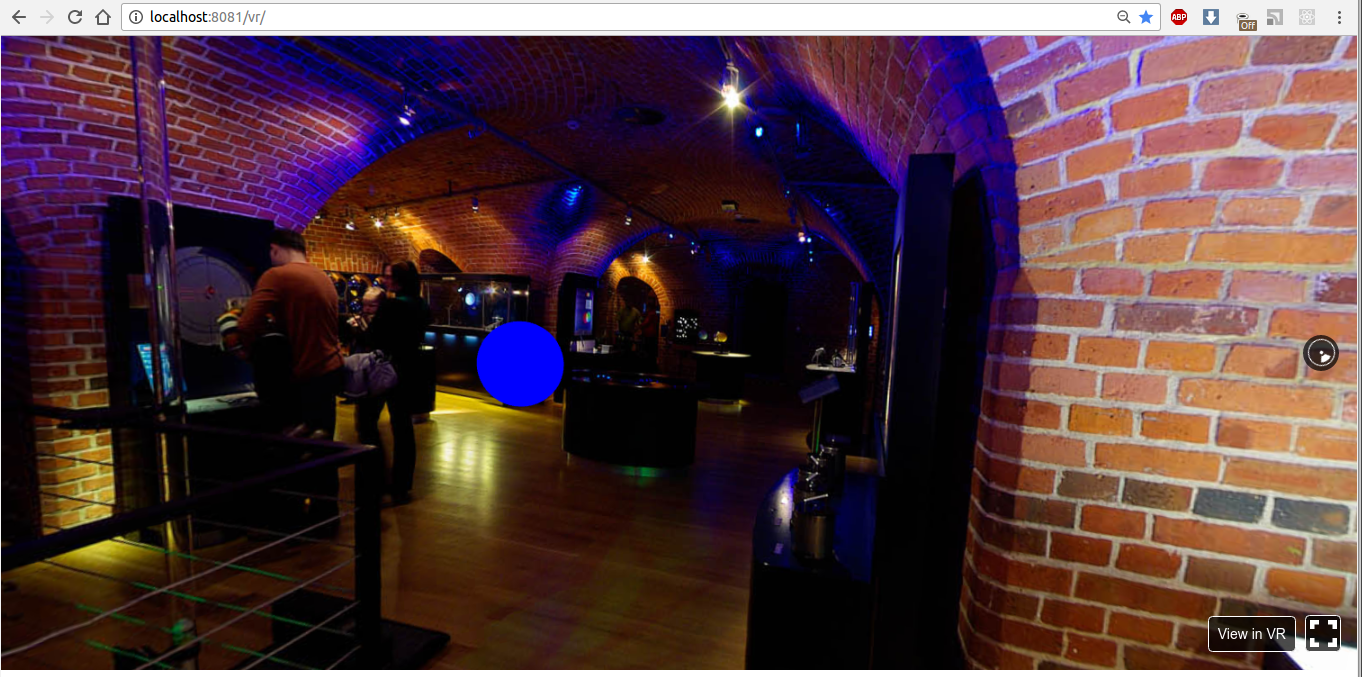
}The last step to make this work is to set the current_scene state to the first element of the scenes array componentWillMount function:
componentWillMount() {
    this.setState({
        current_scene: this.state.scenes[0]
    });
}
The result should be like on this screen:
Now we add a simple animation for the button and implement the logic to navigate between scenes. First of all, for navigation, we need to subscribe to the onInput event for our Mesh element, bind this function to this in constructor, and implement it:
...
constructor(props) {
    ...
    this.onNavigationClick = this.onNavigationClick.bind(this);
    ...
}

...
onNavigationClick(item, e) {
        if (e.nativeEvent.inputEvent.eventType === "mousedown" && e.nativeEvent.inputEvent.button === 0) {
            var new_scene = this.state.scenes.find(i => i['step'] === item.step);
            this.setState({
                current_scene: new_scene
            });
        }
    }
    ...

render() {
    var that = this;
    ... < Mesh key = {
            i
        }
        ...
    onInput = {
            e => that.onNavigationClick(item, e)
        }
        .... >
        ...
}
Then we added a simple animation try it out. For this, we've added one more button inside the existing one in the render method and changed the size of it. We use native the JS requestAnimationFrame function:
const DEFAULT_ANIMATION_BUTTON_RADIUS = 50;
const DEFAULT_ANIMATION_BUTTON_SIZE = 0.05;

constructor(props) {
        ...
        this.state = {
                ...
                animationWidth: DEFAULT_ANIMATION_BUTTON_SIZE,
                    animationRadius: DEFAULT_ANIMATION_BUTTON_RADIUS
                    ...
            }
            ...
        this.animatePointer = this.animatePointer.bind(this);
    }
    ...
componentWillUnmount() {
    if (this.frameHandle) {
        cancelAnimationFrame(this.frameHandle);
        this.frameHandle = null;
    }
}

componentDidMount() {
    this.animatePointer();
}

animatePointer() {
        var delta = this.state.animationWidth + 0.002;
        var radius = this.state.animationRadius + 10;
        if (delta >= 0.13) {
            delta = DEFAULT_ANIMATION_BUTTON_SIZE;
            radius = DEFAULT_ANIMATION_BUTTON_RADIUS;
        }
        this.setState({
            animationWidth: delta,
            animationRadius: radius
        })
        this.frameHandle = requestAnimationFrame(this.animatePointer);
    }
    ...

render() {
    ... < VrButton
    style = {
            {
                width: 0.15,
                height: 0.15,
                borderRadius: 50,
                justifyContent: 'center',
                alignItems: 'center',
                borderStyle: 'solid',
                borderColor: '#FFFFFF80',
                borderWidth: 0.01
            }
        } >
        < VrButton
    style = {
            {
                width: that.state.animationWidth,
                height: that.state.animationWidth,
                borderRadius: that.state.animationRadius,
                backgroundColor: '#FFFFFFD9'
            }
        } >
        < /VrButton> < /VrButton>
        ...
}
And the result looks like this:
Now let's implement manipulations with the animated button and its rotation. We will rotate the button on an X-Y-Z axis. To do so, we need to subscribe to the onInput event for the Pano component and change the rotation via the arrow-up, arrow-right, and arrow-down buttons.

The last thing is to implement the messaging of the VR thread and Main thread to exchange data. Below is the subscription code on receiving messages and posting a message when a scene changes or an image starts/ends loading.
  componentWillMount() {
      window.addEventListener('message', this.onMainWindowMessage);
      ...
  }

  onMainWindowMessage(e) {
      switch (e.data.type) {
          case 'newCoordinates':
              var scene_navigation = this.state.current_scene.navigations[0];
              this.state.current_scene.navigations[0]['translate'] = [e.data.coordinates.x, e.data.coordinates.y, e.data.coordinates.z]
              this.forceUpdate();
              break;
          default:
              return;
      }
  }

  onNavigationClick(item, e) {
      ...
      postMessage({
          type: "sceneChanged"
      })
      this.state.animationWidth = DEFAULT_ANIMATION_BUTTON_SIZE;
      this.state.animationRadius = DEFAULT_ANIMATION_BUTTON_RADIUS;
      this.animatePointer();
      ...
  }

  sceneOnLoad() {
      postMessage({
          type: "sceneLoadStart"
      })
  }

  sceneOnLoadEnd() {
      postMessage({
          type: "sceneLoadEnd"
      })
  }

  render() {
      ... < Pano...
      onLoad = {
          this.sceneOnLoad
      }
      onLoadEnd = {
              this.sceneOnLoadEnd
          }
          ... / >
  }
You can check index.vr.js at our GitHub repository.
In client.js, we implement a zoom with the mouse wheel and a position change with a double-click. We need to store the VR instance and the VRcamera instance to implement the logic above.
function init(bundle, parent, options) {
    const vr = new VRInstance(bundle, 'TMExample', parent, {
        // Add custom options here
        ...options,
    });
    vr.render = function() {
        // Any custom behavior you want to perform on each frame goes here
    };
    // Begin the animation loop
    vr.start();
    window.playerCamera = vr.player._camera;
    window.vr = vr;
    return vr;
}
Then we subscribe to ondblclick and onmousewheel and implement the zoom and change position logic.
  function onRendererDoubleClick() {
      var x = 2 * (event.x / window.innerWidth) - 1;
      var y = 1 - 2 * (event.y / window.innerHeight);
      var coordinates = get3DPoint(window.playerCamera, x, y);
      vr.rootView.context.worker.postMessage({
          type: "newCoordinates",
          coordinates: coordinates
      });
  }

  function onRendererMouseWheel() {
      if (event.deltaY > 0) {
          if (window.playerCamera.zoom > 1) {
              window.playerCamera.zoom -= 0.1;
              window.playerCamera.updateProjectionMatrix();
          }
      } else {
          if (window.playerCamera.zoom < 3) {
              window.playerCamera.zoom += 0.1;
              window.playerCamera.updateProjectionMatrix();
          }
      }
  }
get3DPoint is our custom function to transform screen coordinates to world coordinates using Three.js, implemented in cameraHelper.js.
import * as THREE from 'three';

export function get3DPoint(camera, x, y) {
    var mousePosition = new THREE.Vector3(x, y, 0.5);
    mousePosition.unproject(camera);
    var dir = mousePosition.sub(camera.position).normalize();
    return dir;
}
Let's see the result:
Sometimes, loading scene images takes time. Thus, we've implemented the loader to show this process. In index.html, we add a loader and CSS based on this w3cschools example.
<style>
    body { margin: 0; }
    #loader {
    position: absolute;
    left: 50%;
    top: 50%;
    z-index: 1;
    width: 150px;
    height: 150px;
    margin: -75px 0 0 -75px;
    border: 16px solid #f3f3f3;
    border-radius: 50%;
    border-top: 16px solid #3498db;
    width: 120px;
    height: 120px;
    -webkit-animation: spin 2s linear infinite;
    animation: spin 2s linear infinite;
    }
    @-webkit-keyframes spin {
    0% { -webkit-transform: rotate(0deg); }
    100% { -webkit-transform: rotate(360deg); }
    }
    @keyframes spin {
    0% { transform: rotate(0deg); }
    100% { transform: rotate(360deg); }
    }
    .animate-bottom {
    position: relative;
    -webkit-animation-name: animatebottom;
    -webkit-animation-duration: 1s;
    animation-name: animatebottom;
    animation-duration: 1s
    }
    @-webkit-keyframes animatebottom {
    from { bottom:-100px; opacity:0 }
    to { bottom:0px; opacity:1 }
    }
    @keyframes animatebottom {
    from{ bottom:-100px; opacity:0 }
    to{ bottom:0; opacity:1 }
    }
    #myDiv {
    display: none;
    text-align: center;
    }
</style>
<body>
    <div id='content' style="width:100%; height:100%">
        <div id="loader"></div>
    </div>
    <script src="./client.bundle?platform=vr"></script>
    <script>
        ReactVR.init('../index.vr.bundle?platform=vr&dev=true', document.getElementById('content'));
    </script>
</body>
And don't forget messages in client.js from the VR thread to enable/disable animation:
  function init(bundle, parent, options) {
    ...
    vr.rootView.context.worker.addEventListener('message', onVRMessage);
    ...
  }

  function onVRMessage(e) {
    switch (e.data.type) {
      case 'sceneChanged':
      if (window.playerCamera.zoom != 1) {
        window.playerCamera.zoom = 1;
        window.playerCamera.updateProjectionMatrix();
      }
      break;
      case 'sceneLoadStart':
        document.getElementById('loader').style.display = 'block';
      break;
      case 'sceneLoadEnd':
        document.getElementById('loader').style.display = 'none';
      break;
      default:
      return;
    }
} 
Check our index.html or client.js.
The whole project code sample is available for free download at React VR GitHub.
For more details and VR Tour app made with React - check out our main article React VR Oculus about the process.
If you enjoyed this article and want to learn more about React, check out this collection of tutorials and articles on all things React.
Opinions expressed by DZone contributors are their own.
Comments