How To Migrate From Oracle Database to YugabyteDB With YugabyteDB Voyager
Learn how to migrate a comprehensive web application from Oracle Database to YugabyteDB using the open-source data migration engine YugabyteDB Voyager.
Join the DZone community and get the full member experience.
Join For FreeIn this article, I demonstrate how you can migrate a comprehensive web application from Oracle Database to YugabyteDB using the open-source data migration engine YugabyteDB Voyager. To improve the availability, scalability, and performance of their applications, many developers are migrating from traditional, single-server relational databases to distributed database clusters. Migrating to YugabyteDB allows engineers to use the well-known SQL interface, while also benefiting from the data-resiliency and performance characteristics of distributed databases.
Whether you prefer reading or watching, let’s migrate a sample movie rental application to YugabyteDB.
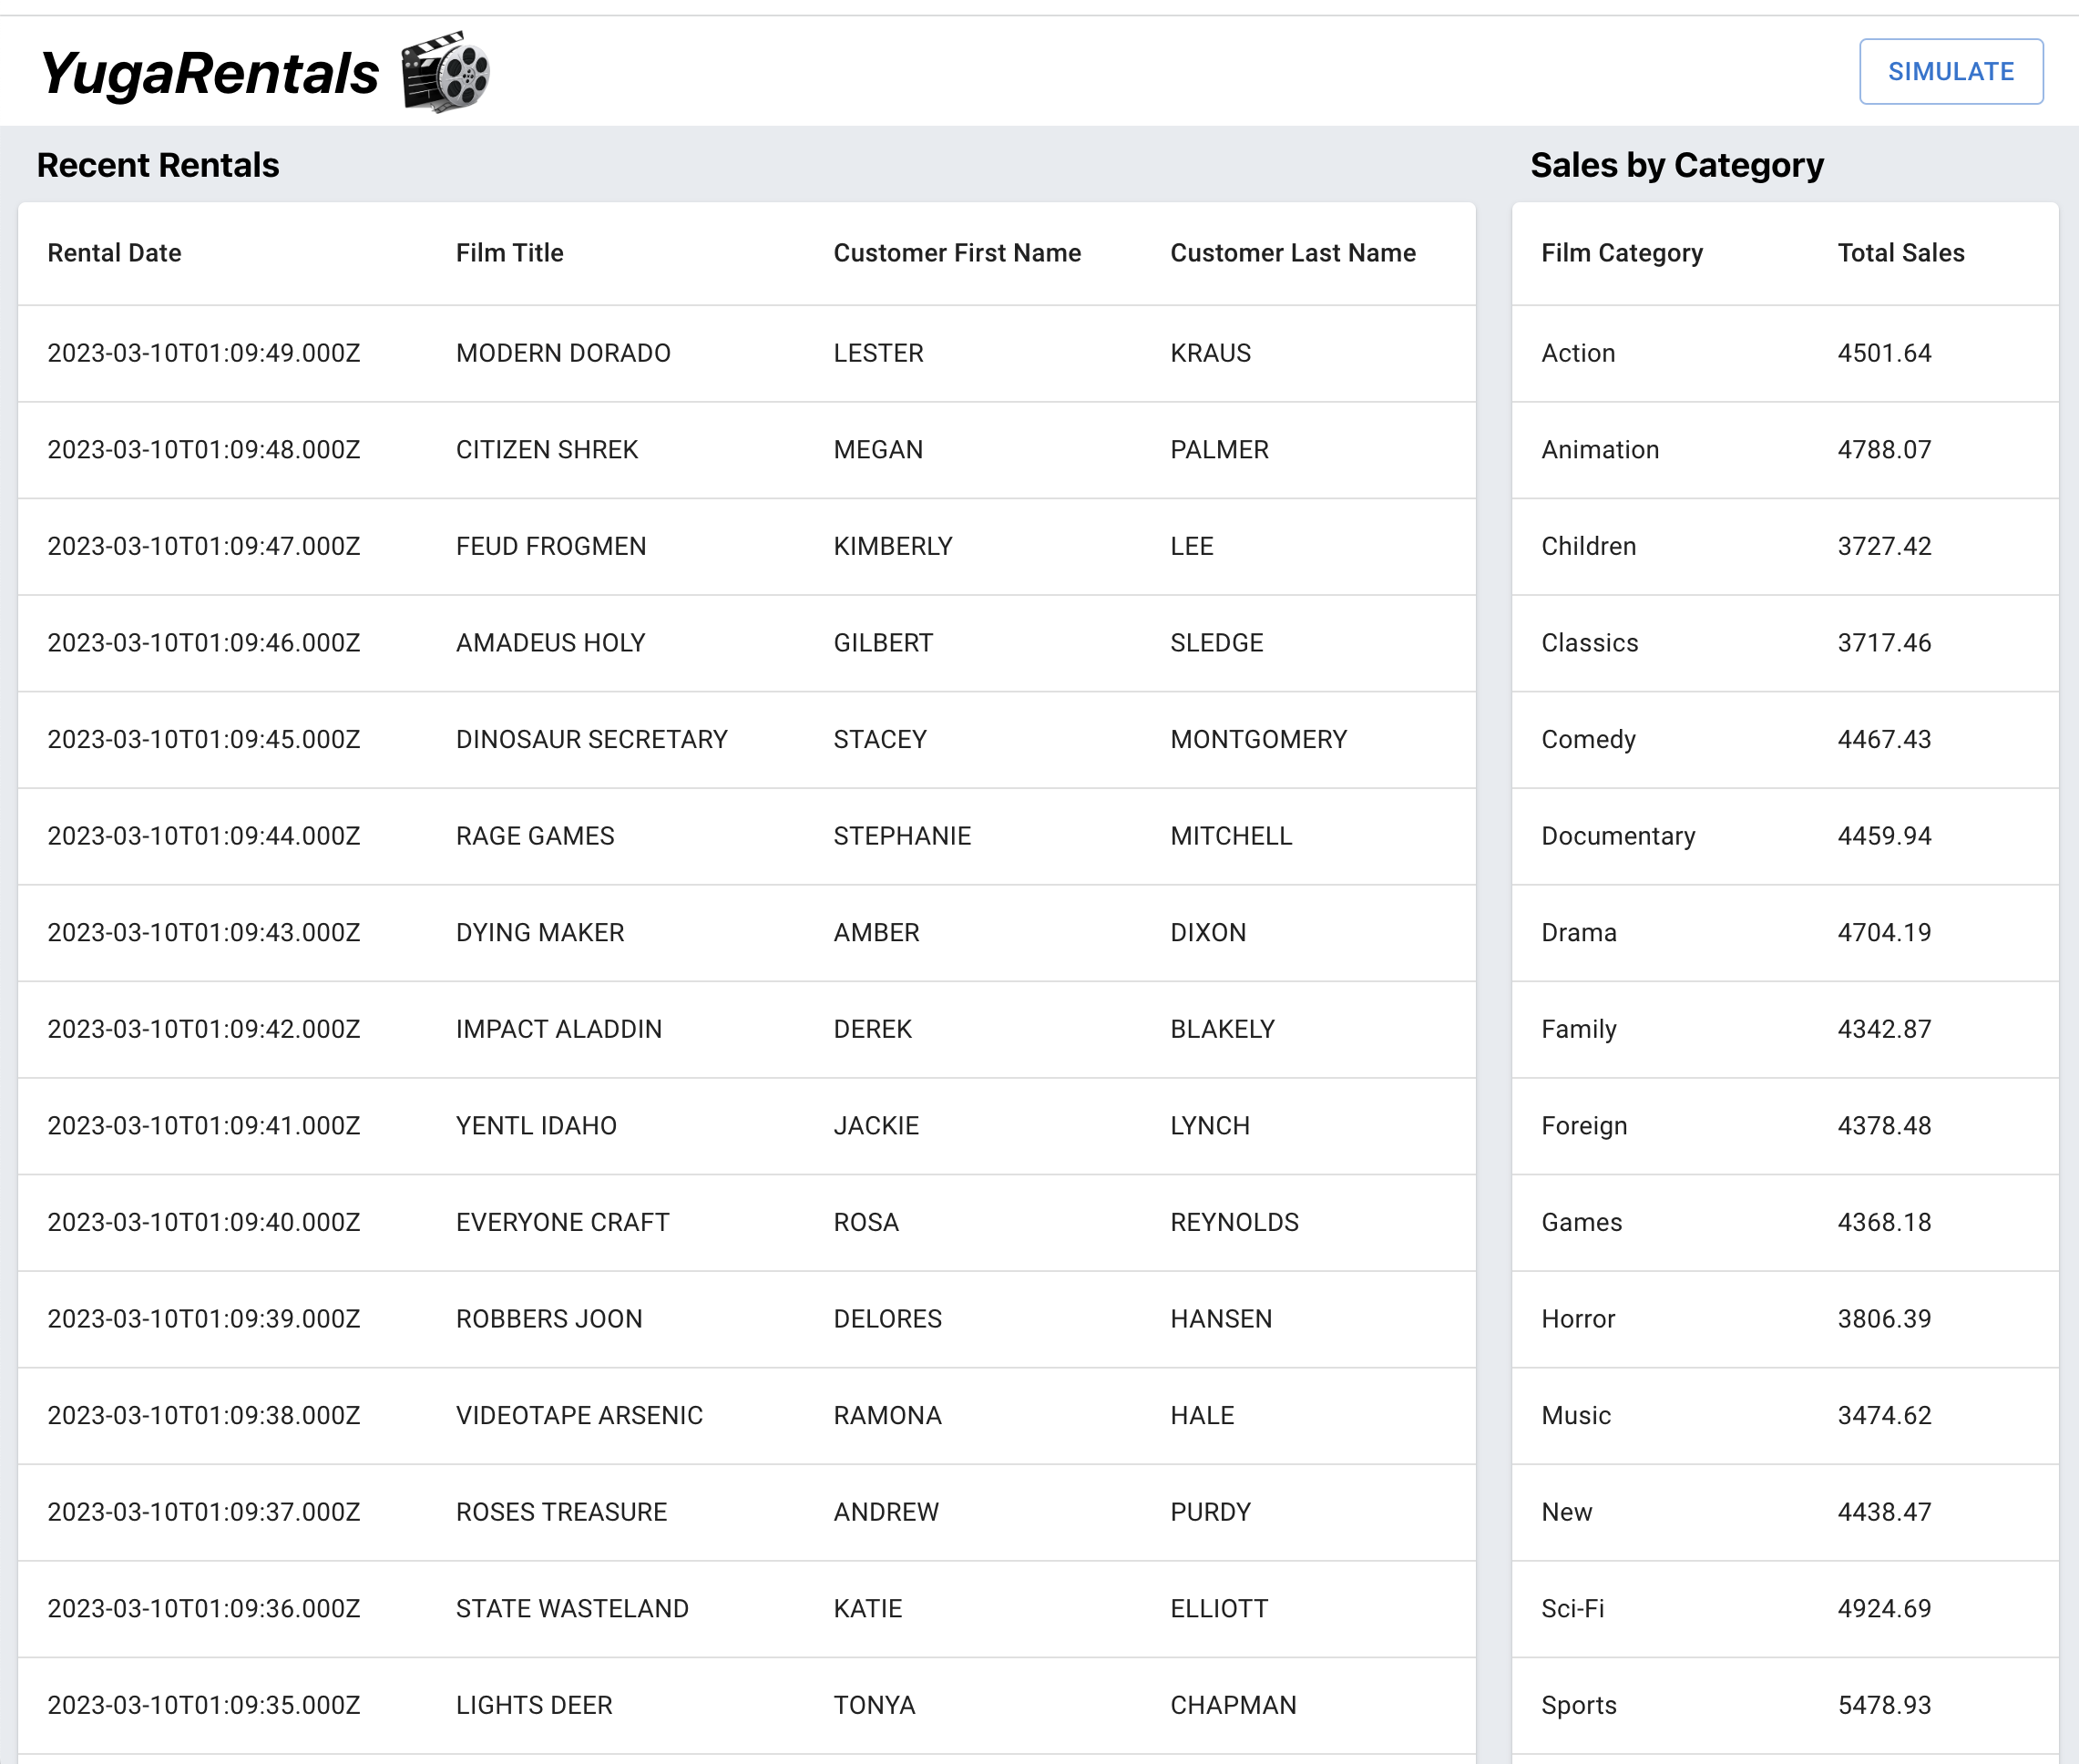
YugaRentals Application
I’ve developed an application called YugaRentals, built to run on both Oracle Database and YugabyteDB.
The YugaRentals application is a movie rental dashboard application that leverages the popular Sakila schema. This application displays the most recent movie rentals, plus a list of rental sales by film category.
Let’s start by deploying and connecting to an Amazon RDS for an Oracle instance. Later, we’ll migrate our data to a multi-node YugabyteDB Managed cluster.
Getting Started With Oracle Database
We could run Oracle Database in the Oracle Cloud, or locally using Docker or a platform-specific installation. In this case, I’m going to demonstrate how to migrate a database hosted on Amazon RDS to YugabyteDB Managed.
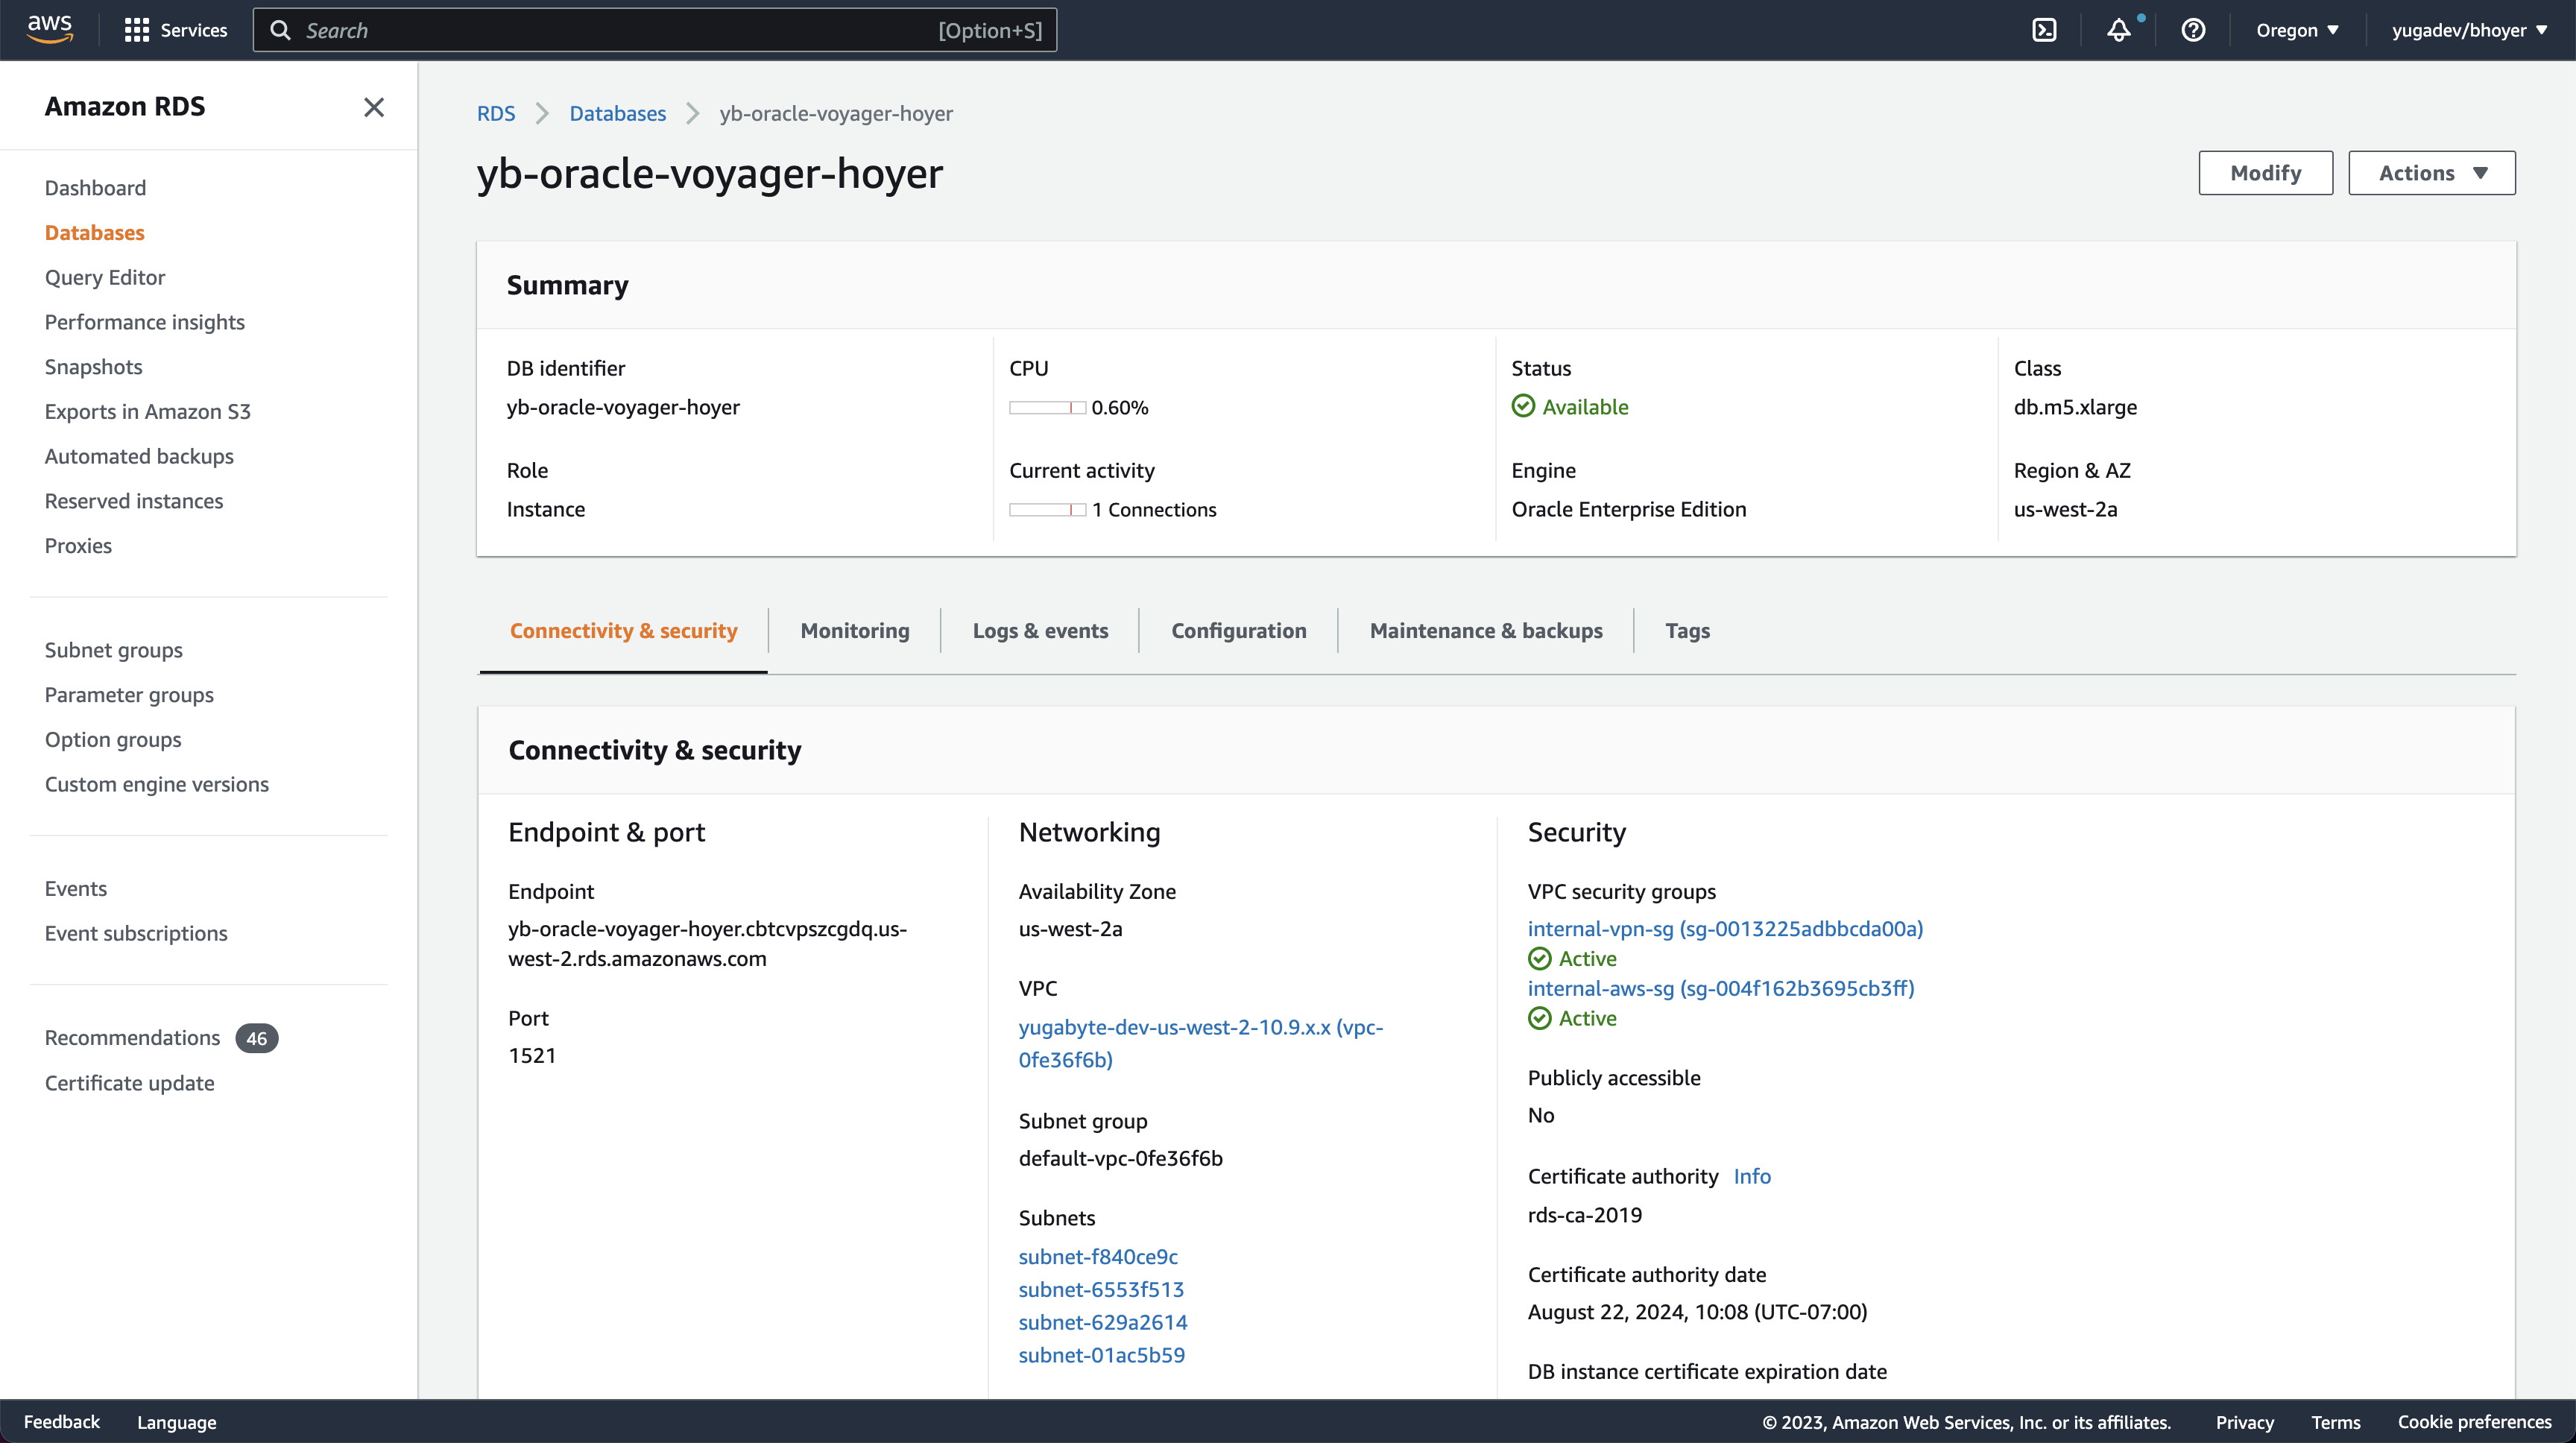
Setting Up Amazon RDS for Oracle
I’ve deployed an instance on Amazon RDS for Oracle and configured it to be accessible from the machine running the YugaRentals application.
Connecting YugaRentals to Oracle Database in Node.js
Connecting to our Oracle Database instance in the cloud from Node.js requires some additional configuration.
The node-oracledb package can be used to connect to our database. This package requires the installation of Oracle Client libraries for your platform. This quick start guide is helpful for first-time users.
After successfully installing the npm package for node-oracledb and the client libraries for Oracle Database v19, we can use the following code snippet to connect to our instance.
// index.js

const oracledb = require("oracledb");
oracledb.initOracleClient({ libDir: process.env.ORACLE_CLIENT_LIB_PATH });
let connection = await oracledb.getConnection({
       user: process.env.DB_USER,
       password: process.env.DB_PASSWORD,
       connectionString: `${process.env.DB_HOST}/${process.env.DB_NAME}`
});
console.log("Successfully connected to Oracle Database");
By setting environment variables with our instance configuration, and running the application, we can confirm our database is configured properly.
> DB_USER=admin \
DB_PASSWORD=foobar \
DB_HOST=[AMAZON_RDS_HOST] \
DB_NAME=ORCL \
ORACLE_CLIENT_LIB_PATH=/path/to/client/lib \
node index.js
Server running on port 8000> DB_USER=admin \
DB_PASSWORD=foobar \
DB_HOST=[AMAZON_RDS_HOST] \
DB_NAME=ORCL \
ORACLE_CLIENT_LIB_PATH=/path/to/client/lib \
node index.js
Server running on port 8000
Successfully connected to Oracle DatabaseAfter verifying our Oracle Database running in the cloud, we can begin to migrate to YugabyteDB Managed.
Setting Up YugabyteDB Managed
It takes less than five minutes to get started with YugabyteDB Managed. First, create an account; then follow the steps to create a YugabyteDB cluster.
I've chosen to deploy a three-node cluster to AWS, in the us-west-2 region. This configuration will provide fault tolerance across availability zones.
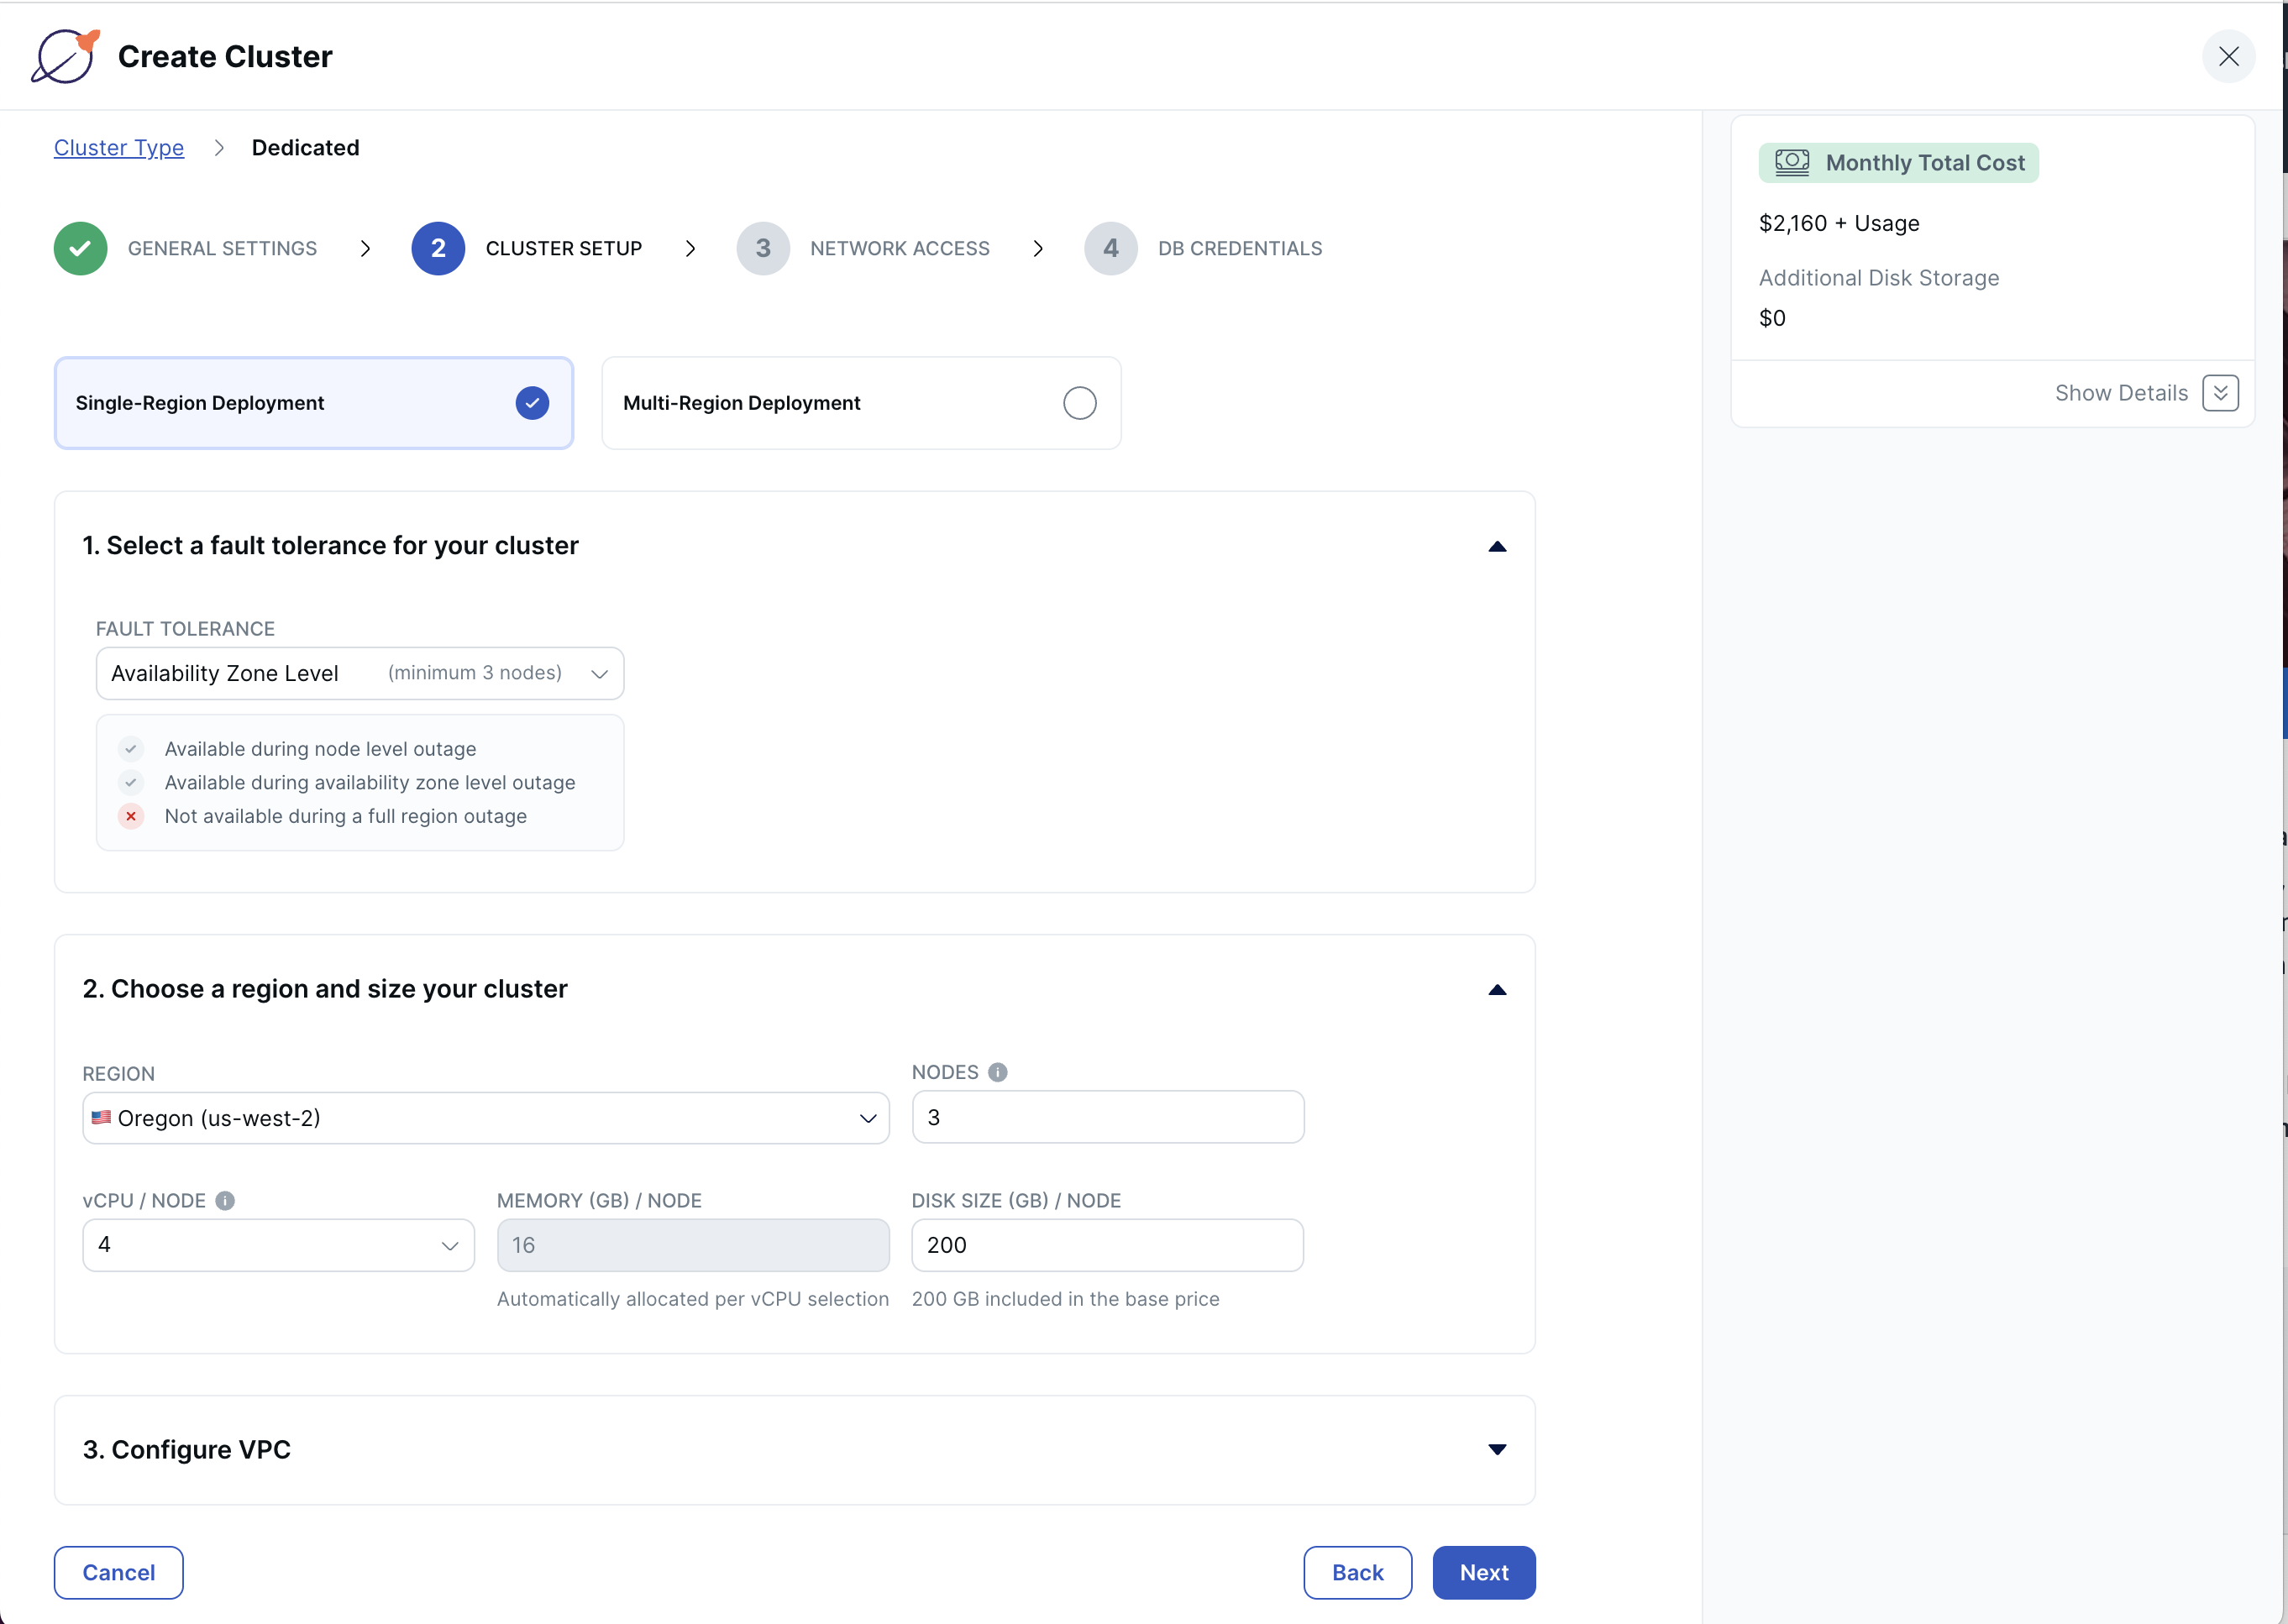
Add your IP address to the cluster allow list so that you can connect from your machine to the remote database, then download the database credentials before creating your cluster.
Once our cluster has been deployed, we’re ready to begin migrating with YugabyteDB Voyager.
Migrating to YugabyteDB With YugabyteDB Voyager
Having verified our Oracle Database deployment, it's time to migrate from Amazon RDS for Oracle, to YugabyteDB using the YugabyteDB Voyager CLI.
YugabyteDB Voyager is a powerful, open-source, data-migration engine, which manages the entire lifecycle of data migration.
Prepare the Databases
After installing YugabyteDB Voyager, we begin by creating users in our source and target databases and granting them roles.
This is how you could use the previously-installed Oracle Client library SQL*Plus.
> sqlplus 'admin@(DESCRIPTION=(ADDRESS=(PROTOCOL=TCP)(HOST=AMAZON_RDS_HOST)(PORT=1521))(CONNECT_DATA=(SID=ORCL)))'

// SQL Shell
SQL >
1. Create a role with read access privileges.
CREATE ROLE ADMIN_reader_role;

BEGIN
   FOR R IN (SELECT owner, object_name FROM all_objects WHERE owner='ADMIN' and object_type in ('VIEW','SEQUENCE','TABLE PARTITION','TABLE','SYNONYM','MATERIALIZED VIEW'))
   LOOP
       EXECUTE IMMEDIATE 'grant select on '||R.owner||'."'||R.object_name||'" to ADMIN_reader_role';
   END LOOP;
END;
/

BEGIN
   FOR R IN (SELECT owner, object_name FROM all_objects WHERE owner='ADMIN' and object_type = 'TYPE')
   LOOP
       EXECUTE IMMEDIATE 'grant execute on '||R.owner||'."'||R.object_name||'" to ADMIN_reader_role';
   END LOOP;
END;
/

GRANT SELECT_CATALOG_ROLE TO ADMIN_reader_role;
GRANT SELECT ANY DICTIONARY TO ADMIN_reader_role;
GRANT SELECT ON SYS.ARGUMENT$ TO ADMIN_reader_role;
2. Create a user and grant roles.
CREATE USER ybvoyager IDENTIFIED BY password;
GRANT CONNECT TO ybvoyager;
GRANT ADMIN_reader_role TO ybvoyager;
3. Repeat this process for the YugabyteDB Managed instance by connecting via the Cloud Shell:
// Optionally, you can create a database for import. Otherwise, the target database will default to 'yugabyte'.
yugabyte=> CREATE USER ybvoyager PASSWORD 'password';
yugabyte=> GRANT yb_superuser TO ybvoyager;
Export the Schema
Our source and target databases are now equipped to use Voyager.
1. Create an export directory and an associated environment variable. It will house schema and data files, as well as logs, metadata, and schema analysis reports.
> mkdir ~/export-dir
> export EXPORT_DIR=$HOME/export-dir
2. Export the schema from Oracle Database.
> yb-voyager export schema --export-dir ~/export-dir \
        --source-db-type oracle \
        --source-db-host ORACLEDB_HOST \
        --source-db-user ybvoyager \
        --source-db-password password \
        --source-db-name ORCL \
        --source-db-schema ADMIN

...
export of schema for source type as 'oracle'
oracle version: Oracle Database 19c Enterprise Edition Release 19.0.0.0.0 - Production
exporting       TYPE            done
exporting   SEQUENCE            done
exporting      TABLE            done
exporting  PARTITION            done
exporting    PACKAGE            done
exporting       VIEW            done
exporting    TRIGGER            done
exporting   FUNCTION            done
exporting  PROCEDURE            done
exporting      MVIEW            done
exporting    SYNONYM            done
Exported schema files created under directory: /export-dir/schema
3. Analyze the exported schema.
> yb-voyager analyze-schema --export-dir ~/export-dir --output-format txt
-- find schema analysis report at: /export-dir/reports/report.txt
By analyzing our schema before exporting data, we have the option to make any necessary changes to our DDL statements. The schema analysis report will flag any statements which require manual intervention.
The generated schema analysis report shows that the exported schema can be migrated without any changes. Good news!
However, this is a chance to make schema optimizations based on our knowledge of the differences between PostgreSQL and Oracle Database.
Optimize Schema
Oracle Database uses triggers with sequences to set values for auto-incrementing columns if no value is supplied. In PostgreSQL, we can access the sequence to set a default directly in the table definition, like so:
CREATE TABLE city (
   city_id INT DEFAULT nextval('city_sequence') NOT NULL
   ...
)
After optimizing the table definition, we can edit the associated trigger.
//NEW
CREATE OR REPLACE FUNCTION trigger_fct_city_before_trigger() RETURNS trigger AS $BODY$
BEGIN
NEW.last_update:=current_date;
RETURN NEW;
END
$BODY$
LANGUAGE 'plpgsql';

//OLD
CREATE OR REPLACE FUNCTION trigger_fct_city_before_trigger() RETURNS trigger AS $BODY$
BEGIN
 IF (NEW.city_id IS NULL) THEN
   SELECT nextval('city_sequence') INTO STRICT NEW.city_id
;
 END IF;
NEW.last_update:=current_date;
RETURN NEW;
END
$BODY$
LANGUAGE 'plpgsql';
These optimizations can be applied to many of our tables. I’ve created a shell script, which can be executed to make these schema changes automatically. Here’s how you can execute it from the command line:
> ./optimize_schema.sh export_dir=$HOME/export-dirExport Data
Now that we’ve optimized our schema, it’s time to export our data.
Export the data from Oracle Database.
> yb-voyager export data --export-dir ~/export-dir \
        --source-db-type oracle \
        --source-db-host ORACLEDB_HOST \
        --source-db-user ybvoyager \
        --source-db-password password \
        --source-db-name ORCL \
        --source-db-schema ADMIN
export of data for source type as 'oracle'
Num tables to export: 17
table list for data export: [ACTOR ADDRESS CATEGORY CITY COUNTRY CUSTOMER FILM FILM_ACTOR FILM_CATEGORY FILM_TEXT INVENTORY LANGUAGE PAYMENT RENTAL STAFF STORE TODOITEM]
calculating approx num of rows to export for each table...
Initiating data export.
Data export started.
Exported tables:- {ACTOR,  ADDRESS,  CATEGORY,  CITY,  COUNTRY,  CUSTOMER,  FILM_ACTOR,  FILM_CATEGORY,  FILM_TEXT,  INVENTORY,  LANGUAGE,  STAFF,  PAYMENT,  STORE,  RENTAL,  TODOITEM,  FILM}

TABLE        	ROW COUNT
ACTOR        	200
ADDRESS      	603
CATEGORY     	16
CITY         	600
COUNTRY      	109
CUSTOMER     	599
FILM         	1000
FILM_ACTOR   	5462
FILM_CATEGORY	1000
FILM_TEXT    	0
INVENTORY    	4581
LANGUAGE     	6
PAYMENT      	16049
RENTAL       	16049
STAFF        	2
STORE        	2

Export of data complete ✅
After successfully exporting our schema and data, we're ready to move our database to YugabyteDB Managed.
Import Schema and Data to YugabyteDB
1. Import the schema to YugabyteDB Managed. As you can see from the terminal output, I’ve chosen to import to the admin schema in the default yugabyte database.
> yb-voyager import schema --export-dir ~/export-dir \
        	--target-db-host YUGABYTEDB_MANAGED_HOST \
        	--target-db-user ybvoyager \
        	--target-db-password password \
        	--target-db-schema admin \
		--target-ssl-mode require
2. Import the data to YugabyteDB Managed. YugabyteDB Voyager makes quick work of this data import with the use of parallel jobs.
> yb-voyager import data --export-dir ~/export-dir \
        --target-db-host YUGABYTEDB_MANAGED_HOST \
        --target-db-user ybvoyager \
        --target-db-password password \
        --target-db-schema admin \
        --target-ssl-mode require

import of data in "yugabyte" database started
Using 2 parallel jobs by default. Use --parallel-jobs to specify a custom value
Preparing to import the tables: [ACTOR ADDRESS CATEGORY CITY COUNTRY CUSTOMER FILM FILM_ACTOR FILM_CATEGORY FILM_TEXT INVENTORY LANGUAGE PAYMENT RENTAL STAFF STORE]

All the tables are imported
3. Import indexes and triggers.
> yb-voyager import schema --export-dir ~/export-dir \
        --target-db-host YUGABYTEDB_MANAGED_HOST \
        --target-db-user ybvoyager \
        --target-db-password password \
        --target-db-schema admin \
        --target-ssl-mode require \
        --post-import-data
INDEXES_table.sql: CREATE INDEX actor_last_name ON actor (last_name);
INDEXES_table.sql: CREATE INDEX address_city_id ON address (city_id);
INDEXES_table.sql: CREATE INDEX city_country_id ON city (country_id);
...
4. Change ownership of the imported objects. We no longer need theybvoyageruser in YugabyteDB Managed. In the YugabyteDB Managed Cloud Shell, run:
> REASSIGN OWNED BY ybvoyager TO admin;
> DROP OWNED BY ybvoyager;
> DROP USER ybvoyager;
It's time to verify that our database was successfully migrated to YugabyteDB Managed, by changing the connection settings in the YugaRentals application.
Connecting YugaRentals to YugabyteDB Managed in Node.js
YugaRentals was originally developed to run on Oracle Database, but I also added support for PostgreSQL. Since YugabyteDB is PostgreSQL-compatible, we can use the "node-postgres" driver for Node.js to connect to our YugabyteDB Managed cluster.
In fact, Yugabyte has developed its own smart drivers, which add load-balancing capabilities to native drivers. This can improve performance by avoiding excessive load on any single cluster node.
After installing the YugabyteDB node-postgres smart driver, we're ready to connect to our database.
> DB_TYPE=yugabyte \
DB_USER=admin \
DB_HOST=YUGABYTEDB_MANAGED_HOST \
DB_PASSWORD=adminpassword \
DB_NAME=yugabyte \
SSL_MODE=true \
node index.js
Server running on port 8000
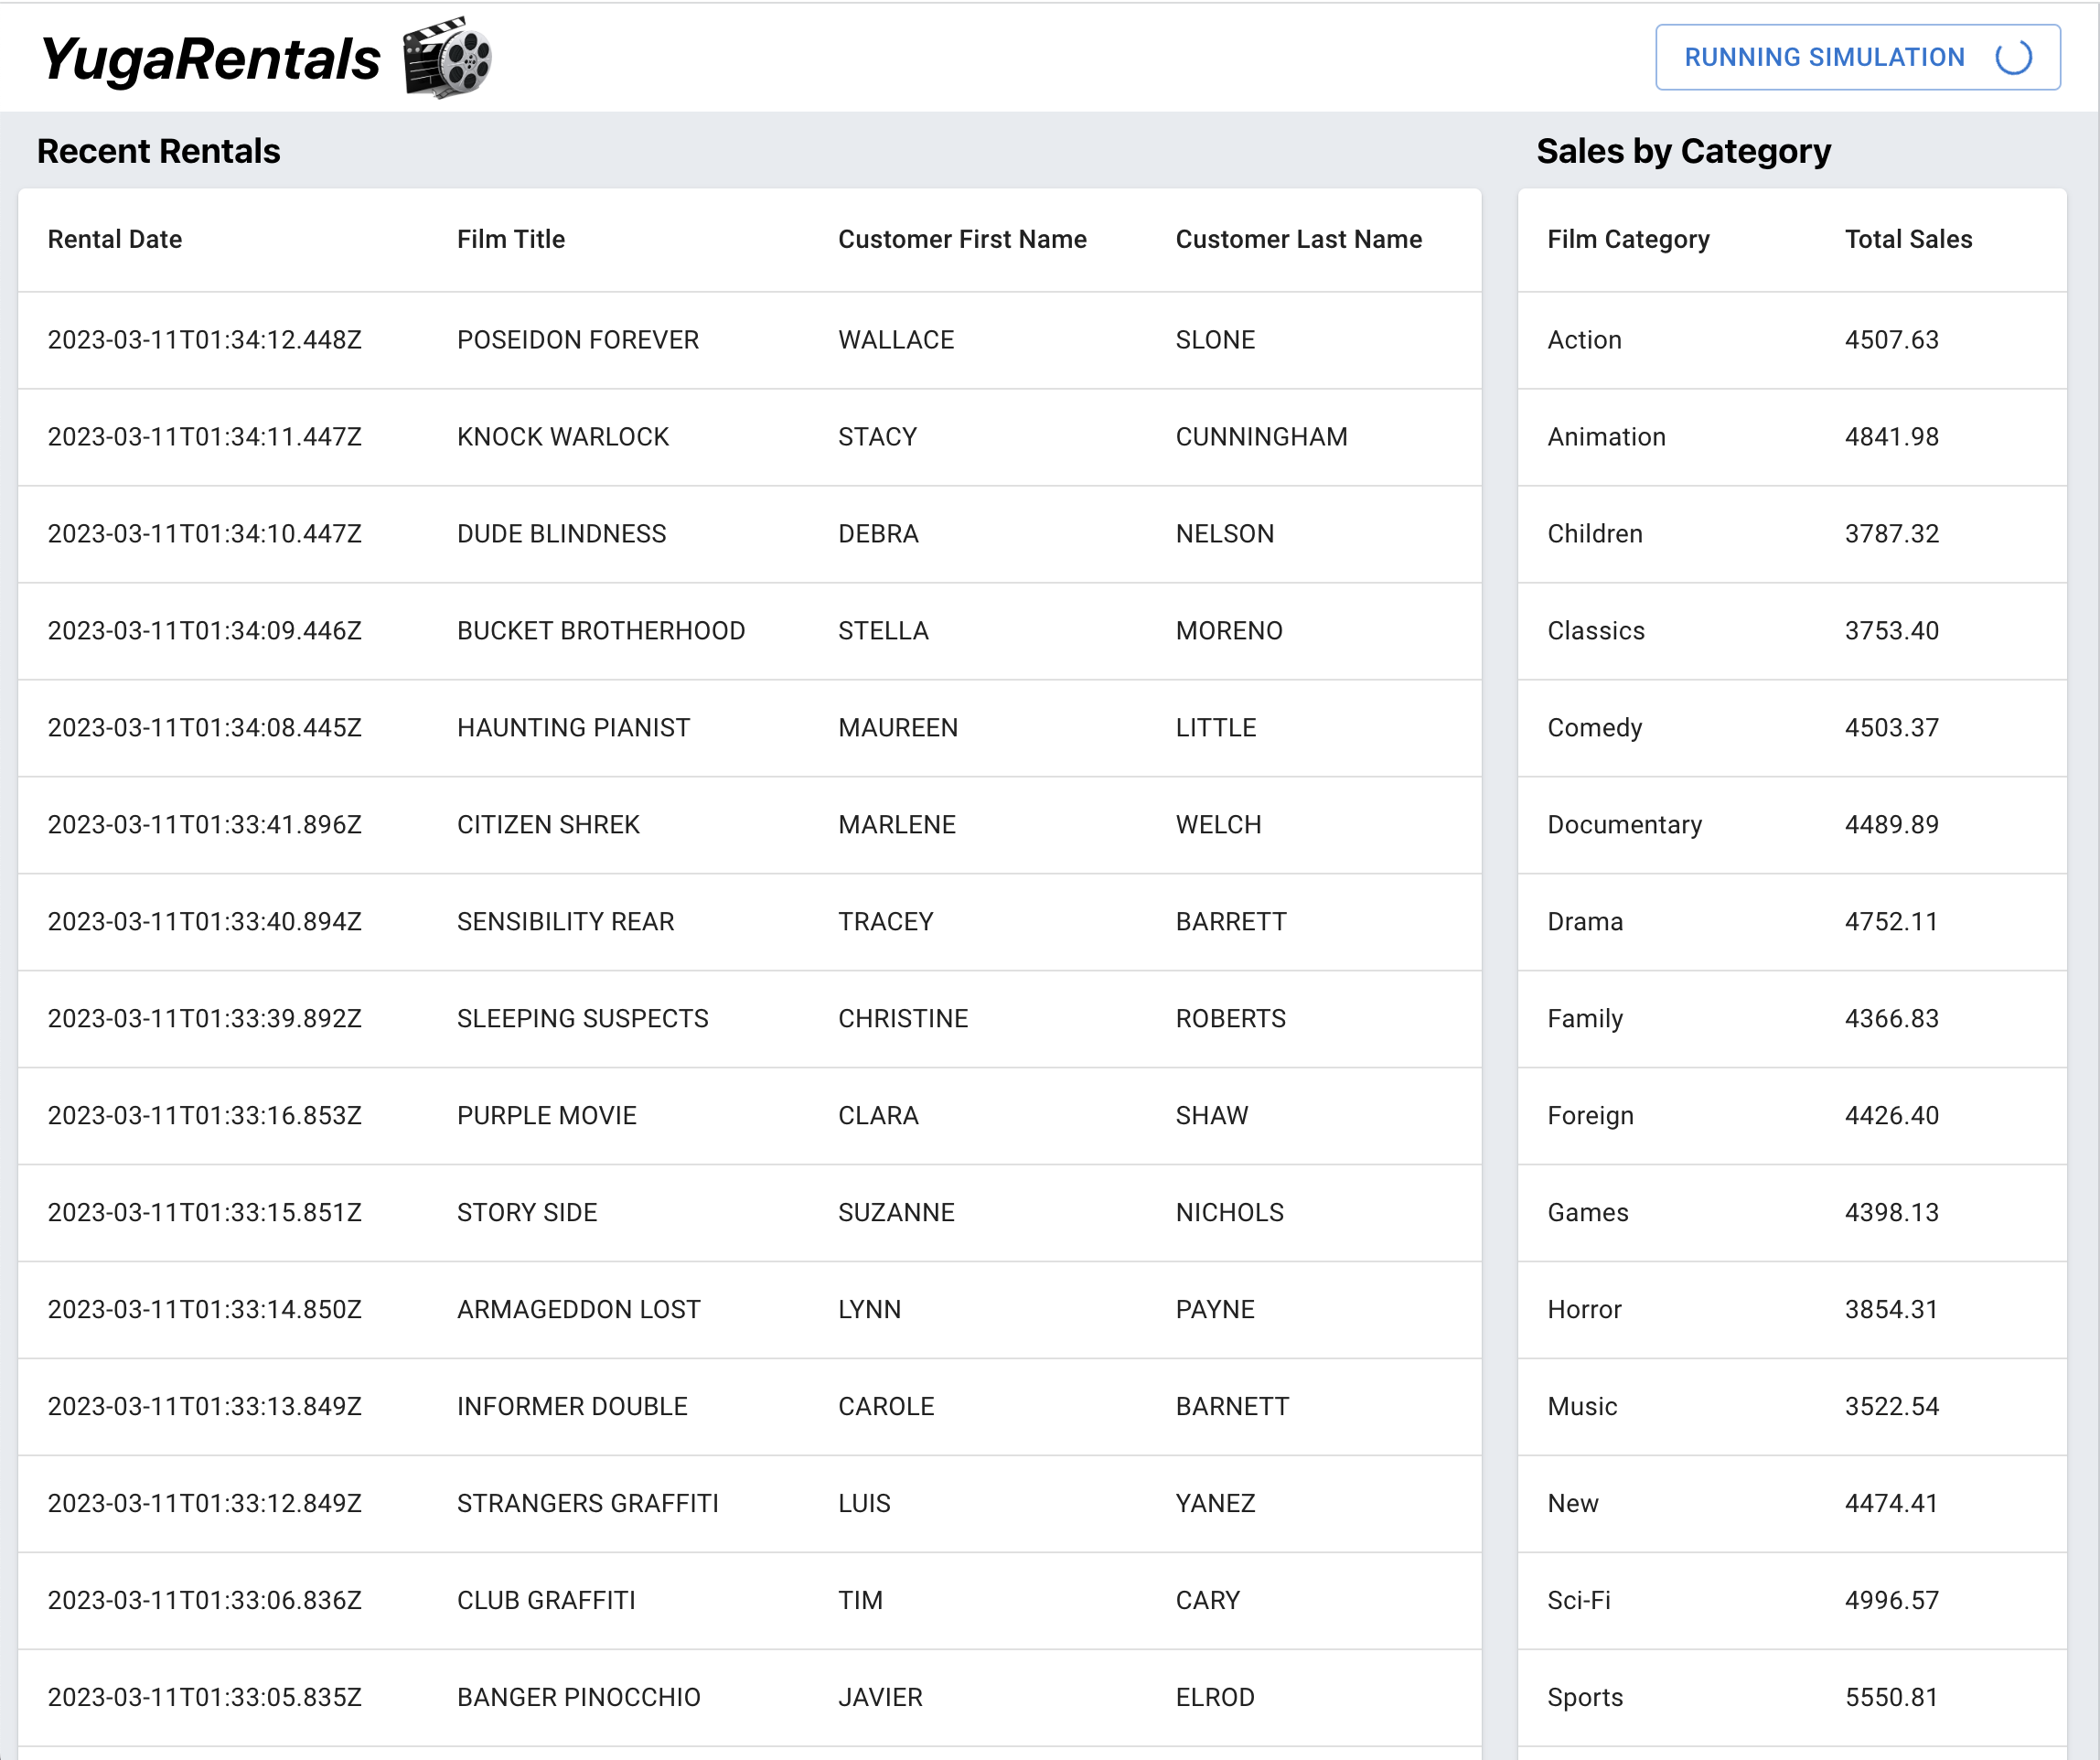
Successfully connected to YugabyteDBThe YugaRentals application functions just the same as before. We can see the latest rentals, which were originally stored in Oracle Database. By running the simulation to generate new rentals, we can verify that our migration to YugabyteDB Managed was successful!
Wrapping Up
As you can see, YugabyteDB Voyager simplifies the migration from Oracle Database to YugabyteDB. Whether you’re migrating from Oracle or another relational database like PostgreSQL or MySQL, I encourage you to give it a try in your next project.
Look out for more articles from me on distributed SQL and Node.js. In the meantime, keep on coding!
Opinions expressed by DZone contributors are their own.
Comments