How To Perform Data Migration in MongoDB Using Node.js
Explore effective MongoDB data migration methods using Node.js, including manual migration, MongoDB drivers, and the Mongoose library.
Join the DZone community and get the full member experience.
Join For FreeData migration in MongoDB refers to the process of transferring data from one database to another. This could involve moving data between different MongoDB instances, upgrading to a newer version of MongoDB, or restructuring the database schema.
Data migration is crucial for maintaining database integrity and scalability. It ensures that data remains accessible and usable as the database evolves. Without proper migration processes in place, data may become fragmented, outdated, or inaccessible, leading to issues with data quality and system performance. Therefore, understanding how to perform data migration effectively is essential for developers working with MongoDB.
Below are the approaches to perform data migration in MongoDB using Node.js
Manual Migration
Manual migration involves transferring data between MongoDB databases manually, without the use of automated tools or scripts. This approach requires developers to export data from the source database, manipulate it if necessary, and then import it into the destination database.
Description
- Developers manually export data from the source MongoDB database using tools like
mongoexport. - The exported data is then processed or transformed as needed, such as converting file formats or restructuring data fields.
- Finally, developers import the processed data into the destination MongoDB database using tools like
mongoimport.
Syntax and Steps
- Export data from the source MongoDB database:
mongoexport --db sourceDB --collection sourceCollection --out data.json- Process or manipulate the exported data as required.
- Import the processed data into the destination MongoDB database:
mongoimport --db destinationDB --collection destinationCollection --file data.jsonPros
- Provides full control over the migration process
- Can accommodate complex data transformations or custom requirements
- No dependency on external tools or libraries
Cons
- Time-consuming and labor-intensive, especially for large datasets
- Prone to human error during manual data manipulation
- Not scalable for frequent or large-scale migrations
Using MongoDB Drivers
Using MongoDB drivers for migration involves leveraging official MongoDB drivers or libraries provided by the MongoDB community to facilitate data migration tasks. These drivers offer a programmatic way to interact with MongoDB databases, allowing developers to perform data migration tasks directly within their Node.js applications.
Explanation
- Developers utilize MongoDB drivers, such as
mongodbormongoose, to connect to MongoDB databases from their Node.js applications. - They can then write custom scripts or applications to handle data migration tasks, such as copying documents from one collection to another or transforming data structures.
- MongoDB drivers provide methods and functions for querying, updating, and inserting data into MongoDB databases, making it easy to perform migration tasks programmatically.
Syntax and Steps
- Install the MongoDB driver for Node.js using
npm:
npm install mongodb- Connect to the source and destination MongoDB databases within your Node.js application.
const MongoClient = require('mongodb').MongoClient;

// Connect to source database
const sourceClient = await MongoClient.connect(sourceURL);
const sourceDB = sourceClient.db(sourceDBName);

// Connect to destination database
const destClient = await MongoClient.connect(destURL);
const destDB = destClient.db(destDBName);
- Use MongoDB driver methods to query data from the source database and insert it into the destination database.
const sourceCollection = sourceDB.collection('sourceCollection');
const destCollection = destDB.collection('destCollection');
const data = await sourceCollection.find({}).toArray();
await destCollection.insertMany(data);
Advantages
- Offers programmatic control over data migration tasks
- Allows for customization and flexibility in handling migration logic
- Integrates seamlessly with Node.js applications, leveraging familiar programming paradigms
Disadvantages
- Requires developers to write custom code for migration tasks
- It may require a deeper understanding of MongoDB and Node.js programming concepts
- Development and testing overhead associated with writing and maintaining migration scripts
Mongoose Library
Using the Mongoose library for data migration involves leveraging its powerful features and abstraction layer to simplify data migration tasks in MongoDB. Mongoose provides an object modeling interface for MongoDB, allowing developers to define schemas, perform CRUD operations, and enforce data validation rules.
Description
- Developers utilize Mongoose's schema and model features to define the structure of their data and interact with MongoDB collections.
- Mongoose abstracts away many of the complexities of working directly with the MongoDB Node.js driver, providing a more streamlined and intuitive way to perform database operations.
- Mongoose's migration capabilities enable developers to easily migrate data between MongoDB collections or databases, while also providing features for data transformation and validation.
Syntax and Steps
- Install
mongooselibrary usingnpm:
npm install mongoose- Connect to MongoDB database using Mongoose:
const mongoose = require('mongoose');
mongoose.connect('mongodb://localhost:27017/mydatabase',
{ useNewUrlParser: true, useUnifiedTopology: true });- Define Mongoose schemas and models for source and destination collections:
const sourceSchema = new mongoose.Schema({ /* Source schema definition */ });
const destSchema = new mongoose.Schema({ /* Destination schema definition */ });
const SourceModel = mongoose.model('Source', sourceSchema);
const DestModel = mongoose.model('Destination', destSchema);
Perform data migration using Mongoose methods:
const data = await SourceModel.find({});
await DestModel.create(data);- Perform data migration using Mongoose methods:
const data = await SourceModel.find({});
await DestModel.create(data);
Benefits
- It simplifies data migration tasks with a higher level of abstraction than using the MongoDB Node.js driver directly.
- Provides schema validation, datacasting, and query-building capabilities out of the box
- Integrates seamlessly with existing Mongoose-based applications, leveraging existing models and schemas
Limitations
- Requires familiarity with Mongoose's API and concepts such as schemas, models, and middleware
- It may introduce additional overhead and complexity compared to simpler migration approaches, especially for simple migration tasks.
Steps To Create an Application
Creating a migration application in Node.js involves installing necessary modules and dependencies, followed by setting up the application to perform data migration tasks.
Installation Guide
1. Install Node.js
If not already installed, download and install Node.js from the official website.
2. Initialize Node.js Project
Create a new directory for your migration application and navigate to it in your terminal. Run the following command to initialize a new Node.js project:
npm init -y3. Install Required Modules
Install the necessary modules and dependencies for your migration application using npm. For example, to install mongoose for MongoDB data migration, run:
npm install mongooseSetup Instructions
1. Create Application Files
Create JavaScript files for your migration application, such as app.js, migration.js, or any other meaningful names.
2. Import Required Modules
In your JavaScript files, import the required modules using the require() function. For example, to import Mongoose in app.js, add:
const mongoose = require('mongoose');3. Connect to MongoDB
Set up a connection to your MongoDB database using the mongoose module. For example, in app.js:
mongoose.connect('mongodb://localhost:27017/mydatabase', {
useNewUrlParser: true, useUnifiedTopology: true });
4. Define Data Migration Logic
Write the data migration logic in your application files. This could involve querying data from the source database, processing it if necessary, and then inserting it into the destination database.
5. Run Migration Application
Once setup is complete and migration logic is implemented, run your migration application using Node.js. Navigate to your application directory in the terminal and execute:
node app.jsBy following these steps, you can create a migration application in Node.js and perform data migration tasks between MongoDB databases with ease.
Updated Dependencies in package.json File
When developing a migration application in Node.js, it's essential to manage dependencies effectively by listing them in the package.json file. This file serves as a manifest for your project, specifying all the modules and packages required for your application to run properly.
Listing of Required Modules
1. Mongoose
Mongoose is a popular Node.js library that provides a schema-based solution to model your application data and interact with MongoDB databases. It simplifies the process of defining schemas, performing CRUD operations, and validating data.
2. MongoDB Driver
If you choose to use the MongoDB Node.js driver directly instead of Mongoose, you'll need to include it as a dependency. The MongoDB driver allows you to connect to MongoDB databases, execute queries, and perform data manipulation tasks programmatically.
"dependencies":{
"mongoose": "^8.2.1",
}
Explanation of Each Dependency
1. Mongoose
Mongoose simplifies data modeling and database interaction by providing a higher-level abstraction over MongoDB. It allows you to define schemas for your data structures, create models based on these schemas, and perform CRUD operations on MongoDB collections using these models. Mongoose also offers features like data validation, middleware, and query building, making it a comprehensive solution for working with MongoDB in Node.js.
2. MongoDB Driver
The MongoDB Node.js driver is a low-level library that allows you to interact with MongoDB databases directly from your Node.js applications. It provides methods and functions for connecting to MongoDB, executing queries, inserting, updating, and deleting documents, and managing database operations. While it offers more control and flexibility compared to Mongoose, it requires writing more boilerplate code for common tasks and lacks some of the higher-level features provided by Mongoose.
By including these dependencies in the package.json file, you ensure that anyone who clones or downloads your project can easily install and use the required modules by running npm install. This simplifies the setup process for collaborators and makes your project more accessible to other developers.
Example
Let's walk through a detailed example of performing data migration using Mongoose, one of the approaches discussed earlier. We'll demonstrate how to migrate data from a source MongoDB collection to a destination collection using Mongoose in a Node.js application.
Step 1: Setup
First, ensure you have Node.js and MongoDB installed on your system. Then, create a new directory for your migration application and initialize a new Node.js project using:
npm init -yStep 2: Install Dependencies
Install the necessary dependencies, including mongoose, using npm:
npm install mongooseStep 3: Create Migration Script
Create a new JavaScript file (e.g., migration.js) and import Mongoose:
const mongoose = require('mongoose');Step 4: Connect to MongoDB
Connect to your source and destination MongoDB databases:
mongoose.connect('mongodb://localhost:27017/sourceDB', { useNewUrlParser: true, useUnifiedTopology: true });
const sourceDB = mongoose.connection;
sourceDB.on('error', console.error.bind(console, 'Connection error:'));
sourceDB.once('open', () => {
	 console.log('Connected to source database.');
});
Step 5: Define Schemas and Models
Define schemas and models for your source and destination collections:
const sourceSchema = new mongoose.Schema({
	 // Define schema for source collection
});
const destSchema = new mongoose.Schema({
	 // Define schema for destination collection
});
const SourceModel = mongoose.model('Source', sourceSchema);
const DestModel = mongoose.model('Destination', destSchema);
Step 6: Perform Data Migration
Query data from the source collection and insert it into the destination collection:
SourceModel.find({}, (err, data) => {
	 if (err) throw err;
	DestModel.create(data, (err) => {
		if (err) throw err;
		console.log('Data migration complete.');
		mongoose.disconnect();
	 });
});
Step 7: Run Migration Script
Save your changes and run the migration script using Node.js:
node migration.jsExplanation
- In this example, we use Mongoose to connect to the source MongoDB database and define the source and destination collections schemas.
- We query data from the source collection using the
find()method and insert it into the destination collection using thecreate()method. - Finally, we disconnect from the MongoDB database once the migration is complete.
By following these steps and understanding the code snippets provided, developers can create their migration scripts using Mongoose to transfer data between MongoDB collections efficiently.
Example
const mongoose = require('mongoose');
// Step 4: Connect to MongoDB
mongoose.connect('mongodb://localhost:27017/myapp',
{
useNewUrlParser: true,
useUnifiedTopology: true
});
const sourceDB = mongoose.connection;
sourceDB.on('error',
console.error.bind(console, 'Connection error:'));
sourceDB.once('open', async () => {
console.log('Connected to source database.');
// Step 5: Define Schemas and Models
const sourceSchema = new mongoose.Schema({
name: String,
age: Number
});
const destSchema = new mongoose.Schema({
name: String,
age: Number
});
const SourceModel = mongoose.model('Source', sourceSchema);
const DestModel = mongoose.model('Destination', destSchema);
try {
// Insert some data into the source collection for demonstration
await SourceModel.create([
{ name: 'GfG1', age: 30 },
{ name: 'GFG2', age: 25 }
]);
console.log('Sample data inserted into source collection.');
// Step 6: Perform Data Migration
const data = await SourceModel.find({});
await DestModel.create(data);
console.log('Data migration complete.');
} catch (err) {
console.error(err);
} finally {
mongoose.disconnect();
}
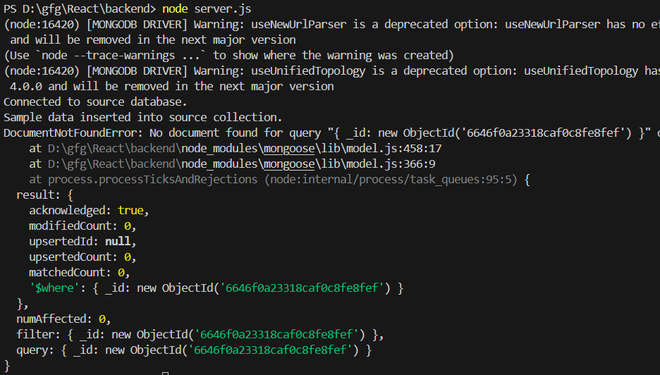
});Output
After successfully performing the data migration process using your chosen approach, you'll want to verify that the migration was successful and that the data integrity has been maintained in the destination MongoDB database.
Showcase of Migrated Data
- To showcase the migrated data, you can connect to the destination MongoDB database using a MongoDB client tool such as MongoDB Compass or Robo 3T.
- Navigate to the destination collection where you migrated the data and inspect the documents to ensure that they match the data from the source collection.
- You should see the same data structure and content in the destination collection as you had in the source collection, indicating that the migration was successful.
Demonstration of Successful Migration
- You can also demonstrate the successful migration programmatically by writing code to query and retrieve data from the destination MongoDB collection.
- Use the same approach you used to query data from the source collection but now query data from the destination collection.
- Compare the retrieved data with the original data from the source collection to ensure that it matches, confirming that the migration was successful.
Verification of Data Integrity
- Finally, verify the integrity of the migrated data by checking for any inconsistencies or discrepancies.
- Ensure that all data has been transferred accurately and that there are no missing or corrupted documents.
- You can perform additional checks or validations based on your application's specific requirements to ensure data integrity.
By showcasing the migrated data, demonstrating the successful migration process, and verifying data integrity, you can confirm that the data migration task has been completed effectively and that the destination MongoDB database contains the expected data from the source database.
Conclusion
We've explored different approaches for data migration in MongoDB using Node.js. We discussed manual migration, using MongoDB drivers, and leveraging the Mongoose library for migration tasks. MongoDB and Node.js are changing the future of app development by offering flexible and powerful tools for managing data and building scalable applications.
Recap of Approaches
- Manual migration: This involves manually exporting data from the source database, manipulating it if necessary, and then importing it into the destination database source and destination collections schemas. This approach offers full control but can be time-consuming and error-prone.
- MongoDB drivers: Using official MongoDB drivers allows for programmatic control over migration tasks. It provides flexibility but may require writing more code compared to other approaches.
- Mongoose library: Leveraging Mongoose simplifies migration tasks with its schema-based approach and built-in features for data modeling and validation. It offers a balance of control and convenience.
Recommendations
When choosing the most suitable approach for your project, consider factors such as the complexity of migration tasks, your familiarity with MongoDB and Node.js, and your application's specific requirements.
- Manual migration may be appropriate for simple migrations or when you need full control over the process.
- Using MongoDB drivers directly might be suitable if you prefer a programmatic approach and require flexibility.
- Leveraging the Mongoose library can streamline the migration process when working with complex data structures or requiring schema validation.
Ultimately, the best approach will depend on your project's unique needs and your team's preferences and expertise. Choose the approach that aligns with your goals and capabilities to ensure a smooth and successful data migration process in MongoDB using Node.js.
Opinions expressed by DZone contributors are their own.
Comments