

How to Secure a Spring AI MCP Server with an API Key via Spring Security
Discover how to protect your Spring AI MCP server with an API key, including clear instructions, sample code, and recommended security practices.
 CORE
·
CORE
·
Join the DZone community and get the full member experience.
Join For FreeInstead of building custom integrations for a variety of AI assistants or Large language models (LLMs) you interact with — e.g., ChatGPT, Claude, or any custom LLM — you can now, thanks to the Model Context Protocol (MCP), develop a server once and use it everywhere.
This is exactly as we used to say about Java applications; that thanks to the Java Virtual Machine (JVM), they're WORA (Write Once Run Anywhere). They're built on one system and expected to run on any other Java-enabled system without further adjustments.
In How to Build an MCP Server and Client With Spring AI MCP, I described in detail how to leverage MCP to enrich the context of these LLMs, making their responses more precise. Moreover, it exemplified how to implement an end-to-end use case that integrates an MCP server and a peer MCP client into an AI assistant.
Nevertheless, no aspects around securing such integrations were provided, which raised legitimate concerns around deploying into production.
Therefore, this article will focus on the MCP Server part. I'll describe how to implement a simple server using Spring AI, and how to test that its working correctly. I'll use a very useful tool called MCP Inspector. Yet, the emphasis here is on how its security can be configured.
According to the MCP Specification, MCP servers that use HTTP as their transport layer shall be secured with OAuth 2.0 access tokens. There are situations, though, in which an infrastructure supporting all the needed entities (authorization servers, etc.) is not available, and thus, the communication still needs to be secured.
The experiment in this article assumes such a case and demonstrates how an MCP server can be configured to authorize only requests from MCP clients that include the proper API key in a designated HTTP header.
Developing the MCP Server
As the purpose here is to secure it with an API key, the example MCP server is designed to expose a single tool that enriches the context with additional information about a specific Ninja character, whose name is passed as a parameter. Normally, such data could be read from a designated private data source (database, file etc.) and delivered back to the peer MCP Client and consequently to the LLM to use in its endeavors.
The server project set-up is the following:
- Java 21
- Maven 3.9.9
- Spring Boot – 3.5.7
- Spring AI – v. 1.1.0
The project is named mcp-server-api-key . In order to be sure of the recommended spring dependencies used, the spring-ai-bom is configured in the pom.xml file.
<dependencyManagement>
    <dependencies>
        <dependency>
            <groupId>org.springframework.ai</groupId>
            <artifactId>spring-ai-bom</artifactId>
            <version>${spring-ai.version}</version>
            <type>pom</type>
            <scope>import</scope>
        </dependency>
    </dependencies>
</dependencyManagement>
The main dependency is the Spring AI MCP Server Boot Starter, which provides the well-known, convenient capability of automatic component configuration, making it easy to set up an MCP server in Spring Boot applications.
<dependency>
    <groupId>org.springframework.ai</groupId>
    <artifactId>spring-ai-starter-mcp-server-webmvc</artifactId>
</dependency>
As the communication is over HTTP, the WebMVC server transport is used. The starter activates McpWebMvcServerAutoConfiguration and provides HTTP-based transport using Spring MVC and automatically configured streamable endpoints. Additionally, the spring-boot-starter-web dependency is included.
To configure the MCP Server, a few properties prefixed by spring.ai.mcp.server are added to the application.properties file. Let’s take them in order.
spring.ai.mcp.server.name = mcp-server-api-key
spring.ai.mcp.server.version = 1.0.0
spring.ai.mcp.server.instructions = Instructions - endpoint: /mcp, type: sync, protocol: streamable

spring.ai.mcp.server.type = sync
spring.ai.mcp.server.protocol = streamable

spring.ai.mcp.server.streamable-http.mcp-endpoint = /mcp

spring.ai.mcp.server.capabilities.tool = true
spring.ai.mcp.server.capabilities.completion = false
spring.ai.mcp.server.capabilities.prompt = false
spring.ai.mcp.server.capabilities.resource = false
In addition to the server’s name and type, which are obvious, the properties that designate the version and the instructions are pretty important. The instance's version is sent to clients and used for compatibility checks, while the instructions property provides guidance upon initialization and allows clients to get hints on how to utilize the server.
spring.ai.mcp.server.streamable-http.mcp-endpoint is the endpoint path that an MCP client will use when communicating with the server. As already mentioned, the server exposes only a single tool; thus, the last four properties in the snippet above are set accordingly.
Once these are configured, the application itself is straight-forward.
In the previous implementations of Spring AI, one would have needed to register a ToolCallbackProvider first, then proceed with the actual tools.
Starting with version 1.1.0, however, this isn’t needed any longer, and the tool configuration can be done directly, as shown in the component below.
@Component
public class NinjaTools {

    private final NinjaService ninjaService;

    public NinjaTools(NinjaService ninjaService) {
        this.ninjaService = ninjaService;
    }

    @McpTool(name = "get-ninja-character-strengths",
            description = "Provides the strength of the Ninja character with the indicated name")
    public NinjaStrengths ninjaStrengths(@McpToolParam(description = "The Ninja character name") String name) {
        return ninjaService.strengthsByName(name);
    }
}
Via the @McpTool annotation, we specify the name and description of the tool — by @McpToolParam, its name parameter. The tool exposed by this MCP server is very simple — it returns the strengths of a Ninja character, based on its provided name.
The purpose is to ultimately provide such a list to the underlying LLM so that it has a better view of the concrete context. Related to this, it’s worth mentioning that the role of the description parameter in the @McpTool An annotation is significant because it allows the MCP client to have a hint that if this MCP server tool is invoked, additional related details might be obtained.
My preference when it comes to implementing MCP servers is to clearly separate the MCP-specific part, (which is pretty similar regardless of the particular tools’ details) from the one containing the actual functionality, which is, by all means, unrelated to MCP.
This leads to a less coupled, more cohesive solution. In the simple case here, the separation looks exaggerated, yet it’s kept as it clearly outlines the idea.
Now, to complete the implementation, the next simple NinjaService is constructed (the focus in this article is on securing the MCP server).
@Service
public class NinjaService {

    public NinjaStrengths strengthsByName(String name) {
        return switch (name) {
            case "lloyd" -> new NinjaStrengths("Lloyd Garmadon – Green Ninja (Life)",
                    List.of("Leadership", "Adaptability", "Courage"));
            case "kai" -> new NinjaStrengths("Kai – Fire Ninja (Fire)",
                    List.of("Determination", "Fearlessness", "Loyalty"));
            case "jay" -> new NinjaStrengths("Jay Walker – Lightning Ninja (Lightning)",
                    List.of("Creativity", "Agility", "Humor"));
            case "cole" -> new NinjaStrengths("Cole – Earth Ninja (Earth)",
                    List.of("Balance", "Stability", "Resilience"));
            case "zane" -> new NinjaStrengths("Zane – Ice Ninja (Ice)",
                    List.of("Intelligence", "Compassion", "Generosity"));
            case "nya" -> new NinjaStrengths("Nya – Water Ninja (Water)",
                    List.of("Independence", "Adaptability", "Curiosity"));
            default -> new NinjaStrengths();
        };
    }

    public record NinjaStrengths(String name, List<String> strengths) {
        public NinjaStrengths() {
            this("Unknown", Collections.emptyList());
        }
    }
}
The results represent the character’s complete name and a list of three strengths, which are packed as NinjaStrengths instances.
Normally, once this point is reached, MCP server development is complete – it can be tested and then used. Nevertheless, this step is postponed for now; its security is configured and applied, and then finally checked with the MCP Inspector tool.
Securing the MCP Server
Regarding the security concern, the mcp-security project is used. At the time of this writing, its maintainers have specified that the module is still under development and compatible with Spiring AI 1.1.0 and up. So for the experiment here, we are good. The mcp-server-security dependency provides the two specified possibilities – OAuth 2.0 and API key-based for MCP, out of which the latter will be used.
The dependencies below are added into the pom.xml file.
<dependency>
    <groupId>org.springaicommunity</groupId>
    <artifactId>mcp-server-security</artifactId>
    <version>0.0.3</version>
</dependency>
<dependency>
    <groupId>org.springframework.boot</groupId>
    <artifactId>spring-boot-starter-security</artifactId>
</dependency>
To secure the MCP server with an API key, in addition to the key itself, a key secret is required. For convenience, they are declared as environmental variables and used in the application.properties file.
api.key.id = ${API_KEY_ID}
api.key.secret = ${API_KEY_SECRET}
In the case of the MCP server, all requests will be intercepted, and only those that are compliant (possess the authorization header denoting the expected API key) are further authorized.
To keep things simple and intuitive, a single ApiKeyEntity instance is constructed and stored as part of a simple InMemoryApiKeyEntityRepository.
Then, when the SecurityFilterChain is built, a SecurityConfigurerAdapter is applied and an McpApiKeyConfigurer is used, which allows two concerns to be addressed:
- Set the expected security header name –
ninja-x-api-key - Set the repository that stores the server API key(s)
The security configuration class is indicated below.
@EnableWebSecurity
@Configuration
public class SecurityConfig {

    @Value("${api.key.id}")
    private String apiKeyId;

    @Value("${api.key.secret}")
    private String apiKeySecret;

    @Bean
    ApiKeyEntity apiKey() {
        return ApiKeyEntityImpl.builder()
                .name("API key")
                .id(apiKeyId)
                .secret(apiKeySecret)
                .build();
    }

    @Bean
    ApiKeyEntityRepository<ApiKeyEntity> apiKeyRepository() {
        return new InMemoryApiKeyEntityRepository<>(List.of(apiKey()));
    }

    @Bean
    SecurityFilterChain securityFilterChain(HttpSecurity http) throws Exception {
        return http.authorizeHttpRequests(auth ->
                        auth.anyRequest().authenticated())
                .with(McpApiKeyConfigurer.mcpServerApiKey(),
                        apiKeyConfig ->
                                apiKeyConfig.apiKeyRepository(apiKeyRepository())
                                        .headerName("ninja-x-api-key"))
                .build();
    }
}
Taking a more general approach, if the API key storage is insufficient, one can implement the interface below and provide a specific mechanism that suits the particular needs.
public interface ApiKeyEntityRepository<T extends ApiKeyEntity> {

    @Nullable
    T findByKeyId(String keyId);

}
At this point, the MCP server is secure. In order to be able to successfully communicate, an MCP client shall send HTTP requests that contain the required header:
"ninja-x-api-key": [api-key-id].[api-key-secret]where api-key-id and api-key-secret are replaced with the values configured above.
Testing the MCP Server
For testing and debugging MCP servers in general (and the one in this article in particular), the MCP Inspector tool is used. Its documentation clearly describes the prerequisites for running it and provides details on the available configurations.
It can be started with the following command.
C:\Users\horatiu.dan>npx @modelcontextprotocol/inspector
Starting MCP inspector...
Proxy server listening on localhost:6277
Session token: 6ae623f67a00875097263bb02ecbd7c3949fdb41e741e9d6650765b282673733
Use this token to authenticate requests or set DANGEROUSLY_OMIT_AUTH=true to disable auth

MCP Inspector is up and running at:
http://localhost:6274/?MCP_PROXY_AUTH_TOKEN=6ae623f67a00875097263bb02ecbd7c3949fdb41e741e9d6650765b282673733

Opening browser...
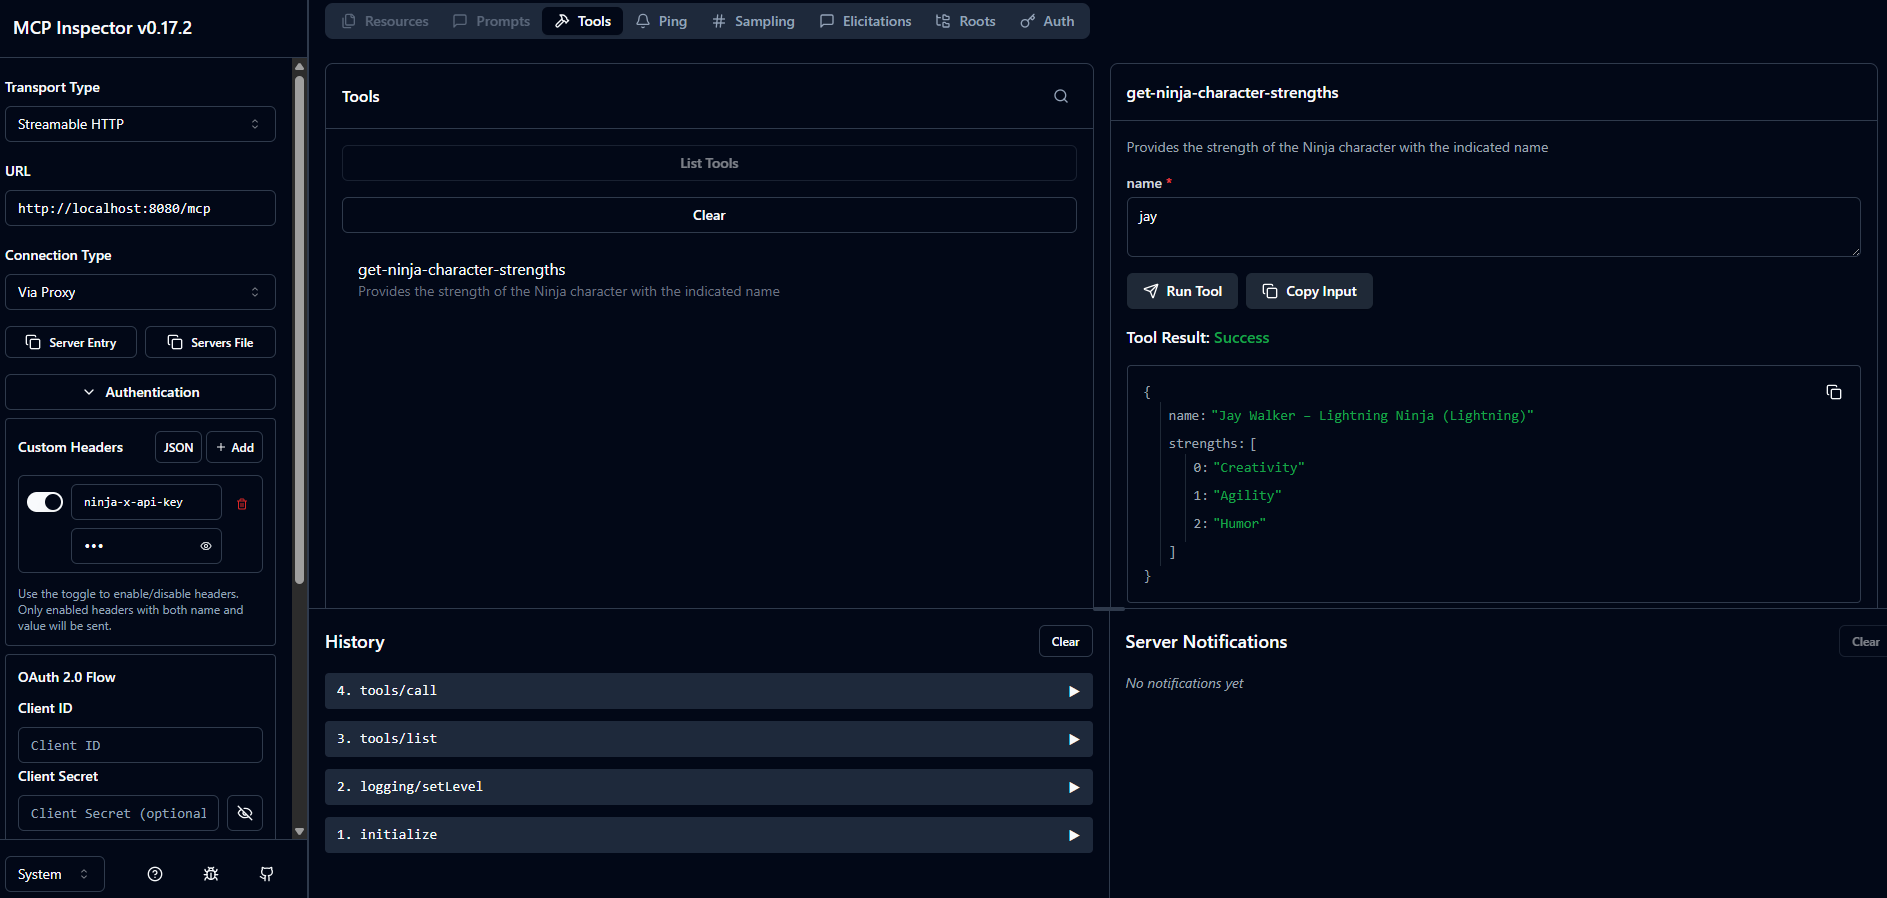
Once it’s up and running, MCP Inspector can be accessed via the link above. Prior to connecting to the developed MCP server, though, there are some prerequisites:
- Transport Type:
Streamable HTTP - URL:
http://localhost:8080/mcp - Set the needed Authentication header –
ninja-x-api-key– with the valueid.secret
Once successfully connected, one can observe the following in the mcp-server-api-key logs.
[mcp-server-api-key] [nio-8080-exec-1] i.m.server.McpAsyncServer : Client initialize request - Protocol: 2025-06-18, Capabilities: ClientCapabilities[experimental=null, roots=RootCapabilities[listChanged=true], sampling=Sampling[], elicitation=Elicitation[]], Info: Implementation[name=inspector-client, title=null, version=0.17.2]On the other hand, the response of the MCP Inspector initialize request is:
{
  "capabilities": {
    "logging": {},
    "tools": {
      "listChanged": true
    }
  },
  "serverInfo": {
    "name": "mcp-server-api-key",
    "version": "1.0.0"
  },
  "instructions": "Instructions - endpoint: /mcp, type: sync, protocol: streamable"
}
Communication being settled, the exposed tool(s) can now be listed and invoked. The picture exemplifies the execution of get-ninja-character-strengths, having as input 'jay' and returning the available character strengths.
Conclusion
Although straightforward, the MCP server implementation and its security configuration with an API key are implemented in only a few lines of code, thanks to Spring AI and Spring Security. Nevertheless, conceptually there is quite a lot to cover and configure and thus, a thorough understanding of the concepts is needed once the enthusiasm passes, so that the developed applications are robust enough and ready for production.
Published at DZone with permission of Horatiu Dan. See the original article here.
Opinions expressed by DZone contributors are their own.
Comments