How to Setup Email Server on Ubuntu 16.04 Alibaba ECS
Learn how to use the popular open source Ubuntu OS and the Alibaba Elastic Compute Service tool by creating an email server.
Join the DZone community and get the full member experience.
Join For FreePostfix is a free, open source software application that works as a Mail Transfer Agent (MTA) for routing and delivering email.
Dovecot is an Open-source MDA (Mail Delivery Agent) and is responsible for delivering emails to local recipients' mailboxes on a server.
Dovecot implements IMAP (Internet Message Access Protocol) and POP3 (Post Office Protocol) and hence remains a good choice for accessing emails via Mail User Agents (MUAs) such as Squirrelmail, MSOutlook, Thunderbird, or Roundcube.
DirectMail is an Alibaba Cloud SMTP service for sending notifications and batch emails. The service is stable and affordable and charges depend on usage.
In this guide, we will cover the steps for configuring a full-blown two way email server using Postfix, Dovecot, Alibaba Cloud DirectMail, and SquirrelMail on an Ubuntu 16.04 Elastic Compute Service (ECS) instance.
For the sake of clarity we will use 198.18.0.14 as a hypothetical public IP address of your Alibaba Cloud ECS instance.
Prerequisites
- Alibaba Cloud Accoun.
- An ECS instance running Ubuntu 16.04.
- A non-root user with sudo privileges.
- A domain name.
You need to allow the following ports on your ECS Instance via the security group for emails to work:
- Port 25: Inbound traffic
- Port 465: Outbound traffic
- Port 993: Inbound traffic
Step 1: Changing Your Hostname to a Fully Qualified Domain Name
Connect to your Ubuntu 16.04 server. Before we begin, we need to setup a Fully Qualified Domain Name (FQDN). First, edit the /etc/cloud/cloud.cfg file:
$ sudo nano /etc/cloud/cloud.cfgLook for the line preserve_hostname and change it from false to true
$ preserve_hostname truePress CTRL+X, Y and Enter to save the file.
Then open the file /etc/hostname:
$ sudo nano /etc/hostnameReplace the existing hostname with mail:
MailPress CTRL+X, Y and Enter to save the file.
Edit the hosts file /etc/hosts:
$ sudo nano /etc/hostsSave the file by pressing CTRL+X, Y and Enter.
Add two lines below the localhost entry as shown below. Remember to replace 198.18.0.14 with the IP address associated with your ECS instance:
127.0.0.1       localhost
127.0.1.1   mail.example.com mail
198.18.0.14  mail.example.com mail

# The following lines are desirable for IPv6 capable hosts
::1     localhost       ip6-localhost   ip6-loopback


...
Save the file by pressing CTRL+X, Y and Enter.
Reboot the server using the command below:
$ sudo rebootStep 2: Installing Apache
Once we have setup a FQDN, we can now go ahead and install the Apache web server. This is very important because SquirrelMail requires a web server to function.
First, update the software index by running the command below:
$ sudo apt-get updateThen, we can now use Ubuntu's Advanced Package Manager to install Apache:
$ sudo apt-get install apache2Step 3: Installing PHP
SquirrelMail is written in PHP. We therefore need to add this general purpose scripting language on our server for the email client to function. To do this, run the command below:
$ sudo apt-get install php libapache2-mod-phpPress Y and hit Enter when prompted to confirm the installation.
Step 4: Installing Let's Encrypt SSL Certificate
We can now pull a free SSL certificate from Let's Encrypt using Certbot in order to enable SSL/TLS support on our mail server.
To do this, run the commands below one by one. Press Y and hit Enter if you are prompted to confirm the installation:
$ sudo apt-get install software-properties-common python-software-properties
$ sudo add-apt-repository ppa:certbot/certbot
$ sudo apt-get update
$ sudo apt-get install python-certbot-apache
$ sudo certbot --apache -d example.com
You will be prompted to enter an email address for urgent SSL renewal and urgent notices. Enter the address and hit Enter.
Next, press A and hit Enter to agree to the terms and conditions.
If you would like to share your email with the Electronic Frontier, press Y and hit Enter otherwise press N and hit Enter.
Towards the end of the SSL installation, you will be asked whether you would like to redirect traffic, just choose 1 for No redirect and hit Enter
You should get a congratulations message at the end:
IMPORTANT NOTES:
 - Congratulations! Your certificate and chain have been saved at:
   /etc/letsencrypt/live/example.com/fullchain.pem
   Your key file has been saved at:
   /etc/letsencrypt/live/example.com/privkey.pem
   Your cert will expire on 2018-11-04. To obtain a new or tweaked
   version of this certificate in the future, simply run certbot again
   with the "certonly" option. To non-interactively renew *all* of
   your certificates, run "certbot renew"
 - If you like Certbot, please consider supporting our work by:

   Donating to ISRG / Let's Encrypt:   https://letsencrypt.org/donate
   Donating to EFF:                    https://eff.org/donate-le
Step 5: Installing the Postfix Server
Next, we can go ahead and install Postfix SMTP server by running the command below:
$ sudo apt-get install postfixOn the screen that appears, press TAB and hit Enter.

Then, select Internet Site as the General type of mail configuration, hit TAB and Enter.

On the next screen, enter the name of your domain name (e.g. example.com and NOT www.example.com). Again, hit TAB and Enter.

Step 6: Configuring Postfix
Next, we are going to make some few changes to postfix configuration files. Instead of editing the file /etc/postfix/main.cf, we will back up the original file and create a fresh configuration file.
Backup the default configuration file:
$ sudo mv /etc/postfix/main.cf /etc/postfix/main.cf.bkThen, create a new configuration file:
$ sudo nano /etc/postfix/main.cfPaste the content below and replace example.com with your domain name:
smtpd_banner = $myhostname ESMTP $mail_name
biff = no

# appending .domain is the MUA's job.
append_dot_mydomain = no
readme_directory = no

#SMTP CONFIGURATION
smtp_use_tls=yes
smtp_tls_security_level = may
smtp_tls_session_cache_database = btree:${data_directory}/smtp_scache

# SMTPD CONFIGURATIONS
# SMTPD AUTHENTICATION

smtpd_sasl_auth_enable = yes
smtpd_sasl_type = dovecot
smtpd_sasl_path = private/auth


# SMPTD TLS

smtpd_use_tls=yes
smtpd_tls_security_level = may
smtpd_tls_session_cache_database = btree:${data_directory}/smtpd_scache

smtpd_tls_cert_file=/etc/letsencrypt/live/example.com/fullchain.pem
smtpd_tls_key_file=/etc/letsencrypt/live/example.com/privkey.pem

myhostname = mail.example.com
myorigin = /etc/mailname
mydestination =  localhost.$mydomain, localhost
relayhost =
mynetworks = 127.0.0.0/8 [::ffff:127.0.0.0]/104 [::1]/128
mailbox_size_limit = 0
recipient_delimiter = +
inet_interfaces = all
inet_protocols = all
alias_maps = hash:/etc/aliases
alias_database = hash:/etc/aliases
virtual_transport = lmtp:unix:private/dovecot-lmtp
virtual_mailbox_domains = /etc/postfix/virtual_mailbox_domains
Press CTRL+X, Y and Enter to save the file.
In the above file, we have instructed Postfix to use virtual_mailbox_domains located at /etc/postfix/virtual_mailbox_domains. We need to add our domain(s) to this file.
We can do this by editing the file:
$ sudo nano /etc/postfix/virtual_mailbox_domainsEnter your domain name as shown below:
$ example.com #domainYou can add as many domains as you want in this file.
Then, to create a virtual mailbox domains database file that Postfix can understand, run the command below:
$ sudo postmap /etc/postfix/virtual_mailbox_domainsThe command above will create a new file /etc/postfix/virtual_mailbox_domains.db.
Next edit the master configuration file:
$ sudo nano /etc/postfix/master.cfLook for the line:
$ #submission inet n - y - - smtpdUncomment it by removing the pound symbol (#).
$ submission inet n - y - - smtpdPress CTRL+X, Y and Enter to save the file.
Step 7: Installing Dovecot
Next, we will install Dovecot and all the necessary packages for IMAP, POP, and LTMPD. The latter uses Local Mail Transfer Protocol (LMTP) to deliver emails to local inboxes.
When an email is sent to our server, Postfix will pass it over to Dovecot for local delivery. Also, our email client SquirrelMail will retrieve emails from local storage through Dovecot via the IMAP protocol.
$ sudo apt-get install dovecot-core dovecot-imapd dovecot-pop3d dovecot-lmtpdPress Y and hit Enter when prompted to confirm the installation.
Step 8: Configuring Dovecot
We are now going to configure Dovecot to make sure everything is working as expected. In the sections that follow, we will configure: mailbox location, IMAPs and POP3s protocols, LMTP socket, authentication, password files etc.
Configuring Dovecot Mailbox Location
Open the 10-mail.conf file using the command below:
$ sudo nano /etc/dovecot/conf.d/10-mail.confLook for the line:
mail_location = mbox:~/mail:INBOX=/var/mail/%uChange it to:
mail_location = maildir:/var/mail/vhosts/%d/%nPress CTRL+X, Y and Enter to save the file.
Create the directory /var/mail/vhosts:
$ sudo mkdir /var/mail/vhostsThen, create a sub-directory on the vhosts directory for each domain that you want to receive mail for:
$ sudo mkdir /var/mail/vhosts/example.comNext create a group and a user that can read the directory that we created above together with all associated files:
$ sudo groupadd -g 5000 vmail$ sudo useradd -r -g vmail -u 5000 vmail -d /var/mail/vhosts -c "virtual mail user"The user we created above should have the full privileges for reading and writing the /var/mail/vhosts directory. To grant the privileges, use the command below:
$ sudo chown -R vmail:vmail /var/mail/vhosts/Enabling IMAPs and POP3s Services
Edit the file /etc/dovecot/conf.d/10-master.conf to enable secure IMAP and POP3 services. To do this, run the command below:
$ sudo nano /etc/dovecot/conf.d/10-master.confLook for:
inet_listener imaps {
    #port = 993
    #ssl = yes
  }
And change to:
inet_listener imaps {
    port = 993
    ssl = yes
  }
Then, look for :
inet_listener pop3s {
    #port = 995
    #ssl = yes
  }
And change to:
inet_listener pop3s {
    port = 995
    ssl = yes
  }
Enabling SSL on IMAP and POP3 protocol ensures the encryption between the email clients and our email servers to avoid exposing email login credentials to third parties such as Internet Service Providers (ISP).
Enabling LMTP socket
On the same file(/etc/dovecot/conf.d/10-master.conf), look for:
service lmtp {
	unix_listener lmtp {
		#mode = 0666
}
And change to:
service lmtp {
	unix_listener /var/spool/postfix/private/dovecot-lmtp {
		mode = 0600
		user = postfix
		group = postfix
}
Configuring Authentication Socket
On the same file (/etc/dovecot/conf.d/10-master.conf), look for:
service  auth {
...
  # Postfix smtp-auth
  #unix_listener /var/spool/postfix/private/auth {
  #  mode = 0666
  #}

}
And change to:
service auth {
...
#Postfix smtp-auth
unix_listener /var/spool/postfix/private/auth {
mode = 0666
user=postfix
group=postfix
}
...
Press CTRL +X, Y and Enter to save the file
Configuring Dovecot Authentication Processes
We can now go ahead and configure Dovecot authentication processes.
$ sudo nano /etc/dovecot/conf.d/10-auth.confLook for the line:
# disable_plaintext_auth = yesAnd change to:
$ disable_plaintext_auth = yesThe section disables any type authentication that tries to connect to Dovecot without SSL.
On the same file, look for:
$ auth_mechanisms = plainAnd change it to:
$ auth_mechanisms = plain loginTowards the end of the same file, we are going to change passwords and user database configuration.
By default, Dovecot supports system level authentication. This means you need to create an account for every user that wants to access emails.
Instead of this, we are going to use a password file to store our user details because this is more flexible. So, comment the line:
$ !include auth-system.conf.extSo that it reads:
#!include auth-system.conf.extThen uncomment the line:
$ #!include auth-passwdfile.conf.extSo that it looks as:
$ !include auth-passwdfile.conf.extPress CTRL +X, Y and Enter to save the file
Configuring Authentication for Password File Users
Next, we can configure authentication for password file users. We need to edit the file /etc/dovecot/conf.d/auth-passwdfile.conf.ext.
$ sudo nano /etc/dovecot/conf.d/auth-passwdfile.conf.ext//Change the file as follows:
passdb {
driver = passwd-file
args = scheme=PLAIN username_format=%u /etc/dovecot/dovecot-users
}
userdb {
driver = static
args = uid=vmail gid=vmail home=/var/mail/vhosts/%d/%n
# Default fields that can be overridden by passwd-file
#default_fields = quota_rule=*:storage=1G
# Override fields from passwd-file
#override_fields = home=/home/virtual/%u
}Press CTRL +X, Y and Enter to save the file.
Creating Dovecot Password file
Next, we need to create a password file that will hold all accounts for the email users:
$ sudo nano /etc/dovecot/dovecot-usersYou can add as many users as you want in this file using the below format:
[email protected]:{plain}2MaishboR1Remember to replace johndoe with your preferred username and example.com with your domain name. The last part (2MaishboR1) represents a password in plain text. You will need the same password to configure an SMTP user account on Alibaba DirectMail so copy this value somewhere.
Press CTRL +X, Y and Enter to save the file.
Enabling SSL in Dovecot
As mentioned above, we would like email clients (e.g. Squirrelmail) to connect to the Dovecot server through the SSL protocol. To accomplish this, we need to make changes to the file /etc/dovecot/conf.d/10-ssl.conf:
$ sudo nano /etc/dovecot/conf.d/10-ssl.confFind the line:
$ ssl = noAnd change it to:
$ ssl = requiredAlso we need to point to the files that we created using certbot. So change the lines:
$ #ssl_cert = </etc/dovecot/dovecot.pem
$ #ssl_key = </etc/dovecot/private/dovecot.pem
To:
$ ssl_cert = </etc/letsencrypt/live/example.com/fullchain.pem
$ ssl_key = </etc/letsencrypt/live/example.com/privkey.pem
Replace example.com with your domain name.
Save the file by pressing CTRL+X, Y and Enter.
For the changes to be enabled, you must restart Dovecot service using the command below:
$ sudo service dovecot restartStep 9: Configuring and Enabling Alibaba DirectMail
Outbound connection to Port 25 is disabled by default in all Alibaba ECS instances. To overcome this problem, we will use Alibaba DirectMail for sending emails. The service works on port 465 and 80 for non-secure connections.
However, incoming emails to our server will be delivered without any problems because port 25 inbound traffic is not disabled.
First, login to your Alibaba Account. Then navigate to DirectMail.
On the left, click on Activate Now as shown below:
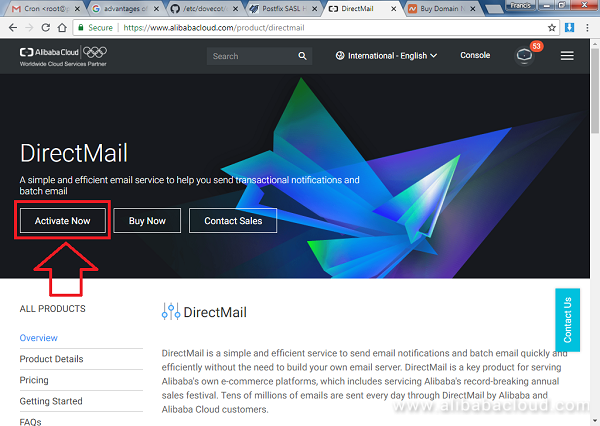
The Alibaba DirectMail product should be activated without any problems and you should see a screen similar to the one below. Then, click on Console

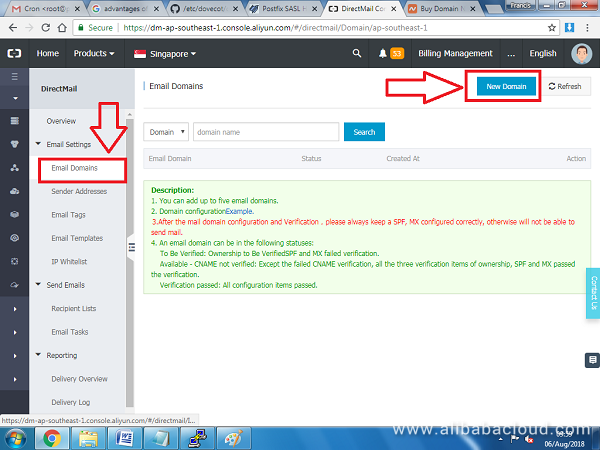
On the next screen, we are going to add the domain associated with our server (e.g. www.example.com)
On the left pane, click Email Domains and then New Domain on the right side:
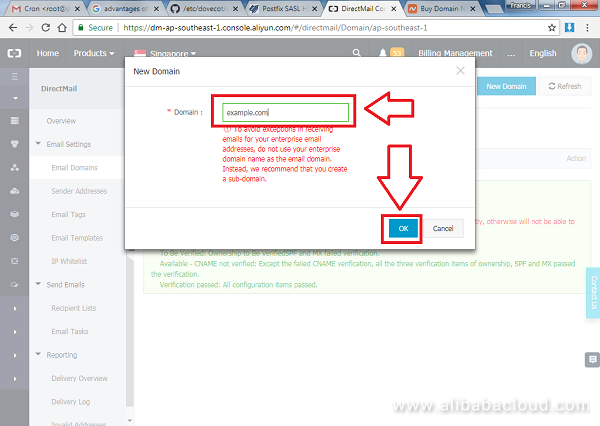
Enter the new domain name and press OK.
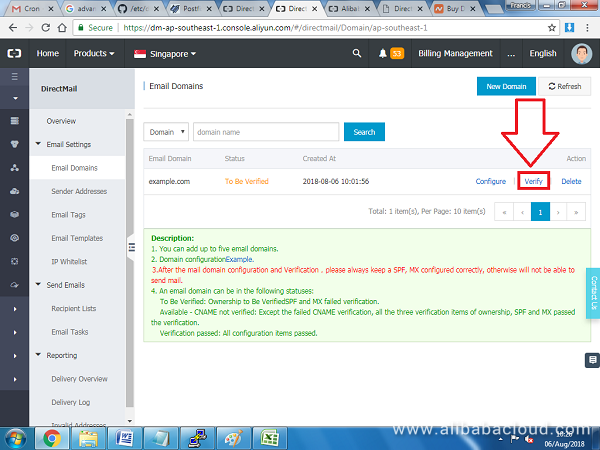
Your domain should be added on the list pending verification, click on Configure next to the domain name.
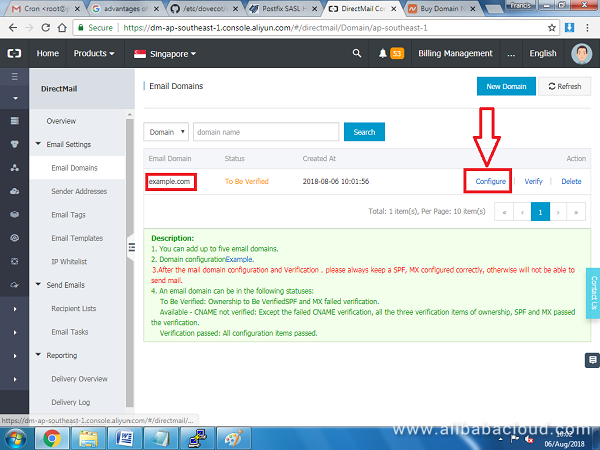
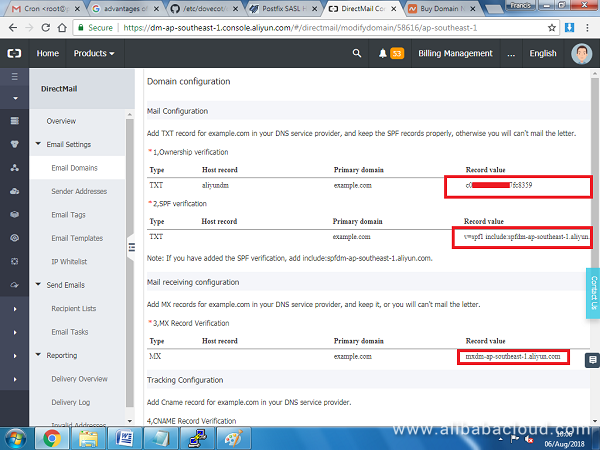
On the next screen, you will see different DNS records that need to be added on your domain. You will need to add two TXT records, one MX record, and one CNAME record to verify the domain is yours.
Step 10: Configuring DNS records
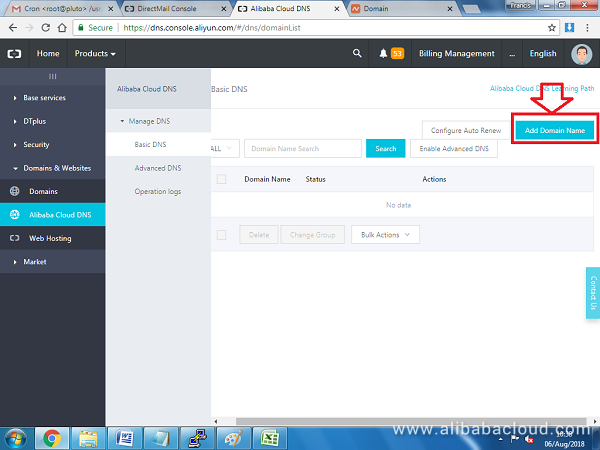
Next, we will use Alibaba Cloud DNS to configure the records. Navigate to: https://dns.console.aliyun.com/#/dns/domainList.
Click on Add Domain Name if your domain is not already in the list.
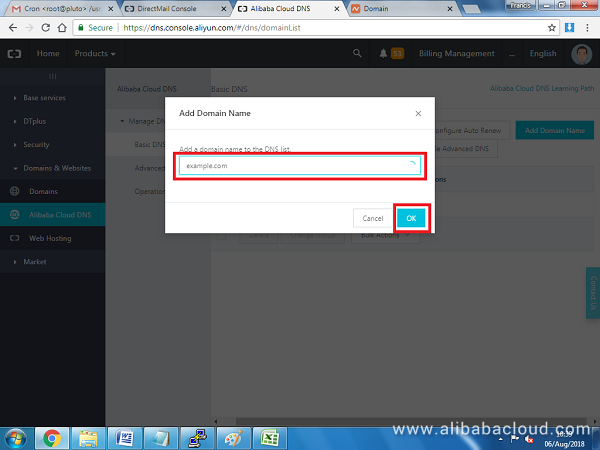
Add your domain in the popup box that appears and hit OK:
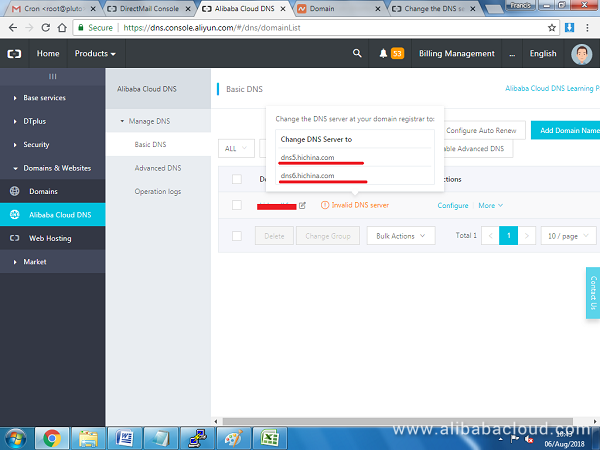
Next, point your domain name servers to Alibaba Cloud. To get the name server addresses, hover over the status that reads (Invalid DNS server) of the domain and copy paste the DNS servers values that popup, e.g. dns5.hichina.com and dns6.hichina.com:
Then, while still on the domain list, click the Configure button next to the domain and add the following DNS records. The TXT, CNAME, and MX records should exactly match the values generated from Alibaba DirectMail when you added the domain there:
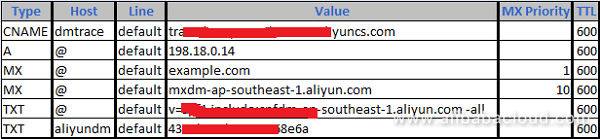
Please note an A record should point to the Public IP address associated with your ECS instance.
Also, you should have two MX records. The first MX record should point to your primary domain name of your server in order for emails to be delivered and it should have a priority of 1.
The second MX records should point to Alibaba SMTP server (e.g. mxdm-ap-southeast-1.aliyun.com) and should have a priority of 10 because it is used for verification purposes only.
Step 11: Verifying Domain and Creating Email Accounts
Once you have setup the DNS on your domain, you can now go back to Alibaba DirectMail to finalize the domain verification process and add an email account.
So, navigate back to Alibaba DirectMail console on the list of domains, click Verify next to the domain that you added previously:
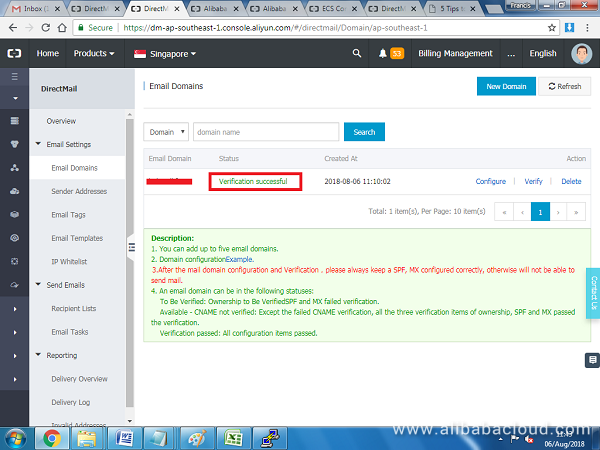
If you followed the DNS setup section, your domain should be verified without any problems.
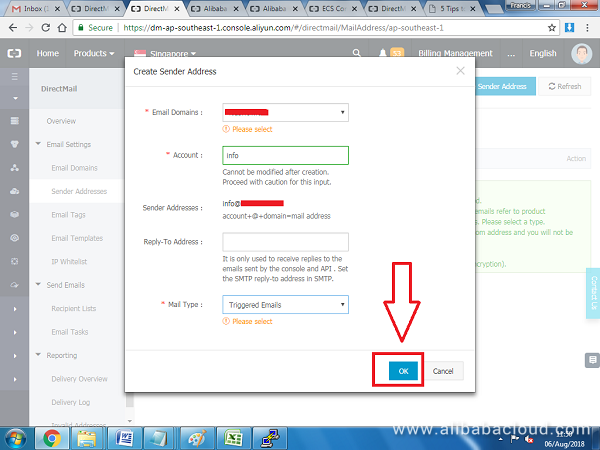
Next, click Sender Addresses on the left pane and click on Create Sender Address:
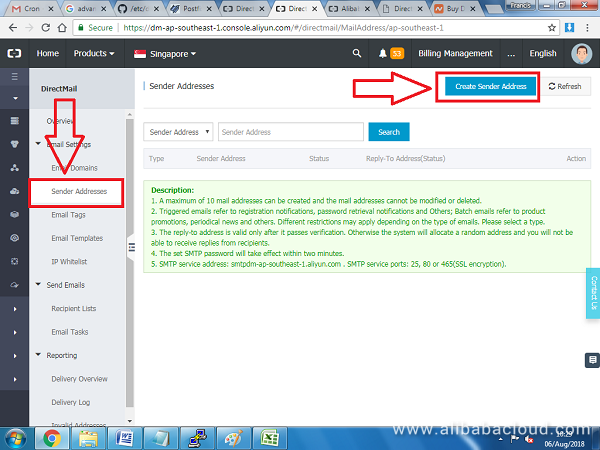
On the popup window that appears, select the domain name that you previously added from a list box, then enter a username for your email address without the domain part, e.g. 'info'. On the mail type select Triggered Email. Click OK to proceed.
Once the username has been created, click Set SMTP password:
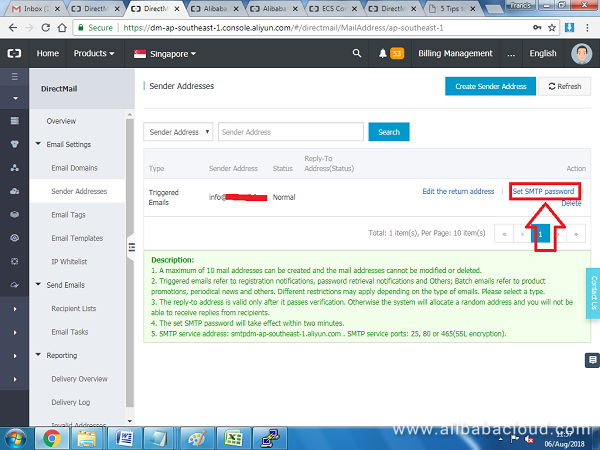
Enter the password that you created when setting up Dovecot users.
Step 12: Installing SquirrelMail on Ubuntu 16.04 ECS
Next we can configure SquirrelMail client. The application is a good candidate for sending and receiving emails via SMTP and IMAP protocol and can run on any browser.
To install the software, run the command below:
$ sudo apt-get install squirrelmailPress Y and hit Enter when prompted to confirm the installation.
Next, we are going to add the SquirrelMail path to the Apache's default virtual host file that has Let's Encrypt SSL certificate enabled.
$ sudo nano /etc/apache2/sites-enabled/000-default-le-ssl.confAdd Alias /mail /usr/share/squirrelmail after ServerName:
<VirtualHost *:443>

...

ServerName example.com
Alias /mail /usr/share/squirrelmail

...

</VirtualHost>
This will allow us to access SquirrelMail email client via the web address below:
www.example.com/mailSquirrelMail settings do not work by default; we need to make some changes by editing its configuration file etc/squirrelmail/config.php:
$ sudo nano /etc/squirrelmail/config.phpFind the lines below and edit the values on the right hand side as shown:
$domain = 'example.com';
$imapServerAddress = 'example.com';
$imapPort=993;
$smtpPort=465;
$smtp_auth_mech='login';
$use_imap_tls='true';
$use_smpt_tls='true';
Also change the smtpServerAddress from localhost to the correct server name. You can check the correct value on Alibaba Website depending on the data center of your DirectMail.
- SMTP service address (China East 1): smtpdm.aliyun.com
- SMTP service address (Singapore): smtpdm-ap-southeast-1.aliyun.com
- SMTP service address (Sydney): smtpdm-ap-southeast-2.aliyun.com
- SMTP port: 80(Non SSL) and 465 (SSL encrypted).
For instance, if you DirectMail service is from Singapore, use the value below:
$smtpServerAddress = 'smtpdm-ap-southeast-1.aliyun.com ';Save the file etc/squirrelmail/config.php by pressing CTRL+X, Yand Enter.
Restart the Apache web server:
$ sudo service apache2 restartRestart Postfix:
$ sudo service postfix restartStep 13: Testing Email Configuration
We now have all the software and services required for sending and receiving emails on our server. From this point forward, we can visit the address:
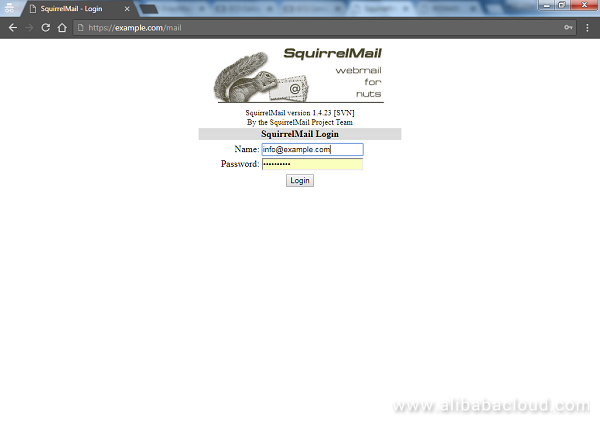
https://example.com/mail
If the setup was completed without any problem, you should see the below SquirrelMail login page. Just enter the username that you created and the password to login
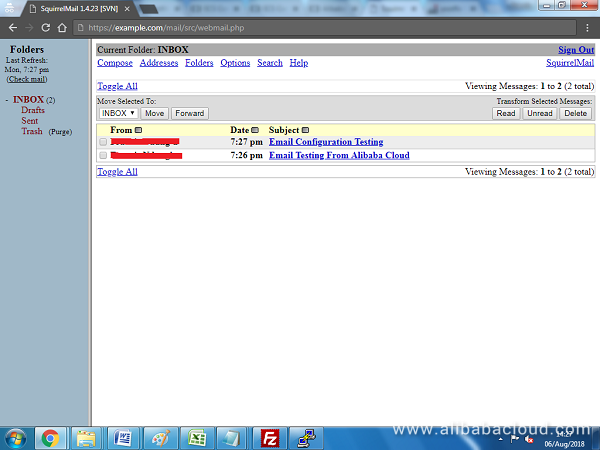
Once you are in the SquirrelMail dashboard, you can send and receive emails. Congratulations! Your email server is now working as expected.
Conclusion
In this guide, we have taken you through the steps of configuring an email server with Postfix, Dovecot, Alibaba Cloud DirectMail, and SquirrelMail on an Ubuntu 16.04 Elastic Compute Service (ECS) instance. Remember, you are not limited to just one single email account. You can add as many email users and domains as you want.
Also, the setup can work with any email client that supports IMAP/POP and SMTP protocols including Outlook and Thunderbird.
By Francis Ndungu, Alibaba Cloud Tech Share Author. Tech Share is Alibaba Cloud's incentive program to encourage the sharing of technical knowledge and best practices within the cloud community.
Published at DZone with permission of Francis Ndungu. See the original article here.
Opinions expressed by DZone contributors are their own.
Comments