How to Setup RAID10 on Dell Servers
Understanding different types of storage configurations is important and today we will discuss how we can achieve redundancy and performance by using RAID arrays.
Join the DZone community and get the full member experience.
Join For FreeWhen it comes to IT Infrastructure, there are several components that play a vital role in a successful deployment, storage is one such component and it plays a crucial role in keeping the data safe and secure. Understanding different types of storage configurations is important and today we will discuss how we can achieve redundancy and performance by using RAID arrays. RAID stands for Redundant Array of Inexpensive/Independent Disks and RAID supports various types of configuration and in this article, we will focus on hardware RAID10 setup on DELL servers and if you are new to RAID and would like to learn more about it please go through this information.
Step 1
Boot the server and wait until you see the option to enter into RAID configuration <Ctrl + R> and once you enter into the configuration menu navigate through VD mgmt and PD mgmt screens and look for the available physical disks on the server. 
Step 2
On the VD mgmt screen -> select "No Configuration Present !" and press F2 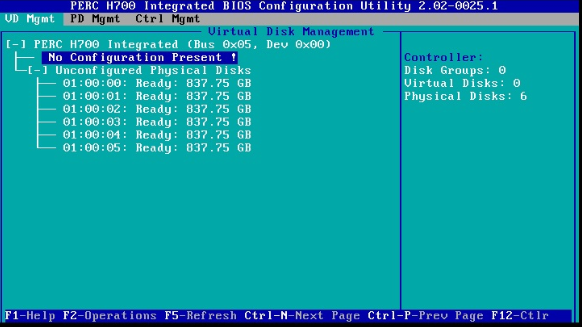
Step 3
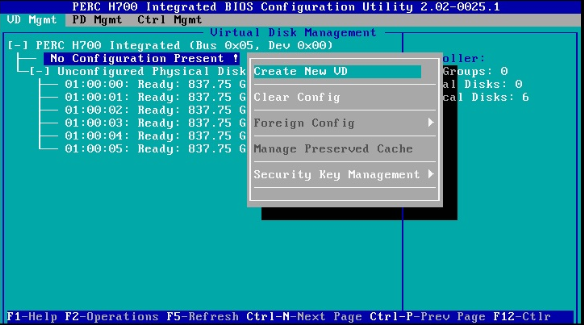
Select "create new VD"
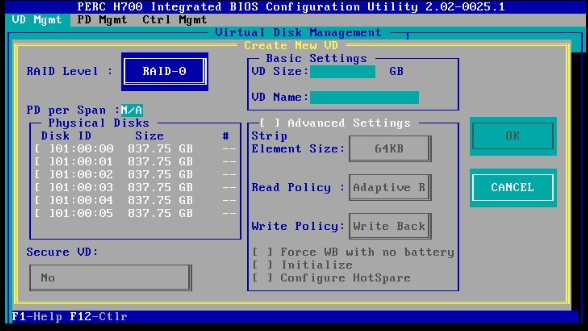
You'll be presented with the below screen:
Step 4
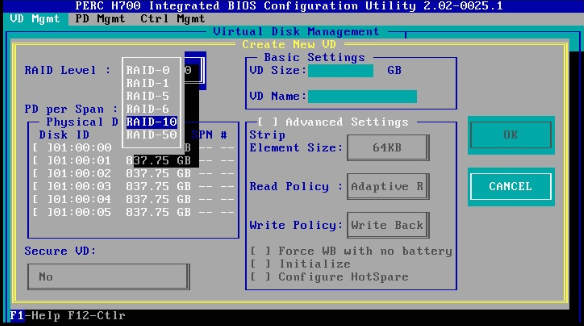
Select the required RAID level by clicking on the RAID level button (Press Enter to select RAID level options).
In this example, I am creating RAID10 which requires a minimum of 4 disks.
As I am creating it as a single volume, selecting all the available disks for RAID10
Step 5
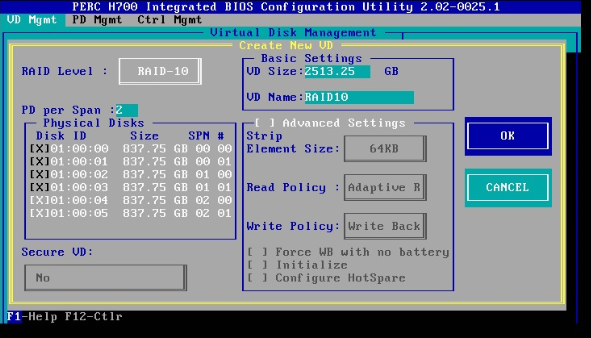
Select the required disks and for selecting the disks use the spacebar key.

Observe the usable space/VD size as per the RAID level after selecting the disks.
Step 6
Enter the VD name in VD name field. 
Step 7
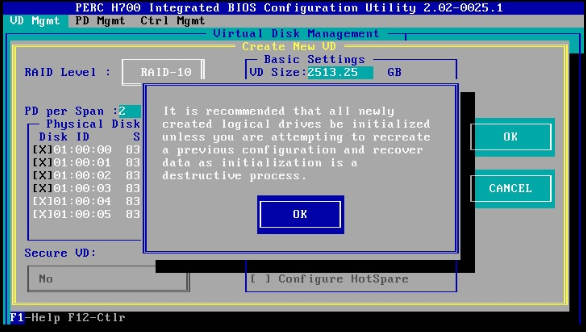
Click on OK button, and click OK if prompted for initializing the newly created logical drives.
That's all and you are done with the RAID setup, you can now reboot the host, and RAID configuration will persist across host reboots.
Once the system is back up, you can connect to the host using your terminal to configure the Filesystem. You can find the available disks by using fdisk -l command and that should list the available disks on your system, you can partition the drive using the same fdisk command and in this case, I set it up as an LVM partition by running the below commands in order.
fdisk /dev/sda
n # select n for creating a new partition

p # primary partition

Partition number (1-4): 1 # specify a partition number and press enter twice, by default the first and last cylinders of the available space will allocated to the new partition and at this point your partition is ready but before we exit the setup, we need to change the partition type

Command (m for help): t # t is selected to change to a partition’s system ID, in this case we change to '1' which is the one we just created.

Partition number (1-5): 1

Hex code (type L to list codes): 8e # Then hex code ’8e’ was entered as this is the code for a Linux LVM which is what we want this partition to be, Linux LVM allows us to expand the disk online without requiring a reboot.
Changed system type of partition 1 to 8e (Linux LVM)

‘w’ is used to write the table to disk and exit, basically all the changes that have been done will be saved and then you will be exited from fdisk.
Once the partition is created you can now format and mount using the commands below.
pvcreate /dev/sda1 # Creating phyiscal volume

vgcreate vg_raid10 /dev/sda1 # Creating Volume group

lvcreate -l 100%FREE -n lv_raid10 vg_raid10 # To allocate 100% of the available space to the lvm

mkfs.xfs /dev/vg_raid10/lv_raid10 # Create XFS file system on lvm parition

#Create a directory under root and mount using mount command or update /etc/fstab for permanent mounting

mkdir /data-raid10

mount /dev/vg_raid10/lv_raid10 /data-raid10


# Edit /etc/fstab and insert the below line:

/dev/vg_raid10/lv_raid10 /data-raid10 xfs defaults 0 2Opinions expressed by DZone contributors are their own.
Comments