Step-by-Step Guide to Use Anypoint MQ: Part 1
Learn how to create an Anypoint MQ queue and a client application. We’ll also get a demo of how to use the publish and consume operations of Anypoint MQ.
Join the DZone community and get the full member experience.
Join For FreeThis blog is the first part of the series, “Step-by-Step Guide to Use Anypoint MQ.” Part 1 will provide an understanding of what Anypoint MQ is, why it is used, and how we can create queues using Anypoint MQ to use in the Mule API. We will see how to create an Anypoint MQ queue and a client application. We’ll also get a demo of how to use the publish and consume operations of Anypoint MQ.
What Is a Queue & Why Do We Need One?
A queue is a temporary storage area used for inter-app communication — in simple words, to transfer the message from one API/service to another. If we consider an example of API-led connectivity in Mulesoft, we may require a mechanism to send messages from our exp API to the process API so a queue can be used. The exp API will send the message to the queue and the process API will consume the same message from the queue. This is just a simple example; there are many such use cases where queues can be used.
What Is Anypoint MQ?
Anypoint MQ:
- Is a cloud messaging service that performs asynchronous messaging scenarios between applications such as queuing and pub/sub.
- Is managed easily using Anypoint Platform.
- Supports large payloads, encryption, queuing, and publish/subscribe (pub/sub)paradigms.
- Enables easy connection to non-Mule applications using the REST API.
- Provides dead-letter queue (DLQ) for undeliverable messages.
- Displays usage statistics on the number of messages and API requests.
Note: Anypoint MQ is not included in the trial account. We require a separate Enterprise subscription to use Anypoint MQ.
Anypoint MQ is only available for the Cloudhub-hosted application; it is not available for the APIs hosted on on-premise server.
Operations
The Anypoint MQ connector provides five operations:
- Publish to publish the message to the Queue.
- Subscriber to subscribe to the queue and listen for the receiving message.
- Consumer to consume a message from the queue.
- Ack to send an acknowledgement to the queue about the successful consumption of the message and delete the message from in-flight status.
- Nack to send negative acknowledgement to the queue stating the consumed message is not processed successfully; changes the status of the message from in-flight to in-queue to be consumed again by an available consumer.
Note: Anypoint MQ is not included in the trial account. A separate Enterprise subscription is required to use Anypoint MQ.
How to Start With Anypoint MQ
1. Queue and Client App Creation
First of all, we should have the license to use Anypoint MQ available in the CloudHub platform. Once we have the license, we need to login to the Anypoint Platform where we can see MQ as an option. Click on MQ.

After clicking on MQ, we will get the below screen:

To create a queue, we need to select a region. It is good to select a region that is geographically close, or we can select any region.
Note: We can’t move the queue from one region to another.
In the above image, we can see the region is selected as Asia Pacific (Singapore) and the URL for that is written next to it. This URL is important and it is different for each region and we require it for Anypoint MQ Connector configuration in Anypoint Studio.
If we click the + icon visible in the above image, we can see option to create queue/exchanges.
It will provide you three options to choose from:
- Queue: The queue is a storage area where messages are stored for processing.
- FIFO (first in, first out): FIFO is also a normal queue where messages are stored. The FIFO queue needs to be used when ordering, whereas in the queue, ordering is not maintained.
- Exchange: The exchange is used for broadcasting a messages, like one message to multiple consumers. If any message is send to the exchange, it will be forwarded to all the the queues associated with the exchange.
We can select Queue, Exchange, or FIFO Queue based on requirements.
Let’s create a sample queue:

Once we click Queue, a Create Queue window will popup where we need to fill the details:

Here, TTL means time to live. It defines how long the message is in the queue before Anypoint MQ expires the message and removes it from the queue.
Default Acknowledgement Timeout is how long a message remains unacknowledged before being returned to the queue.
Once we fill the details and click Create Queue, the queue gets created.
We can see the newly created queue with the name test-queue. If you click on the queue, you can see a dashboard on the RHS that shows a graphical view of the messages of the queue and queue details.

Our Queue is successfully is created. To access the queue, we need to create client apps, which will provide us with a unique client ID and password to use this newly created queue.
Click on Client Apps then click on the + icon on the tight:

A pop-up will open where we need to give the name of our app and then click Save Changes.

After providing the client app name when we click Save Changes, we will get a client app ID and client secret for this client app as shown in below image.
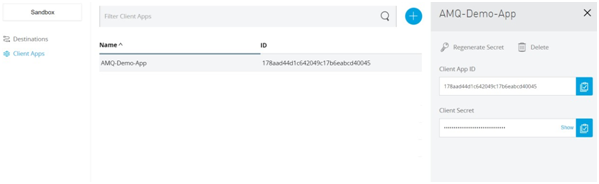
Now, we will use these details in Anypoint Studio and see how this MQ can be used in the flow.
2. Publish and Subscribe Operation
We need to open Anypoint Studio and add Anypoint MQ Connector from the exchange, as it is not present in the Mule palette by default.

Once the connector is added in the palette, we start designing our sample API. We will create a simple flow for publishing the message to the queue.

We will create the API as shown below:

Here, we are getting a message from the client through the HTTP listener. Then, we log that message in the logger and publish it to Anypoint MQ. Finally, in the logger, we are displaying a success message stating that the message is published successfully.
We drag and drop the publish Anypoint MQ component from the palette to the canvas and do the config as below.
We can see that the URL is the URL of the region in which the Queue is created and copy the client app ID and client secret from before.

After filling the details, we can try to for test connection. If everything is okay, we will get a success message.

This means we are set to go ahead. In the publish Anypoint MQ Connector, give the name of the queue in which we want to publish the message.
Note: The queue name we provide in the Destination field must be present.

Now, we will try to run our API and publish the message to our queue.
In our studio, we will see the logs as below. The text message received is { “Input” : ”This is a sample Message” } is printed by the logger after receiving the message from the HTTP listener and “Message Published” is printed after the publish operation:
xxxxxxxxxx
**************************************************************************************************************************
INFO 2020-12-14 15:20:06,691 [[MuleRuntime].uber.09: [anypointmq-demo].anypointmq-demoFlow.CPU_LITE ] [processor: anypointmq-demoFlow/processors/0; event: bf0dfdf1-3df1-11eb-b964-568d5a57601b] org.mule.runtime.core.internal.processor.LoggerMessageProcessor: message received is {
"Input" : "This is a sample Message"
}
INFO 2020-12-14 15:20:07,340 [[MuleRuntime].uber.05: [anypointmq-demo].anypointmq-demoFlow.CPU_LITE ] [processor: anypointmq-demoFlow/processors/2; event: bf0dfdf1-3df1-11eb-b964-568d5a57601b] org.mule.runtime.core.internal.processor.LoggerMessageProcessor: "Message Published"
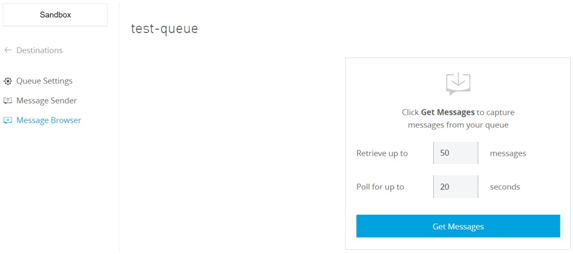
Go to the Anypoint Platform MQ and select our queue (test-queue):

Select Message Browser and click the Get Message button shown below to see the message available in the queue for processing:
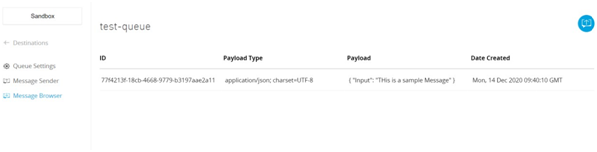
We can see the same message in the queue.
How to Use/Read This Published Message From the Queue
For this, we have Subscriber source in the Anypoint MQ connector that enables the app to listen for new messages and consume them as they arrive at the destination.
By default, the Subscriber source works in continuous listening mode.
In our Studio, we create a flow for getting the message from our queue. Here, we are using the same Anypoint MQ connector Configuration we did for the publish operation, and in the queue tab of the subscriber, we give the name of the queue from which we want to get the messages (in our case, test-queue).

Now, we will run our API and see if wel get the message from the queue. When the API runs, we can see the below logs in the Studio console, which shows that the flow anypointmq-demo- subscribeFlow is triggered and the logger prints the message received from the queue.
xxxxxxxxxx
*************************************************************************************************
INFO 2020-12-14 15:52:32,453 [[MuleRuntime].uber.04: [anypointmq-demo].anypointmq-demo-SubscribeFlow.CPU_LITE ] [processor: anypointmq-demo-SubscribeFlow/processors/0; event: 46d38ad1-3df6-11eb-b964-568d5a57601b] org.mule.runtime.core.internal.processor.LoggerMessageProcessor: "Message received from Queue is " {
"Input" : "This is a sample Message"
}
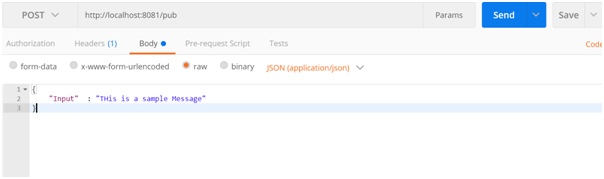
We got the message! Now, let’s try to publish one more message. We will send the message from Postman.
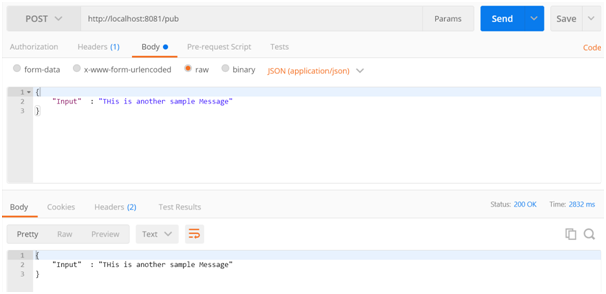
We can see the success response in Postman, which means that the message sent successfully. Now, let’s have a look on the logs. We can see that first, the anypointmq-demoFlow triggered, and it publishes the message to the queue.Just after publishing, the same message is being consumed by anypointmq-demo-SubscribeFlow.
xxxxxxxxxx
INFO 2020-12-14 16:01:59,337 [[MuleRuntime].uber.04: [anypointmq-demo].anypointmq-demoFlow.CPU_LITE ] [processor: anypointmq-demoFlow/processors/0; event: 98b86590-3df7-11eb-b964-568d5a57601b] org.mule.runtime.core.internal.processor.LoggerMessageProcessor: message received is {
"Input" : "This is another sample Message"
}
INFO 2020-12-14 16:02:01,664 [[MuleRuntime].uber.04: [anypointmq-demo].anypointmq-demo-SubscribeFlow.CPU_LITE ] [processor: anypointmq-demo-SubscribeFlow/processors/0; event: 9a1b7800-3df7-11eb-b964-568d5a57601b] org.mule.runtime.core.internal.processor.LoggerMessageProcessor: "Message received from Queue is " {
"Input" : "This is another sample Message"
}
INFO 2020-12-14 16:02:01,684 [[MuleRuntime].uber.12: [anypointmq-demo].anypointmq-demoFlow.CPU_LITE ] [processor: anypointmq-demoFlow/processors/2; event: 98b86590-3df7-11eb-b964-568d5a57601b] org.mule.runtime.core.internal.processor.LoggerMessageProcessor: "Message Published"
We can directly publish/insert the message into the Anypoint MQ queue from th Console. For this, on Anypoint Platform, we can go to MQ, select the queue for which we want to insert the message, and select the option Message Sender.
We need to select the message type from dropdown (text/CSV/JSON), insert the message we want to sent in Payload section, and click Send to publish this data to queue.
 We can check the same message in the message browser.

As soon as our application runs, this message will be picked up by the Subscriber:
xxxxxxxxxx
INFO 2020-12-14 18:23:36,079 [[MuleRuntime].uber.05: [anypointmq-demo].anypointmq-demo-SubscribeFlow.CPU_LITE ] [processor: anypointmq-demo-SubscribeFlow/processors/0; event: 61093d90-3e0b-11eb-b7ee-568d5a57601b] org.mule.runtime.core.internal.processor.LoggerMessageProcessor: 'Message received from Queue is ' { "Input" : "This message is sent from Queue" }
We can see that the message gets published and immediately the same message is picked up by the Anypoint MQ Subscriber.
In this way, we can create a queue, client app and use Anypoint MQ for implementing simple pub-sub mechanism in Mule API.
Opinions expressed by DZone contributors are their own.
Comments