How To Use Constraint Layout in Xamarin.Android
An easy way to structure your pages for Android development.
Join the DZone community and get the full member experience.
Join For Free
What Is Constraint Layout?
Constraint helps to reduce the hierarchy of Views and increase the layout performance and flexibility of Views. It helps to design based on positing, size, dimension, and alignment of different Views. Constraint Layout has different attributes to set Views in the layout. You can set the View of any position of the layout easily, rather than that in Relative Layout. It supports Android and iOS platforms. Constraint layout comes under ViewGroup.
Advantages of Constraint Layout
- Flat View Hierarchy and no nested view.
- Better performance and high responsiveness.
- Align position, size, and alignment of the screen.
- Support Android (API 9) and iOS.
Some Important Constraint Layout Properties and Attributes
These attributes take only id or parent. Align view from any side of the target view.,
- layout_constraintLeft_toLeftOf - align left of the desired view is left of the target view.
- layout_constraintLeft_toRightOf - align left of the desired view is right of the target view.
- layout_constraintRight_toLeftOf - align-right of the desired view is left of the target view.
- layout_constraintRight_toRightOf - align-right of the desired view is right of the target view.
- layout_constraintTop_toTopOf - align the top of the desired view is top of the target view.
- layout_constraintTop_toBottomOf - align the top of the desired view is the bottom of the target view.
- layout_constraintBottom_toTopOf - align the bottom of the desired view is top of the target view.
- layout_constraintBottom_toBottomOf - align the bottom of the desired view is the bottom of the target view.
- layout_constraintBaseline_toBaselineOf - align the baseline of the desired view is the baseline of the target view.
- layout_constraintStart_toEndOf - align the start of the desired view is the end of the target view.
- layout_constraintStart_toStartOf - align the start of the desired view is the start of the target view.
- layout_constraintEnd_toStartOf - align the end of the desired view is the start of the target view.
- layout_constraintEnd_toEndOf - align the end of the desired view is the end of the target view.
Margin Attributes - These attributes take only positive values.
- layout_marginStart - Margin from start side of the desired view.
- layout_marginEnd - Margin from the end side of the desired view.
- layout_marginLeft - Margin from the left side of the desired view.
- layout_marginTop - Margin from the top side of the desired view.
- layout_marginRight - Margin from the right side of the desired view.
- layout_marginBottom - Margin from the bottom side of the desired view.
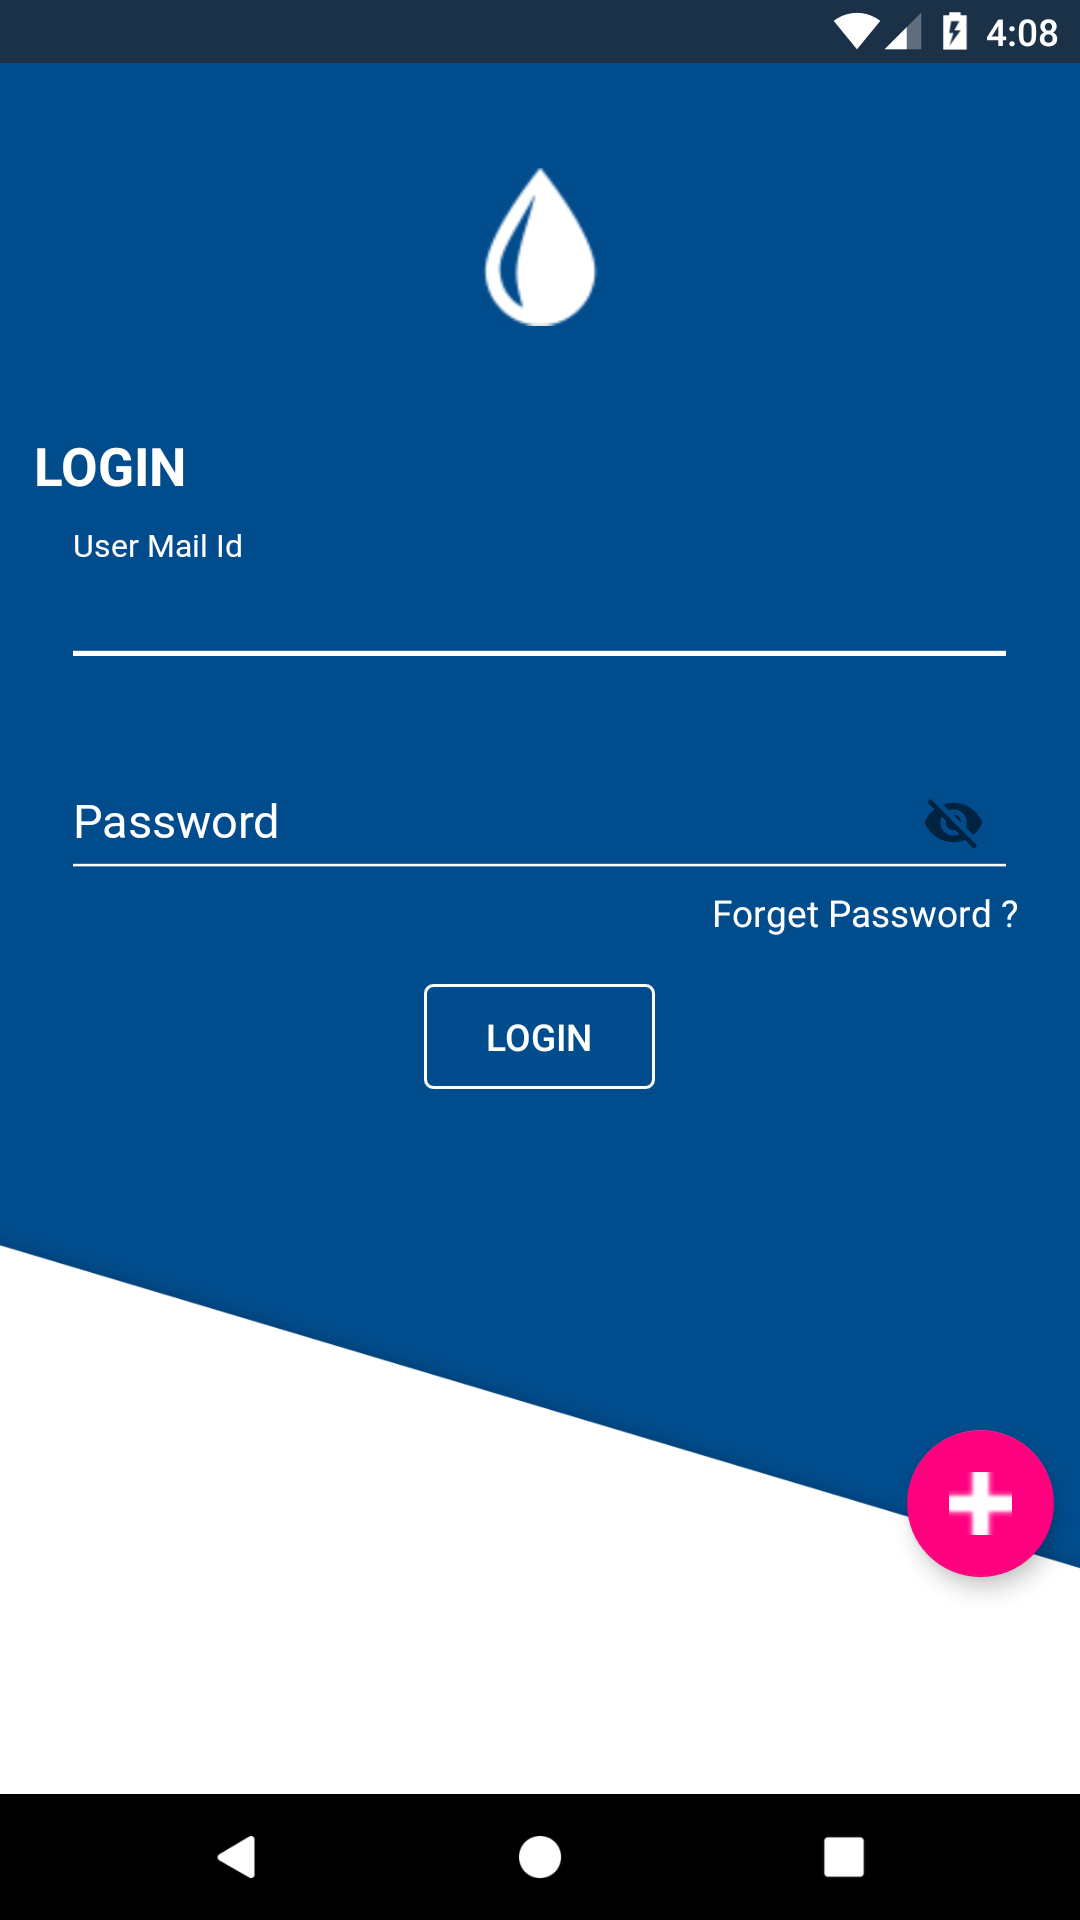
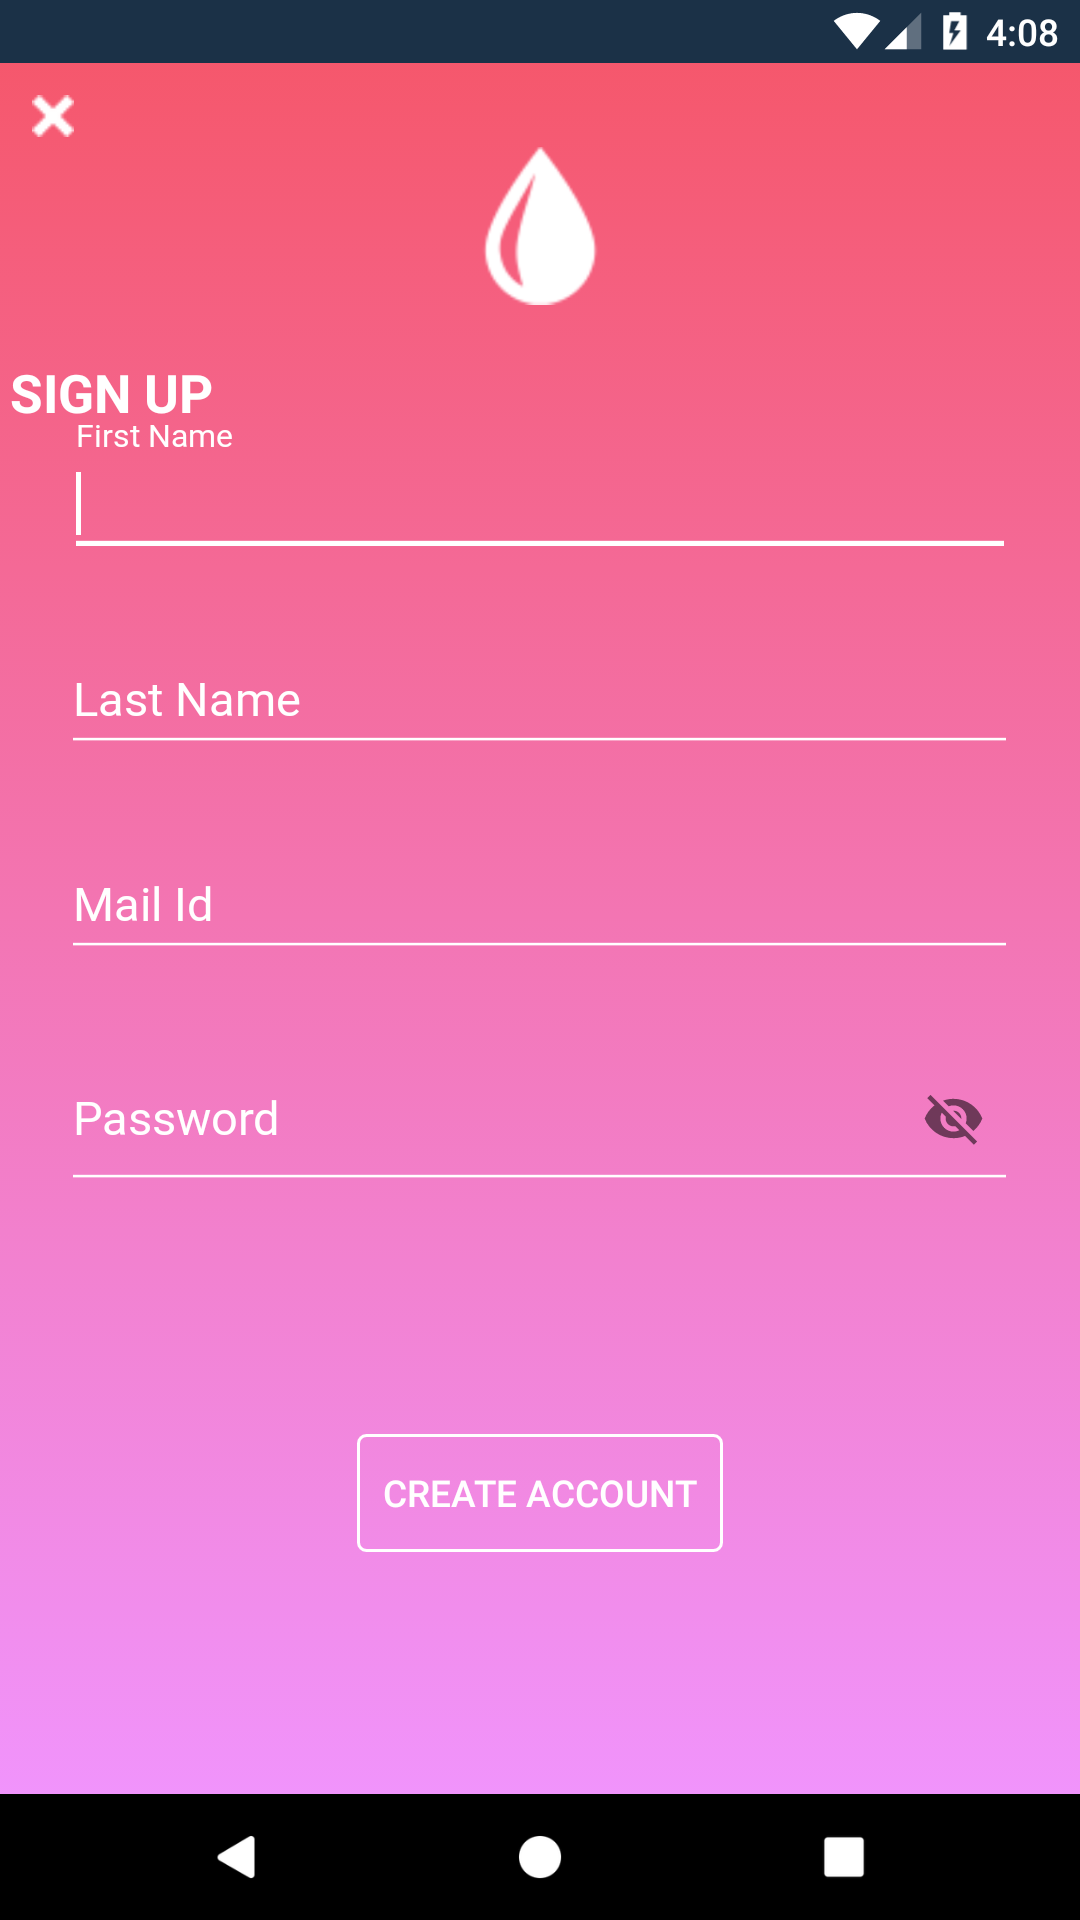
Let's see how to use Constraint Layout to design or align views in Xamarin.Android.
Android output


There is no default package for constraint layout in Xamarin.Android. So, we need to install a plugin for this.

Follow these steps to archive the above view using Constraint Layout.
Let’s start.
Step 1 — Create a New Project
You can create a Xamarin Android app by going to File >> New >> Android under select App. In the General section, select Android App. Then, click Next.
In the new window, enter and select your application name, theme, and compatibility. Then, click Create project.

Step 2 — Add Constraint Layout Plugin
After project creation add the following NuGet package to your project
- Xamarin.Android.Support.Constraint.Layout
- Material Design.
For that, right-click packages and select Add packages. A new dialog will appear. At the right-top corner, search for “Xamarin.Android.Support.Constraint.Layout” and click the Add Packages button.
Step 3 — Design Instruction
Now, design the Signup page. For that, go to Solution Explorer >> Resource >> layout >> double click to open content_main.xml. First, we need to set the root of the layout as a Constraint layout and declare the app namespace.
<android.support.constraint.ConstraintLayout
        xmlns:android="http://schemas.android.com/apk/res/android"
        xmlns:app="http://schemas.android.com/apk/res-auto"
        xmlns:tools="http://schemas.android.com/tools"
        android:id="@+id/container"
        android:background="@drawable/gradientcolor_rose"
        android:layout_width="match_parent"
        android:layout_height="match_parent"
        android:paddingBottom="@dimen/activity_vertical_margin"
        android:paddingLeft="@dimen/activity_horizontal_margin"
        android:paddingRight="@dimen/activity_horizontal_margin"
        android:paddingTop="@dimen/activity_vertical_margin"
        android:hapticFeedbackEnabled="false">
</android.support.constraint.ConstraintLayout >
Now, start your design. Set the image button in the left top corner of the page. The Constraint attribute below is used to set the image button based on parent view.
app:layout_constraintLeft_toLeftOf = “parent”
app:layout_constraintTop_toTopOf = “parent”
Logo Image
This view is set by the right of the image button and center of the parent. The top, end, and start attribute of the image is set based on the parent view and another attribute is set based on another view id.
app:layout_constraintTop_toTopOf="parent"
app:layout_constraintStart_toEndOf="@+id/imageView2"
app:layout_constraintStart_toStartOf="parent"
app:layout_constraintEnd_toEndOf="parent"
Text View
This view is set below the image and to the left side of the parent. The below constraint attributes are used to set the text in the correct position. The first left attribute is set based on the parent but other attributes are set by different id.
app:layout_constraintLeft_toLeftOf="parent"
app:layout_constraintTop_toBottomOf="@+id/imageView"
app:layout_constraintBottom_toTopOf="@+id/txtFirstName"
You can also set other child views using different attributes.
Step 4 — Login Page Design
Now, let us design the Login Page. For that, go to Solution Explorer >> Resource >> layout. Then, double-click to open login_activity.xml. The code is given below:
<?xml version="1.0" encoding="utf-8"?>
<android.support.constraint.ConstraintLayout
    xmlns:android="http://schemas.android.com/apk/res/android"
    xmlns:app="http://schemas.android.com/apk/res-auto"
    xmlns:tools="http://schemas.android.com/tools"
    android:id="@+id/container"
    android:layout_width="match_parent"
    android:layout_height="match_parent"
    android:background="@drawable/BackgroundImagegradient"
    android:paddingBottom="@dimen/activity_vertical_margin"
    android:paddingLeft="@dimen/activity_horizontal_margin"
    android:paddingRight="@dimen/activity_horizontal_margin"
    android:paddingTop="@dimen/activity_vertical_margin"
    android:hapticFeedbackEnabled="false">
    <ImageView
        android:layout_width="60dp"
        android:layout_height="120dp"
        app:srcCompat="@drawable/water64"
        android:id="@+id/imageView"
        android:layout_marginBottom="8dp"
        app:layout_constraintEnd_toEndOf="parent"
        android:layout_marginEnd="8dp"
        android:layout_marginRight="8dp"
        app:layout_constraintStart_toStartOf="parent"
        android:layout_marginLeft="8dp"
        android:layout_marginStart="8dp"
        android:layout_marginTop="8dp"
        app:layout_constraintTop_toTopOf="parent"/>
    <TextView
        android:text="LOGIN"
        android:id="@+id/txtlogin"
        android:textColor="@color/colorWhite"
        android:layout_width="108dp"
        android:layout_height="47dp"
        app:layout_constraintTop_toBottomOf="@id/imageView"
        android:layout_marginEnd="8dp"
        android:layout_marginRight="8dp"
        app:layout_constraintStart_toStartOf="parent"
        android:layout_marginLeft="8dp"
        android:layout_marginStart="8dp"
        android:layout_marginBottom="8dp"
        android:textSize="20dp"
        android:gravity="center_vertical"
        android:textStyle="bold"
        android:paddingLeft="3dp"/>
    <android.support.design.widget.TextInputLayout
        android:id="@+id/etPasswordLayout1"
        android:layout_width="363dp"
        android:layout_height="70dp"
        android:layout_marginBottom="8dp"
        app:layout_constraintTop_toBottomOf="@id/txtlogin"
        app:layout_constraintStart_toStartOf="parent"
        android:layout_marginLeft="8dp"
        android:layout_marginStart="8dp"
        app:layout_constraintEnd_toEndOf="parent"
        android:layout_marginEnd="8dp"
        android:layout_marginRight="8dp">
        <android.support.design.widget.TextInputEditText
            android:id="@+id/etPassword1"
            android:layout_width="match_parent"
            android:layout_height="wrap_content"
            android:textColor="@color/colorWhite"
            android:hint="User Mail Id"
            android:inputType="textEmailAddress"/>
    </android.support.design.widget.TextInputLayout>
    <android.support.design.widget.TextInputLayout
        android:id="@+id/etPasswordLayout"
        android:layout_width="363dp"
        android:layout_height="wrap_content"
        app:passwordToggleEnabled="true"
        android:layout_marginTop="8dp"
        app:layout_constraintTop_toBottomOf="@id/etPasswordLayout1"
        android:layout_marginBottom="8dp"
        app:layout_constraintStart_toStartOf="parent"
        android:layout_marginLeft="8dp"
        android:layout_marginStart="8dp"
        app:layout_constraintEnd_toEndOf="parent"
        android:layout_marginEnd="8dp"
        android:layout_marginRight="8dp">
        <android.support.design.widget.TextInputEditText
            android:id="@+id/etPassword"
            android:layout_width="match_parent"
            android:layout_height="wrap_content"
            android:textColor="@color/colorWhite"
            android:hint="Password"
            android:inputType="textPassword"/>
    </android.support.design.widget.TextInputLayout>
    <TextView
        android:text="Forget Password ?    "
        android:layout_width="wrap_content"
        android:textColor="@color/colorWhite"
        android:layout_height="29dp"
        android:id="@+id/textView2"
        android:layout_marginBottom="8dp"
        app:layout_constraintTop_toBottomOf="@+id/etPasswordLayout"
        app:layout_constraintEnd_toEndOf="parent"
        app:layout_constraintRight_toRightOf="parent"
        android:layout_marginEnd="8dp"
        android:layout_marginRight="20dp"
        android:layout_marginLeft="8dp"
        android:layout_marginStart="8dp"/>
    <Button
        android:text="LOGIN"
        android:layout_width="wrap_content"
        android:layout_height="40dp"
        android:id="@+id/button"
        android:textColor="@color/colorWhite"
        android:background="@drawable/border_button"
        app:layout_constraintEnd_toEndOf="parent"
        android:layout_marginEnd="8dp"
        android:layout_marginRight="8dp"
        app:layout_constraintStart_toStartOf="parent"
        android:layout_marginLeft="8dp"
        android:layout_marginStart="8dp"
        android:layout_marginTop="8dp"
        app:layout_constraintTop_toBottomOf="@+id/textView2"
        android:layout_marginBottom="8dp"/>
    <android.support.design.widget.FloatingActionButton
        android:layout_width="wrap_content"
        android:layout_height="wrap_content"
        android:clickable="true"
        app:srcCompat="@drawable/plus16"
        android:id="@+id/floatingActionButton"
        android:layout_marginTop="178dp"
        app:backgroundTint="#FF007F"
        android:layout_marginBottom="8dp"
        app:layout_constraintTop_toBottomOf="@+id/textView2"
        app:layout_constraintEnd_toEndOf="parent"
        android:layout_marginEnd="8dp"
        android:layout_marginRight="35dp"
        android:layout_marginStart="8dp"
        android:layout_marginLeft="50dp"
        app:fabSize="normal"/>
</android.support.constraint.ConstraintLayout>
Step 5 — Signup Page Design
Now, we create a background color for the Signup page, named grandientcolor_rose.xml. Add a new XML page by right-clicking the drawable folder and selecting Add new File >> Left bar select Android >> next. Then, select XML file and enter the grandientcolor_rose.xml. Copy and paste the below code.
<?xml version="1.0" encoding="utf-8"?>
<android.support.constraint.ConstraintLayout
        xmlns:android="http://schemas.android.com/apk/res/android"
        xmlns:app="http://schemas.android.com/apk/res-auto"
        xmlns:tools="http://schemas.android.com/tools"
        android:id="@+id/container"
        android:background="@drawable/gradientcolor_rose"
        android:layout_width="match_parent"
        android:layout_height="match_parent"
        android:paddingBottom="@dimen/activity_vertical_margin"
        android:paddingLeft="@dimen/activity_horizontal_margin"
        android:paddingRight="@dimen/activity_horizontal_margin"
        android:paddingTop="@dimen/activity_vertical_margin"
        android:hapticFeedbackEnabled="false">
    <ImageButton
            android:layout_width="20dp"
            android:layout_height="20dp"
            android:background = "@null"
            android:src="@drawable/xmark16"
            android:id="@+id/imageView2"
            android:layout_marginTop="8dp"
            app:layout_constraintTop_toTopOf="parent"
            app:layout_constraintLeft_toLeftOf="parent"
            android:layout_marginEnd="8dp"
            android:layout_marginRight="8dp"
            app:layout_constraintStart_toStartOf="parent"
            android:layout_marginLeft="8dp"
            android:layout_marginStart="8dp"
            android:layout_marginBottom="8dp"/>
    <ImageView
            android:layout_width="60dp"
            android:layout_height="120dp"
            app:layout_constraintStart_toStartOf="parent"
            android:src="@drawable/water64"
            android:id="@+id/imageView"
            app:layout_constraintEnd_toEndOf="parent"
            android:layout_marginEnd="8dp"
            android:layout_marginRight="20dp"
            android:layout_marginLeft="8dp"
            android:layout_marginStart="8dp"
            app:layout_constraintTop_toTopOf="parent"
            app:layout_constraintStart_toEndOf="@+id/imageView2"/>
    <TextView
            android:text="SIGN UP"
            android:layout_width="108dp"
            android:layout_height="47dp"
            android:layout_marginTop="2dp"
            android:layout_marginBottom="8dp"
            android:textSize="20dp"
            android:textColor="@color/colorWhite"
            android:gravity="center_vertical"
            android:textStyle="bold"
            android:paddingLeft="2dp"
            app:layout_constraintLeft_toLeftOf="parent"
            app:layout_constraintTop_toBottomOf="@+id/imageView"
            app:layout_constraintBottom_toTopOf="@+id/txtFirstName"
            tools:layout_editor_absoluteX="24dp"
            android:id="@+id/textView"/>
    <android.support.design.widget.TextInputLayout
            android:id="@+id/txtFirstName"
            android:layout_width="361dp"
            android:layout_height="69dp"
            app:layout_constraintStart_toStartOf="parent"
            android:layout_marginLeft="8dp"
            android:layout_marginStart="8dp"
            app:layout_constraintEnd_toEndOf="parent"
            android:layout_marginEnd="8dp"
            android:layout_marginRight="8dp"
            app:layout_constraintBottom_toTopOf="@+id/txtLastName"
            android:layout_marginBottom="84dp"
            android:layout_marginTop="13dp"
            app:layout_constraintTop_toBottomOf="@+id/imageView">
        <android.support.design.widget.TextInputEditText
                android:id="@+id/etPassword132"
                android:layout_width="match_parent"
                android:layout_height="wrap_content"
                android:textColor="@color/colorWhite"
                android:hint="First Name"
                android:inputType="textEmailAddress"/>
    </android.support.design.widget.TextInputLayout>
    <android.support.design.widget.TextInputLayout
            android:id="@+id/txtLastName"
            android:layout_width="363dp"
            android:layout_height="70dp"
            app:layout_constraintStart_toStartOf="parent"
            app:layout_constraintEnd_toEndOf="parent"
            android:layout_marginLeft="8dp"
            android:layout_marginStart="8dp"
            android:layout_marginEnd="8dp"
            android:layout_marginRight="8dp"
            app:layout_constraintTop_toBottomOf="@id/txtFirstName"
            app:layout_constraintBottom_toTopOf="@+id/txtEmail">
        <android.support.design.widget.TextInputEditText
                android:id="@+id/txtLastName1"
                android:layout_width="match_parent"
                android:layout_height="wrap_content"
                android:textColor="@color/colorWhite"
                android:hint="Mail Id"
                android:inputType="text"/>
    </android.support.design.widget.TextInputLayout>
    <android.support.design.widget.TextInputLayout
            android:id="@+id/txtEmail"
            android:layout_width="363dp"
            android:layout_height="70dp"
            app:layout_constraintStart_toStartOf="parent"
            android:layout_marginLeft="8dp"
            android:layout_marginStart="8dp"
            app:layout_constraintEnd_toEndOf="parent"
            android:layout_marginEnd="8dp"
            android:layout_marginRight="8dp"
            android:layout_marginBottom="8dp"
            app:layout_constraintBottom_toTopOf="@+id/txtLastName"
            android:layout_marginTop="118dp"
            app:layout_constraintTop_toBottomOf="@+id/txtPassword">
        <android.support.design.widget.TextInputEditText
                android:id="@+id/txtEmail1"
                android:layout_width="match_parent"
                android:textColor="@color/colorWhite"
                android:layout_height="wrap_content"
                android:hint="Last Name"
                android:inputType="text"/>
    </android.support.design.widget.TextInputLayout>
    <android.support.design.widget.TextInputLayout
            android:id="@+id/etPasswordLayout"
            android:layout_width="363dp"
            android:layout_height="70dp"
            android:layout_marginLeft="0dp"
            android:layout_marginStart="0dp"
            app:passwordToggleEnabled="true"
            app:layout_constraintBottom_toTopOf="@+id/button"
            app:layout_constraintTop_toBottomOf="@id/txtEmail"
            android:layout_marginTop="-10dp"
            android:layout_marginRight="12dp"
            app:layout_constraintEnd_toEndOf="parent"
            app:layout_constraintStart_toStartOf="parent">
        <android.support.design.widget.TextInputEditText
                android:id="@+id/etPassword"
                android:layout_width="match_parent"
                android:layout_height="59dp"
                android:textColor="@color/colorWhite"
                android:hint="Password"
                android:inputType="textPassword"/>
    </android.support.design.widget.TextInputLayout>
    <Button
            android:text="CREATE ACCOUNT"
            android:layout_width="wrap_content"
            android:textColor="@color/colorWhite"
            android:background="@drawable/border_button"
            android:layout_height="45dp"
            android:id="@+id/button"
            app:layout_constraintTop_toBottomOf="@id/etPasswordLayout"
            android:layout_marginEnd="8dp"
            android:layout_marginRight="8dp"
            app:layout_constraintStart_toStartOf="parent"
            android:layout_marginLeft="8dp"
            android:layout_marginStart="8dp"
            android:layout_marginTop="8dp"
            android:layout_marginBottom="8dp"
            app:layout_constraintBottom_toBottomOf="parent"
            android:paddingLeft="10dp"
            android:paddingRight="10dp"
            app:layout_constraintEnd_toEndOf="parent"/>
</android.support.constraint.ConstraintLayout>
Step 6 - MainActivity.cs Code
Next, open MainActivity.cs (Login Activity) and add the following code to validate the user input. When you click login, it will validate and check the user is available or not. If credentials are correct, it goes to the main page. If you want to sign up click a floating button.
using System;
using Android.App;
using Android.OS;
using Android.Runtime;
using Android.Support.Design.Widget;
using Android.Support.V7.App;
using Android.Views;
using Android.Widget;
using SignLoginScreen.Resources.activitys;

namespace SignLoginScreen
{
    [Activity(Label = "@string/app_name", Theme = "@style/AppTheme.NoActionBar", MainLauncher = true)]
    public class MainActivity : AppCompatActivity
    {

        protected override void OnCreate(Bundle savedInstanceState)
        {
            base.OnCreate(savedInstanceState);
            Xamarin.Essentials.Platform.Init(this, savedInstanceState);
            SetContentView(Resource.Layout.activity_login
                );
            var clickLogin = FindViewById<Button>(Resource.Id.button);
            var userMail = FindViewById<EditText>(Resource.Id.etPassword1);
            var userPWD = FindViewById<EditText>(Resource.Id.etPassword);

            clickLogin.Click += delegate {
                var emailText = Intent.GetStringExtra("eMail");
                var pwdText = Intent.GetStringExtra("pwd");
                if (emailText.ToString() == userMail.Text.ToString())
                {
                    if(pwdText.ToString() == userPWD.Text.ToString())
                    {
                        Android.App.AlertDialog.Builder dialog1 = new Android.App.AlertDialog.Builder(this);
                        Android.App.AlertDialog alert1 = dialog1.Create();
                        alert1.SetTitle("Login Sucess");
                        var userNameIntent = Intent.GetStringExtra("userName");
                        alert1.SetMessage($"Hi {userNameIntent} Good Day");
                        alert1.SetButton("OK", (c, ev) =>
                        {
                            StartActivity(typeof(HomeActivity));
                        });
                        alert1.Show();
                    }
                    else
                    {
                        Android.App.AlertDialog.Builder dialog = new Android.App.AlertDialog.Builder(this);
                        Android.App.AlertDialog alert = dialog.Create();
                        alert.SetTitle("Failed");
                        alert.SetMessage($"Password Incorrect");
                        alert.SetButton("OK", (c, ev) =>
                        {
                            //   StartActivity(i);
                        });
                        alert.Show();
                        }
                }
                else
                {
                    Android.App.AlertDialog.Builder dialog = new Android.App.AlertDialog.Builder(this);
                    Android.App.AlertDialog alert = dialog.Create();
                    alert.SetTitle("Login Failed");
                    alert.SetMessage("Enter Valid Credentials");
                    alert.SetButton("OK", (c, ev) =>
                    {
                     //   StartActivity(i);
                    });
                    alert.Show();
                }
            };
            var fabClick = FindViewById<FloatingActionButton>(Resource.Id.floatingActionButton);
            fabClick.Click += FabClick_Click;
        }

        private void FabClick_Click(object sender, EventArgs e)
        {
            StartActivity(typeof(signupActivity));
        }

        public override bool OnCreateOptionsMenu(IMenu menu)
        {
            MenuInflater.Inflate(Resource.Menu.menu_main, menu);
            return false;
        }

        public override bool OnOptionsItemSelected(IMenuItem item)
        {
            int id = item.ItemId;
            if (id == Resource.Id.action_settings)
            {
                return true;
            }
            return base.OnOptionsItemSelected(item);
        }
        public override void OnRequestPermissionsResult(int requestCode, string[] permissions, [GeneratedEnum] Android.Content.PM.Permission[] grantResults)
        {
            Xamarin.Essentials.Platform.OnRequestPermissionsResult(requestCode, permissions, grantResults);
            base.OnRequestPermissionsResult(requestCode, permissions, grantResults);
        }
    }
}
Step 7 — SignupActivity.cs Code
Add another activity for the sign-up page. For that, Go to Solution Explorer >> Resources >> activities and add a new activity named signup_activity.cs. The full source code is given below. Entered data will be validated and stored in Intent.
using System;
using System.Collections.Generic;
using System.Linq;
using System.Text;

using Android.App;
using Android.Content;
using Android.OS;
using Android.Runtime;
using Android.Views;
using Android.Widget;

namespace SignLoginScreen.Resources.activitys
{
    [Activity(Label = "signupActivity")]
    public class signupActivity : Activity
    {
        protected override void OnCreate(Bundle savedInstanceState)
        {
            base.OnCreate(savedInstanceState);

            // Create your application here
            SetContentView(Resource.Layout.layout2);
            var imageButton = FindViewById<ImageButton>(Resource.Id.imageView2);
            var firstName = FindViewById<TextView>(Resource.Id.etPassword132);
            var lastName = FindViewById<TextView>(Resource.Id.txtLastName1);
            var emailText = FindViewById<TextView>(Resource.Id.txtEmail1);
            var pwdText = FindViewById<TextView>(Resource.Id.etPassword);
            var submitButton = FindViewById<Button>(Resource.Id.button);
            var displayalartText = new StringBuilder();
            displayalartText.Append(" inVaild this filed of");
            submitButton.Click += delegate
             {
                 string inputemail = lastName.Text.ToString();
                 if (inputemail == null)
                     displayalartText.Append(" Enter Email Id");
                 else
                 {
                     var emailValue = isValidEmail(inputemail);
                     if (emailValue != true)
                         displayalartText.Append(" Enter Email Id");
                 }
                 if (firstName == null)
                     displayalartText.Append(" Enter First Name");

                 if (pwdText == null)
                     displayalartText.Append(" Enter Last Name");

                 if (displayalartText.ToString() == " inVaild this filed of")
                 {
                     Intent i = new Intent(this, typeof(MainActivity));
                     //Add PutExtra method data to intent.
                     i.PutExtra("eMail", inputemail.ToString());
                     i.PutExtra("pwd", pwdText.Text.ToString());
                     i.PutExtra("userName", firstName.Text.ToString());

                     //StartActivity

                     Android.App.AlertDialog.Builder dialog = new AlertDialog.Builder(this);
                     AlertDialog alert = dialog.Create();
                     alert.SetTitle("Sucess");
                     alert.SetMessage("Sign Up Success");
                     alert.SetButton("OK", (c, ev) =>
                     {
                         StartActivity(i);
                     });
                     alert.Show();

                     #region WithIcon Alert
                     //Android.App.AlertDialog.Builder dialog = new AlertDialog.Builder(this);
                     //AlertDialog alert = dialog.Create();
                     //alert.SetTitle("Title");
                     //alert.SetMessage("Complex Alert");
                     //alert.SetIcon(Resource.Drawable.alert);
                     //alert.SetButton("OK", (c, ev) =>
                     //{
                     //    // Ok button click task
                     //});
                     //alert.SetButton2("CANCEL", (c, ev) => { });
                     //alert.Show();
                     #endregion

                 }
                 else
                 {
                     Android.App.AlertDialog.Builder dialog = new AlertDialog.Builder(this);
                     AlertDialog alert = dialog.Create();
                     alert.SetTitle("Failed");
                     alert.SetMessage("Sign Up Failed");
                     alert.SetButton("OK", (c, ev) =>
                     {
                         // Ok button click task
                     });
                     alert.Show();
                 }
             };

            imageButton.Click += ImageButton_Click;
        }

        private void ImageButton_Click(object sender, EventArgs e)
        {
            StartActivity(typeof(MainActivity));
        }
        public bool isValidEmail(string email)
        {
            return Android.Util.Patterns.EmailAddress.Matcher(email).Matches();
        }
    }
}
Step 8 — Output
Now, rebuild and run your application. You should have the results shown below.
Android Output


Note:
Import images, string, color, theme.
Full Source Code Source
Thanks for reading, and if you have any suggestions comment below.
Reference Android Guide.
Further Reading
Opinions expressed by DZone contributors are their own.

Comments