How to Use JWTs for Client-Side Auth With GraphQL
In this article, we will dig deep into best practices in implementing JWT on the client side while keeping security considerations in mind.
Join the DZone community and get the full member experience.
Join For FreeJWTs (JSON Web Token) is a popular way of handling auth. In this article, we will dig deep into best practices in implementing JWT on the client side while keeping security considerations in mind. The examples used are with GraphQL clients, but the concepts can apply to any front-end client.
For a detailed, technical description of JWTs refer to this article.
For the purposes of auth, a JWT is a token that is issued by the server. The token has a JSON payload that contains information specific to the user. This token can be used by clients when talking to APIs (by sending it along as an HTTP header) so that the APIs can identify the user represented by the token and take user-specific action.
Security Considerations
To prevent a client from creating a random JSON payload and impersonating a user, a JWT also contains a signature. This signature is created by the server that issued the token (let’s say your login endpoint), and any other server that receives this token can independently verify the signature to ensure that the JSON payload was not tampered with and has information that was issued by a legitimate source.
It is important to consider that if a valid and signed JWT is stolen from the client, then the thief can keep using the JWT. An API that accepts JWTs does an independent verification without depending on the JWT source, so the API server has no way of knowing if it was a stolen token. This is why JWTs have expiry values that are kept short. Common practice is to limit them to around 15 minutes so that any leaked JWTs will cease to be valid fairly quickly.
To ensure that JWTs don’t get leaked, it's important NOT to store the JWT on the client persistently. Doing so will make your app vulnerable to CSRF & XSS attacks by malicious forms or scripts to use or steal your token lying around in cookies or localStorage.
JWT Structure
A JWT looks something like this when it's serialized:
eyJhbGciOiJIUzI1NiIsInR5cCI6IkpXVCJ9.eyJzdWIiOiIxMjM0NTY3ODkwIiwibmFtZSI6IkpvaG4gRG9lIiwiaWF0IjoxNTE2MjM5MDIyfQ.XbPfbIHMI6arZ3Y922BhjWgQzWXcXNrz0ogtVhfEd2o
If you decode that base64, you'll get JSON in 3 essential parts: header, payload, and signature.
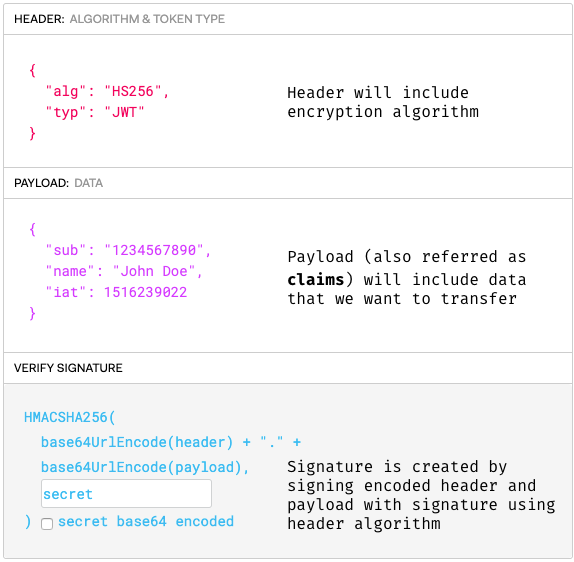
The serialized form is in the following format:
[ base64UrlEncode(header) ] . [ base64UrlEncode(payload) ] . [ signature ]
A JWT is not encrypted. It is based64 encoded and signed. So anyone can decode the token and use its data. A JWT's signature is used to verify that it is, in fact, from a legitimate source.
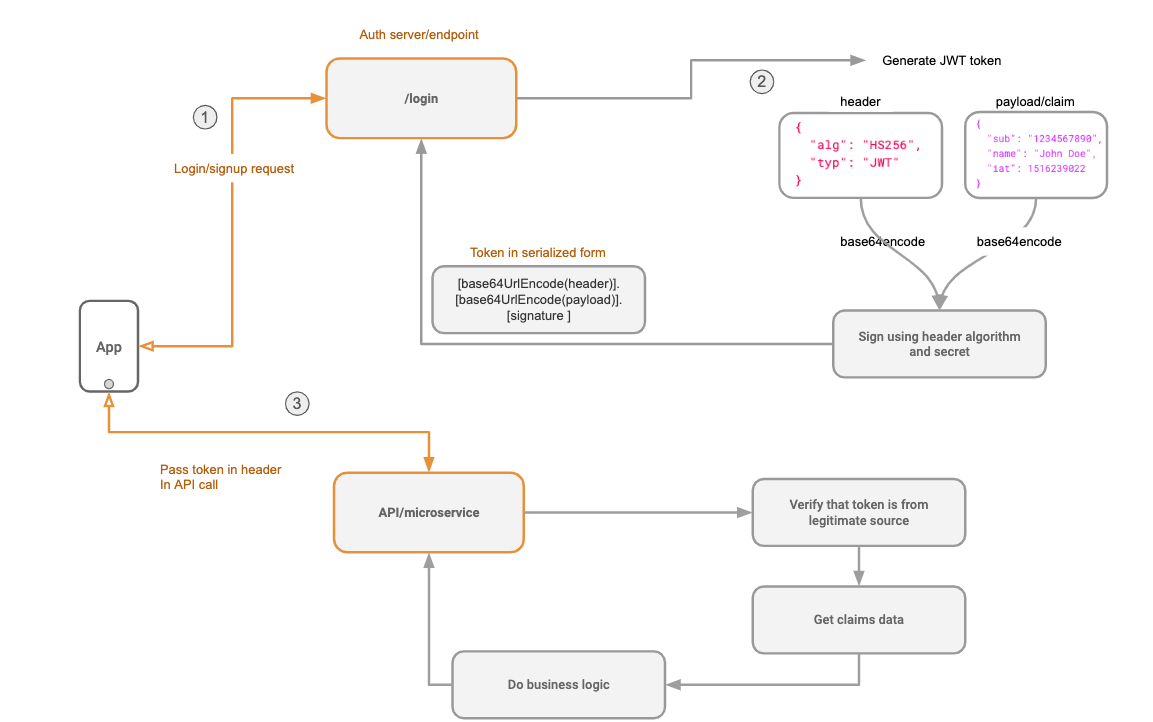
Here is the diagram of how a JWT is issued (/login) and then used to make an API call to another service (/api) in a nutshell:
Replacing Session Tokens With JWTs
Backend developers like using JWTs instead of session tokens because a) microservices and b) not needing a centralized token database.
In a microservices setup, each microservice can independently verify that a token received from a client is valid. The microservice can further decode the token and extract relevant information without needing to have access to a centralized token database.
However, if you can get away with a session token issued by your favorite monolithic framework, you’re totally good to go and probably don’t need JWTs.
Login
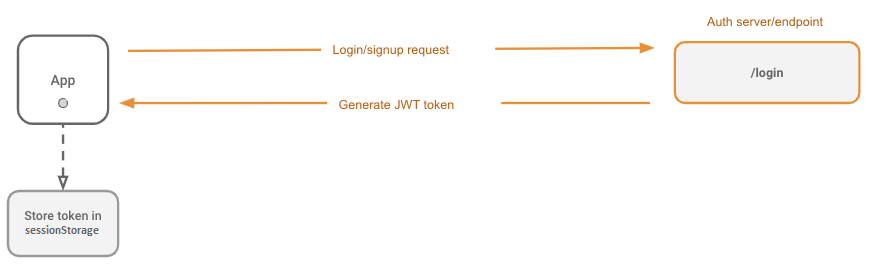
Now that we have a basic understanding of what a JWT is, let's create a simple login flow and extract the JWT. This is what we want to achieve:
How to Start
The login process doesn’t really change from what you'd usually do. For example, here’s a login form that submits a username/password to an auth endpoint and grabs the JWT token from the response. This could be login with an external provider, an OAuth or OAuth2 step. It really doesn't matter, as long as the client finally gets a JWT token in response to the final login success step.
First, we'll build a simple login form to send the username and password to our login server. The server will issue a JWT token, and we will store it in memory.
This is what the handleSubmit handler for a login button might look like:
async function handleSubmit () {
  //...
  // Make the login API call
  const response = await fetch(`/auth/login`, {
    method: 'POST',
    body: JSON.stringify({ username, password })
  })
  //...
  // Extract the JWT from the response
  const { jwt_token } = await response.json()
  //...
  // Do something the token in the login method
  await login({ jwt_token })
}
The login API returns a token, and then we pass this token to a login function from /utils/auth where we can decide what to do with the token once we have it.
import { login } from '../utils/auth'
await login({ jwt_token })
Where to Safely Store the Token
We need to save our JWT token somewhere so that we can forward it to our API as a header. You might be tempted to persist it in localstorage, but don’t do it! This is prone to XSS attacks.
Creating cookies on the client to save the JWT will also be prone to XSS. If it can be read on the client from Javascript outside of your app - it can be stolen. You might think an HttpOnly cookie (created by the server instead of the client) will help, but cookies are vulnerable to CSRF attacks.
Note: HttpOnly and sensible CORS policies cannot prevent CSRF form-submit attacks, and using cookies requires a proper CSRF mitigation strategy.
Note: A SameSite cookie will make Cookie based approaches safe from CSRF attacks. It might not be a solution if your Auth and API servers are hosted on different domains, but it should work really well otherwise!
The OWASP JWT Cheatsheet and OWASP ASVS (Application Security Verification Standard) prescribe guidelines for handling and storing tokens.
The sections that are relevant to this are the Token Storage on Client Side and Token Sidejacking issues in the JWT Cheatsheet and chapters 3 (Session Management) and 8 (Data Protection) of ASVS.
From the Cheatsheet, Issue: Token Storage on the Client Side:
"This occurs when an application stores the token in a manner exhibiting the following behavior:"
- Automatically sent by the browser (Cookie storage).
- Retrieved even if the browser is restarted (Use of browser localStorage container).
- Retrieved in case of XSS issue (Cookie accessible to JavaScript code or Token stored in browser local/session storage).
"How to Prevent:"
- Store the token using the browser
sessionStoragecontainer. - Add it as a Bearer HTTP
Authenticationheader with JavaScript when calling services. - Add
fingerprintinformation to the token.
By storing the token in the browser sessionStorage container, it exposes the token to being stolen through an XSS attack. However, fingerprints added to the token prevent the reuse of the stolen token by the attacker on their machine. To close a maximum of exploitation surfaces for an attacker, add a browser Content Security Policy to harden the execution context.
Where a fingerprint is the implementation of the following guidelines from the Token Sidejacking issue:
"Symptom:"
This attack occurs when a token has been intercepted/stolen by an attacker, and they use it to gain access to the system using targeted user identity.
How to Prevent:
A way to prevent it is to add a "user context" in the token. A user context will be composed of the following information:
- A random string will be generated during the authentication phase. It will be sent to the client as a hardened cookie (flags: HttpOnly + Secure + SameSite + cookie prefixes).
- A SHA256 hash of the random string will be stored in the token (instead of the raw value) in order to prevent any XSS issues allowing the attacker to read the random string value and setting the expected cookie.
IP addresses should not be used because there are some legitimate situations in which the IP address can change during the same session. For example, when a user accesses an application through their mobile device and the mobile operator changes during the exchange, then the IP address may (often) change. Moreover, using the IP address can potentially cause issues with European GDPR compliance.
During token validation, if the received token does not contain the right context (for example, if it has been replayed), then it must be rejected.
An implementation of this on the client side may look like this:
// Short duration JWT token (5-10 min)
export function getJwtToken() {
    return sessionStorage.getItem("jwt")
}

export function setJwtToken(token) {
    sessionStorage.setItem("jwt", token)
}

// Longer duration refresh token (30-60 min)
export function getRefreshToken() {
    return sessionStorage.getItem("refreshToken")
}

export function setRefreshToken(token) {
    sessionStorage.setItem("refreshToken", token)
}

function handleLogin({ email, password }) {
  // Call login method in API
  // The server handler is responsible for setting user fingerprint cookie during this as well
  const { jwtToken, refreshToken } = await login({ email, password })
  setJwtToken(jwtToken)
  setRefreshToken(refreshToken)

  // If you like, you may redirect the user now
  Router.push("/some-url")
}
The token will be nullified when the user switches between tabs, but we will deal with that later.
Now That We Have the Token, Here’s What We Can Do With It
- Using in our API client to pass it as a header to every API call.
- Check if a user is logged in by seeing if the JWT variable is set.
- Optionally, we can even decode the JWT on the client to access data in the payload. Let's say we need the user-id or the username on the client, which we can extract from the JWT.
How to Check if the User Is Logged In
We check if the token variable is set and if it isn't - redirect to the login page.
const jwtToken = getJwtToken();
if (!jwtToken) {
  Router.push('/login')
}
Client Setup
Now it’s time to set up our GraphQL client. The idea is to get the token from the variable we set, and if it’s there, we pass it to our GraphQL client.
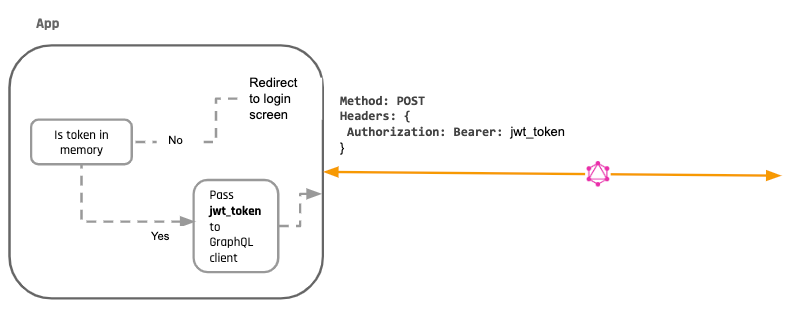
Assuming your GraphQL API accepts a JWT auth token as an Authorization header, you need to set up your client to set an HTTP header by using the JWT token from the variable.
Here's what a setup with the Apollo GraphQL client using an ApolloLink middleware.
import { useMemo } from "react"
import { ApolloClient, InMemoryCache, HttpLink, ApolloLink, Operation } from "@apollo/client"
import { getMainDefinition } from "@apollo/client/utilities"
import { WebSocketLink } from "@apollo/client/link/ws"
import merge from "deepmerge"

let apolloClient

function getHeaders() {
    const headers = {} as HeadersInit
    const token = getJwtToken()
    if (token) headers["Authorization"] = `Bearer ${token}`
    return headers
}

function operationIsSubscription(operation: Operation): boolean {
    const definition = getMainDefinition(operation.query)
    const isSubscription = definition.kind === "OperationDefinition" && definition.operation === "subscription"
    return isSubscription
}

let wsLink
function getOrCreateWebsocketLink() {
    wsLink ??= new WebSocketLink({
        uri: process.env["NEXT_PUBLIC_HASURA_ENDPOINT"].replace("http", "ws").replace("https", "wss"),
        options: {
            reconnect: true,
            timeout: 30000,
            connectionParams: () => {
                return { headers: getHeaders() }
            },
        },
    })
    return wsLink
}

function createLink() {
    const httpLink = new HttpLink({
        uri: process.env["NEXT_PUBLIC_HASURA_ENDPOINT"],
        credentials: "include",
    })

    const authLink = new ApolloLink((operation, forward) => {
        operation.setContext(({ headers = {} }) => ({
            headers: {
                ...headers,
                ...getHeaders(),
            },
        }))
        return forward(operation)
    })

    if (typeof window !== "undefined") {
        return ApolloLink.from([
            authLink,
            // Use "getOrCreateWebsocketLink" to init WS lazily
            // otherwise WS connection will be created + used even if using "query"
            ApolloLink.split(operationIsSubscription, getOrCreateWebsocketLink, httpLink),
        ])
    } else {
        return ApolloLink.from([authLink, httpLink])
    }
}

function createApolloClient() {
    return new ApolloClient({
        ssrMode: typeof window === "undefined",
        link: createLink(),
        cache: new InMemoryCache(),
    })
}

export function initializeApollo(initialState = null) {
    const _apolloClient = apolloClient ?? createApolloClient()

    // If your page has Next.js data fetching methods that use Apollo Client, the initial state
    // get hydrated here
    if (initialState) {
        // Get existing cache, loaded during client side data fetching
        const existingCache = _apolloClient.extract()

        // Merge the existing cache into data passed from getStaticProps/getServerSideProps
        const data = merge(initialState, existingCache)

        // Restore the cache with the merged data
        _apolloClient.cache.restore(data)
    }

    // For SSG and SSR always create a new Apollo Client
    if (typeof window === "undefined") return _apolloClient
    // Create the Apollo Client once in the client
    if (!apolloClient) apolloClient = _apolloClient

    return _apolloClient
}

export function useApollo(initialState) {
    const store = useMemo(() => initializeApollo(initialState), [initialState])
    return store
}
As you can see from the code, whenever there is a token, it’s passed as a header to every request.
But what will happen if there is no token? It depends on the flow in your application. Let's say you redirect the user back to the login page:
else {
 Router.push('/login')
}
What happens if a token expires as we're using it? Let's say our token is only valid for 15 minutes. In this case, we'll probably get an error from our API denying our request (let's say a 401: Unauthorized error). Remember that every service that knows how to use a JWT can independently verify it and check whether it has expired or not.
Let’s add error handling to our app to handle this case. We'll write code that will run for every API response and check the error. When we receive the token expired/invalid error from our API, we trigger the logout or the redirect to login workflow.
Here's what the code looks like if we're using the Apollo client:
import { onError } from 'apollo-link-error';

const logoutLink = onError(({ networkError }) => {
    if (networkError.statusCode === 401) logout();
})

if (typeof window !== "undefined") {
    return ApolloLink.from([
        logoutLink,
        authLink,
        ApolloLink.split(operationIsSubscription, getOrCreateWebsocketLink, httpLink),
    ])
} else {
    return ApolloLink.from([
      logoutLink,
      authLink,
      httpLink
    ])
}
Notice that this will result in a fairly sucky user experience. The user will keep getting asked to re-authenticate every time the token expires. This is why apps implement a silent refresh workflow that keeps refreshing the JWT token in the background. More on this in the next sections below!
Logout
With JWTs, a "logout" is simply deleting the token on the client side so that it can't be used for subsequent API calls.
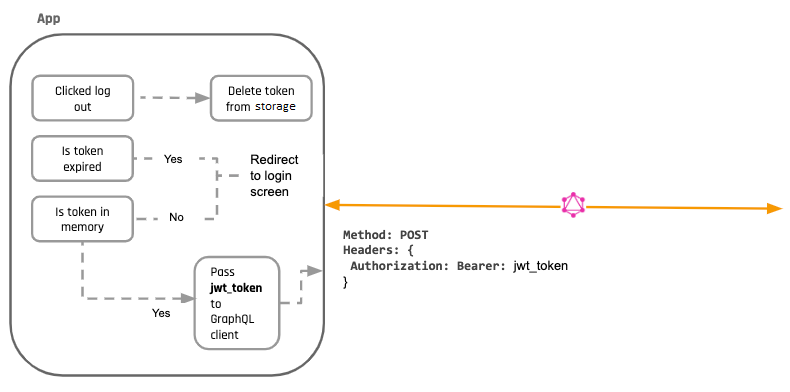
There is no /logout API call. A logout endpoint is not really required because any microservice that accepts your JWTs will keep accepting it. If your auth server deletes the JWT, it won't matter because the other services will keep accepting it anyway (since the whole point of JWTs was to not require centralized coordination).
Note: The token is still valid and can be used. This is why keeping JWT expiry values to a small value is important to ensure that the token cannot be used ever again. And this is why ensuring that your JWTs don't get stolen is even more important. The token is valid (even after you delete it on the client), but only for short period to reduce the probability of it being used maliciously.
In addition, you can add a deny-listing workflow to your JWTs. In this case, you can have a /logout API call, and your auth server puts the tokens in an "invalid list." However, all the API services that consume the JWT now need to add an additional step to their JWT verification to check with the centralized "deny-list." This introduces central state again and brings us back to what we had before using JWTs.
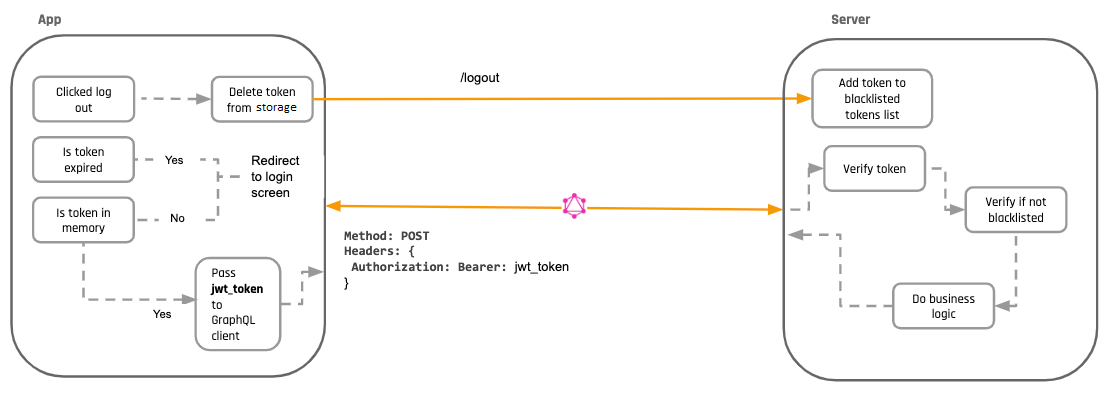
Deny-Listing
Deny-listing is an optional precaution that you can take if you are worried that your token can get stolen and misused, but it also increases the amount of verification that has to be done.
Force Log-Out on Multiple Tabs
One way of solving the issue of log-ins on multiple tabs is by introducing a global event listener on localstorage. Whenever we update this logout key in localstorage on one tab, the listener will fire on the other tabs and trigger a "logout" too and redirect users to the login screen.
window.addEventListener('storage', this.syncLogout)

//....

syncLogout (event) {
  if (event.key === 'logout') {
    console.log('logged out from storage!')
    Router.push('/login')
  }
}
These are the 2 things we now need to do on logout:
- Nullify the token
- Set
logoutitem in local storage
import { useEffect } from "react"
import { useRouter } from "next/router"
import { gql, useMutation, useApolloClient } from "@apollo/client"
import { setJwtToken, setRefreshToken } from "../lib/auth"

const SignOutMutation = gql`
    mutation SignOutMutation {
        signout {
            ok
        }
    }
`

function SignOut() {
    const client = useApolloClient()
    const router = useRouter()
    const [signOut] = useMutation(SignOutMutation)

    useEffect(() => {
        // Clear the JWT and refresh token so that Apollo doesn't try to use them
        setJwtToken("")
        setRefreshToken("")
        // Tell Apollo to reset the store
        // Finally, redirect the user to the home page
        signOut().then(() => {
            // to support logging out from all windows
            window.localStorage.setItem('logout', Date.now())
            client.resetStore().then(() => {
                router.push("/signin")
            })
        })
    }, [signOut, router, client])

    return <p>Signing out...</p>
}
In that case, whenever you log out from one tab, event listener will fire in all other tabs and redirect them to the login screen.
For force logout of multiple devices, please read on in a dedicated section below.
Silent Refresh
There are 2 major problems that users of our JWT based app will still face:
- Given our short expiry times on the JWTs, the user will be logged out every 15 minutes. This would be a fairly terrible experience. Ideally, we'd probably want our users to be logged in for a long time.
- If a user closes their app and opens it again, they'll need to log in again. Their session is not persisted because we're not saving the JWT token on the client anywhere.
To solve this problem, most JWT providers provide a refresh token. A refresh token has 2 properties:
- It can be used to make an API call, say,
/refresh_token, to fetch a new JWT token before the previous JWT expires. - It can be safely persisted across sessions on the client.
How a Refresh Token Works
This token is issued as part of the authentication process along with the JWT. The auth server should save this refresh token and associate it with a particular user in its own database so that it can handle the renewing JWT logic.
On the client, before the previous JWT token expires, we wire up our app to make a /refresh_token endpoint and grab a new JWT.
How a Refresh Token Is Safely Persisted on the Client
We follow the guidelines in the OWASP JWT Guide to prevent issues with the client-side storage of a token.
Improper client-side storage occurs when "an application stores the token in a manner exhibiting the following behavior":
- Automatically sent by the browser (Cookie storage).
- Retrieved even if the browser is restarted (Use of browser localStorage container).
- Retrieved in case of XSS issue (Cookie accessible to JavaScript code or Token stored in browser local/session storage).
To prevent this, the following steps are taken:
- Store the token using the browser
sessionStoragecontainer. - Add it as a Bearer HTTP
Authenticationheader with JavaScript when calling services. - Add
fingerprintinformation to the token.
By storing the token in browser sessionStorage container, it exposes the token to being stolen through a XSS attack. However, fingerprints added to the token prevent reuse of the stolen token by the attacker on their machine. To close a maximum of exploitation surfaces for an attacker, add a browser Content Security Policy to harden the execution context.
Where the implementation of a fingerprint also serves to prevent Token Sidejacking from occurring and is done according to the guidelines here.
Nothing much changes with the new login process except that a refresh token gets sent along with the JWT. Let's take a look at login process diagram again, but now with refresh_token functionality:
Nothing much changes,except that a refresh token gets sent along with the JWT. Let's take a look at a diagram of login process again, but now with refresh_token functionality:
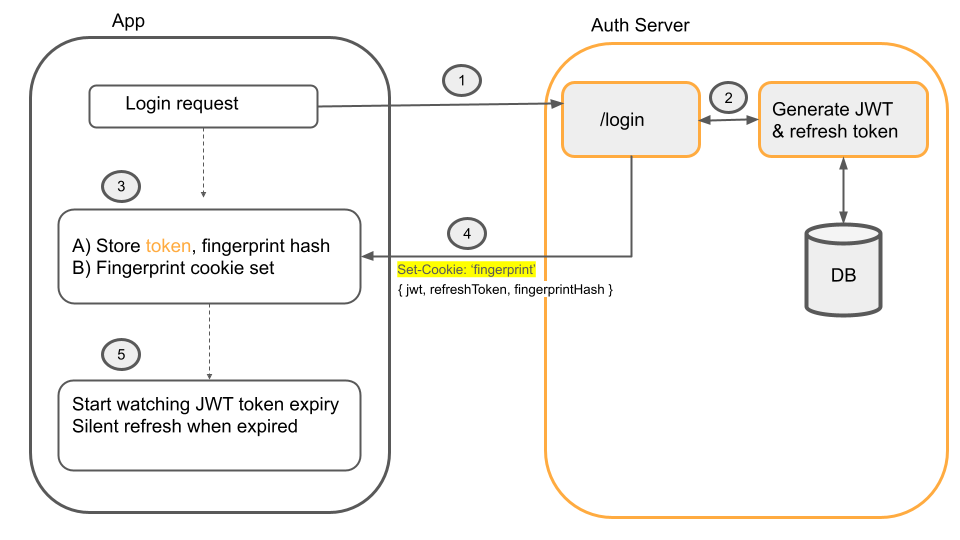
- The user logs in with a login API call.
- Server generates JWT token and
refresh_token, and afingerprint - The server returns the JWT token, refresh token, and a
SHA256-hashed version of the fingerprint in the token claims. - The un-hashed version of the generated fingerprint is stored as a hardened,
HttpOnlycookie on the client. - When the JWT token expires, a silent refresh will happen. This is where the client calls the
/refreshtoken endpoint.
Here Is What the Silent Refresh Looks Like
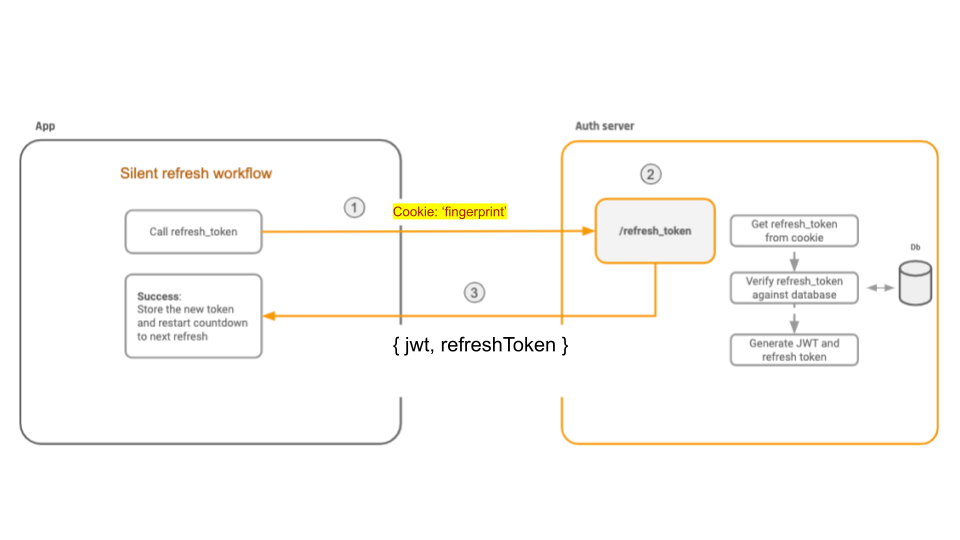
Here's what happens:
- The refresh endpoint must check for the existence of the fingerprint cookie and validate that the comparison of the hashed value in the token claims is identical to the unhashed value in the cookie.
- If either of these conditions is not met, the refresh request is rejected.
- Otherwise, the refresh token is accepted, and a fresh JWT access token is granted, resetting the silent refresh process.
An implementation of this workflow using the apollo-link-token-refresh package is like the example below.
Using this as a non-terminating link will automatically check the validity of our JWT nd attempt a silent refresh if needed when any operation is run.
import { TokenRefreshLink } from "apollo-link-token-refresh"
import { JwtPayload } from "jwt-decode"
import { getJwtToken, getRefreshToken, setJwtToken } from "./auth"
import decodeJWT from "jwt-decode"

export function makeTokenRefreshLink() {
    return new TokenRefreshLink({
        // Indicates the current state of access token expiration
        // If token not yet expired or user doesn't have a token (guest) true should be returned
        isTokenValidOrUndefined: () => {
            const token = getJwtToken()

            // If there is no token, the user is not logged in
            // We return true here, because there is no need to refresh the token
            if (!token) return true

            // Otherwise, we check if the token is expired
            const claims: JwtPayload = decodeJWT(token)
            const expirationTimeInSeconds = claims.exp * 1000
            const now = new Date()
            const isValid = expirationTimeInSeconds >= now.getTime()

            // Return true if the token is still valid, otherwise false and trigger a token refresh
            return isValid
        },
        // Responsible for fetching refresh token
        fetchAccessToken: async () => {
            const jwt = decodeJWT(getJwtToken())
            const refreshToken = getRefreshToken()
            const fingerprintHash = jwt?.["https://hasura.io/jwt/claims"]?.["X-User-Fingerprint"]

            const request = await fetch(process.env["NEXT_PUBLIC_HASURA_ENDPOINT"], {
                method: "POST",
                headers: {
                    "Content-Type": "application/json",
                },
                body: JSON.stringify({
                    query: `
                  query RefreshJwtToken($refreshToken: String!, $fingerprintHash: String!) {
                    refreshJwtToken(refreshToken: $refreshToken, fingerprintHash: $fingerprintHash) {
                      jwt
                    }
                  }
                `,
                    variables: {
                        refreshToken,
                        fingerprintHash,
                    },
                }),
            })

            return request.json()
        },
        // Callback which receives a fresh token from Response.
        // From here we can save token to the storage
        handleFetch: (accessToken) => {
            setJwtToken(accessToken)
        },
        handleResponse: (operation, accessTokenField) => (response) => {
            // here you can parse response, handle errors, prepare returned token to
            // further operations
            // returned object should be like this:
            // {
            //    access_token: 'token string here'
            // }
            return { access_token: response.refreshToken.jwt }
        },
        handleError: (err) => {
            console.warn("Your refresh token is invalid. Try to reauthenticate.")
            console.error(err)
            // Remove invalid tokens
            localStorage.removeItem("jwt")
            localStorage.removeItem("refreshToken")
        },
    })
}
Referring back to the section addressing what will happen if you’re logged in on multiple tabs, using sessionStorage for this means we won't be authenticated in new tabs (if they weren't created using "Duplicate tab") or windows.
A potential solution to this, while still remaining secure, is to use localStorage as an event-emitter again and sync sessionStorage between tabs of the same base URL on load.
This can be accomplished by using a script such as this on your pages:
if (!sessionStorage.length) {
    // Ask other tabs for session storage
    localStorage.setItem("getSessionStorage", String(Date.now()))
}

window.addEventListener("storage", (event) => {
    if (event.key == "getSessionStorage") {
        // Some tab asked for the sessionStorage -> send it
        localStorage.setItem("sessionStorage", JSON.stringify(sessionStorage))
        localStorage.removeItem("sessionStorage")
    } else if (event.key == "sessionStorage" && !sessionStorage.length) {
        // sessionStorage is empty -> fill it
        const data = JSON.parse(event.newValue)
        for (let key in data) {
            sessionStorage.setItem(key, data[key])
        }
    }
})
Persisting Sessions
Persisting sessions runs against the OWASP security guidelines for clients and token authentication:
"... Retrieved even if the browser is restarted (Use of browser localStorage container)."
There is currently no acceptable way that allows for a persistent user session after a browser has been fully closed and re-opened unless the browser implementation retains the tab session state (sessionStorage).
You may choose to store your token in localStorage or a Cookie instead in order to have persistent sessions across browser restarts, but doing so is at your discretion.
Note: For an ongoing discussion of this topic, read here.
Force Logout of All Sessions/Devices
Now that our users are logged in forever and stay logged in across sessions, there's a new problem that we need to worry about: Force logout or logging out of all sessions and devices.
The refresh token implementations from the sections above show us that we can persist sessions and stay logged in.
In this case, a simple implementation of "force logout" is asking the auth server to invalidate all refresh tokens associated for a particular user.
This is primarily an implementation on the auth server backend and doesn't need any special handling on the client. Apart from a "Force Logout" button on your app, perhaps.
Server-Side Rendering (SSR)
In server-side rendering, there are additional complexities involved when dealing with JWT tokens.
This is what we want:
- The browser makes a request to an app URL
- The SSR server renders the page based on the user's identity
- The user gets the rendered page and then continues using the app as a SPA (single page app)
In order for the SSR service to know if a user is logged in, the browser needs to send some information about the current user's identity to the SSR server. The only way to do this is via a cookie.
Since we've already implemented refresh token workflows via cookies, when we make a request to the SSR server, we need to make sure that the refresh token is also sent along.
Note: For SSR on authenticated pages, it is vital that the domain of the auth API (and hence the domain of the refresh_token cookie) is the same as the domain of the SSR server. Otherwise, our cookies won't be sent to the SSR server.
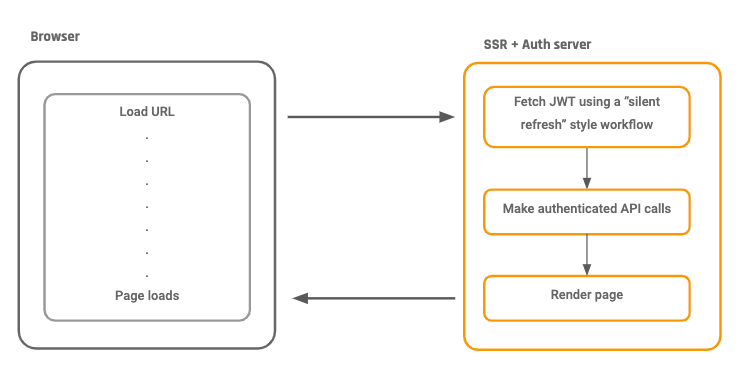
This is what the SSR server does:
- Upon receiving a request to render a particular page, the SSR server captures the refresh_token cookie.
- The SSR server uses the refresh_token cookie to get a new JWT for the user
- The SSR server uses the new JWT token and makes all the authenticated GraphQL requests to fetch the right data
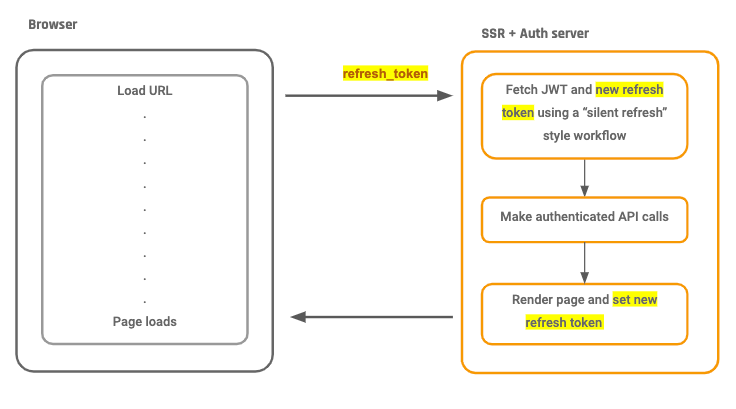
Note: The user can not continue making authenticated API requests once the SSR page has loaded, not without some additional fiddling around, unfortunately.
Once the SSR server returns the rendered HTML, the only identification left on the browser about the user's identity is the old refresh token cookie that has already been used by the SSR server.
If the app code tries to use this refresh token cookie to fetch a new JWT, this request will fail, and the user will get logged out.
To solve this, the SSR server, after rendering the page, must send the latest refresh token cookie so that the browser can use it.
The Entire SSR Flow, End to End:
Summary
Sample code for this article with an end-to-end working app with SSR capabilities is available here. The repository also contains the sample auth backend code.
If you've worked through all the above sections, your app should now have the capabilities and standards of a modern app using a JWT and should be secure from the common major security pitfalls that JWT implementations have.
Published at DZone with permission of Tanmai Gopal. See the original article here.
Opinions expressed by DZone contributors are their own.
Comments