How to Use Mulesoft VM Connector
In this article, you will develop an understanding of how to use a VM connector to implement a VM queue in Mulesoft through a quick tutorial.
Join the DZone community and get the full member experience.
Join For FreeVM Connector is used for intra-app (within the app) and inter-app communication through either Transient or Persistent asynchronous queues.
- Transient queues: This type of queue is volatile, meaning the data would be lost if the system crashed or restarted. Transient queues are faster than Persistent queues.
- Persistent queues: This type of queue is more reliable; data would be persisted if the system crashed, failed, or restarted. These queues are slower than Transient queues.
VM Connector is mainly used for the following:
- To transfer the message from one flow to another.
- To distribute workload (load balancing) across a cluster.
- To communicate with different apps running in the same Mule domain.
- To perform simple queueing.
VM Connector provides the following operations:
- Publish: To publish the data into the queue.
- Consume: To pull data from the queue. If there is no message in the queue, then the
consumeoperation waits for up to the configuredqueueTimeoutvalue, after which theVM:QUEUE_TIMEOUTerror is thrown. - Listener: To listen to the queue and pick the message.
- Publish Consume: To publish the message and then wait for a response from the consuming operation. This operation publishes the content into the queue and waits for a response up to the configured
queueTimeoutvalue. If the response is not received in the given time then theVM:QUEUE_TIMEOUTerror is thrown.
Let's try to understand these operations and how VM queues work with a demo.
1. Publish the Message Into the VM Queue and Listen to the Message From the Queue
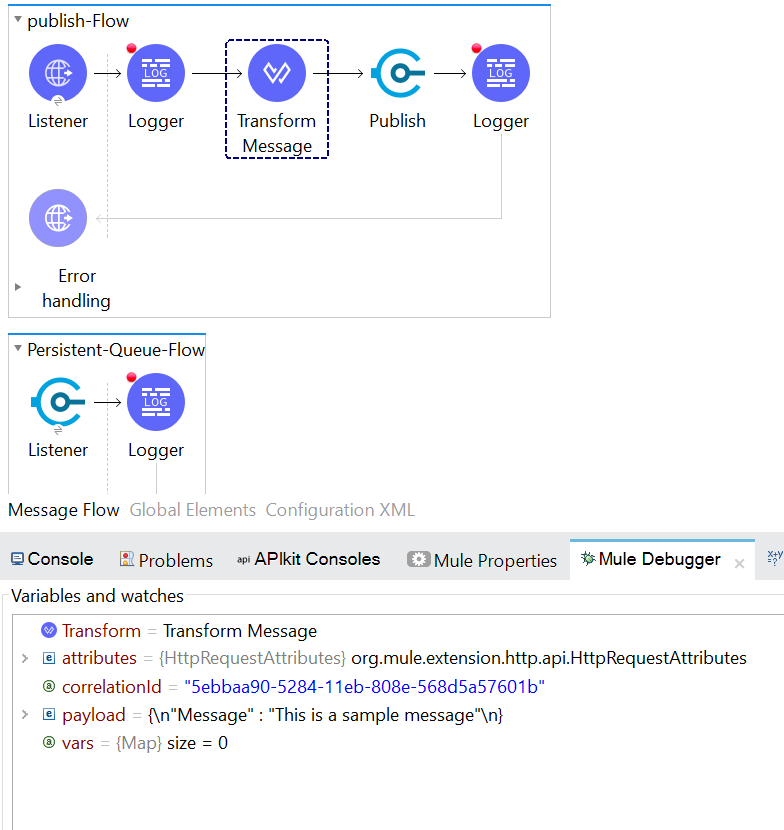
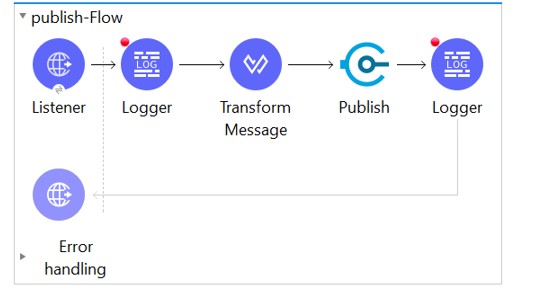
We will create Mule flows as shown in the below image. Publish-flow is a flow for publishing the message into the VM queue. Here, we have an HTTP Listener, we receive the message by triggering the HTTP endpoint, then, in the logger, the received message gets printed. Next, we have a transforming message where we are adding the current time in an additional field named "Time." Next, we have the VM publish operation, which publishes the message to the queue, and, lastly, we print the published message in a logger.
In the Persistent-Queue-Flow, we have a VM listener source that listens for the VM queue and picks the available message from the queue. Next, we have a logger that displays the message picked from by the listener source.

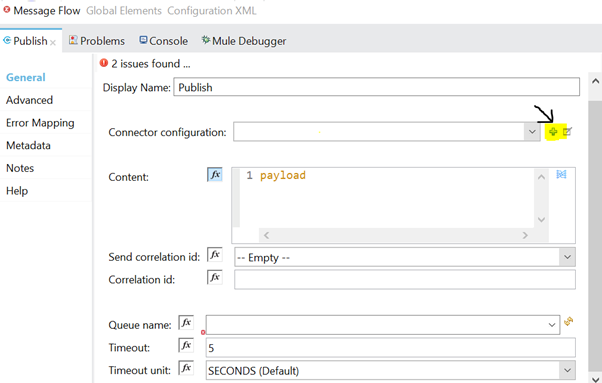
Let's have a look into the configuration of VM Queue when we drag and drop the VM publish component into a Mule flow from the Mule Palette to create the flow. Initially, it would give an error, as we don’t have a configuration set up. We will create the VM configuration by clicking on the Plus (+) icon on the 'Connector configuration,' as highlighted in the below image.
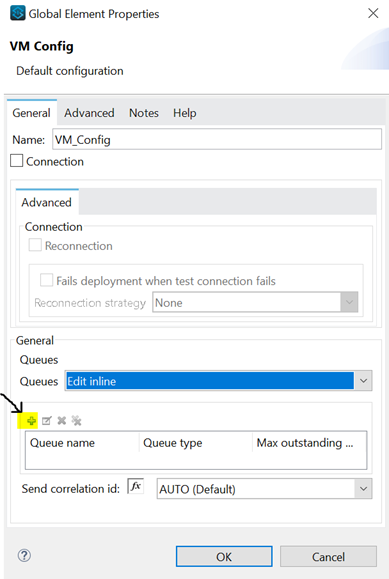
In the VM Connector configuration, inside the General section, for the Queue field, we will select Edit inline from the drop-down. And then, we can click on the plus (+) as shown in the below image.
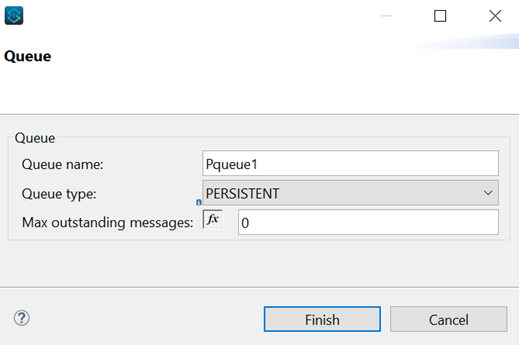
The moment we click, a pop-up, as shown in the below image, will appear for the Queue where we can see three fields: Queue name, Queue type (Transient or Persistent), and Max outstanding messages. We enter a value for these fields and click on finish.
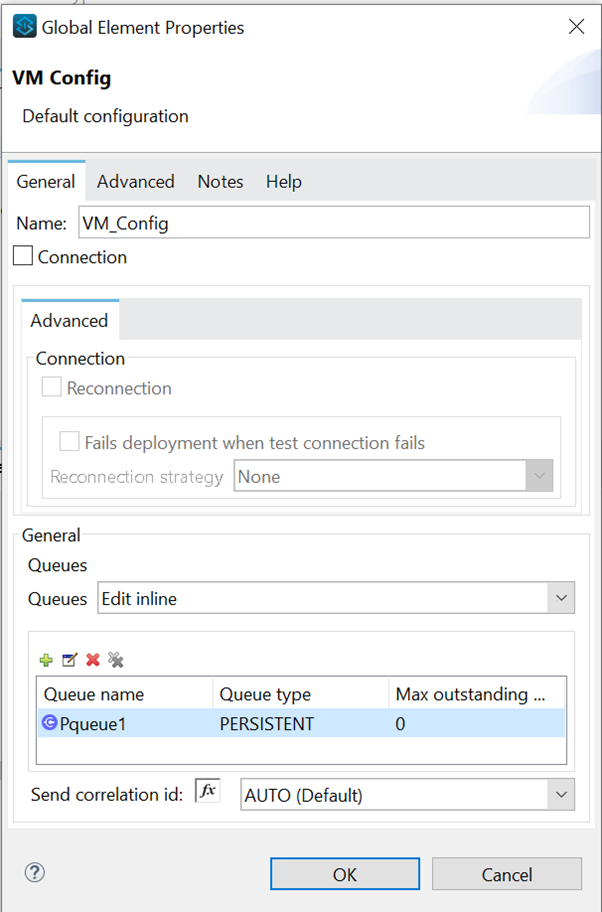
We can see our newly created Pqueue1 is visible in the Queue section, as shown in the below image.
If we want to create more queues, we will again click on the Plus (+) icon and add more queues. We can see the queues in the queue section of the VM Configuration.
Once the Connector configuration is done, we can see the queue name is visible as a drop-down inside Publish operation connector. We will select the queue Pqueue1.
In the transform message component, we have written the below dataweave to add a timestamp:
%dw 2.0
output application/json
---
{
Message : payload.Message,
Time : now()
}
In the Listener flow below, we set the configuration:

Now, let's startup the API in debug mode and try to trigger the request from Postman and see how the VM queue is working.
The request triggered by Postman is shown below:
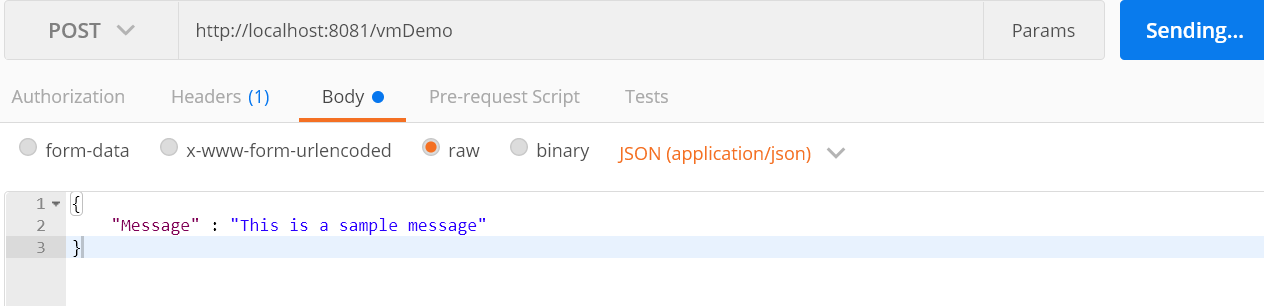
We can see the same message in our Publish flow; notice that we have only one field named "Message" in the payload.
After executing the Transform Message component, we have added one more field in the payload named "Time."
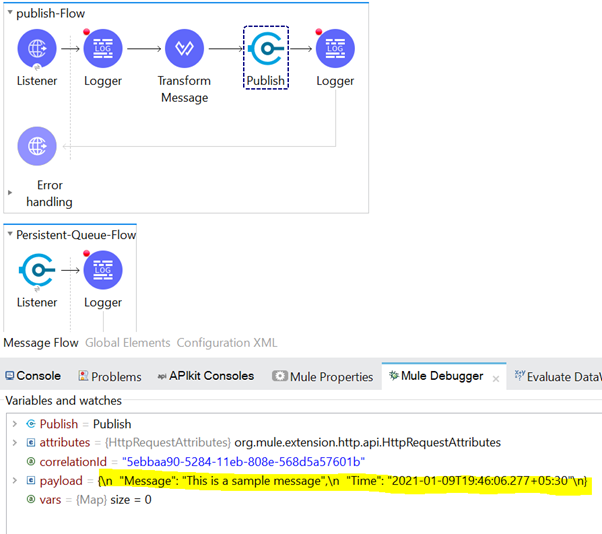
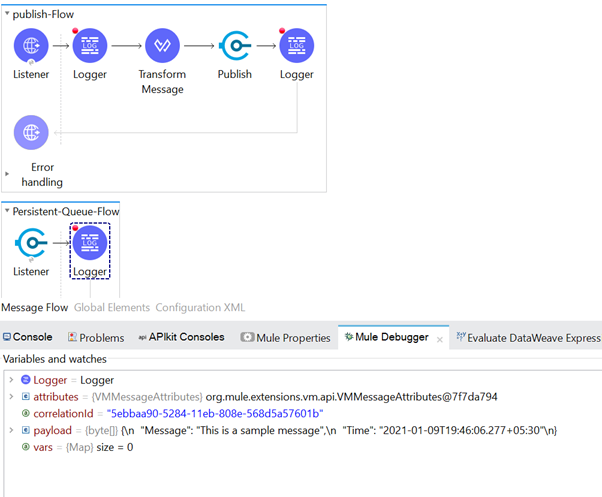
Now we can publish it. Once we process the Publish and Logger components of the Publish flow, we will see the same message is being picked up by the VM listener.
We can get a clearer picture of this by looking at the Mule logs below:
INFO 2021-01-09 19:40:40,451 [[MuleRuntime].uber.01: [vm-demo-app].publish-Flow.CPU_LITE @32c58043] [processor: publish-Flow/processors/0; event: 5ebbaa90-5284-11eb-808e-568d5a57601b] org.mule.runtime.core.internal.processor.LoggerMessageProcessor: Received message is {
"Message" : "This is a sample message"
}
INFO 2021-01-09 19:49:09,877 [[MuleRuntime].uber.01: [vm-demo-app].publish-Flow.BLOCKING @69d02fe8] [processor: publish-Flow/processors/3; event: 5ebbaa90-5284-11eb-808e-568d5a57601b] org.mule.runtime.core.internal.processor.LoggerMessageProcessor: "Message Published Successfully and Published Message is " {
"Message": "This is a sample message",
"Time": "2021-01-09T19:46:06.277+05:30"
}
INFO 2021-01-09 19:50:33,301 [[MuleRuntime].uber.03: [vm-demo-app].Persistent-Queue-Flow.CPU_LITE @3b19e87c] [processor: Persistent-Queue-Flow/processors/0; event: 5ebbaa90-5284-11eb-808e-568d5a57601b] org.mule.runtime.core.internal.processor.LoggerMessageProcessor: "Received message from VM listener is " {
"Message": "This is a sample message",
"Time": "2021-01-09T19:46:06.277+05:30"
}
In this way, we can send messages to the VM queue and consume the same message from the queue.
2. The Publish Consume Operation
Upon using Publish Consume, the published message will wait for the defined time to get a response from the queue.
For the publish consume operation demo, we replace the publish component of our Publish flow with the Publish consume component. We will use the VM Listener component to receive messages from the queue.
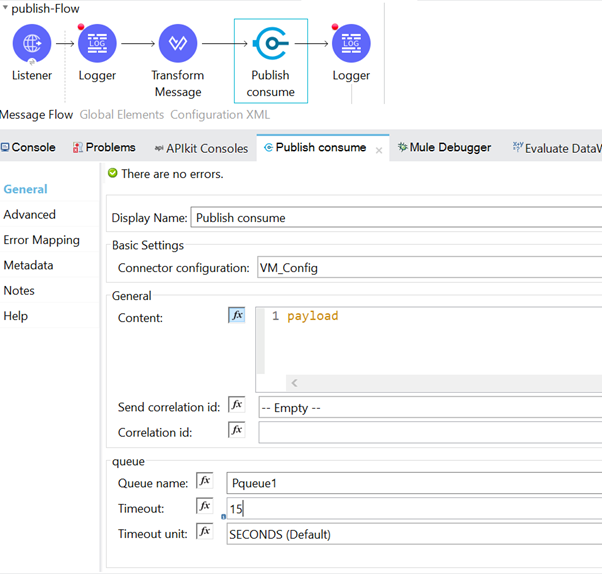
We are publishing the message into the queue, Pqueue1, and the defined timeout is set to 15 seconds, which means, after publishing, the message to the queue (i.e. the publish consume operation) waits for 15 seconds to receive the response. If it fails to receive anything, then it will throw a QUEUE_TIMEOUT error.
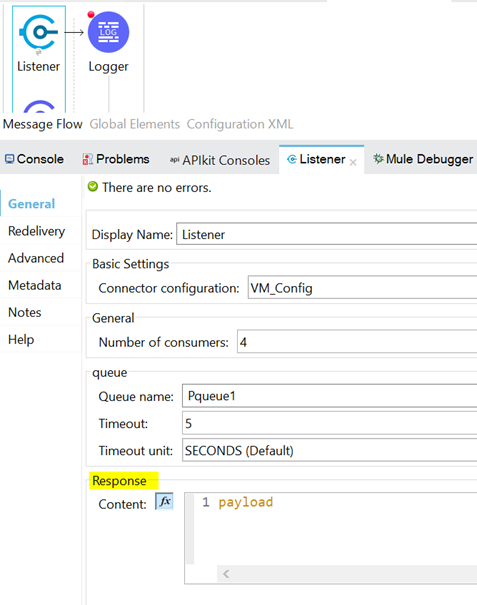
Below is the configuration of VM Listener. We can see that it has a section named "Response," with a default value of #[payload]. This is used to inform Publish Consumer that the message has successfully been picked up from the queue.
Let's run the application to trigger the same sample message from Postman and see how it works:
xxxxxxxxxx
INFO 2021-01-09 22:15:40,907 [[MuleRuntime].uber.09: [vm-demo-app].publish-Flow.CPU_LITE @47090f15] [processor: publish-Flow/processors/0; event: 1ba15051-529a-11eb-8433-568d5a57601b] org.mule.runtime.core.internal.processor.LoggerMessageProcessor: Received message is {
"Message" : "This is a sample message"
}
INFO 2021-01-09 22:15:41,178 [[MuleRuntime].uber.01: [vm-demo-app].Persistent-Queue-Flow.CPU_LITE @388d8b85] [processor: Persistent-Queue-Flow/processors/0; event: 1ba15051-529a-11eb-8433-568d5a57601b] org.mule.runtime.core.internal.processor.LoggerMessageProcessor: "Received message from VM listener is " {
"Message": "This is a sample message",
"Time": "2021-01-09T22:15:41.015+05:30"
}
INFO 2021-01-09 22:15:41,247 [[MuleRuntime].uber.09: [vm-demo-app].publish-Flow.BLOCKING @6a8f14d2] [processor: publish-Flow/processors/3; event: 1ba15051-529a-11eb-8433-568d5a57601b] org.mule.runtime.core.internal.processor.LoggerMessageProcessor: "Message Published Successfully and Published Message is " {
"Message": "This is a sample message",
"Time": "2021-01-09T22:15:41.015+05:30"
}
If we look closely into the console logs, we can find that the first log is the message that is received from the HTTP listener for the publish-Flow. Then, we have logs for the Persistent-Queue-Flow, and it is printing the received message. In the last log, the publish consume operation in the publish-Flow is processed.
3. The Consume Operation
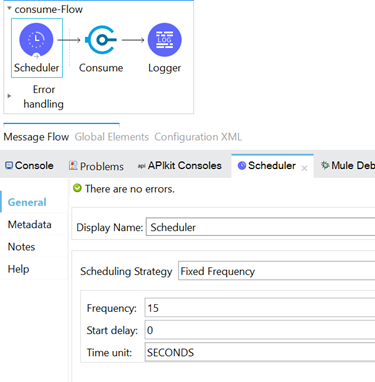
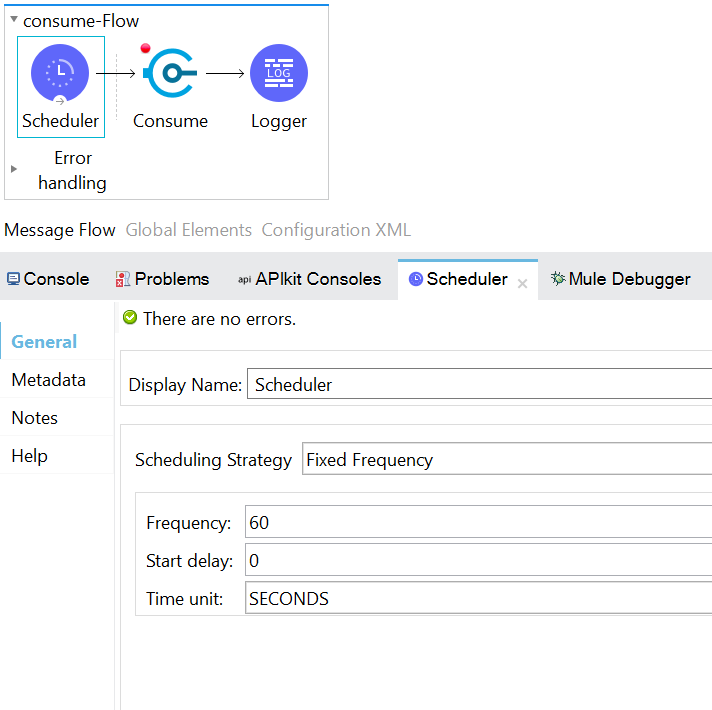
For the consume operation, we will change the publish-consume component with the publish component in the Publish flow. We create one more flow named consume-flow, as shown in the image below. Here, we are using a scheduler that will run every 15 seconds, and, next to it, we have the VM consume operation where we will consume the message from the queue, and, in the logger, we are displaying the message received from the queue.
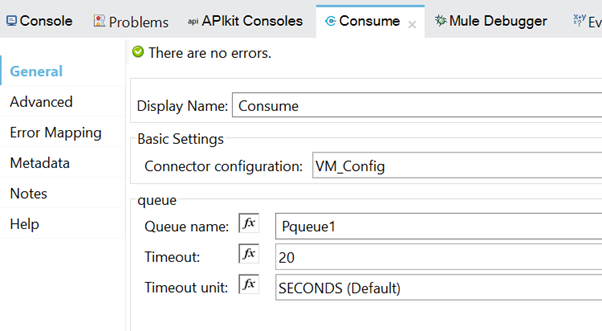
In the consume operation, we perform the configuration as shown in the below image. We are using the same VM configuration, created as a publishing operation, and we are using Pqueue1. We have set the timeout to 20 Seconds, which means that once the flow is triggered, the consume operation will wait for 20 seconds to receive the message. If no message is received within this time frame, the VM:EMPTY_QUEUE error will be thrown.
Note: We have removed the persistent-queue-flow, as the VM Listener is pointing to the same queue, Pqueue1.
Now, let’s run the app and trigger a request from Postman to see how it works.
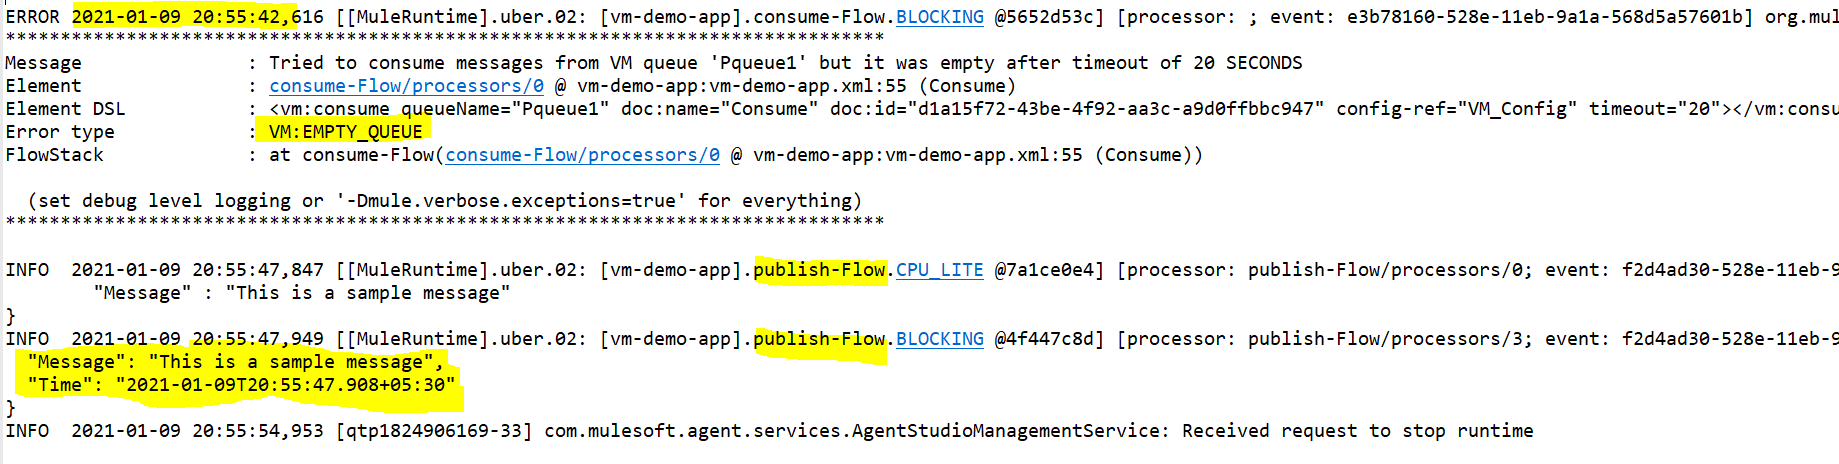
When we sent the same message from Postman, it was received by the publish flow and displayed in the logs. Then, after the addition of the time field, this message was published to the queue. In the logs, we can see that the published message had a time field.
The same message is picked up by the consumer, which we can see in the logs.
Here, after our defined time of 20 seconds, the consume operation will throw a VM:EMPTY_QUEUE error, as there was no other message in the queue to pick up.
xxxxxxxxxx
INFO 2021-01-09 20:20:42,656 [[MuleRuntime].uber.05: [vm-demo-app].publish-Flow.CPU_LITE @33648a8f] [processor: publish-Flow/processors/0; event: 0c0c28a1-528a-11eb-b090-568d5a57601b] org.mule.runtime.core.internal.processor.LoggerMessageProcessor: Received message is {
"Message" : "This is a sample message"
}
INFO 2021-01-09 20:20:42,740 [[MuleRuntime].uber.05: [vm-demo-app].publish-Flow.BLOCKING @4b4fc8df] [processor: publish-Flow/processors/3; event: 0c0c28a1-528a-11eb-b090-568d5a57601b] org.mule.runtime.core.internal.processor.LoggerMessageProcessor: "Message Published Successfully and Published Message is " {
"Message": "This is a sample message",
"Time": "2021-01-09T20:20:42.714+05:30"
}
INFO 2021-01-09 20:20:42,756 [[MuleRuntime].uber.03: [vm-demo-app].consume-Flow.BLOCKING @5f53f894] [processor: consume-Flow/processors/1; event: 0994c000-528a-11eb-b090-568d5a57601b] org.mule.runtime.core.internal.processor.LoggerMessageProcessor: "The message received from the vm queues is " {
"Message": "This is a sample message",
"Time": "2021-01-09T20:20:42.714+05:30"
}
ERROR 2021-01-09 20:21:13,482 [[MuleRuntime].uber.05: [vm-demo-app].consume-Flow.BLOCKING @5f53f894] [processor: ; event: 1284a720-528a-11eb-b090-568d5a57601b] org.mule.runtime.core.internal.exception.OnErrorPropagateHandler:
********************************************************************************
Message : Tried to consume messages from VM queue 'Pqueue1' but it was empty after timeout of 20 SECONDS
Element : consume-Flow/processors/0 @ vm-demo-app:vm-demo-app.xml:55 (Consume)
Element DSL : <vm:consume queueName="Pqueue1" doc:name="Consume" doc:id="d1a15f72-43be-4f92-aa3c-a9d0ffbbc947" config-ref="VM_Config" timeout="20"></vm:consume>
Error type : VM:EMPTY_QUEUE
FlowStack : at consume-Flow(consume-Flow/processors/0 @ vm-demo-app:vm-demo-app.xml:55 (Consume))
## (set debug level logging or '-Dmule.verbose.exceptions=true' for everything)
We said that Persistent Queue holds the data even in case of a restart or crash. Let’s test this hypothesis. For this, make a small alteration to the existing Mule flow by changing the scheduler frequency to 60 seconds.
After these changes, when we run the application, the scheduler starts, and the consume operation will wait for 20 seconds to get a message from the queue. If nothing is found, then it will throw an error. And, again, after one minute from the start time elapses, the scheduler starts and consumes the operation, then waits for the message from the queue, and so on.
Here, we will wait for the timeout and, after that, we will trigger the message from Postman to stop the application just after publishing the message. Upon restart, we will see whether the VM consumers receive the same message or not.
From the above logs, we can say that the application started and triggered the consume flow, but as the consume operation couldn’t find any messages from the queue in the given time, the EMPTY_QUEUE error was thrown. After this, we triggered the message from Postman, and we can see in the logs that the message was published in the queue with the timestamp. After publishing, we stopped the app.
On restarting the application again after five minutes, when the scheduler triggered the flow, the consume operation picked up the message that was published before the app stopped. We can confirm that it is the same message by looking at the time field, which has the time when the message was published, and it is the same as in the last image.

In this way, by using a Persistent queue, we can process our messages even after an application restarts or crashes.
Note: In the same scenario, if we use a Transient queue in the place of a Persistent queue, the published message would be lost upon restarting the application.
Now we know how to use a VM queue in Mule flow and how we can perform various operations provided by the VM connector.
Opinions expressed by DZone contributors are their own.
Comments