How WebDriverIO Uses Selenium Locators in a Unique Way
Learn how WebDriverIO is transforming the way of Selenium locator strategy and how easy to remember and write it.
Join the DZone community and get the full member experience.
Join For FreeIn any automation testing framework, finding elements is the most fundamental activity. We have to choose web elements very carefully so that automation script execution can handle static and dynamic elements for stable test results. WebDriverIO has many advanced Selenium locators/ selector strategies compared to other automation testing frameworks. Traditionally, each locator has a specific By method which identifies the locators during runtime.
WebdriverIO has simplified these By methods and now we do not have to specify them explicitly.
WebdriverIO has the intelligence to identify which locator has been passed. By the end of this WebdriverIO tutorial, you will learn how WebDriverIO is transforming the way of Selenium locator strategy and how easy to remember and write it.
You may also like: How Selenium 4 Relative Locator Can Change The Way You Test
Note: If you refer to the official documentation of the WebdriverIO framework, you will notice that they have referred to Locators as Selectors. You need not get confused if you are familiar with some other test automation framework in Selenium. For example, if you have worked with Selenium Locators in Java, then those locators in WebdriverIO are addressed as Selectors.
For the ease of understanding, I will refer to them as Selenium locators in this WebdriverIO tutorial. As it is a more standardized and familiar term around automation testing with Selenium.
What Are Selenium Locators In WebDriverIO?
Before we start off this WebdriverIO tutorial for Selenium locators/selectors, let us quickly understand what they are used for. Selenium locators are utilized to find elements on a web page through a Selenium WebDriver when a test automation script is executed. The Selector is a command in Selenium. Selenium library reads this command from the script, converts into an HTTP request and interacts with Web browsers lastly, it performs actions based on the command.
Selenium Locator Strategies
When you get hands-on Selenium automation testing using WebdriverIO, you should be aware of the correct strategy that works for locating unique elements on a web page. Finding elements by ID, Name and relative XPath would be the first choice to find a unique element from the website. If you could not find any of these ways then it is advisable to choose other types of the Selenium locators/ selector.
If you have performed Selenium automation testing with Java, you may have used findElement() and findElements() method to find the selector from DOM. However, WebdriverIO offers a unique way of Selenium testing with WebDriverIO.
With WebdriverIO, you don’t have to mention the Selenium locator’s strategy as it will automatically understand which types of locator strategy should be used. We will look into each Selenium Locator in this WebdriverIO tutorial. Before we jump into a practical demonstration, make sure to note down the below methods for finding elements in WebDriverIO:
$(): Single dollar sign used to find single web element
$$(): Double dollar sign used to find multiple web elements
Apart from these two methods, WebDriverIO Support other methods which are:
custom$(): used to find a custom strategy for a single web element
custom$(): used to find a custom strategy for multiples web elements
react$(): used to find single React component by their given name and it gets filter by props and state
react$$(): used to find multiples React components by their given name and it gets filter by props and state
Note: react$ and react$$ command only works with applications using React v16.x
How To Find A Web Element In Browser?
To find a web element in the browser, User has to go to the browser’s developer tools by pressing F12 in windows and option+command+i in Mac Operating System or right-clicking on a website and select inspect option.
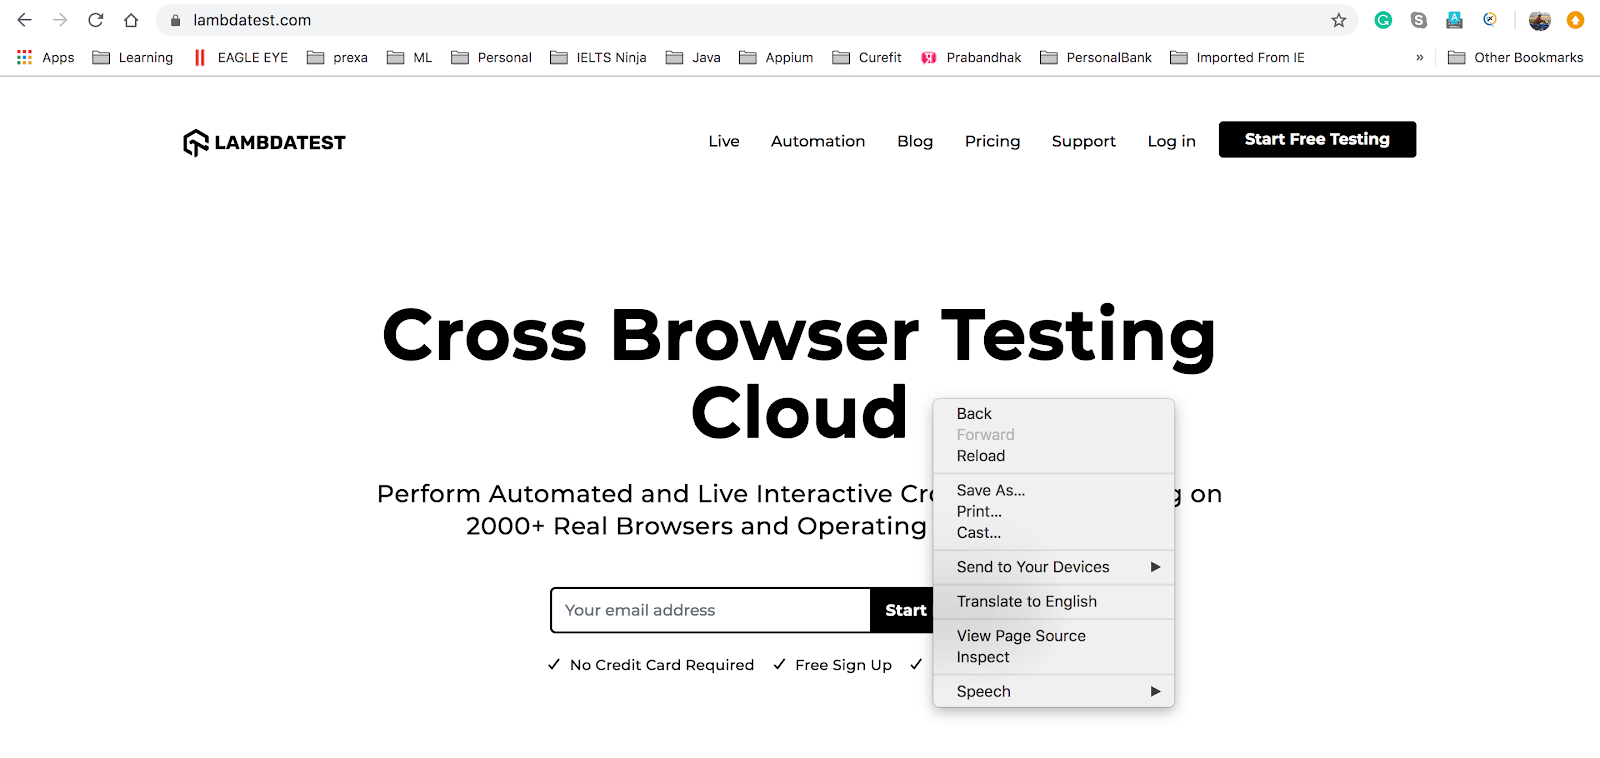
Browser Developer Tools
When you open the developer tool, you can see HTML tags under the “Elements” tab. This HTML tab calls DOM elements. To find particular Web Elements, select the selector icon( before the Elements tab) and hover over the element you wish to find in the DOM.
List Of Selenium Locators In WebDriverIO
Now that you have a good understanding of Selenium Locators, let us see the different types of Selenium Locators in this WebdriverIO tutorial. The following are the supported selectors by the WebdriverIO.
- CSS Query Selector.
- Link Text.
- Partial Link Text.
- Element with certain text.
- Tag Name.
- Name.
- XPath.
- ID.
- JS Function.
- Chain Selectors.
- React Selectors.
- Custom Selector.
Using $, $$, Custom$, Custom$$, react$ and react$$ methods the user can find the elements and perform desired operations. Let’s deep dive at each one of these Selenium Locators in this WebdriverIO tutorial for Selenium automation testing with examples of a sample DOM.
CSS Query Selector
The first locator in this WebdriverIO tutorial for Selenium automation testing is the CSS Query selector, which is used to find the element from DOM.
How Can You Find the CSS Query?
Go to developer tools and find the element and right-click on the Selected element in the DOM and copy CSS selector option.
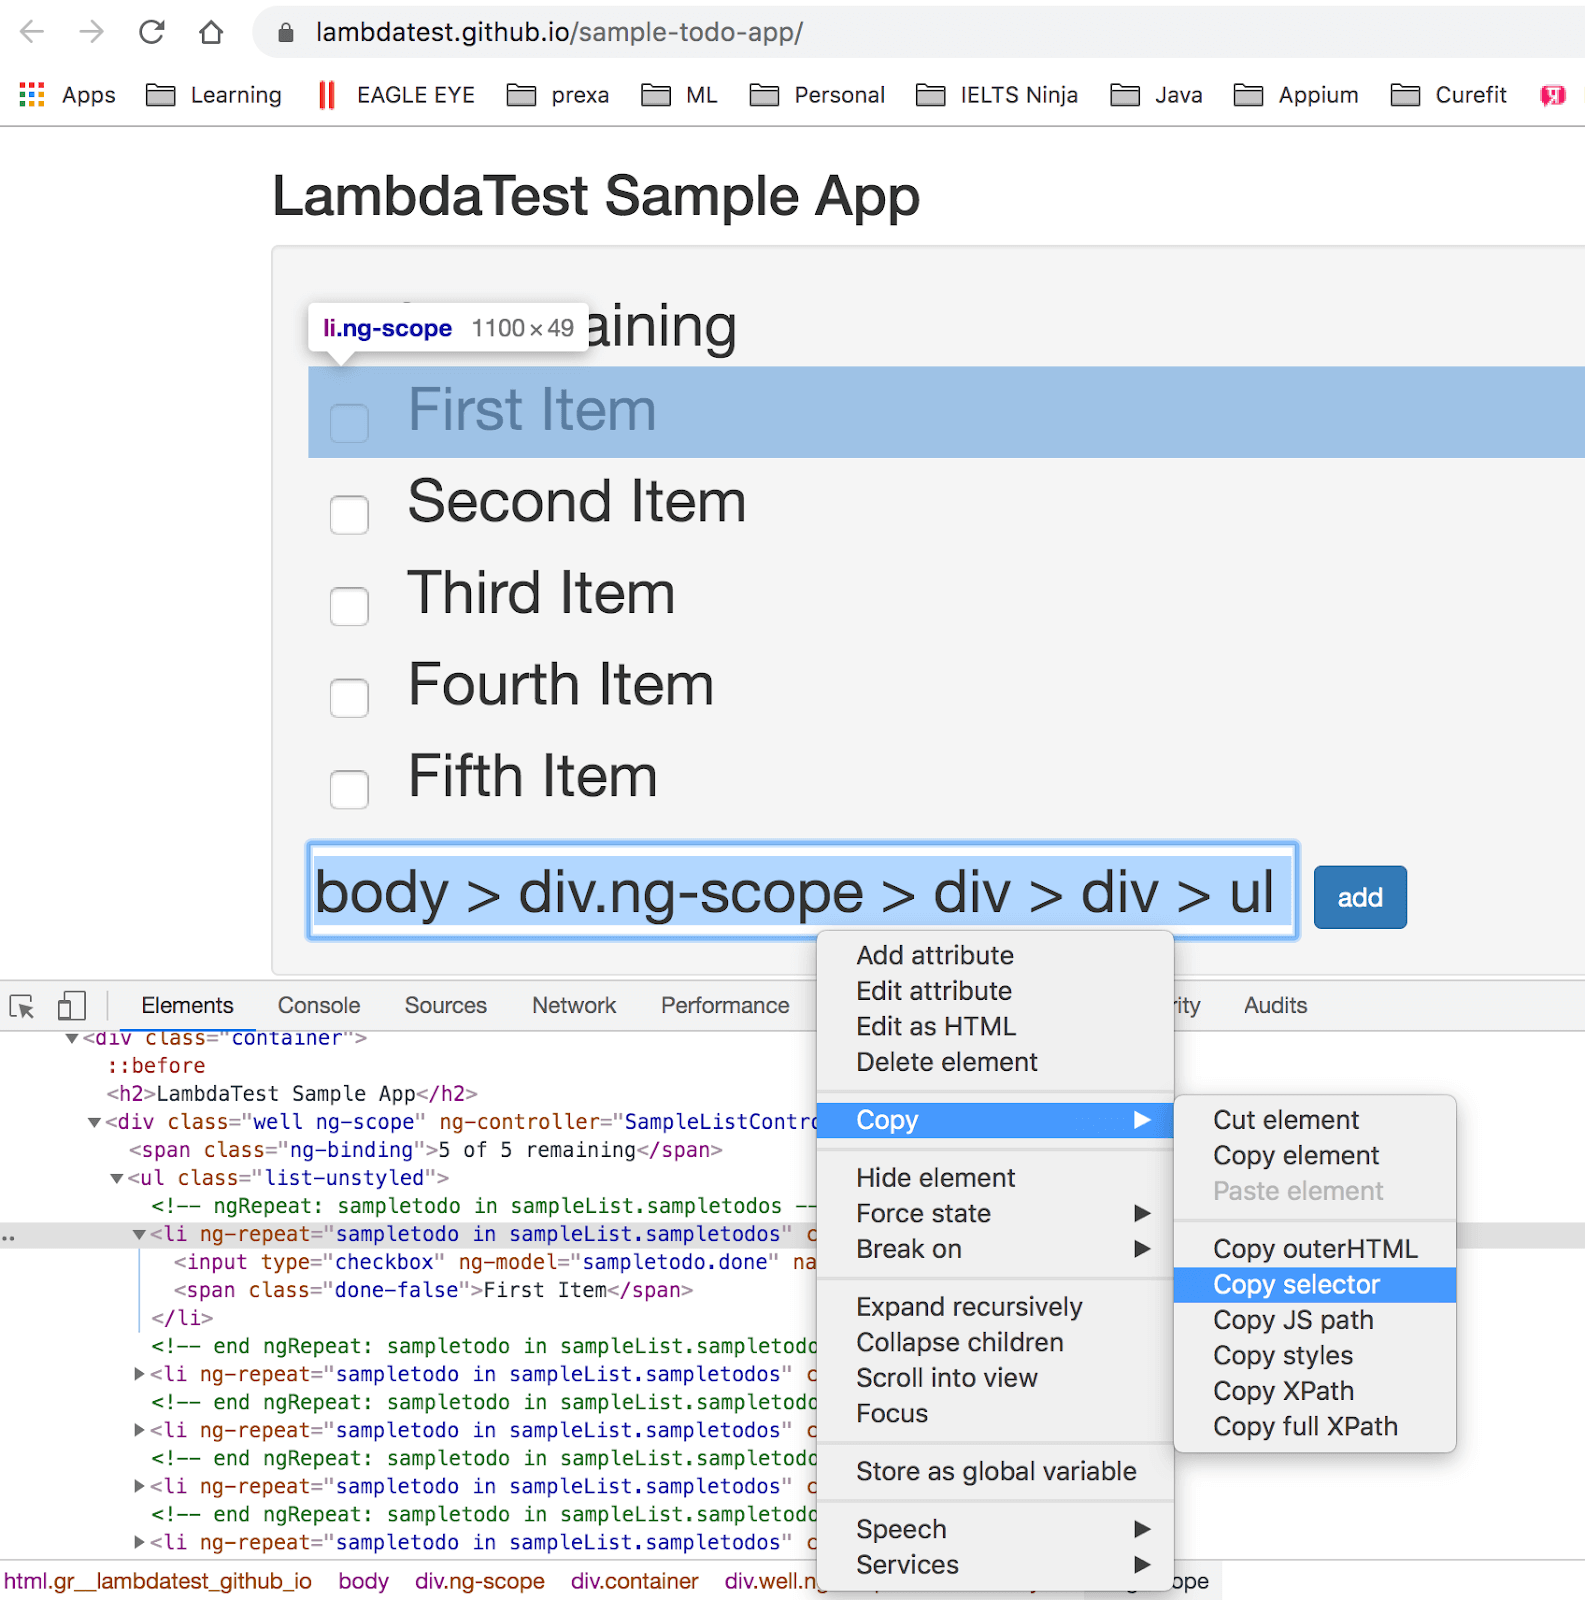
Syntax: $(‘CSS Query’);
Example
xxxxxxxxxx
const assert = require("assert");
describe("Selector Example", function() {
it("CSS Query Selector", function() {
driver.url("https://lambdatest.github.io/sample-todo-app/");
$("body > div.ng-scope > div > div > ul").click();
});
});
Output
When you run the above script, you can find the console log and observed that WebdriverIO converted into findElement method with CSS selector strategy.
xxxxxxxxxx
[0-0] 2019-12-24T10:34:19.689Z INFO webdriver: COMMAND findElement("css selector", "body > div.ng-scope > div > div > ul")
[0-0] 2019-12-24T10:34:19.689Z INFO webdriver: [POST] http://127.0.0.1:4444/session/839505649081eaf3bef60a252593f2f9/element
[0-0] 2019-12-24T10:34:19.689Z INFO webdriver: DATA { using: 'css selector',
value: 'body > div.ng-scope > div > div > ul' }
Remember, Sometimes using a CSS query selector could result in locating multiple elements as a CSS sheet used for the whole website. Now, let us head to the next Selenium locator in this WebdriverIO tutorial.
Link Text
A website is made up of different types of components e.g textbox, links, drop-down, etc. Even a single web page can have numerous links over it. Selecting a particular link for your Selenium automation testing script could become challenging. This is where Link Text as a Selenium Locators for WebdriverIO comes into play. If you want to find any hyperlink then use this link text selector strategy.
Syntax: $(‘=anchorText’);
Here, = equal to sign is used to find anchor element with ‘specific text’.
Example
xxxxxxxxxx
const assert = require("assert");
describe("Selector Example", function() {
it("Open URL", function() {
driver.url("https://www.lambdatest.com/");
});
it("Link Text Example", function() {
$("=Automation").click();
});
});
When you run the above automation testing script, you can find the console log. If you notice the logs you will observe that WebdriverIO has automatically detected the findElement method with link text strategy.
Output
xxxxxxxxxx
0-0] 2019-12-24T10:58:56.640Z INFO webdriver: COMMAND findElement("link text", "Automation")
[0-0] 2019-12-24T10:58:56.640Z INFO webdriver: [POST] http://127.0.0.1:4444/session/0a34df231b0b77c5e0e4d687a14829a2/element
[0-0] 2019-12-24T10:58:56.640Z INFO webdriver: DATA { using: 'link text', value: 'Automation' }
Be careful about the elements being selected by this Selenium Locator in WebdriverIO as it might lead to multiple anchors with the same link text. Now that we know of Link text, let us now head to the Partial link text locator in this WebdriverIO tutorial.
Partial Link Text
Partial link text is similar to link text but the only difference is that this helps when the starting few characters of a link are fixed and the rest is dynamic.
Syntax: $(‘=anchorMatchedText’);
*= start equal to sign is used to find an anchor element with the matched text’.
$("=Automa")
Example
xxxxxxxxxx
const assert = require("assert");
describe("Selector Example", function() {
it("Open URL", function() {
driver.url("https://www.lambdatest.com/");
});
it("Partial Link Text Example", function() {
$("*=Automa").click();
});
});
When you run the above script, you can find the console log and observe that WebdriverIO converted into the findElement method with a partial link text strategy.
Output
xxxxxxxxxx
0-0] 2019-12-24T11:15:23.860Z INFO webdriver: COMMAND findElement("partial link text", "Automa")
[0-0] 2019-12-24T11:15:23.860Z INFO webdriver: [POST] http://127.0.0.1:4444/session/592f966aa9382a63642f944c37068533/element
[0-0] 2019-12-24T11:15:23.861Z INFO webdriver: DATA { using: 'partial link text', value: 'Automa' }
Element With Certain Text
In HTML every tag is known as an element and few elements have the direct text and few elements wrapped around other tags. If you want to find the element which has a certain or partial text then this selector is preferred to use.
While Selenium automation testing using Java, you would use XPath with normalize-space() method to find text along with HTML tag if you want to find an HTML tag with some text but WebdriverIO uses the method below.
Syntax
xxxxxxxxxx
2
$(‘elementTag=certain text’); used for fixed text
$(‘elementTag*=partial text’); used for partial text
This selector takes help from = (equal to) and *= (start equal to) sign.
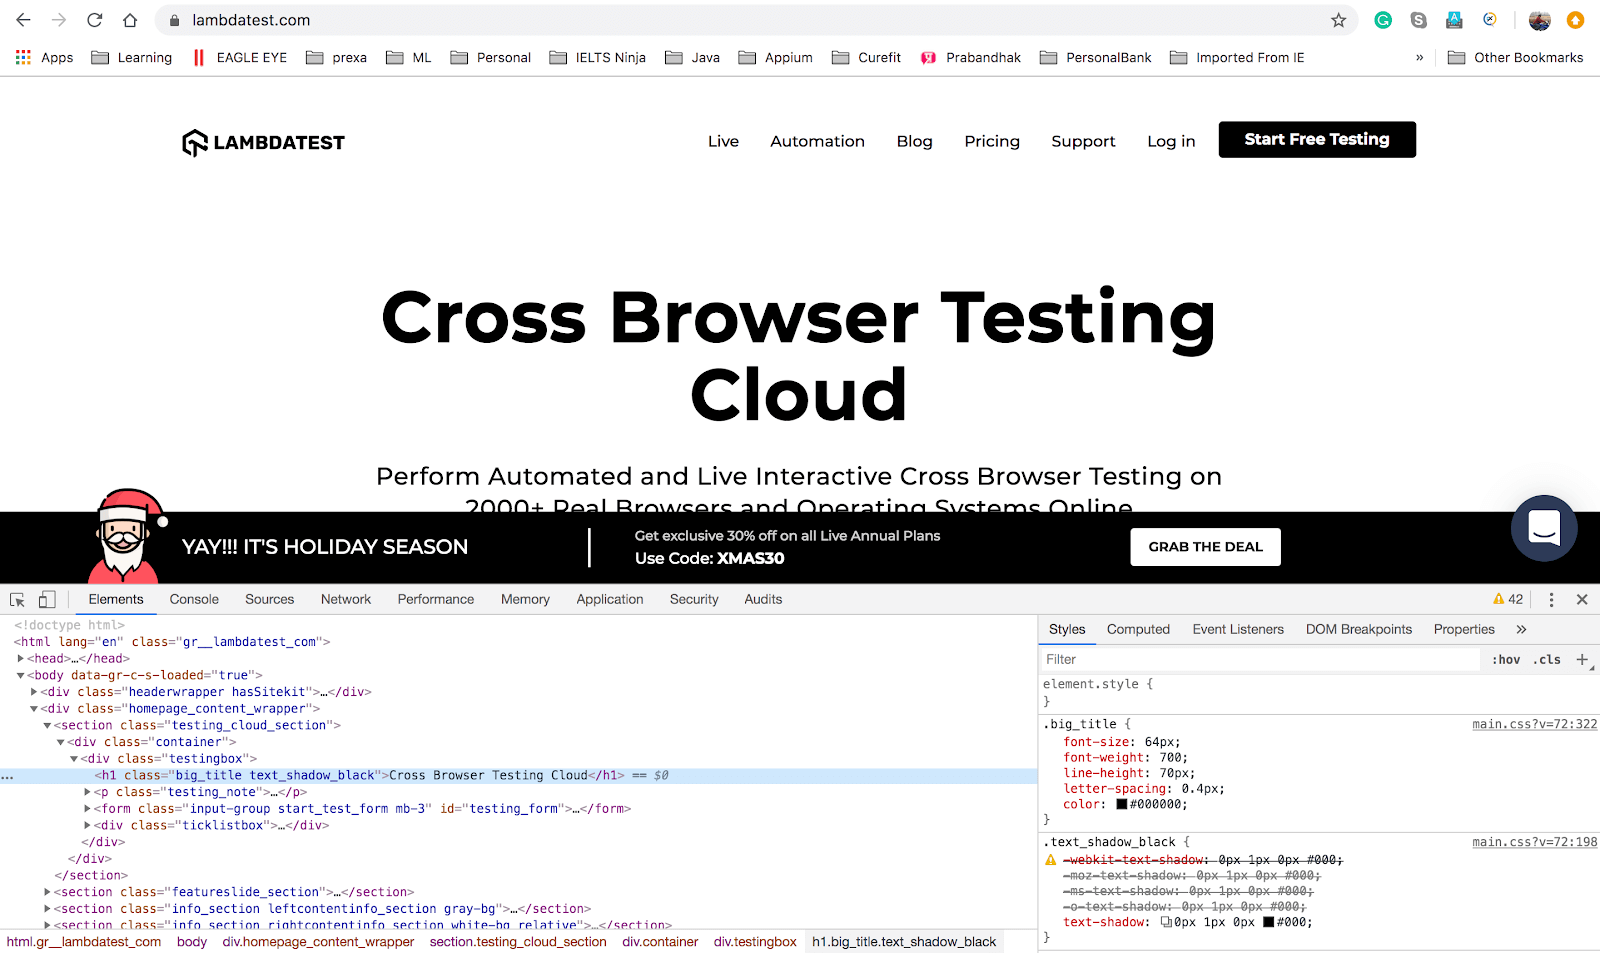
For instance, to find Cross Browser Testing Cloud from below H1 tag, using this command: $(“h1=Cross Browser Testing Cloud”)
< h1 class="big_title text_shadow_black __web-inspector-hide-shortcut__">
Cross Browser Testing Cloud< /h1>
The same thing will work for class and the ID attribute of the elements. For example:
$(‘#id=certain text’); used for fixed text
$(‘#id*=certain text’); used for partial text
$(‘.classname=certain text’); used for fixed text
$(‘.classname*=partial text’); used for partial text
Here, # is used when you want to find elements by ID and . (dot) used for the class name.
Example
xxxxxxxxxx
const assert = require("assert");
describe("Selector Example", function() {
it("Open URL", function() {
driver.url("https://www.lambdatest.com/");
});
it("Element with certain text Example", function() {
$("h1=Cross Browser Testing Cloud").click();
});
it("Element with Partial text Example", function() {
$("h1*=Cross Browser Testing").click();
});
});
When you run the above script, you can find the console log and observe that WebdriverIO converted into findElement method with “normalize-space()” and “contains()”.
Output
xxxxxxxxxx
[0-0] 2019-12-24T11:39:33.082Z INFO webdriver: COMMAND findElement("xpath", ".//h1[normalize-space() = "Cross Browser Testing Cloud"]")
[0-0] 2019-12-24T11:39:33.082Z INFO webdriver: [POST] http://127.0.0.1:4444/session/423097da27eadf53b1fac0f11655e9be/element
[0-0] 2019-12-24T11:39:33.083Z INFO webdriver: DATA { using: 'xpath',
value: './/h1[normalize-space() = "Cross Browser Testing Cloud"]' }
[0-0] 2019-12-24T11:39:33.099Z INFO webdriver: RESULT { 'element-6066-11e4-a52e-4f735466cecf': '03328283-f372-423c-8218-48759ac98631' }
[0-0] 2019-12-24T11:39:33.104Z INFO webdriver: COMMAND elementClick("03328283-f372-423c-8218-48759ac98631")
[0-0] 2019-12-24T11:39:33.105Z INFO webdriver: [POST] http://127.0.0.1:4444/session/423097da27eadf53b1fac0f11655e9be/element/03328283-f372-423c-8218-48759ac98631/click
[0-0] 2019-12-24T11:39:33.151Z INFO webdriver: COMMAND findElement("xpath", ".//h1[contains(., "Cross Browser Testing")]")
[0-0] 2019-12-24T11:39:33.151Z INFO webdriver: [POST] http://127.0.0.1:4444/session/423097da27eadf53b1fac0f11655e9be/element
[0-0] 2019-12-24T11:39:33.151Z INFO webdriver: DATA { using: 'xpath',
value: './/h1[contains(., "Cross Browser Testing")]' }
Now, let us have a look at the Tag Name locator in this WebdriverIO tutorial for Selenium automation testing.
Tag Name
We use the tag name selector to find the element using any HTML tag. This is a very rarely used Selenium locator. However, this is very important if you are dealing with tables or calendar elements. While Selenium automation testing, you can pass the Tag Name as either of < tag > or < tag />.
Syntax
$(‘<tag>’); $(‘<tag />’);
Example
xxxxxxxxxx
const assert = require("assert");
describe("Selector Example", function() {
it("Open URL", function() {
driver.url("https://www.lambdatest.com/");
});
it("Tag Name Example", function() {
$("<h1>").getText();
});
});
Here is the output when the above Selenium automation testing script is executed in WebdriverIO.
Output
xxxxxxxxxx
[0-0] 2019-12-26T10:07:37.804Z INFO webdriver: COMMAND findElement("tag name", "h1")
[0-0] 2019-12-26T10:07:37.804Z INFO webdriver: [POST] http://127.0.0.1:4444/session/d67eadf284b85ecd1e641855c194937b/element
2019-12-26T10:07:37.804Z INFO webdriver: DATA { using: 'tag name', value: 'h1' }
Name
This Selenium locator is similar to the ID Locator in Selenium. Sometimes a web developer gives a name to the HTML node. If a node has a name attribute then it is preferred to incorporate the Name locator in Selenium automation testing. The name selector has to be within square brackets with the name attribute.
Syntax
$(‘[<name attribute>]’)
Example
xxxxxxxxxx
const assert = require("assert");
describe("Selector Example", function() {
it("Open URL", function() {
driver.url("https://www.facebook.com/");
});
it("Name Example", function() {
$("[name = 'email']").setValue("123");
});
});
Output
xxxxxxxxxx
[0-0] 2019-12-26T10:15:08.208Z INFO webdriver: COMMAND findElement("css selector", "[name = 'email']")
[0-0] 2019-12-26T10:15:08.208Z INFO webdriver: [POST] http://127.0.0.1:4444/session/aee87e328f63eb11678a49adce17df4b/element
[0-0] 2019-12-26T10:15:08.208Z INFO webdriver: DATA { using: 'css selector', value: '[name = \'email\']' }
XPath
An extremely pivotal Selenium locator of this WebdriverIO tutorial. In WebDriverIO also, you can write absolute XPath and relative XPath. Absolute XPath starts with / slash and relative starts with // slash. This is a very strong and frequently used selector/ locator for identifying elements through Selenium automation testing.
The following special characters are used while writing XPath.
. – Dot means selection starts from the current node
* – Star means select any node
/ – Single slash means starts with the root node and used for absolute XPath
// – Double slash means to search the node using relative XPath
[ ] – square bracket used for index and also used for searching XPath bypassing attribute and it’s value
@ – used for identify for HTML attribute in XPath
The syntax for Absolute XPath:
$(‘<starts with /body>’);
The syntax for Relative XPath:
$(‘<starts with .//>’);
Example
xxxxxxxxxx
const assert = require("assert");
describe("Selector Example", function() {
it("Open URL", function() {
driver.url("https://www.lambdatest.com/");
});
it("Xpath - Absolute Example", function() {
$("/html/body/div[2]/section[1]/div/div/h1").getText();
});
it("Xpath - Relative Example", function() {
$(".//h1[@class='big_title text_shadow_black']").getText();
});
});
When you run the above script, you can find the console log. Observe that WebdriverIO converted into the findElement method with “XPath”.
Output
xxxxxxxxxx
[0-0] 2019-12-25T17:54:37.674Z INFO webdriver: COMMAND findElement("xpath", "/html/body/div[2]/section[1]/div/div/h1")
[0-0] 2019-12-25T17:54:37.675Z INFO webdriver: [POST] http://127.0.0.1:4444/session/5f6efebb541063139a91dec5d13c32f6/element
2019-12-25T17:54:37.675Z INFO webdriver: DATA { using: 'xpath',
value: '/html/body/div[2]/section[1]/div/div/h1' }
[0-0] 2019-12-25T17:54:37.688Z INFO webdriver: RESULT { 'element-6066-11e4-a52e-4f735466cecf': 'bc244c90-ed18-4d94-9b7a-d026ba7d70d4' }
[0-0] 2019-12-25T17:54:37.694Z INFO webdriver: COMMAND getElementText("bc244c90-ed18-4d94-9b7a-d026ba7d70d4")
[0-0] 2019-12-25T17:54:37.694Z INFO webdriver: [GET] http://127.0.0.1:4444/session/5f6efebb541063139a91dec5d13c32f6/element/bc244c90-ed18-4d94-9b7a-d026ba7d70d4/text
[0-0] 2019-12-25T17:54:37.709Z INFO webdriver: RESULT Cross Browser Testing Cloud
[0-0] 2019-12-25T17:54:37.710Z INFO webdriver: COMMAND findElement("xpath", ".//h1[@class='big_title text_shadow_black']")
[0-0] 2019-12-25T17:54:37.710Z INFO webdriver: [POST] http://127.0.0.1:4444/session/5f6efebb541063139a91dec5d13c32f6/element
[0-0] 2019-12-25T17:54:37.710Z INFO webdriver: DATA { using: 'xpath',
value: './/h1[@class=\'big_title text_shadow_black\']' }
ID
Another crucial Selenium Locator of this WebdriverIO tutorial. The ID is an extremely powerful selector to find an element from DOM. This is always a unique element in the DOM. One more important thing is that, if you want to speed up your automation execution then this is a must-use Locator for Selenium automation testing. The ID directly gets a search from DOM whereas XPath scan the documents based on a relative or absolute path which is a time-consuming method.
# sign used to find elements using the ID.
Syntax
$(#<idname>);
Example
xxxxxxxxxx
const assert = require("assert");
describe("Selector Example", function() {
it("Open URL", function() {
driver.url("https://www.facebook.com/");
});
it("ID Example", function() {
$("#email").setValue("123");
});
});
Now, here you should observe this output log. When you run the above script, you can see the ID selector internally converted into a CSS selector and finding the element.
Output
xxxxxxxxxx
[0-0] 2019-12-25T18:29:26.359Z INFO webdriver: COMMAND findElement("css selector", "#email")
[0-0] 2019-12-25T18:29:26.360Z INFO webdriver: [POST] http://127.0.0.1:4444/session/52e465fa0b2d0dacaf976994dd1edc60/element
2019-12-25T18:29:26.360Z INFO webdriver: DATA { using: 'css selector', value: '#email' }
Now, we have covered the usual Selenium locators in WebdriverIO. Next, we look at the advanced Selenium Locators/ Selectors in this WebdriverIO tutorial.
Chain Selectors
Sometimes it gets difficult to find an element that has no ID, name and tables rows and cells, in such a case, this chain selector helps you to get your unique element. There is no specific symbol given for this but you just call $().$() until you find the desired element by period (.) sign.
Note: Chain Selector/Locator uses the parent-child concept. So the Next chain element should fall under the parent chain selector.
Syntax
$(selector).$(selector).$(selector)
Example
xxxxxxxxxx
const assert = require("assert");
describe("Selector Example", function() {
it("Open URL", function() {
driver.url("https://www.facebook.com/");
});
it("Chain - Selector Example", function() {
$("#login_form")
.$(".//table[@role='presentation']")
.$("#email")
.setValue("123");
});
});
When the script gets executed, each element starts finding elements one by one until it reaches the final element. Firstly it uses findElement() and then calls findElementFromElement().
Output
xxxxxxxxxx
0-0] 2019-12-26T06:14:22.748Z INFO webdriver: COMMAND findElement("css selector", "#login_form")
[0-0] 2019-12-26T06:14:22.748Z INFO webdriver: [POST] http://127.0.0.1:4444/session/3f354aaa54fb0ffee1fdf547ad3d9b04/element
[0-0] 2019-12-26T06:14:22.748Z INFO webdriver: DATA { using: 'css selector', value: '#login_form' }
[0-0] 2019-12-26T06:14:22.760Z INFO webdriver: RESULT { 'element-6066-11e4-a52e-4f735466cecf': 'f0736c61-735d-4cc8-82e1-1fd1e0f47b39' }
[0-0] 2019-12-26T06:14:22.766Z INFO webdriver: COMMAND findElementFromElement("f0736c61-735d-4cc8-82e1-1fd1e0f47b39", "xpath", ".//table[@role='presentation']")
[0-0] 2019-12-26T06:14:22.766Z INFO webdriver: [POST] http://127.0.0.1:4444/session/3f354aaa54fb0ffee1fdf547ad3d9b04/element/f0736c61-735d-4cc8-82e1-1fd1e0f47b39/element
[0-0] 2019-12-26T06:14:22.766Z INFO webdriver: DATA { using: 'xpath', value: './/table[@role=\'presentation\']' }
[0-0] 2019-12-26T06:14:22.778Z INFO webdriver: RESULT { 'element-6066-11e4-a52e-4f735466cecf': 'ab53a7ad-fc8d-4081-810d-745b001fad02' }
[0-0] 2019-12-26T06:14:22.779Z INFO webdriver: COMMAND findElementFromElement("ab53a7ad-fc8d-4081-810d-745b001fad02", "css selector", "#email")
[0-0] 2019-12-26T06:14:22.780Z INFO webdriver: [POST] http://127.0.0.1:4444/session/3f354aaa54fb0ffee1fdf547ad3d9b04/element/ab53a7ad-fc8d-4081-810d-745b001fad02/element
[0-0] 2019-12-26T06:14:22.780Z INFO webdriver: DATA { using: 'css selector', value: '#email' }
[0-0] 2019-12-26T06:14:22.789Z INFO webdriver: RESULT { 'element-6066-11e4-a52e-4f735466cecf': '090696e4-585f-442c-a39d-dfe98f4d5d78' }
[0-0] 2019-12-26T06:14:22.791Z INFO webdriver: COMMAND elementClear("090696e4-585f-442c-a39d-dfe98f4d5d78")
[0-0] 2019-12-26T06:14:22.791Z INFO webdriver: [POST] http://127.0.0.1:4444/session/3f354aaa54fb0ffee1fdf547ad3d9b04/element/090696e4-585f-442c-a39d-dfe98f4d5d78/clear
[0-0] 2019-12-26T06:14:22.817Z INFO webdriver: COMMAND elementSendKeys("090696e4-585f-442c-a39d-dfe98f4d5d78", "123")
[0-0] 2019-12-26T06:14:22.817Z INFO webdriver: [POST] http://127.0.0.1:4444/session/3f354aaa54fb0ffee1fdf547ad3d9b04/element/090696e4-585f-442c-a39d-dfe98f4d5d78/value
[0-0] 2019-12-26T06:14:22.817Z INFO webdriver: DATA { text: '123' }
JS Function
WebdriverIO supports JS selector/locator to find the elements using a JavaScript.
Syntax
xxxxxxxxxx
$(function() {return <JS script>})
$(function() {return <JS script>})
Example
xxxxxxxxxx
const assert = require("assert");
describe("Selector Example", function() {
it("Open URL", function() {
driver.url("https://www.lambdatest.com/");
});
it("JS Function Example", function() {
const elem = $("//*[@id='navbarSupportedContent']/ul/li[1]");
console.log(
elem
.$(function() {
return this.nextSibling.nextSibling;
})
.getText()
);
});
});
Web Elements stored in the variable and then JS functions call with help if $(). It converted internally executeScript().
Output
xxxxxxxxxx
[0-0] 2019-12-25T18:49:26.477Z INFO webdriver: COMMAND executeScript(<fn>, <object>)
[0-0] 2019-12-25T18:49:26.477Z INFO webdriver: [POST] http://127.0.0.1:4444/session/7ad49103a958fbdf72f36aa974c04f39/execute/sync
[0-0] 2019-12-25T18:49:26.477Z INFO webdriver: DATA { script: 'return (function (elem) {\n return (function () {\n\t\t\t\t\treturn this.nextSibling.nextSibling;\n\t\t\t\t}).call(elem);\n }).apply(null, arguments)',
args:
[ { 'element-6066-11e4-a52e-4f735466cecf': 'b6cb6661-b048-418f-b1f8-58ed3f9836fe',
ELEMENT: 'b6cb6661-b048-418f-b1f8-58ed3f9836fe' } ] }
React Selector
React is another one of the advanced locators in WebdriverIO which has been provided to create custom react components for mobile apps. WebDriverIO has provided a feature that you can directly find an element using the react$() method.
react$$() method helps to find an array of WebDriverIO elements.
Syntax
react$(‘ReactComponent’);
Let’s understand by below React Native Example:
xxxxxxxxxx
import React from 'react'
import ReactDOM from 'react-dom'
function RootComponent() {
return (
<div>
RootComponent
</div>
)
}
function App() {
return (<RootComponent />)
}
ReactDOM.render(<App />, document.querySelector('#root'))
In the above example, ‘RootComponent’ is a react component and when it renders within HTML element with id=’root’.
This RootComponent can be found by react$() and below is the example:
xxxxxxxxxx
const rootComponent = browser.react$(‘RootComponent’);
Custom Selector
One of the most convenient Selenium locators/ selectors in WebdriverIO which comes handy when facing complex scenarios for Selenium automation testing. The Custom selector allows you to use a customized strategy declared by using browser.addLocatorStrategy.
custom$$() method helps to find an array of WebDriverIO elements.
Syntax
browser.custom$(strategyName, strategyArguments)
browser.custom$(strategyName, strategyArguments)
Example
xxxxxxxxxx
const assert = require("assert");
describe("Selector Example", function() {
it("Open URL", function() {
driver.url("https://www.facebook.com/");
});
it("Custom Selector Example - ", () => {
browser.addLocatorStrategy("emailById", selector => {
return document.querySelectorAll(selector);
});
const emailID = browser.custom$("emailById", "#email");
emailID.setValue("[email protected]");
});
});
With the help of addLocatorStrategy(), we have created ‘emailById’ custom selector for the email ID field and we can use emailById selector using the custom$() method. Internally, WebDriverIO converts custom$() into executeScript() and finds the element.
Note: In this WebdriverIO tutorial, we have discussed single $() which helps to deal with a single element. All these selectors can be used with $$() for the array of WebDriverIO.
Conclusion
WebDriverIO is one of the top JavaScript testing frameworks and when you look at the variety it offers for you to locate elements on a web page, you would be sure to make a note of it for your upcoming projects. It has a very unique selector choice including react$ and custom$ selectors.
WebDriverIO has a single way to find the element but has different signs for selector e.g * , *=, .(period) and # different. I am sure that this WebdriverIO tutorial will help you to take your knowledge of test automation to the next step.
Further Reading
Published at DZone with permission of Ramit Dhamija. See the original article here.
Opinions expressed by DZone contributors are their own.
Comments