IBM App Connect Enterprise
In this article, we describe and provide a walkthrough of the configuration required to run a SAP Inbound scenario in an IBM App Connect Enterprise Container.
Join the DZone community and get the full member experience.
Join For FreeIntroduction
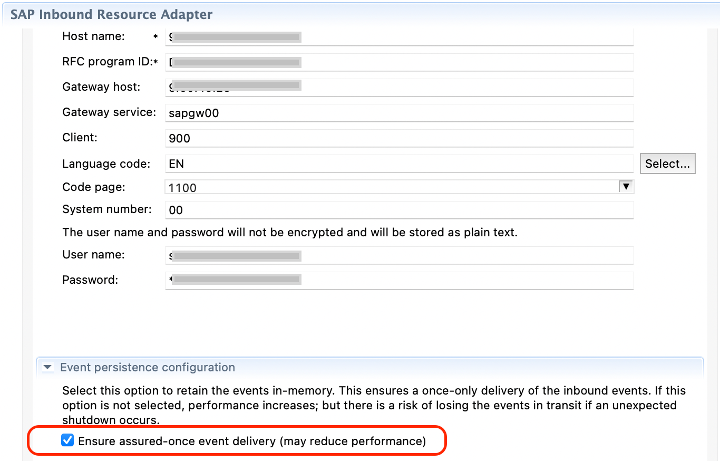
WebSphere Adapter for SAP Software provides multiple ways to interact with applications and data on SAP servers. The adapter uses the SAP Java™ Connector (SAP JCo) API to communicate with SAP applications supporting inbound and outbound interactions. The adapter has a property “Select assured once-only delivery”, which it uses as a data source to persist the event data received from the SAP server. Event recovery is provided to track and recover events in case a problem occurs when the adapter attempts to deliver the event to the endpoint. Any user looking into exploiting this feature will have to set up a remote queue manager for the persistence of message and recovery to work.
In this article, we describe the configuration and steps required for running an SAP Inbound Adapter based message flow in IBM App Connect Enterprise running in IBM Cloud Pak for Integration (CP4I). This particular scenario is focused on the SAP Inbound Adapter set with the Assured Once delivery option and the Integration Server configured to use a remote default QMGR option.
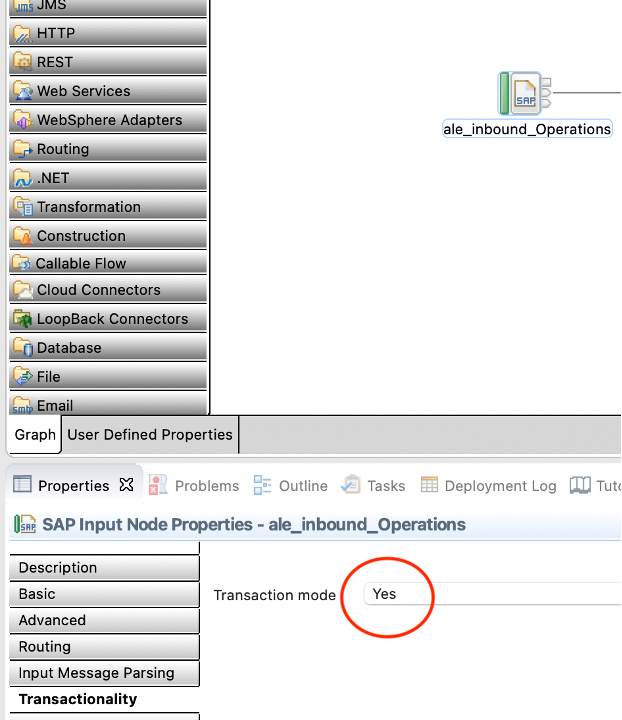
By default, the Transaction mode property of the SAPInput node is set to Yes, which means that messages in the flow are processed under sync point control. Information about the state of in-flight transactions is held in IBM MQ queues, which means that IBM App Connect Enterprise must have access to IBM MQ when it is processing these messages.
However, if you do not require the nodes in the flow to be transactional, you can set the Transaction mode property to No, and access to IBM MQ will not be required.
The configuration steps below are for the use-case where the Transaction Mode property of the SAPInput node is set to Yes and Assured once delivery is selected in the adapter settings.
Prerequisites
- Cloud infrastructure with OpenShift installed with IBM CloudPak for Integration.
Steps
The following steps are performed on an environment with CP4I 2021.1.1 on OCP 4.6
1. Build an ACE Custom Image
You need to create a custom AppConnect Enterprise Server image by baking in SAP JCO Libraries into it. You also require a services file to be added to the image.
A sample Dockerfile is shown below that you can use for creating a custom image. It is assumed that the SAP JCO library, jars and services file are placed in the same directory from where you run the 'docker build' command.
The following links provide guidance for adding external software dependencies for SAP and the SAP Connection configurable service.
Sample service file entry:/etc/services
sapgw00 3300/tcp --> here SAP system number is 00
Sample Dockerfile:
FROM cp.icr.io/cp/appc/ace-server-
prod@sha256:b218a2daec93b8e4555f58a3fd658c3d7b30893b6bff69ec92f81d946c4d1ab3
RUN mkdir sap_lib
COPY sapidoc3.jar sapjco3.jar libsapjco3.so sap_lib/
COPY services /etc/
Make sure you have the required login details to push to the OpenShift registry;
- Build the custom ACE image with SAP JCO libraries and services file
docker build -t ace-sap:latest -f <Dockerfilename> .
(the last period is important) - Docker login to your OpenShift repository
- Docker push the image to the OpenShift registry
-
Note: If you want to use your own registry, then make sure the credentials to access your registry are added to the cluster’s secret.HTML
HOST=$(oc get route default-route -n openshift-image-registry --template='{{ .spec.host }}') docker login -u $(oc whoami) -p $(oc whoami -t) $HOST docker tag ace-sap $HOST/cp4i-ace/ace-sap:latest docker push $HOST/cp4i-ace/ace-sap:latest - At this point you should have an image in the OCP Registry that you can use to deploy an Integration Server with the BAR file that contains the flow with the SAP Adapter.
2. MQ Configurations
- Create a namespace or project in OpenShift cluster to install IBM MQ instance, for example:
ace-sow-mq - Follow this link to add MQ to the catalog and create an instance,
- The Queue Manager name in this demonstration is:
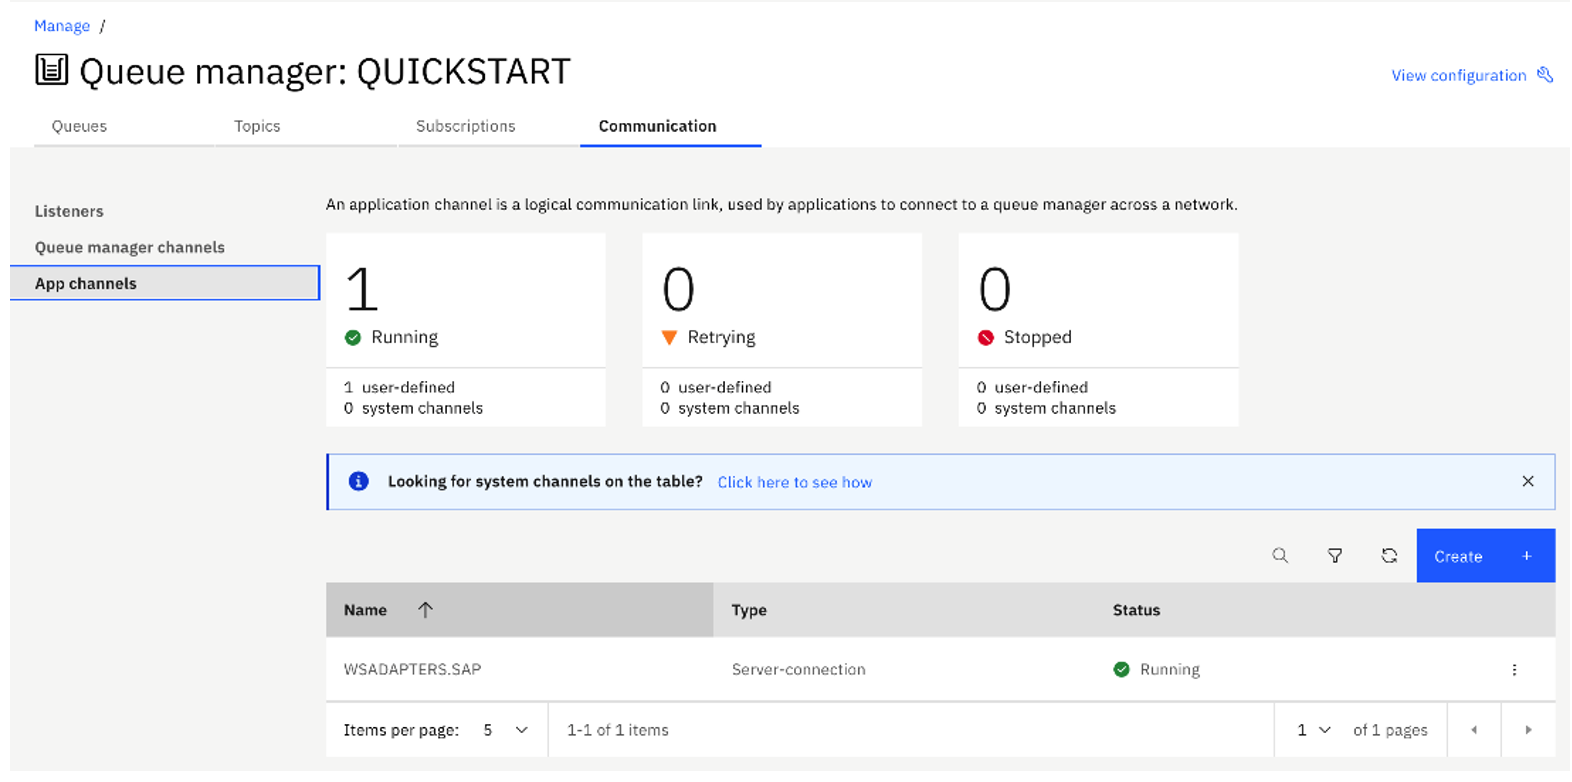
QUICKSTART - From the IBM MQ Console, create an SVRCONN channel
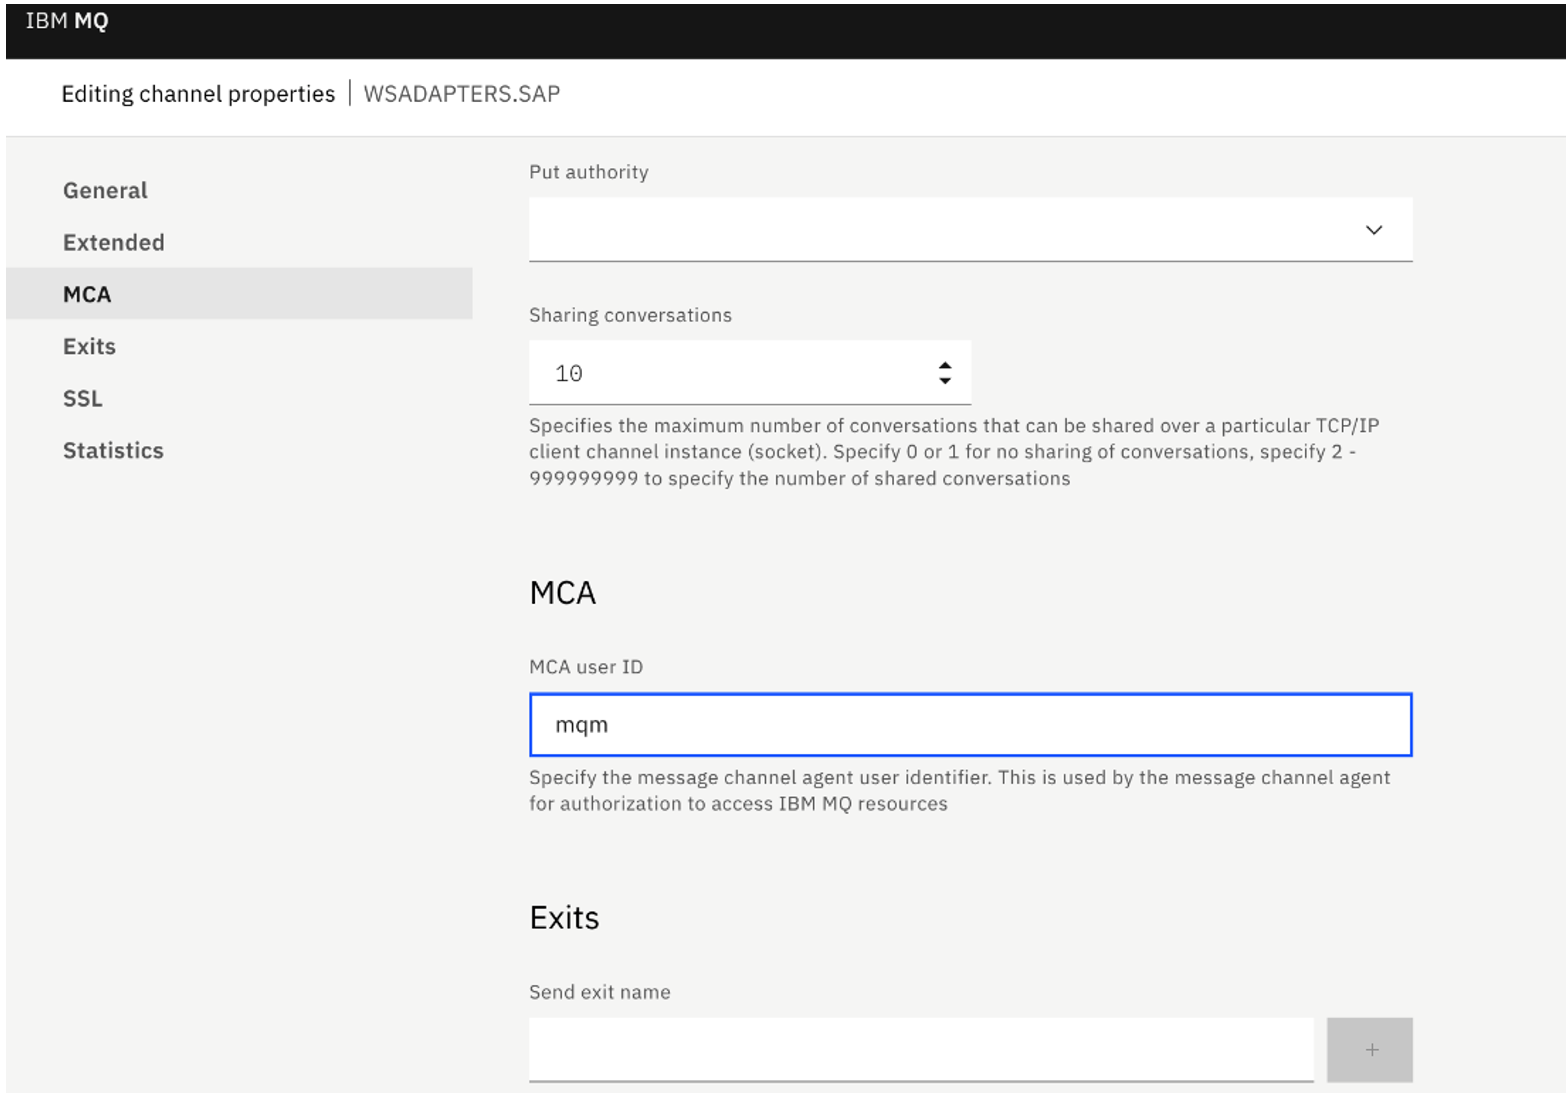
WSADAPTERS.SAP. - We set the following properties on the SVRCONN Channel for simple authorization purposes:
- MCA ID to 'mqm' under MCA settings.
- In this demonstration, we have turned Off SSL authentication. Under SSL settings, set SSL Authentication to optional.
![Set MCA User ID to mqm]()
![Make SSL Authentication Optional]()
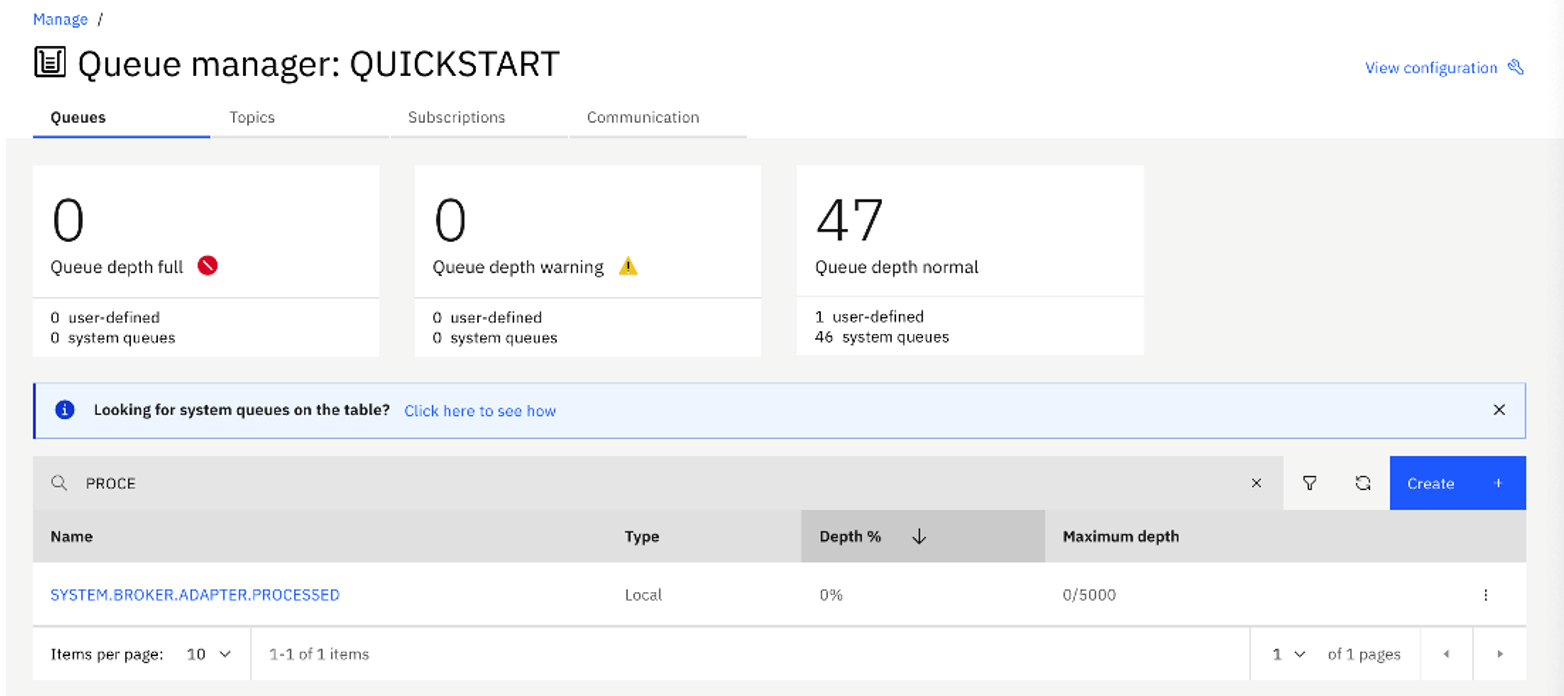
- Create a Local queue with the name
SYSTEM.BROKER.ADAPTER.PROCESSEDwith default values.![Create a Local Queue with the Name System.Broker.Adapter.Processed]()
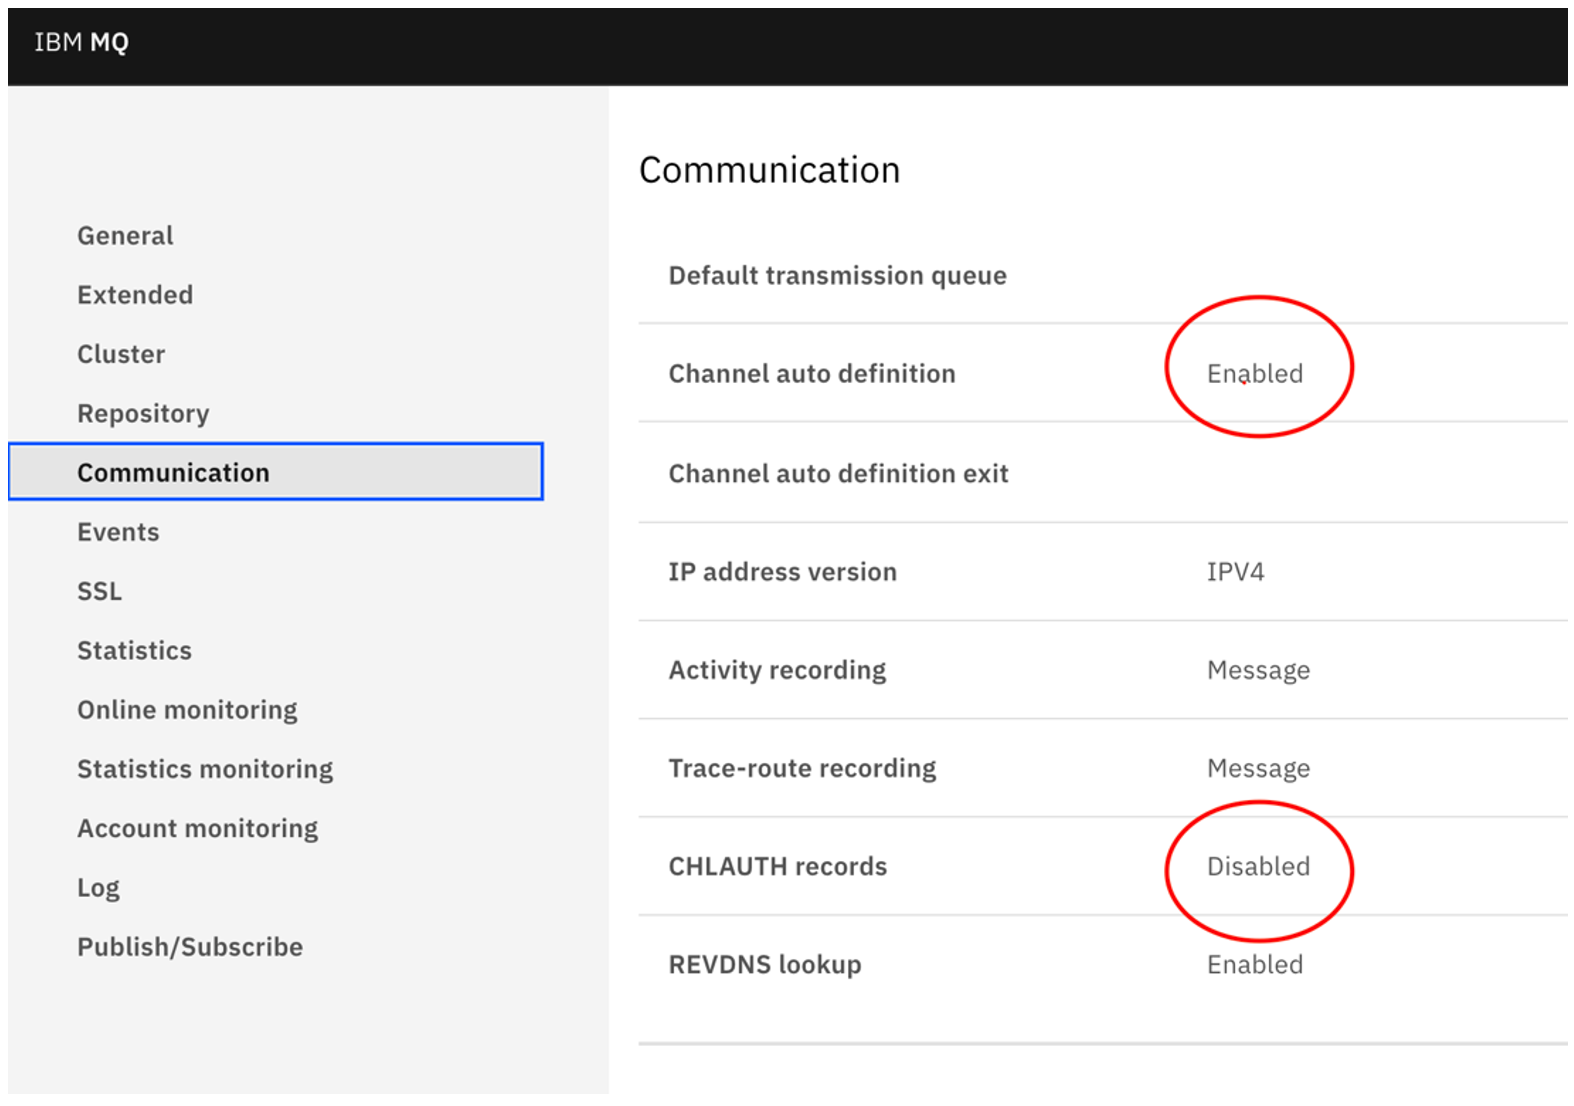
- Go to the Manage navigation menu, select the Queue Manager name and click View configurationsin the top right corner as shown in the figure above and change the following (we have unset the SSL and channel auth to simplify the setup for this article demonstration).
- SSL settings: clear the SSL Key Repository.
- Communication settings: change CHLAUTH records to Disabled and Channel auto definition to Enabled.
![SSL Queue Manager EmptyValue]()
![Communication tab with highlighted areas]() Now from the 'oc' command line create a Client Connection channel on the queue manager:
Now from the 'oc' command line create a Client Connection channel on the queue manager:
oc login -u <userid> -p <passwd> <OCP API Server URL>oc project ace-sow-mqoc get pods- Login into the queue manager pod
oc rsh <QM pod> - Run command
runmqsc - Execute the command to create the channel
DEFINE CHANNEL ('WSADAPTERS.SAP') CHLTYPE (CLNTCONN)CONNAME('saptest-ibm-mq.ace-sow-mq.svc(1414)')TRPTYPE(TCP) QMNAME(QUICKSTART)
Get the service name from the Service section of the OpenShift cluster and then attach <namespace>.svc to it. For example;aptest-ibm-mq.ace-sow-mq.svc - Inspect the TAB file created in the path
(TAB file location -/var/mqm/qmgrs/QUICKSTART/@ipcc/AMQCLCHL.TAB) - Exit out of the container
- Copy the TAB file to the local system
$ oc rsync pod/saptest-ibm-mq-0:/var/mqm/qmgrs/QUICKSTART/@ipcc/AMQCLCHL.TAB . - Create a Zip file from the TAB file and save it as 'mqTab.zip'.
All commands for the steps above are executed via terminal with the output detailed below*** Ignore the warningHTML$./oc login https://xxx-46.cp.ibm.com:6443 -u kubeadmin -p xxx --insecure-skip-tls-verify=true Login successful. You have access to 81 projects, the list has been suppressed. You can list all projects with 'oc projects' Using project "default". $ ./oc project ace-sow-mq $./oc get pods NAME READY STATUS RESTARTS AGE ibm-common-service-operator-5dd99ddcb9-ngf78 1/1 Running 1 19d ibm-mq-887786f79-hpmfw 1/1 Running 1 19d saptest-ibm-mq-0 1/1 Running 1 19d $ ./oc rsh saptest-ibm-mq-0 sh-4.4$ runmqsc 5724-H72 (C) Copyright IBM Corp. 1994, 2021. Starting MQSC for queue manager QUICKSTART. DEFINE CHANNEL ('WSADAPTERS.SAP') CHLTYPE (CLNTCONN) CONNAME('saptest-ibm-mq.ace-sow-mq.svc(1414)') TRPTYPE(TCP) QMNAME(QUICKSTART) 1 : DEFINE CHANNEL ('WSADAPTERS.SAP') CHLTYPE (CLNTCONN) CONNAME('saptest-ibm-mq.ace-sow-mq.svc(1414)') TRPTYPE(TCP) QMNAME(QUICKSTART) AMQ8016I: IBM MQ channel created. sh-4.4$ cat /var/mqm/qmgrs/QUICKSTART/@ipcc/AMQCLCHL.TAB sh-4.4$ exit $ ./oc rsync pod/saptest-ibm-mq-0: /var/mqm/qmgrs/QUICKSTART/@ipcc/AMQCLCHL.TAB . WARNING: cannot use rsync: rsync not available in container AMQCLCHL.TAB

 Now from the 'oc' command line create a Client Connection channel on the queue manager:
3. Develop the SAP Flow and Policy Project In the ACE Toolkit
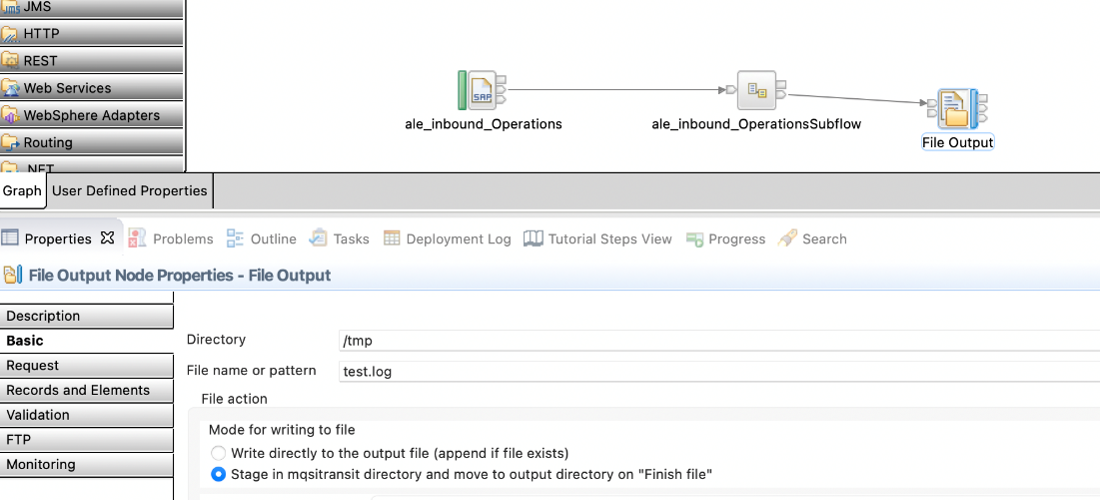
We create a simple SAP Inbound message flow that reads an IDOC from the SAP System and writes the data into a local file. Here are the configuration details for the message flow:
- SAPInput Node mapped to Fileoutput node. The output file name is set to
/tmp/test.log - Make sure to set Transactionality to Yes on the SAP node.
- Ensure Assured once event-delivery is selected on the inbound adapter (Event Persistence configuration) as shown in the figure below
![Event Persistence configuration]()
![Ensure assured-once event delivery (yes)]()
![Stage in mqsitransit directory]()
Now Create a Policy project and add 2 policies, one for SAP and another for MQ.
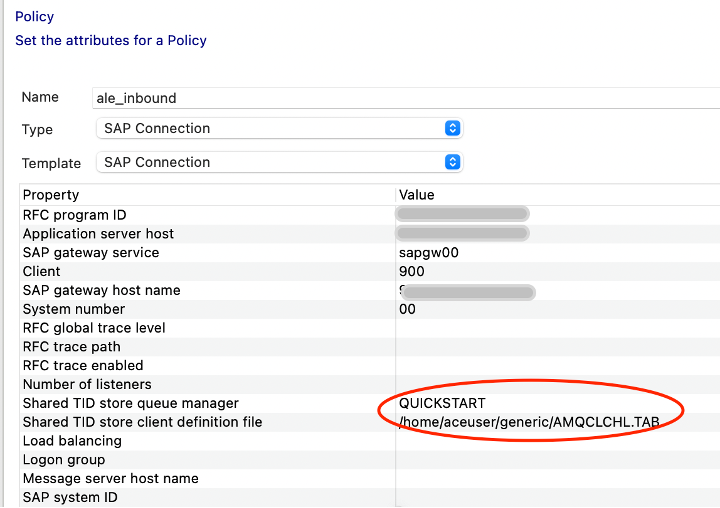
- In the SAP Connection Policy, specify the Queue Manager name and MQ TAB file along with the SAP server connection details. (When we upload the configuration as generic type in the ACE Dashboard, the default location it will be unpacked inside the ace-server pod is
/home/aceuser/generic) - SAP Policy file Sample xml
HTML
<?xml version="1.0" encoding="UTF-8"?> <policies> <policy policyType="SAPConnection" policyName="ale_inbound" policyTemplate="SAPConnection"> <rfcProgramID>XXX</rfcProgramID> <applicationServerHost>x.x.x.x</applicationServerHost> <gatewayService>sapgw00</gatewayService> <client>900</client> <gatewayHost> x.x.x.x </gatewayHost> <systemNumber>00</systemNumber> <RFCTraceLevel></RFCTraceLevel> <RFCTracePath></RFCTracePath> <RFCTraceOn></RFCTraceOn> <numberOfListeners></numberOfListeners> <sharedTidStoreQmgr>QUICKSTART</sharedTidStoreQmgr> <sharedTidStoreClientDefinitionFile>/home/aceuser/generic/AMQCLCHL.TAB</sharedTidStoreClientDefinitionFile> <loadBalancing></loadBalancing> <logonGroup></logonGroup> <messageServerHost></messageServerHost> <SAPSystemID></SAPSystemID> <assuredOnceDelivery></assuredOnceDelivery> <retryConnectionOnStartup></retryConnectionOnStartup> <retryLimit></retryLimit> <retryInterval></retryInterval> <connectionIdleTimeout>0</connectionIdleTimeout> </policy> </policies> - Following is the screen capture of the SAP Connect Policy Project view from the ACE Toolkit.
![SAP Connect Policy Project view from the ACE Toolkit]()
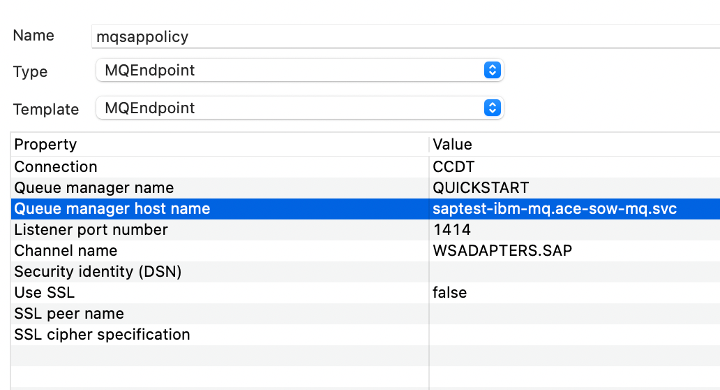
In the MQ policy, mention the Queue Manager name, Queue Manager hostname, listener port, and Channel name.
MQ Policy file sample xml
Note: the Hostname is the MQ service name that we used while creating the channel.HTML
HTML<?xml version="1.0" encoding="UTF-8"?> <policies> <policy policyType="MQEndpoint" policyName="mqsappolicy" policyTemplate="MQEndpoint"> <connection>CCDT</connection> <destinationQueueManagerName>QUICKSTART</destinationQueueManagerName> <queueManagerHostname>saptest-ibm-mq.ace-sow-mq.svc </queueManagerHostname> <listenerPortNumber>1414</listenerPortNumber> <channelName>WSADAPTERS.SAP</channelName> <securityIdentity></securityIdentity> <useSSL>false</useSSL> <SSLPeerName></SSLPeerName> <SSLCipherSpec></SSLCipherSpec> </policy> </policies>
Following is the screen capture of the MQ Endpoint Policy Project view from the ACE Toolkit.![Following is the screen capture of the MQ Endpoint Policy Project view from the ACE Toolkit.]()
4. Deployment and Testing
- Prepare artifacts for deployment to the cluster.
- Create a BAR file for the message flow created in Step 3 above.
- Export the policy projects, created in Step 3, as zip files.
- Save the MQ TAB file definition that was obtained in Step 2, as a zip file
- Dockerfile for building the custom image as described in Step 1.
- Deploy the integration flow: make sure a new workspace
ace-sow-sapis created where the App Connect instance with Dashboard operand is created.- Login to the ACE Dashboard instance of your CP4I cluster.
- Click on create Server.
- Select Toolkit flow and click next.
- Upload the BAR file and click next.
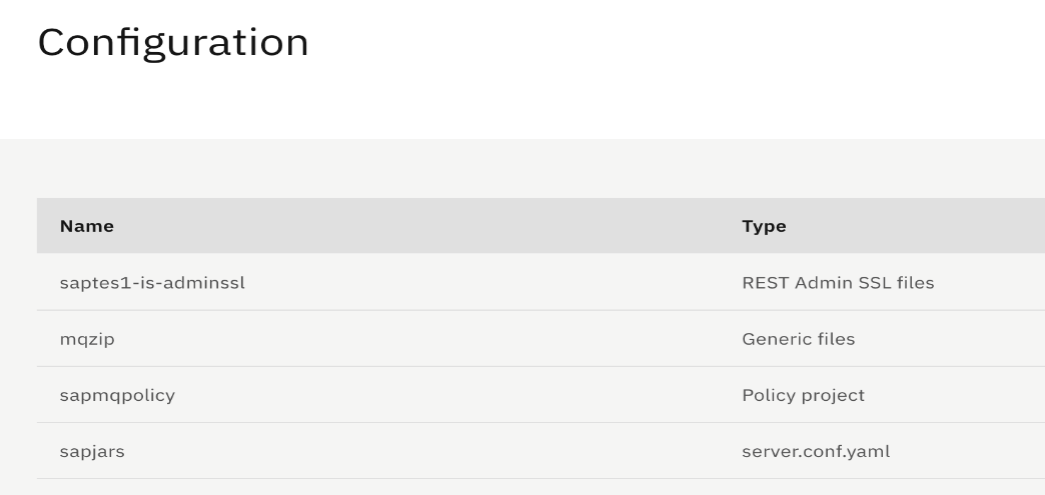
- Create configurations
- Upload the MQ TAB file under Generic files configuration. The name of the configuration can be anything, eg. 'mqzip '
- Upload the Policy Project under the Policy project configuration. The name of the configuration can be anything, eg. 'sapmqpolicy'
- Create a server.conf.yaml override file, specifying the policy project and sap jars location details, as shown below and upload it under the server.conf.yaml configuration. The name of the configuration can be anything, eg. sapjars.
HTMLremoteDefaultQueueManager: '{DefaultPolicies}:mqsappolicy' Defaults: defaultApplication: 'DefaultApplication' BrokerRegistry: mqCCDT: ‘/home/aceuser/generic/AMQCLCHL.TAB’ ConnectorProviders: SAPConnectorProvider: jarsURL: '/home/aceuser/sap_lib' # Set to the absolute path containing the SAP JCo JARs. nativeLibs: '/home/aceuser/sap_lib' # Set to the absolute path containing the SAP JCo libraries - Select all three configurations and click next.
![Configuration of files]()
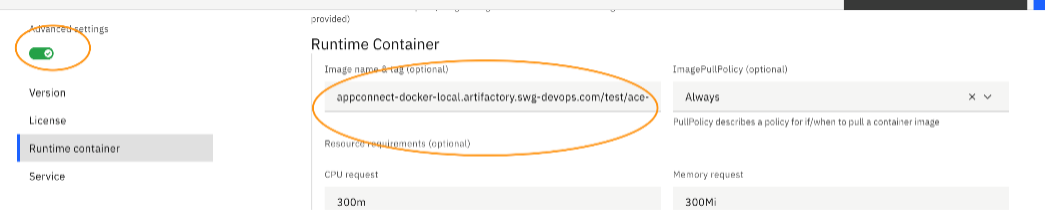
- Specify a name to the Integration Server, turn on the Advanced settings toggle on the left, select Runtime containers, and provide the link of the custom ACE image that you created in Step 1. (Make sure the secret to download the image from the artifactory is already part of the secrets of the cluster).
![Runtime container info]()
- For non-UI based deployed: set this value to change the image location
cr.Spec.Pod.Containers.Runtime - Click create, after a couple of minutes you will have the server and flow in running state.
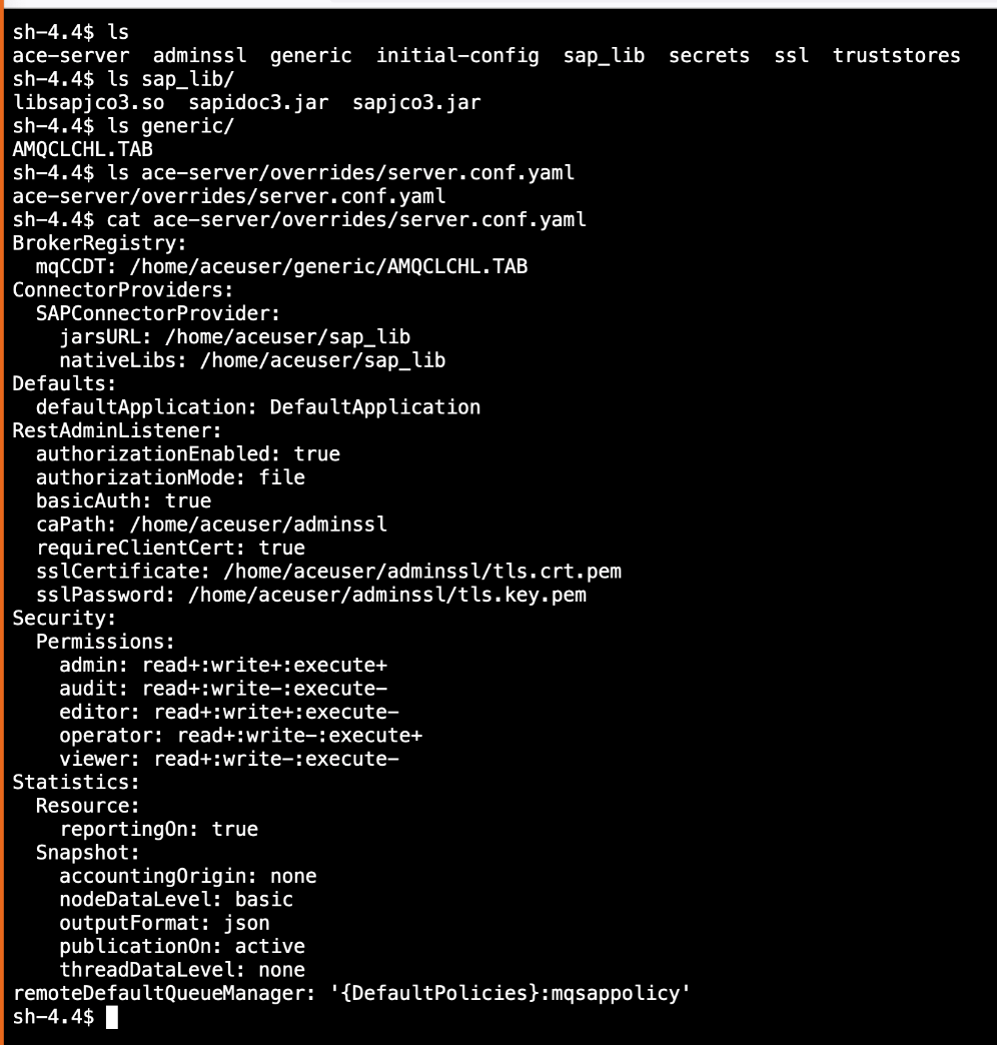
- Once POD is up, log into the terminal and inspect the files,
sap_jars, policy project, server confgi file.![Inspect the terminal files]()
- Check the integration server pod log and confirm that it shows a message similar to:
Adapter'ale_inbound.inadapter' in integration server 'saptes1' has been configured for high availability by using a shared Transation ID (TID) store on queue manager 'QUICKSTART'. - A complete pod log is shown below for reference:
-
HTML
2021-06-22T09:34:05.349Z Setup configuration files - configuration
names: mqzip,sapmqpolicy,sapjars,saptes1-is-adminssl
2021-06-22T09:34:05.453Z Construct a configuration on the
filesystem - configuration name: mqzip type: generic
2021-06-22T09:34:05.453Z Construct generic files on the filesystem
2021-06-22T09:34:05.453Z Construct a configuration on the
filesystem - configuration name: sapmqpolicy type: policyproject
2021-06-22T09:34:05.453Z Construct policy project on the filesystem
2021-06-22T09:34:05.454Z Construct a configuration on the
filesystem - configuration name: sapjars type: serverconf
2021-06-22T09:34:05.454Z Construct serverconfyaml on the filesystem
2021-06-22T09:34:05.454Z Construct a configuration on the
filesystem - configuration name: saptes1-is-adminssl type: adminssl
2021-06-22T09:34:05.454Z Construct adminssl on the filesystem

About to 'Initialize' the deployed resource 'SAP_Inbound' of type
'Application'.
2021-06-22T09:34:39.532Z Integration server not ready yet
2021-06-22 09:34:41.131708: Created compiled 'XMLNSC' schema file
'SAP_Inbound/$mqsiApplication.bir'.
2021-06-22T09:34:44.623Z Integration server not ready yet
2021-06-22T09:34:49.627Z Integration server not ready yet
2021-06-22 09:34:53.332604: About to 'Start' the deployed resource
'SAP_Inbound' of type 'Application'.
2021-06-22T09:34:54.631Z Integration server not ready yet
2021-06-22 09:34:56.035240: Adapter'ale_inbound.inadapter' in
integration server 'saptes1' has been configured for high
availability by using a shared Transation ID (TID) store on queue
manager 'QUICKSTART'.
2021-06-22T09:34:59.729Z Integration server not ready yet
2021-06-22 09:35:03.942118: The integration server 'saptes1' on
integration node 'integration_server' has SAP adapter components
deployed to it which are being used in at least one message flow.
2021-06-22 09:35:03.942766: Deployed resource 'testflow'
(uuid='testflow',type='MessageFlow') started successfully.
2021-06-22T09:35:04.735Z Integration server not ready yet ..2021-
06-22 09:35:07.324726: IBM App Connect Enterprise administration
security is authentication, authorization file.
2021-06-22 09:35:07.346472: The HTTP Listener has started listening
on port '7600' for 'RestAdmin http' connections. .
2021-06-22 09:35:07.352681: Integration server has finished initialization.
2021-06-22T09:35:09.823Z Integration server is ready
- Test the flow. Now that the message flow is successfully deployed and is listening for events, trigger an IDOC from SAP (TCODE- WE19) and check that it has reached the App Connect flow and that its contents have been written into the /tmp/test.log file.
- From the IDOC Test tool we sent an IDOC. The IDOC number is : 00000000271102
![Test tool for iDoc]()
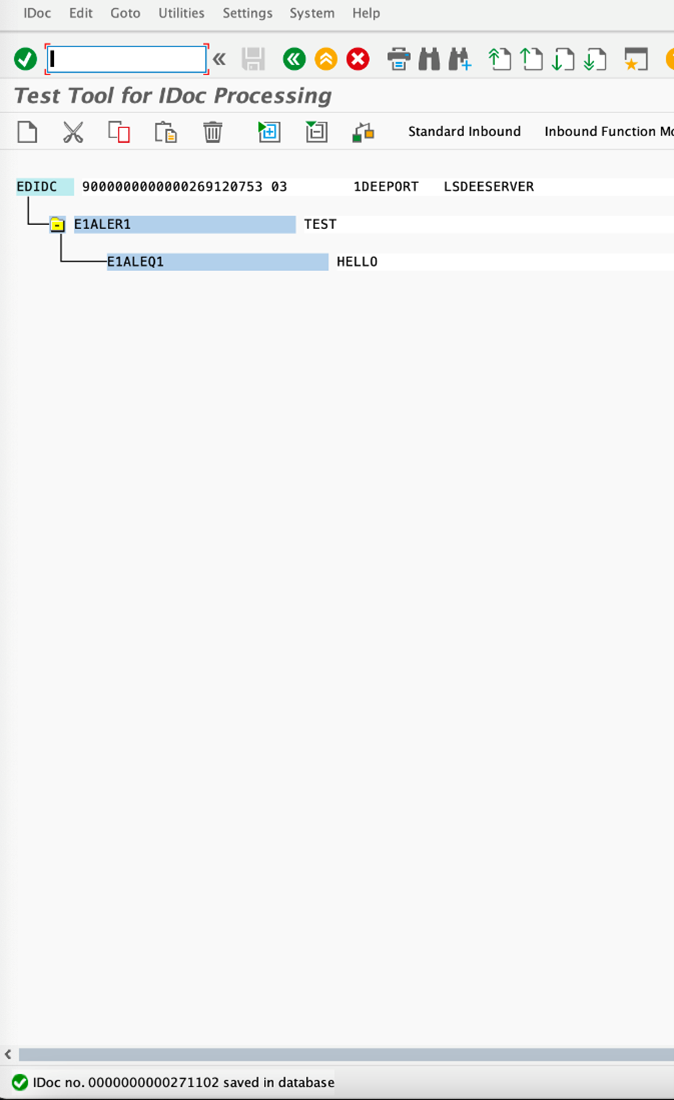
The contents of the output file with IDOC details:

Published at DZone with permission of Amar Shah. See the original article here.
Opinions expressed by DZone contributors are their own.
Comments