Implementing EKS Multi-Tenancy Using Capsule (Part 3)
Understand how to configure namespace options, resource quotas, and limit ranges, network policies for the tenants. Verify cross-tenant and cross-cluster communications.
Join the DZone community and get the full member experience.
Join For FreeIn the previous articles of this series (Part 1 and Part 2), we have understood what multi-tenancy is, different types of tenant isolation models, challenges with Kubernetes native services, installing capsule framework on AWS EKS, and creating single or multiple tenants on EKS cluster, with single or multiple AWS IAM users as tenant owners.
In this part, we will explore how to configure namespace options, resource quotas, and limit ranges, and assign network policies for the tenants using the Capsule framework.
Configure Namespace Options and Verify Across Namespace Inheritance for the Tenant
The cluster admin can control how many namespaces a tenant can create by setting a quota in the tenant manifest spec.namespaceOptions.quota.
kubectl apply -f oil-ns-options.yaml
# oil-ns-options.yaml is as below
apiVersion: capsule.clastix.io/v1beta2
kind: Tenant
metadata:
  name: oil
spec:
  owners:
  - name: shiva
    kind: User
  namespaceOptions:
quota: 3# get the description of the tenant created
kubectl get tenant oil -o yaml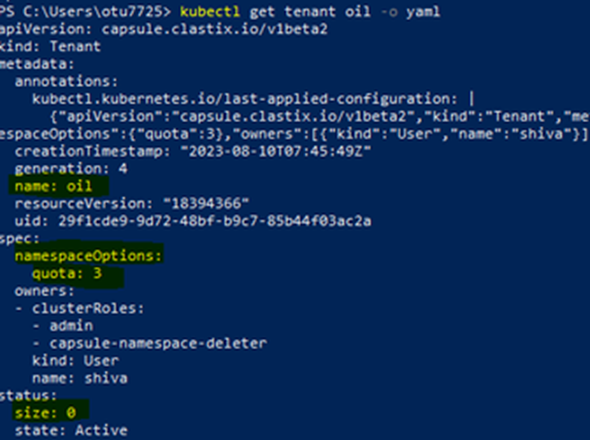
The current namespace size is 0 while the quota allotted is 3. Tenant owner can create additional namespaces according to the quota:
# login as shiva and create multiple namespaces until it exceeds quota
aws eks --region us-east-1 update-kubeconfig --name eks-cluster1 --profile shiva
kubectl create ns oil-development
kubectl create ns oil-production
kubectl create ns oil-qa
kubectl create ns oil-tesing
Once the namespace quota assigned to the tenant has been reached, the tenant owner cannot create further namespaces. The enforcement of the maximum number of namespaces per Tenant is the responsibility of the Capsule controller via its Dynamic Admission Webhook capability.
As a cluster administrator, verify the tenant oil description.
kubectl get tenant oil -o yaml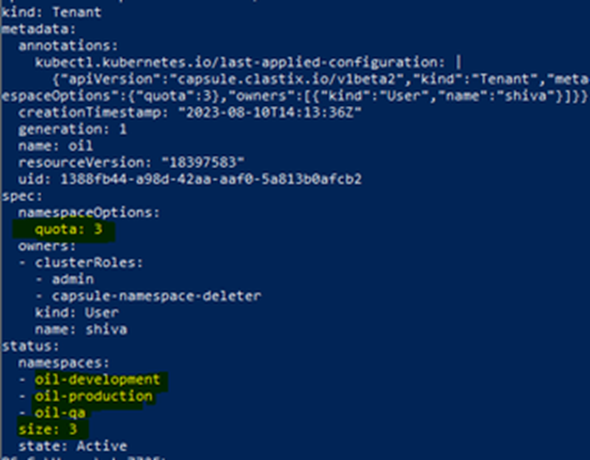
Configure Resource Quotas and Verify Across Namespaces Inheritance for the Tenant
ResourceQuota is an object in Kubernetes that enables administrators to restrict cluster tenants' resource usage per namespace. Namespaces creates virtual clusters within a physical Kubernetes cluster to help users avoid resource naming conflicts and manage capacity, among others.
As a cluster administrator, apply the below YAML configuration.
apiVersion: capsule.clastix.io/v1beta2
kind: Tenant
metadata:
  name: oil
spec:
  owners:
  - name: shiva
    kind: User
  namespaceOptions:
    quota: 3
  resourceQuotas:
    scope: Tenant
    items:
    - hard:
        limits.cpu: "8"
        limits.memory: 16Gi
        requests.cpu: "8"
        requests.memory: 16Gi
    - hard:
        pods: "10"
We have defined two hard limits. One with CPU, memory limits, and requests. Other total number of pods in the tenant oil. When the aggregate usage for all namespaces crosses the hard quota, then the native ResourceQuota . The admission Controller in Kubernetes denies the tenant owner's request to create resources exceeding the quota:
As a tenant owner, verify the resource quotas above will be inherited by all the namespaces.
kubectl -n oil-production describe quota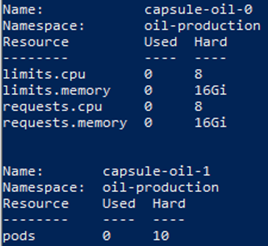
kubectl -n oil-development describe quota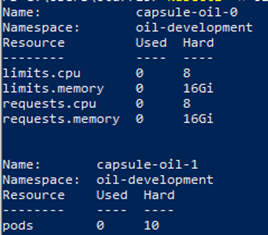
As a tenant owner, create an nginx deployment by applying the below YAML in the oil-development namespace.
kubectl -n oil-development apply -f oil-nginx-deploy-quota.yaml

# Get the pods created in the namespace development of tenant oil
kubectl -n oil-development get pods

Now, change the replica count from 3 to 10 in oil-nginx-deploy-quota.yaml and apply it in the ‘oil-production’ namespace.
kubectl -n oil-production apply -f oil-nginx-deploy-quota.yaml# oil-nginx-deploy-quota.yaml is as below
apiVersion: apps/v1
kind: Deployment
metadata:
name: nginx-deployment
labels:
app: nginx
spec:
replicas: 10
selector:
matchLabels:
app: nginx
template:
metadata:
labels:
app: nginx
spec:
containers:
- name: nginx
image: nginx
resources:
limits:
memory: 200Mi
cpu: 1
requests:
memory: 100Mi
cpu: 100m
ports:
- containerPort: 80kubectl -n oil-production get pods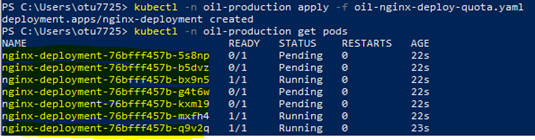
Though the replica count is 10, only 7 pods are created as the total hard limit specified is 10, and 3 are already created in the 'oil-development' namespace.
Configure Pod and Container Limits, and Verify Across Namespaces Inheritance for the Tenant
A limit range allows you to specify the minimum and maximum CPU and memory limits for all containers across a pod in a given project. To create a container in the project, the container CPU and memory requests in the Pod spec must comply with the values set in the LimitRange object.
As a cluster admin, apply the below YAML configuration.
apiVersion: capsule.clastix.io/v1beta2
kind: Tenant
metadata:
  name: oil
spec:
...
  limitRanges:
    items:
      - limits:
          - type: Pod
            min:
              cpu: "50m"
              memory: "5Mi"
            max:
              cpu: "1"
              memory: "1Gi"
      - limits:
          - type: Container
            defaultRequest:
              cpu: "100m"
              memory: "10Mi"
            default:
              cpu: "200m"
              memory: "100Mi"
            min:
              cpu: "50m"
              memory: "5Mi"
            max:
              cpu: "1"
              memory: "1Gi"
      - limits:
          - type: PersistentVolumeClaim
            min:
              storage: "1Gi"
            max:
              storage: "10Gi"
When a tenant owner creates the namespace any new namespace, Limits will be inherited by all the namespaces created.
Assign Network Policies
Kubernetes network policies control network traffic between namespaces and between pods in the same namespace. A cluster admin can enforce network traffic isolation between different tenants while leaving to the tenant owner, the freedom to set isolation between namespaces in the same tenant or even between pods in the same namespace.
Create a Tenant-Level Network Policy
As a cluster administrator, create a new tenant ‘oil’ with IAM user ‘shiva’ as the tenant owner having ingress and egress network policies as shown in the below YAML file:
kubectl apply -f oil-tenant-net.yaml## oil-tenant-net.yaml
apiVersion: capsule.clastix.io/v1beta2
kind: Tenant
metadata:
name: oil
spec:
owners:
- name: shiva
kind: User
networkPolicies:
items:
- policyTypes:
- Ingress
- Egress
egress:
- to:
- ipBlock:
cidr: 0.0.0.0/0
except:
- 192.168.0.0/16
ingress:
- from:
- namespaceSelector:
matchLabels:
capsule.clastix.io/tenant: oil
- podSelector: {}
- ipBlock:
cidr: 192.168.0.0/16
podSelector: {}Verify Network Policy Applied Across All the Namespaces in the Tenant
As a tenant owner, create two new namespaces ‘oil-development’ and ‘oil-production’. Get the network policies of the namespaces. Tenant policies have to be applied across all the namespaces.
# Get network policies of the namespace
kubectl -n oil-develoment get networkpolicies
kubectl -n oil-production get networkpolicies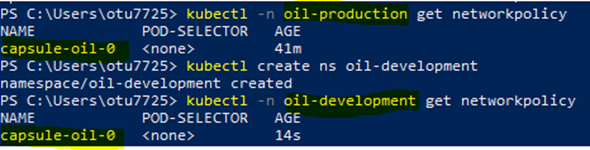
kubectl -n oil-production describe networkpolicy casule-oil-0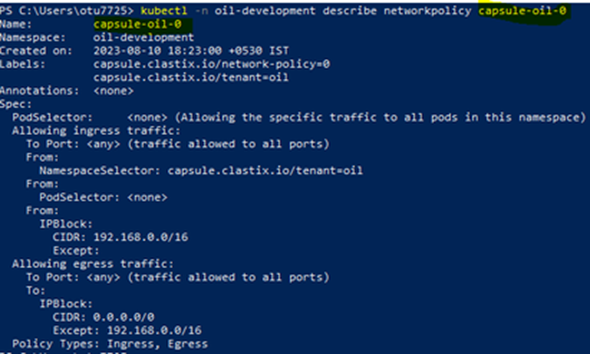
Verify if the Tenant Owner Can Create Additional Network Policies in the Namespace
As tenant owner, create network policy “production-network-policy" against the namespace ‘oil-production’ by applying the below YAML file.
apiVersion: networking.k8s.io/v1
kind: NetworkPolicy
metadata:
  labels:
  name: production-network-policy
  namespace: oil-production
spec:
  podSelector: {}
  policyTypes:
  - Ingress
- Egresskubectl -n oil-production get networkpolicies
Verify if the Tenant Owner Can Delete the Network Policies
Shiva can create, patch, and delete additional network policies within her namespaces.
kubectl -n oil-production auth can-i get networkpolicies
yes

kubectl -n oil-production auth can-i delete networkpolicies
yes

kubectl -n oil-production auth can-i patch networkpolicies
yes

kubectl -n oil-production delete networkpolicy production-network-policy
Any attempt of the tenant owner to delete the tenant network policy defined in the tenant manifest is denied by the Validation Webhook enforcing it.
Expose Services Across Tenant Namespaces and Among Clusters in the Kubernetes Environment
NodePort and LoadBalancer are both service types used in Kubernetes to expose deployments or pods to external traffic. They differ in how they achieve this and the level of control they offer.
NodePort services expose pods internally the same way a ClusterIP service does. However, NodePort exposes a service on a predefined port range (30000-32767) on all worker nodes in the Kubernetes cluster.
NodePort services are useful for exposing pods to external traffic where clients have network access to the Kubernetes nodes. For example, if your nodes have the hostnames node1 and node2, the example service above lets clients access here or here. It doesn't matter which node the external client connects to, as Kubernetes configures the network routing to direct all traffic from port 30007 on any node to the appropriate pods.
But the nodeport has many disadvantages:
- Can have only one service per port.
- Only can use ports 30,000-32,767
- If the Node/VM IP address changes, it has to be dealt with manually.
For these reasons, we will expose the service as a load balancer service.
Below are the steps we have used for exposing nginx with a load balancer for communicating within or outside the cluster and verifying the use cases below.
- We will create two tenants: “oil” with tenant owner shiva and “gas” with tenant owner “ganesha.” Please refer to previous sections on the creation process.
- As a tenant owner Shiva, creates nginx deployment in the oil-production namespace and exposes it as a load balancer service.
kubectl -n oil-production create deployment lb-nginx --image=nginx
kubectl -n oil-production create service loadbalancer lb-nginx --tcp=80:80- As a tenant owner Shiva, get the services in the space to get the external-ip address.
kubectl -n oil-production get svcFrom the result, the external address of the service is:
Expose Service and Verify Cross Tenant Communication
As a tenant owner, Ganesha created a test pod in the gas-production namespace in tenant ‘gas’.
aws eks --region us-east-1 update-kubeconfig --name eks-cluster1 --profile ganesha
kubectl -n gas-production run webserver --image=nginx
Log into the pod and try to access/curl the external IP address of lb-nginx service created by owner Shiva in the namespace “oil-production” of tenant ‘oil’. The “Welcome to Nginx” page is displayed.
kubectl -n gas-production get pods
kubectl -n gas-production exec -it nginx-6bb49bc94b-g52qw sh
curl a55013c0596be488a9ee2a63254bd021-1734400256.us-east-1.elb.amazonaws.com
Expose Service and Verify Cross-Cluster Communication
- Login into the AWS console and create one more EKS cluster eks-cluster2.
- From the local machine, log in to the PowerShell.
- As a cluster administrator, in "eks-cluster2" cluster, create a new namespace, called test.
aws eks --region us-east-1 update-kubeconfig --name eks-cluster2
kubectl create ns test
kubectl get ns
Create a test pod in the namespace and try to access/curl the external IP address of lb-nginx service created by owner Shiva in the namespace “oil-production” of tenant ‘oil’.
kubectl -n test run nginx --image=nginx
kubectl -n test exec -it nginx sh
curl a55013c0596be488a9ee2a63254bd021-1734400256.us-east-1.elb.amazonaws.com
“Welcome to Nginx” page is displayed.
As the cluster's nodes are in a private subnet and are reachable only inside or through a VPC, the services will be only accessible within the organization and not from the internet.
Summary
In this part, we have understood how to configure namespace options, resource quotas, and limit ranges, network policies for the tenants. Also, we have exposed services and verified cross-tenant and cross-cluster communications. In the next article, we will deep dive into security policy verification use cases by configuring security policy engines like Kyverno or Open Gatekeeper.
Opinions expressed by DZone contributors are their own.
Comments