Implementing Multi-Level Caching in Java With NCache
Understanding the benefits of multi-level caching and setting up multi-level caching in Java using NCache — using it both as a distributed cache and a local cache.
Join the DZone community and get the full member experience.
Join For FreeMulti-level caching is a technique used to improve the performance of applications by storing frequently accessed data in different cache layers. The cache layers generally lie at various levels of the application stack.
It is a common practice to use a distributed cache like NCache to implement multi-level caching in applications. NCache provides a scalable and high-performance caching solution that can store data in memory across multiple servers. In addition to this, NCache provides a feature to enable local caching in client nodes to offer even faster data access.
In this article, we will discuss how to implement multi-level caching with NCache and the benefits of using this approach.
Why Multi-Level Caching?
Before implementing multi-level caching, let's understand how storing data in multiple cache layers can benefit an application.
Let's talk about a typical application setup where data is stored in a database and retrieved by the application when needed:
- When an application needs to access data, it sends a request to the database, which retrieves the data and sends it back to the application.
- This process can be slow due to network latency and the time to retrieve data from the database.
To improve the application performance, we need to reduce the number of times the application has to query the database for the same data. This is where caching comes into play.
Improving Performance With Caching
To solve the problem, we can store frequently accessed data in a cache, which is faster to access than a database.
When the application needs the data, it first checks the cache. If the data is found in the cache, it is returned to the application without querying the database. This reduces the load on the database and improves the response time of the application.
Caches can be implemented at different levels of the application stack, such as:
- Local cache: A cache local to the application instance. It stores data in memory on the same server where the application is running. This is the fastest to access but is limited to a single server.
- Distributed cache: A cache that is shared across multiple servers in a cluster. It stores data in memory across multiple servers, providing scalability and high availability. NCache is an example of a distributed cache.
In addition to the above, there can be other cache layers like database query caches, CDN caches, etc. We'll focus on local and distributed caching to demonstrate multi-level caching as they are most commonly used.
Let's look at a comparison of local and distributed caching in the below table:
| Local Cache | Distributed Cache | |
|---|---|---|
| Scope | Local to the application instance | Shared across multiple servers in a cluster |
| Scalability | Limited to a single server | Can be scaled to multiple servers |
| High Availability | Goes down if the server goes down | Provides high availability through replication and failover |
| Performance | Fastest access | Slower access than local cache due to network latency |
| Storage | Limited by server memory | Can store larger amounts of data |
| Use Case | Suitable for small-scale applications | Suitable for large-scale applications with high-traffic |
By combining local and distributed caching, we can create a multi-level caching strategy that leverages the benefits of both types of caches. This can help improve the performance of the application and reduce the load on the database.
L1 and L2 Caching
In multi-level caching, the cache layers are often called L1 and L2 caches.
- L1 Cache: An L1 Cache stores limited data but provides faster access times. Since it stores limited data, it may have a higher cache miss rate. Local caches are typically used as L1 caches.
- L2 Cache: An L2 Cache stores more data and is shared across multiple servers. The purpose of the L2 cache is to reduce the cache miss rate by storing more data and providing high availability. Distributed caches like NCache are often used as L2 caches.
By combining L1 and L2 caching, applications can balance fast access times and high availability, thus resulting in improved performance and scalability.
Let's look at a diagram that illustrates the concept of multi-level caching with L1 and L2 caches:
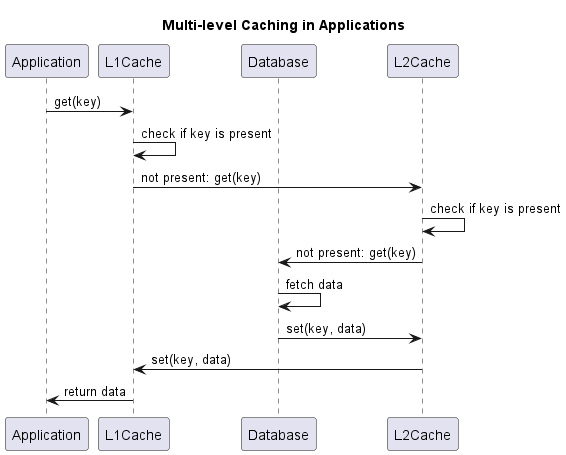
In the diagram:
- The application instances have their local caches (L1 caches) that store frequently accessed data.
- The distributed cache (L2 cache) stores more data and is shared across multiple servers in a cluster.
- When an application needs data, it first checks the L1 cache. If the data is not found in the L1 cache, it checks the L2 cache. If the data is found in the L2 cache, it is returned to the application.
- If the data is not found in either cache, the application queries the database and stores the data in both caches for future access.
In the data update scenario, when the application updates data, it updates the database and invalidates/updates the corresponding data in both caches. This ensures that the data remains consistent across all cache layers.
Using this multi-level caching strategy, applications can reduce the load on the database, improve response times, and scale to handle high-traffic loads.
Setting up a Distributed Cache With NCache
Now that we understand the benefits of multi-level caching, let's see how we can implement it using NCache. We'll build a simple Java application that uses NCache as the distributed cache and a local cache for storing data.
To begin with, let's explore how we can set up a cache cluster with NCache and connect to it from our Java application.
Setting up NCache Server
Before we start coding, we need to set up NCache on our servers. NCache provides a distributed caching solution that can be installed on Windows and Linux servers.
We'll create a cache cluster using NCache and configure it. Once the cache cluster is set up, we can connect to it from our Java application.
Adding NCache Dependencies
To use NCache in our Java application, we need to add the NCache client libraries to our project. We can do this by adding the following Maven dependencies to our pom.xml file:
<dependency>
    <groupId>com.alachisoft.ncache</groupId>
    <artifactId>ncache-client</artifactId>
    <version>5.3.3</version> <!-- Use the latest version -->
</dependency>
This client will allow us to connect to the NCache cluster and interact with the cache from our Java code.
Setting up NCache Connection
To connect to the NCache cluster, we'll configure the cache settings in our Java application.
The preferred way to do this is by using a configuration file. The configuration file contains the cache settings, server details, and other properties required to connect to the cache cluster:
<configuration>
  <ncache-server connection-retries="5" retry-connection-delay="0" retry-interval="1" command-retries="3" command-retry-interval="0.1" client-request-timeout="90" connection-timeout="5" port="9800" local-server-ip="20.200.20.38" enable-keep-alive="true" keep-alive-interval="30" />
  <cache id="demoCache" client-cache-id="" client-cache-syncmode="optimistic" default-readthru-provider="" default-writethru-provider="" load-balance="True" enable-client-logs="False" log-level="error">
    <server name="20.200.20.38"/>
    <server name="20.200.20.23"/>
  </cache>
</configuration>
Alternatively, we can declare cache connection programmatically using CacheConnectionOptions. This would require changes in the code when we need to update the cache connection details and therefore is not recommended.
Code Example: Building Blocks
Now that we have set up NCache and connected to the cache cluster, let's build a simple Java application that demonstrates multi-level caching with NCache.
We'll create a small service that provides a CRUD (Create, Read, Update, Delete) interface for storing and retrieving Product data. The service will use a distributed cache backed by NCache.
In addition to this, we'll explore how to use NCache Client Cache to provide local caching.
Data Class
Let's start by defining a simple Product class that represents a product in our application:
public class Product {
    private int id;
    private String name;
    private double price;

    // Getters and Setters
}
Distributed Cache Operations With NCache
Next, we'll create the NCacheService class that provides methods to interact with the NCache cluster.
Here's an outline of the NCacheService class:
import java.util.Calendar;

public class ProductNCacheService {
    private final Cache cache;

    public ProductNCacheService() throws Exception {
        // connects to NCache cluster and gets the cache instance
        cache = CacheManager.GetCache("demoCache");
    }

    public Product get(int id) {
        return cache.get(id, Product.class);
    }

    public void put(int id, Product product) {
        cache.add(id, new CacheItem(product));
    }

    public void delete(int id) {
        cache.remove(id);
    }
}
First, we connect to the NCache cluster and get the cache instance. Then, we provide methods to get, put, and delete products in the cache.
Using NCache
Next, we'll create a ProductService class that provides methods to interact with the caches and the database.
The service will interact with the cache and the database to store and retrieve product data.
Retrieving Data
Let's implement the getProduct method in the ProductService class. This method retrieves a product by its ID from NCache, or the database if not found in the cache:
public class ProductService {
    private final ProductNCacheService nCacheService;
    private final ProductDatabaseService databaseService;

    public ProductService(ProductNCacheService nCacheService, ProductDatabaseService databaseService) {
        this.nCacheService = nCacheService;
        this.databaseService = databaseService;
    }
        public Product getProduct(int id) {
        Product product = nCacheService.get(id);
        if (product == null) {
            product = databaseService.getProduct(id);
            nCacheService.put(id, product);
        }
        return product;
    }
}
Let's look at the getProduct method in detail:
- The
ProductServiceclass has a reference to theProductNCacheServiceandProductDatabaseServiceclasses. - In the
getProductmethod, we first try to retrieve the product from the NCache using thegetmethod. If the product is not found in the cache, we fetch it from the database using thegetProductmethod of theProductDatabaseServiceclass. - Once we have the product, we store it in the NCache using the
putmethod so that it can be retrieved from the cache in subsequent calls.
This is an implementation of one level of caching where we first check the distributed cache (NCache) and then the database if the data is not found in the cache. This helps reduce the load on the database and improves the response time of the application.
Updating Data
Now that we understand retrieving data, let's implement the updateProduct method in the ProductService class. This method updates a product in NCache and the database:
public void updateProduct(Product product) {
    databaseService.updateProduct(product);
    nCacheService.put(product.getId(), product); // Update the product in the cache instantly
}
There are multiple ways to handle data updates in multi-level caching:
- It is possible that instant updates are not required in the cache. In this scenario, the client can update the database and invalidate the cache data. The next read operation will fetch the updated data from the database and store it in the cache.
- For scenarios where instant updates are required, the client can update the database and then update the cache data. This ensures that the cache data is always in sync with the database.
Since we are using a dedicated distributed cache, it may be beneficial to update the cache data after updating the database to maintain consistency and avoid cache misses.
Another important aspect of NCache is its support for Read-Through and Write-Through caching strategies. Read-through caching allows the cache to fetch data from the database if it is not found in the cache. Similarly, write-through/write-behind caching allows the cache to write data to the database when it is updated in the cache. This helps maintain consistency between the cache and the database at all times.
Adding a Local Cache Using NCache Client Cache
The next step is to add a local cache as the L1 cache in our application. We could provide our own implementation of an in-memory cache or use a more sophisticated local cache like the NCache Client Cache.
NCache provides a Client Cache that can be used as a local cache in the application. Using NCache Client Cache instead of our own in-memory cache removes the overhead of managing cache eviction, cache size, and other cache-related concerns.
Let's see how we can use the NCache Client Cache as the L1 cache in our application.
NCache Client Cache Setup
NCache can create a client cache that connects to the NCache server and stores data locally. The client cache can be configured to use different synchronization modes, eviction policies, and isolation levels to control how data is retrieved and updated.
To set up the NCache Client Cache, we'll configure it in the NCache Server. We can create a client cache for an existing clustered cache and configure its properties.
Here are a few properties we need to set when creating a new client cache:
- Cache name: The name of the client cache.
- Sync mode: The synchronization mode for the client cache. We can choose between
OptimisticandPessimisticmodes. Optimistic mode ensures data is always returned to the client if a key exists. However, due to cache synchronization delays, data may not always be consistent. Pessimistic mode ensures inconsistent data is not returned to the client but may have a performance impact as it can lead to a few more local cache misses. - Isolation Level: We can choose between InProc and OutProc isolation levels. InProc stores data in the application's memory, while OutProc stores data in a separate process. The benefit of OutProc is that it can store more data and is more resilient to application crashes. At the same time, InProc is faster as it stores data in the application's memory.
- Cache size: The total size to which the cache can grow.
In addition to this, we can set up an eviction policy:
- Eviction policy: The eviction policy determines how the cache handles data when it reaches its maximum size. We can choose between
LRU(Least Recently Used),LFU(Least Frequently Used), andPriorityeviction policies. - Default priority: The default priority of the items in the cache. If priority-based eviction is enabled, items with higher priority are evicted last. The client can override default priority when adding items to the cache.
- Eviction percentage: The percentage of items to evict when the cache reaches its maximum size.
- Clean interval: The interval at which the cache is cleaned up. It looks for expired items and evicts them.
Using NCache Client Cache
Once the NCache Client Cache is set up, we can use it in our Java application as the L1 cache. One big advantage is that the code interacting with NCache needs no changes.
Method 1 (Preferred): Configuration File
If using a configuration file, we can add the cache name and other properties to the client.ncconf file. Here's an example of the same:
<configuration>
  <ncache-server connection-retries="5" retry-connection-delay="0" retry-interval="1" command-retries="3" command-retry-interval="0.1" client-request-timeout="90" connection-timeout="5" port="9800" local-server-ip="20.200.20.38" enable-keep-alive="true" keep-alive-interval="30" />
  <cache id="demoCache" client-cache-id="demoClientCache" client-cache-syncmode="optimistic" default-readthru-provider="" default-writethru-provider="" load-balance="True" enable-client-logs="False" log-level="error">
    <server name="20.200.20.38"/>
    <server name="20.200.20.23"/>
  </cache>
</configuration>
Here, in addition to the usual properties, we have added client-cache-id="demoClientCache" and client-cache-syncmode="optimistic" to specify client cache behavior. This is easy to manage and allows us to configure the client cache properties without changing the code.
Method 2: Programmatic Configuration
Similarly, if using programmatic configuration, we can add the client cache details to our connection. Let's define our NCacheService class to include a client cache connection:
public class NCacheService {
    private final Cache cache;

    public NCacheService() throws Exception {
        CacheConnectionOptions cacheConnectionOptions = new CacheConnectionOptions();
        cacheConnectionOptions.UserCredentials = new Credentials("domain\\user-id", "password");
        cacheConnectionOptions.ServerList = new List<ServerInfo>() {
            new ServerInfo("remoteServer",9800);
        };

        CacheConnectionOptions clientCacheConnectionOptions = new CacheConnectionOptions();
        clientCacheConnectionOptions.LoadBalance = true;
        clientCacheConnectionOptions.ConnectionRetries = 5;
        clientCacheConnectionOptions.Mode = IsolationLevel.OutProc;

        cache = CacheManager.GetCache("demoCache", cacheConnectionOptions, "demoClientCache", clientCacheConnectionOptions);
    }
}
Here, we have added a clientCacheConnectionOptions object to specify the client cache properties. We pass this object when creating the cache instance using CacheManager.GetCache. This method is not recommended as it doesn't allow for easy configuration changes.
Conclusion
In this article, we discussed the concept of multi-level caching and how it can be used to improve the performance of applications. By combining local and distributed caching, applications can balance fast access times and high availability resulting in better performance and scalability.
We implemented a simple Java application to demonstrate multi-level caching. First, we created an application that uses NCache as a distributed cache. Then, we used NCache's Client Cache feature to create a local cache for the application with minimal code changes.
Using NCache as the distributed and the local cache, we demonstrated how multi-level caching can be implemented in Java applications. This approach can help reduce the load on the database, improve response times, and scale to handle high-traffic loads.
Opinions expressed by DZone contributors are their own.
Comments