Implementing a Custom OAuth Policy in Mule
This article is an attempt to resolve the drawbacks of Mule's existing default OAuth policy and to add some more value-added features in the existing system.
Join the DZone community and get the full member experience.
Join For FreeAs we all know OAuth 2 is an authorization mechanism that enables applications or users to obtain limited access to an API and provides user authentication to the API or service based on various roles/scopes. Mule also provides an OAuth provider that allows us to restrict the clients/users to an API.
Together with Mule's external OAuth provider and OAuth 2.0 access token enforcement using external provider policy, it makes an almost perfect system to implement an OAuth feature to protect APIs across the Anypoint platform from external users.
However, working with Mule's default OAuth policy, which is known as OAuth 2.0 access token enforcement using external provider policy, I realize there are certain limitations in getting a perfect OAuth system in our Anypoint platform.
Few of the limitations I found while working with Mule's default OAuth policy are:
- Token cache: In Mule's default OAuth policy the validation result of a valid access_token is Cached. If the same valid access_token is requested multiple times in an API(proxy API), and if the access_token is not expired, the validation result is reused, which means the policy will not validate the access_token against the validate URL again. Instead, it will simply pass the user request and allow the proxy API to hit the actual backend API. The Mule policy uses <oauth2-gw:validate/> component in their policy code. Now, caching the validation result somewhere and allowing the backend API to be hit is a serious security violation. The impact will be huge. Now, for example, if a user is using a valid access_token in the proxy URL which is hitting the backend API, the user will get the success response from the API. The user can use the same token multiple times till it expires to get the result. But what in the meantime, the admin of the application has revoked the access_token? The user now should not able to get the response with that access_token right? But here it doesn't happen. Since the default OAuth policy is caching the validation result of that token, the user will still get a success response with that revoked token which is a security violation. Refer here to know how default OAuth policy works behind the scene to validate the token.
- Flexibility in passing access_token: Generally, all the APIs that are protected by Mule's external OAuth provider needs the access_token in their proxy API to get validated. This access_token can be passed in 3 different ways with the proxy API. 1) access_token can be passed as a query param
(?access_token=123)2) access_token can be passed as an Authorization header as a Bearer Token (Authorization:Bearer 123) 3) access_token can be simply passed as a header named access_token (access_token: 123). All 3 ways are supported by Mule's external OAuth provider. But with this default OAuth 2.0 access token enforcement using external provider policy, there is a limitation where we can pass the access_token in the proxy API only in the first 2 ways, that is with query param and Authorization header. The third way, in the header named as access_token, is not allowed in this policy. No matter how you try, even writing the process in API RAML as the header will not help you in passing the access_token in an API proxy header. This is another limitation in the default policy. - Cannot restrict Clients or Scope from the policy: In Mule's default OAuth policy, there is no way you can configure the API for a particular client or restrict other clients from accessing it. For example, if I have an API which is exposed to 5 different clients or users configured in it. If for some reason I want only 2 out of that 5 clients (though they are registered in the Anypoint platform to access the API) to be able to access this particular API and want to add an extra level of security, there is no way in the default policy that I can configure a list of clients or add only a particular client. Similarly, if I want to restrict the API based on a particular scope, I am not able to configure that here. Though Mule's default OAuth policy has the ability to add scope in its configuration, I will be unable to implement a list of scopes that I want to allow from the policy level with Mule's default OAuth policy. It doesn't work correctly with the default policy.
To overcome all these above issues, I created my own custom OAuth policy build on the top of Mule default OAuth policy, so that it works perfectly with Mule external OAuth provider or with any Mule custom OAuth provider and customize my need. The custom policy can be found here on GitHub.
Installing Custom OAuth Policy on Anypoint Platform:
Installing a custom policy is very easy on Anypoint platform. Once the installation is done, the API can be protected with the OAuth mechanism anywhere on-premises as well as in CloudHub.
The policy contains an XML and a YAML file. The policy once installed on Anypoint platform through API Manager, any number of APIs can be protected.
Here are those simple steps:
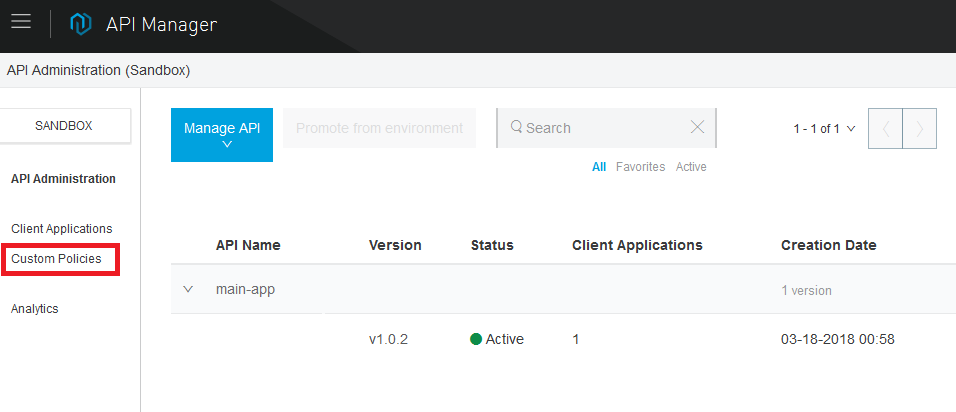
- If we click the Custom Policies link in API Manager, we will able to upload the policies:
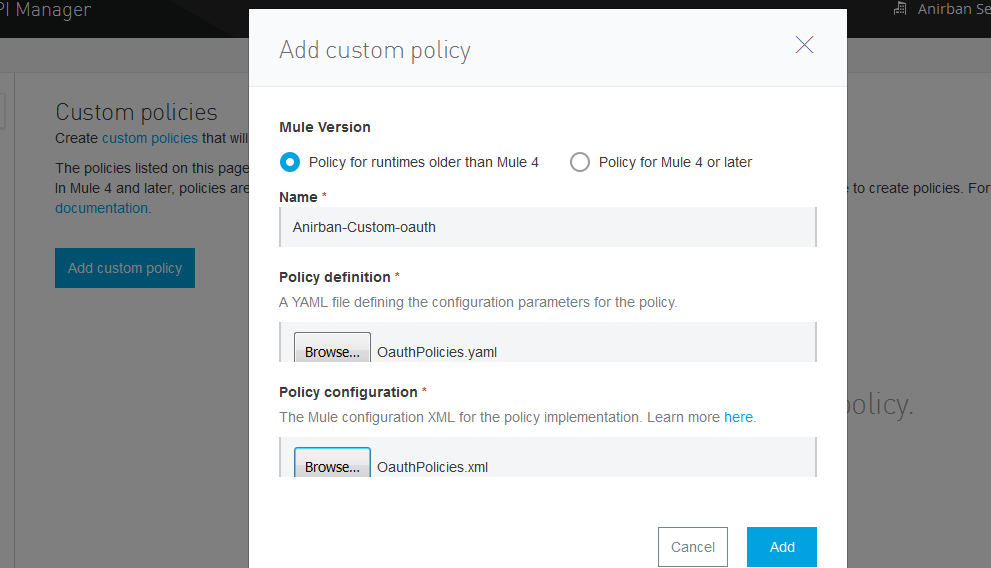
- Once the Add Custom Policy dialogue box appears, we will be able to upload the XML and the YAML files to install the Custom Policy on our platform:
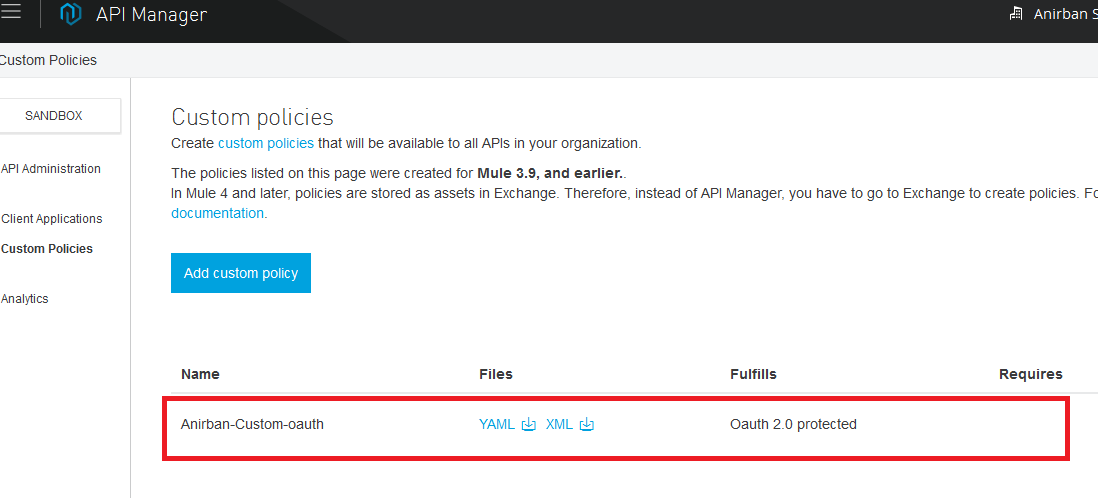
- After we upload both the files, we can see the custom policy is installed and is ready to use!
Configuring the Policy With an Existing API:
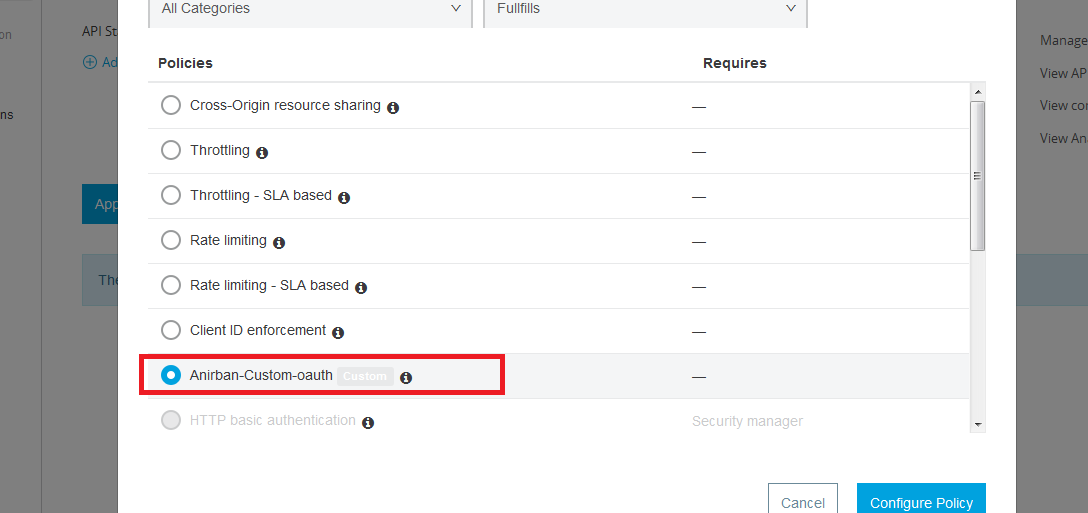
Once the policy is installed and ready, we can configure it and protect any number of APIs with the OAuth system. When we select an API to apply to the policy, we can see the custom policy is visible on the list to select:
Once applied, the policy will be ready to be configured as per our needs:
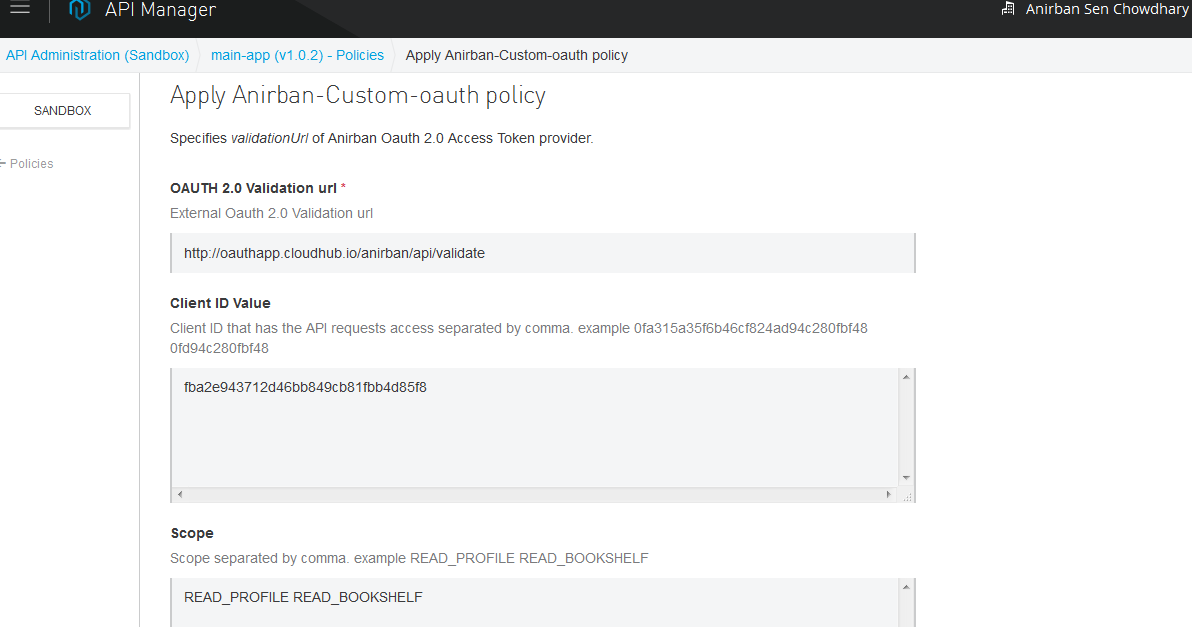
The first field is the validation URL, which is a mandatory field, where we need to put the validation URL of our Mule external OAuth provider.
The second field is the list of Client IDs separated by spaces, which we want to allow to access the API. This is an optional field and if nothing is mentioned or left blank, then it will allow all the Client ID registered with the API to access it. This is an optional yet powerful additional layer of security where we can allow any particular or a list of Clients to access the API even though they have registered for API access in that group.
Now, in a real-world scenario, if we have 3 Clients A, B and C registered in the Anypoint platform that has request access for an API, and for some reason, we want only Client A and B to be able to access the API, we will then put the Client ID of A and B in the Client ID field of the custom policy with a space separating them. So when Client C tries to access the API with it's access_token it gets the following:
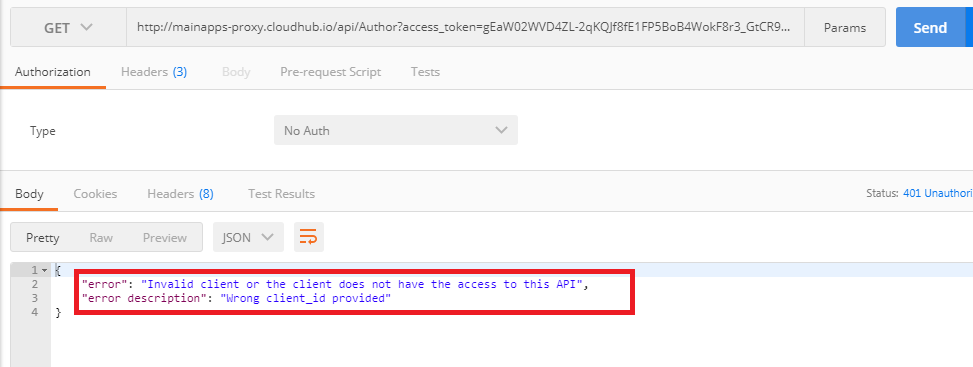
This extra layer of security configuration from the policy is for people like me who use a customized Mule external OAuth provider and create new Clients from the OAuth provider along with the customized Client ID/Secret rather than creating the Client applications and obtaining ClientID/Secret and API access privilege in the Anypoint platform. So in this case, the API access privilege is set from the Custom policy.
Similarly, in the Scope field, we can put all the scopes, with spaces separating them, that we want to allow the access to the API.
For example, if we have configured the scopes READ_PROFILE and READ_BOOKSHELF in the policy, but we are trying to access the API with some other scope, we will get the following:
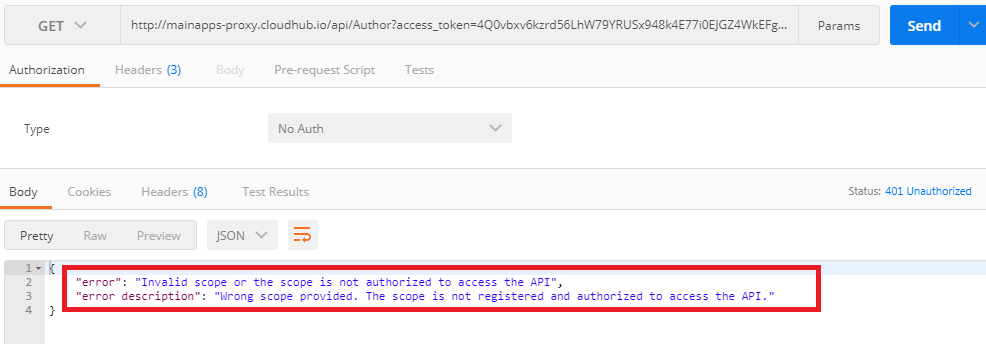
It should be noted that both the Scope and the Client ID field in the custom policy are optional. Leaving it blank will allow all Clients and Scopes to access it.
Flexibility in Passing an access_token:
Now, our custom policy is created in such a way that we are able to pass the access_token in the proxy API in all 3 ways:
- As a query param (
?access_token=123):
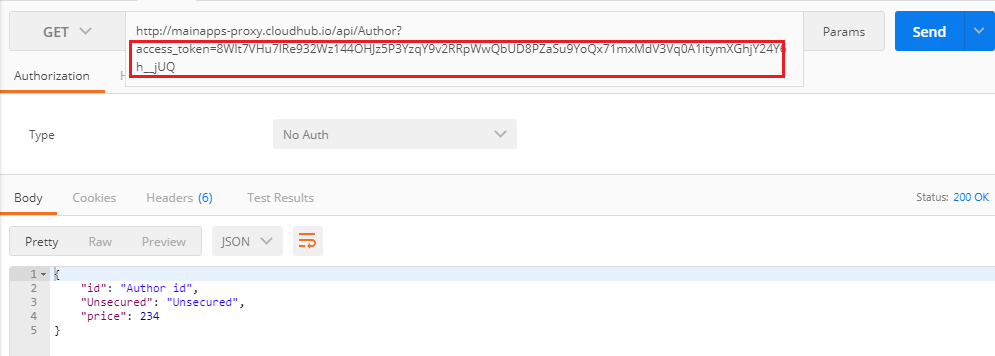
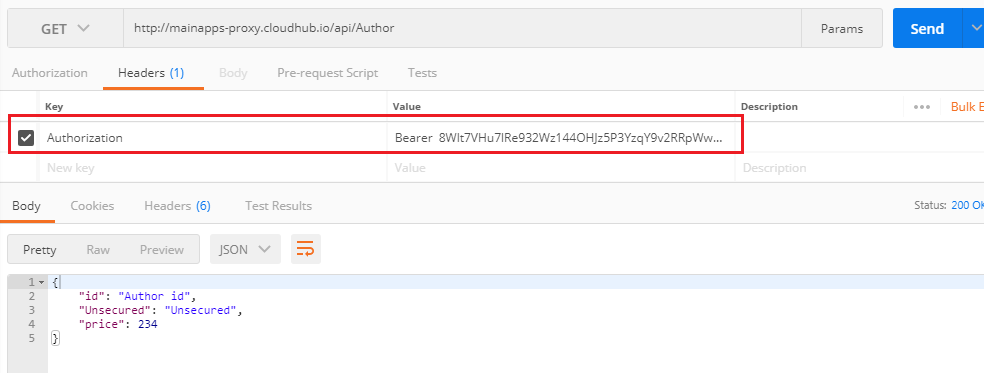
- In an Authorization header as a Bearer Token (
Authorization:Bearer 123):
- As a header named access_token:
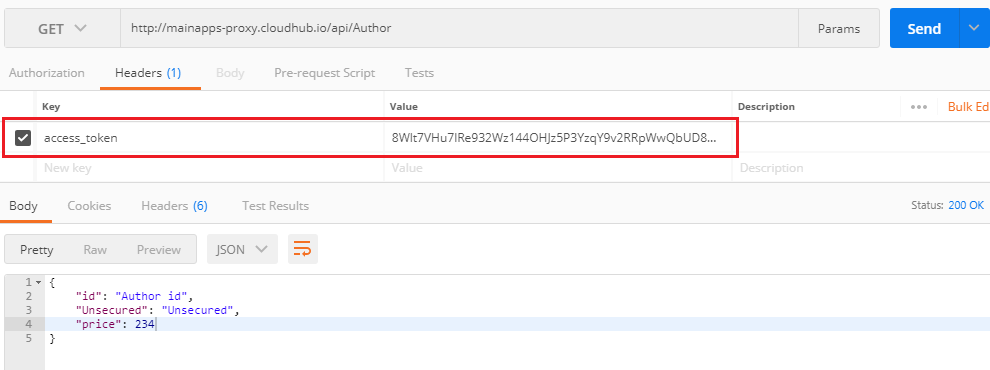
In Mule's default OAuth policy, this third option doesn't work and this is resolved here in the custom policy.
Resolving the Token Cache:
As discussed in the beginning, Mule's default OAuth policy uses a caching technique and caches the token validation results. So, if the same access_token is used in an API multiple times before it's expiry, it will produce the same results as if the caching were performed in storing the end result and no new validation of access_token is performed.
So, in the meantime, if the access_token is revoked, it will produce the same result and response, unaware of the fact that the access_token is revoked.
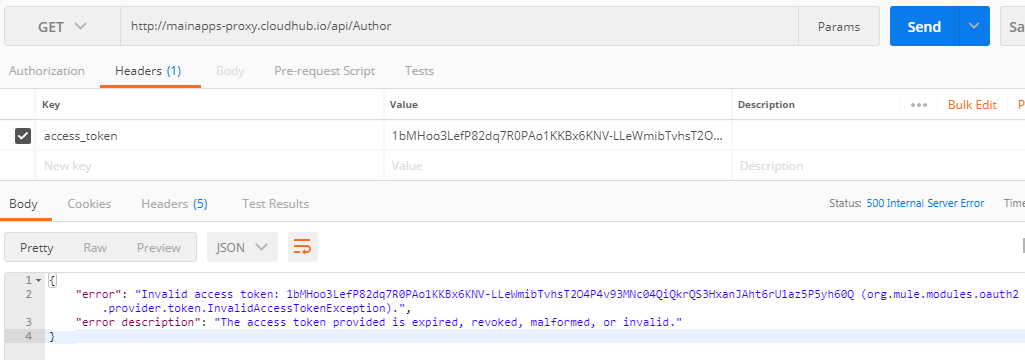
But here in this custom policy, the issue is resolved and even the same access_token is being used multiple time until it's expiry time, the policy will be calling the actual backend API. So in case the access_token is revoked, the access_token validation will be performed every time to determine the validity of the token and if it's found invalid or revoked, it will show the following:
Conclusion:
I created this custom policy to resolve the drawbacks of Mule's existing default OAuth policy and to add some more value-added features in the existing system. If there is a successful OAuth validation of an access_token, the actual backend API is called in the background to perform the actual function by the external client/user. The Client ID, Scope, and Username will be available to the backend API application as an inbound property, client_id, username, and scope respectively.
An important point to note, to execute this custom policy with Mule's external OAuth provider flawlessly, the validation flow component of the provider, on the other hand, should be configured to throw the exception as follows:
<oauth2-provider:validate throwExceptionOnUnaccepted="true"/>
Hope you liked this article. In the next post, I will discuss the customization of Mule's external OAuth provider and will demonstrate its features after customizing it to our needs.
Opinions expressed by DZone contributors are their own.

Comments