

Alert Controller In Objective-C
Learn how to use Xcode and objective-C to create a Security alert.
Introduction
We have seen a security alert in iOS applications that looks like the following image:

In this article, we will learn how to create a security alert in Objective-c using Xcode. If you are a beginner and need help getting started, check out this tutorial on getting started with Xcode.
Step 1
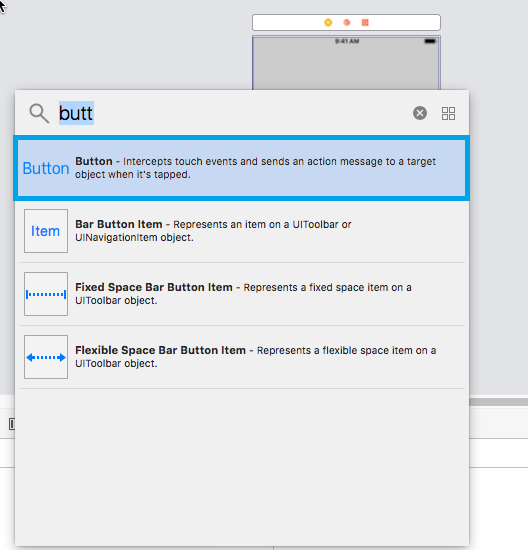 Add button from the object library.
Open up the object library and add a button to your screen.
 Adjust button
Then, adjust the button on the screen.
Step 2
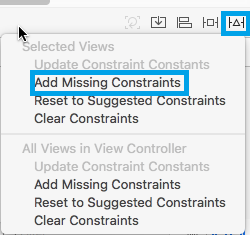 Add Constraints.
Provide constrain with the help of Resolve layout issue on bottom middle.
If a warning is still there, then select update missing constraints.
 Update Constraints.
Step 3
To uniquely identify the event on the component, we need to provide a name to the event. To provide a unique name to the event open, ViewController.h and Main.storyboard at the same time with the help of an assistant editor.
Step 4
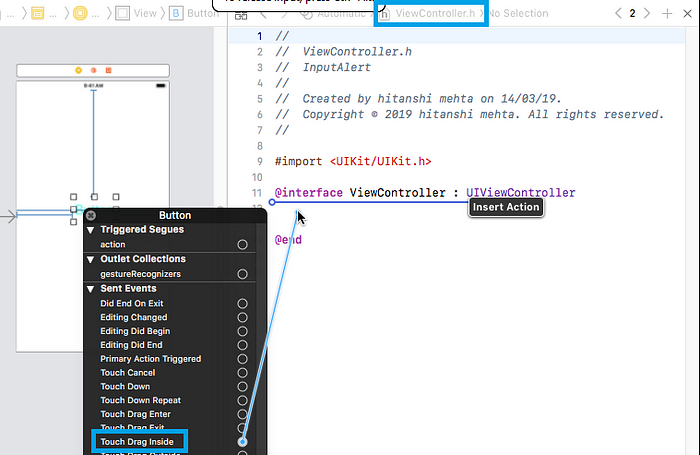
Add touch up inside.
Make sure that Main.StoryBoard and viewController.h files are open. If these files are not open, you can change it from the top of the screen (highlighted with box).
Right-click on the button. Select touch up inside. This will allow you to perform any task on button click.
Step 5

Provide a name for touch up inside event.
Once you will release the cursor, the following pop-up will appear. Here you can provide a unique name for the event. Click Connect.
Now we will write some code.
Step 6

In the alert box, we need three things:
1. Alertbox With Heading
@implementation ViewController- (void)viewDidLoad {
  [super viewDidLoad];
  // Do any additional setup after loading the view, typically from a nib.
}
-(void)InformativeAlertWithmsg:(NSString *)msg
{
  UIAlertController *alertvc=[UIAlertController alertControllerWithTitle:@"Security alert" message:msg preferredStyle:UIAlertControllerStyleAlert];
}
First, create a method that takes a string as a parameter.
In that method, create an instance of UIAlertController. This will provide a heading and display a text message. You will pass your desired message as the argument.
2. Dismiss Button
-(void) InformativeAlertWithmsg: (NSString * ) msg {
  UIAlertController * alertvc = [UIAlertController alertControllerWithTitle: @ "Security alert"
                                 message: msg preferredStyle: UIAlertControllerStyleAlert
                                ];
  UIAlertAction * action = [UIAlertAction actionWithTitle: @ "Dismiss"
                            style: UIAlertActionStyleDefault handler: ^ (UIAlertAction * _Nonnull action) {
                              NSLog(@ "Dismiss Tapped");
                            }
                           ];
  [alertvc addAction: action];
  [self presentViewController: alertvc animated: true completion: nil];
}
Create an instance of UIAlertAction that provides title and default style. Then, double click on the handler and ensure that action is performed.
We have created action and alert but they are not connected. We can connect them using addAction. We then need to connect an action controller to the current view controller using presentViewController.
3. Information Message
- (IBAction)btnInfoAlert:(id)sender {
  [self InformativeAlertWithmsg:@"Please check network connectivity"];
}
We have created an alert controller with action(Dismiss button), now we will provide information message. For that call, a method from a button touchup inside the event. While calling method provide information message as an argument.
Output


I hope that the concept is clear to you. If you have any questions, ask in the comment section!!
Opinions expressed by DZone contributors are their own.