Install Arch Linux on Windows 10 Hyper-V
This guide will walk you through how to install Arch Linux on a Windows 10 Hyper-V virtual machine.
Join the DZone community and get the full member experience.
Join For FreeA few months back, I upgraded my laptop to a new Microsoft Surface Book 2 that has all these nice features, like a detachable screen. My previous laptop and current desktop run Arch Linux as the main OS. My work is mostly done in the IDE Visual Studio Code or shell. VCS runs well on Windows 10, but shell, I don’t think I want to invest too much time in PowerShell and WSL is not exactly the best working environment for me.
I decided to deploy Arch Linux on a Windows Hyper-V virtual machine for my bash needs as I am not yet sure if I want to completely replace Windows as the main desktop on my Surface Book 2, since I still like the detachable screen and Windows 10 face authentication and the VR kit. Maybe, in the near future, I will deploy Arch Linux beside Windows 10.
This guide will walk you through how to install Arch Linux on Windows 10.
Requirements
- Download the latest Archlinux ISO Image to
$HOME\Downloads\ - VT-x/AMD-v virtualization must be enabled in BIOS (requires machine restart)
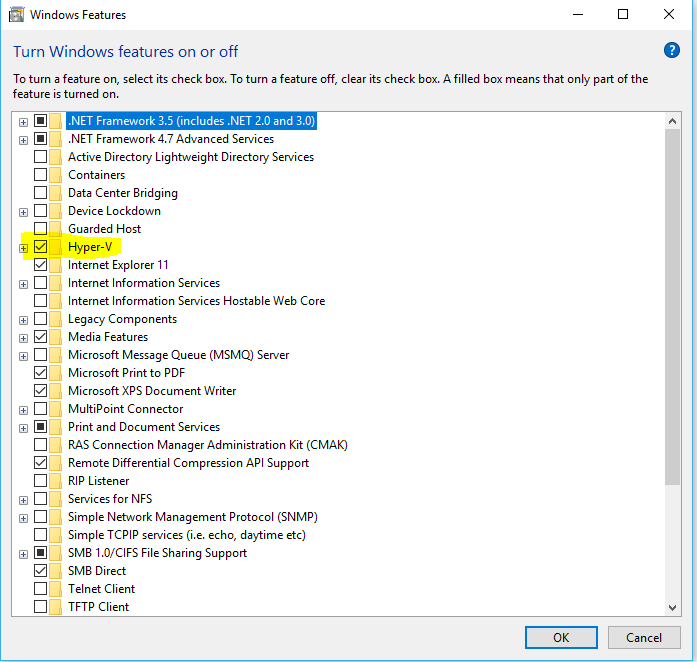
- Enable Hyper-V: go to Windows features On or Off and you will see a dialog box with a list of Windows features, as shown below. Navigate to the Hyper-V section and enable it (requires machine restart).
Hyper-V Installation
Hyper-V has been included with Windows since Windows Server 2008 as well as Windows 8, 8.1, and 10 in the Pro versions. It can be enabled from the Control Panel at “Turn Windows features on or off” under “Programs and Features.” Activate the “Hyper-V” checkbox, apply the change, and follow the directions on the screen.
Network Configuration
First, you must configure a new virtual switch so that your virtual machine will be able to connect to the Internet. Once Hyper-V is enabled, start the Hyper-V Manager.
Configuration can be done in GUI by opening Power Shell as Administrator and running Hyper-V Manager:
mmc.exe virtmgmt.mscOr we can use only PowerShell for the rest of the configurations.
Creating External Switch
Using PowerShell (run as Administrator)
- Get a list of the network adapters in the host. On a laptop, you should typically see "Ethernet" and "Wi-Fi."
Get-NetAdapter- Create the external switch with a name of VM-External-Switch, bound to the network adapter named Wi-Fi retrieved from the previous command. You may need to change your -NetAdapterName to interface connected to the internet.
New-VMSwitch -name ExternalSwitch -NetAdapterName "Ethernet 3" -AllowManagementOS $trueCreate Virtual Machine in Hyper-V
- Set VM Name, Switch Name, and Installation Media Path.
- Define PowerShell variables
$VMName = ‘ArchLinux’
$Switch = ‘ExternalSwitch’
$InstallMedia = ‘archlinux-2018.05.01-x86_64.iso’
$VMPath = ‘C:\Users\Public\Documents\Hyper-V\Virtual Hard Disks\’
$HOSTNAME = (Get-WmiObject -Class Win32_ComputerSystem -Property Name).Name- Create New Virtual Machine
New-VM -Name $VMName -MemoryStartupBytes 4GB -Generation 2 -NewVHDPath “$VMPath\$VMName.vhdx” -NewVHDSizeBytes 128GB -Path “$VMPath” -SwitchName $Switch- Optional Disable Hyper-V checkpoint
Set-VM -Name $VMName -CheckpointType $false- Add additional CPU to created VM
Set-VMProcessor $VMName -Count 4- Disable Dynamic RAM allocation in Hyper V
Set-VMMemory $VMName -DynamicMemoryEnabled $false- Disable secure boot functionality on the virtual machine
Set-VMFirmware $VMName -EnableSecureBoot Off- Add DVD Drive to existing SCSI Controller
Add-VMDvdDrive -VMName $VMName -ControllerNumber 0 -ControllerLocation 1 -Path $HOME\Downloads\$InstallMedia- Mount Installation Media
$DVDDrive = Get-VMDvdDrive -VMName $VMName- Configure Virtual Machine to Boot from DVD
Set-VMFirmware -VMName $VMName -FirstBootDevice $DVDDrive- Start VM
Start-VM -Name $VMName- Connect to the virtual machine by using Virtual Machine Connection (VMConnect).
VMConnect $HOSTNAME $VMNameArch Linux Installation
Hyper-V does not allow clipboard COPY/PASTE; for this, we will use SSH into the VM. The latest Windows 10 Fall Creators Update includes an SSH client that can be installed following the guide from How-To Geek.
Once in Hyper-V Arch shell,
- Add root password
passwd- Allow remote ssh
systemctl start sshd- Find IP to connect from remote
ip a show dev eth0 | grep -w inet- SSH into VM from Power Shell
ssh root@IPArch Installation Check and Initial Configuration
- Verify if installation supports EFI
ls -la /sys/firmware/efi- Generate a mirror list to improve installation speed
- Visit mirrorlist generator in the browser or another computer; generate a mirrorlist.
- Example mirrors in Singapore:
Server = http://mirror.nus.edu.sg/archlinux/$repo/os/$arch
Server = https://mirror.0x.sg/archlinux/$repo/os/$arch
Server = https://download.nus.edu.sg/mirror/arch/$repo/os/$arch
Server = https://sgp.mirror.pkgbuild.com/$repo/os/$arch
Server = http://download.nus.edu.sg/mirror/arch/$repo/os/$arch
Server = http://mirror.0x.sg/archlinux/$repo/os/$arch- Backup the default mirrorlist
mv /etc/pacman.d/mirrorlist /etc/pacman.d/mirrorlist.bk- Add the mirrorlist generated to
/etc/pacman.d/mirrorlist
nano /etc/pacman.d/mirrorlist- Optional: automatically scan for the best mirror. Note: this takes a considerable amount of time to scan all mirrors.
sed -i ‘s/^#Server/Server/’ /etc/pacman.d/mirrorlist.bkrankmirrors -n 6 /etc/pacman.d/mirrorlist.bk > /etc/pacman.d/mirrorlist- Example results after run:
Server = http://mirror.0x.sg/archlinux/$repo/os/$arch
Server = http://download.nus.edu.sg/mirror/arch/$repo/os/$arch
Server = http://mirror.nus.edu.sg/archlinux/$repo/os/$arch
Server = http://mirrors.evowise.com/archlinux/$repo/os/$arch
Server = http://f.archlinuxvn.org/archlinux/$repo/os/$arch
Server = http://mirror2.totbb.net/archlinux/$repo/os/$arch
Partitioning
- Verify the available disks
dmesg | grep sdalsblk- Partition EFI
gdisk /dev/sda- Clear partitions
Command (? for help): o
This option deletes all partitions and creates a new protective MBR.
Proceed? (Y/N): Y- Create EFI partition
Command (? for help): n
Partition number (1–128, default 1):
First sector (34–268435422, default = 2048) or {+-}size{KMGTP}:
Last sector (2048–268435422, default = 268435422) or {+-}size{KMGTP}: +512M
Current type is ‘Linux filesystem’
Hex code or GUID (L to show codes, Enter = 8300): EF00
Changed type of partition to ‘EFI System’- Create root partition
Command (? for help): n
Partition number (2–128, default 2):
First sector (34–268435422, default = 1050624) or {+-}size{KMGTP}:
Last sector (1050624–268435422, default = 268435422) or {+-}size{KMGTP}:
Current type is ‘Linux filesystem’
Hex code or GUID (L to show codes, Enter = 8300):
Changed type of partition to ‘Linux filesystem’- Verify partitions before writing
Command (? for help): p
Disk /dev/sda: 268435456 sectors, 128.0 GiB
Model: Virtual Disk
Sector size (logical/physical): 512/4096 bytes
Disk identifier (GUID): 7A0873FE-EA25–4CC1–8543–1559F4861C2B
Partition table holds up to 128 entries
Main partition table begins at sector 2 and ends at sector 33
First usable sector is 34, last usable sector is 268435422
Partitions will be aligned on 2048-sector boundaries
Total free space is 2014 sectors (1007.0 KiB)

Number Start (sector) End (sector) Size       Code  Name
1      2048           1050623      512.0 MiB  EF00  EFI System
2 1050624 268435422 127.5 GiB 8300 Linux filesystem- Write to the disk changes
Command (? for help): w
Final checks complete. About to write GPT data. THIS WILL OVERWRITE EXISTING
PARTITIONS!!
Do you want to proceed? (Y/N): Y
OK; writing new GUID partition table (GPT) to /dev/sda.
The operation has completed successfully.
Format Partitions
- Format EFI partition
mkfs.fat -F32 /dev/sda1- Format root partition
mkfs.ext4 /dev/sda2Mount Partition
mount /dev/sda2 /mntmkdir /mnt/bootmount /dev/sda1 /mnt/bootStart Installation
- Update system clock
timedatectl set-ntp true- Install base system
pacstrap /mnt base base-devel openssh- Generate fstab file
genfstab -U /mnt >> /mnt/etc/fstab- Chroot into newly deploy arch
arch-chroot /mnt- Install boot loader
bootctl installConfigure bootctl Loader
nano /boot/loader/loader.conf

default arch
timeout 3
editor 0- Find /dev/sda2 root partition UUID
blkid -s PARTUUID -o value /dev/sda2Note down PARTUUID nr Ex. 55523bad-38db-4e00–8cdb-d498e47f0b05
- Optional copy configuration
cp /usr/share/systemd/bootctl/arch.conf /boot/loader/entries/


nano /boot/loader/entries/arch.conf

title Arch Linux
linux /vmlinux-linux
initrd /initramfs-linux.img
options root=PARTUUID=8444d6ba-32af-415b-b148-cf4f20a04ac9 rw- Or you can update arch.conf
echo “options root=PARTUUID=$(blkid -s PARTUUID -o value /dev/sda2) rw” >> /boot/loader/entries/arch.conf- The last step is to update the bootloader
bootctl update
bootctl
Arch Linux Post-Installation Configuration
- Set shell locale (uncomment en_US.UTF-8 UTF-8)
nano /etc/locale.gen

en_US.UTF-8 UTF-8- Generate locale
locale-gen- Check locale setup
locale -a
localedef — list-archive
localectl list-locales- Edit setting for the LANG system locale
nano /etc/locale.conf

LANG=en_US.UTF-8- Or just run
localectl set-locale LANG=en_US.UTF-8- Time zone
ls -la /usr/share/zoneinfo/
ln -sf /usr/share/zoneinfo/Asia/Singapore /etc/localtime
hwclock — systohc- Set hostname
hostnamectl set-hostname Arch- Allow root login add the entry PermitRootLogin yes /etc/ssh/sshd_config
nano /etc/ssh/sshd_config

PermitRootLogin yes- Enable SSHD service
systemctl enable sshd.service- Create a root login password
passwd- Create swap file:
fallocate -l 1G /swapfile
chmod 600 /swapfile
mkswap /swapfile
echo ‘/swapfile none swap sw 0 0’ | tee -a /etc/fstab- Check swap
swapon -s- Check network config
ip a show
ip route show- Use DHCP IP allocation at startup
systemctl start dhcpcd
systemctl enable dhcpcd- Or, you can use network manager in case you want to use static IP, or even DHCP
- Use network manager with DHCP or static IP setup
nano /etc/systemd/network/20-wired.network

[Match]
Name=eth0
[Network]
DHCP=ipv4

systemctl enable systemd-networkd- Or with static IP, your IP can be different IP a show
nano /etc/systemd/network/20-wired.network

[Match]
Name=eth0
[Network]
Address=192.168.1.21/24
Gateway=192.168.1.1
DNS=1.1.1.1
DNS=1.0.0.1

systemctl enable systemd-networkd
systemctl enable systemd-resolved- Solver configuration
cat /etc/resolv.conf
cat /run/systemd/resolve/resolv.conf- Add time sync systemd service
timedatectl set-ntp true
timedatectl status- Exit and reboot
exit
shutdown now
Post Install VM Cleanup
In PowerShell as (Administrator):
- Change the boot order for the VM
$getb2 = Get-VMFirmware $VMName
$gen2.BootOrder
$gen2file = $gen2.BootOrder[0]
echo $gen2file
Set-VMFirmware -VMName $VMName -FirstBootDevice $gen2file
Get-VMFirmware $VMName- Remove DVD from VM with same SCSI as HDD
Get-VMDvdDrive -VMName $VMName -ControllerNumber 0 | Remove-VMDvdDrive- Remove the DVD Scsi controller from the VM
Get-VMScsiController -VMName $VMName -ControllerNumber 1 | Remove-VMScsiControllerFinal Touches for Arch Linux
Let’s start our new Arch Linux and install some useful tools:
- Start Arch VM
$VMName = ‘ArchLinux’Start-VM -Name $VMName- Connect to the virtual machine by using Virtual Machine Connection (VMConnect).
VMConnect $HOSTNAME $VMNameSSH into Arch VM:
- Link the resolver to resolv.conf
ln -sf /run/systemd/resolve/resolv.conf /etc/resolv.conf- Add the entry into the hosts file
nano /etc/hosts

127.0.0.1 localhost.localdomain localhost
::1 localhost.localdomain localhost
127.0.0.1 arch.localdomain arch- Install useful tools
pacman -Syyu
pacman -S p7zip unzip pygmentize docker vim htop git jq rsync tmux bash-completion keychain mlocate- Start the Docker daemon
systemctl enable docker
systemctl start docker- Create a new user
useradd -m -g users -G wheel,storage,power,docker -s /bin/bash your_user
passwd your_user
visudo
%wheel ALL=(ALL) NOPASSWD: ALL- Add the AUR package manager
nano /etc/pacman.conf

[archlinuxfr]
SigLevel = Never
Server = http://repo.archlinux.fr/$arch

pacman -Sy- Install the yaourt tool to manage AUR packages
pacman -S yaourt
su - your_user
yaourt -Syyua- Install pacaur as a better AUR package manager
gpg - recv-key 1EB2638FF56C0C53
yaourt -S pacaur
pacaur -Syyua
Remove the root SSH
sed -i ‘s/^PermitRootLogin yes/#PermitRootLogin yes/’ /etc/ssh/sshd_configShare folders and files between VM and host OS
- First, share one folder in Windows 10 and add all needed permissions
- On Arch Linux, install the SAMBA client
pacman -S cifs-utils smbclient
mkdir /etc/samba /mnt/Hyper-V
touch /etc/samba/smb.conf- Test connectivity
ping -c 3 $(nmblookup YOUR_PC_NAME | head -n 1 | cut -d ‘ ‘ -f 1)- As root user:
vim ~/.credentials
username=your_windows_login
password=windows_password
chmod 600 ~/.credentials
mount -t cifs //YOUR_PC_NAME/Hyper-V-Share /mnt/Hyper-V -o credentials=~/.credentials,ip=”$(nmblookup YOUR_PC_NAME | head -n 1 | cut -d ‘ ‘ -f 1)”
In some cases, when you use Windows Ethernet and WiFi, your VM needs to be aware.
In PowerShell as (Administrator):
- Switch the Network Wi-Fi/Ethernet vs Ethernet/Wi-Fi
$Switch = ‘ExternalSwitch’
Get-VMSwitch -SwitchType External
Get-NetAdapter
Set-VMSwitch $Switch -NetAdapterName “Wi-Fi”- Or, back to Ethernet
Set-VMSwitch $Switch -NetAdapterName “Ethernet 3”For the final setup, I use custom configured .files like .bashrc, vimrc, and .tmux.conf. You can find them on GitHub.
Opinions expressed by DZone contributors are their own.
Comments