Introducing Puppygram, Powered by Courier Inbox, Next.js, and Inngest
Follow this step-by-step tutorial to build Instagram-style iOS notifications using the Courier iOS SDK, Courier Inbox, Next.js, and Inngest.
Join the DZone community and get the full member experience.
Join For FreeAn in-app notification center is an essential component of any modern app, but they're time-consuming and complicated to build from scratch. What if you want to launch something quickly and easily? Where do you start?
I decided to use Courier Inbox to build something light years away from a product inbox. I thought long and hard about what to build and, perhaps sensing my creative block, my dog Otto came up and asked for his afternoon walk.

And just like that, Puppygram was born! Puppygram is an Instagram clone that is built for iOS and is powered by Courier Inbox, Next.js, and Inngest. In this blog post we’re going to cover:
- Creating a fresh Next.js web application
- Configuring Courier to send Inbox notifications
- Fetching random pictures of cute dogs using the random.dog API
- Using Inngest to send a new dog notification to our Inbox every minute
- Creating the Puppygram iOS experience using the Courier iOS SDK
There are a few prerequisites for completing this tutorial:
- Node.js
- Xcode for Mac
- Courier and Inngest accounts
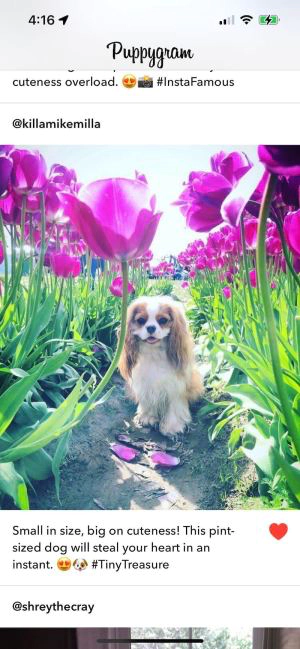
When we're done, we'll have an app that looks like this:
You can find the full source code for the Puppygram Server and Puppygram iOS app on GitHub and a live demo of this app hosted on Vercel.
Creating a Next.js Web Application
In order to build a Next.js app, you’ll need to have Node.js installed. My preference these days is to use NVM (Node Version Manager) to install Node.js. It makes it easy to install multiple versions of Node.js and switch between them in your projects.
Once you’ve installed Node.js, open up a terminal and run the following command to install Next.js:
npx create-next-app@latest
You’ll be prompted to answer several questions, but it’s fine to stick to the defaults. Once this process is complete, a new directory will be created and loaded with all of the default files for this app.
Change into this new directory and create a .env.local file to store secrets for Courier and Inngest. We’ll populate this file while we’re building and testing on localhost, and you’ll just need to remember to copy these environment variables to whatever platform or infra you deploy your app to.
Get Courier API Credentials
Log in to your Courier account, click on the gear icon, and then API Keys. When you create a Courier account, two Workspaces are automatically created for you: one for testing and one for production. Each workspace has its own set of data and API keys.
For simplicity, we’re going to stick to the “production” workspace. Copy the “published” production API Key and paste into into .env.local using the following key:
COURIER_AUTH_TOKEN=pk_XXX
Configure Your Courier Inbox Provider
Click on “Channels” in the left nav. Channels represent the different mediums that a user can receive a notification on. Courier supports all the most popular channels, including SMS, email, mobile push, and others. For each channel, you’ll see a list of Providers. For instance, Courier supports multiple SMS providers, including Twilio, MessageBird, and Vonage just to name a few.
In our case, scroll down and select the “Courier Inbox” provider. When the page opens, scroll to the bottom and click “install”. You are now ready to send notifications to the “inbox” channel using the “Courier Inbox” provider.
Creating a Public Inbox
Courier Inbox is primarily designed to display notifications to individual users, but in our case, the Inbox and its content will be viewed by anyone using the app. Still, we need to create a “user” to send these notifications to, so click on “Users” in the left navigation and create a new user.
The only required field is user_id, so just go ahead and enter puppygram and click “Save”. In your .env.local, create the following variable:
NEXT_PUBLIC_COURIER_USER=puppygram
Get Inngest Credentials
Inngest is a workflow-as-code service that makes it easy to build reliable serverless workflows in your current codebase, without any new infrastructure. We’re going to use Inngest to create a cron job that sends puppy pics to our app once every minute.
Log in to your Inngest account and click on “Manage” in the top nav. Click on “Event Keys” in the subnav.
Event Keys are used to bundle similar events. This helps when navigating the Inngest dashboard, debugging, etc. The recommendation is that you create a new Event Key for every combination of environment and application. In our case, we’re just going to use the “Default ingest key”, but you can easily create new Event Keys to use. Copy the value for this key and paste it into your app’s .env.local file:
INNGEST_EVENT_KEY=xxx
Next, click on “Signing Key." The Signing Key is used by the Inngest SDK to securely communicate with your application. Copy the value for this key and paste it into your app’s .env.local file:
INNGEST_SIGNING_KEY=signkey-prod-yyy
Let’s Start Coding!
Okay, now that we have our services and configuration out of the way, let’s dive into the code. We’re going to start by building the server-side web application that is responsible for sending pictures of puppies to our iOS app. Our web application will be designed to:
- Wake up once a minute
- Select a random picture of a dog
- Send an inbox notification with the URL of the picture of the random dog
Using Inngest To Schedule Jobs
With just a few lines of code, we are going to wire up our web application to Inngest so that the service can call into our application once a minute to trigger a new notification to our Courier Inbox. We’re going to breeze through their Quick start, which you can review in more detail later.
In the root of your project, run the following command to install the Inngest SDK:
npm install inngest
Create a new directory called inngest in your project root. Create a file called client.js in this new directory:
import { Inngest } from "inngest";

// Create a client to send and receive events
export const inngest = new Inngest({ name: "Puppygram Next.js" });
Now create a route handler to handle the /api/inngest route. Create a directory in app called api and a directory in api called inngest. Create a file called route.js:
import { serve } from "inngest/next";
import { inngest } from "../../../inngest/client";

export const { GET, POST, PUT } = serve(inngest, []);
Finally, let’s create an Inngest function that prints “Hello Puppygram” every minute. Edit route.js and paste this function just below the imports:
export const sendNotification = inngest.createFunction(
    { name: "Puppygram Send Notification" },
    { cron: "* * * * *" },
    async () => {
      console.log(“Hello Puppygram!”)
    }
)
Now, update the serve call at the bottom of the file to include this new Inngest function that has been created:
export const { GET, POST, PUT } = serve(inngest, [
    sendNotification3])
In your terminal, go ahead and start your web application:
npm run dev
Open up another terminal and run:
npx inngest-cli@latest dev
This will execute a localhost version of the Inngest service. This will connect to your web application (running on port 3000) and begin executing your cron job. Go back to the terminal you launched your web app in, and every minute you should see this printout:
Hello Puppygram!
Getting Pictures of Random Dogs
Thanks to our friends at the Random Dog API, we have a service that we can use to get pictures of very cute, very random dogs. The API supports 3 different endpoints:
/woof- Return the ID of a random dog/woof.json- Return a JSON payload of a random dog/doggos- Return JSON array of all dog IDs
Since our service is going to wake up once a minute to send a notification with a picture of a random dog, we didn’t want to burden this free service with all those API calls. So instead we invoked the /doggos endpoint and copied that information into a file in our project.
Create a directory at the project root called data and a file in it called doggos.json. Paste the following into that file:
[
    "00186969-c51d-462b-948b-30a7e1735908.jpg",
    "00b417af-0b5f-42d7-9ad0-6aab6c3db491.jpg",
    "027eef85-ccc1-4a66-8967-5d74f34c8bb4.jpg",
    "02f1d7d0-9ff7-44af-8066-dd9247ebe74d.jpg",
    "03024628-188b-408e-a853-d97c9f04f903.jpg",
    "0356c15a-8874-4af3-a02a-ed0ae8d62b55.jpg"
]
Now, let’s update our sendNotification function in app/api/inngest/routes.js to pick a random image and print it out to the console. Add the following import to the top of the file:
import doggos from '../../../data/doggos.json' assert { type: 'json' }
Update the function to select a random image from the array and print it out:
export const sendNotification = inngest.createFunction(
    { name: "Puppygram Send Notification" },
    { cron: "* * * * *" },
    async () => {
        // get random dog photo
        const randomIndex = Math.floor(Math.random() * doggos.length)
        const image = doggos[randomIndex]
        console.log(image)
    }
)
Reset your Next.js dev server, and you should see random image filenames being printed out once a minute. Now it’s time to send those to Courier Inbox!
Sending Random Dog Pics to Courier Inbox
The final part of the server-side component of Puppygram is the code to send the random dog pic to Courier Inbox.
First, let’s add the Courier Node.js SDK to our project:
npm i @trycourier/courier
Next, import the module and initialize the API client at the top of route.js:
import { CourierClient } from '@trycourier/courier'

const courier = CourierClient()
Finally, in the body of our sendNotification function, make the API call to Courier:
export const sendNotification = inngest.createFunction(
    { name: "Puppygram Send Notification" },
    { cron: "* * * * *" },
    async () => {
        // get random dog photo
        const randomIndex = Math.floor(Math.random() * doggos.length)
        const image = doggos[randomIndex]
        // send a notification with the URL to the random image
        await courier.send({
            message: {
                to: {
                   user_id: process.env.NEXT_PUBLIC_COURIER_USER
                },
               content: {
                    title: "",
                    body: "Meet my fluffy and playful partner in crime, always ready for some mischief! :heart_eyes: :paw_prints: #AdorableTroublemaker"
                },
                data: {
                    image_url: `https://random.dog/${image}`
                },
                routing: {
                   method: "single",
                    channels: [
                       "inbox"
                    ]
                }
            }
        })
    }
)
You’re done! Now, all you need to do is deploy this web app (there are many options for deploying a Next.js application) and deploy your serverless function to Inngest. Make sure your web application is fully deployed and live before you deploy the function to Inngest.
Now, let’s turn our attention to building the iOS app.
Creating an iOS App
In order to build an iOS app, you’ll need to install Xcode. I’ll wait…
< 2 hours later >
Hey, welcome back! Ok, now that you’ve downloaded several gigabytes of IDE, let's start building an iOS app!
Create a New App
- Create a new Project, select "iOS" and "App," and click "Next".
- Give it the name "Puppygram", make sure "SwiftUI" is selected, and click "Next".
- Create a new folder for your project and then click "Create".
Install the Courier iOS SDK
Now that you've created your project, let's install the Courier iOS SDK.
Select the "Puppygram" project in the top left of your application nav and click "Package Dependencies" on the right. Click the "+" sign at the bottom and you'll be prompted to add a dependency. Paste this link in:
https://github.com/trycourier/courier-ios
Click "Add Package" to add this to your project. That's it! You now have the power of Courier at your fingertips.
Building the View
For the purpose of this blog post, we're going to build a single-screen app that has a list view that updates in real time to display the notifications we are sending the app.
In your project, open up the ContentView file. At the top of the file, import the Courier iOS SDK:
1import Courier_iOS
Underneath the ContentView declaration, create a messages instance variable to hold the Inbox messages that we receive from Courier:
1struct ContentView: View {2 @State private var messages: [InboxMessage] = []3 var body: some View {
Immediately following the .padding() call, add an onAppear event handler with the following code.
1.padding()2.onAppear{3 Task {4 try await5 // Sign-in to Courier6 Courier.shared.signIn(accessToken:"<JWT TOKEN>",clientKey:"<COURIER_CLIENT_KEY>",userId:"<NEXT_PUBLIC_COURIER_USER>")7 // Add an Inbox listener8 Courier.shared.addInboxListener(9 onInitialLoad: { },10 onError: { error in },11 onMessagesChanged: { messages, unreadMessageCount, totalMessageCount, canPaginate in12 // update the messages array when new messages come in13 self.messages = messages14 }15 )16 }17}
This code signs the user into Courier and wires up an event handler to update the messages instance variable when new messages come in. In order to get the Courier.shared.signIn call working properly, you need to replace those 3 values. Let's go one by one.
Authenticating the iOS SDK
Replace <NEXT_PUBLIC_COURIER_USER> with the to value you are using in your web app when you send a notification using Courier. In our case, the value is puppygram.
Replace<COURIER_CLIENT_KEY> with the value of the Courier Public Key for your Courier Inbox Provider. This key is completely safe to use on the client, in both web and mobile apps.
Finally, we need to set the accessToken property. In order to do this safely, it is recommended that developers generate JWTs for their users that specify scope and expiration information. For the purposes of this tutorial, we're going to use the Courier API to generate a JWT on the command line. Open up a terminal, and run the following command substituting your values for <NEXT_PUBLIC_COURIER_USER> and <COURIER_AUTH_TOKEN>:
1curl --request POST \2 --url https://api.courier.com/auth/issue-token \3 --header 'Accept: application/json' \4 --header 'Authorization: Bearer <COURIER_AUTH_TOKEN>' \5 --header 'Content-Type: application/json' \6 --data '7{8 "scope": "user_id:<NEXT_PUBLIC_COURIER_USER> read:messages",9 "expires_in": "2 days"10}11'
You'll get back some JSON that looks like this:
1{"token":"eyzzz"}
Copy the value of the token property and paste it into the authToken parameter for Courier.shared.signIn. You are totally authenticated!
Displaying the Messages
Now that we're authenticated, the last step for our app is to display the messages. Delete the code below:
1Image(systemName: "globe")2 .imageScale(.large)3 .foregroundColor(.accentColor)4Text("Hello, world!")
Replace it with this:
1List {2 ForEach(messages, id: \.self) { message in3 AsyncImage(url: URL(string: message.imageUrl)){ image in4 image.resizable()5 } placeholder: {6 ProgressView()7 }8 .frame(width: 300, height: 300)9 .clipShape(RoundedRectangle(cornerRadius: 25)) 10 VStack {11 Text(message.subtitle ?? "")12 }13 }14}
This is the simplest way to define a List and the elements inside of it. For now, we're just going to just display the image (passed in via the custom data field of the REST API call) and the image description which we are passing in the body field of the REST API call.
Important Note: In the iOS SDK, the subtitle property of the message object maps to the value of body in the REST API call.
Now, if you try to build this it will fail. This is because we need to tell the iOS SDK that we're passing in a custom field in the REST API call. You can do this by extending the InboxMessage class. Just paste this code at the top of your file, just below the imports:
1extension InboxMessage {2 var imageUrl: String {3 get {4 return (data?["image_url"] as? String) ?? ""5 }6 }7}
If all goes well, you can press "play" and you should see something like this running in the simulator.
Wrapping Things Up
Okay, we covered a LOT of territory building an Instagram clone for cute dogs. We learned how to:
- Create a fresh Next.js web application
- Configure Courier to send Inbox (in-app) notifications
- Fetch random pictures of cute dogs using the random.dog API
- Use Inngest to send a new dog notification to our Inbox every minute
- Create a fresh iOS app
- Use the Courier iOS SDK to custom render notifications
With a little UI polish, you can render the data and end up with an app that looks and feels like this:
Whether you're building Kittygram, Bunnygram, or a modern application inbox, Courier Inbox, provides a flexible set of APIs and UI components to help you build exactly what you need. And don't forget, while we focused on iOS, Inbox UI components are available for both web and Android applications too.
Enjoy!
Published at DZone with permission of Carter Rabasa. See the original article here.
Opinions expressed by DZone contributors are their own.
Comments