Introduction to Codenvy
Join the DZone community and get the full member experience.
Join For Free

what is codenvy exactly? well, their website states:
codenvy is a cloud environment for coding, building, and debugging apps.
basically, it’s an ide in the cloud (“ide as a service?”) accessible by all the major browsers . it started out as an additional feature to the exo platform in early 2009 and gained a lot of traction after the first paas (openshift) and git integration was added mid-2011.
codenvy targets me as a (java) software developer to run and debug applications in their hosted cloud ide, while being able to share and collaborate during development and finally publish to a repository – e.g. git – or a number of deployment platforms – e.g. amazon, openshift or google app engine.
i first encountered their booth at
javaone
last september, but they couldn’t demo their product right there on the
spot over the wifi, because their on-line demo workspace never finished
loading
![]() well i got the t-shirt instead then, but now’s the time to see what codenvy has in store as a cloud ide.
well i got the t-shirt instead then, but now’s the time to see what codenvy has in store as a cloud ide.
signing up
signing up took 3 seconds. all you have to do is go to codenvy.com , use the “sign up” button, choose an email address and a name for your workspace , confirm the email they’ll send you and you’re done.
the “workspace” holds all your projects and is part of the url codenvy will create for you, like “ https://codenvy.com/ide/<workspace> .although not very clear during the registration process – which of course nowadays is usually minimalistic as can be – it seems that i’ve signed up for codenvy’s free community plan , which gives me an unlimited number of public projects. you can even start coding without registration.
after confirming the registration mail, i’m in. finally i’ll end up in the browser where your (empty) workspace has been opened.

empty workspace
a few options a possible for here on, as seen in the figure above:
- create a new project from scratch – generate an empty project from predefined project types
- import from github – import projects from your github account
- clone a git repository – create a new project from any public git reposiroty
- browse documentation
- invite people – get team members on board
- support – questions, feedback and troubleshooting
let’s…
create a new project from scratch
this option allows you to name the new project – e.g. “myproject”, choose a technology and a paas . the technology is a defined set of languages of frameworks to develop with.

available technologies
at the moment the technologies are:
- java jar
- java war
- java spring
- javascript
- ruby on rails
- python
- php
- node.js
- android
- maven multi-module
at the time of writing java 1.6 is supported.

available paas
at the moment the available platforms are:
- amazon webservices (aws) elastic beanstalk
- savvis cloud appfrog
- cloudbees
- google app engine (gae)
- heroku
- manymo android emulator
- red hat’s openshift
- none
depending on the choice of technology, or or more paas options become available. a single jar can not be deployed onto any of the platforms, leaving only the option “none” available. a java web application (war) can be deployed onto any number of platforms, except heroku and manymo. node.js can only be deployed to openshift.
creating a simple jar project
after having selected a jar (and no platform) one can select a project template .
e.g. if webapplication (war) would have been selected, codenvy would present project templates, such as google app engine java project illustrating simple examples that use the search api , java web project with datasource usage or a demonstration of accessing amazon s3 buckets using the java sdk .the jar technology has only one project: simple jar project . after having finished the wizard, our jar project has been created in our workspace. we’ll see two views of our project: a project explorer and a package explorer.
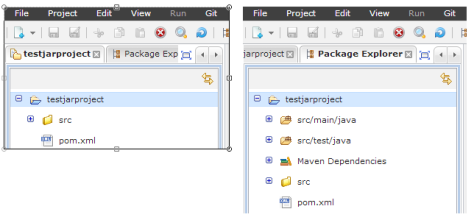
project- and package explorer
what we can see is that our jar project has been given a maven pom.xml with the following content:
01.
<
project
xmlns
=
      "

       http://maven.apache.org/pom/4.0.0

      "
xmlns:xsi
=
      "

       http://www.w3.org/2001/xmlschema-instance

      "
02.
xsi:schemalocation
=
      "

       http://maven.apache.org/pom/4.0.0


       http://maven.apache.org/xsd/maven-4.0.0.xsd

      "
>
03.
<
modelversion
>4.0.0</
modelversion
>
04.
<
groupid
>com.codenvy.workspaceyug8g52wjwb5im13</
groupid
>
05.
<
artifactid
>testjarproject</
artifactid
>
06.
<
version
>1.0-snapshot</
version
>
07.
<
packaging
>jar</
packaging
>
08.
09.
<
name
>sample-lib</
name
>
10.
11.
<
properties
>
12.
<
project.build.sourceencoding
>utf-8</
project.build.sourceencoding
>
13.
</
properties
>
14.
15.
<
dependencies
>
16.
<
dependency
>
17.
<
groupid
>junit</
groupid
>
18.
<
artifactid
>junit</
artifactid
>
19.
<
version
>3.8.1</
version
>
20.
<
scope
>test</
scope
>
21.
</
dependency
>
22.
</
dependencies
>
23.
</
project
>
we have a generated group id
com.codenvy.workspaceyug8g52wjwb5im13
, our own artifact id and the
junit
dependency,
which is a decent choice for many java developers use it as a testing
framework. the source encoding has already been set to utf-8, which is
also a sensible choice.
as a convenience we’ve also been given a
hello.sayhello
class, so we know we’re actually in a java project
![]()
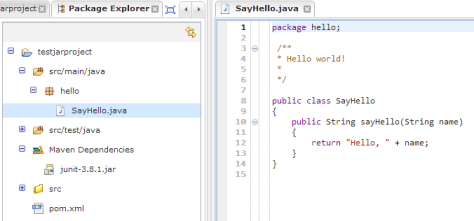
say hello
file & project management
so what about the browser-based editor we’re working in? on top we’re seeing a few menu’s, like file, project, edit, view, run, git, paas, window, share and help . i’ll be highlighting a few.
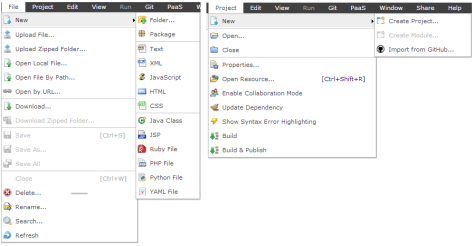
file- and project menu
the file menu allows to creating folders , packages and various kind of filetypes , such as text, xml (1.0 at time of writing) , html (4.1) , css (2.0), java classes and jsp’s (2.1). although i’m in a jar project, i am still also able to create here e.g. ruby, php or python files.
a very convenient feature is to
upload existing files
to the workspace, either separately or in zip archives. i’ve tried
dropping a file onto the package explorer from the file system, but the
browser (in this case, chrome) tries to open it instead
![]()
the project menu allows to create new projects, either by launching the create project wizard again, but also allows for importing from github . in order to clone a repository, you’ll have to authorize codenvy to access github.com to be able to import a project.
after having authorized github, codeenvy presents me with a list of projects to choose from. after having imported all necessary stuff, it somehow needs to know what kind of project i’m importing.
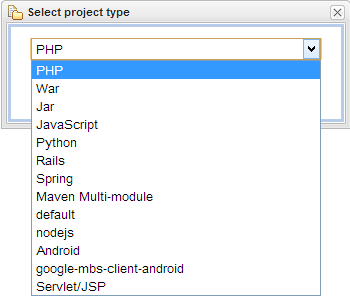
selecting a file type after importing a project from github
the project i imported didn’t give codenvy any clues as to what kind of project it is (which is right since i only had a readme.md in it), so it lists a few options to choose from. i chose the maven multi-module type after which the output window shows:
git@github.com:tvinke/examples.git was successfully cloned.
[info] project type updated.
if you’d have a pom.xml in the root of your project, it would immediately recognize it a s a maven project.
apart from going through the project > import from github option, you can also go directly to the git menu, and choose clone repository . this allows you to manually enter the remote repository uri, wanted project name and the remote name (e.g. “origin”).
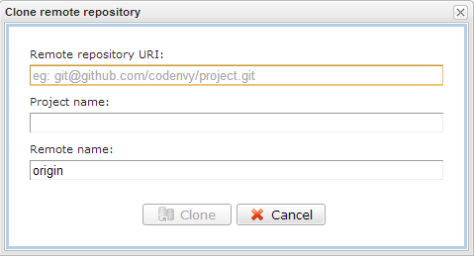
cloning a repository
one you have pulled in a git project, the git menu allows all kinds of common operations, such as adding and removing files, committing, pushing, pulling and much more.
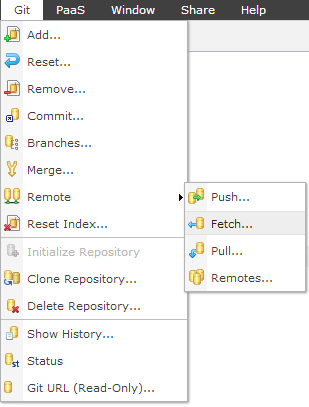
git menu
the ssh keys can be found under menu window > preferences where you can view the github.com entry, where one can view the details or delete it. also a new key can be either generated or uploaded here.
sharing the project
one of the unique selling points of codenvy are their collaboration possibilities which come along with any project. you can:
- invite other developers with read-only rights or full read-write rights to your workspace and every project in it.when you’re pair-programming like this, or co-editing a file with a colleague, you can also send each other code pointers – small shortcuts to code lines.
-
use factories to create temporary workspaces
,
through cloning, off one source project (“factory”) and represent the
cloning mechanism as a url which can be given to other developers. a use
case might be to get a colleague quickly started on a project by
providing a fully working development environment.there’s a lot more
about
creating factories in the docs
(such as through rest), but the nice thing is that once you have a
factory url, you can embed it as a button, send it through email of
publish it somewhere for others!
a factory url to load up e.g. their twitter bootstrap sample – as they use on their website themselves – looks like:https://codenvy.com/factory?v=1.0&pname=sample-twitterbootstrap&wname=codenvy-factories&vcs=git&vcsurl=http%3a%2f%2fcodenvy.com%2fgit%2f04%2f0f%2f7f%2fworkspacegcpv6cdxy1q34n1i%2fsample-twitterbootstrap&idcommit=c1443ecea63471f5797f172c081cd802bac6e6b0&action=openproject&ptype=javascript
conclusion
applications are run in the cloud nowadays, so why not create them there too? codenvy brings some interesting features, such as being able to instantly provision workspaces (through factory urls) and share projects in real-time. it supports common operations with projects, files and version control. with a slew of languages and platforms and as an ide being always accessible through the internet, it could lower the barrier to actually code anytime and anywhere. in a future post i will try and see whether or not it can actually replace my conventional desktop ide for java development.
Opinions expressed by DZone contributors are their own.

Comments