iOS Project (CI/CD): Integrating GitLab-CI, Fastlane, HockeyApp, and AppCenter
Follow the key steps to create a base framework for CI/CD process.
Join the DZone community and get the full member experience.
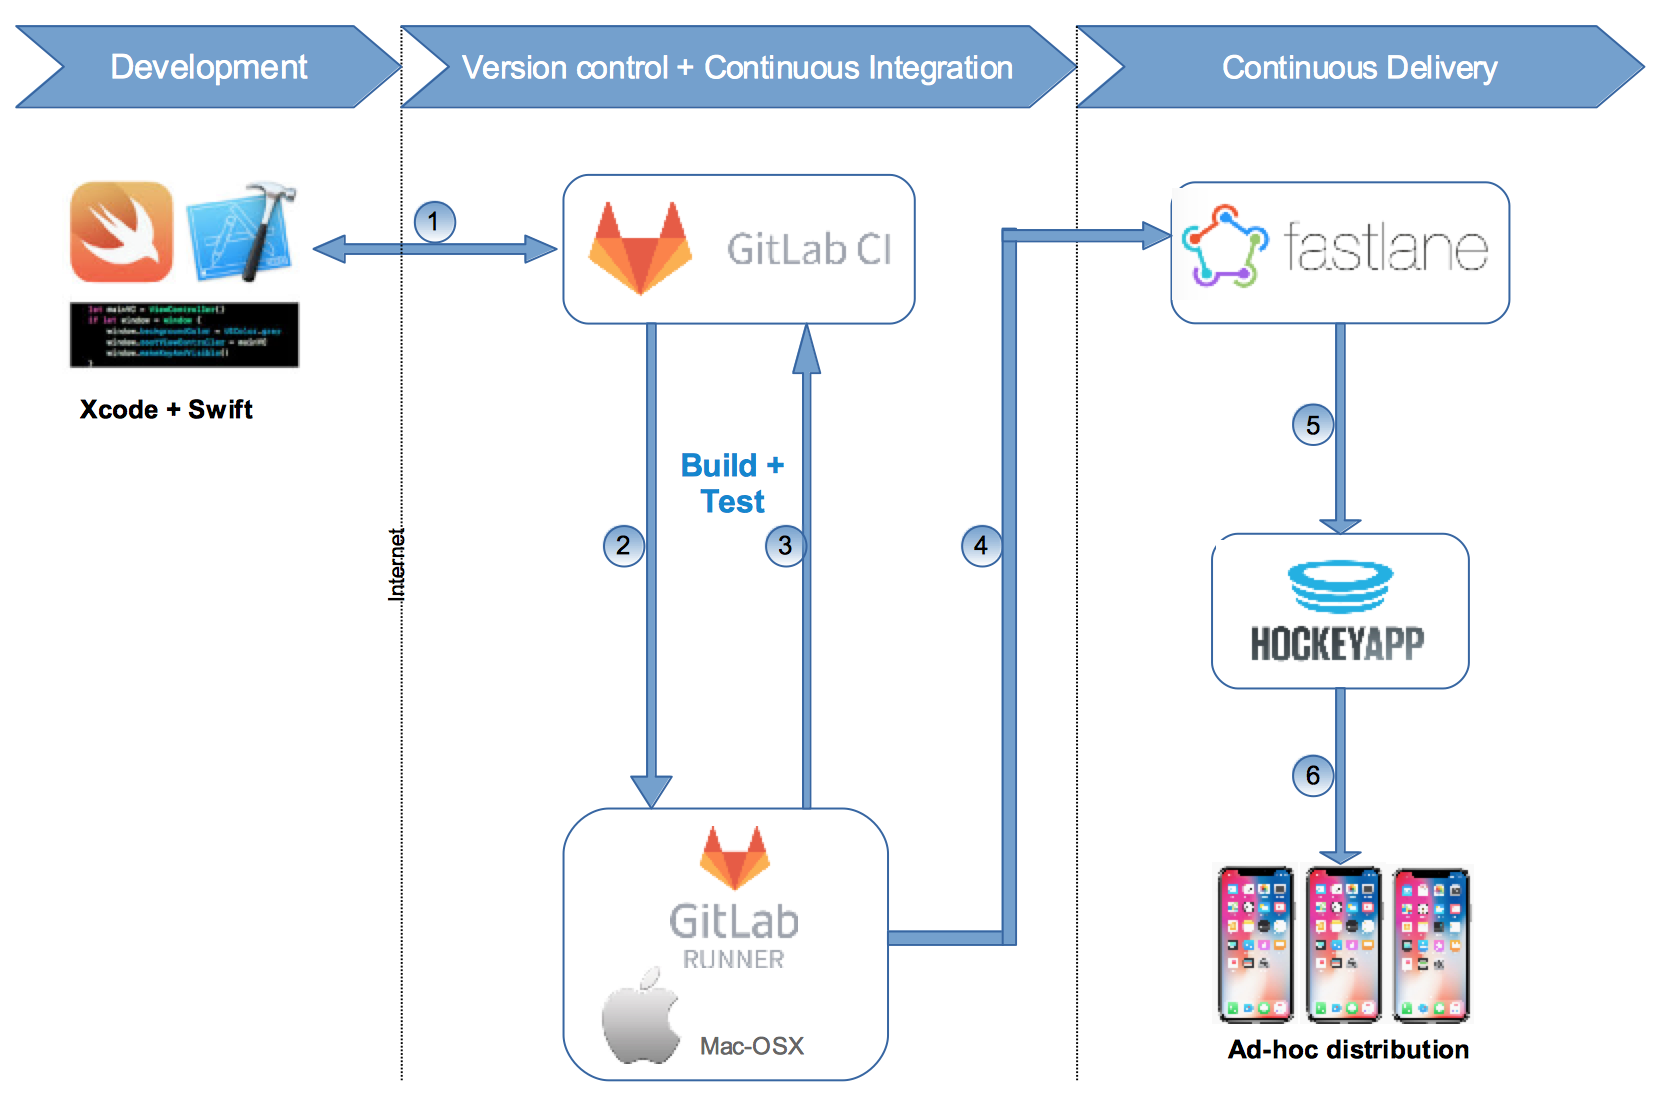
Join For FreeThere are many ways to implement CI/CD for iOS projects, and choosing the right combination of technology all depends on your project type, existing infrastructure, and customer requirements. Here, we’re using Fastlane — an open-source technology for HockeyApp/AppCenter uploading, but Fastlane itself is mature and capable of handling all tedious tasks. Here is the easiest way to setup CI/CD by using GitLab-CI, Runner, Fastlane, and AppCenter/HockeyApp for final app distribution.

Please follow the below key steps to create a base framework for CI/CD process:
Access to existing GitLab account/Create a new one
Setup GitLab-Runner in MacOSX build machine
Register GitLab-Runner with GitLab-CI
Install Fastlane in build/development machine
Enable GitLab-CI and Fastlane
Access to existing AppCenter/HockeyApp account or create a new one
Before starting CI/CD implementation, make sure that GitLab account is ready and the code has been pushed to the repository from your development machine.
Setting up GitLab-Runner (MacOSX Machine)
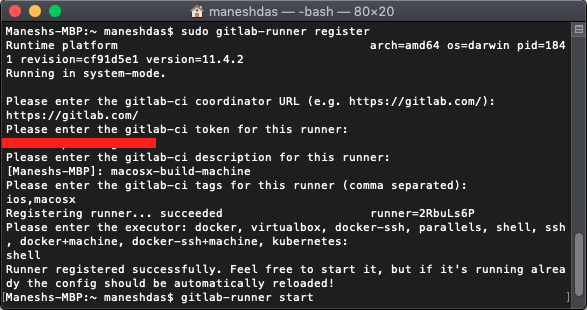
$ sudo curl --output /usr/local/bin/gitlab-runner https://gitlab-runner-downloads.s3.amazonaws.com/latest/binaries/gitlab-runner-darwin-amd64$ gitlab-runner installRegister GitLab-Runner Instance With Your GitLab Account
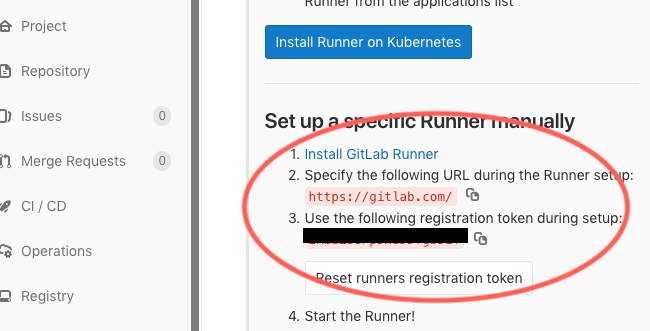
$ sudo gitlab-runner registerBefore executing the above command, please write down or copy gitlab-ci token and gitlab-ci coordinator url from GitLab account -> Settings -> CICD


Once you are done with the gitlab-runner registration process, start the GitLab-Runner by executing the following command:
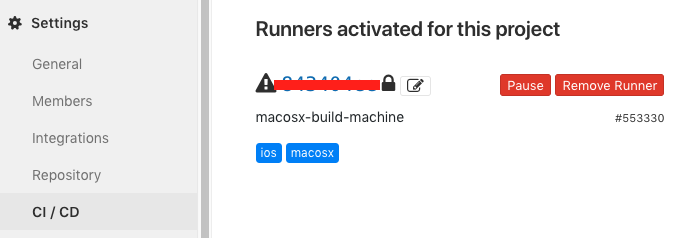
$gitlab-runner startPlease make sure the runner status in GitLab account and note that "tag name" can be used to identify the specific GitLab-Runner instance, which can be added in the .gitlab-ci.yml file.

Installing Fastlane in Build/Development Machine
You need to install Fastlane on both the build and development machine in order to test and configure.
Execute the following command from your build and development machine "Terminal" to install Fastlane.
$sudo gem install fastlane -NVAfter installing Fastlane in your development machine, go to project root directory and initialize Fastlane dependencies for Swift. The Swift version of Fastlane is in Beta stage, and this will not support Fastlane-Plugins. If you choose AppCenter or any other distribution platform that requires additional Fastlane-plugins, then you can avoid the "swift" parameter from the below command.
$fastlane init swiftOnce initialization is completed, open "Fastfile.swift" or "Fastfile" and insert the following code for uploading iOS binary to HockeyApp or AppCenter.
func appBetaDistributionToHockeyApp() {
//Fastlane API to upload signed ipa to HockeyApp
hockey(apiToken:<<Token from HockeyApp account>>, ipa: <</ios-builds/beta/hellogitlab.ipa>>, notes:<<any notes here>)
}
func appBetaDistributionToAppCenter() {
//Fastlane API to upload signed ipa to AppCenter
appcenter_upload(
api_token: "<appcenter token>",
owner_name: "<your appcenter account name>",
app_name: "<your app name>",
ipa: "<path to iOS build>"
)
}Install Fastlane — AppCenter Plugin
To upload application binary to AppCenter, you need to install the AppCenter-plugin for Fastlane.
fastlane add_plugin appcenterhttps://github.com/Microsoft/fastlane-plugin-appcenter
Enable GitLab-CI
To enable GitLab-CI, create a new file called ".gitlab-ci.yml" and save it in your project root directory. Insert the following xcodebuild commands to the yml file to clean, build, archive, and export ipa from GitLab-Runner. It is mandatory to create an export options plist file with proper code signing identity and details.
-----------------
build_project:
script:
- "xcodebuild -workspace HelloGitLab.xcworkspace -scheme HelloGitLab clean"
- xcodebuild -workspace HelloGitLab.xcworkspace -scheme HelloGitLab -configuration Debug CODE_SIGNING_REQUIRED=“NO” CODE_SIGNING_ALLOWED=“NO” -destination generic/platform=iOS archive -archivePath /ios-builds/archive/path/HelloGitLab.xcarchive
- "xcodebuild -exportArchive -archivePath /ios-builds/archive/path/HelloGitLab.xcarchive -exportPath /ios-builds/dev/ipa/path -exportOptionsPlist /ios-builds/dev/exportoptions-development.plist”
- "fastlane appBetaDistributionToHockeyApp"
stage: build
tags:
- ios
stages:
-----------------
Please validate your .gitlab-ci.yml file by using built-in GitLab validation tool or any yml lint tool available online.
Export Options plist
It is recommended to create multiple "export options" plist files for different targets like development, ad-hoc, enterprise, etc. with different code signing and provisioning profile details. Below is the sample one for development target.
<?xml version="1.0" encoding="UTF-8"?>
<!DOCTYPE plist PUBLIC "-//Apple//DTD PLIST 1.0//EN" "http://www.apple.com/DTDs/PropertyList-1.0.dtd">
<plist version="1.0">
<dict>
<key>compileBitcode</key>
<false/>
<key>method</key>
<string>development</string>
<key>provisioningProfiles</key>
<dict>
<key>bundle identifier</key>
<string>Provisioning profile name</string>
</dict>
<key>signingCertificate</key>
<string>Signing certificate name</string>
<key>signingStyle</key>
<string>manual</string>
<key>stripSwiftSymbols</key>
<false/>
<key>teamID</key>
<string>teamID</string>
<key>thinning</key>
<string><none></string>
</dict>
</plist>Once you complete all these steps, do a fresh commit and push the code into the GitLab repository and see the GitLab pipeline result.
Happy coding!
Opinions expressed by DZone contributors are their own.

Comments