

Java/Spring: How to Generate an Entire Database CRUD REST API With Speedment
In this article, see how to generate an entire database CRUD REST API with Speedment.

The new Spring Boot version "2.2.0" and the year "2020" are almost a perfect match. Thus, the Speedment team has now filled the gap by revamping the Spring Boot plugin.
If this is your first time hearing of Speedment, you're in for a treat, as we will be demonstrating how the Speedment Spring Boot plugin allows developers to effortlessly build Spring database applications with Speedment, an ORM with a powerful Stream-based query API, as its backbone.
About Speedment
Speedment can be described as an ORM that the Java community deserves - a toolkit for those who like fast development and even faster applications. By leveraging the Java Stream API as its primary means of communication with your database of choice, Speedment makes developers with previous Java experience feel right at home. Alongside the easy-to-use API, Speedment provides developers with a graphical tool that generates the domain model for them in a matter of seconds.
If you're interested in Speedment as a whole, go to the following link for detailed documentation with examples. The rest of this article will focus on the Spring Boot plugin.
You may also like: How to Create a REST API With Spring Boot
Speedment Spring Boot plugin has been around for a while, but starting with Speedment 3.2.2 a major feature was introduced - the ability to generate an entire CRUD REST API directly from your database model.
Depending on whether you're starting from scratch or have an existing project, the steps will differ, but rest assured that the integration process is effortless regardless of the state of your project.
If you wish to integrate Spring Boot into an existing Speedment project, you are required to add the following 2 clauses to your pom.xml:
xxxxxxxxxx
<plugin>
<groupId>com.speedment.enterprise</groupId>
<artifactId>speedment-enterprise-maven-plugin</artifactId>
<version>${speedment.version}</version>
<configuration>
<components>
<component>com.speedment.enterprise.plugins.spring.SpringGeneratorBundle</component>
</components>
<appName>${project.artifactId}</appName>
<packageName>${project.groupId}</packageName>
</configuration>
... // Database connector dependency
</plugin>
<dependencies>
...
<dependency>
<groupId>javax.annotation</groupId>
<artifactId>javax.annotation-api</artifactId>
<version>1.3.1</version>
</dependency>
<dependency>
<groupId>org.springframework.boot</groupId>
<artifactId>spring-boot-starter-web</artifactId>
<version>2.2.1.RELEASE</version>
</dependency>
<dependency>
<groupId>com.speedment.enterprise.plugins</groupId>
<artifactId>spring-runtime</artifactId>
<version>${speedment.version}</version>
</dependency>
...
</dependencies>
Once added, the next time you regenerate your domain model, a Speedment-specific Spring configuration should get generated. The generated configuration handles database connection properties and bean registrations for various managers generated by Speedment.
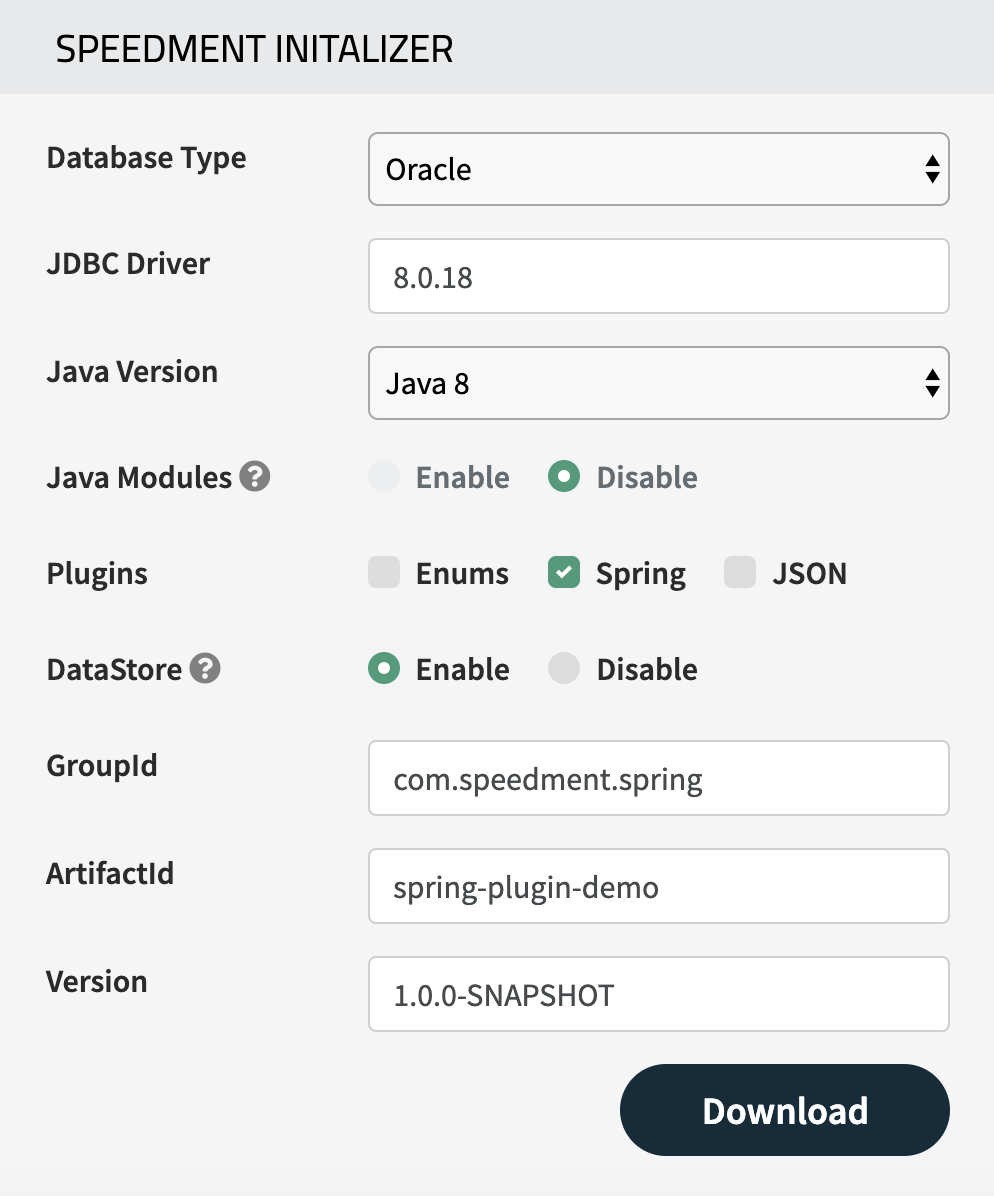
If you're starting from scratch, head over to the project initializer where a Spring-Boot-ready project will be generated for you. How you will configure the project is up to you, but to include the Spring Boot plugin in the generated project, make sure that the checkbox next to Spring in the Plugins section is checked. Once you're satisfied with the project configuration, click on the Download button and you will receive a zipped-up project ready for use.
CRUD Made Easy
Once you install the plugin, some Spring Boot specific options will be available in the Speedment tool which can be used to configure your REST API. You can launch the Speedment tool by issuing the following command:
xxxxxxxxxx
mvn speedment:tool
If this is your first time using Speedment, you may want to familiarize yourself with the workflow by following the "Hello Speedment" quick start guide.
By default, the Speedment tool won't generate a REST API. To generate a CRUD REST API for a specific table, select the table in the tree view and check the "Generate @RestController" option along with the "REST Enable Create/Update/Delete" option. By clicking "Generate", a set of REST mappings that implement CRUD operations for a specific table will get generated.

That's it! No manual coding is needed. Just start the generated Spring by issuing the command:
xxxxxxxxxx
mvn spring-boot:run
Creating Entities Using REST
To create a new entity using your generated REST API, you must execute a POST request to the route specified in the tool. By default, the name of this route is the same as the name of your table, prefixed by the name of your schema. If you uncheck the "REST Endpoint" option, you may specify a custom route name. The request body should contain key-value pairs in a JSON object where "REST Field Name" values from the tool are keys.
If we were to have a table called 'person' with the columns 'id', 'name', and 'age', we would send the following request to create a new 'person' entity:
xxxxxxxxxx
POST localhost:8080/db/person
{
"id": 1,
"name": "Jane",
"age": 25
}
xxxxxxxxxx
curl -d '{"id": 1,"name": "Jane","age": 25}' -H "Content-Type:application/json" -X POST localhost:8080/db/person
If a column is auto-generated (or is using a sequence), you may exclude it from the POST body. If you wish to enforce the exclusion of a certain column from the POST body, click on the specific column in the tool tree view and uncheck "Include in Create Body" and regenerate your domain model. On the other hand, if you want to enforce that a certain column is present in the POST body when a request is executed, check "Required in Create Body" and regenerate your domain model.

Retrieving Entities Using REST
To retrieve our newly created entity, we must execute a GET request on the same path used for entity creation:
xxxxxxxxxx
GET localhost:8080/db/person
xxxxxxxxxx
curl localhost:8080/db/person/1
The executed request will return a JSON Array of all existing entities. In our case, it would return an array with just our only entity:
xxxxxxxxxx
[
{
"id": 1,
"name": "Jane",
"age": 25
}
]
Advanced concepts such as filters and sorters are covered in great detail in the official Speedment documentation.
Updating Existing Entities Using REST
Updating an existing entity using your REST API is done in a similar fashion as creating an entity. Instead of a POST request, we execute a PATCH request and the route is extended by an entity identifier. What our entity identifier depends on the Primary Key column of that table. Since our PK column is a numeral type, our entity identifier will be an integer.
To update the entity we created in our previous example, we would execute the following request:
xxxxxxxxxx
PATCH localhost:8080/db/person/1
{
"name": "Mike",
"age": 43
}
xxxxxxxxxx
curl -d '{"name": "Jane","age": 25}' -H "Content-Type:application/json" -X PATCH localhost:8080/db/person/1
By default, all columns are included in the PATCH body (except the Primary Key column), but they are not mandatory. If you wish to enforce the exclusion of a certain column from your request body, click on the specific column in the tool tree view and uncheck "Include in Update Body" and regenerate your domain model. On the other hand, if you want to enforce column presence in the request body, check "Required in Update Body" and regenerate your domain model.
Deleting Entities Using REST
Deleting an entity using your REST API is quite straightforward — we execute a DELETE request on the same path used for entity updates.
To delete the entity we've created and updated in the previous examples, we would execute the following request:
xxxxxxxxxx
DELETE localhost:8080/db/person/1
xxxxxxxxxx
curl -X DELETE localhost:8080/db/person/1
Summary
Starting new projects can sometimes be a hustle. As developers, we want to avoid these inconveniences as much as possible and dive straight into coding. With Speedment's new Spring Boot plugin, developers can get ahead of the game by automatically generating all necessary configurations and REST controllers directly from the database.
We hope you've enjoyed this brief guide to the new CRUD features the Speedment Spring Boot plugin provides. If you're interested in a more detailed explanation of the new features, head over to the official documentation where you will find in-depth explanations and examples of the new CRUD features.
Further Reading
Creating a REST API Part 4: Handling POST, PUT and DELETE Requests
Building a Basic CRUD RESTful Spring Boot MVC Application: Getting Started With Java Spring
Published at DZone with permission of Per-Åke Minborg. See the original article here.
Opinions expressed by DZone contributors are their own.