K8s KnowHow - Using a ConfigMap
Use ConfigMap to create an externalized configuration decoupled from deployment artifacts.
Join the DZone community and get the full member experience.
Join For FreeThis is the fifth article of Kubernetes KnowHow series. In first four articles we have learned how to use pod, services and replicaset and deployment in K8s.
Properties files are very important in any application. Not only they make application flexible but they also provide different behavior depending upon the value you set in the file. In fact, many times we use a properties file to drive different behavior in staging, development, QA, UAT or production environments.
Generally, properties files are packed along with the code and the entire package is deployed in the execution environment. In this approach, if you want to change any properties then its absolutely essential to ship the code even if there is a change in the properties file. Hence, up to a certain extent, this approach works fine. However, in today’s era of digital transformation in which five nines has become the need of the hour, an externalized configuration is desired. Therefore, a similar functionality is a need in K8s runtime environment.
This is the fifth article of K8s knowhow series. In this article, I am going to demonstrate how K8s provides externalized configuration, flexible configuration and portability for containers. ConfigMaps allow you to decouple configuration artifacts from deployment artifacts, a capability that provides portability to containerized applications. For a production environment, the recommended approach is to externalize this configuration and ConfigMap file approach comes handy in this.
If you are familiar with the Spring Cloud ecosystem, then ConfigMap is similar to Spring Config server. There are two ways of using ConfigMaps.
- Using ConfigMap as an environment variable
- Mounting ConfigMap as file service
Let’s get into action. We will be using our Hello World application. The demonstration is based on Spring Boot, Docker, and K8s.
Using ConfigMap As an Environment Variable
In this case, we will create a new environment variable in K8s and it will be used in the code. Now in Java world, an environment variable can be used in the code using System.getenv(String) API. In a regular Java application, the environment variable can be set up in J2EE application containers such as Oracle WLS or IBM WAS or it can be set up in the OS. However, in K8s things are not the same. In order to use the environment variable we have to create config map from a literal.

Using the kubectl create configmap command, we have created two environment variables, app.name and app.desc. Environment variables are created using a literal.
Let's understand what happens behind the scenes.
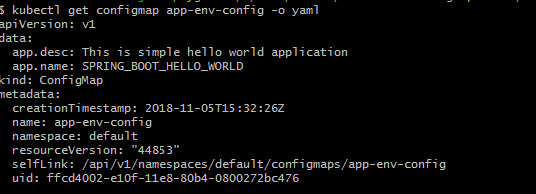
Now pay attention to the data section. Under the data section, you will find key and value pairs. Technically, ConfigMap is mere a key-value store. The name of the property is the key and value of the property is the value. The application code requires you to just lookup for these key-value pairs.
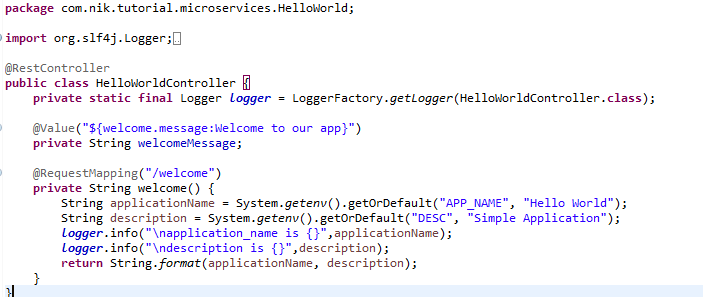
In order to use this environment variable in a Java code, we just write the following code.

The below snippet defines two K8s environment variables named "SPRING_BOOT_HELLO_WORLD_APP_NAME" and "SPRING_BOOT_HELLO_WORLD_DESC." These variables will get the values from the ConfigMap app-env-config. The important point to note is the key.

Properties files are used to keep “N” number of properties in a single file to run the application in different environments. In a Spring Boot application, properties are kept in the application.properties file under the classpath. Let us take a look at application.properties file packed inside the application jar. This is the default file.

We are using the command kubectl create configmap to create a ConfigMap from an individual file, or from multiple files.
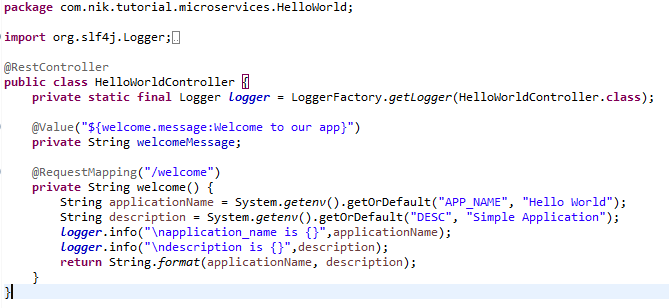
Now let us see the entire code.
Mounting ConfigMap as a File
In this section, I will be illustrating how to use ConfigMap for mounting files to externalize the configuration. In this example, I will be externalizing the application.properties file using ConfigMap. Even though the default file is wrapped inside the jar, under src/main/resources. In simple terms, we are going to override the default file by supplying the file through ConfigMap.
The first step is to create ConfigMap from the application.properties. Let us understand how this ConfigMap is stored in K8s.

Through ConfigMap, we will mount the application.properties file into K8s cluster and it can be used in the application. Notice that the data section contains the contents of application.properties, and the key is the file name.
Now, in order to override the default configuration file, we need to mount the application.properties (through ConfigMap) in the classpath of application. Spring Boot provides this capability by providing different options. SpringApplication loads properties from application.properties files in the following locations and adds them to the Spring Environment:
- A /config subdirectory of the current directory
- The current directory
- A classpath /config package
- The classpath root
You can visit the Spring official page for more details.
The most simple and best way is to mount application.properties in the “/config ” directory.
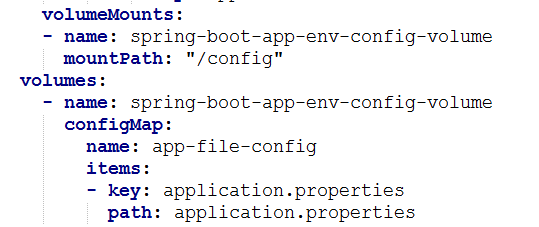
Carefully, take a look at the mount path. Notice that the name of the ConfigMap should be exactly the same that we created above that is app-file-configmap. The key should be the name of the file. Also, ensure that name of volume mount configuration to that of volume configuration.

This snippet explains how any property defined in the application.properties file can be used in the application. It is a no-brainer as we are using the standard way recommended by Spring that is using @Value annotation to inject property value into a variable.
Now we are good to go ahead with our ConfigMap sample application. Let us take a look at the entire code snippet.
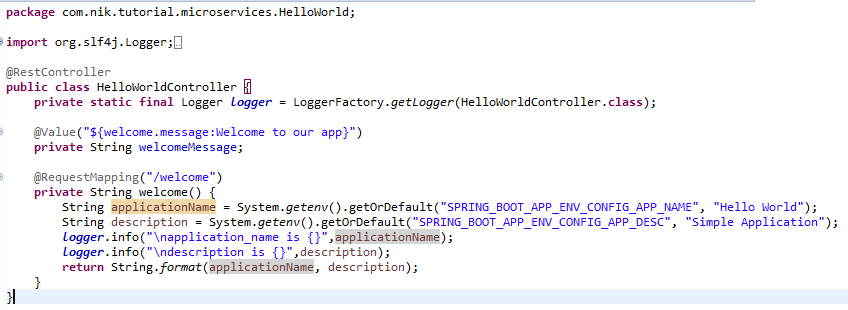
Let's create a Docker image and upload it to Dockerhub. In my case, the name of the image is k8s-springboot-helloworld-configmap--app.
The following is K8s pod configuration file.
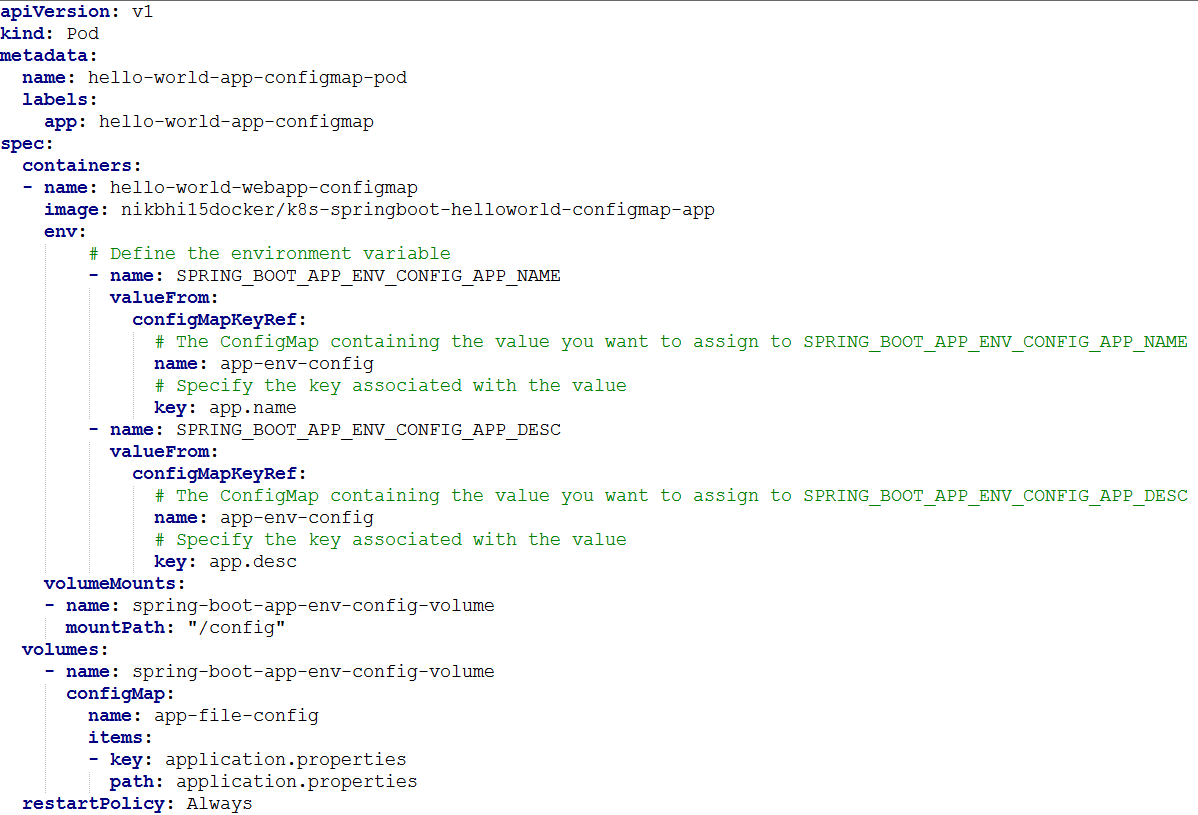
Let us also create the service with a NodePort service type so that the welcome service can be used from outside the K8s cluster.
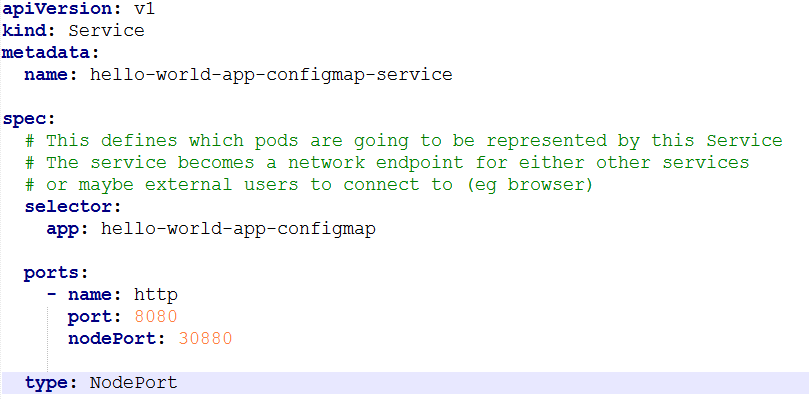
Now let's apply these changes into K8s.
Navigate to browser and access http://<minikube_ip>:<service_node_port>/welcome. In my case its, http:// 192.168.99.100:30880/welcome.
Scrupulously observe the output. The returned string is:

At the same time, check the default values of environment variables hardcoded in the code and the default value of property in the application.properties wrapped inside jar. You can figure out that values of environment variables and application.properties are getting fetched from ConfigMap.
This project is available on my github.
That’s it for now in this article. In the next article, we will see how to use ConfigMap’s “Secret” object. Stay tuned for more.
Opinions expressed by DZone contributors are their own.

Comments