Launching Pega Web Mashup Forms on a Secure Static Website With AWS S3
Learn how to configure and deploy Pega Web Mashup forms on a static website hosted in an AWS S3 bucket for seamless user access and simplified infrastructure.
Join the DZone community and get the full member experience.
Join For FreeI am pleased to share that I have designed and implemented a cost-effective and efficient solution for delivering a workflow-based form directly to end users via a publicly accessible static website. This solution streamlined user access while minimizing infrastructure complexity, ensuring a secure, scalable, and user-centered experience.
Overview
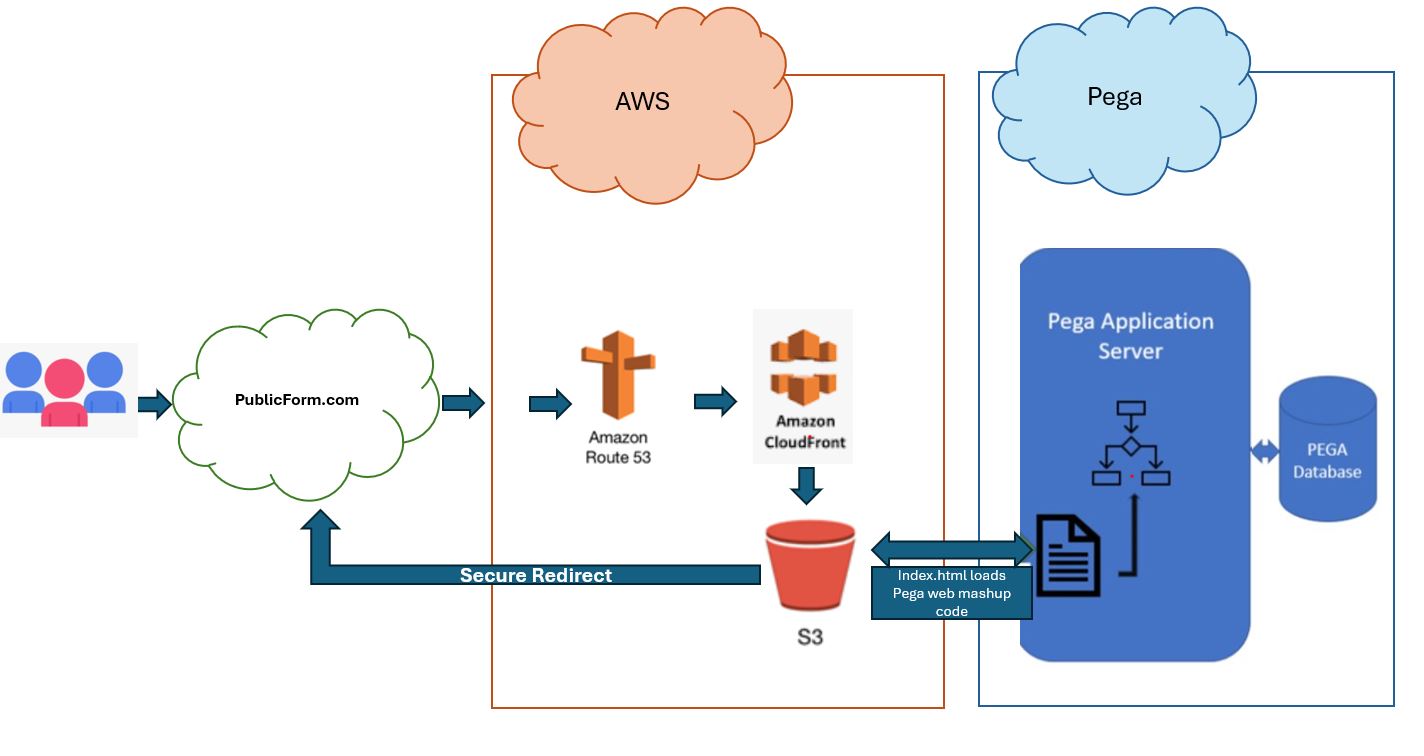
Pega Web Mashup is a powerful feature from Pega that allows businesses to embed Pega forms and applications into existing websites or portals. By using AWS S3, we can host a static website that contains a Pega Web Mashup form, which enables rapid deployment with minimal infrastructure overhead. This tutorial will walk through the steps to deploy a Pega Web Mashup form as a static website using an AWS S3 bucket.
By combining Pega’s web mashup capabilities with the cost-effective and scalable AWS S3 hosting solution, we can efficiently publish interactive forms, surveys, and other Pega-based tools for broader accessibility. Here’s a step-by-step guide on how to accomplish this.
Architecture Diagram
Required Components
- AWS account
- Pega Application Server
- Web Mashup HTML code for a Pega Form
- Amazon S3 bucket
- Amazon Route 53
- Amazon CloudFront
Step-by-Step Guide
Step 1: Prepare the Pega Web Mashup Code
In the Pega application, Generate the Mashup Code by following the steps below:
- Navigate to App Studio > Channels and Interfaces.
- Select the Web Mashup option and add a new channel if one doesn’t already exist.
- Configure the mashup parameters, including the Application Name, Access Group, and Portal.
- Customize other settings, such as the display mode and allowed actions, to fit your requirements.
- Copy the generated HTML snippet. This HTML snippet code will be embedded into the HTML file of your static website.
- Ensure that any references to Pega assets (CSS, JS) are correct
- Add necessary cross-origin headers if your Pega instance is hosted on a separate domain.
<div data-pega-encrypted ='true'
data-pega-gadgetname ='PegaGadget'
data-pega-action ='createNewWork'
data-pega-applicationname ='appname'
data-pega-threadname ='thread1'
data-pega-channelID ='id'
data-pega-resizetype ='stretch'
data-pega-url ='https://demo.pegapp.com/appname'
data-pega-action-param-parameters ='{"","""}' ></div>
Step 2: Create an S3 Bucket for the Static Website
Set up your S3 bucket to serve as a static website by following the steps below:
- Log in to the AWS Management Console, Go to S3, and click Create Bucket. Enter a unique name for the bucket and choose a region.
- Disable block public access (for website access) by adjusting the settings under Object Ownership and confirming public access.
- In the bucket properties, navigate to Static website hosting.
- Enable static website hosting and enter the file name for the Index Document (e.g., index.html). Save these changes.
Step 3: Set Up and Upload Your HTML File in S3 Bucket
Follow the steps below:
- Create an HTML file that will host the Pega Web Mashup form.
- Create the index.html file.
- Open a text editor and start a new HTML document.
- Paste the Pega Web Mashup code you generated in Step 1 into the body of this HTML file.
<!DOCTYPE html>
<html lang="en">
<head>
    <title>Pega Web Mashup Form</title>
    <!-- Include any necessary Pega CSS or JS -->
</head>
<body>
    <h1>Embed Pega Form</h1>
    <!-- Insert the Pega Web Mashup code here -->
    <div data-pega-gadgetname="PegaGadget" data-pega-action="createNewWork"
         data-pega-application="appName"
        data-pega-port="https://demo.pega.com/appName/">
    </div>
</body>
</html>
- In your S3 bucket, go to the Objects tab and click Upload to add the index.html file.
- Ensure permissions allow the file to be publicly accessible.
Step 4: Configure Bucket Permissions
Follow the steps below:
- To make the website public, modify the bucket permissions and Set Bucket Policy.
- In the Permissions tab, go to Bucket Policy.
- Then, paste a policy that allows public read access to the bucket contents. Here’s the code for public policy.
- Verify that the permissions are set correctly for individual files, particularly the index.html.
{
    "Version": "2011-07-27",
    "Statement": [
        {
            "Effect": "Allow",
            "Principal": "*",
            "Action": "s3:GetObject",
            "Resource": "arn:aws:s3:::YOUR_BUCKET_NAME/*"
        }
    ]
}
Step 5: Access the Static Website
Follow the steps below:
- Once the S3 bucket is set up and permissions are configured, you can access your Pega Web Mashup form via the S3 bucket's website endpoint:
- In the Properties tab, find the Static website hosting section.
- The Bucket website endpoint URL provided there is the URL to access your static website. Go ahead and open it in a browser to see your Pega form embedded within a static page.
Security Considerations
- Cross-Origin Resource Sharing (CORS): If your Pega instance is on a different domain, configure CORS settings in both AWS S3 and Pega to allow the mashup to load correctly.
- Security: Avoid exposing sensitive data, and consider adding AWS CloudFront for additional security, caching, and performance benefits.
- Data Collection: If the form collects sensitive data, ensure you configure encryption and other security measures in AWS to protect user data.
Conclusion
This article should provide some useful guidance on by following these steps, you can easily launch a Pega Web Mashup form on a static website hosted in an AWS S3 bucket. This method enables quick, scalable deployment without extensive infrastructure, providing an efficient way to share Pega-based forms and applications with your audience. As a next step, consider integrating further with AWS Lambda or CloudFront to enhance functionality and improve user experience.
Opinions expressed by DZone contributors are their own.


Comments