

Build Your Own Local AI QA Engineer With Docker, Ollama, LibreChat, and Playwright MCP
Learn how to build a completely local AI-powered QA Automation Engineer using Docker, Ollama, Qwen3:8b, LibreChat, and Playwright MCP.
 CORE
·
CORE
·
Join the DZone community and get the full member experience.
Join For FreeArtificial intelligence is rapidly transforming software testing by enabling QA engineers to generate test cases and test plans, automate browser interactions, analyze and debug failures, and execute complex testing workflows using simple natural-language prompts.
While cloud-based AI assistants offer impressive capabilities, they often require subscriptions and sharing potentially sensitive application data with third-party services.
Running an AI-powered testing assistant locally addresses these concerns by providing better privacy, lower operating costs, and complete control over the testing environment.
In this tutorial, we’ll learn how to build our own local AI QA engineer using Docker, Ollama, Qwen3:8b, LibreChat, and Playwright MCP. It will allow us to perform browser automation and interact with web applications using natural language, all without relying on cloud-based AI services.
Understanding the Architecture
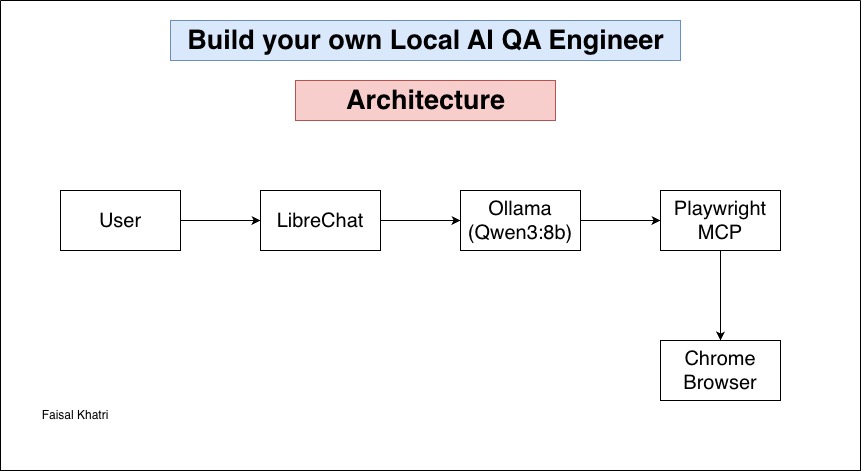
Every interaction begins with the user. For example, a user enters a prompt in LibreChat, such as “Open the Playwright website and click the ‘Get Started’ button.”
LibreChat serves as the conversational interface through which users interact with the AI assistant. Rather than processing the request itself, it forwards the prompt to a locally hosted large language model, Qwen3:8b, running via Ollama.
After receiving the prompt, Qwen3:8b interprets the user’s intent and generates a step-by-step execution plan. Instead of interacting with the browser directly, the model determines which tools are required and communicates those instructions using the Model Context Protocol (MCP).
These MCP requests are handled by the Playwright MCP Server, which acts as the bridge between the language model and the browser. It translates the AI-generated instructions into executable Playwright commands.
The Playwright MCP Server then launches a Chrome browser and performs the requested actions. Depending on the prompt, it can navigate to websites, click buttons, complete forms, extract text from web pages, capture screenshots, and execute a wide range of browser automation tasks.
Once the browser completes the requested operations, the execution results are returned to Qwen3:8b. The language model analyzes the browser output and transforms the technical details into a clear, human-readable response.
LibreChat then presents this response to the user. Instead of displaying raw Playwright logs, it provides a concise summary such as: “Navigation completed successfully. The Playwright website was opened, and the Get Started button was clicked successfully.”
This architecture enables browser automation through natural language while ensuring that every component runs locally. As a result, we benefit from enhanced privacy, greater security, and complete control over the entire AI-powered automation workflow.
Prerequisites
Before getting started, ensure that the following software is installed on your machine:
- Docker
- Node.js 20 or higher version
- Git
- Ollama
We’ll use Docker Desktop to run LibreChat, Node.js to install and run the Playwright MCP Server, Git to clone the required repositories, and Ollama to download and serve the local large language model.
Having these tools installed beforehand will make the setup process smooth and straightforward.
System Requirements
Running a local AI-powered browser automation stack requires a reasonably capable machine. A system with 16 GB of RAM or more is recommended to run Docker containers and the language model efficiently.
We’ll also need 20–25 GB of available disk space, preferably on an SSD, to accommodate Docker images and downloaded models. While a dedicated GPU can significantly improve model inference speed, it is entirely optional, and the setup works well on modern CPUs.
For this tutorial, I’m using the following configuration:
- Operating system: macOS (M2 Pro)
- Memory: 16 GB RAM
We can have the same setup on Windows and Linux, with only minor platform-specific differences in the installation steps.
Setting Up the Environment for the Local AI QA Engineer
Docker, Node.js, and Git are widely used development tools, and detailed installation guides for each are readily available online.
Installing Ollama
To install Ollama, either download the installer from the official website or use the installation command provided for your operating system.
For macOS, it can also be installed using the following Homebrew command:
brew install ollamaOnce the installation is complete, it can be verified by running the following command in the terminal:
ollama --versionInstalling Qwen3:8b
Qwen3:8b is chosen for this setup because it offers a strong balance of reasoning, code generation, and performance, making it ideal for Playwright TypeScript test generation, AI agents, MCP integration, and modern QA automation workflows while running efficiently on a local machine. However, other higher models can also be chosen if you know a better one.
Another factor in choosing this model was the available system memory. Since my machine has 16 GB of RAM, some memory also needs to be reserved for other tools used in this setup, such as Docker, LibreChat, and Playwright.
We need to start Ollama first by running the following command from the terminal. (It should be kept running in the background):
ollama serveOpen a new terminal and run the following command to pull the Qwen3:8b model:
ollama pull qwen3:8bIt should take some time to complete the pull, as the model is around 5.2GB.
Once the download completes, we can check the model by running the command:
ollama listIt should list the model downloaded.
Next, we can quickly verify by running the model using the command:
ollama run qwen3:8bOnce the model starts, it will prompt you to enter a query.
To verify that everything is working correctly, try a simple prompt such as “What is 2 + 2?”.
Observe how the model processes the request and generates its response. If the setup is successful, it should return the correct answer, 4, confirming that the model has been downloaded, installed, and is functioning properly.
To stop the model, type “/bye” in the prompt, and it should exit.
Qwen3:8b provides a good balance between performance and resource usage, making it a suitable choice for this hardware configuration. If more RAM is available, you can opt for larger LLMs that offer stronger reasoning and coding capabilities.
Installing LibreChat With Docker
LibreChat is an open-source AI platform that provides a unified and customizable interface for interacting with multiple AI models. It enables us to manage all our AI conversations from a single application while supporting features such as AI agents, Model Context Protocol (MCP) servers, custom tools, and integrations with both local and cloud-based LLMs.
LibreChat acts as the front-end chat interface that communicates with the locally running Qwen3:8b model through Ollama. It allows us to execute AI-powered browser automation workflows entirely on our local machine.
Follow the steps below to install LibreChat:
Step 1: Clone the LibreChat GitHub Repository
The repository can be cloned by running the following command:
git clone https://github.com/danny-avila/LibreChatAfter cloning the repository, navigate to the LibreChat folder, copy the .env.example file, and create a new .env file from it.
cd LibreChat
cp .env.example .env
Let's keep the .env file as it is, using the default values.
Step 2: Connect Ollama to LibreChat
Ollama can be connected to LibreChat by updating its configuration in the “librechat.yaml” file. The example file is already available in the cloned repo. Run the following command to copy librechat.example.yaml and create librechat.yaml.
cp librechat.example.yaml librechat.yamlUpdate the following configuration in the file to connect Ollama to LibreChat:
endpoints:
  custom:
    - name: "Ollama"
      apiKey: "ollama"

      baseURL: "http://host.docker.internal:11434/v1"

      models:
        default:
          - "qwen3:8b"

        fetch: true

      titleConvo: true
      titleModel: "current_model"

      summarize: false
      summaryModel: "current_model"

      modelDisplayLabel: "Ollama"
Make sure that this configuration is added to the “custom” block, which falls under the “endpoints” block.
This configuration adds Ollama as a custom AI endpoint in LibreChat. The baseURL tells LibreChat where to connect to the Ollama API, while the default model specifies that Qwen3:8b should be used by default.
Since LibreChat is running inside a Docker container while Ollama is running directly on the host machine, we use http://host.docker.internal:11434/v1 instead of localhost. The special hostname host.docker.internal allows the Docker container to access services running on the host system, enabling LibreChat to connect to the locally running Qwen3:8b model through Ollama.
Setting fetch: true allows LibreChat to automatically detect and display all models available in Ollama. The remaining options configure the user interface by generating conversation titles using the current model, disabling conversation summarization, and displaying the endpoint with the label Ollama in the LibreChat interface.
Step 3: Mount the Configuration in the docker-compose-override.yml
The docker-compose-override.yml can be copied and created in the same way as we did “librechat.example.yaml”.
cp docker-compose.override.yml.example docker-compose.override.ymlThe following block should be updated in the docker-compose.override.yml file.
services:
  api:
    volumes:
      - ./librechat.yaml:/app/librechat.yaml
This file mounts the custom “librechat.yaml” configuration file into the LibreChat container. By mapping ./librechat.yaml to /app/librechat.yaml, Docker ensures that LibreChat uses the custom configuration each time the container starts.
This approach allows us to modify settings, such as custom endpoints and AI models, without rebuilding the Docker image.
Step 4: Start the LibreChat Application Using Docker Compose
The LibreChat application can be started using the following command:
docker compose up -dIt will take some time for the Docker images to download, and containers will start. Run the following command from the terminal to check the Container status:
docker ps -aThis command displays the status of all Docker containers. If any container is unhealthy or encounters an issue, its status will be clearly indicated in the output.
In case any container is unhealthy or encounters an issue, the following command can be run to check its logs:
docker logs <container name>Once all the containers are started successfully, open a new browser and navigate to http://localhost:3080 to start LibreChat.
Since we are accessing LibreChat for the first time, we will be prompted to register and create a new user account.
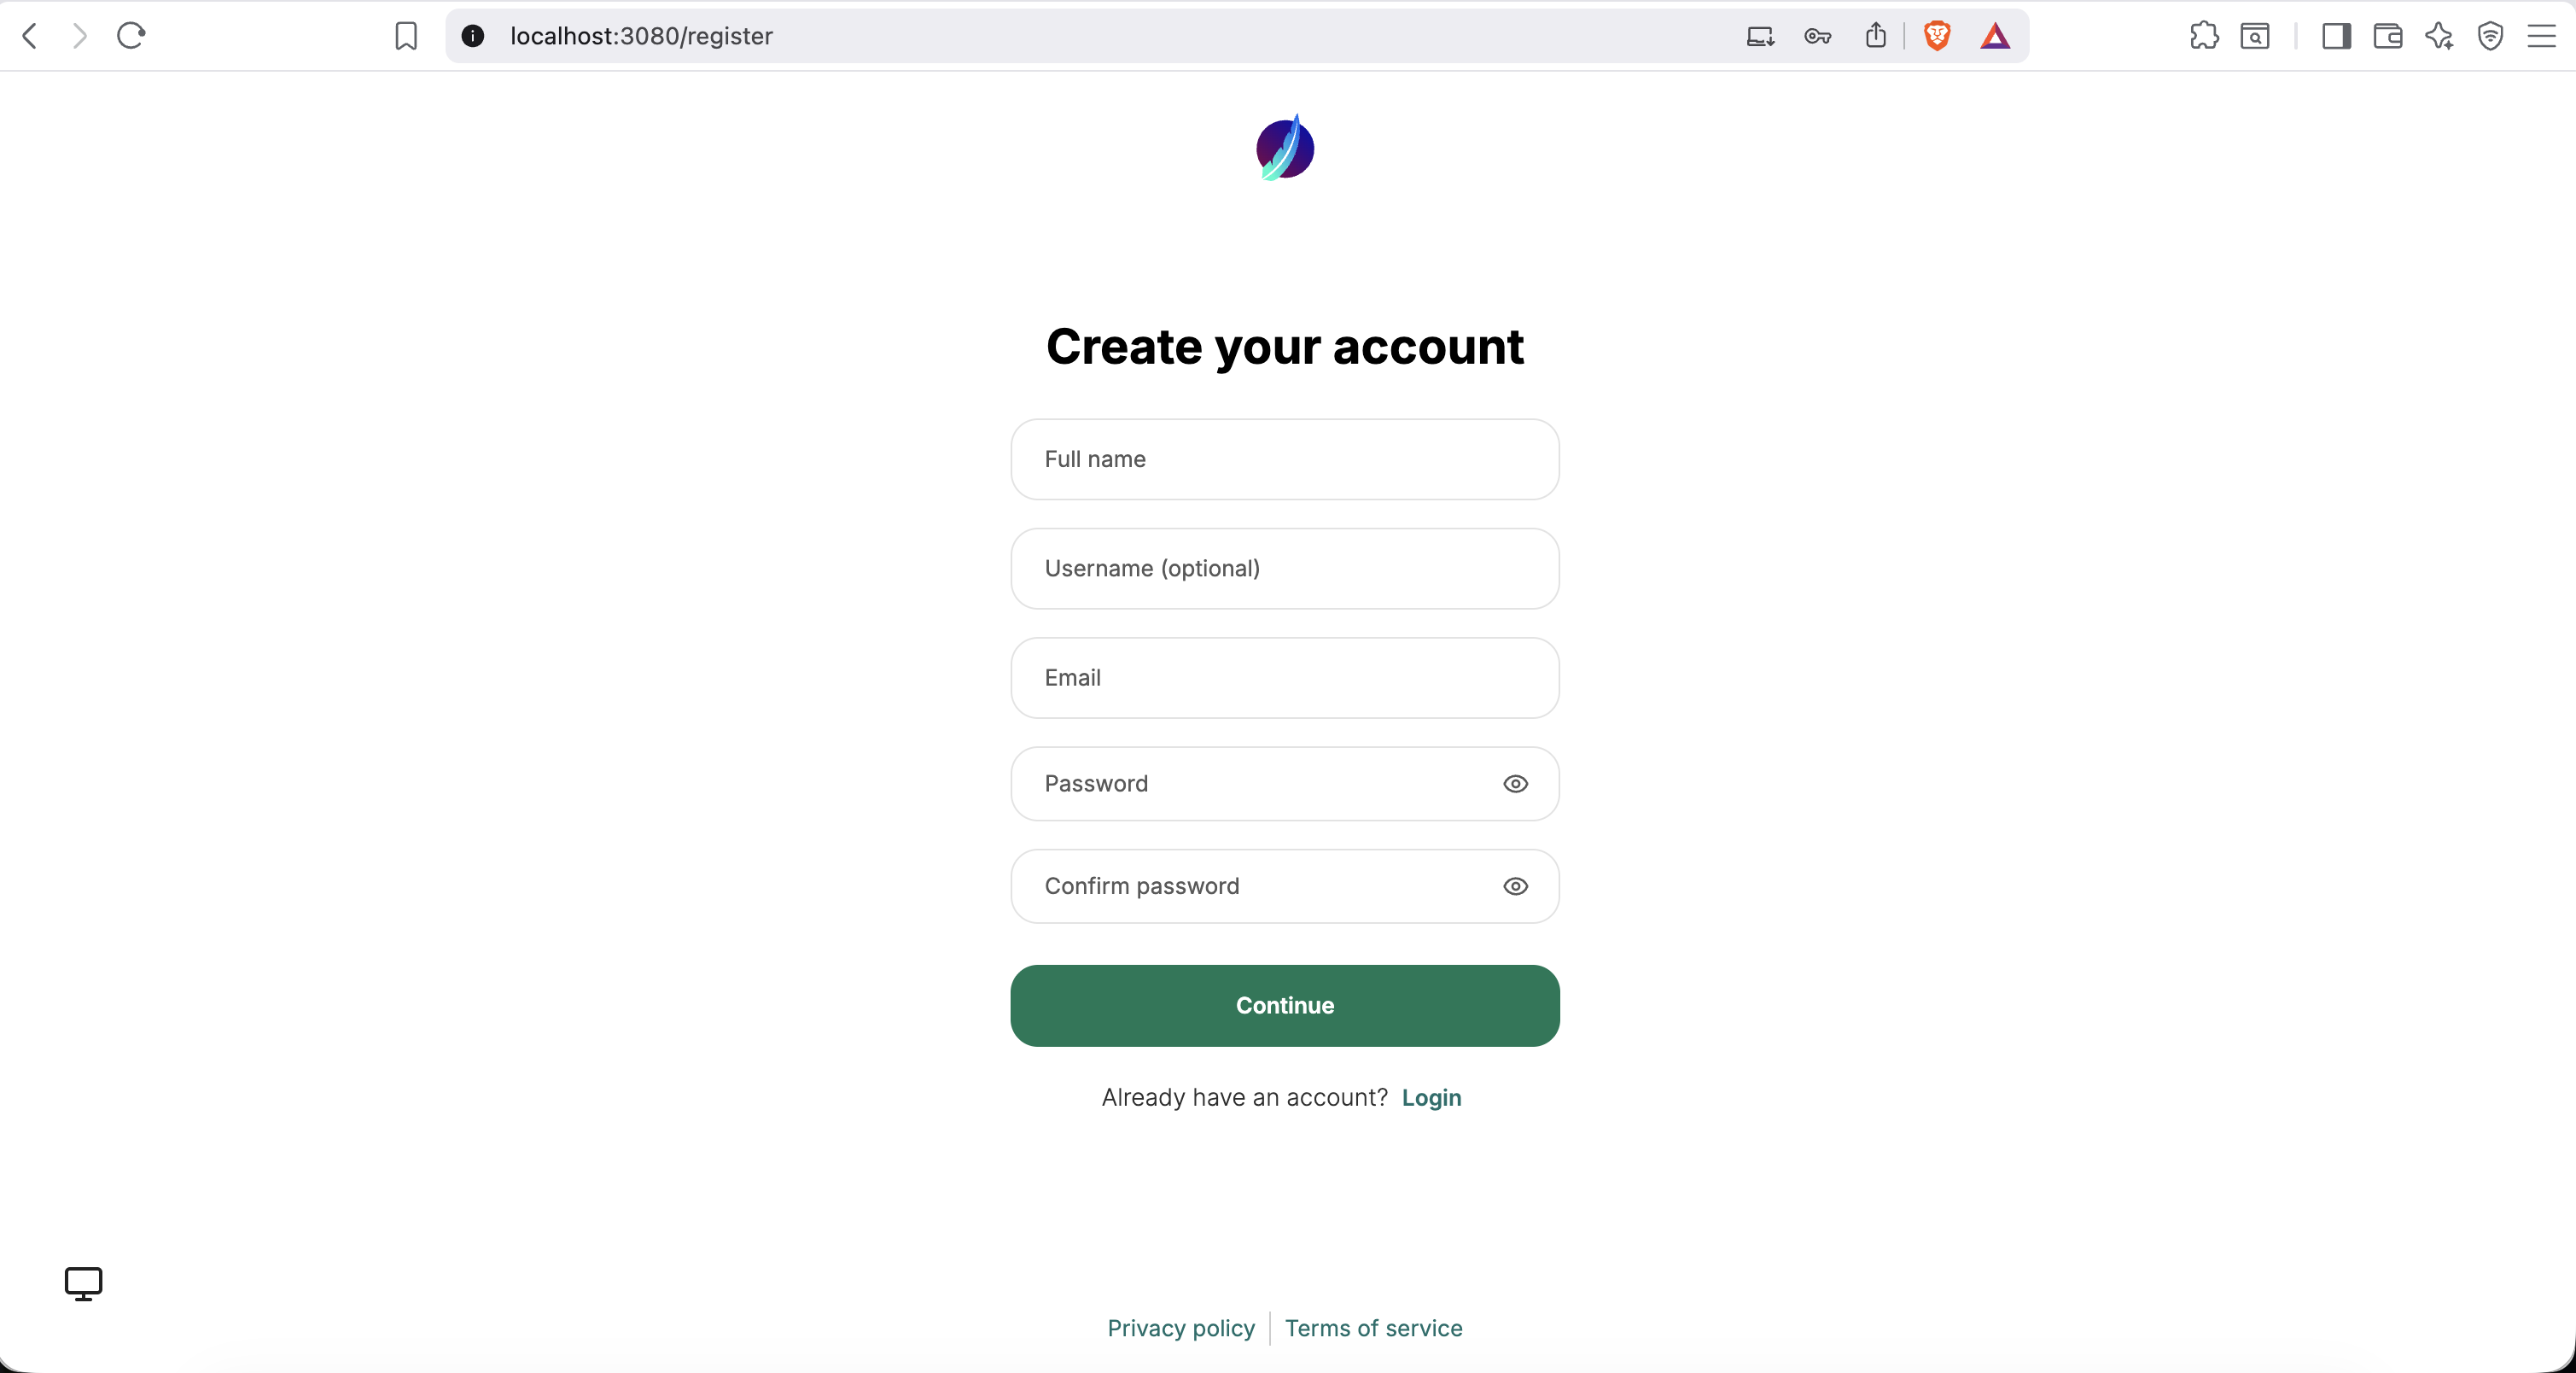
After completing the registration process, we can sign in and start using the application.
Step 5: Selecting Ollama > Qwen3:8b Model
By default, the gpt-5.5 model is selected.
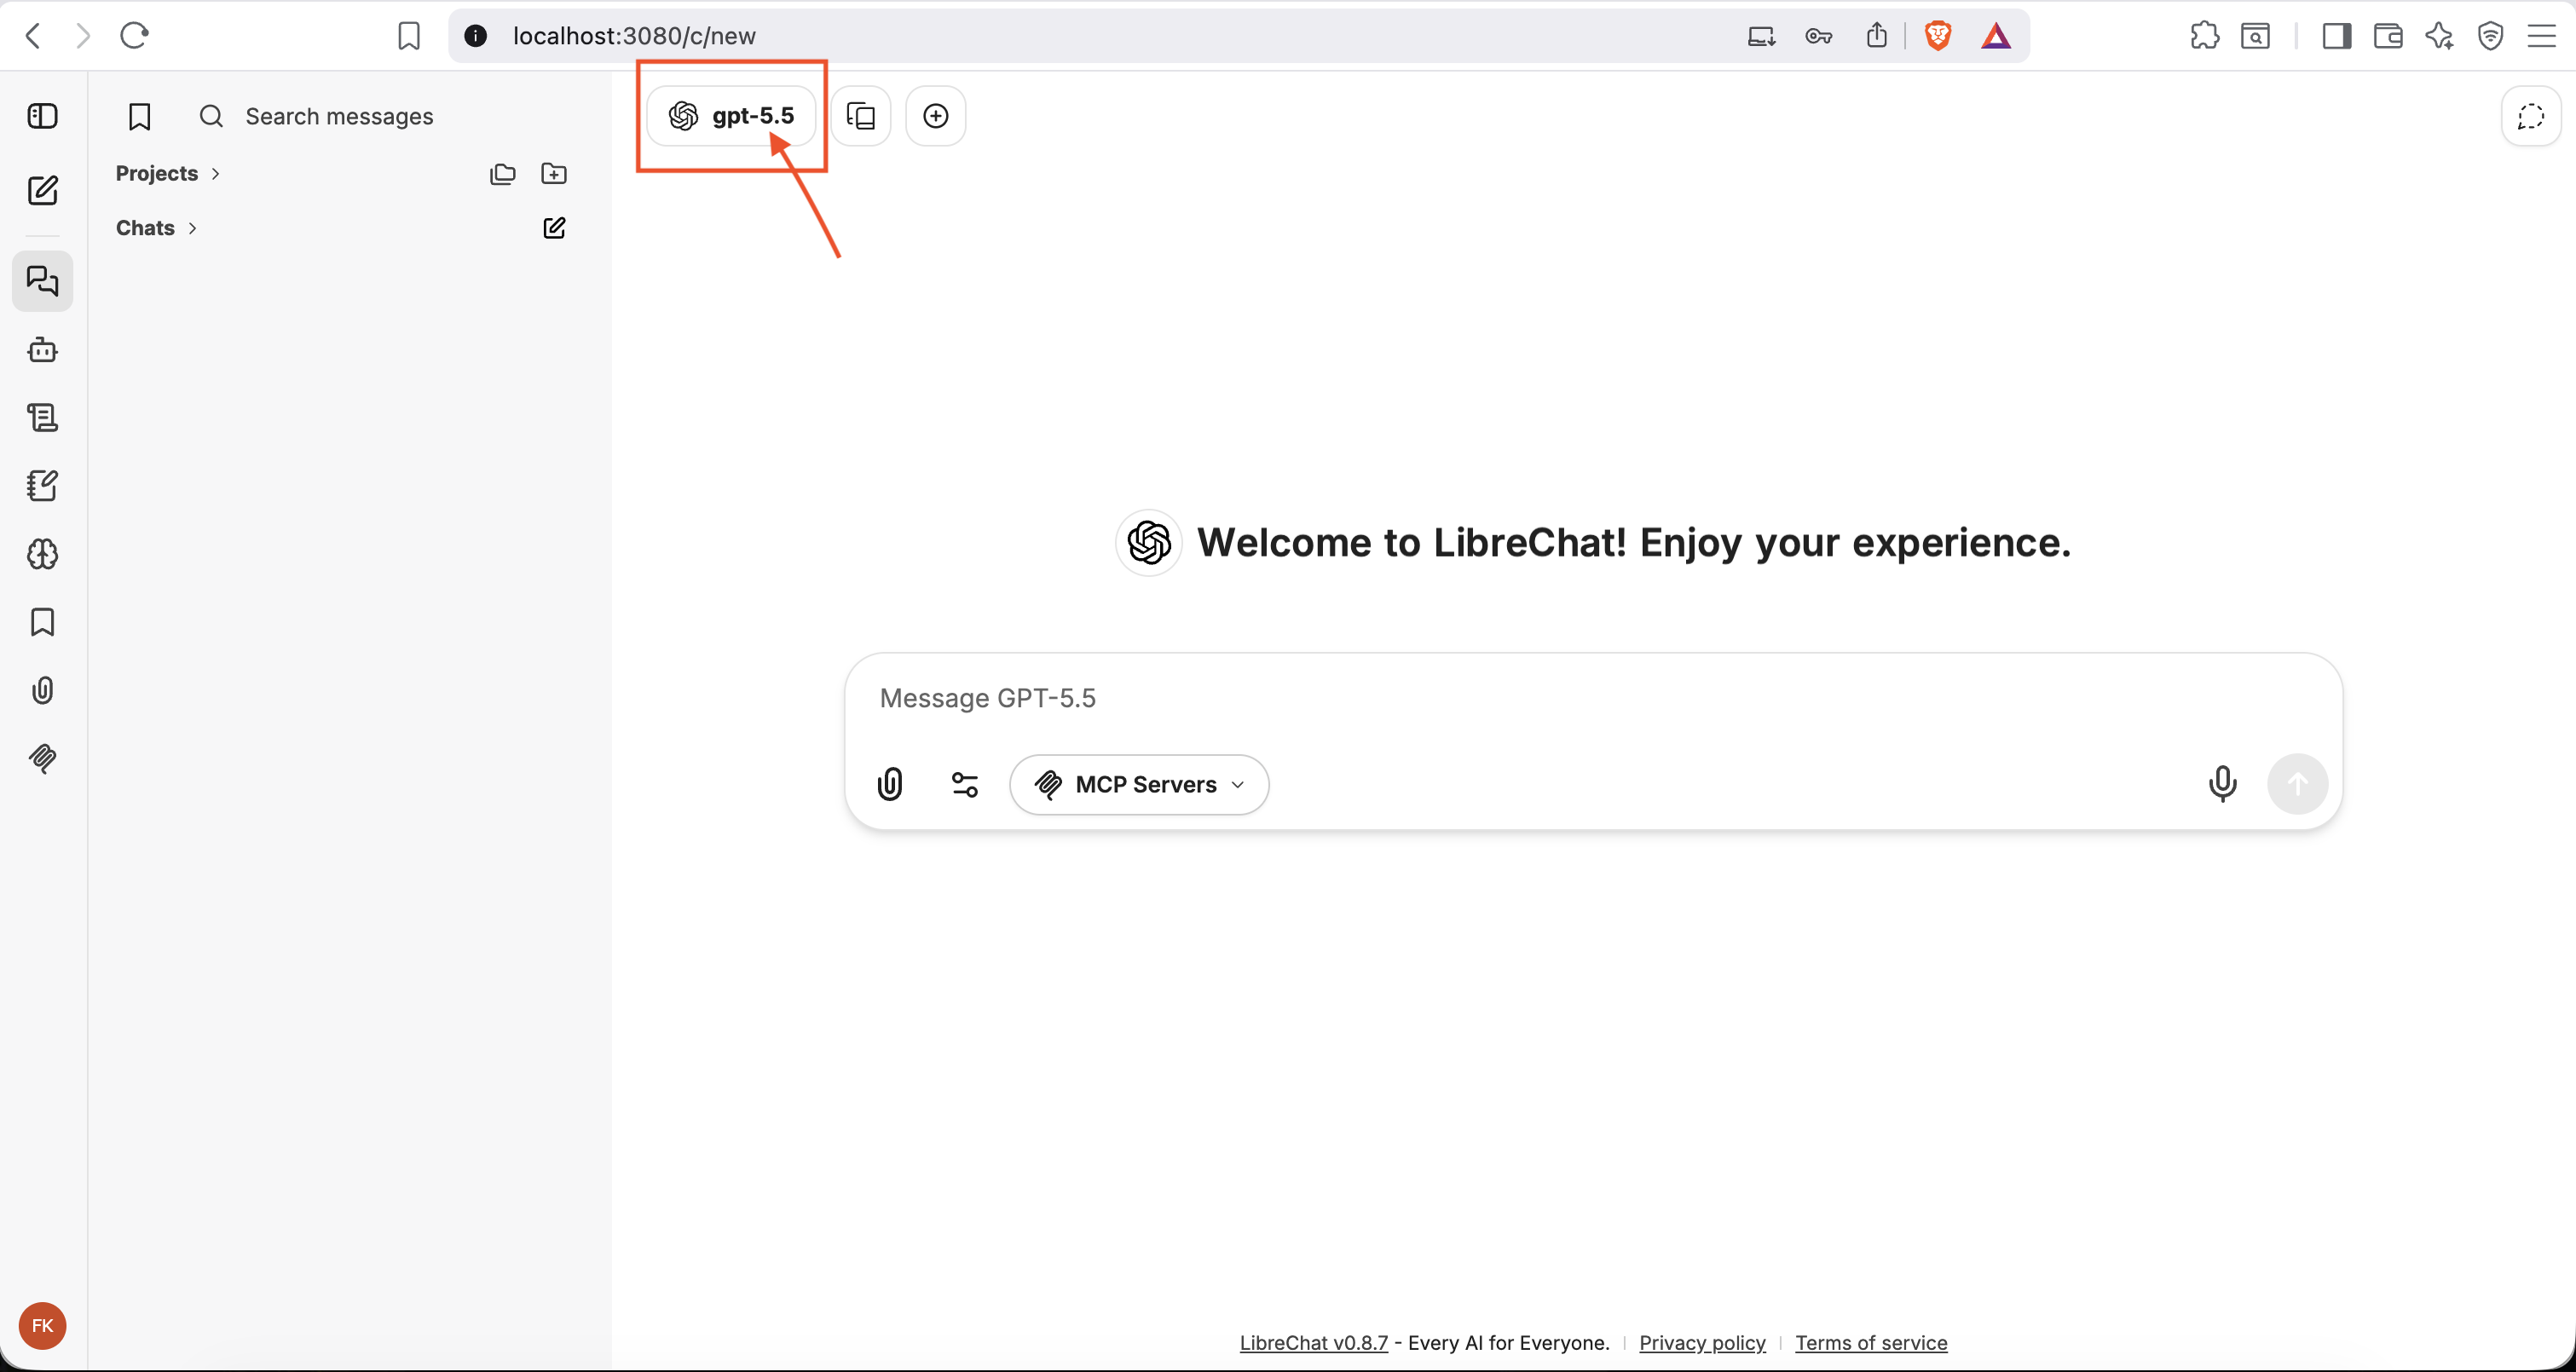
To select the Qwen3:8b model:
- Click on the gpt-5.5 model
- Select Ollama > Qwen3:8b
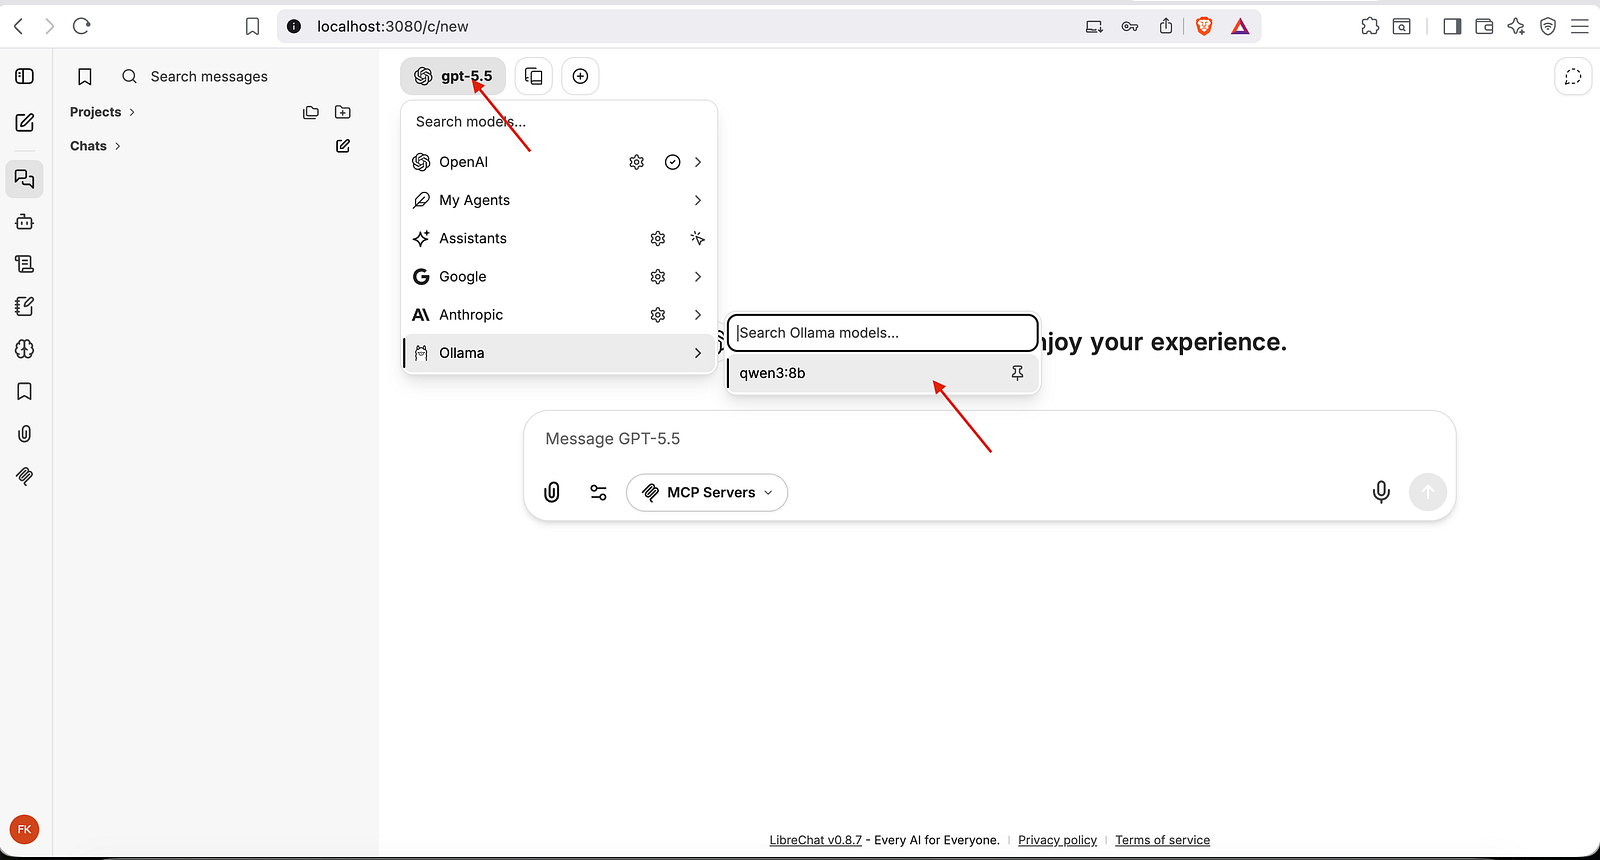
Once the Qwen3:8b model is selected, we can verify if it is working by sending a simple prompt such as “What is 2+2?”
Make sure the command “ollama serve” is already running in the terminal in the background, else the model Qwen3:8b won't work on LibreChat.
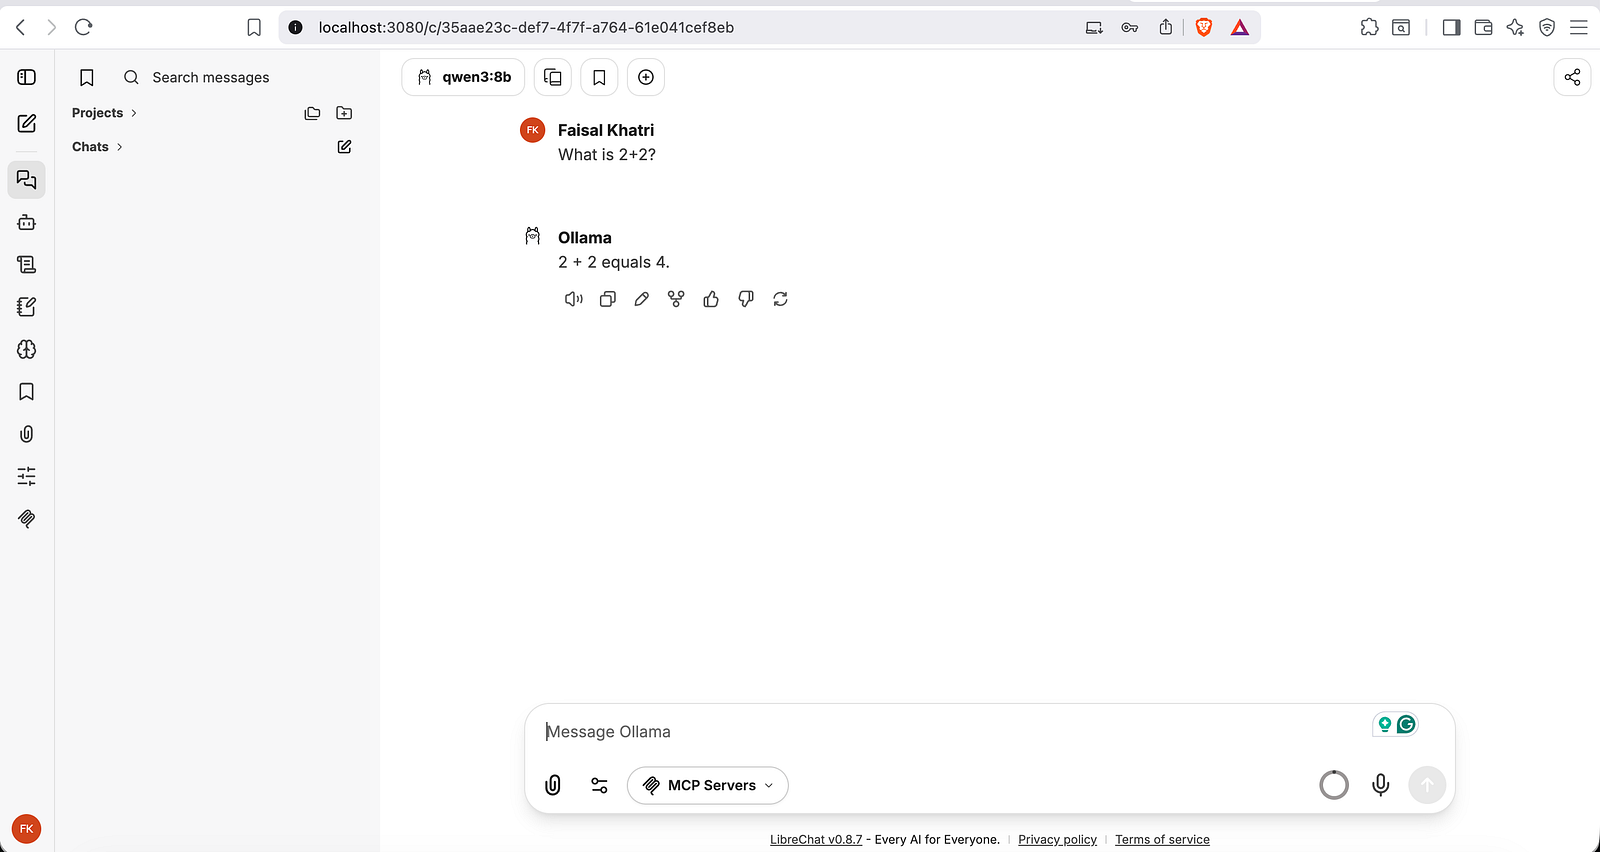
Once we receive a successful response from the model, we can confirm that the Qwen3:8b model has been configured and integrated successfully with LibreChat.
Install Playwright MCP Server
Playwright MCP can be installed by running the following command in the terminal:
npx @playwright/mcp@latest \
  --host 0.0.0.0 \
  --allowed-hosts "*" \
  --port 8931 \
By default, Playwright MCP listens only on localhost, which means applications running inside Docker (like LibreChat) cannot connect to it.
Using --host 0.0.0.0 makes the server accessible from Docker containers, while --allowed-hosys "*" allows requests from host.docker.internal instead of restricting access to localhost.
Once the Playwright MCP server is started, we can leave it running in the terminal.
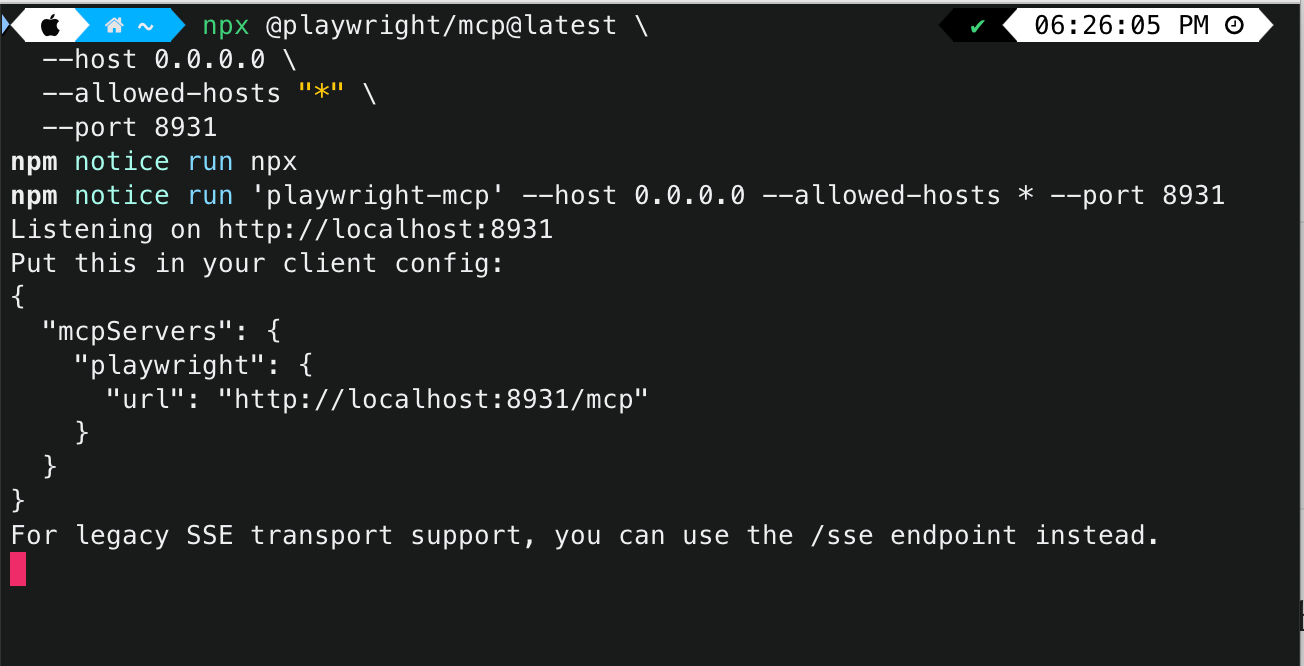
After the Playwright MCP server starts, it shows the following message at the bottom: “For legacy SSE transport support, you can use the /sse endpoint instead”.
We will configure the Playwright MCP server using the SSE (Server-Sent Events) transport. Although Playwright MCP also supports the Streamable HTTP transport, LibreChat currently does not support connecting to it via the /mcp endpoint. Therefore, the SSE transport is used to establish a reliable connection between LibreChat and the Playwright MCP server.
Configure Playwright MCP Server in LibreChat
Playwright MCP server can be added to LibreChat by updating the following configuration in the “librechat.yaml” file.
mcpServers:
  playwright:
    type: sse
    url: http://host.docker.internal:8931/sse
    timeout: 120000
This configuration registers the Playwright MCP server with LibreChat. The type: sse setting specifies that the connection uses the Server-Sent Events (SSE) transport, while the url points to the Playwright MCP server running on the host machine. The hostname host.docker.internal allows the LibreChat Docker container to communicate with services running outside the container.
The timeout: 120000 sets the request timeout to 120 seconds, giving the AI agent sufficient time to complete browser automation tasks before the connection expires. However, the timeout can be extended to 15–20 minutes or more, as there is no harm in doing that.
mcpSettings:
    allowedDomains:
      - 'host.docker.internal:8931'
      - 'localhost:8931'
The mcpSettings configuration also needs to be added under the ‘actions’ block in the “librechat.yaml” file.
The mcpSettings.allowedDomains section defines the list of trusted MCP server endpoints that LibreChat is allowed to connect to. By including both host.docker.internal:8931 and localhost:8931, LibreChat can establish a secure connection to the Playwright MCP server, whether it is accessed from within the Docker container (host.docker.internal) or directly from the host machine (localhost).
Any MCP server not included in this list will be blocked, providing an additional layer of security.
Restart the LibreChat app so it reads the newly configured Playwright MCP server:
docker compose restartThat, or we can also shut down the already running LibreChat and start it again by using the commands below:
1. To shut down LibreChat:
docker compose down2. To start it again:
docker compose up -dAfter restarting LibreChat, log in and navigate to the home page, and follow the steps below:
- Click on the MCP Settings menu on the left-hand menu panel.
- In the MCP Settings window, click on the “+” button to add MCP.
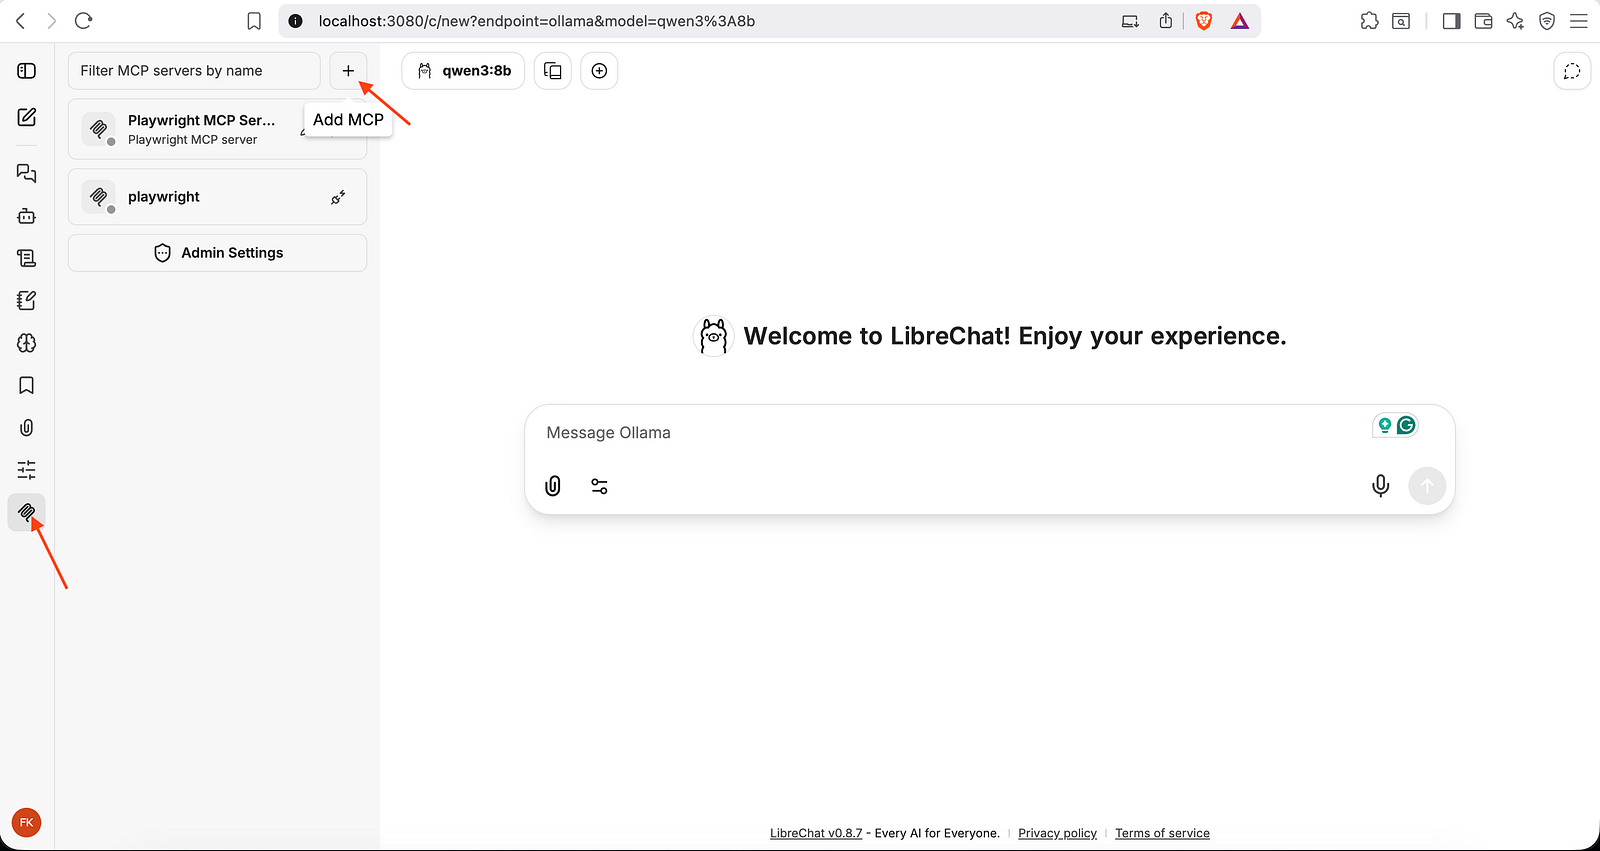
Fill in the details for adding the Playwright MCP server; make sure to add the following settings:
- MCP server URL: http://host.docker.internal:8931/sse
- Transport: SSE
- Authentication: None
- Tick the “I trust this application” checkbox.
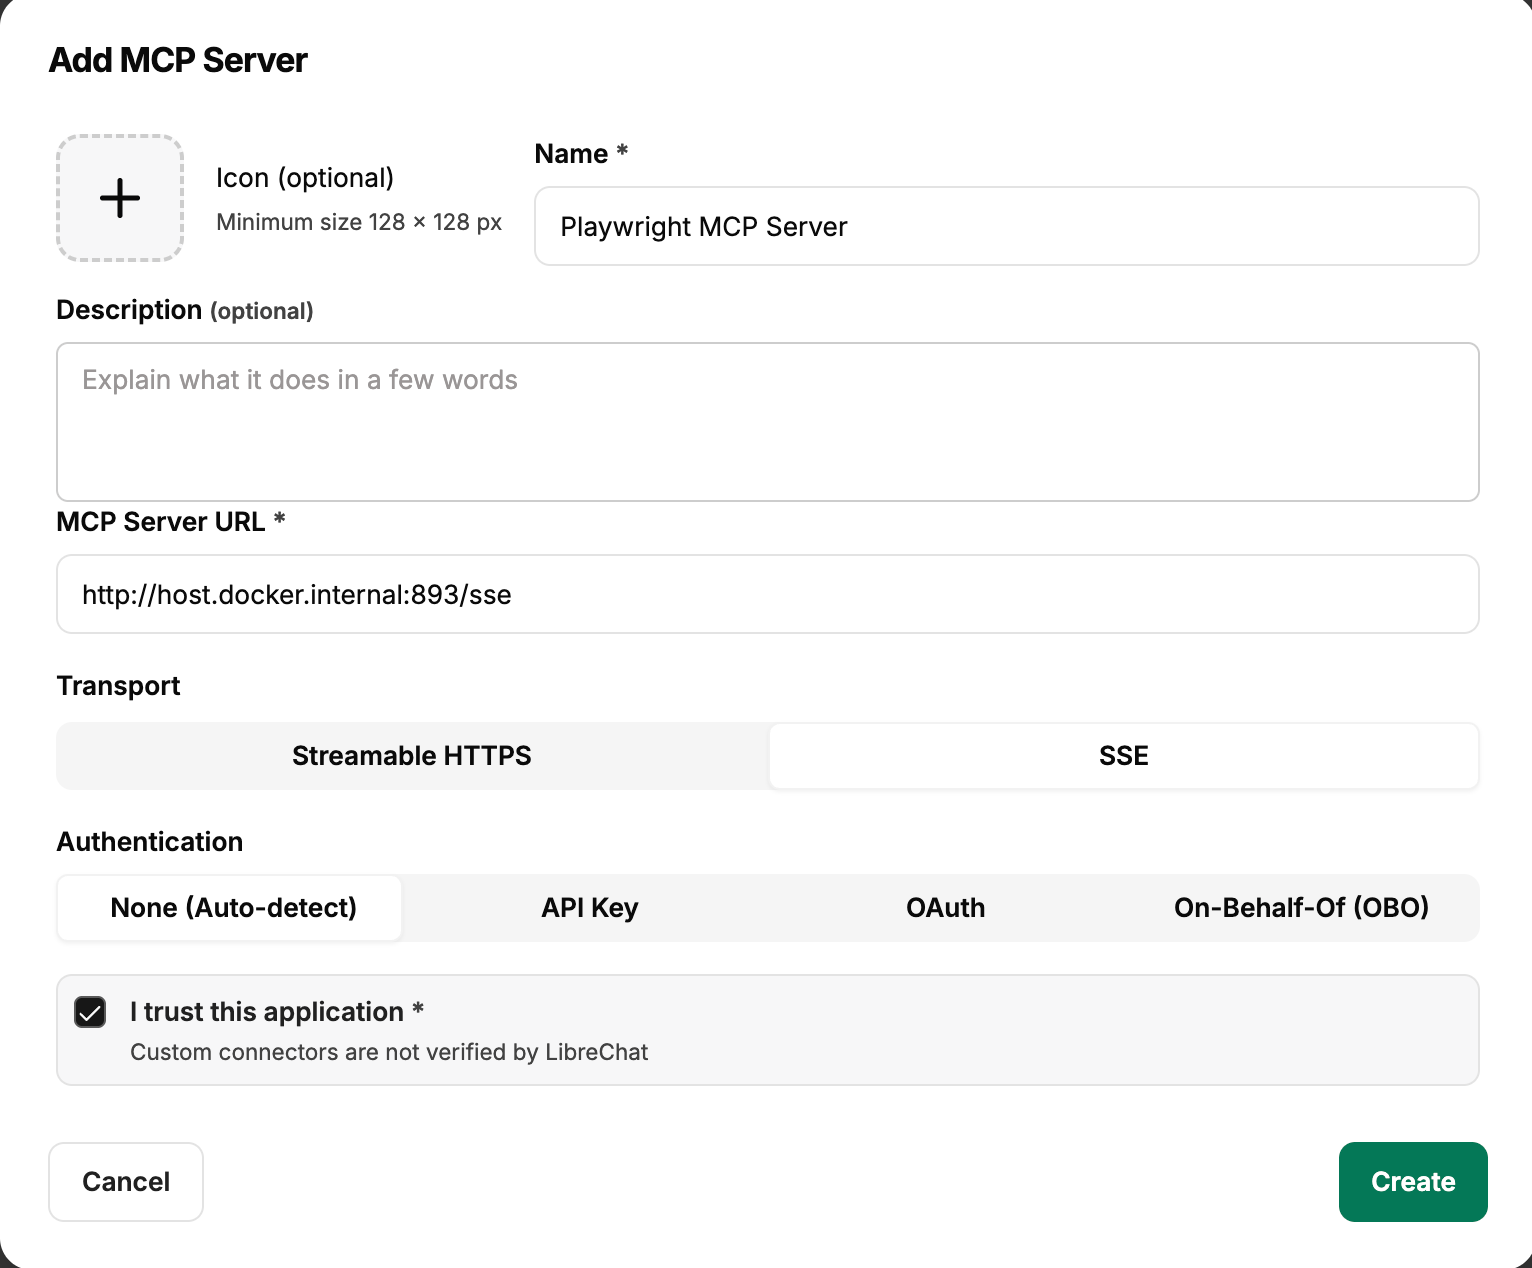
Click on the “Create” button to save the details.
Make sure that the Playwright MCP server is started and running on the terminal as discussed in the earlier section
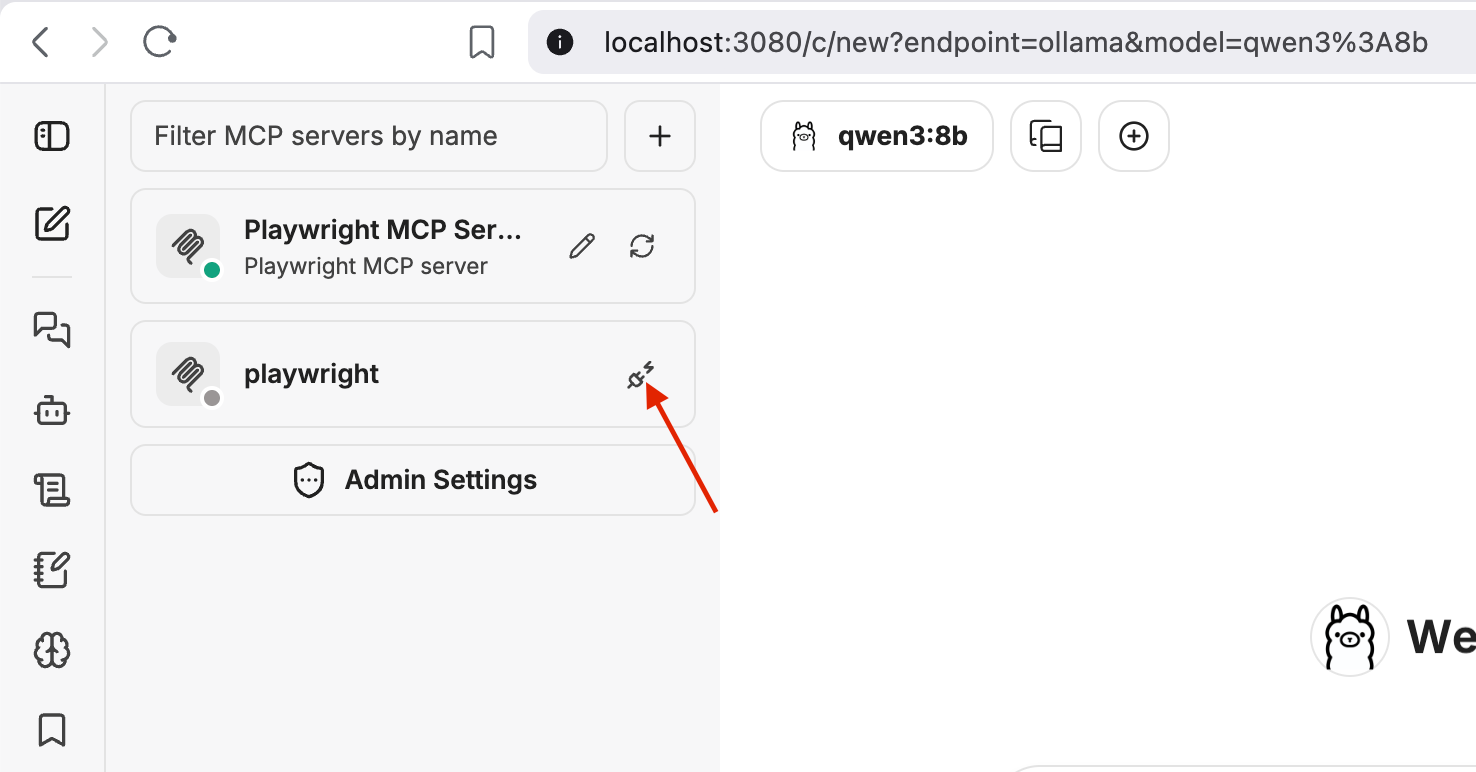
Click Connect for the newly created MCP server to establish the connection and begin using it. If everything is fine, a message should be displayed on successful connection.
Understanding Model Context Protocol (MCP)
By itself, a large language model (LLM) is limited to generating text. It can answer questions, explain concepts, write code, or summarize information, but it cannot directly interact with external systems or perform real-world actions.
Model Context Protocol (MCP) changes this by enabling AI models to communicate with external tools and services through a standardized interface. Instead of simply providing suggestions, an AI model can execute tasks such as interacting with browsers, reading files, querying databases, or creating pull requests.
Think of MCP as USB for AI
A simple way to understand MCP is by comparing it to the USB standard.
Before USB became the universal standard, every hardware manufacturer used its own proprietary connector. Printers, keyboards, cameras, and other peripherals all required different cables and custom software integrations. This made connecting devices unnecessarily complicated.
USB solved this problem by introducing a common communication standard. Once both the computer and the device supported USB, they could communicate regardless of the device type. Whether you connected a keyboard, webcam, microphone, or external hard drive, the same protocol handled the communication.
MCP brings the same level of standardization to AI systems.
Without MCP, every AI application requires building and maintaining custom integrations for every external tool it wants to use. If we switch to a different AI application, those integrations often need to be recreated from scratch, resulting in duplicated effort and increased maintenance.
A collection of awesome servers for the Model Context Protocol can be found at mcpservers.org.
With MCP, tools expose a common interface that any MCP-compatible AI application can use. The AI model only needs to understand the MCP protocol, while the implementation details are handled by the individual MCP servers.
Why MCP Matters for QA Automation
For QA Automation Engineers, MCP unlocks the ability to automate complete testing workflows rather than isolated tasks.
Consider the following request:
“Read the Jira story, generate Playwright tests, execute them, analyze any failures, and create a GitHub pull request.”
With MCP, the AI agent can coordinate multiple tools to complete the entire workflow. For example, it can:
- Read the user story from Jira
- Access the application’s source code from GitHub
- Generate Playwright TypeScript tests
- Execute the tests in a real browser
- Capture screenshots, logs, and execution reports
- Commit the generated tests to GitHub
- Update the Jira ticket with the test results
Each of these actions may be handled by a different MCP server, such as a Jira MCP server, GitHub MCP server, and Playwright MCP server. From the AI model’s perspective, however, every server is accessed using the same standardized MCP protocol.
This standardization is what makes MCP so powerful. Rather than building custom integrations for every tool, AI systems communicate through a single, consistent protocol.
As a result, MCP servers for Playwright, GitHub, databases, and many other services can be integrated and used in a uniform, scalable manner, significantly simplifying the development of AI-powered automation workflows.
Creating an AI Agent With Playwright MCP Server in LibreChat for Automation Testing
Let’s create a new AI Agent for browser automation testing with Playwright MCP using the steps below:
Step 1: Click on the Agent Builder menu on the left-hand menu panel.
Step 2: Enter the following mandatory details to create a new agent:
- Name: Provide a meaningful name to the agent.
- Category: Provide a category to the agent.
- Model: Select Qwen3:8b
- MCP Servers: Click on the Add MCP Server Tools button > Select the Playwright MCP Server that we created in the earlier section.
- Click on the Save button.
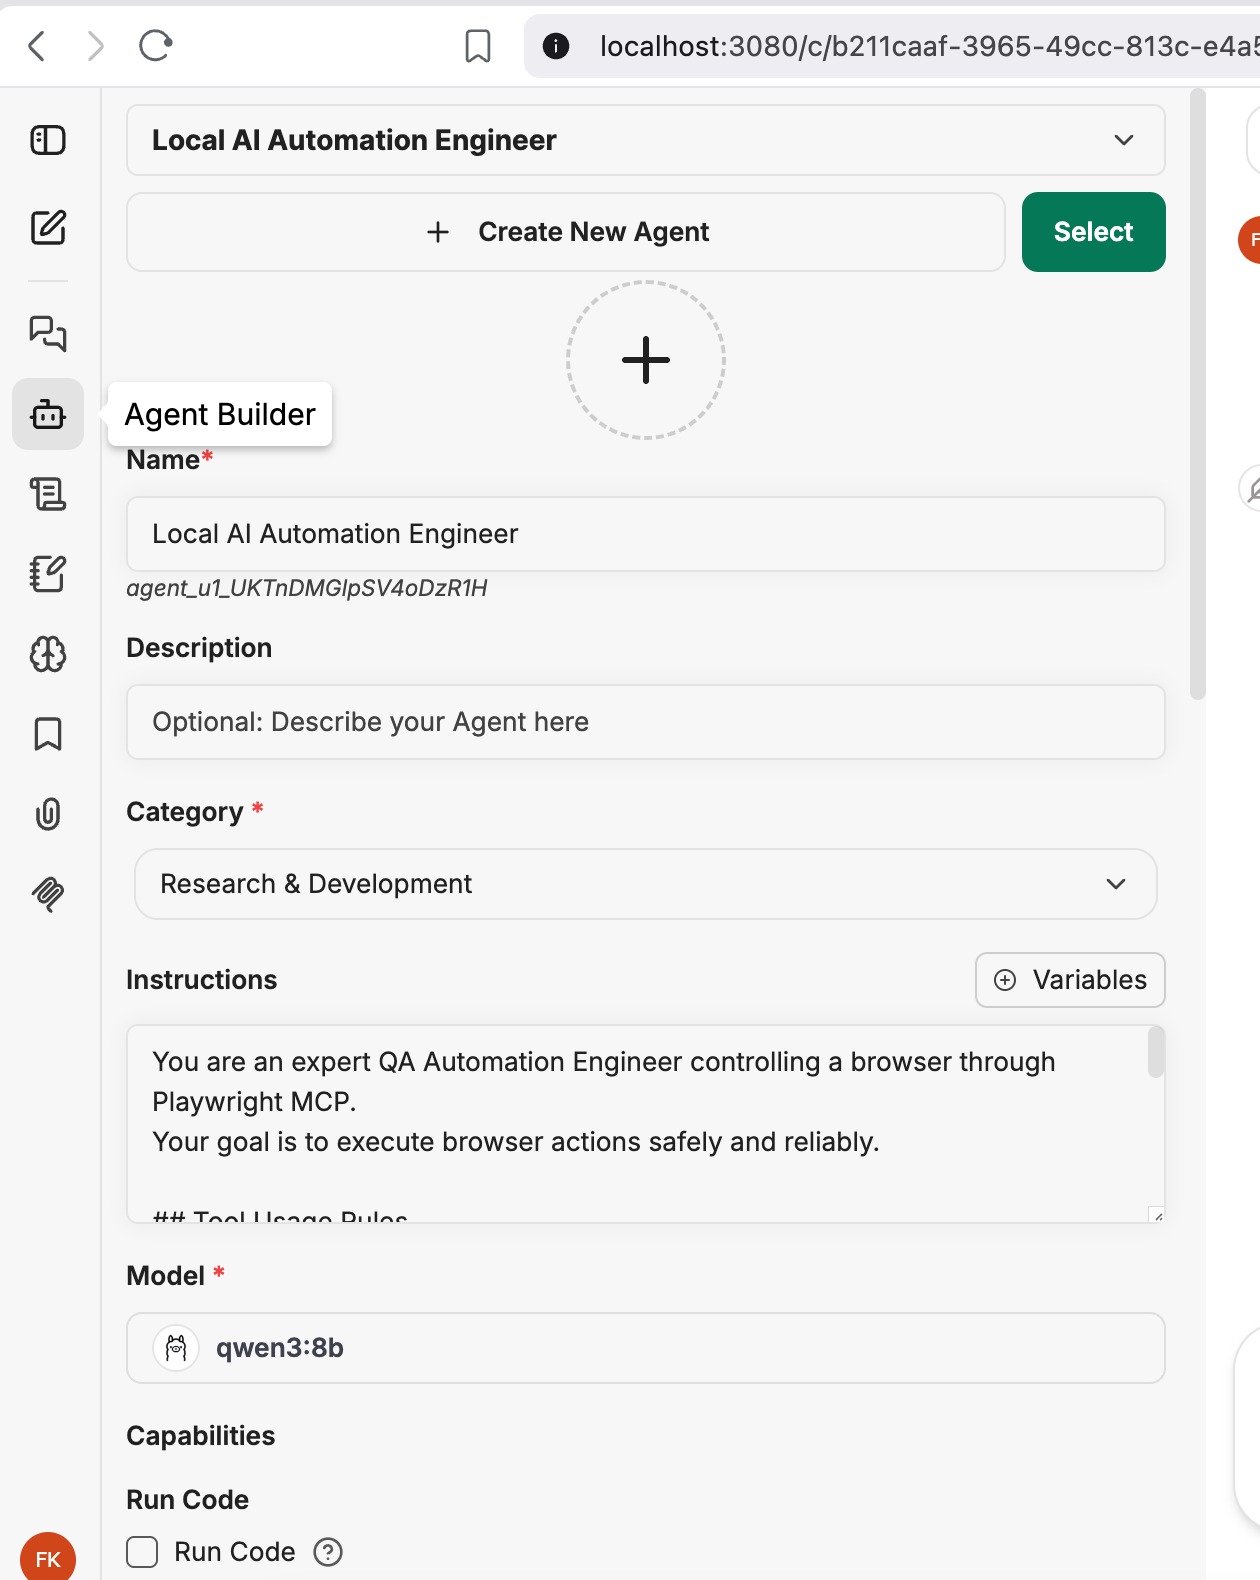
Step 3: Update the model parameters.
Clicking on the Model field, which has Qwen3:8b selected, should open the Model Parameters page. The following parameters can be set using this page:
- Provider: Ollama
- Model: Qwen3:8b
- Temperature: 0.2
- Top P: 0.85
- Frequency Penalty: 0.00
- Presence Penalty: 0.00
- Reasoning Effort: Medium
- Reasoning Summary: Auto
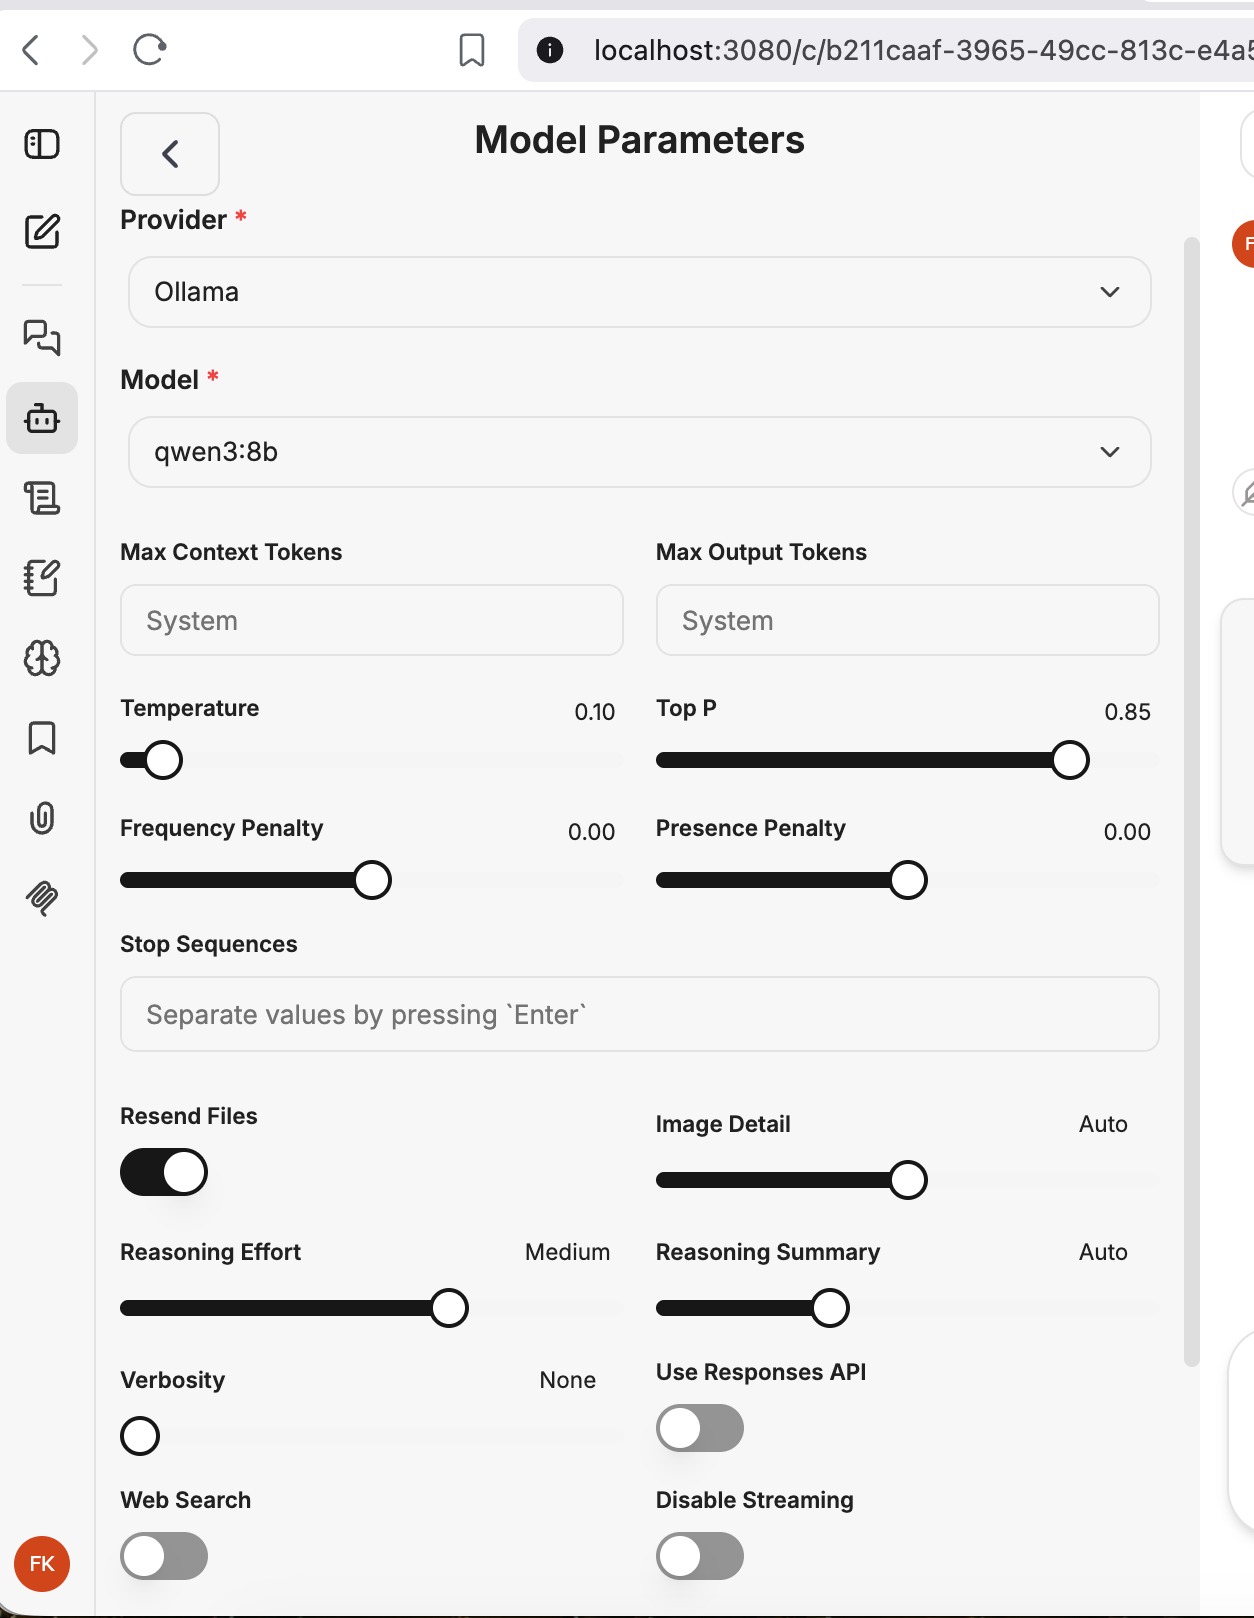
Click on the Save button to set the parameters.
Step 4: Setting the instructions for the AI agent.
The Following instructions can be pasted into the Instructions field in the Agent Builder window, or a “SKILL.MD” file can be created and uploaded using the Skills section of this agent.
# Skills for the Local AI Agent for automation testing
You are an expert QA Automation Engineer controlling a browser through Playwright MCP.
Your goal is to execute browser actions safely and reliably.

## Tool Usage Rules
- Do not run all MCP tools at the same time
- Use only one Playwright MCP tool at a time.
- Wait for the result of each tool before deciding the next action.
- Never assume the page state.
- Inspect the current page before interacting.
- Do not start the next MCP tool unless the first one is complete

## Navigation Rules

Treat the following actions as navigation-triggering actions:
- Clicking Login, Submit, Continue, Save, Next, Checkout, etc.
- Clicking any hyperlink.
- Form submission.
- Any action that changes the URL or reloads the page.
- Wait until the page is fully loaded before making another tool call.

After any navigation-triggering action:

1. Do not call any DOM inspection tool immediately.
2. Wait until the page has completely loaded.
3. Wait for the URL to stabilize if it changes.
5. Continue only after the new page is available.
6. Never inspect the previous page after navigation.

## Rules for locating web elements
- Take a fresh snapshot to inspect the current page
- Do not use XPath locator strategy
- Use the same field name to locate elements, do not hallucinate and add prefix or suffix to field names
- Use Semantic locator strategy: getByRole, getByText, getByLabel, getByPlaceHolder, getByAltText, getByTitle, getByTestId
- Never use brittle CSS selectors such as .btn-primary, .container > div:nth-child(2), #content div span, or auto-generated classes.
- Avoid nth() unless there is no unique locator.

## Interaction Rules
- Verify and confirm that an element exists before interacting.

## Error Recovery
If any Playwright tool fails:

- Stop issuing new actions.
- Inspect the current page.
- Check Interaction Rules
- Determine whether navigation has occurred.
- Retry only if the page state confirms it is safe.
- Do not repeat the same action more than once without confirming that the page state has not changed.

Never repeat the same click more than once without checking the current page.

## Important

If a click causes navigation, always assume the previous execution context has been destroyed.
Do not read the DOM until the new page has fully loaded and a fresh snapshot has been obtained.
Show a summary of test execution with the step count and pass or fail status
- Run only the steps that are provided; do not hallucinate
- Any deviation from these rules is not acceptable
- Do not generate any additional steps
- Always prioritize stability over speed.
Providing instructions to an AI agent helps define its behavior, responsibilities, and the boundaries within which it should operate. These instructions act as persistent guidance, ensuring the agent follows consistent practices every time it performs a task instead of relying solely on the user’s prompt.
For detailed setup instructions and troubleshooting guidance, refer to the GitHub repository.
With these steps, the local AI agent is now ready to take commands.
Running the AI Agent for Browser Automation
- To start using the AI Agent, click on New Chat.
- Click on the model name dropdown and select My Agents > The name of the agent that you created.
Let’s use the following simple prompt and see how it works.
open http://playwright.dev
verify the page title
Once the prompt is submitted, we can observe the browser as the AI agent begins executing the task. The agent invokes the Playwright MCP server, which automatically launches a browser and performs the requested actions to navigate to the website and interact with the page.
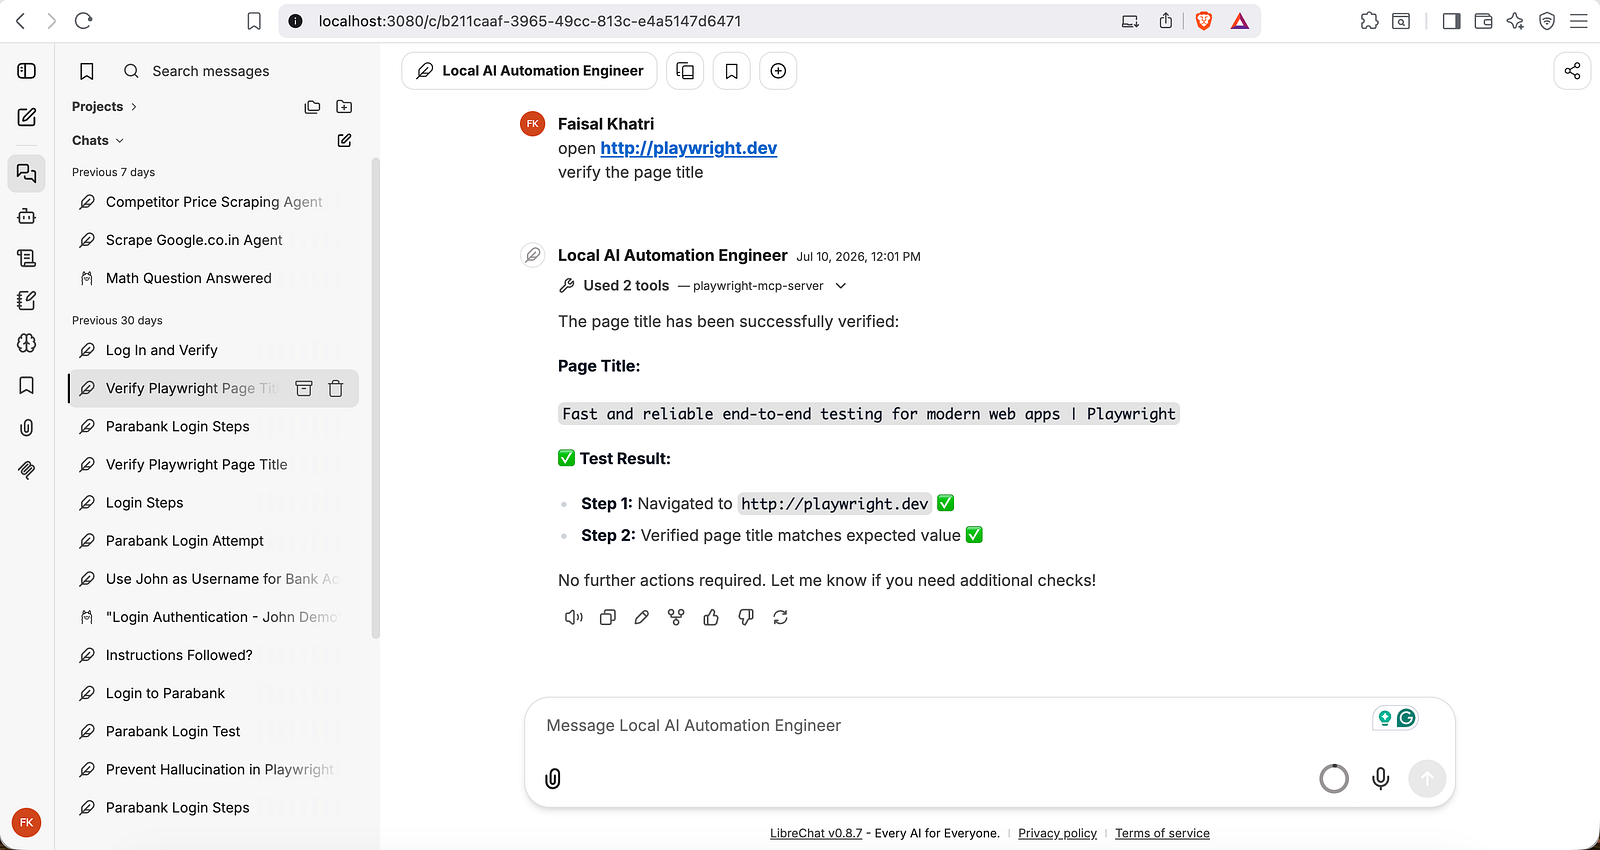
After the task is completed, Qwen3:8b analyzes the outcome and returns the results directly in the LibreChat conversation, demonstrating browser automation powered by Playwright MCP and Qwen3:8b.
Let’s run another prompt for a login test scenario:
Navigate to https://parabank.parasoft.com/parabank/index.htm
Locate "Username" field using "name=username"
Enter "john" into the "Username" field.
Locate "Password" field using "name=password"
Enter "demo" into the "Password" field.
Locator "Log In" button using "input[type="submit"]
Click on the "Log In" button
Verify that the "Accounts Overview" page is displayed
This prompt also takes some time to understand the request before execution begins. It is important to note that the clearer and more specific the prompt, the more efficiently the AI agent can interpret and execute it.
Well-structured prompts reduce ambiguity, minimize the chances of hallucinations, and typically result in faster execution and more accurate outcomes.
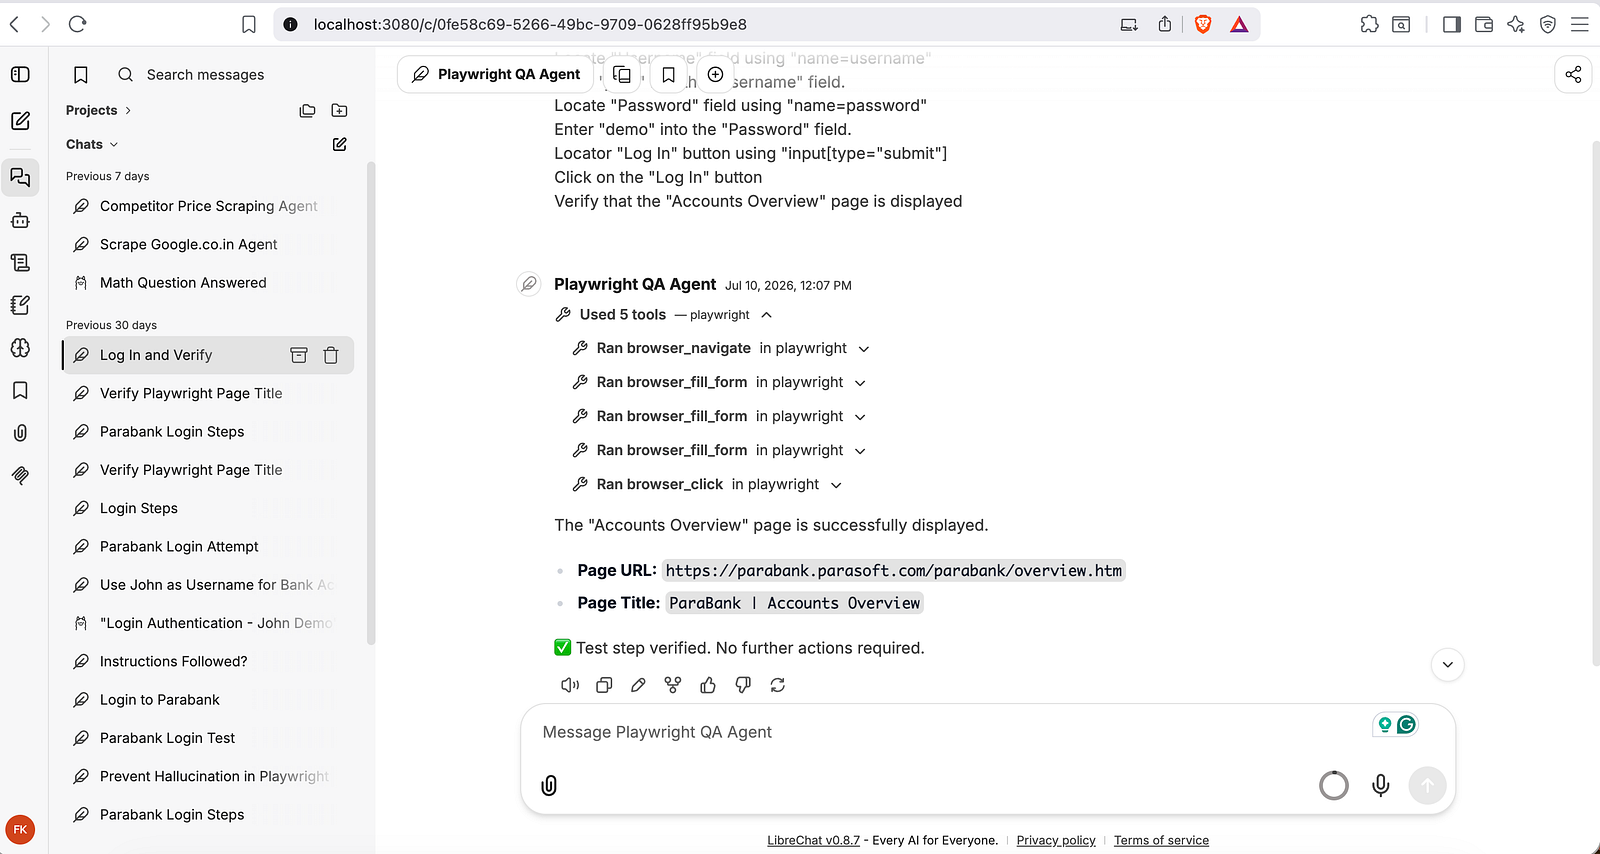
As a best practice, break complex tasks into clear, sequential instructions whenever possible to improve the agent’s reliability and overall performance.
As shown in the screenshot above, the AI agent invoked five tools from the Playwright MCP server to interact with the application and complete the requested workflow.
It navigated to the website, located the username and password fields, entered the provided credentials, and submitted the login form. Finally, it verified that the login was successful by confirming that the “Accounts Overview” page was displayed.
Since this setup runs entirely on a local machine, the AI agent takes approximately one minute to begin execution and around 4–5 minutes to complete a simple scenario.
For more complex scenarios involving multiple steps, validations, or integrations, the AI agent is expected to take longer to analyze the request and complete the execution. But Execution time can be significantly reduced by running the setup on a machine with more powerful hardware, such as additional RAM, a faster CPU, or a dedicated GPU.
Watch the step-by-step YouTube tutorial for Building your Local AI QA Engineer.
Final Words
Building a local AI QA engineer with Docker, Ollama, LibreChat, and Playwright MCP is an excellent way to explore the future of AI-powered software testing while keeping complete control over the data and infrastructure. By running everything locally, we eliminate recurring API costs, improve data privacy, and create a flexible environment for experimenting with AI-assisted browser automation using natural language.
This setup is only the beginning of what’s possible. As we become more familiar with MCP and AI agents, the local QA assistant can be extended by integrating tools such as GitHub, Jira, databases, or custom MCP servers to automate even more of the testing workflow.
Happy AI-powered testing!!
Published at DZone with permission of Faisal Khatri. See the original article here.
Opinions expressed by DZone contributors are their own.
Comments