Logback Configuration: Using XML
Logback is a logging library from the creator of JUnit. In this series continuation, Spring guru John Thompson shows how to configure it using XML.
Join the DZone community and get the full member experience.
Join For FreeThe whole purpose of logging gets defeated when the underlying logging framework becomes a bottleneck. Logging frameworks need to be fast, have a small memory footprint, and easily configurable. Logback is a logging framework with those qualities. If you are new to Logback, I suggest going through my introductory post on Logback: Logback Introduction: An Enterprise Logging Framework.
Logback supports configuration through XML and Groovy. In this post, I’ll discuss how to configure Logback using an XML file.
Creating a Logger
We will start by creating an application logger and later configure it through XML. As mentioned here, if we are using Spring Boot, we don’t require any additional dependency declaration on Logback in our Maven POM. We can straightaway start writing logging code.
LogbackConfigXml.java
package guru.springframework.blog.logbackxml;

import org.slf4j.Logger;
import org.slf4j.LoggerFactory;

public class LogbackConfigXml {
    private final Logger logger = LoggerFactory.getLogger(this.getClass());
    public void performTask(){
        logger.debug("This is a debug message.");
        logger.info("This is an info message.");
        logger.warn("This is a warn message.");
        logger.error("This is an error message.");

    }
}
Our test class uses JUnit to unit test the preceding LogbackConfigXml class.
LogbackConfigXmlTest.java
package guru.springframework.blog.logbackxml;

import org.junit.Test;

import static org.junit.Assert.*;


public class LogbackConfigXmlTest {
    @Test
    public void testPerformTask() throws Exception {
        LogbackConfigXml logbackConfigXml=new LogbackConfigXml();
        logbackConfigXml.performTask();
    }
}
The Logback Configuration File
For Logback configuration through XML, Logback expects a Logback.xml or Logback-test.xml file in the classpath. In a Spring Boot application, you can put the Logback.xml file in the resources folder. If your Logback.xml file is outside the classpath, you need to point to its location using the Logback.configurationFile system property, like this.
-DLogback.configurationFile=/path/to/Logback.xmlIn a Logback.xml file, all the configuration options are enclosed within the <configuration> root element. In the root element, you can set the debug=true attribute to inspect Logback’s internal status. You can also configure auto scanning of the configuration file by setting the scan=true attribute. When you do so, Logback scans for changes in its configuration file. If Logback finds any changes, Logback automatically reconfigure itself with the changes. When auto scanning is enabled, Logback scans for changes once every minute. You can specify a different scanning period by setting the scanPeriod attribute, with a value specified in units of milliseconds, seconds, minutes or hours, like this.
<configuration debug="true" scan="true" scanPeriod="30 seconds" >
  ...
</configuration>
The <configuration> root element can contain one or more properties in local scope, each specified using a <property> element. Such a property exists from the point of its definition in the configuration file until the interpretation/execution of the file completes. Configuration options in other parts of the file can access the property using the ${property_name} syntax. Declare properties in the local scope for values that might change in different environments. For example, path to log files, database connections, SMTP server settings, and so on.
<configuration debug="true" scan="true" scanPeriod="30 seconds" >
  <property name="LOG_PATH" value="logs"/>
  <property name="LOG_ARCHIVE" value="${LOG_PATH}/archive"/>
 ...
</configuration>
The configuration code above declares two properties, LOG_PATH and LOG_ARCHIVE whose values represent the paths to store log files and archived log files respectively.
At this point, one Logback element worth mentioning is <timestamp>. This element defines a property according to the current date and time – particularly useful when you log to a file. Using this property, you can create a new log file uniquely named by timestamp at each new application launch. The code to declare a timestamp property is this.
<timestamp key="timestamp-by-second" datePattern="yyyyMMdd'T'HHmmss"/>In the code above, the datePattern attribute denotes the date pattern used to convert the current time following the conventions defined in SimpleDateFormat.
Next, we’ll look how to use each of the declared properties from different appenders.
Console and File Appenders
You declare one or more appenders with the <appender> element containing the mandatory name and class attributes. The name attribute specifies the appender name that loggers can refer whereas the class attribute specifies the fully qualified name of the appender class. The appender element can contain <layout> or <encoder> elements to define how logging events are transformed. Here is the configuration code to define console and file appenders:
. . .
<appender name="Console-Appender" class="ch.qos.Logback.core.ConsoleAppender">
    <layout>
        <pattern>%msg%n</pattern>
    </layout>
</appender>
<appender name="File-Appender" class="ch.qos.Logback.core.FileAppender">
    <file>${LOG_PATH}/logfile-${timestamp-by-second}.log</file>
    <encoder>
        <pattern>%msg%n</pattern>
        <outputPatternAsHeader>true</outputPatternAsHeader>
    </encoder>
</appender>
. . .- Line 2 – Line 6: We defined a console appender with the name Console-Appender to use a pattern layout. Note that we haven’t explicitly set the layout, but instead relied on the default Logback value that uses pattern layout.
- Line 4: We defined a conversion pattern with the <pattern> element. A conversion pattern is composed of literal text and format control expressions called conversion specifiers. In the code, the %msg conversion specifier outputs the application-supplied message associated with the logging event. The %n conversion specifier outputs the platform dependent line separator characters. You can learn more about pattern layout and conversion specifiers here.
- Line 7 – Line 13: We defined a file appender with the name File-Appender. This appender writes to a file defined by the <file> element. Observe how we referred the properties we defined earlier to generate a new log file each time the application starts.
- Line 10 – Line 11: We defined an encoder with a pattern. We also used outputPatternAsHeader to insert the pattern used for the log output at the top of log files.
Note: Encoders were introduced in Logback version 0.9.19. Due to the benefits that encoders provide, as explained here, it is recommended to use encoders instead of layouts. As a matter of fact, Logback has removed support for layouts in FileAppender and its sub-classes from version 0.9.19 onwards.
We will now configure an application-specific logger along with the root logger to use the console and appenders, like this.
. . .
<logger name="guru.springframework.blog.Logbackxml" level="info">
   <appender-ref ref="File-Appender"/>
</logger>
<root>
    <appender-ref ref="Console-Appender"/>
</root>
. . .
In the code above, we defined two loggers. The first logger defined by <logger> configures all loggers under the guru.springframework.blog.Logbackxml package to use the file appender. The second one defined by <root> is the root logger configured to use the console appender.
If we run the Log4J2XmlConfTest test class, Log4J 2 will generate log messages and send them to both the console and the file, as shown in this figure.

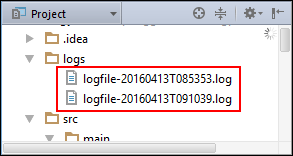
Run the test class again. Observe how Logback uses the timestamp property to generate a separate log file based on the specified date pattern.
Rolling File Appender
The rolling file appender supports writing to a file and rolls the file over according to one of your pre-defined policies. The most popular policy is the time-based rolling policy. You can define a time-based policy to perform a rollover once the date/time pattern is no longer applies to the active log file. To learn more about the rolling file appender and its policies, refer to the Logback user manual.
The code to configure a rolling file appender is this.
. . .
<appender name="RollingFile-Appender" class="ch.qos.Logback.core.rolling.RollingFileAppender">
    <file>${LOG_PATH}/rollingfile.log</file>
    <rollingPolicy class="ch.qos.Logback.core.rolling.TimeBasedRollingPolicy">
        <fileNamePattern>${LOG_ARCHIVE}/rollingfile.%d{yyyy-MM-dd}.log</fileNamePattern>
        <maxHistory>30</maxHistory>
        <totalSizeCap>1MB</totalSizeCap>
    </rollingPolicy>
    <encoder>
        <pattern>%msg%n</pattern>
    </encoder>
</appender>
. . .
In the code above:
- Line 3: The <file> element defines the name of the log file to write to.
- Line 4: The <rollingPolicy> element defines a time-based policy.
- Line 5: The <fileNamePattern> element defines a file name pattern for archived log files. The rollover period is inferred from the value of <fileNamePattern>, which in the code example is set for daily rolling.
- Line 6: The <maxHistory> element sets the maximum number of archive files to keep, before deleting older files asynchronously.
- Line 7: The <totalSizeCap> element sets the total size of all archive files. Oldest archives are deleted asynchronously when the total size cap is exceeded.
To use the rolling file appender, add the appender reference to the logger declaration, like this.
. . .
<logger name="guru.springframework.blog.Logbackxml" level="info">
   <appender-ref ref="File-Appender"/>
    <appender-ref ref="RollingFile-Appender"/>
</logger>
. . .
At this point, when you run the test class, a rolling log file, named rollingfile.log is created under logs. To simulate a rollover, set the system clock one day ahead, and run the test class again. A new rollingfile.log is created under logs and the previous file is archived in the logs/archive folder.

In addition to the time-based rolling policy, you can define a size-based triggering policy. It’s important to understand the difference between rolling and triggering policies. A rolling policy defines WHAT happens when rollover occurs, whereas a triggering policy defines WHEN a rollover should occur. The following code sets a triggering policy to trigger a rollover when the size of a log file exceeds 1 MB.
. . .
<triggeringPolicy class="ch.qos.Logback.core.rolling.SizeBasedTriggeringPolicy">
    <maxFileSize>1MB</maxFileSize>
</triggeringPolicy>
. . .
Logback Async Appender
For increased logging performance, we want lower logging latency and higher throughput. Latency is the time required to perform some action or to produce some result. On the other hand, throughput is the number of some actions executed or results produced per unit of time.
To consistently achieve lower latency and higher throughput, Logback supports asynchronous logging through an async appender. Logback executes an async appender in a separate thread to decouple the logging overhead from the thread executing your code.
Using the async appender is incredibly easy. Refer the appender that should be asynchronously invoked within an <appender> element. Then, set the class attribute to the fully qualified name of AsyncAppender, like this.
. . .
<appender name="Async-Appender" class="ch.qos.Logback.classic.AsyncAppender">
    <appender-ref ref="RollingFile-Appender"/>
</appender>
. . .. . .
<logger name="guru.springframework.blog.Logbackxml" level="info" >
<appender-ref ref="File-Appender" />
<appender-ref ref="Async-Appender" />
</logger>
. . .Logback Additivity
To understand Logback additivity, let’s add the configured console appender to the application logger. The logger configuration code is this.
. . .
<logger name="guru.springframework.blog.Logbackxml" level="info">
   <appender-ref ref="Console-Appender"/>
   <appender-ref ref="File-Appender"/>
   <appender-ref ref="RollingFile-Appender"/>
</logger>
<root>
    <appender-ref ref="Console-Appender"/>
</root>
. . .
The console output on running the test class is this.

In the figure above, notice the duplicate output. It’s due to additivity. The appender named Console-Appender is attached to two loggers: root and guru.springframework.blog.Logbackxml. Since root is the ancestor of all loggers, logging request made by guru.springframework.blog.Logbackxml gets output twice. Once by the appender attached to guru.springframework.blog.Logbackxml itself and once by the appender attached to root. You can override this default Logback behavior by setting the additivity flag of a logger to false, like this.
. . .
<logger name="guru.springframework.blog.Logbackxml" level="info" additivity="false">
   <appender-ref ref="Console-Appender"/>
   <appender-ref ref="File-Appender"/>
   <appender-ref ref="RollingFile-Appender"/>
</logger>
<root>
    <appender-ref ref="Console-Appender"/>
</root>
. . .
With additivity set to false, Logback will not use Console-Appender of root to log messages.
Although additivity is a convenient feature and is not intended to trip new users, it can be somewhat confusing. I suggest reviewing the Logback manual on the subject.
The complete code of the Logback.xml file is this.
Logback.xml
<?xml version="1.0" encoding="UTF-8"?>
<configuration debug="true" scan="true" scanPeriod="30 seconds">
    <property name="LOG_PATH" value="logs" />
    <property name="LOG_ARCHIVE" value="${LOG_PATH}/archive" />
    <timestamp key="timestamp-by-second" datePattern="yyyyMMdd'T'HHmmss"/>
    <appender name="Console-Appender" class="ch.qos.logback.core.ConsoleAppender">
        <layout>
            <pattern>%msg%n</pattern>
        </layout>
    </appender>
    <appender name="File-Appender" class="ch.qos.logback.core.FileAppender">
        <file>${LOG_PATH}/logfile-${timestamp-by-second}.log</file>
        <encoder>
            <pattern>%msg%n</pattern>
            <outputPatternAsHeader>true</outputPatternAsHeader>
        </encoder>
    </appender>
    <appender name="RollingFile-Appender" class="ch.qos.logback.core.rolling.RollingFileAppender">
        <file>${LOG_PATH}/rollingfile.log</file>
        <rollingPolicy class="ch.qos.logback.core.rolling.TimeBasedRollingPolicy">
            <fileNamePattern>${LOG_ARCHIVE}/rollingfile.log%d{yyyy-MM-dd}.log</fileNamePattern>
            <maxHistory>30</maxHistory>
            <totalSizeCap>1KB</totalSizeCap>
        </rollingPolicy>
        <encoder>
            <pattern>%msg%n</pattern>
        </encoder>
    </appender>
    <appender name="Async-Appender" class="ch.qos.logback.classic.AsyncAppender">
        <appender-ref ref="RollingFile-Appender" />
    </appender>

    <logger name="guru.springframework.blog.logbackxml"  level="info" additivity="false">
        <appender-ref ref="Console-Appender" />
        <appender-ref ref="File-Appender" />
        <appender-ref ref="Async-Appender" />
    </logger>
    <root>
        <appender-ref ref="Console-Appender" />
    </root>
</configuration>
Summary
One feature I’d like to see with Logback is the ability to use different appenders at different levels from the same logger. On searching the web, I came to the LOGBACK-625 enhancement issue requesting this feature. One workaround is using a filter inside the appender, as described here. Although not elegant, you can use the approach until the Logback team addresses this enhancement request.
Published at DZone with permission of John Thompson. See the original article here.
Opinions expressed by DZone contributors are their own.
Comments