Magento on Kubernetes
Take a look at how to deploy Magento as a Docker image on Kubernetes with help from Google Cloud.
Join the DZone community and get the full member experience.
Join For Free![Magento on Kubernetes]() 1. Prepare the Repo
1. Prepare the Repo
 1. Prepare the Repo
- Download Magento v2 sources (there are a lot of different versions, but this guide is for v2) and create the main repo.
- Create a project in Buddy and push the code.
- Magento requires running some jobs in the cron from time to time for tasks like sending a newsletter or reindexing a database. You can find more here. The result is we need to enable it on our own by adding a
crontabfile to the repo with the following content:
* * * * * www-data /usr/local/bin/php /var/www/html/bin/magento cron:run >> /var/www/html/var/log/magento.cron.log 2>&1It executes cron:run job via the Magento CLI. The user that executes it will be added in the Docker image (to be created later on).
- Copy
auth.json.sampletoauth.jsonand fill the placeholders with the keys received from Magento. The keys are used to pull the sources from PHP Composer (Magento repos are private and without that it’s impossible to pull all sources) - Create the
Dockerfilewith the following contents:
## image
FROM php:7.1-apache

## envs
ENV INSTALL_DIR /var/www/html

## install composer
RUN curl -sS https://getcomposer.org/installer | php \
&& mv composer.phar /usr/local/bin/composer

## install libraries
RUN requirements="cron libpng-dev libmcrypt-dev libmcrypt4 libcurl3-dev libfreetype6 libjpeg62-turbo libjpeg62-turbo-dev libfreetype6-dev libicu-dev libxslt1-dev" \
 && apt-get update \
 && apt-get install -y $requirements \
 && rm -rf /var/lib/apt/lists/* \
 && docker-php-ext-install pdo_mysql \
 && docker-php-ext-configure gd --with-freetype-dir=/usr/include/ --with-jpeg-dir=/usr/include/ \
 && docker-php-ext-install gd \
 && docker-php-ext-install mcrypt \
 && docker-php-ext-install mbstring \
 && docker-php-ext-install zip \
 && docker-php-ext-install intl \
 && docker-php-ext-install xsl \
 && docker-php-ext-install soap \
 && docker-php-ext-install bcmath

## add magento cron job
COPY ./crontab /etc/cron.d/magento2-cron
RUN chmod 0644 /etc/cron.d/magento2-cron
RUN crontab -u www-data /etc/cron.d/magento2-cron

## turn on mod_rewrite
RUN a2enmod rewrite

## set memory limits
RUN echo "memory_limit=2048M" > /usr/local/etc/php/conf.d/memory-limit.ini

## clean apt-get
RUN apt-get clean && rm -rf /var/lib/apt/lists/* /tmp/* /var/tmp/*

## www-data should own /var/www
RUN chown -R www-data:www-data /var/www

## switch user to www-data
USER www-data

## copy sources with proper user
COPY --chown=www-data . $INSTALL_DIR

## set working dir
WORKDIR $INSTALL_DIR

## composer install
RUN composer install
RUN composer config repositories.magento composer https://repo.magento.com/

## chmod directories
RUN chmod u+x bin/magento

## switch back
USER root

## run cron alongside apache
CMD [ "sh", "-c", "cron && apache2-foreground" ]
In the Dockerfile we are using the official PHP image from the DockerHub in which we install all required libraries, copy all sources, install the sources from Composer, and run cron and Apache.
All layers are optimized to cache as many things as possible.
2. Create a Pipeline That Builds the Image
- Add a pipeline, select the branch that you want to dockerize, and set the trigger mode (manual or on-push).
- Add the Build Docker Image action and save it as it is (do not change anything at the moment).
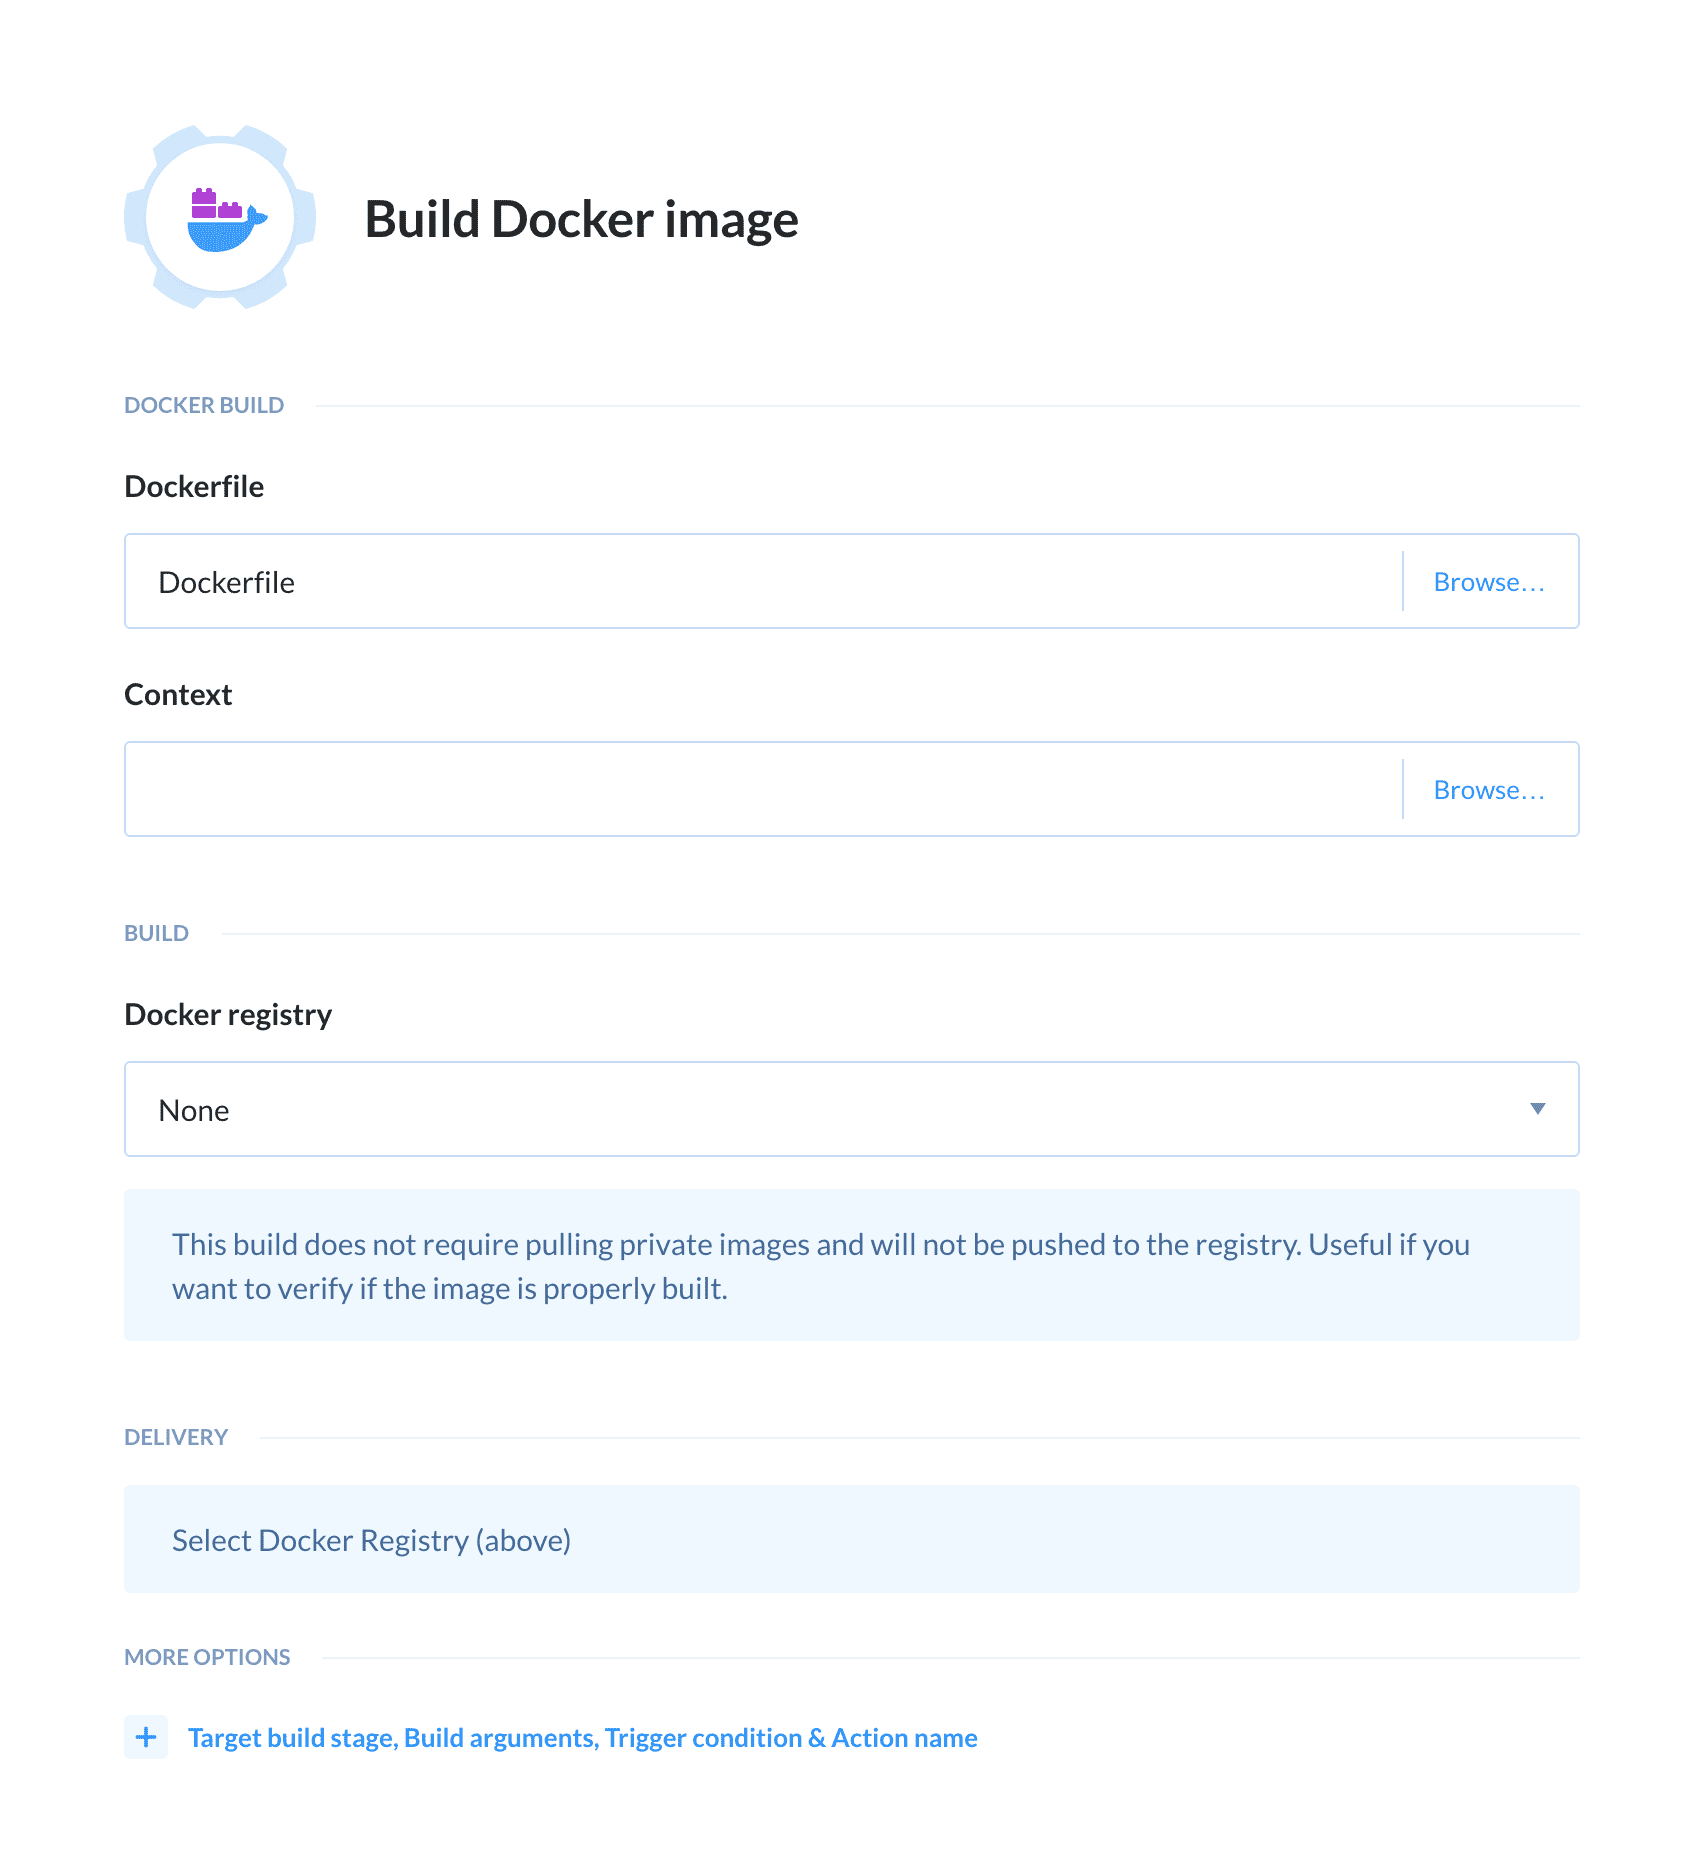
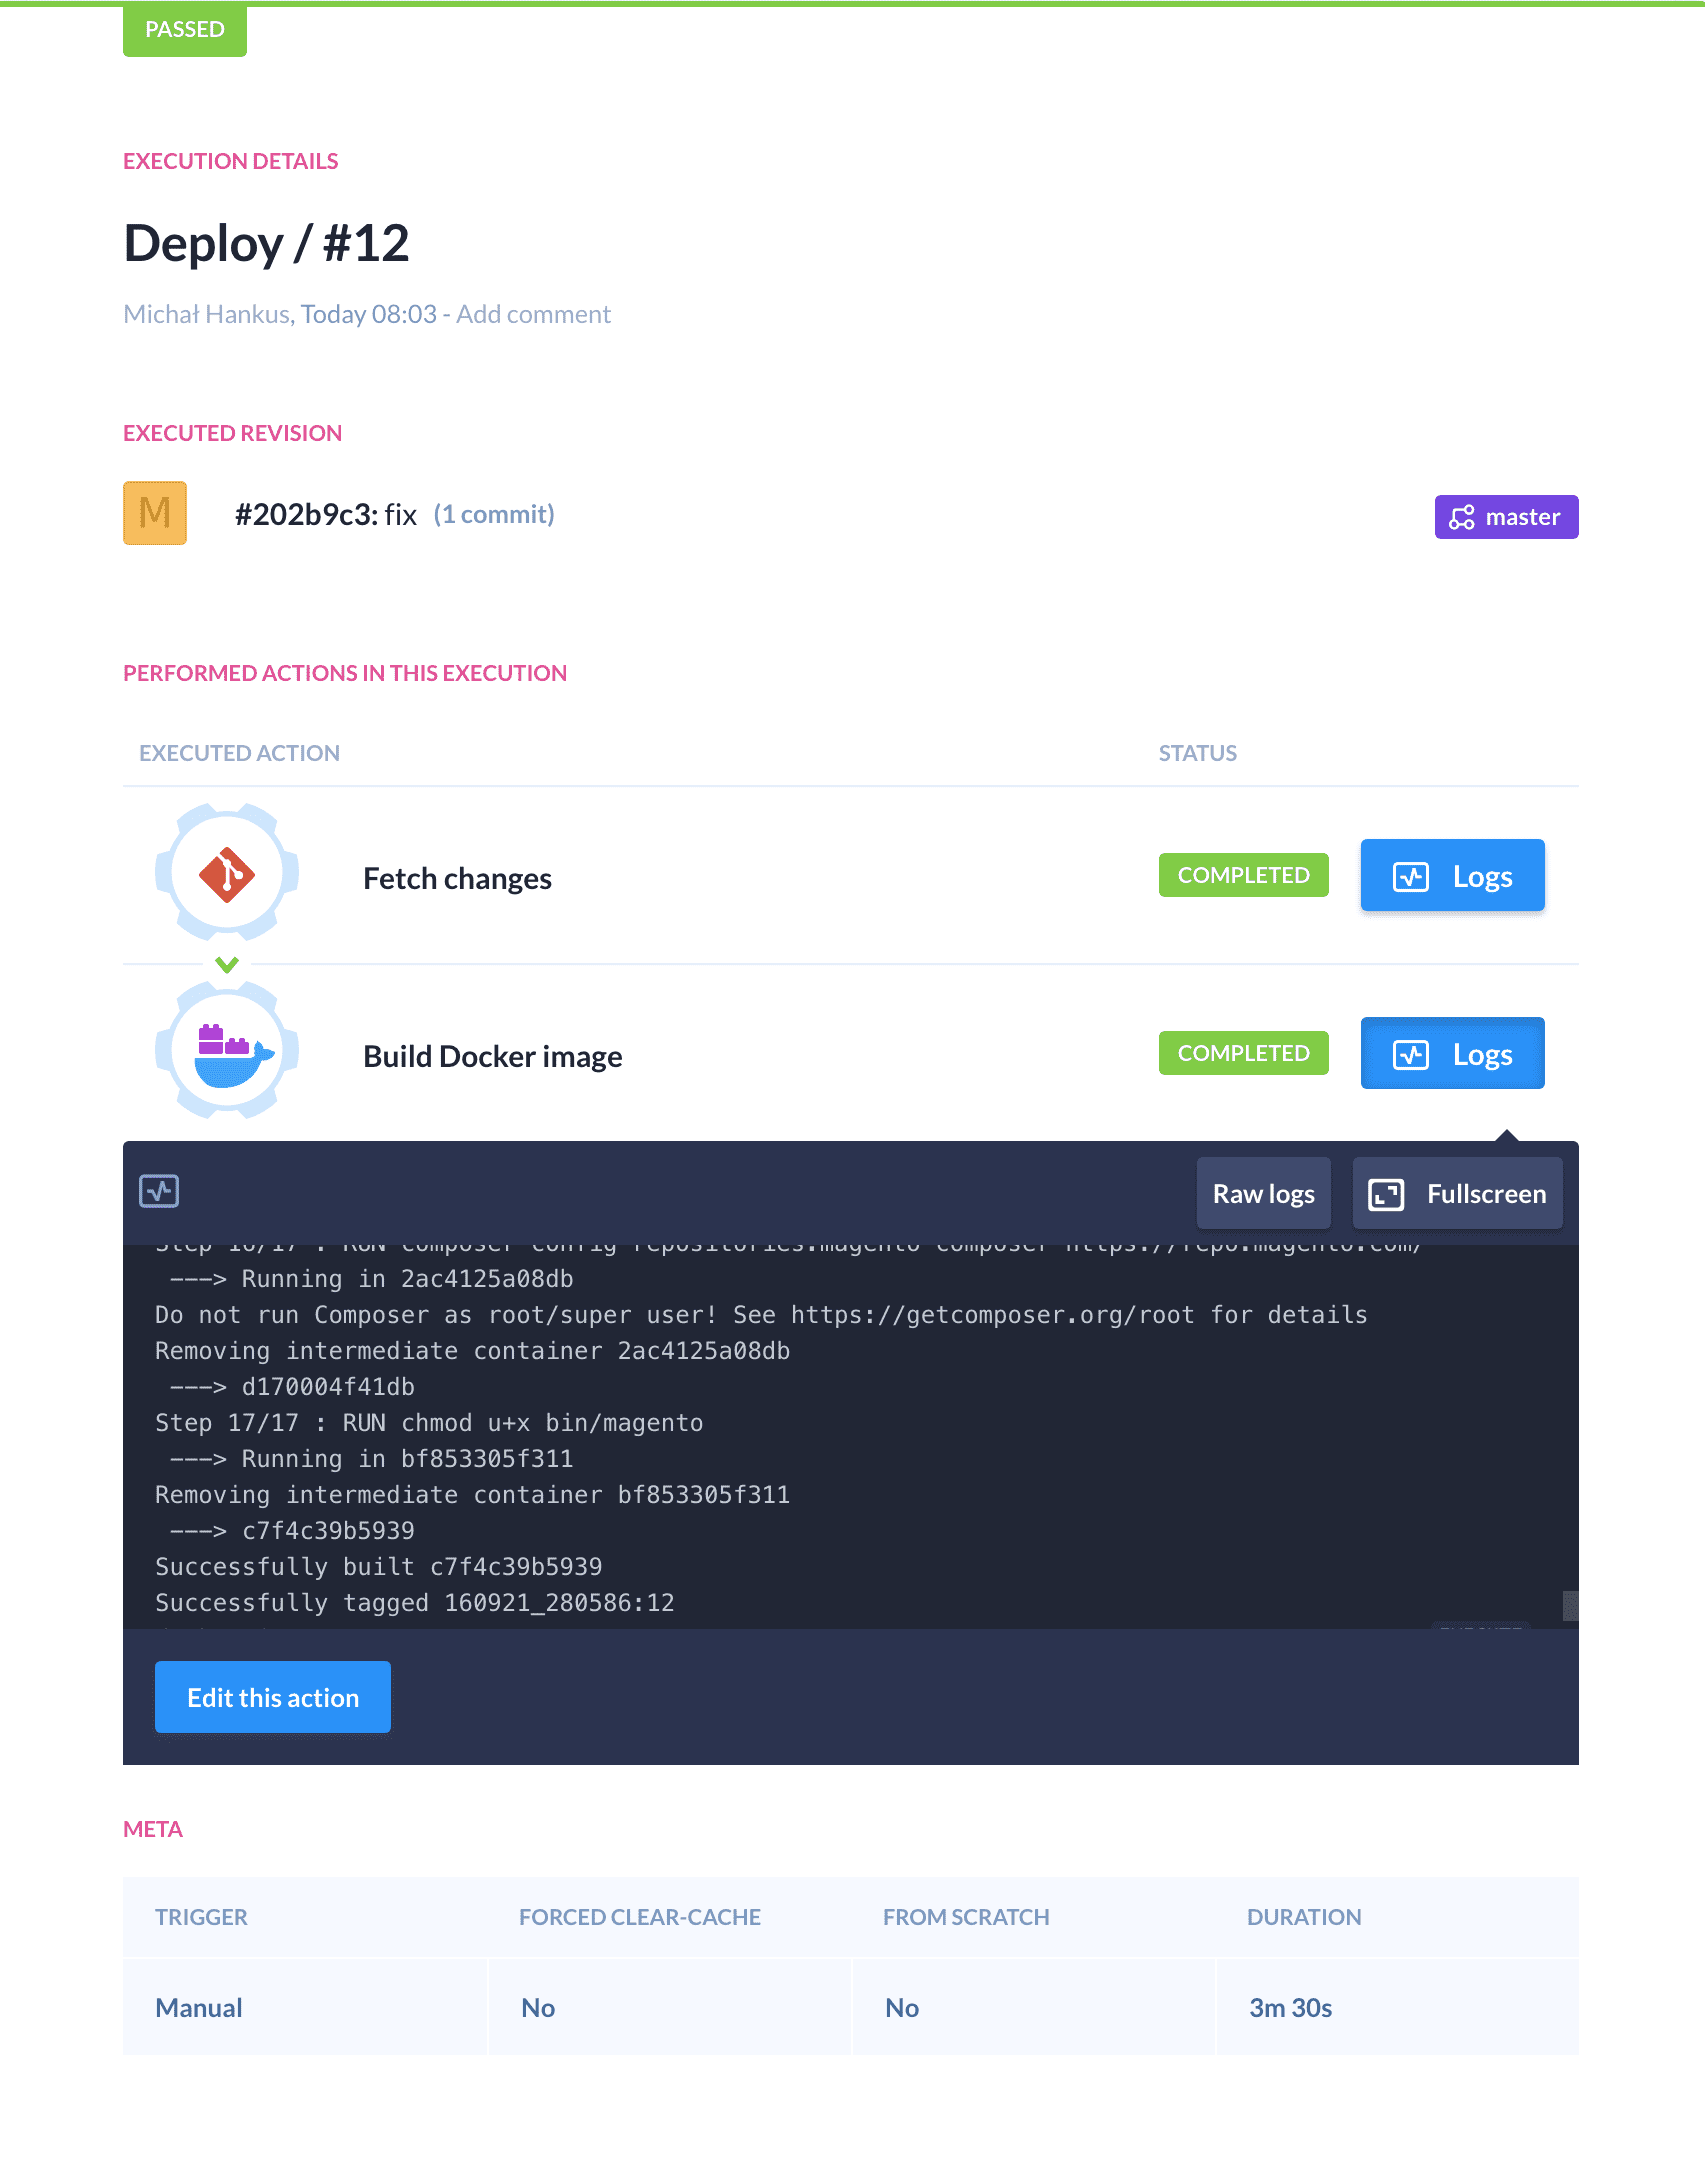
Once we save the action, we need to run the pipeline to check if the Docker image is building successfully. If so, we can keep going:
3. Push the Image to Google Container Registry
- Log in to GCloud.
- Add a new project or use an existing one.
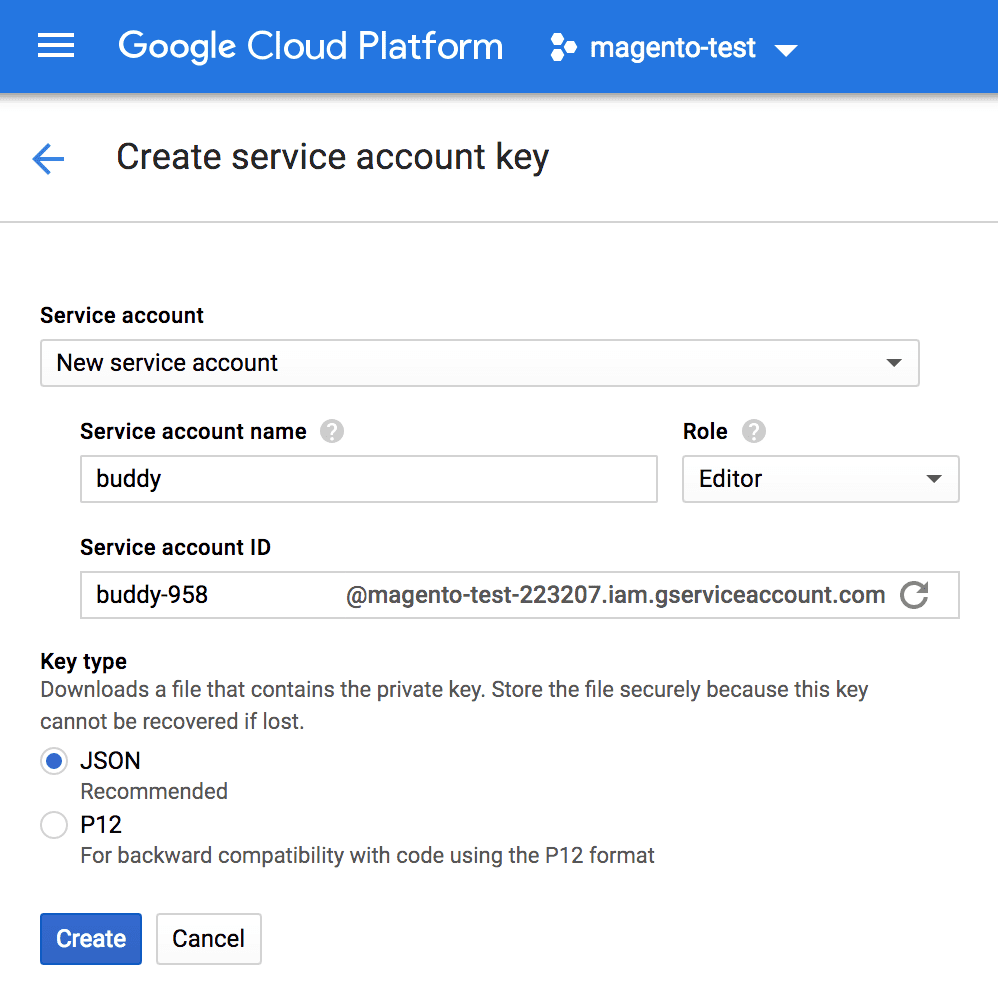
- Create a service account for this project (you can use an existing one if you already have any). To create it, enter the API credentials in that project. Click Create credentials —> Service account key. Next, give it a name and a proper role (for example, "Editor," but you can give any role that is able to push to GCR and manage GKE). Once you click Create, GCloud will create the account and send you a JSON file with authorization data:
![]()
- Now we can get back to our pipeline.
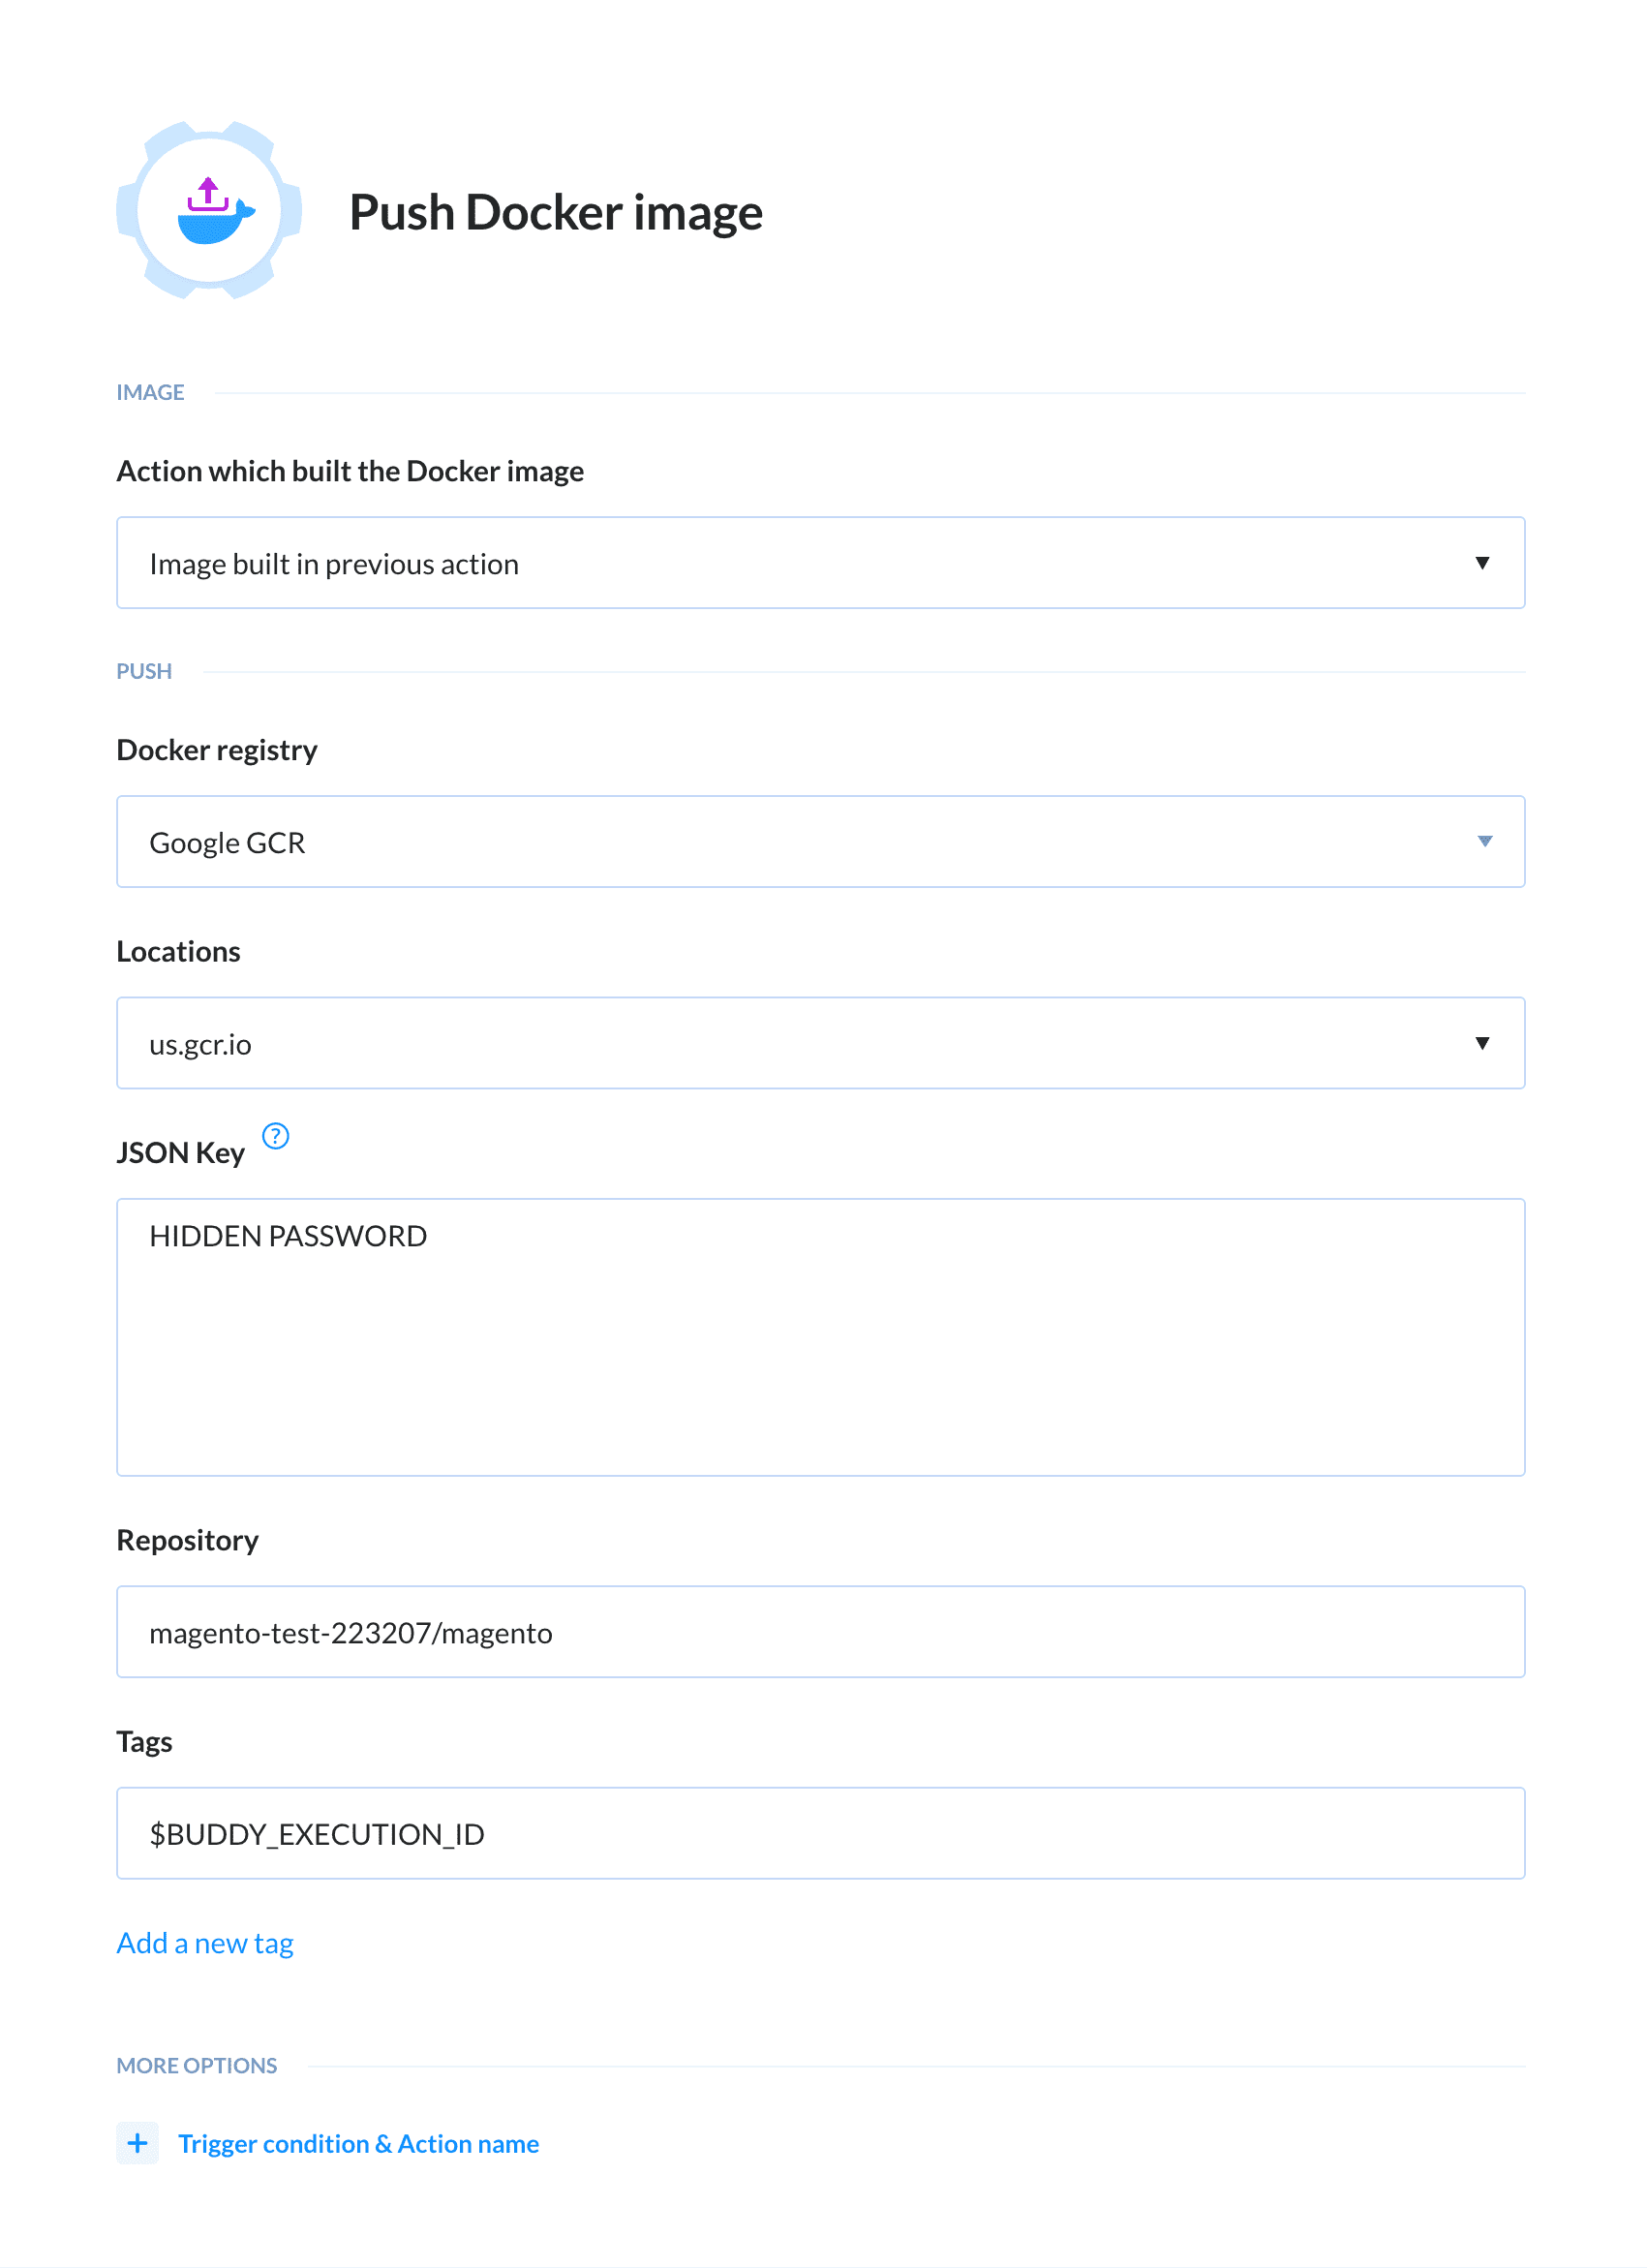
- Add a new action at the end — Push Image. Since we built the image earlier, leave "Image built in the previous action" selected. In Docker registry, select "Google GCR" and choose the Location (the best idea is to choose the same location where you want to run the cluster and Magento). In JSON key, paste the content of the file downloaded in step 3.3. In Repository, paste the name of the repo that you created in GCloud, eg.
magento-test-223207with the image name that should be pushed, eg.magento:magento-test-223207/magento- In Tags enter the image’s tag. However, we don’t want any constant value like "latest" or "dev" because it will result in an issue in K8s cluster. In Kuberenetes deployment, if the YAML file with deployment doesn’t change (and it won’t if the tag remains the same) then Kubernetes will not update our image on the cluster. To prevent that, we need to give our image a different tag every time. You don’t have to do it manually before every deployment—Buddy has a set of predefined variables that you can use. For example:
Once you enter it, Buddy will automatically increment the tag with the number of the most recent execution. Once you’re done, click Save:$BUDDY_EXECUTION_ID![]()
- Now it’s time to test your pipeline. If we configured everything correctly in our project in GCR, you should see an image with a proper tag:
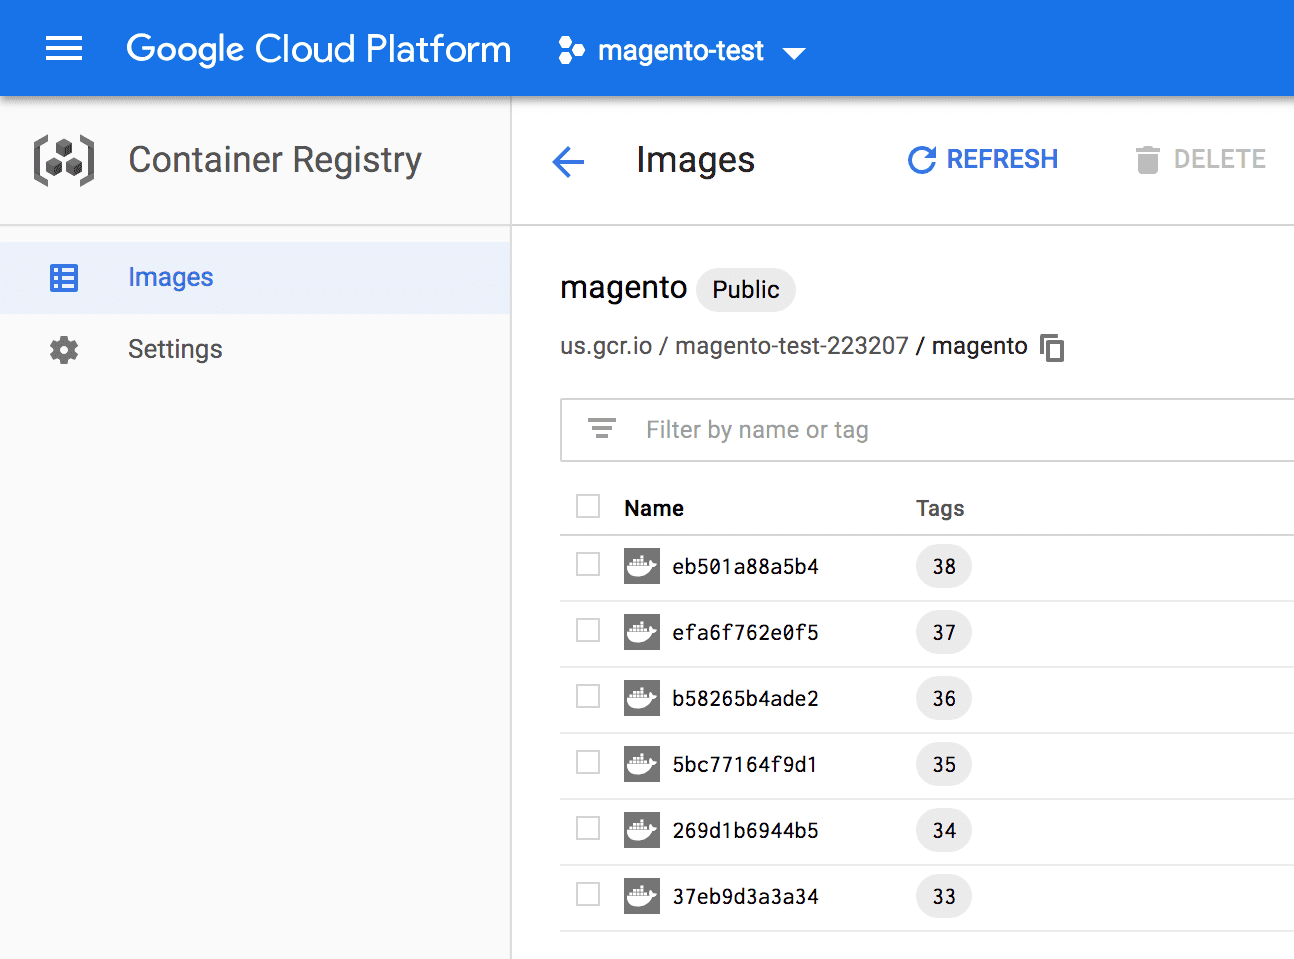
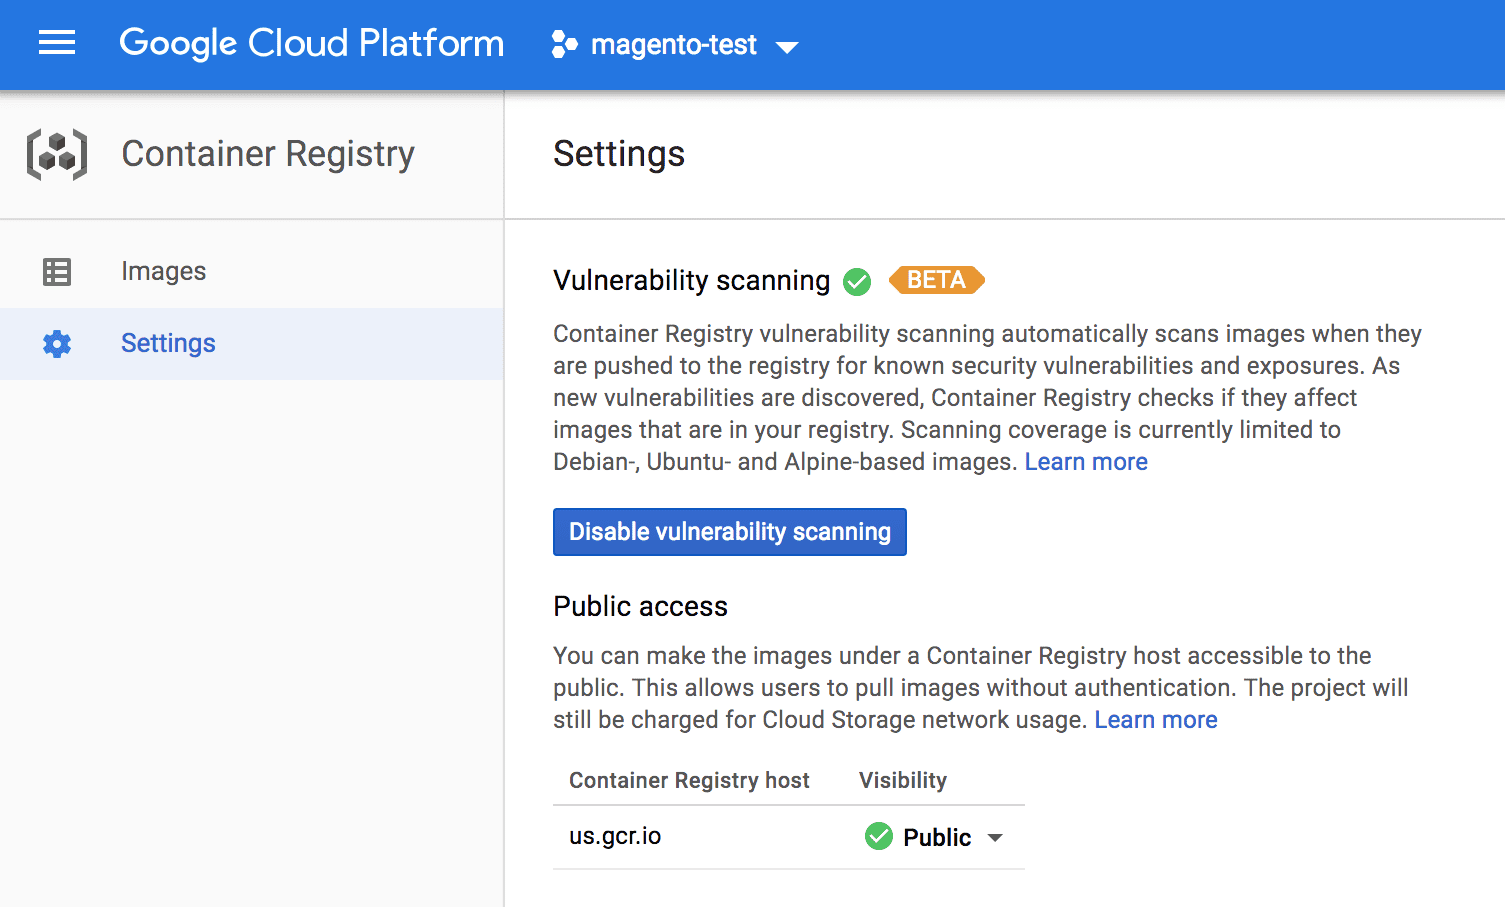
By default, GCR works in private mode (all pushed images are private) and you can’t pull images without authorization. For the purpose of this guide, our registry is set to public mode (you can change that in the settings—see the image below). If you want to use GCR in private mode, then in K8s deployment you have to use the
ImagePullSecretsvariable. You can read more here.
4. GKE deployment
4.1 Prepare the Cluster
The image is created and pushed to the registry. Now it’s time to run it on a K8s cluster.
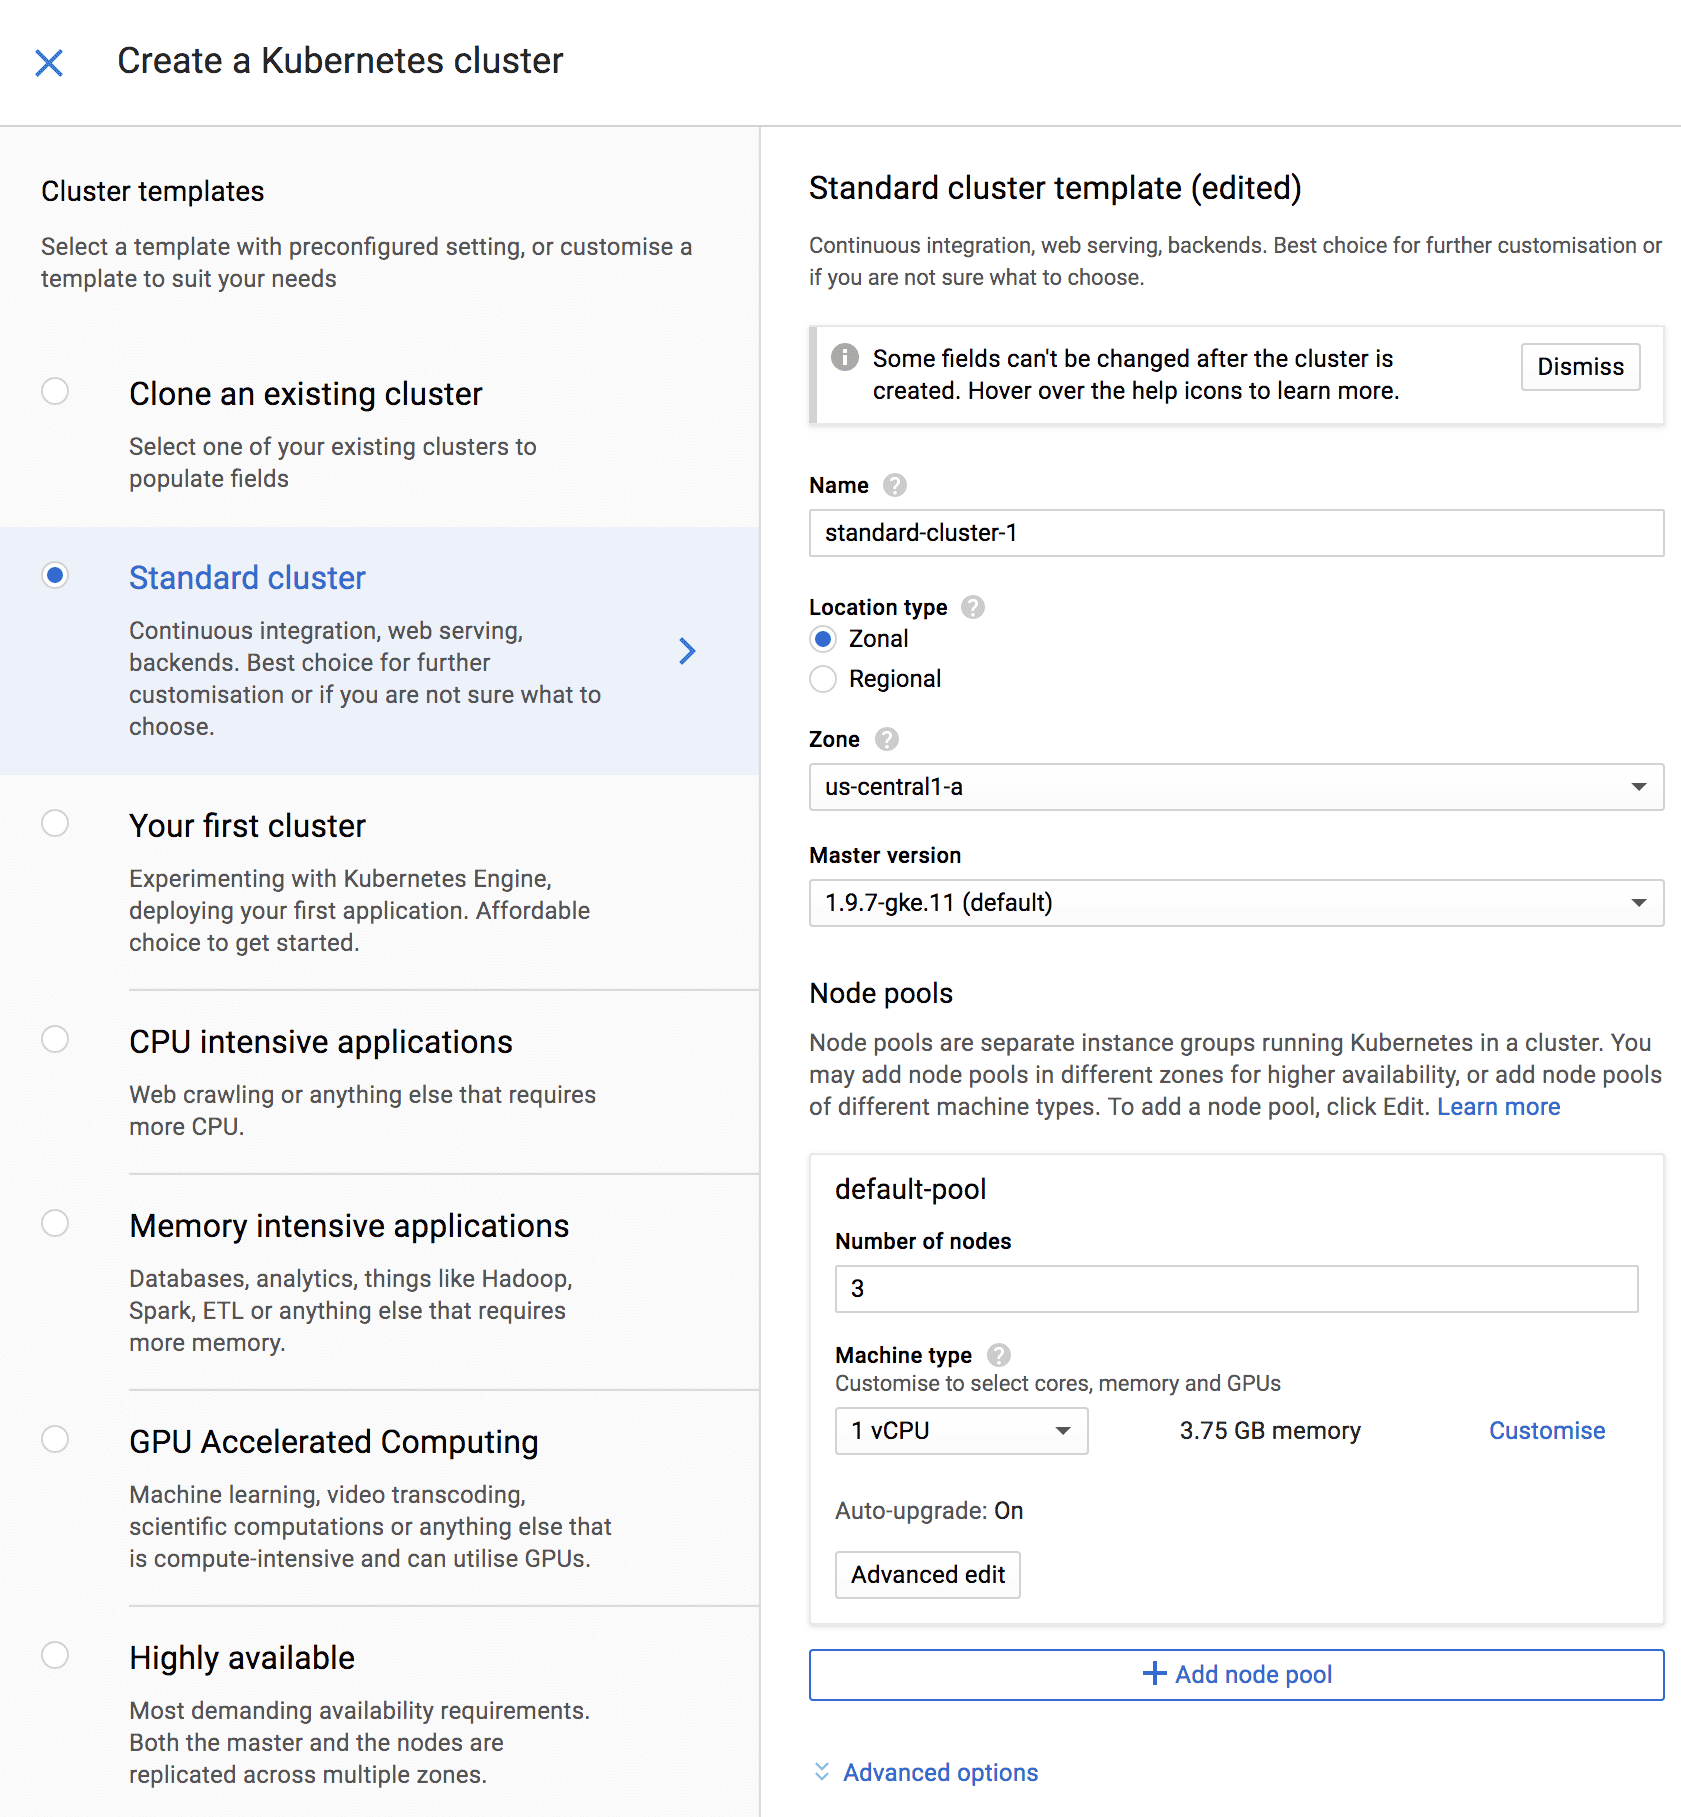
- If you don’t have any K8s cluster yet, you need to create it:
![]()
- Now, create 2 config files for Kubernetes in your repo:
mysql.yamlthat will contain MySQL configuration (Magento requires it to work)buddy.yamlthat will contain Magento configuration
4.2 Apply MySQL deployment
Commit mysql.yaml to the repository:
apiVersion: v1
kind: Service
metadata:
  name: magento-mysql
  labels:
    app: magento
spec:
  ports:
    - port: 3306
  selector:
    app: magento
    tier: mysql
  clusterIP: None
---
kind: PersistentVolumeClaim
apiVersion: v1
metadata:
  name: mysql-volumeclaim
  labels:
    app: magento
spec:
  accessModes:
    - ReadWriteOnce
  resources:
    requests:
      storage: 10Gi
---
apiVersion: apps/v1
kind: Deployment
metadata:
  name: magento-mysql
  labels:
    app: magento
spec:
  replicas: 1
  selector:
    matchLabels:
      app: magento
      tier: mysql
  strategy:
    type: Recreate
  template:
    metadata:
      labels:
        app: magento
        tier: mysql
    spec:
      containers:
        - image: mysql:5.6
          name: mysql
          args:
            - "--ignore-db-dir=lost+found"
          env:
            - name: MYSQL_ROOT_PASSWORD
              valueFrom:
                secretKeyRef:
                  name: mysql
                  key: password
            - name: MYSQL_DATABASE
              value: magento
          ports:
            - containerPort: 3306
              name: mysql
          volumeMounts:
            - name: mysql-persistent-storage
              mountPath: /var/lib/mysql
      volumes:
        - name: mysql-persistent-storage
          persistentVolumeClaim:
            claimName: mysql-volumeclaim
This file consist of 3 components:
- the service that shares MySQL 3306 port to other applications run in the cluster (by default all apps are run in isolation). This type of service does not share the MySQL to the outside, only inside the cluster.
PersistentVolumeClaim. In the example, we gave it 10GB, but you can increase it and GKE will automatically create proper storage. This storage is constant so the data won’t be lost even when you create a MySQL container afresh.- MySQL deployment in which:
- You use the image from DockerHub (mysql:5.6)
- Share the 3306 port
- Mount an available volume in the path where MySQL keeps the data
/var/lib/mysql - Fetch the password from the Kubernetes secret. We’ll show you how to create a secret below.
Such configuration assures that even when the MySQL service stops or the container is killed, we will still have the data that we saved in MySQL available for the next run.
To create the secret password to MySQL, you need a properly configured kubectl:
kubectl create secret generic mysql --from-literal=password=YOUR_PASSWORDHere you can find how to configure kubectl with Gcloud.
Now we can finally add the Apply deployment action to the pipeline (you will find it in the Kubernetes section). In the action details, select Google Kubernetes Engine, your Google account, Project, Zone and Cluster. Change the Authentication mode to "Service account" and paste the content of the JSON file that you downloaded. In Configuration file, choose mysql.yaml:
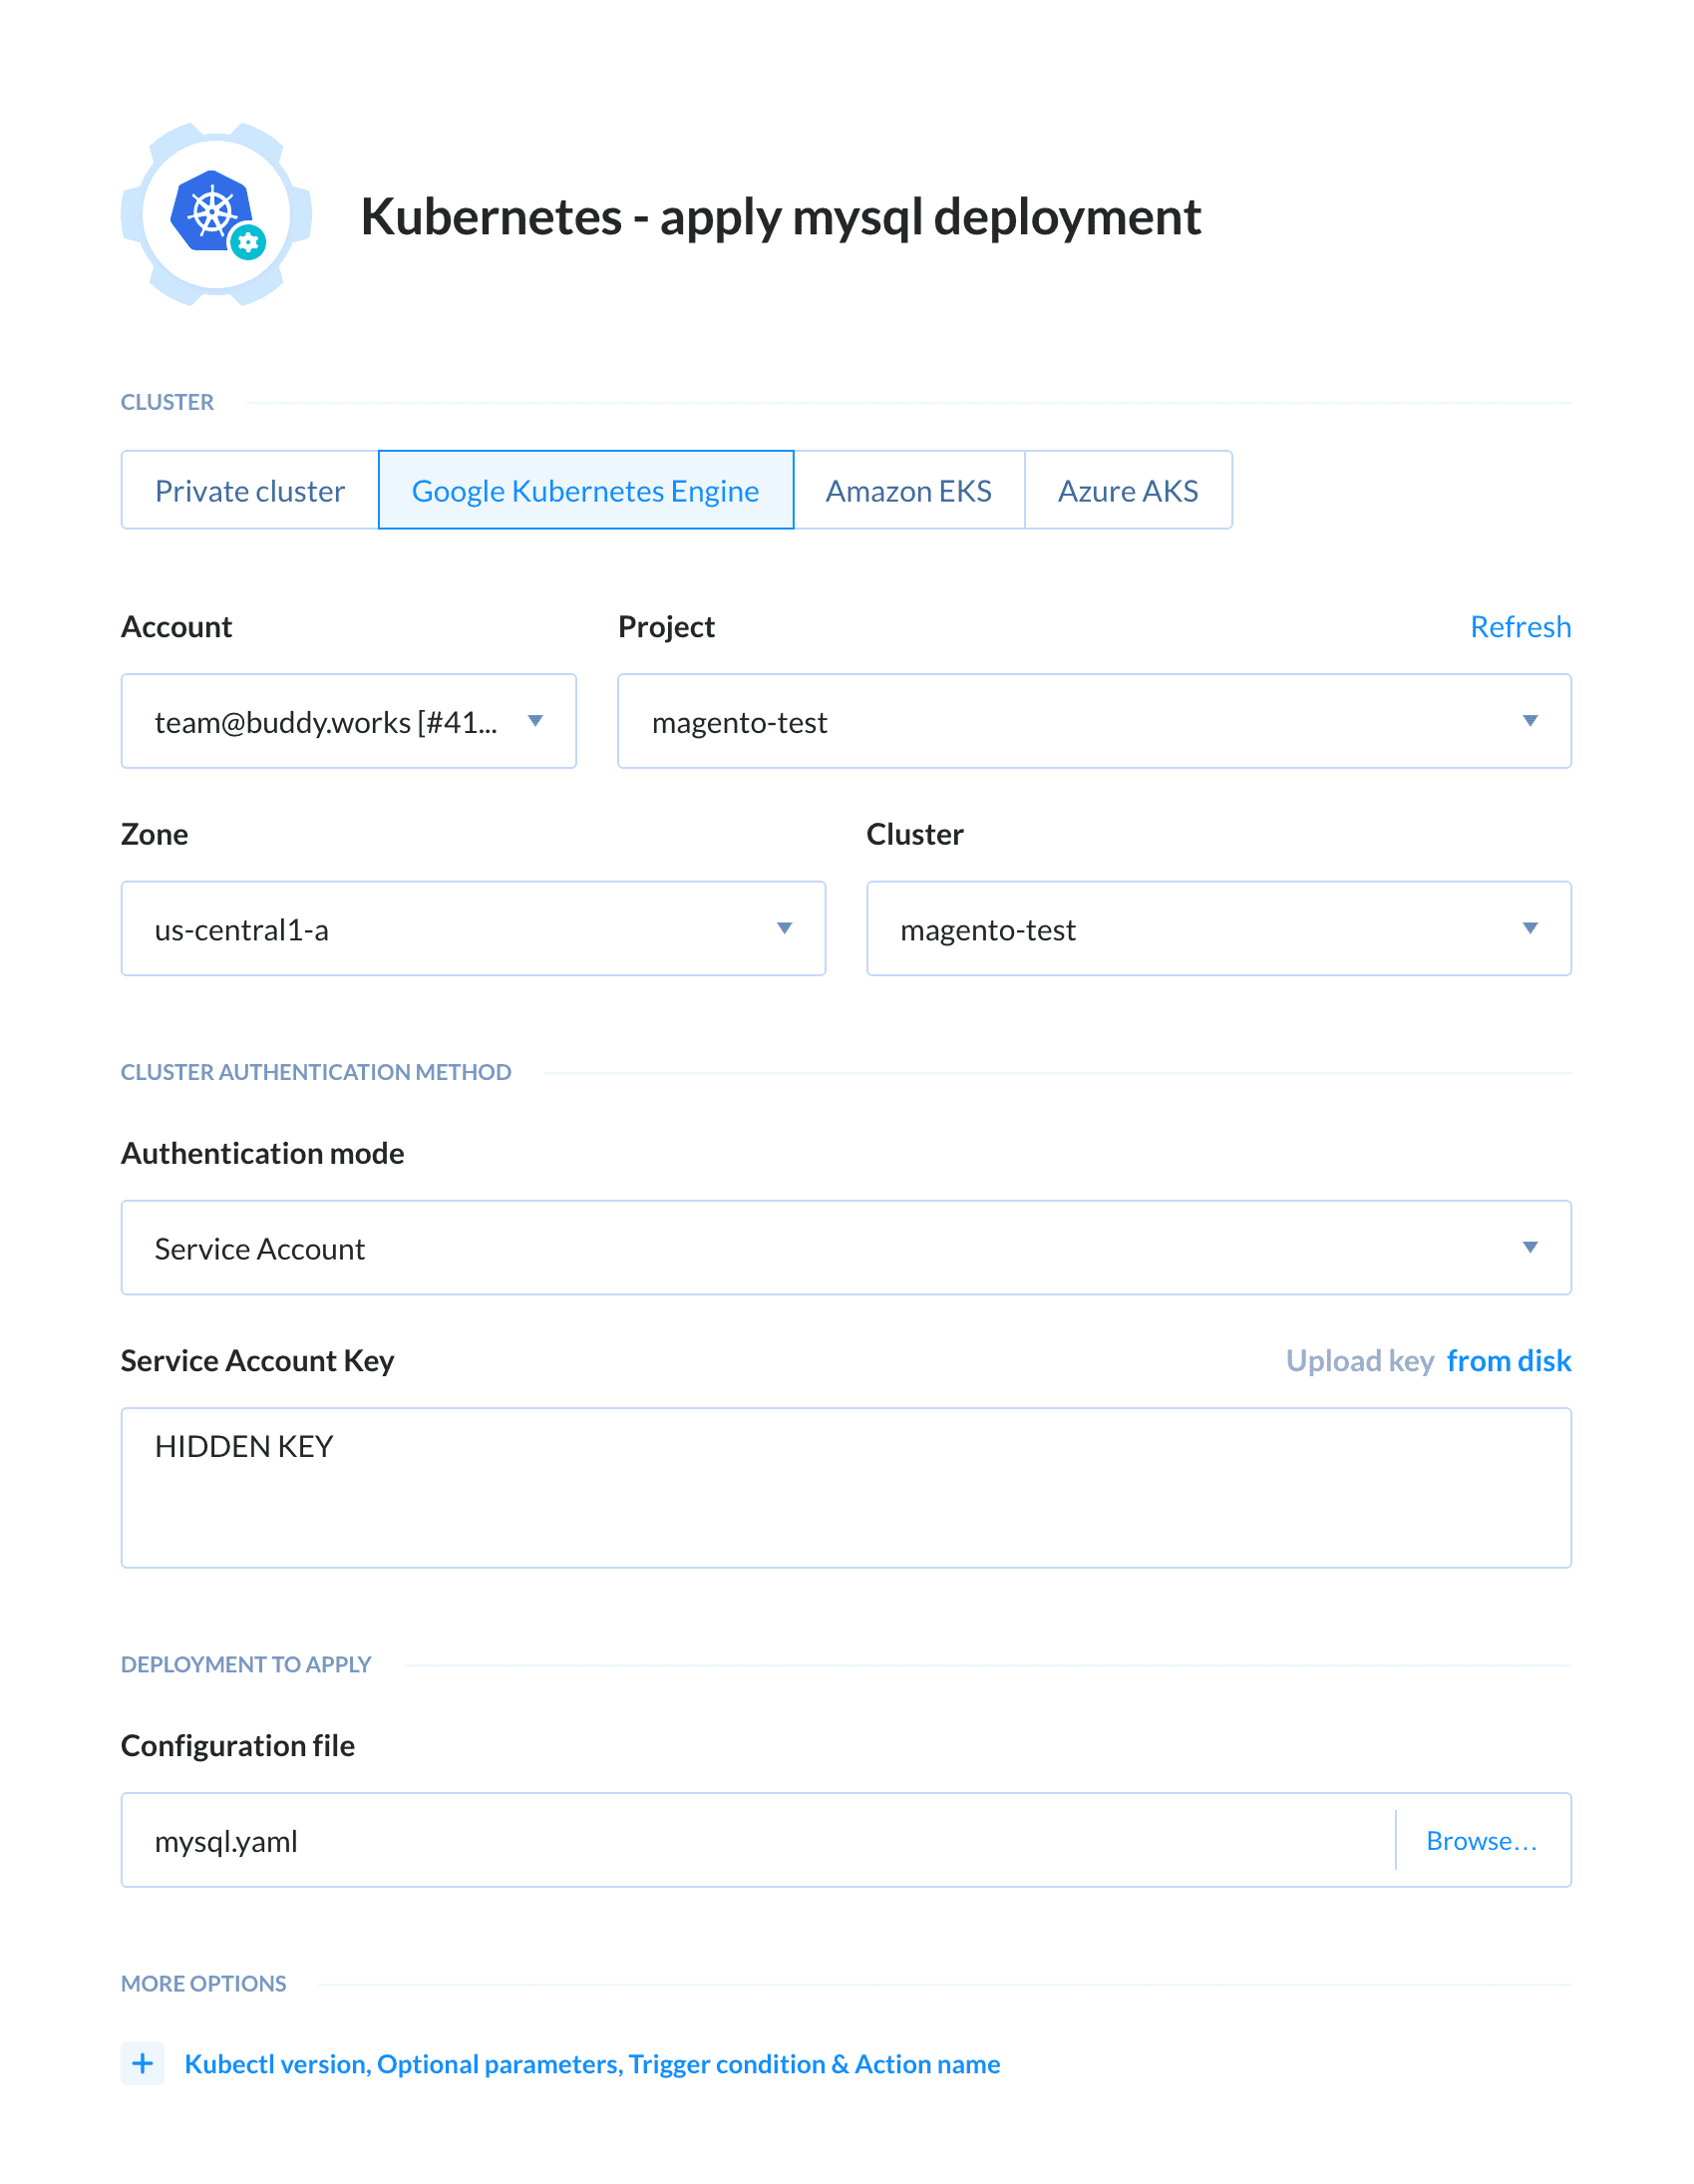
Now it’s time to run the pipeline. If everything has passed successfully, in GKE you should see a running MySQL container with the storage service:

4.3 Apply Magento Deployment
Commit magento.yaml to the repository:
apiVersion: v1
kind: Service
metadata:
  labels:
    app: magento
  name: magento
spec:
  type: LoadBalancer
  ports:
    - port: 80
  selector:
    app: magento
    tier: frontend
---
apiVersion: apps/v1
kind: Deployment
metadata:
  name: magento
  labels:
    app: magento
spec:
  replicas: 1
  selector:
    matchLabels:
      app: magento
      tier: frontend
  strategy:
    type: Recreate
  template:
    metadata:
      labels:
        app: magento
        tier: frontend
    spec:
      containers:
        - image: us.gcr.io/magento-test-223207/magento:$TAG_NAME
          name: magento
          ports:
            - containerPort: 80
              name: magento
This file consist of 2 components:
- A LoadBalancer type of service that shares our application to the outside so that it’s available from the internet. Kubernetes assigns it an IP address and maps the IP’s port 80 to the port 80 in the container
- Magento deployment in which we use the built image and share the 80 port (it’s used by Apache)
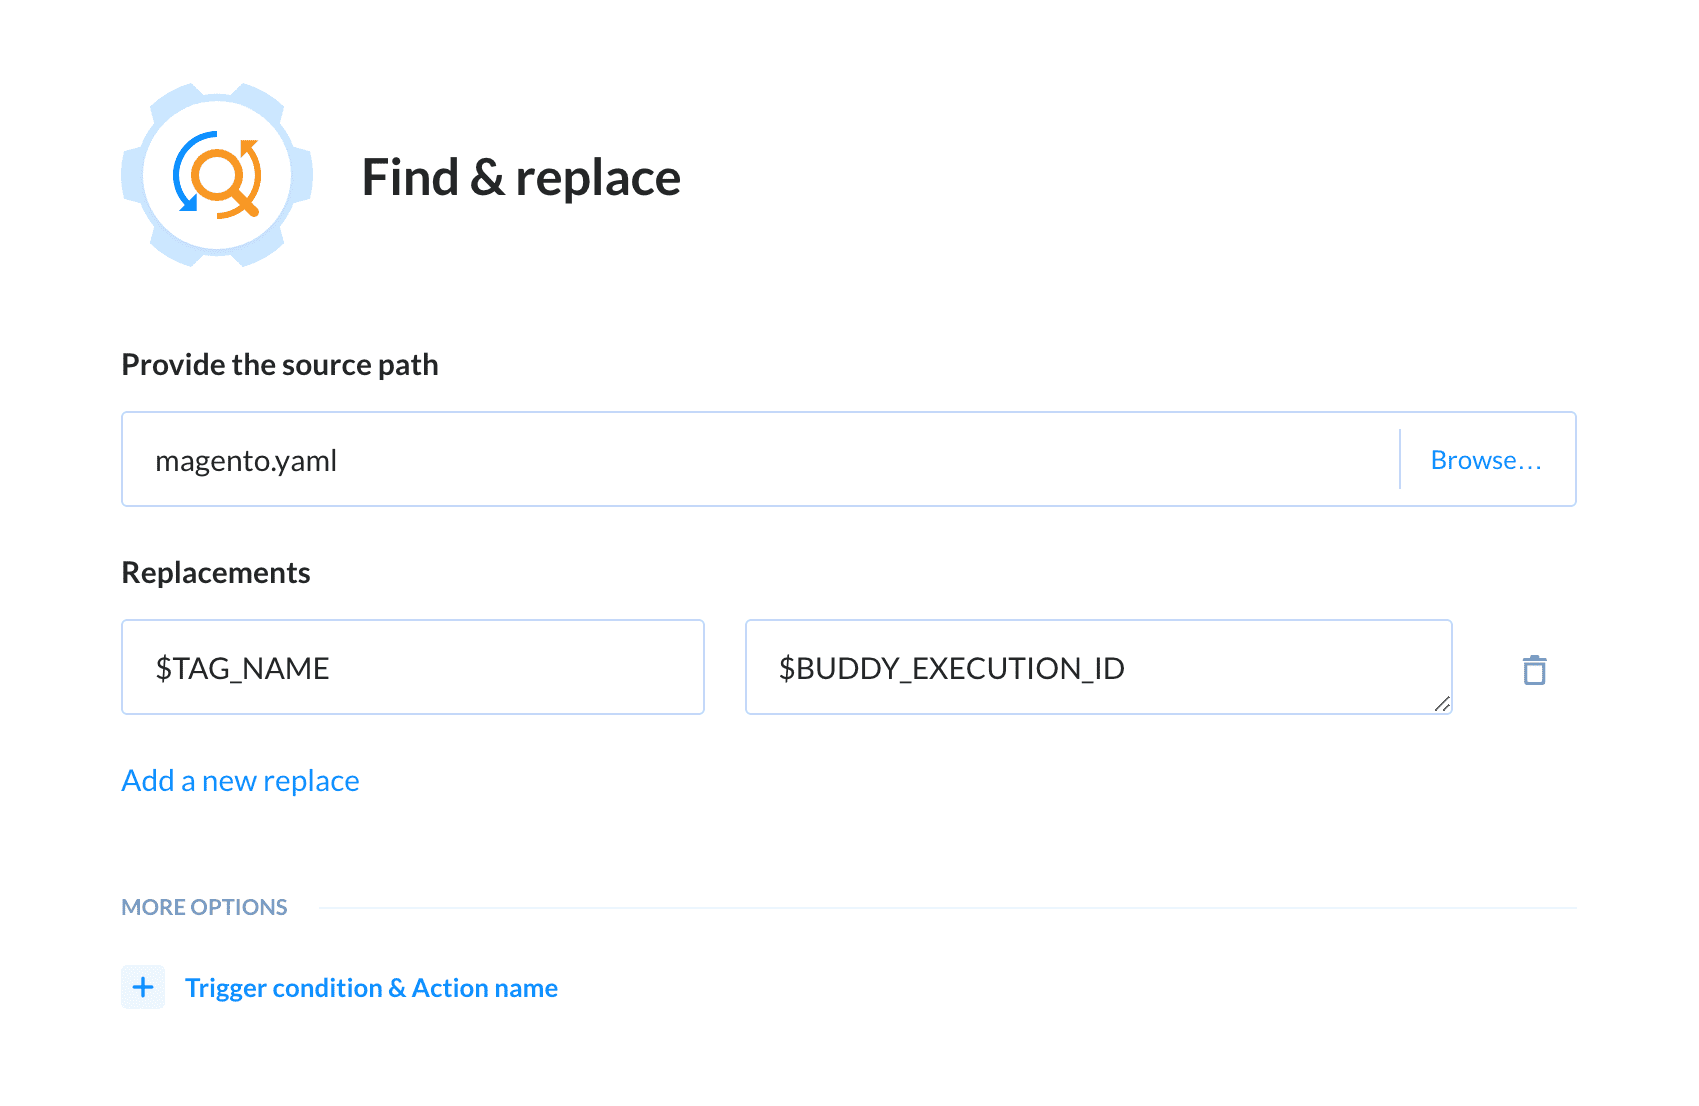
In the image deployment we use the $TAG_NAME variable but as for now nothing is replacing it = the deployment will not run if nothing has changed. Instead of this variable, we should use the ID of the execution (BUDDY_EXECUTION_ID). So how do we replace one variable with another? We can do that with the Find & Replace action.
Summing up: add the Find & Replace action that will replace $TAG_NAME in the magento.yaml file with $BUDDY_EXECUTION_ID:
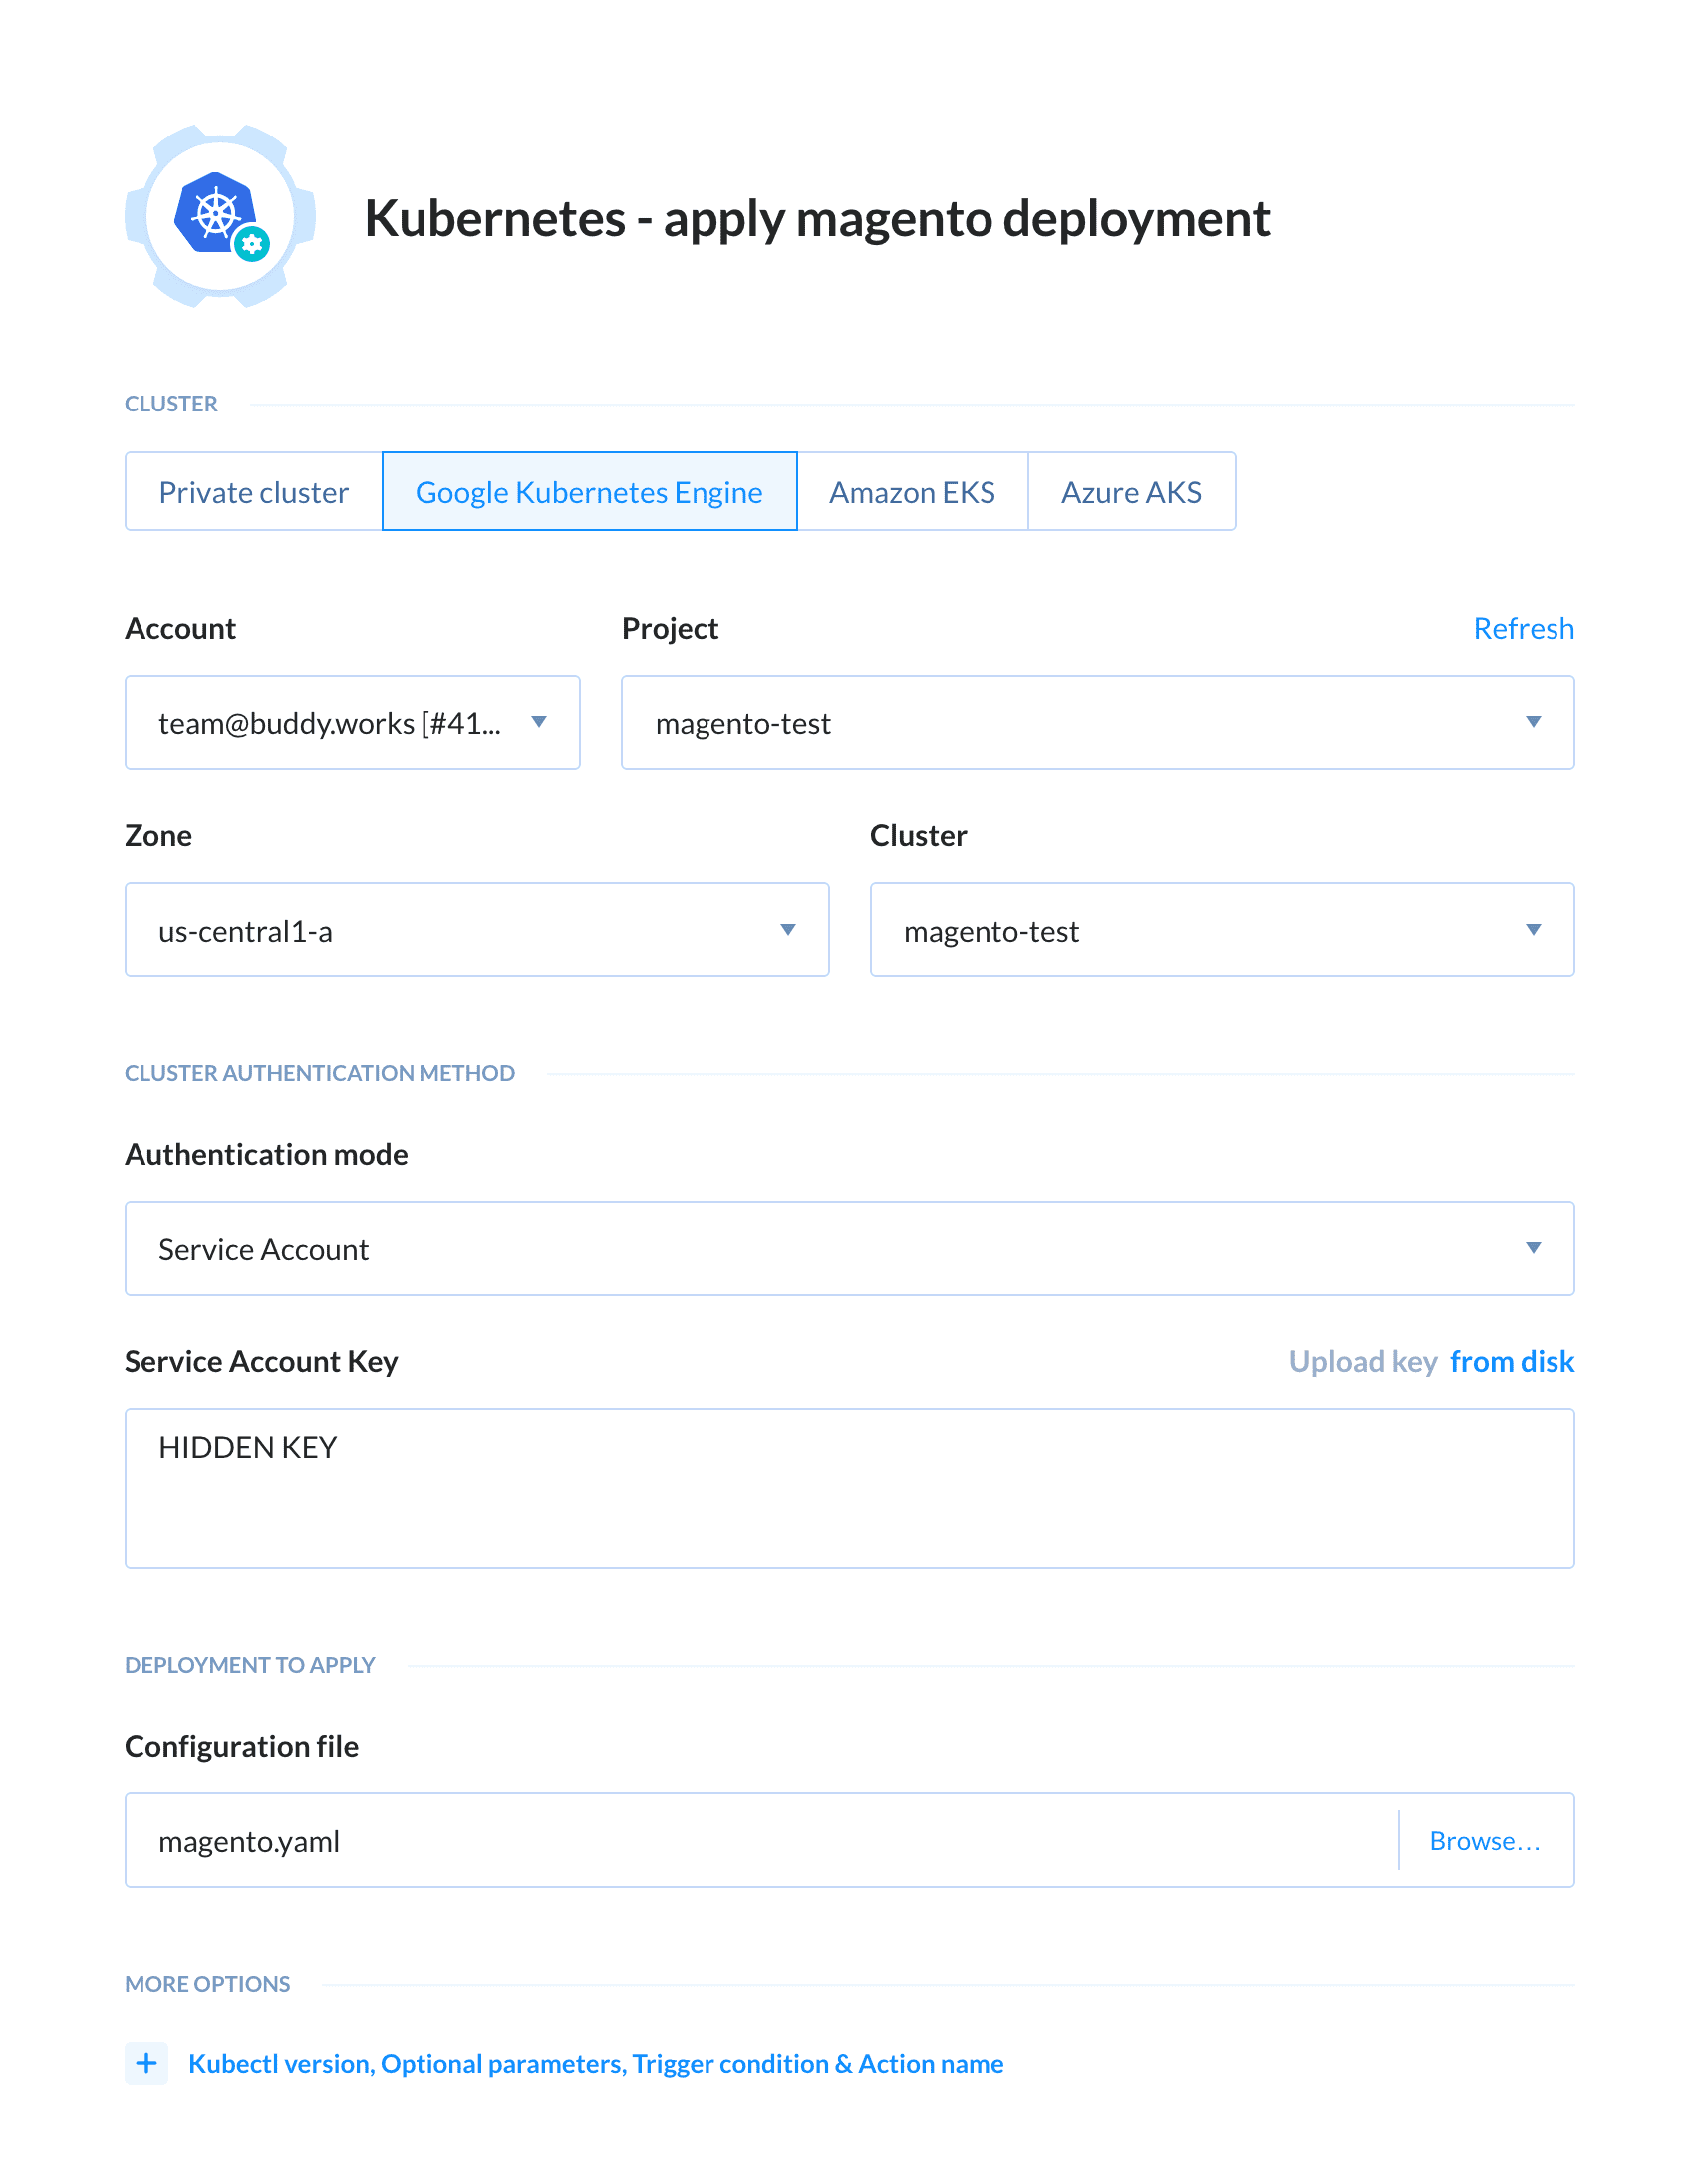
With everything prepared, we can finally add the most important action in the pipeline: Apply deployment for our Magento application. Just like before with MySQL, in the action details select Google Kubernetes Engine, your Google Account, Project, Zone and Cluster. Change the Authentication mode to ‘Service account’ and paste the content of the JSON file that you downloaded. In Configuration file, however, choose magento.yaml:
5. Execution Final Tweaks
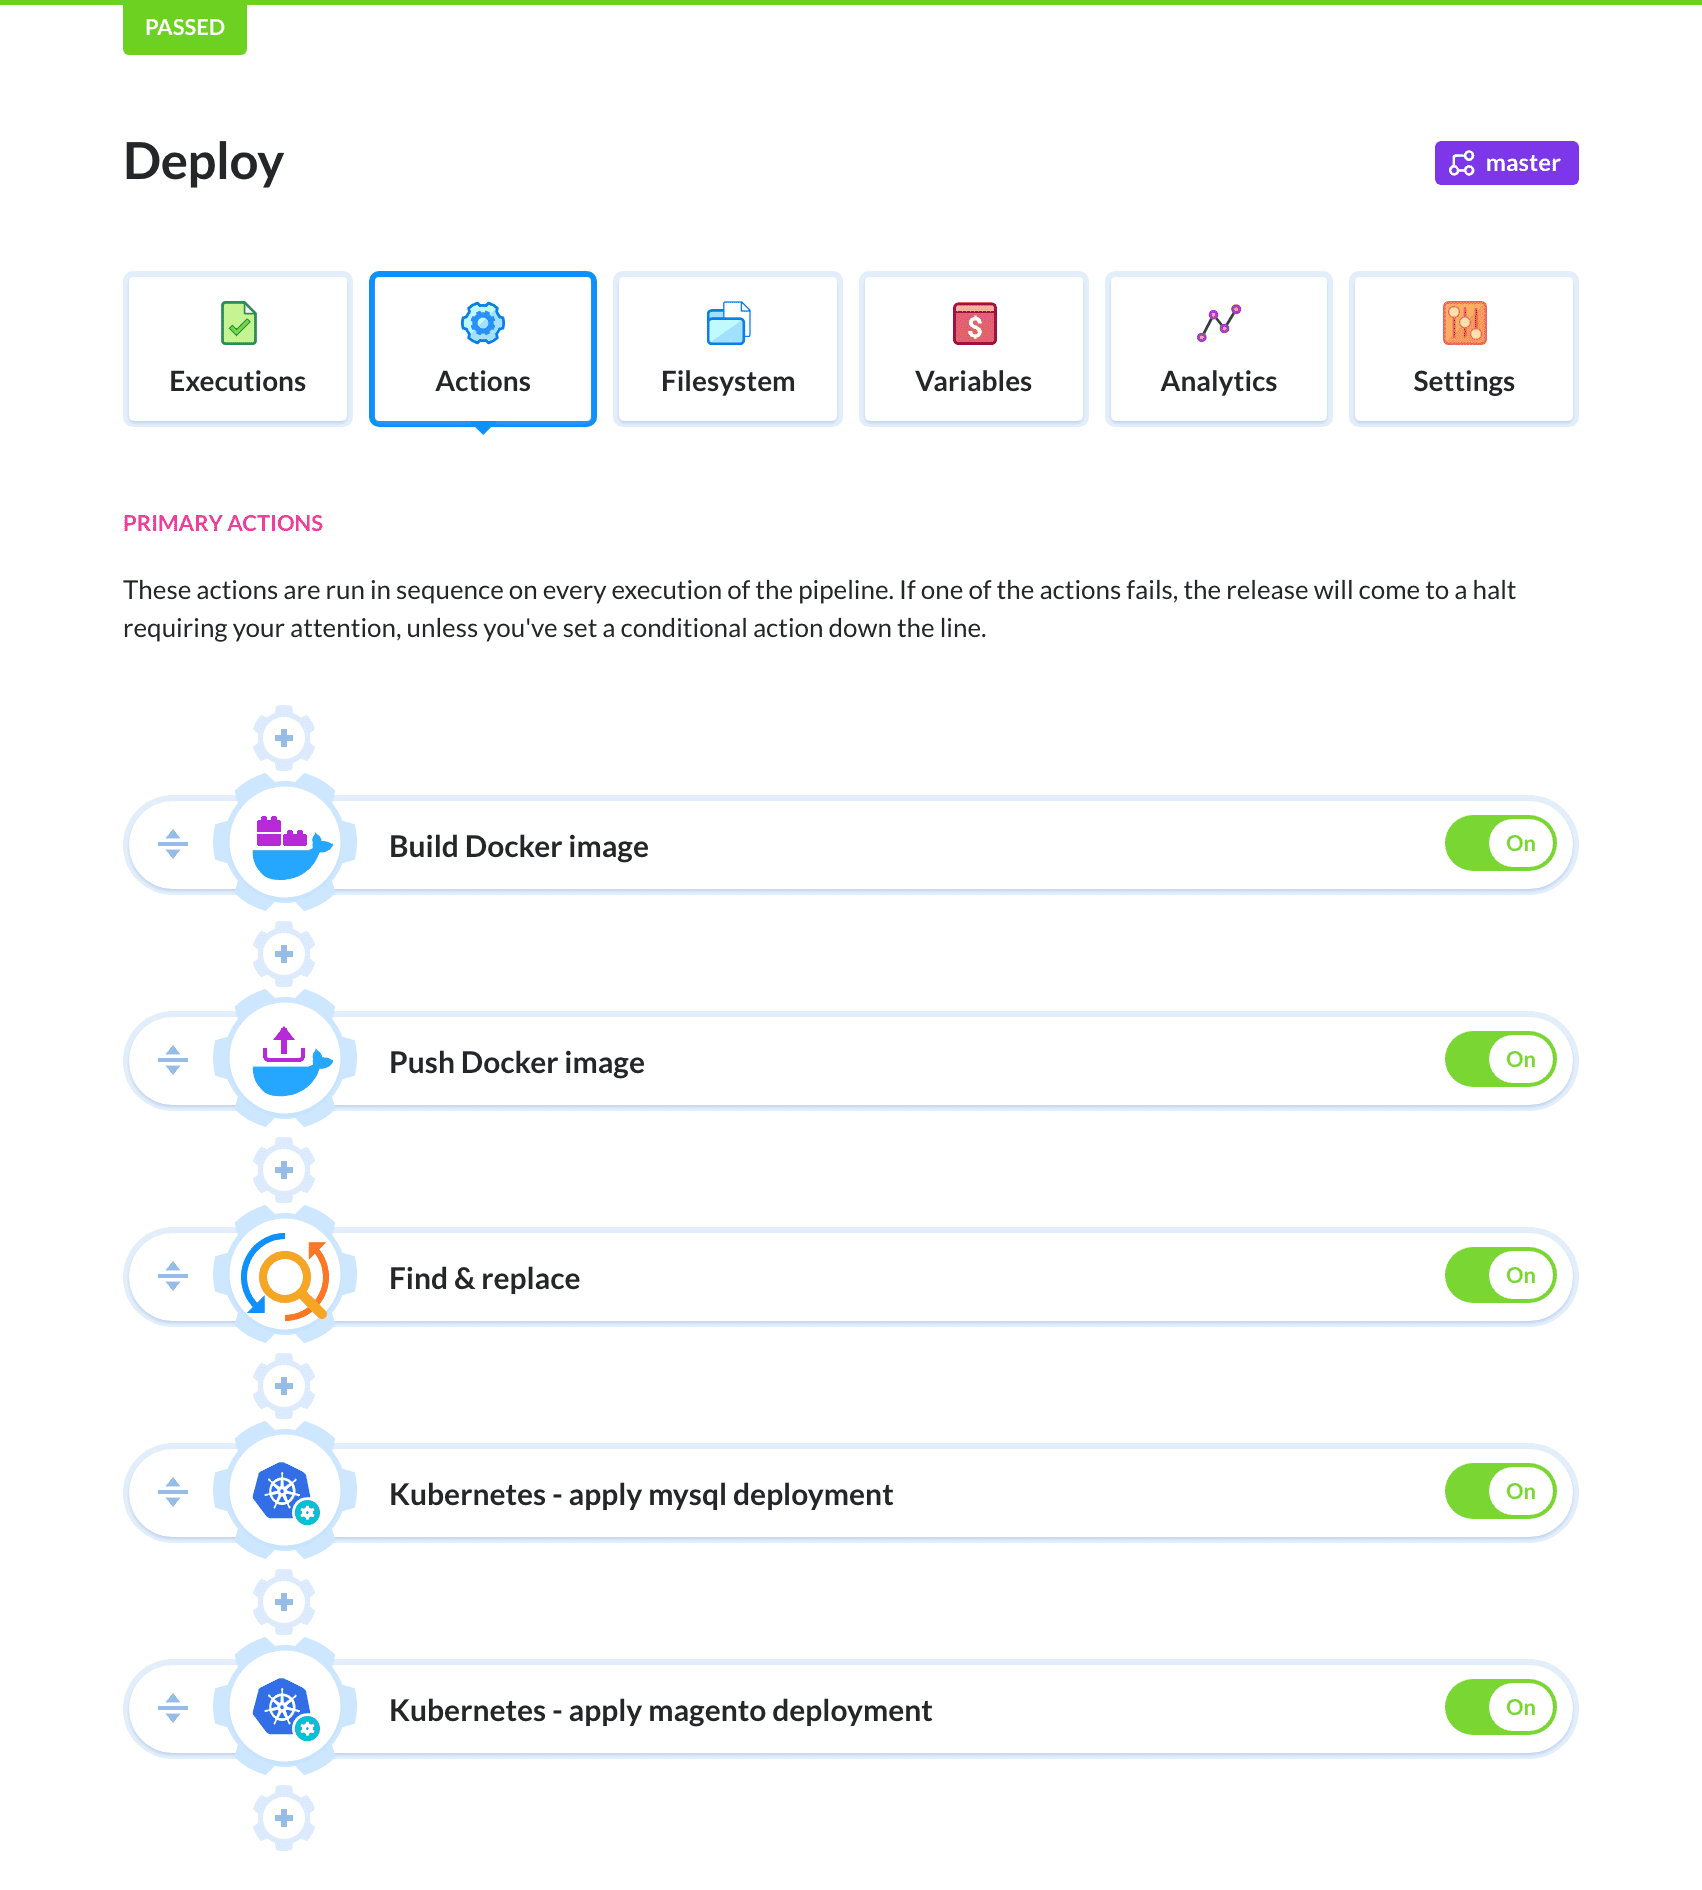
In its final form, our pipeline should look like this:
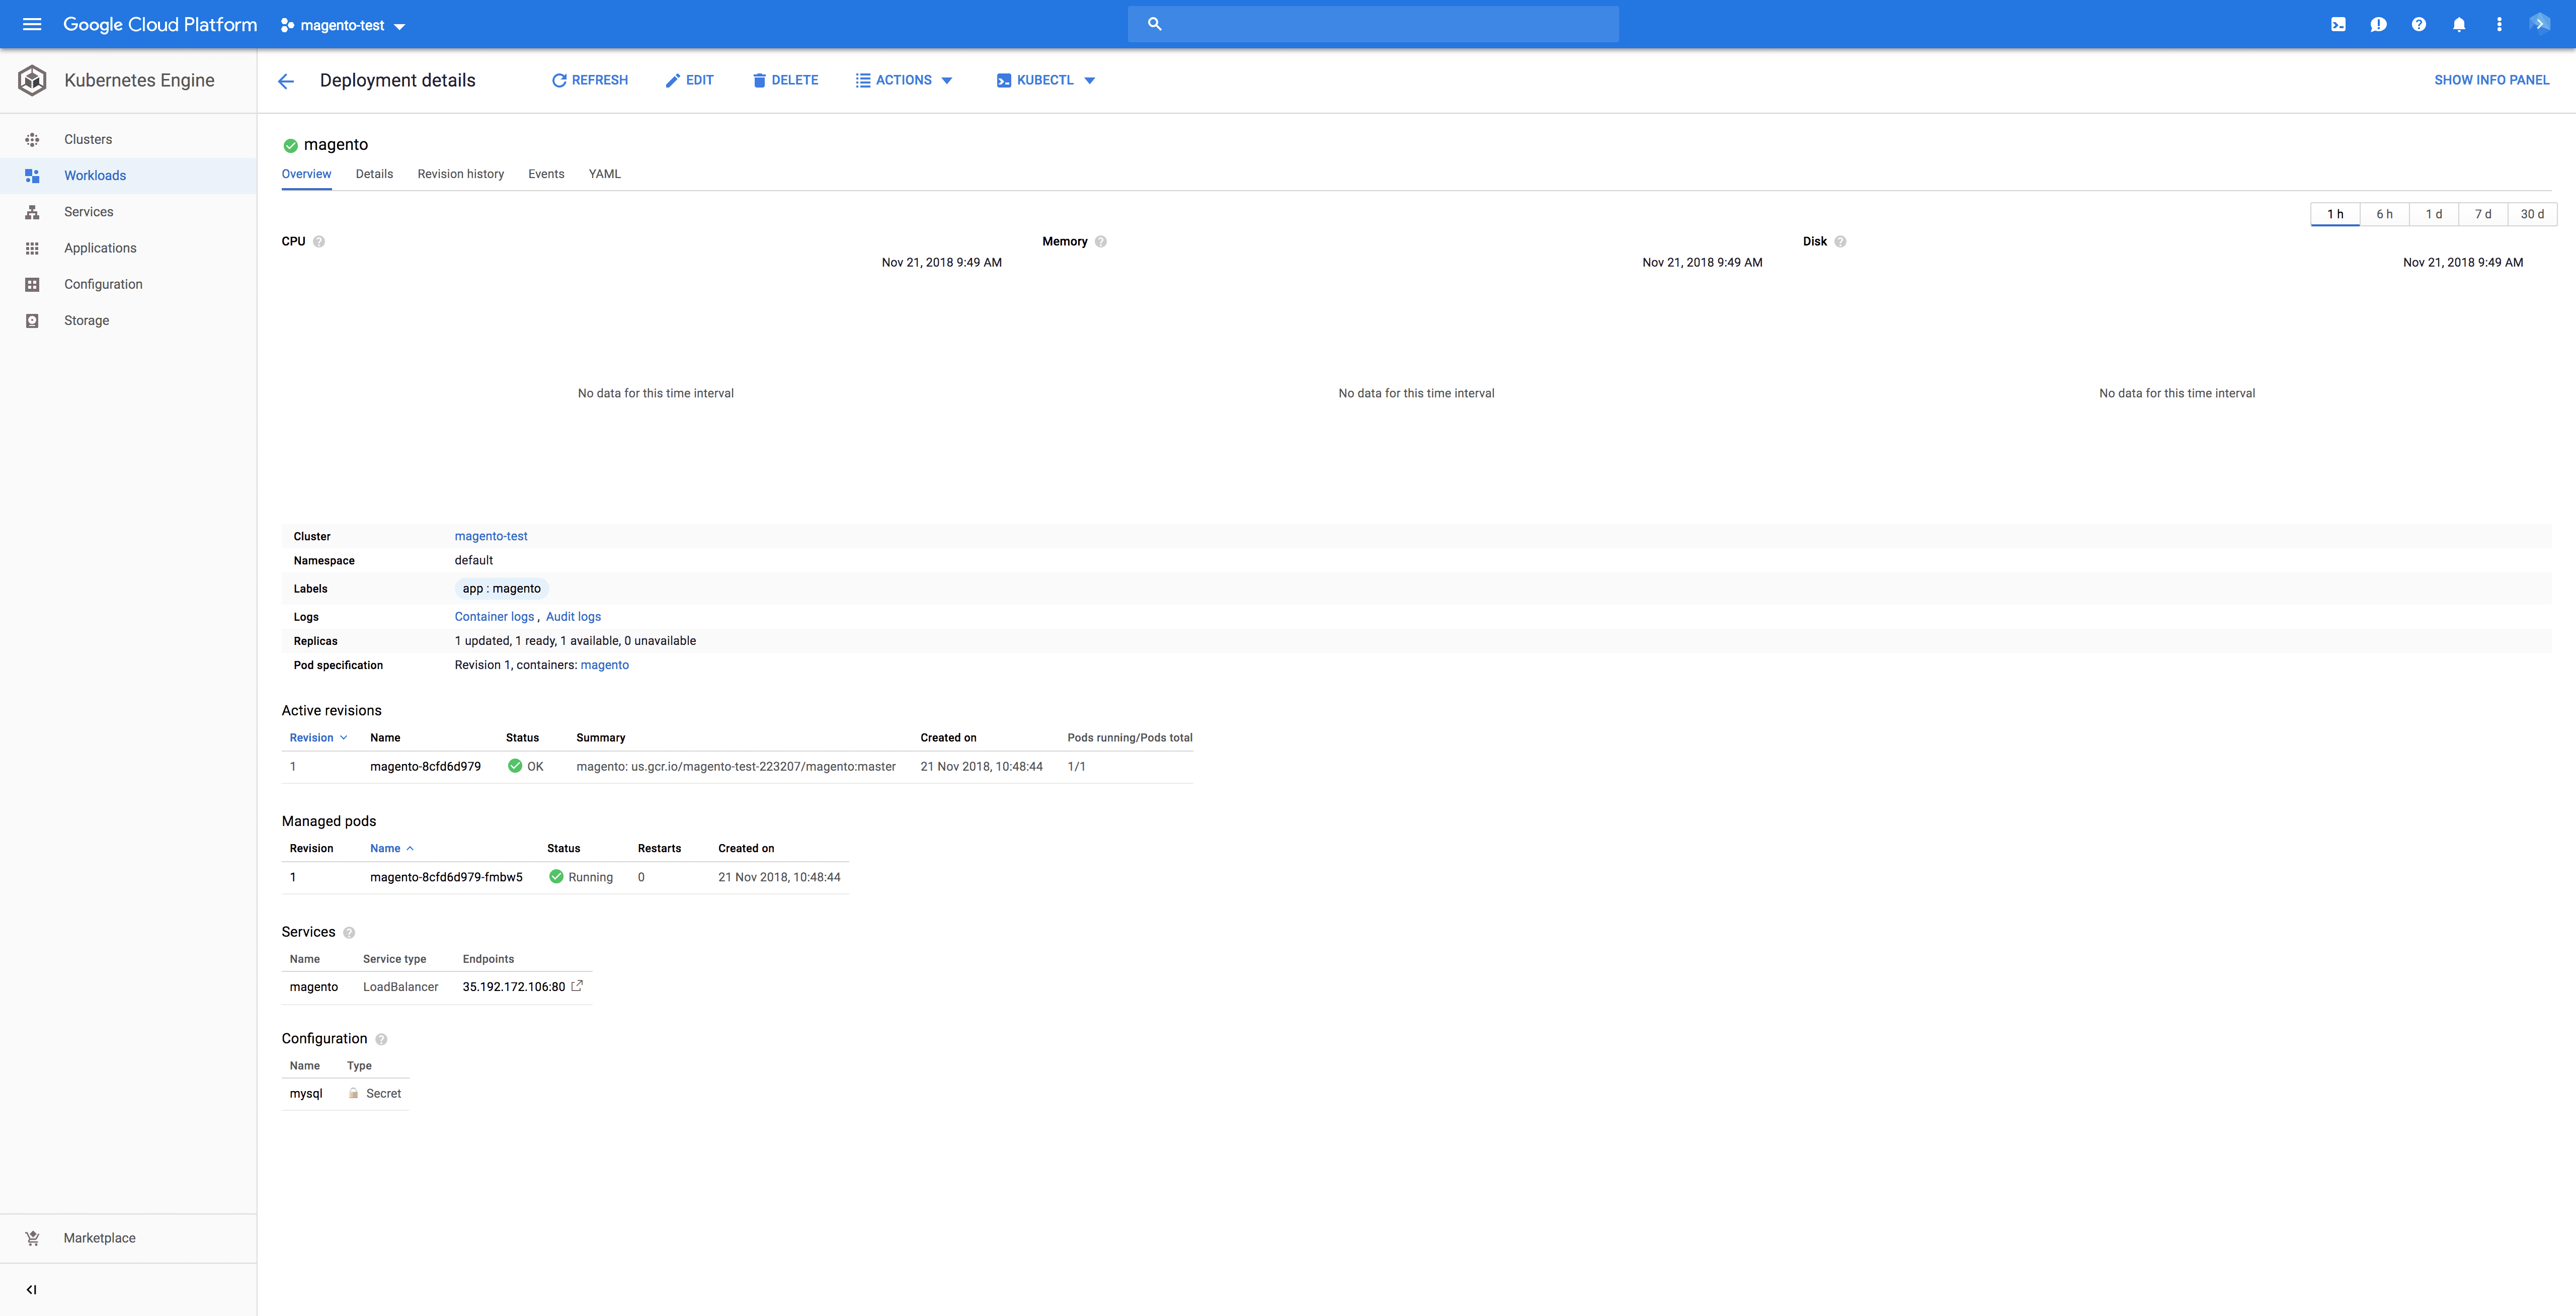
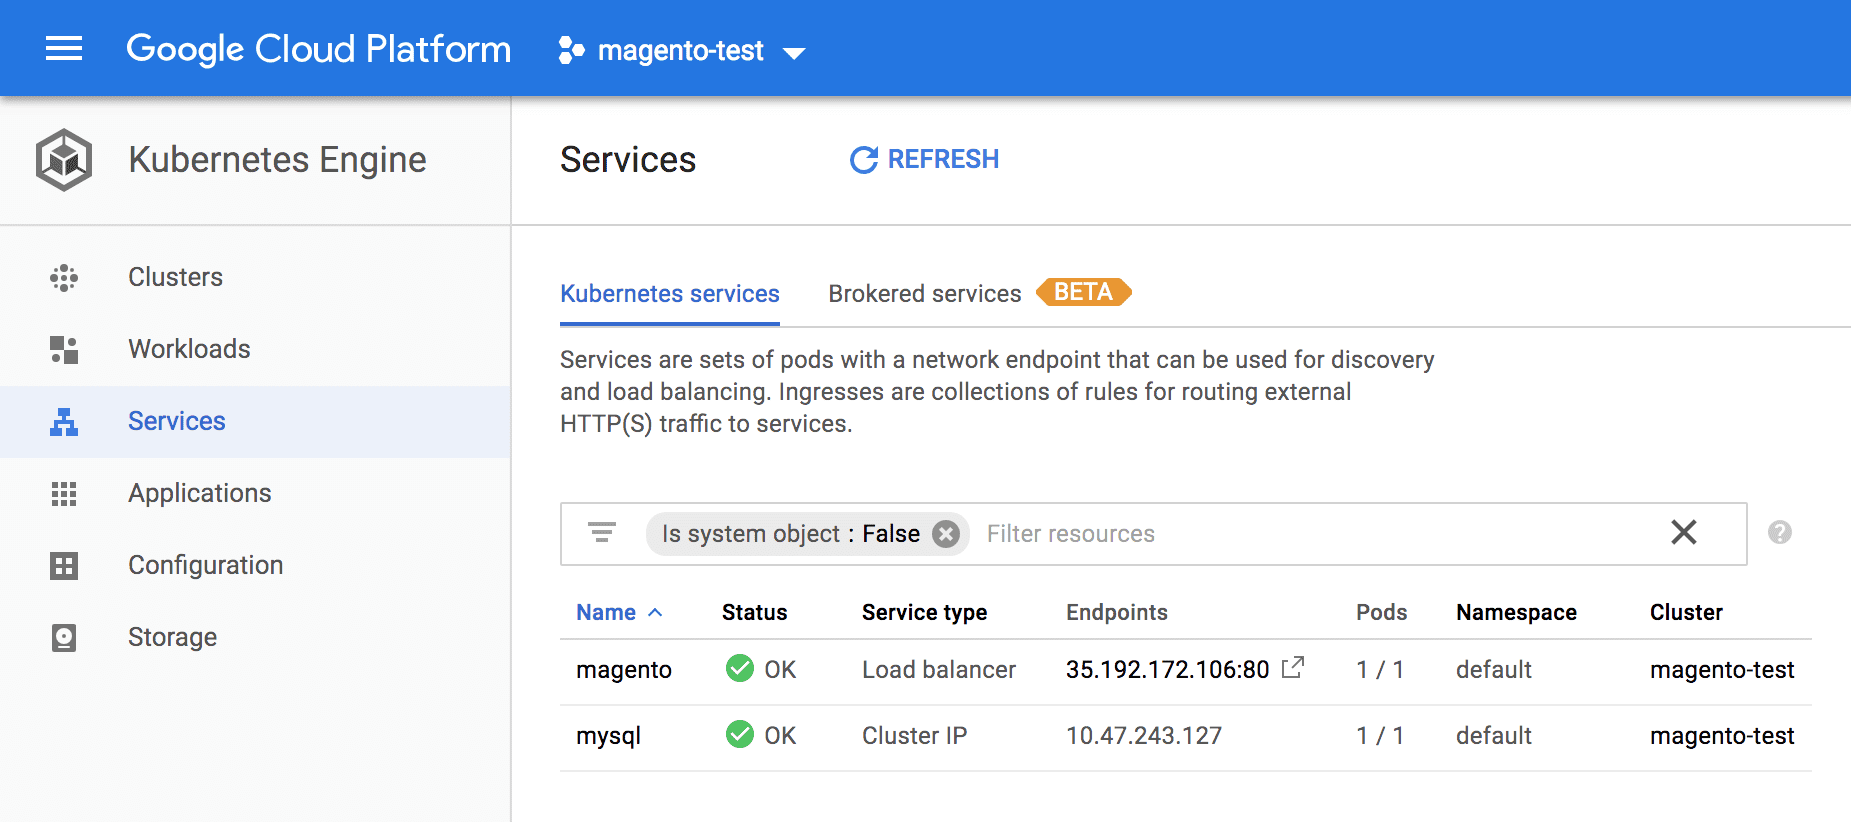
Let’s see if everything’s okay. Click the "Run" button or make a push to the repository to execute the pipeline. If all actions pass correctly, you will see a running container in your Google Cloud console:
To locate the address at which your Magento is available, go to the Services tab and look up the endpoint in the Magento line:
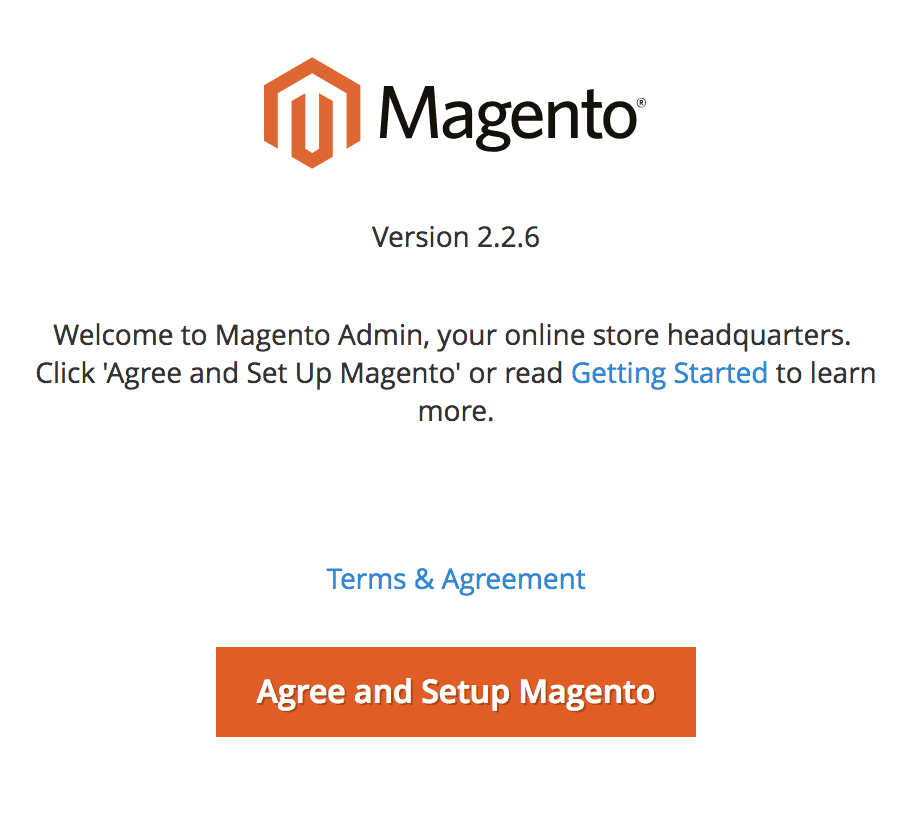
Once we open it, we should see a familiar Magento site:
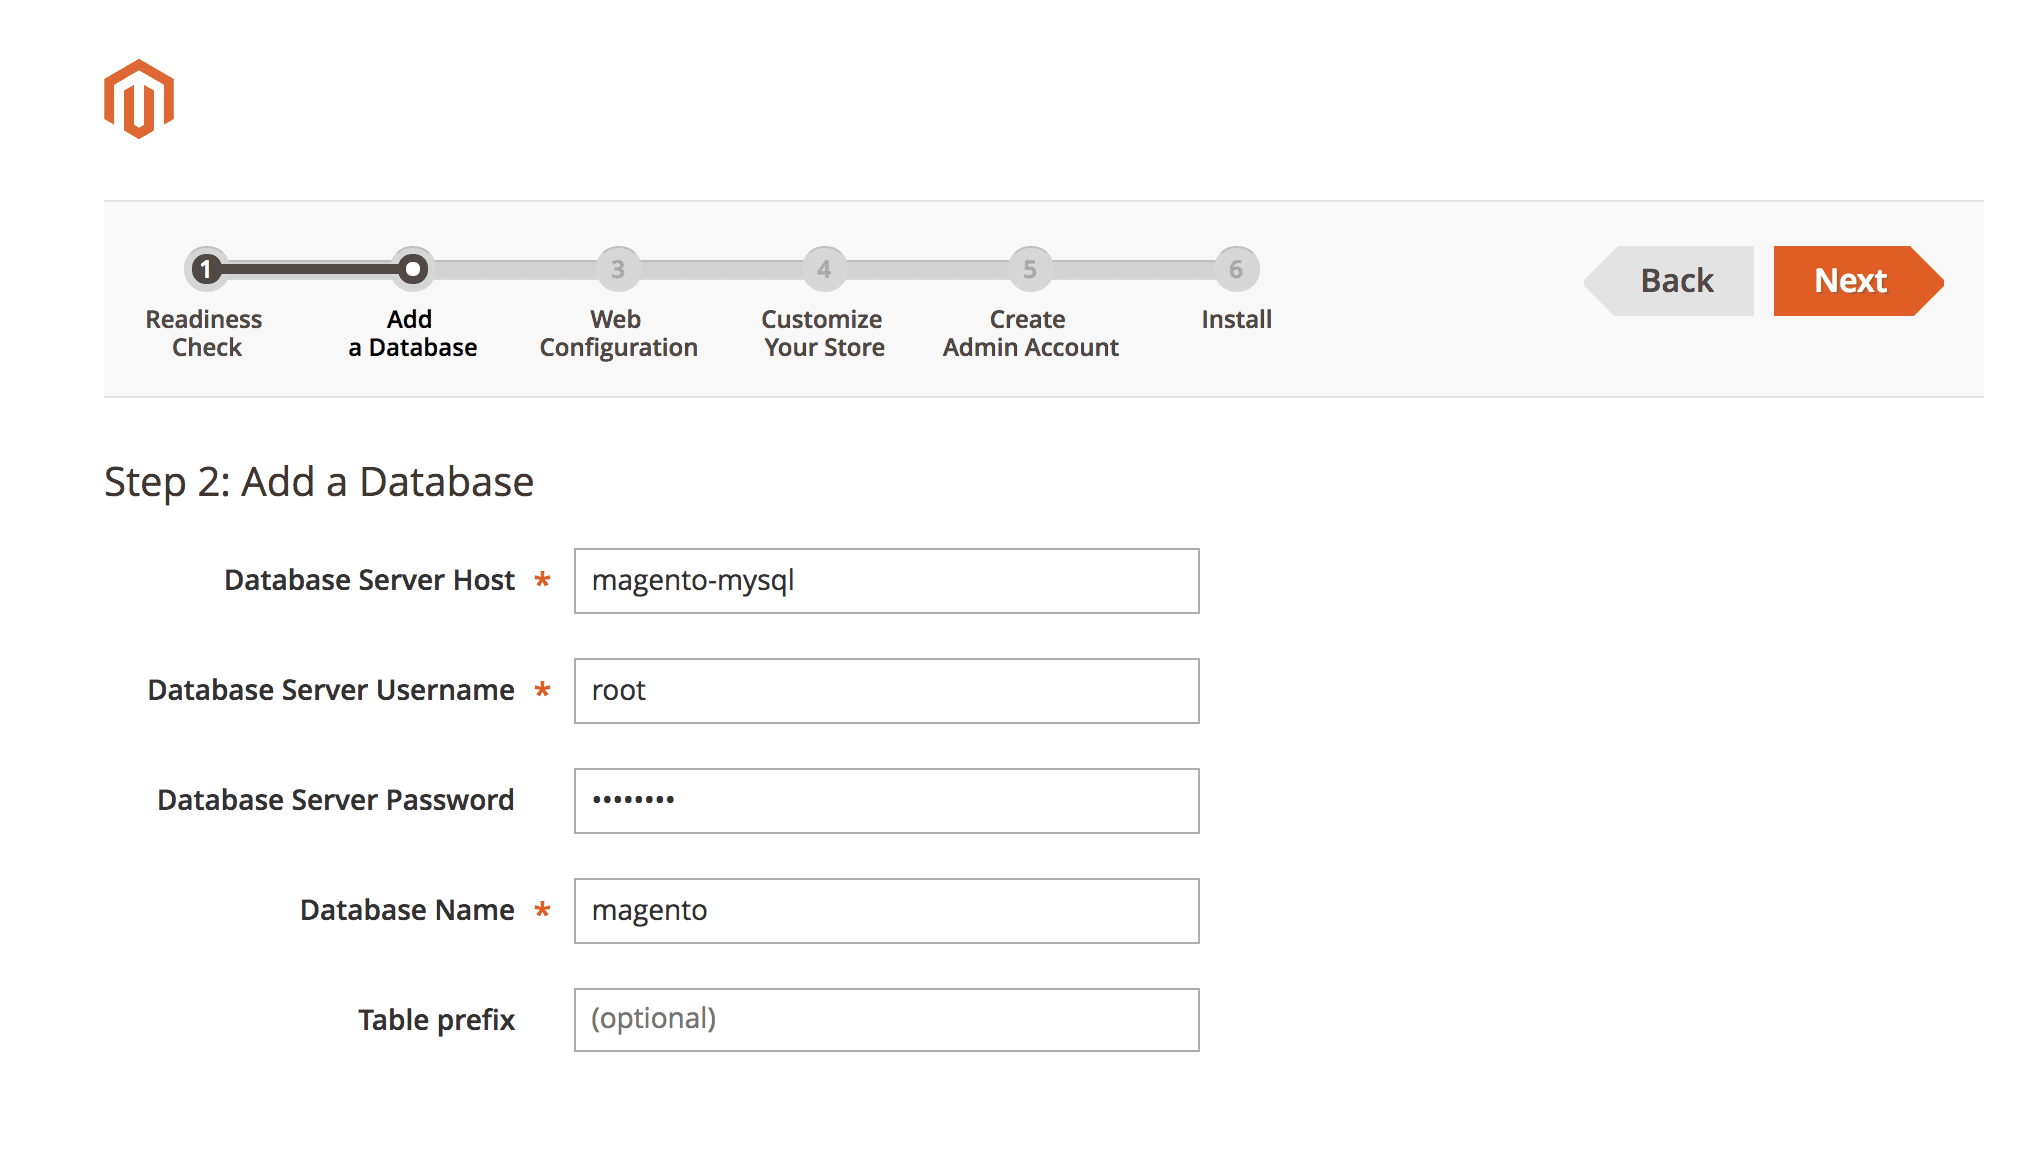
To finish the installation process for the database, enter the following:
- Host:
magento-mysql - Username:
root - Password: our secret password
- Database Name: anything (you can leave the default one)
- Table prefix: anything (you can leave the default one)
 At this moment, Kubernetes kills the Magento container and creates a brand new one on every execution. This means we have to go through the installation process every time, which is not very convenient. To prevent that, we need to deliver two files that Magento creates after the installation:
 config.php and env.php. Here’s how to do it:
- Run the pipeline and go through the installation process
- enter the terminal and run these command on the configured kubectl:
$ kubectl get pods - we will get the list of pods that are running in our cluster:
NAME READY STATUS RESTARTS AGE magento-64f7bfc667-cfqmd 1/1 Running 0 5m magento-mysql-65886c4f6-4zsqh 1/1 Running 0 18h - now we need to open the terminal directly in the Magento container:
kubectl exec -it magento-64f7bfc667-cfqmd -- /bin/bash - Now we’re inside the container where you can view and copy the content of the 2 files that we need. You can find them in these paths:
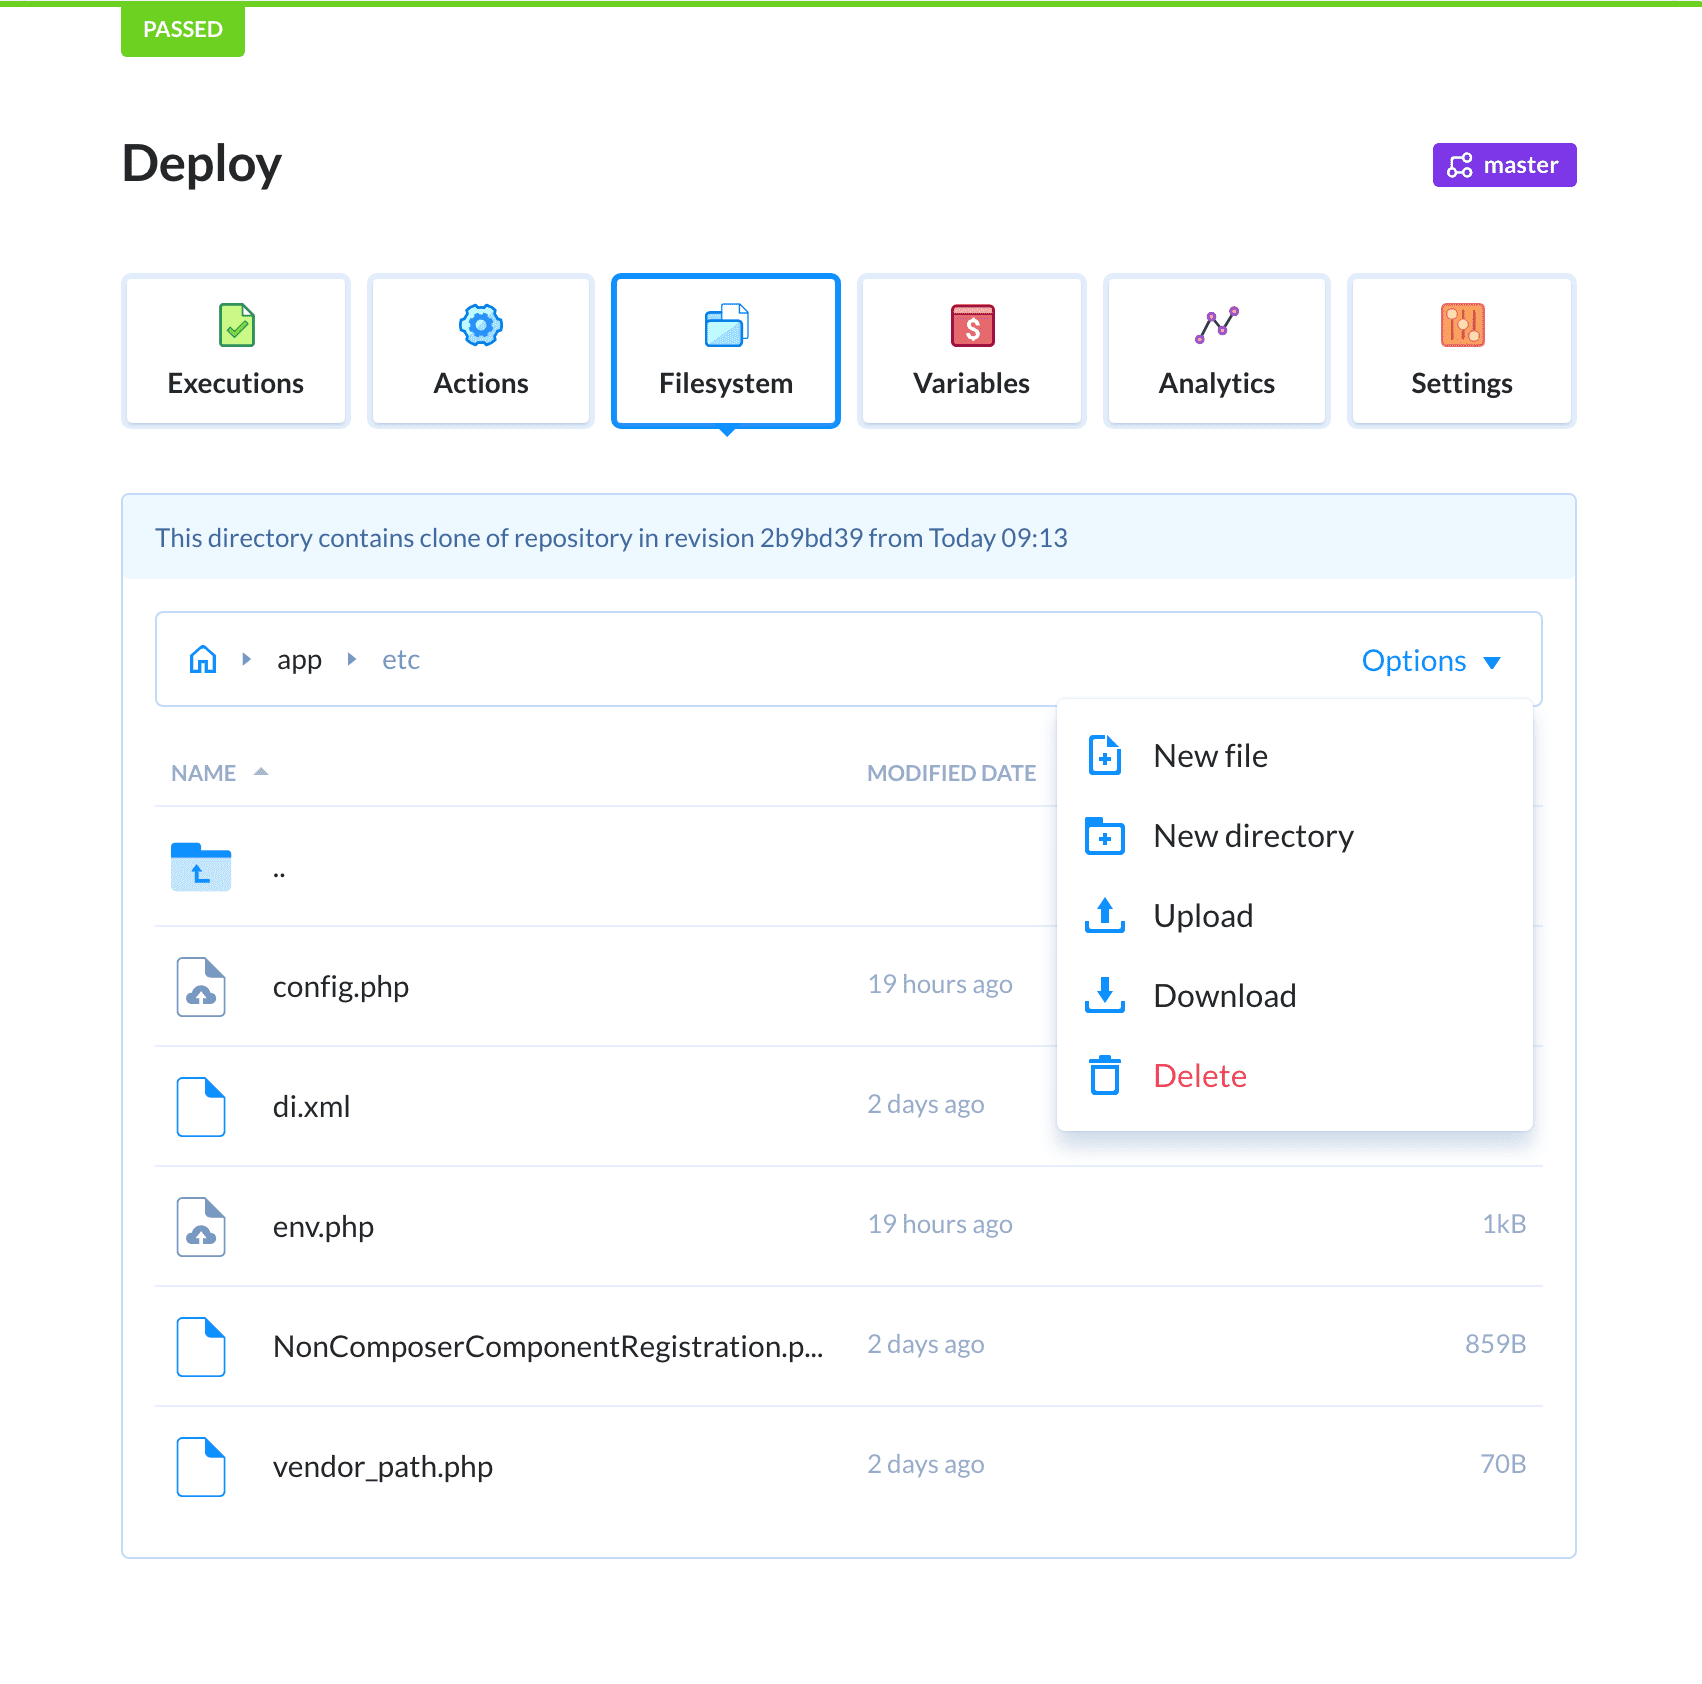
/var/www/html/app/etc/config.php /var/www/html/app/etc/env.php - Go back to your pipeline in Buddy and switch to the Filesystem tab. Go to this directory:
app/etc - paste both files or create them via Buddy’a interface:
- If you run the pipeline now and open the Magento site, you’ll see that you didn’t lose your configuration.
- Dump/Import MySQL database. If you already have a database and you want to restore it, you can easily do that with configured kubectl. To do that, we need to repeat the steps above, i.e. locate the proper pod in our cluster – this time with MySQL. Once you do that, run the following command in the terminal:
 ```
 kubectl -i POD_NAME -- mysql -u root -pPASSWORD < DUMP.sql
 ```
Where:POD_NAME- MySQL pod name. You can identify it by runningkubectl get podsPASSWORD- our secret MySQL passwordDUMP.sql- path to the dump on our machine.
Congratulations! You have just introduced advanced DevOps to your Magento delivery line. If you have any trouble on the way, let us know at [email protected] and send the URL to your pipeline so we can help you out.
Published at DZone with permission of Beata Zubek. See the original article here.
Opinions expressed by DZone contributors are their own.
Comments