MCP Client Agent: Architecture and Implementation
Learn how to build a custom MCP client agent that connects to MCP servers programmatically and understand the end-to-end request flow in the process.
Join the DZone community and get the full member experience.
Join For FreeIn this post, we’ll go deeper into the overall MCP architecture and client flow, and we’ll also implement an MCP client agent.
The goal is to provide some clarity on “What happens when you submit your request to MCP powered with LLMs”—breaking down what’s actually going on behind the scenes.
There are plenty of articles out there about building MCP servers. For reference, here is an official example from the MCP website. In this post, though, we’ll focus only on implementing an MCP client agent that can programmatically connect to MCP servers.
High-Level MCP Architecture
MCP Components
Host: AI Code editors (like Claude Desktop or Cursor) that users directly interact with, serving as the main interface and system manager.
Clients: Intermediaries that maintain connections between hosts and MCP servers, handling communication protocols and data flow.
Servers: Components that provide specific functionalities, data sources, and tools to AI models through standardized interfaces
Without delaying further lets get to the core of this article.
What are MCP Client Agents?
Custom MCP Clients: Programmatically Invoking MCP Servers
Most of the use cases we've seen so far involve using MCP within an AI-powered IDE. In these setups, users configure MCP servers inside the IDE and interact with them through a chat interface. In this case, the chat interface acts as the MCP client or host.
But what if you want to invoke MCP servers programmatically from your own services? That’s where the real strength of MCP comes in. It provides a standardized way to supply context and tools to your LLMs. Instead of writing custom code to integrate with every external API, resource, or file, you can focus on packaging the right context and capabilities, then hand them off to the LLM to reason over and act on.
MCP Client Agent Workflow With Multiple MCP Servers
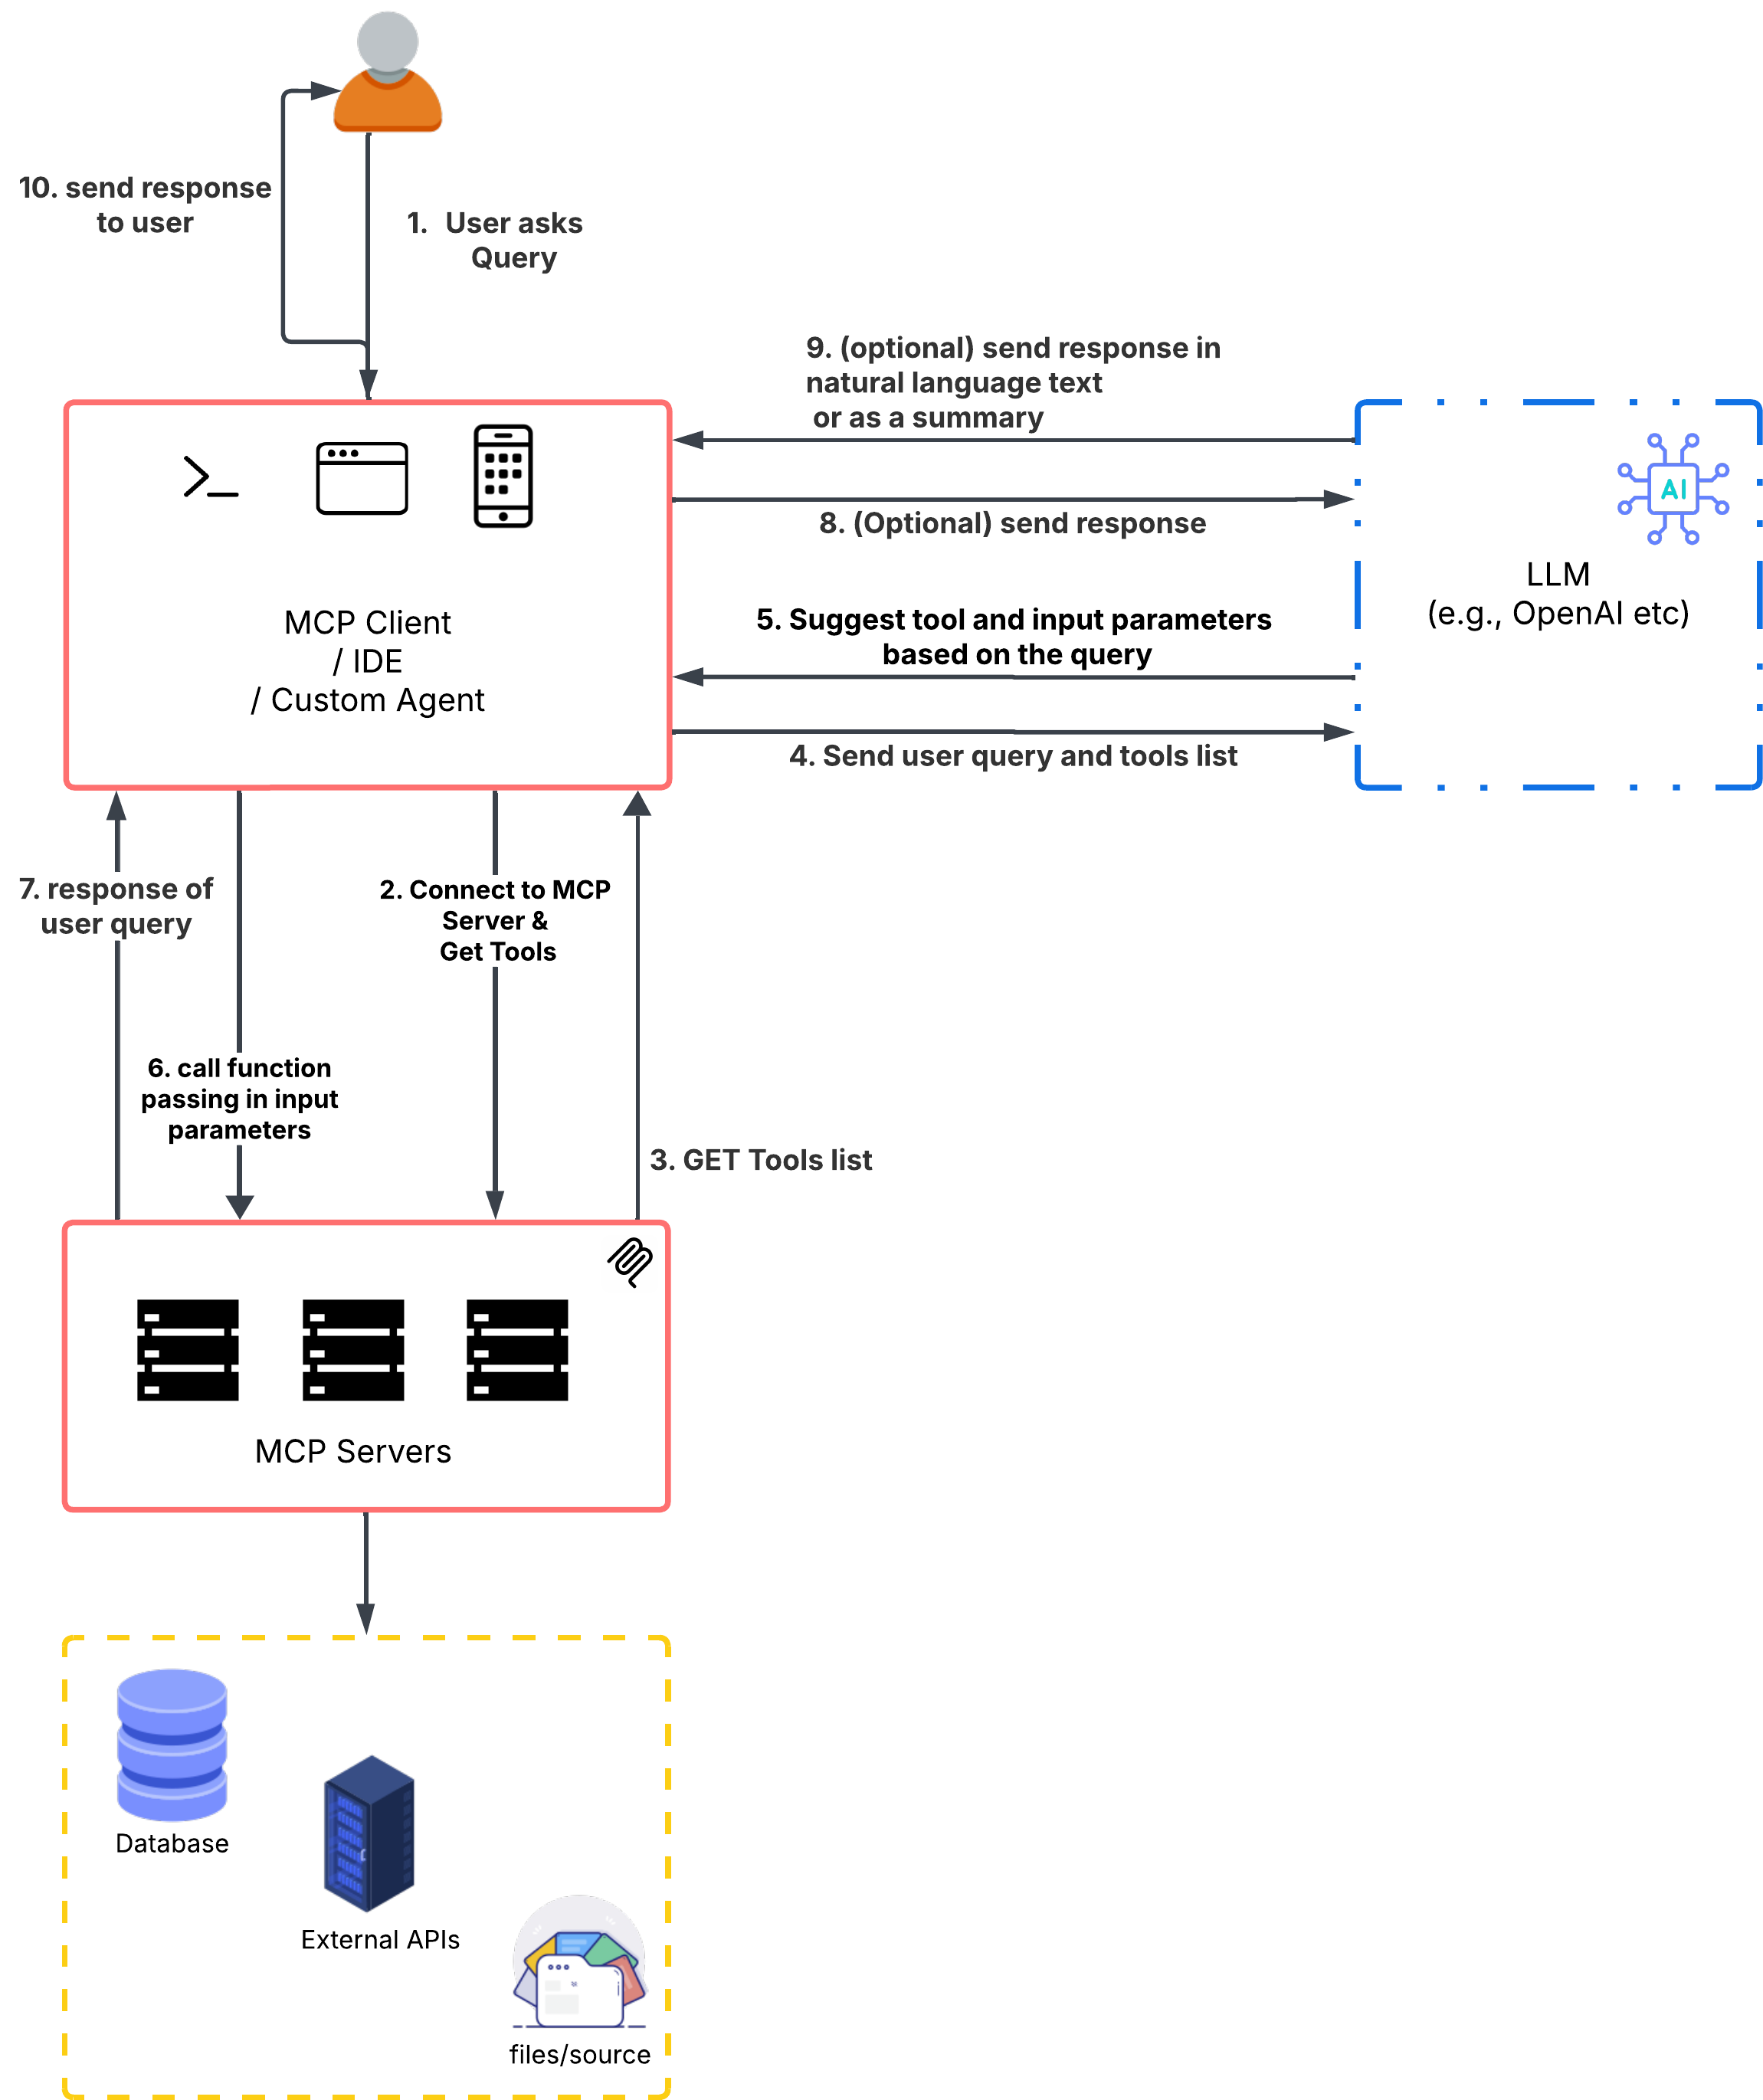
The diagram illustrates how MCP Custom Clients/AI agents process user requests through MCP servers. Below is a step-by-step breakdown of this interaction flow:
Step 1: User Initiates Request
- User asks a query or submits a request either through an IDE, or browser or terminal.
- Query is received by the Custom MCP Client/Agent interface.
Step 2: MCP Client and Server Connection
- MCP Client connects to the MCP Server. It can connect to multiple servers at a time and requests for tools from these servers
- Servers send back the supported list of tools and functions.
Step 3: AI Processing
- Both user query and tools list are sent to the LLM (e.g., OpenAI).
- LLM analyzes the request and suggests appropriate tool and input parameters and sends back response to MCP Client.
Step 4: Function Execution
- MCP Client calls the selected function in MCP Server with the suggested parameters.
- MCP Server receives the function call and processes the request, depending on the request the corresponding tool in a specific MCP Server will get called. Please note to make sure the tool names across your MCP servers are different to avoid LLM hallucination and non-deterministic responses.
- Server may interact with databases, external APIs, or file systems to process the request.
Step 5: (Optional) Improve Response using LLM
- MCP Server returns the function execution response to MCP Client.
(Optional)
- MCP Client can then forward that response to LLM for refinement.
- LLM converts technical response to natural language or creates a summary.
Step 6: Respond to User
- Final processed response is sent back to the user through the client interface.
- User receives the answer to their original query.
Custom MCP Client Implementation / Source Code
Connecting to MCP Servers:
As discussed earlier, an MCP client can connect to multiple MCP servers. This behavior can be simulated in a custom MCP client implementation.
Note: To reduce hallucinations and ensure consistent results, it’s recommended to avoid tool name collisions across multiple MCP servers.
MCP Server Transport Options:
MCP servers support two types of transport mechanisms:
- STDIO – for local process communication
- SSE – for HTTP/WebSocket-based requests
Connecting to STDIO Transport
async def connect_to_stdio_server(self, server_script_path: str):
        """Connect to an MCP stdio server"""
        is_python = server_script_path.endswith('.py')
        is_js = server_script_path.endswith('.js')
        if not (is_python or is_js):
            raise ValueError("Server script must be a .py or .js file")
        command = "python" if is_python else "node"
        server_params = StdioServerParameters(
            command=command,
            args=[server_script_path],
            env=None
        )
        stdio_transport = await self.exit_stack.enter_async_context(stdio_client(server_params))
        self.stdio, self.write = stdio_transport
        self.session = await self.exit_stack.enter_async_context(ClientSession(self.stdio, self.write))
        await self.session.initialize()
        print("Initialized stdio...")
Connecting to SSE Transport
async def connect_to_sse_server(self, server_url: str):
        """Connect to an MCP server running with SSE transport"""
        # Store the context managers so they stay alive
        self._streams_context = sse_client(url=server_url)
        streams = await self._streams_context.__aenter__()
        self._session_context = ClientSession(*streams)
        self.session: ClientSession = await self._session_context.__aenter__()
        await self.session.initialize()
        print("Initialized SSE...")
Get Tools and Process User request With LLM and MCP Servers
Once the Servers are initialized, we can now fetch tools from all available servers and process user query, processing user query will follow the steps as described above:
stdio_tools = await std_server.list_tools()
sse_tools = await sse_server.list_tools()
Process User Request:
async def process_user_query(self, available_tools: any, user_query: str, tool_session_map: dict):
        """
        Process the user query and return the response.
        """
        model_name = "gpt-35-turbo"
        api_version = "2022-12-01-preview"

        # On first user query, initialize messages if empty
        self.messages = [
            {
                "role": "user",
                "content": user_query
            }
        ]

        # Initialize your LLM - e.g., Azure OpenAI client
        openai_client = AzureOpenAI(
            api_version=api_version,
            azure_endpoint=<OPENAI_ENDPOINT>,
            api_key=<API_KEY>,
        )

        # send the user query to the LLM along with the available tools from MCP Servers
        response = openai_client.chat.completions.create(
            messages=self.messages,
            model=model_name,
            tools=available_tools,
            tool_choice="auto"
        )
        llm_response = response.choices[0].message

        # append the user query along with LLM response
        self.messages.append({
            "role": "user",
            "content": user_query
        })
        self.messages.append(llm_response)

        # Process respose and handle tool calls
        if azure_response.tool_calls:
            # assuming only one tool call suggested by LLM or keep in for loop to go over all suggested tool_calls
            tool_call = azure_response.tool_calls[0]

            # tool call based on the LLM suggestion
            result = await tool_session_map[tool_call.function.name].call_tool(
                tool_call.function.name,
                json.loads(tool_call.function.arguments)
            )

            # append the response to messages
            self.messages.append({
                "role": "tool",
                "tool_call_id": tool_call.id,
                "content": result.content[0].text
            })

            # optionally send the response to LLM to summarize
            azure_response = openai_client.chat.completions.create(
                messages=self.messages,
                model=model_name,
                tools=available_tools,
                tool_choice="auto"
            ).choices[0].message
Hopefully, this gave you a solid starting point for implementing MCP clients. In future posts, we'll explore how to host MCPs for remote access using tools like Kubernetes and Docker.
If you’d like to dive deeper right away, check out this sample source code, which includes both an MCP client agent and server implementation.
Published at DZone with permission of Venkata Rakesh Buddhiraju. See the original article here.
Opinions expressed by DZone contributors are their own.
Comments