MCP Elicitation: Human-in-the-Loop for MCP Servers
MCP elicitation provides a standardized way for servers to request real-time user input through the client during a session.
Join the DZone community and get the full member experience.
Join For FreeWhat Is MCP
The Model Context Protocol (MCP) is an open standard developed by Anthropic that enables large language models (LLMs) to receive data from any backend or application in a single, standardized format. Prior to the introduction of MCP, developers working on agent-based AI systems had to rely on custom tools and logic to connect with the APIs of various third-party applications. This process was often tedious and didn't scale effectively, as every integration had to be manually built and maintained by the developers.
With MCP, this responsibility has shifted: application developers can now expose their APIs in a unified format that most models and agent frameworks can easily understand right from the outset.
MCP Evolution: Update of June 18, 2025
The protocol is continually evolving, bringing in new features with each update. As of June 18, 2025, the latest enhancements include:
Structured Tool Output
Tools can now deliver structured data rather than just plain strings. This enhancement simplifies result parsing and allows for the development of more advanced pipelines. Many agent frameworks have already supported structured output for tools within the agent itself, and this capability is now officially integrated into the MCP specification.
OAuth 2.1: Resource Server and Resource Indicators
MCP servers are now treated as full-fledged OAuth Resource Servers. Clients must use Resource Indicators (RFC 8707) to ensure access tokens aren't misused across different servers.
Resource Links in Tool Call Results
Tool responses can now include links to external resources, such as files, logs, or web pages, along with the raw data.
Elicitation
This one's a game-changer: servers can now request user input during a session through the client, with validation managed via JSON Schema. This opens up a new kind of user experience (UX) for agent interactions.
What Is Elicitation
Elicitation is a mechanism in MCP that allows the server to temporarily halt a tool’s execution until the client provides any missing user data. A similar idea is found in agent frameworks, often referred to as Human-In-The-Loop (HITL), where the agent pauses its operation, seeks input from the user, and then continues with the updated data.
However, MCP works differently. The MCP server is isolated; it runs independently and lacks awareness of the frontend. It does not influence the UX and cannot directly interact with the user. Typically, the architecture has three layers: the frontend, the agent (backend), and one or more MCP servers connected to the agent.
MCP communicates solely with the agent — and that’s the extent of it.
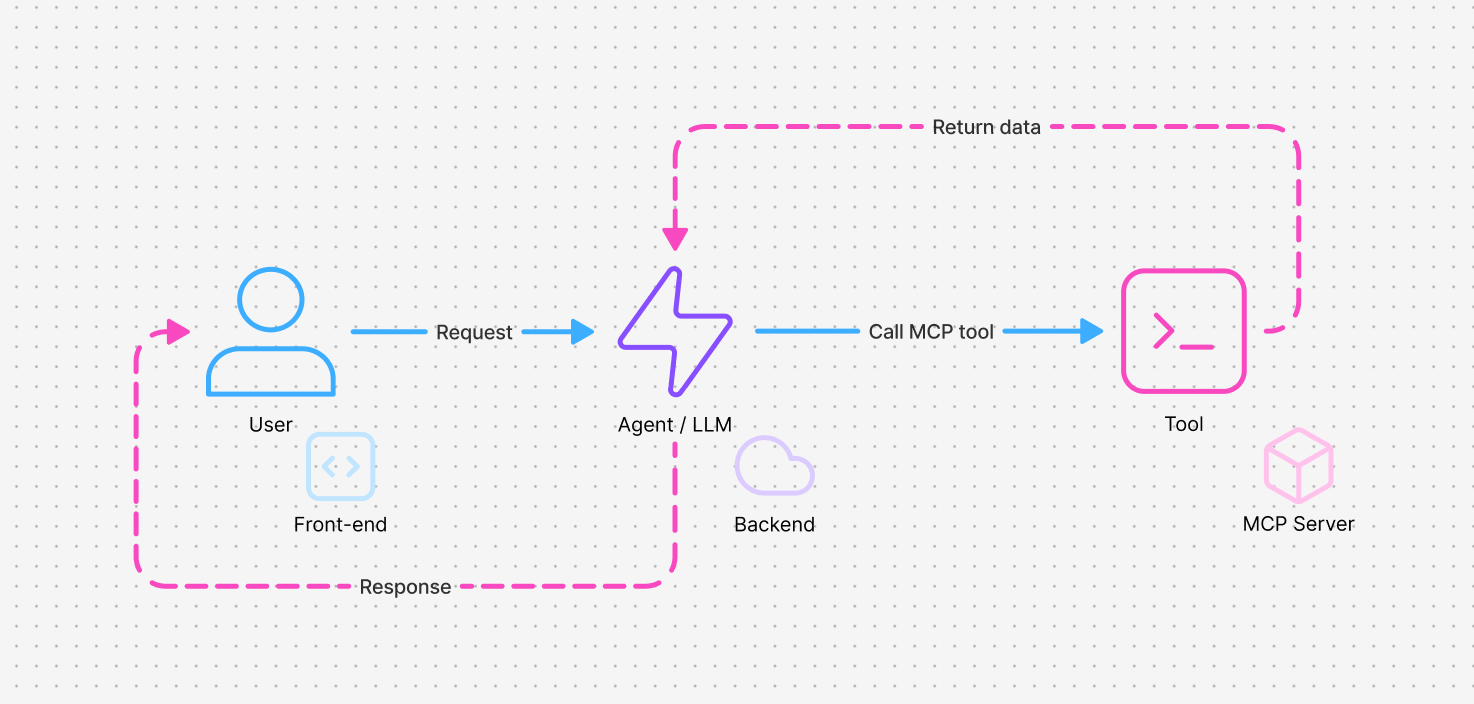
In this setup, an MCP tool may simply lack the necessary data and cannot retrieve it independently. Consider a typical example: you build an MCP server for table bookings that includes a BookTable tool. When the chatbot invokes this tool, it requires complete information — such as the date, time, number of guests, names, and any special requests. However, some of this information might be missing, incorrect, or the requested slot might be unavailable.
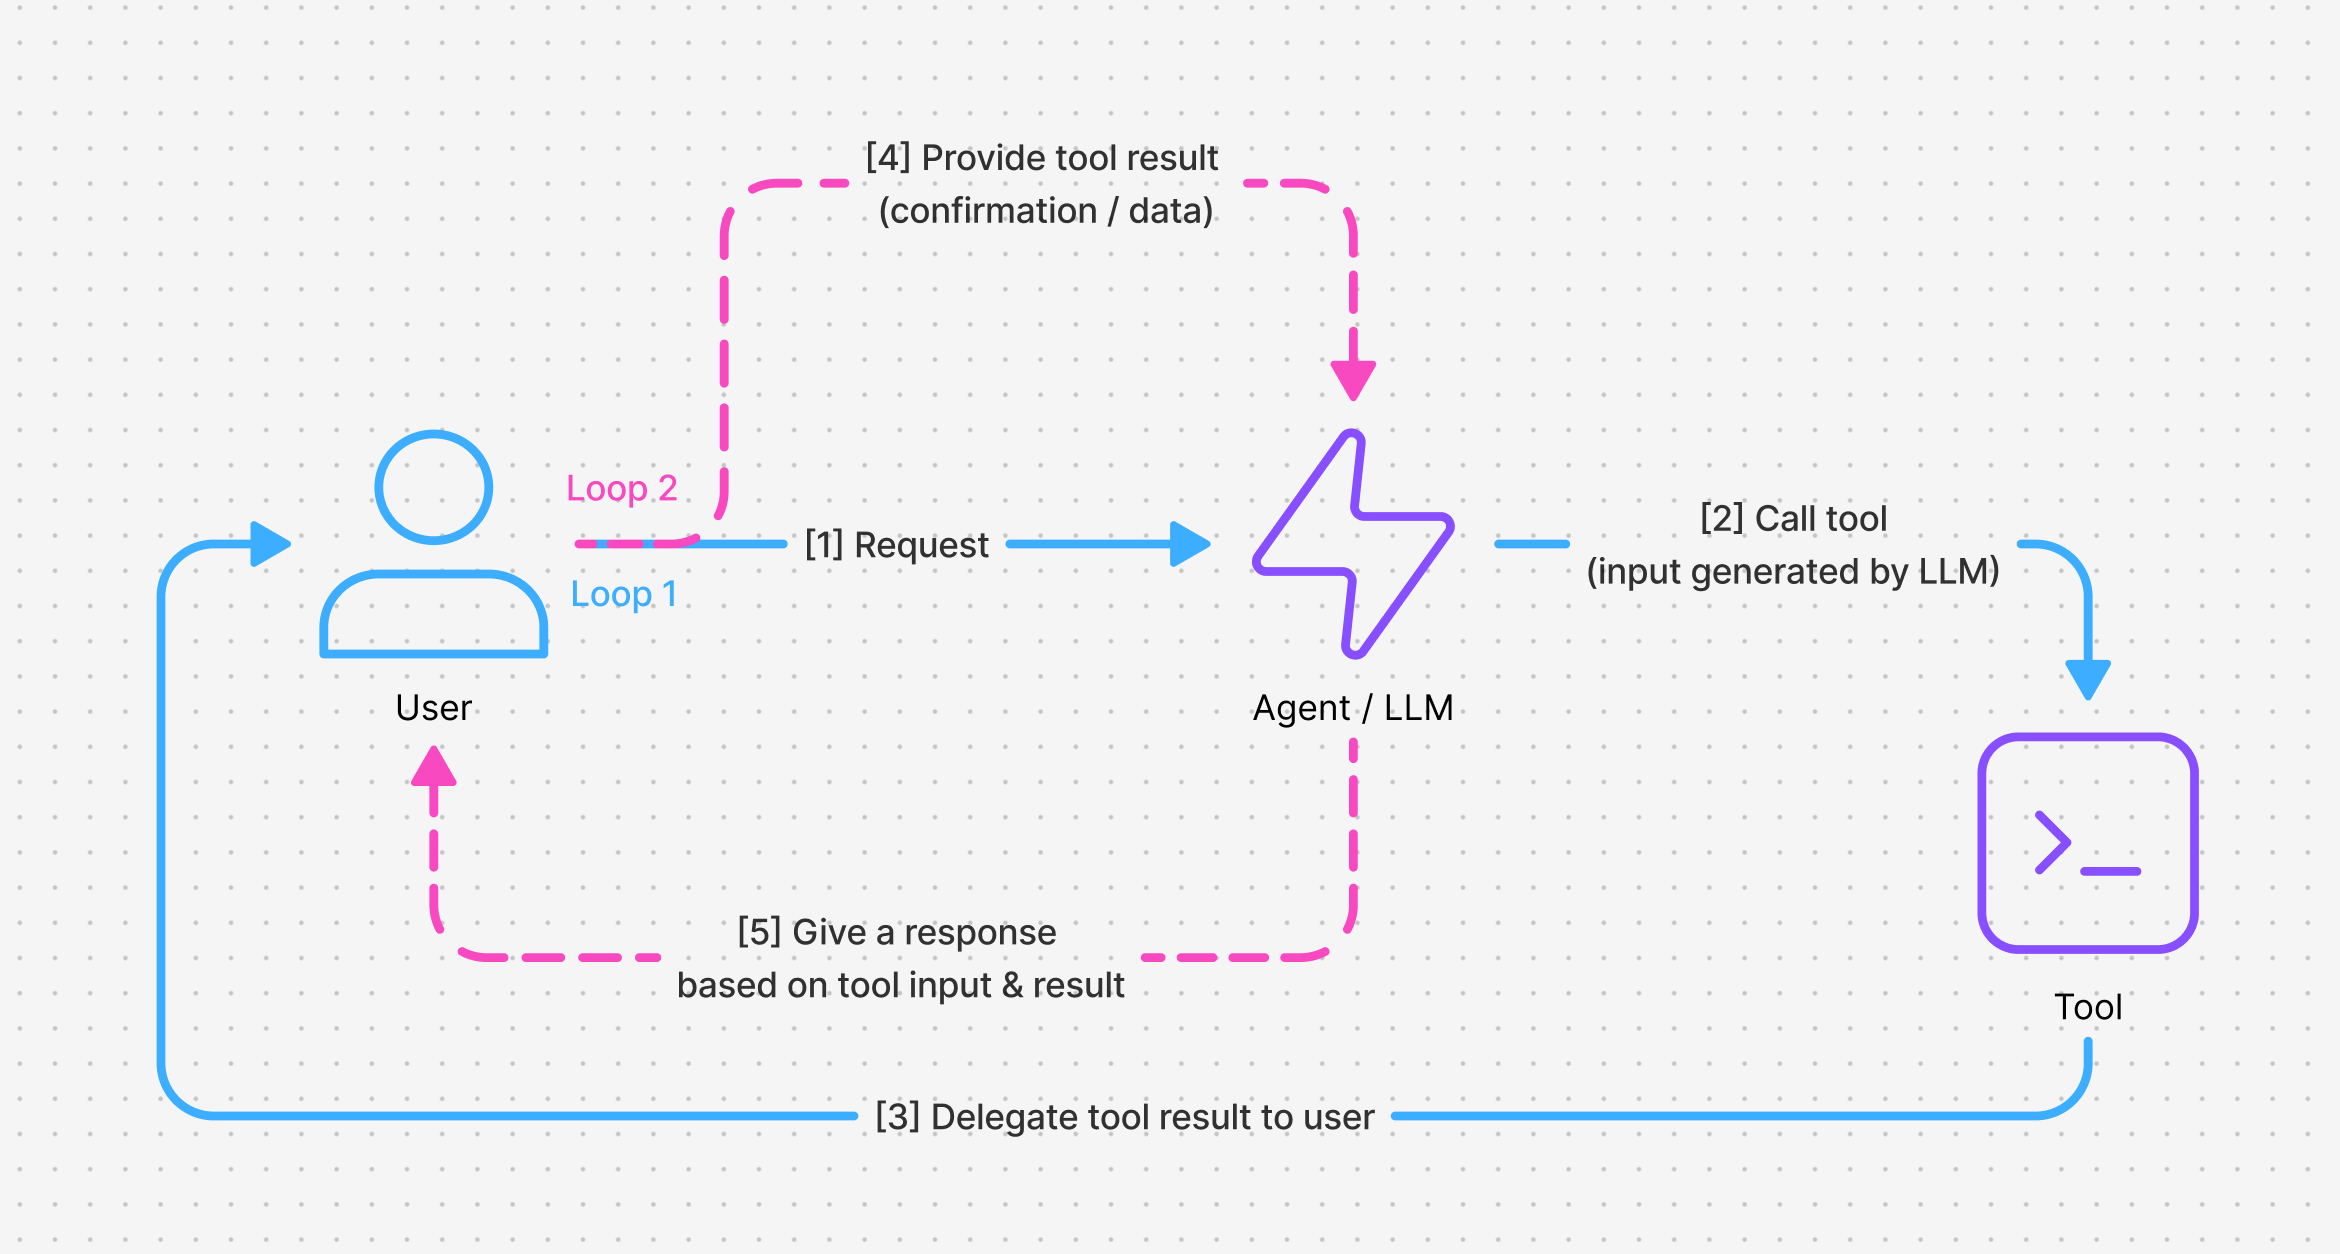
Even without MCP, effectively handling this kind of human-in-the-loop flow is rarely executed well within agent frameworks. A common workaround is to create a tool that returns no result, signaling the agent loop to pause. Meanwhile, the frontend displays a user interface (UI) element, like a form or confirm buttons, prompting the user for the additional data. Once the user submits this information, it is attached as the tool's result, leading to a new request that contains the updated message history sent to the agent. The agent then reviews the original tool call along with the result and determines the next steps.
In this flow, the tool’s input comes from the LLM, and its output is derived from the user.
In practice, you often have to define two tools:
- One for the frontend that collects or confirms data (gather_booking_info_tool)
- Another for the backend that processes it (process_booking_tool)
This setup introduces several downsides, such as losing context on the backend, dealing with duplicate requests, and incurring extra token usage, among other issues.
When you're building an MCP server, things complicate even further. The tool operates without a shared execution context with the calling agent. This means it can’t pause the loop or directly request more input — it’s completely decoupled. However, elicitation fixes this. It provides MCP tools with the capability to request data from the client during execution and actually wait for a response.
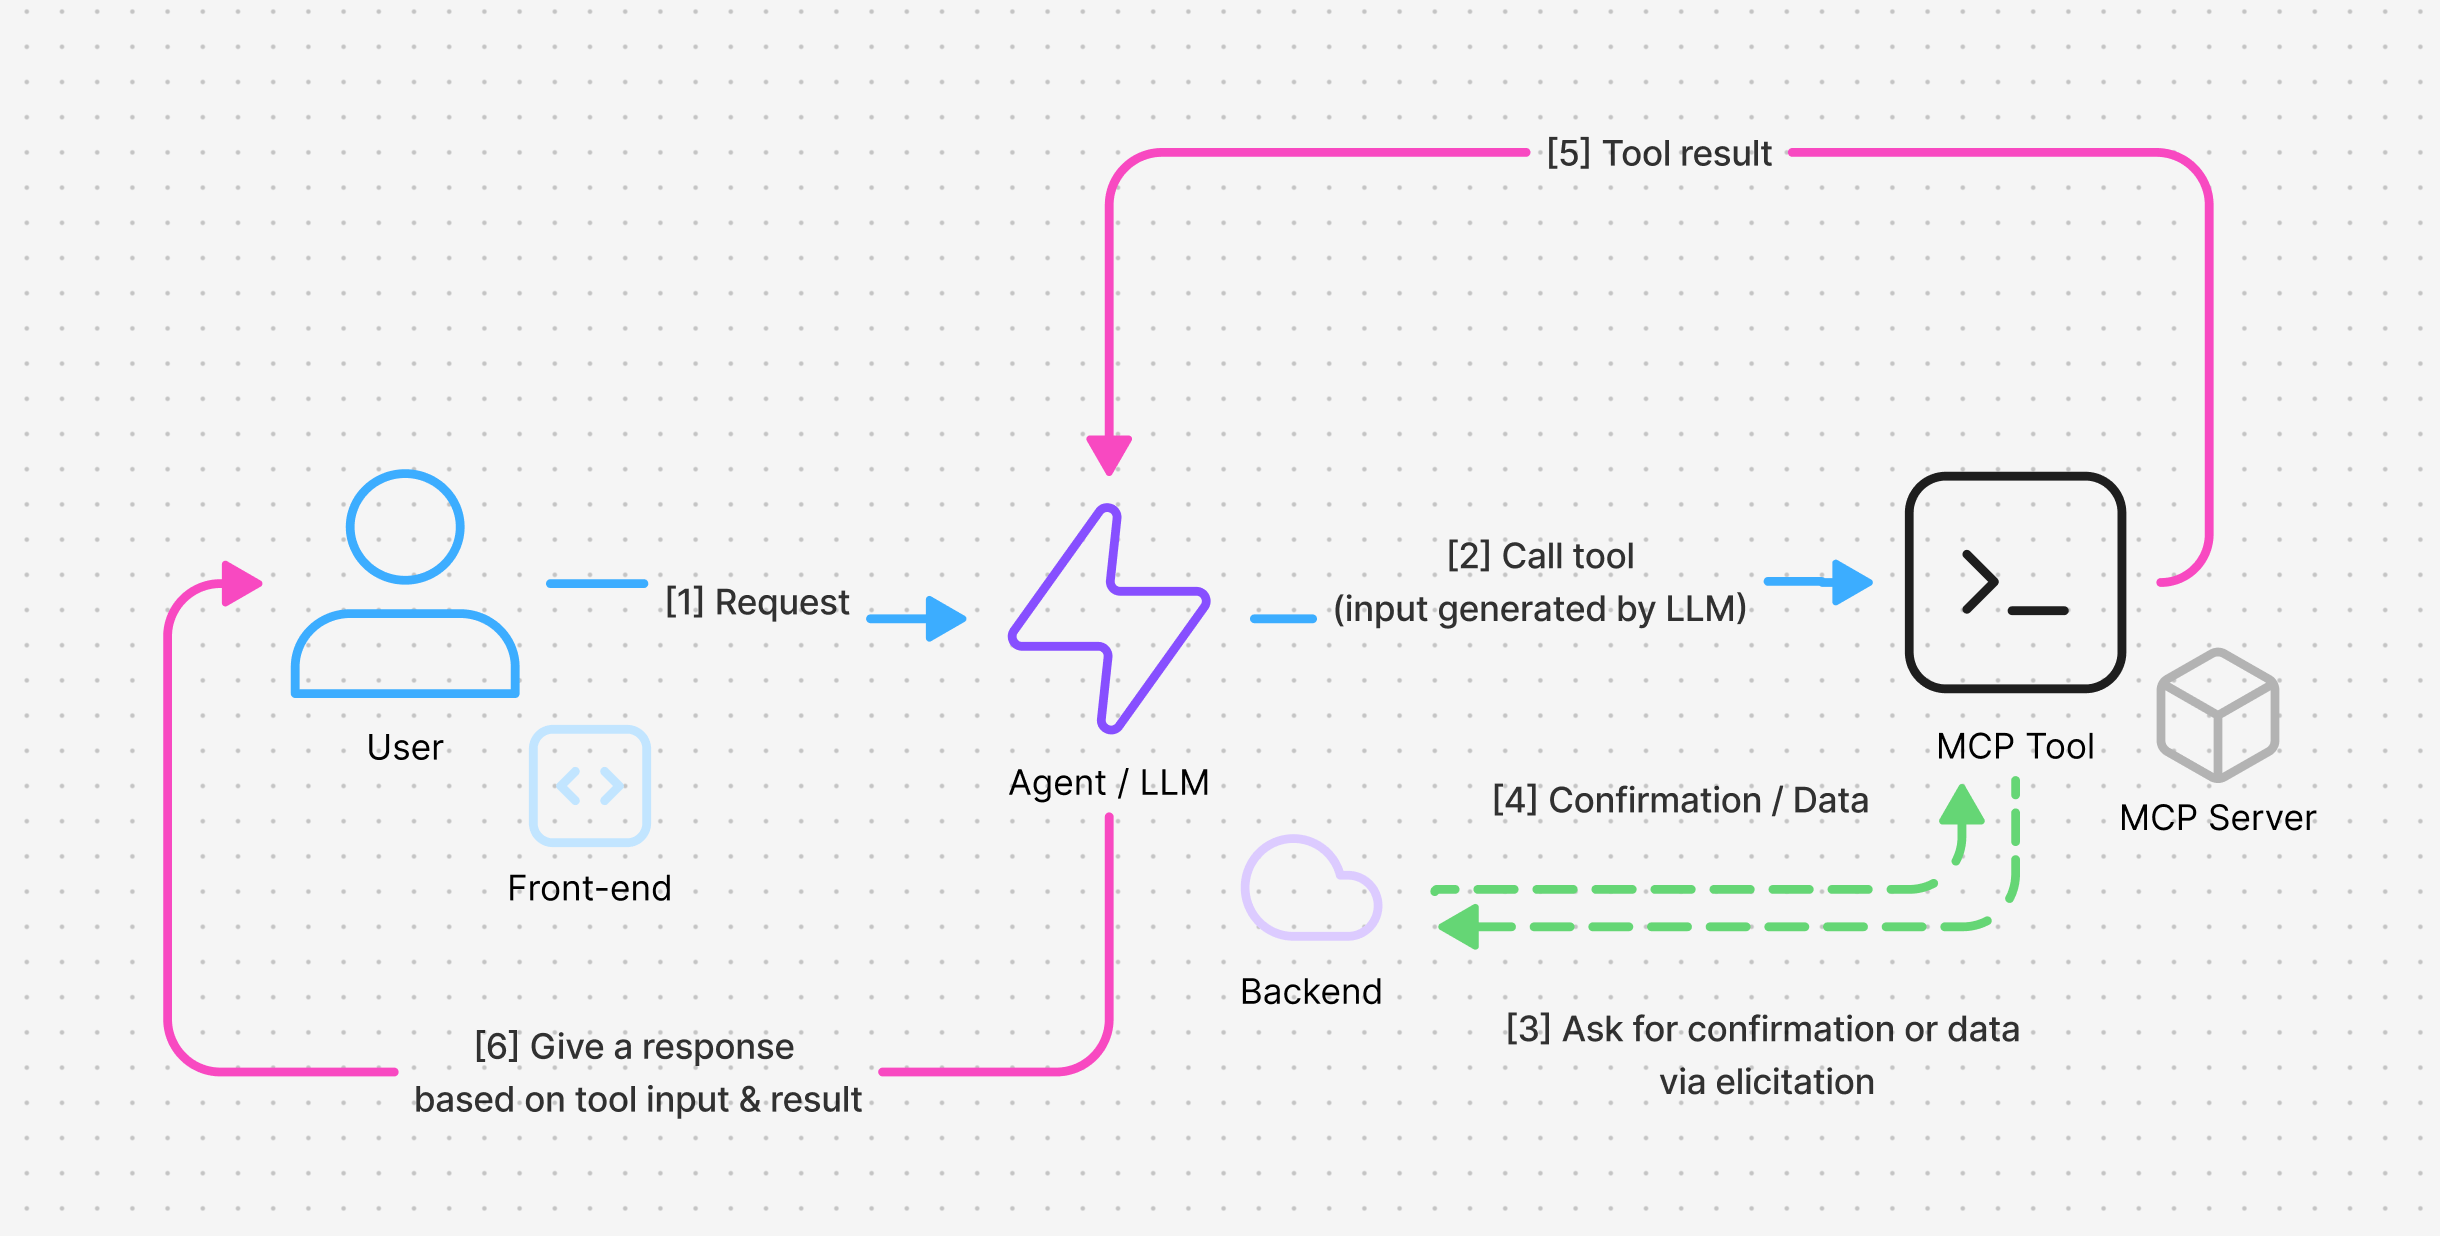
The best part is that everything unfolds within a single request and session. The server sends an elicitation request, which returns a Promise. This Promise gets resolved with the data provided by the user once the client responds.
Additionally, this functionality allows the server to keep the client informed about the ongoing progress of the tool execution. The MCP server can send a request each time the task status changes, enabling the client can react by, for example, displaying a progress bar in the interface.
Elicitation Protocol Format
When a tool realizes that it’s lacking certain data, it initiates an elicitation or create request by sending a JSON Schema that outlines the required fields. For example:
{
  "jsonrpc": "2.0",
  "id": 1,
  "method": "elicitation/create",
  "params": {
    "message": "Please provide your GitHub username",
    "requestedSchema": {
      "type": "object",
      "properties": {
        "name": {
          "type": "string"
        }
      },
      "required": ["name"]
    }
  }
}
There are four types of fields that are supported:
String
{
  "type": "string",
  "title": "Display Name",
  "description": "Description text",
  "minLength": 3,
  "maxLength": 50,
  "format": "email" // Supported: "email", "uri", "date", "date-time"
}
Number
{
  "type": "number", // or "integer"
  "title": "Display Name",
  "description": "Description text",
  "minimum": 0,
  "maximum": 100
}
Boolean
{
  "type": "boolean",
  "title": "Display Name",
  "description": "Description text",
  "default": false
}
Enumeration (Enum)
{
  "type": "string",
  "title": "Display Name",
  "description": "Description text",
  "enum": ["option1", "option2", "option3"],
  "enumNames": ["Option 1", "Option 2", "Option 3"]
}
The protocol expects a response that includes both the outcome, (whether accept, decline, or cancel), and the requested data:
{
  "jsonrpc": "2.0",
  "id": 1,
  "result": {
    "action": "accept",
    "content": {
      "name": "octocat"
    }
  }
}
Required action format:
- `action:
"accept"`: Client explicitly approved the request and submitted the data - `action:
"decline"`: Client explicitly declined the request. The content field is typically omitted. - `action:
"cancel"`: Client dismissed the request without making an explicit choice.
The handler should appropriately process each of these scenarios.
Create MCP Server and MCP Client With Elicitation Support
I’m going to build an MCP server that runs over HTTP, along with a simple chat application built on assistant-ui. From there, I’ll wire elicitation requests directly into the UI.
MCP Server
Not all frameworks and SDKs currently support elicitation. We can certainly write code using the official modelcontextprotocol/sdk, but my main focus will be on Mastra — an open-source TypeScript agent framework designed to simplify the process of building agents, MCP servers, clients, and more.
Mastra is built on the AI SDK, ensuring compatibility with most tools that support it. For the server setup, I’ll be using Bun and Hono.js, which provides us with a fast HTTP configuration that supports multiple MCP servers within a single service. This setup also includes WebSockets, an auth server, and any other functionalities a real application might need.
Let’s start and create a new project for the MCP server:
mkdir mcp-server && cd mcp-server
bun init -y
bun add typescript tsx @types/node mastra@latest @mastra/core@latest zod@^3 fetch-to-node hono -D
This command will set up a new project and install Mastra. Next, proceed to create the necessary files: src/index.ts
import { Hono } from 'hono';

const app = new Hono();

import { toFetchResponse, toReqRes } from 'fetch-to-node';

import mcpServer from './mcp-server';

app.all('/mcp/server', async(c) => {
    const { req, res } = toReqRes(c.req.raw);

    await mcpServer.startHTTP({
        url: new URL(c.req.url),
        httpPath: '/mcp/server',
        req,
        res,
        options: {
            sessionIdGenerator: undefined,
        },
    });

    return await toFetchResponse(res);
});

export default {
    ...app,
    port: 4444,
};
In this setup, we’re establishing a basic web server and linking our MCP server to the /mcp/server endpoint using the modern streamable HTTP protocol. Alternatively, you could also use HTTP with server-sent events (SSE), or connect directly to the MCP server through standard input/output (stdio) — it's up to you.
The server will run on port 4444: mcp-server.ts
import { MCPServer } from '@mastra/mcp';
import tools from './tools';

const mcpServer = new MCPServer({
    version: '0.1.0',
    name: 'MCP server for demonstration purposes',
    description: 'This MCP server shows how to use the MCP server API to create a server that can be used in a chat application.',
    tools,
});

export default mcpServer;
Here we define the MCP server itself — giving it a name, description, and the list of tools it exposes: tools.ts
import { createTool } from '@mastra/core';
import { z } from 'zod';
import { spawn } from 'child_process';

export const runCommand = createTool({
    id: 'runCommand',
    description: 'Run a shell command on the server. Prompts for confirmation if the command is dangerous.',
    inputSchema: z.object({
        command: z.string().describe('The shell command to run, e.g., "ls"'),
        args: z.array(z.string()).optional().describe('Arguments for the command'),
    }),
    outputSchema: z.object({
        stdout: z.string(),
        stderr: z.string(),
        code: z.number(),
    }),
    async execute({ context }, options) {
        const dangerousCommands = ['rm', 'mv', 'dd', 'shutdown', 'reboot', 'mkfs', 'chmod', 'chown', 'kill', 'killall', 'poweroff', 'halt'];
        const cmd = context.command.trim();
        const args = context.args || [];

        // Ask for confirmation if the command is dangerous
        if (dangerousCommands.includes(cmd)) {
            const elicitation = (options as any)?.elicitation;

            if (!elicitation || typeof elicitation.sendRequest !== 'function') {
                return {
                    code: -1,
                    stdout: '',
                    stderr: 'Elicitation is not available in this context. Cannot confirm dangerous command.',
                }
            }

            const result = await elicitation.sendRequest({
                message: `Are you sure you want to run the dangerous command: '${cmd}'?`,
                requestedSchema: {
                    type: 'object',
                    properties: {
                        confirm: {
                            type: 'boolean',
                            title: 'Confirm',
                            description: `Confirm running '${cmd}'?`,
                        },
                    },
                    required: ['confirm'],
                },
            });

            if (result.action !== 'accept' || !result.content.confirm) {
                return {
                    code: -1,
                    stdout: '',
                    stderr: 'Command was rejected by the user.',
                }
            }
        }

        return new Promise((resolve, reject) => {
            const child = spawn(cmd, args, { shell: true });
            let stdout = '';
            let stderr = '';

            child.stdout.on('data', (data) => { stdout += data.toString(); });
            child.stderr.on('data', (data) => { stderr += data.toString(); });

            child.on('close', (code) => {
                resolve({ stdout, stderr, code: code ?? -1 });
            });

            child.on('error', (err) => {
                reject(err);
            });
        });
    },
});

export default {
    runCommand,
};
For this demonstration, I’m creating a single tool that runs shell commands on the server (just to be clear, this should never be used in a real application — it’s purely for illustrative purposes). If a command appears to be potentially dangerous (such as rm or kill), the tool prompts the user for confirmation before proceeding. Now let’s go ahead and start the MCP server:
bun src/index.tsAgent and MCP Client
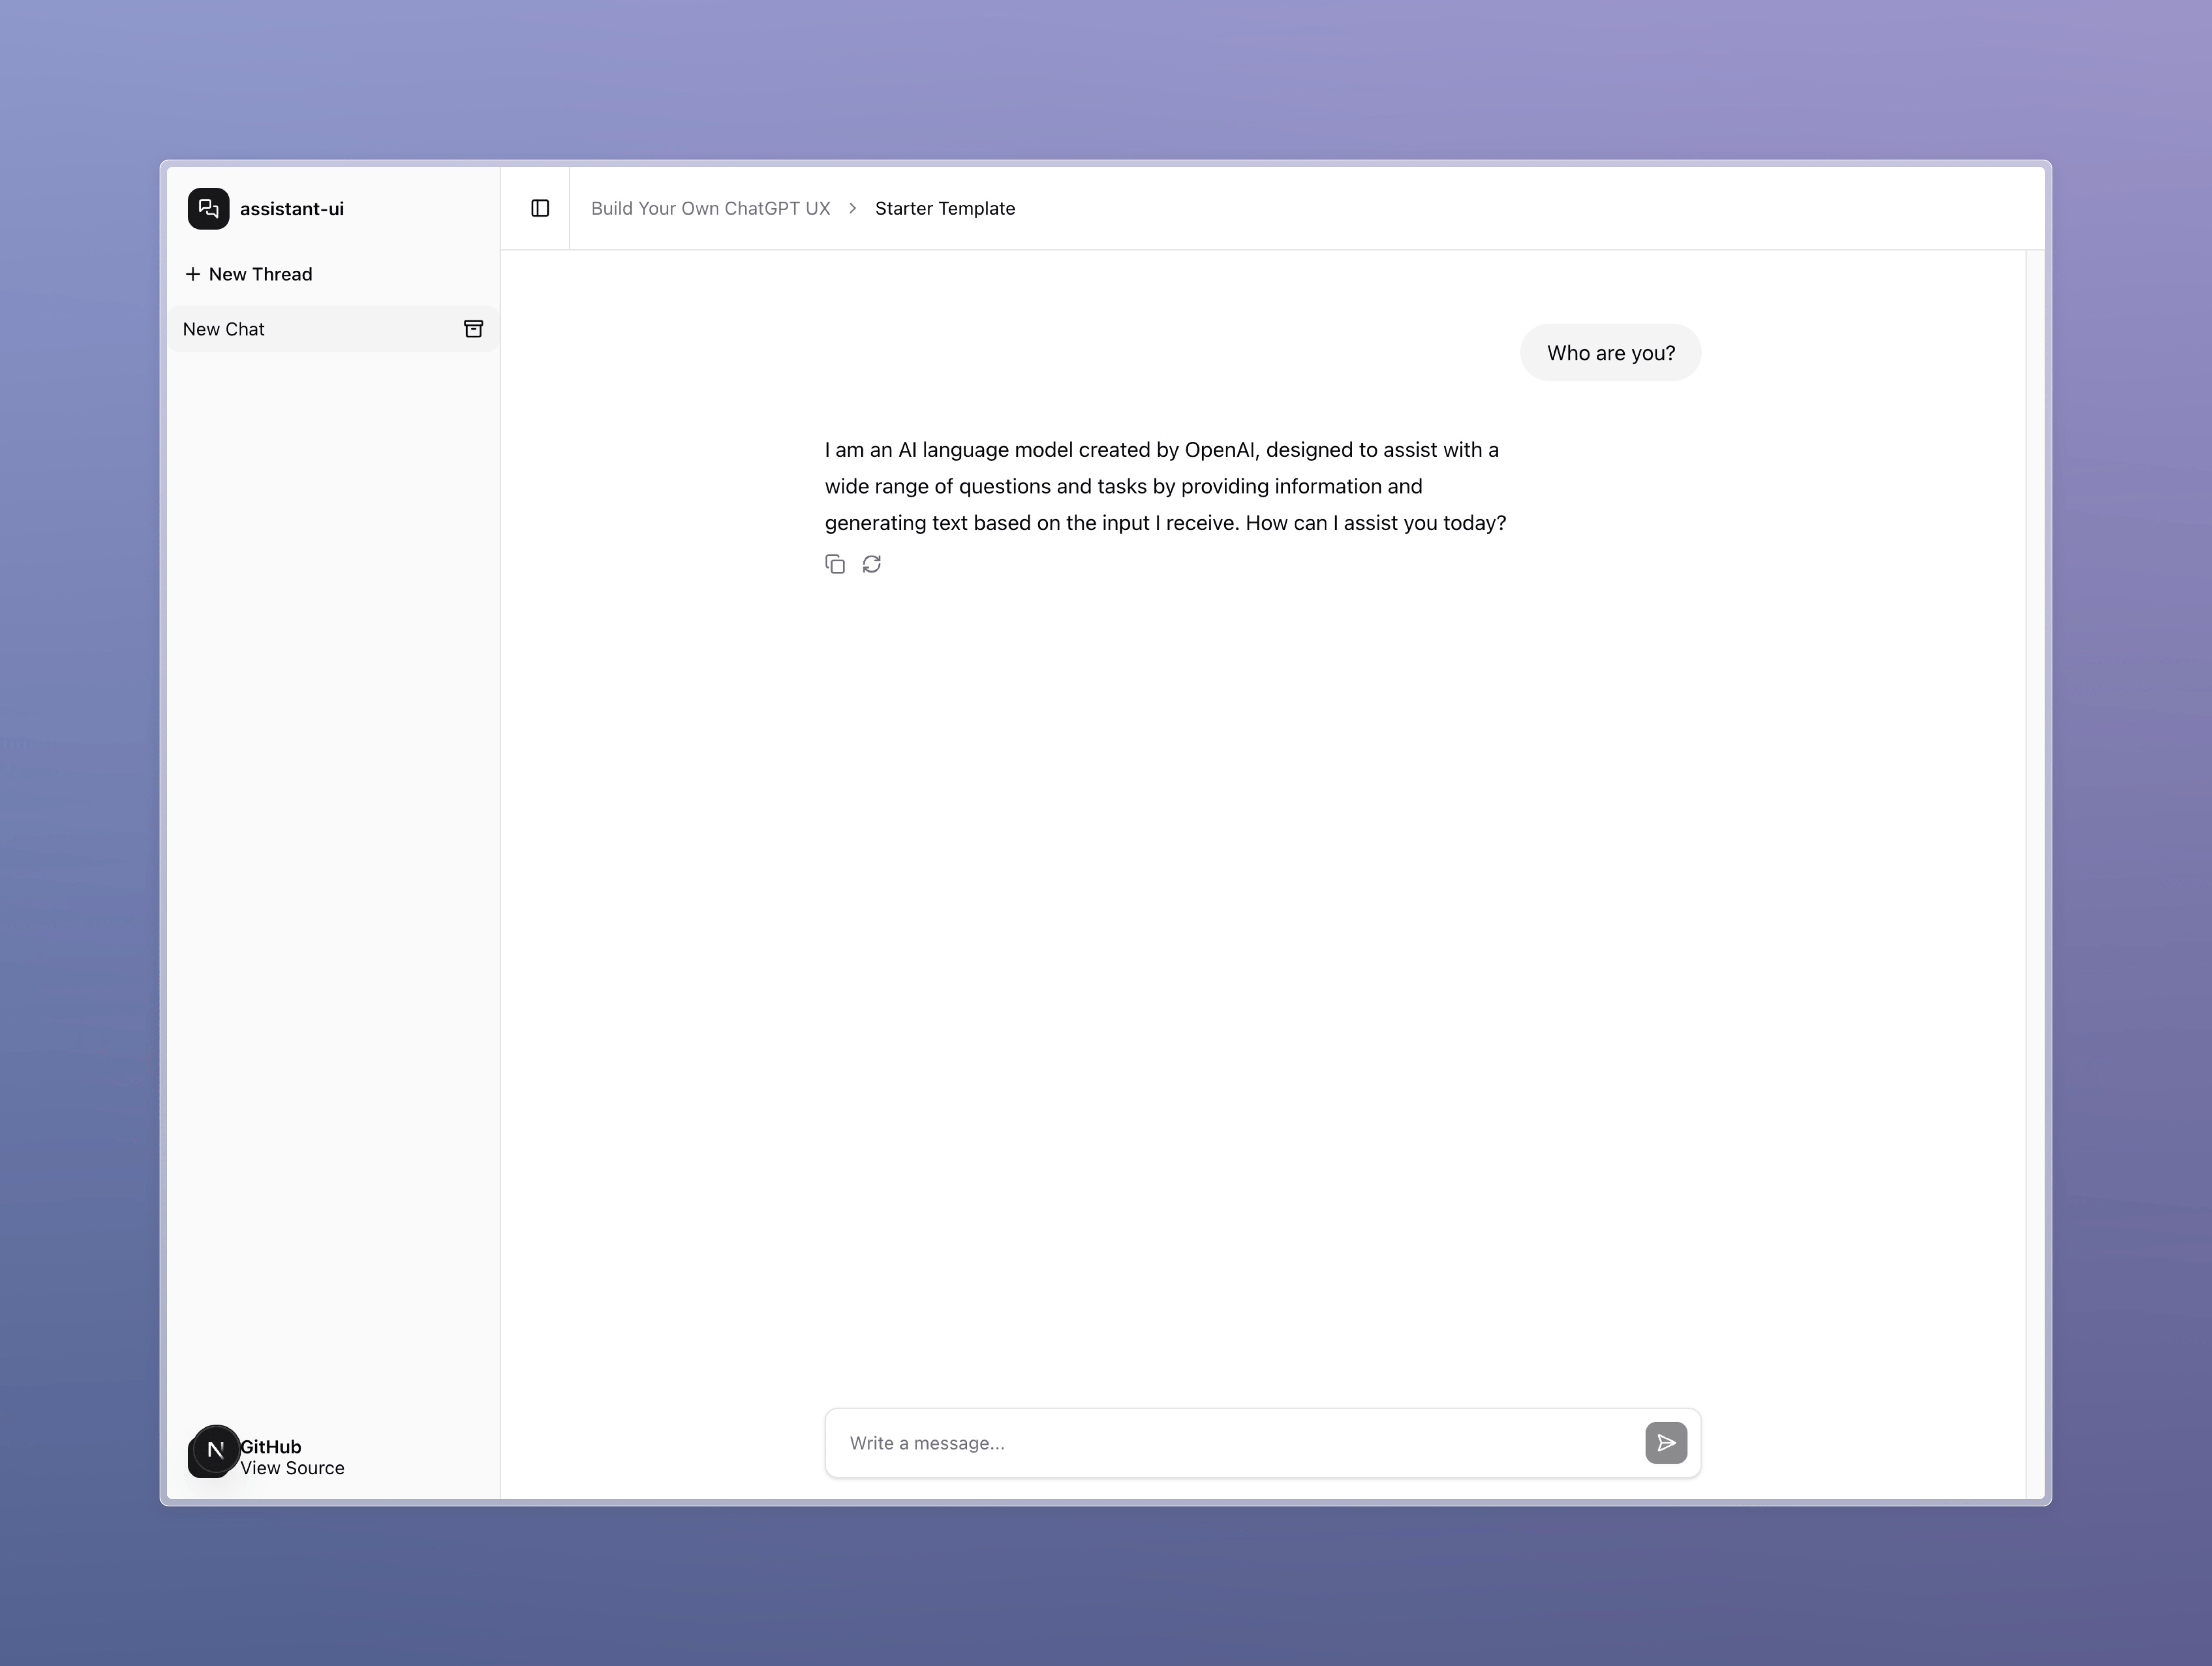
To demonstrate and build a UI agent, I'll use assistance-ui. First I'll set up a new Next.js project and then proceed to install assistant-ui and Mastra:
npx assistant-ui@latest create mcp-app
cd mcp-app
bun add mastra -D
This command will create a new Next.js application with a chat interface. Create a file: .env.local
OPENAI_API_KEY=sk-proj-4fpws4nXpCYXsQVK7DdaUCdLNxMa...
Simply add your OPENAI API key here. Now you can launch the application and verify that the chat function works smoothly:
Let's set up a Mastra Agent and link it to our MCP server: app/api/chat/route.ts
import { openai } from '@ai-sdk/openai';
import { frontendTools } from '@assistant-ui/react-ai-sdk';
import { Agent } from '@mastra/core';
import { MCPClient } from '@mastra/mcp';
import { createDataStreamResponse } from 'ai';

// Define the MCP server name and URL for connecting to the tool server
const MCP_SERVER_NAME = 'testing';
const MCP_SERVER_URL = 'http://localhost:4444/mcp/server';

// Initialize the MCP client with server configuration
const mcp = new MCPClient({
    id: '1', // Unique client ID
    servers: {
        [MCP_SERVER_NAME]: {
            url: new URL(MCP_SERVER_URL),
        },
    },
});

// Create an AI agent with a model, name, and instructions
const agent = new Agent({
    model: openai('gpt-4o'), // Use OpenAI GPT-4o model
    name: 'Chat Agent',
    instructions: `
    You are a helpful assistant that provides accurate information.
    Do not ask questions before running tools, just run them.
    If you see that the user rejects a tool call, then stop and do not try to find another way to perform the task.
    `,
});


// API route handler for POST requests
export async function POST(req: Request) {
    // Parse the incoming request body for chat messages, system prompt, and tool list
    const { messages, system, tools } = await req.json();

    // Create a streaming response for the chat
    const response = createDataStreamResponse({
        status: 200,
        statusText: 'OK',
        async execute(dataStream) {
            // Run the agent and stream its response to the client
            const agentStream = await agent.stream(messages, {
                system, // Optional system prompt
                toolsets: {
                    ...(await mcp.getToolsets()), // Dynamically load toolsets from MCP server
                },
                clientTools: frontendTools(tools), // Add any client-side tools
            });

            // Merge the agent's output into the HTTP data stream
            agentStream.mergeIntoDataStream(dataStream);
        },
        // Custom error handler for the stream
        onError: (error: any) => `Custom error: ${ error.message }`,
    });

    // Return the streaming response to the client
    return response;
}
This code processes incoming requests from the frontend by creating an agent and an MCP client, subsequently invoking the agent. The agent then responds to the frontend using the Stream AI SDK format. It manages tool execution via MCP, handles the results, and is capable of running multiple tools in parallel until it arrives at a final answer. Let’s check that our agent is functioning correctly and that it recognizes the tools exposed by our MCP server:
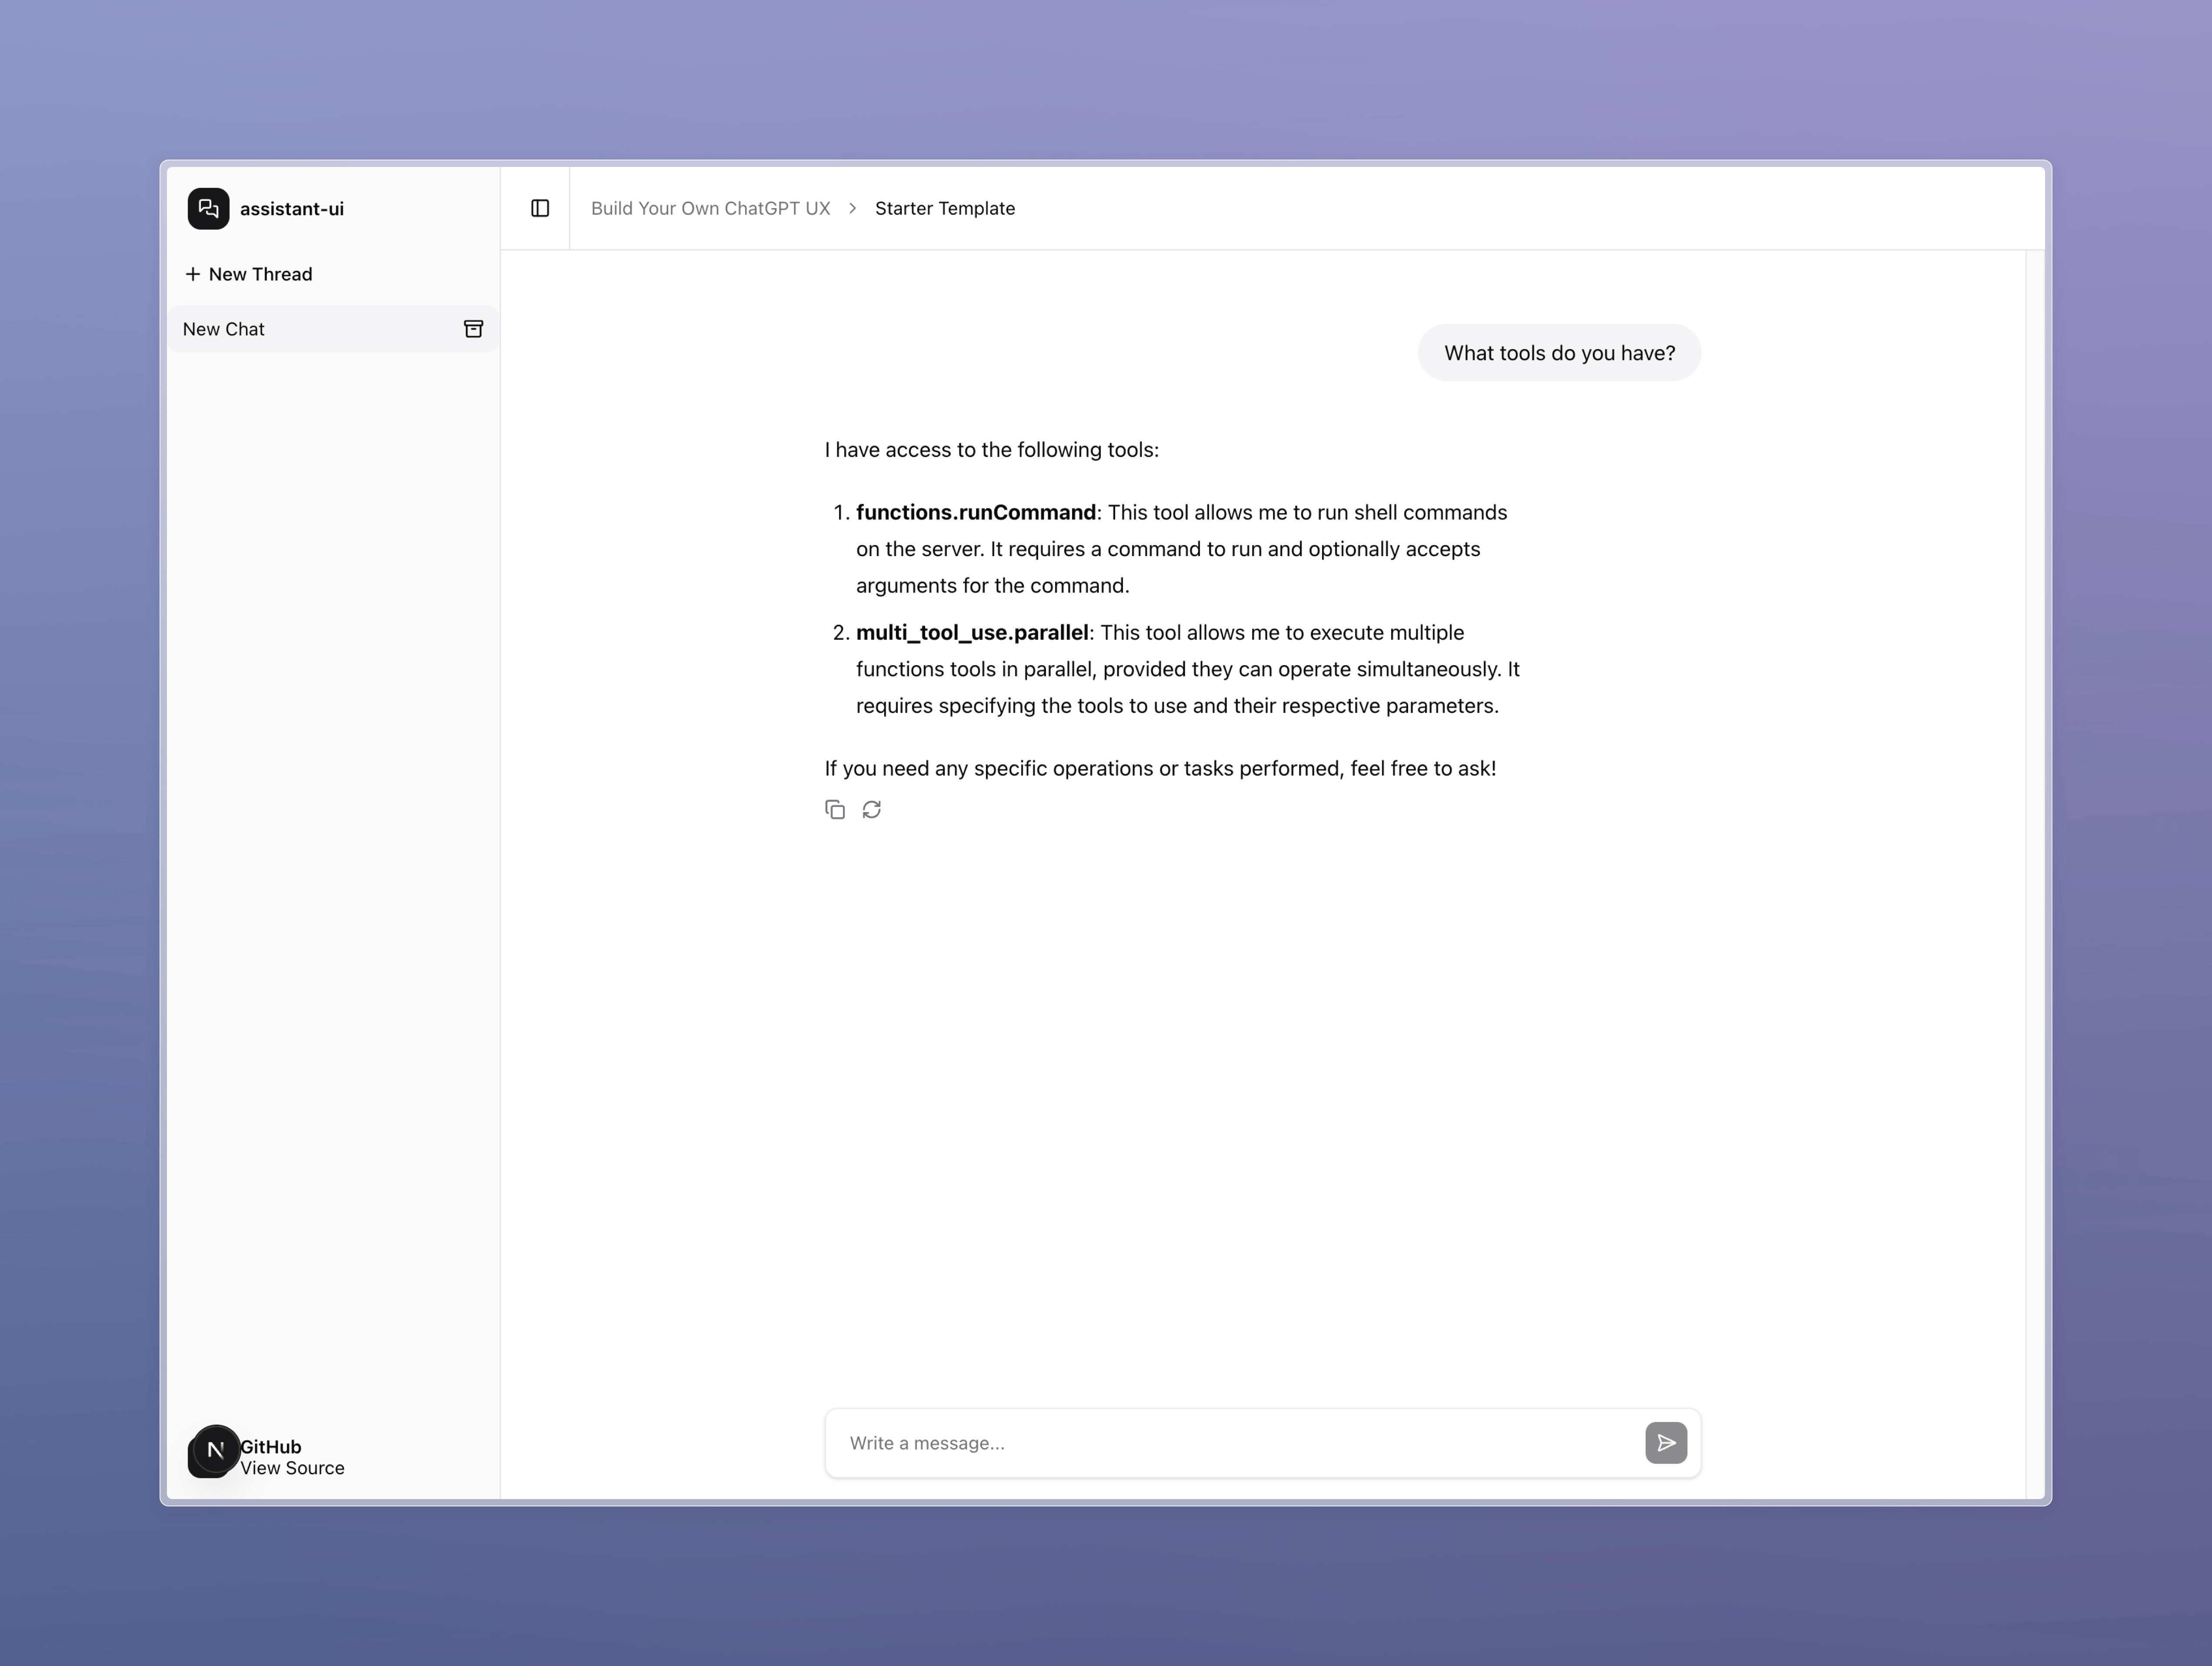
Our runCommand tool is already equipped to generate an elicitation request whenever it detects potentially dangerous commands (like rm). Now, it’s time to implement the handling of that elicitation request in our application.
In the execute method of app/api/chat/route.ts, we need to add:
// Set up elicitation handler to respond to tool confirmation requests from the server
await mcp.elicitation.onRequest(MCP_SERVER_NAME, async(request) => {
// Log the server's request and the schema it expects
console.log('Server request:', request);
await new Promise(resolve => setTimeout(resolve, 10_000));
// Respond to the elicitation request
// NOTE: The action must be one of 'accept', 'decline', or 'cancel' as per the MCP protocol
// Here, we always decline (for tutorial purposes)
return {
action: 'decline',
content: {
confirm: false, // Indicate that the dangerous command is NOT confirmed
},
};
});
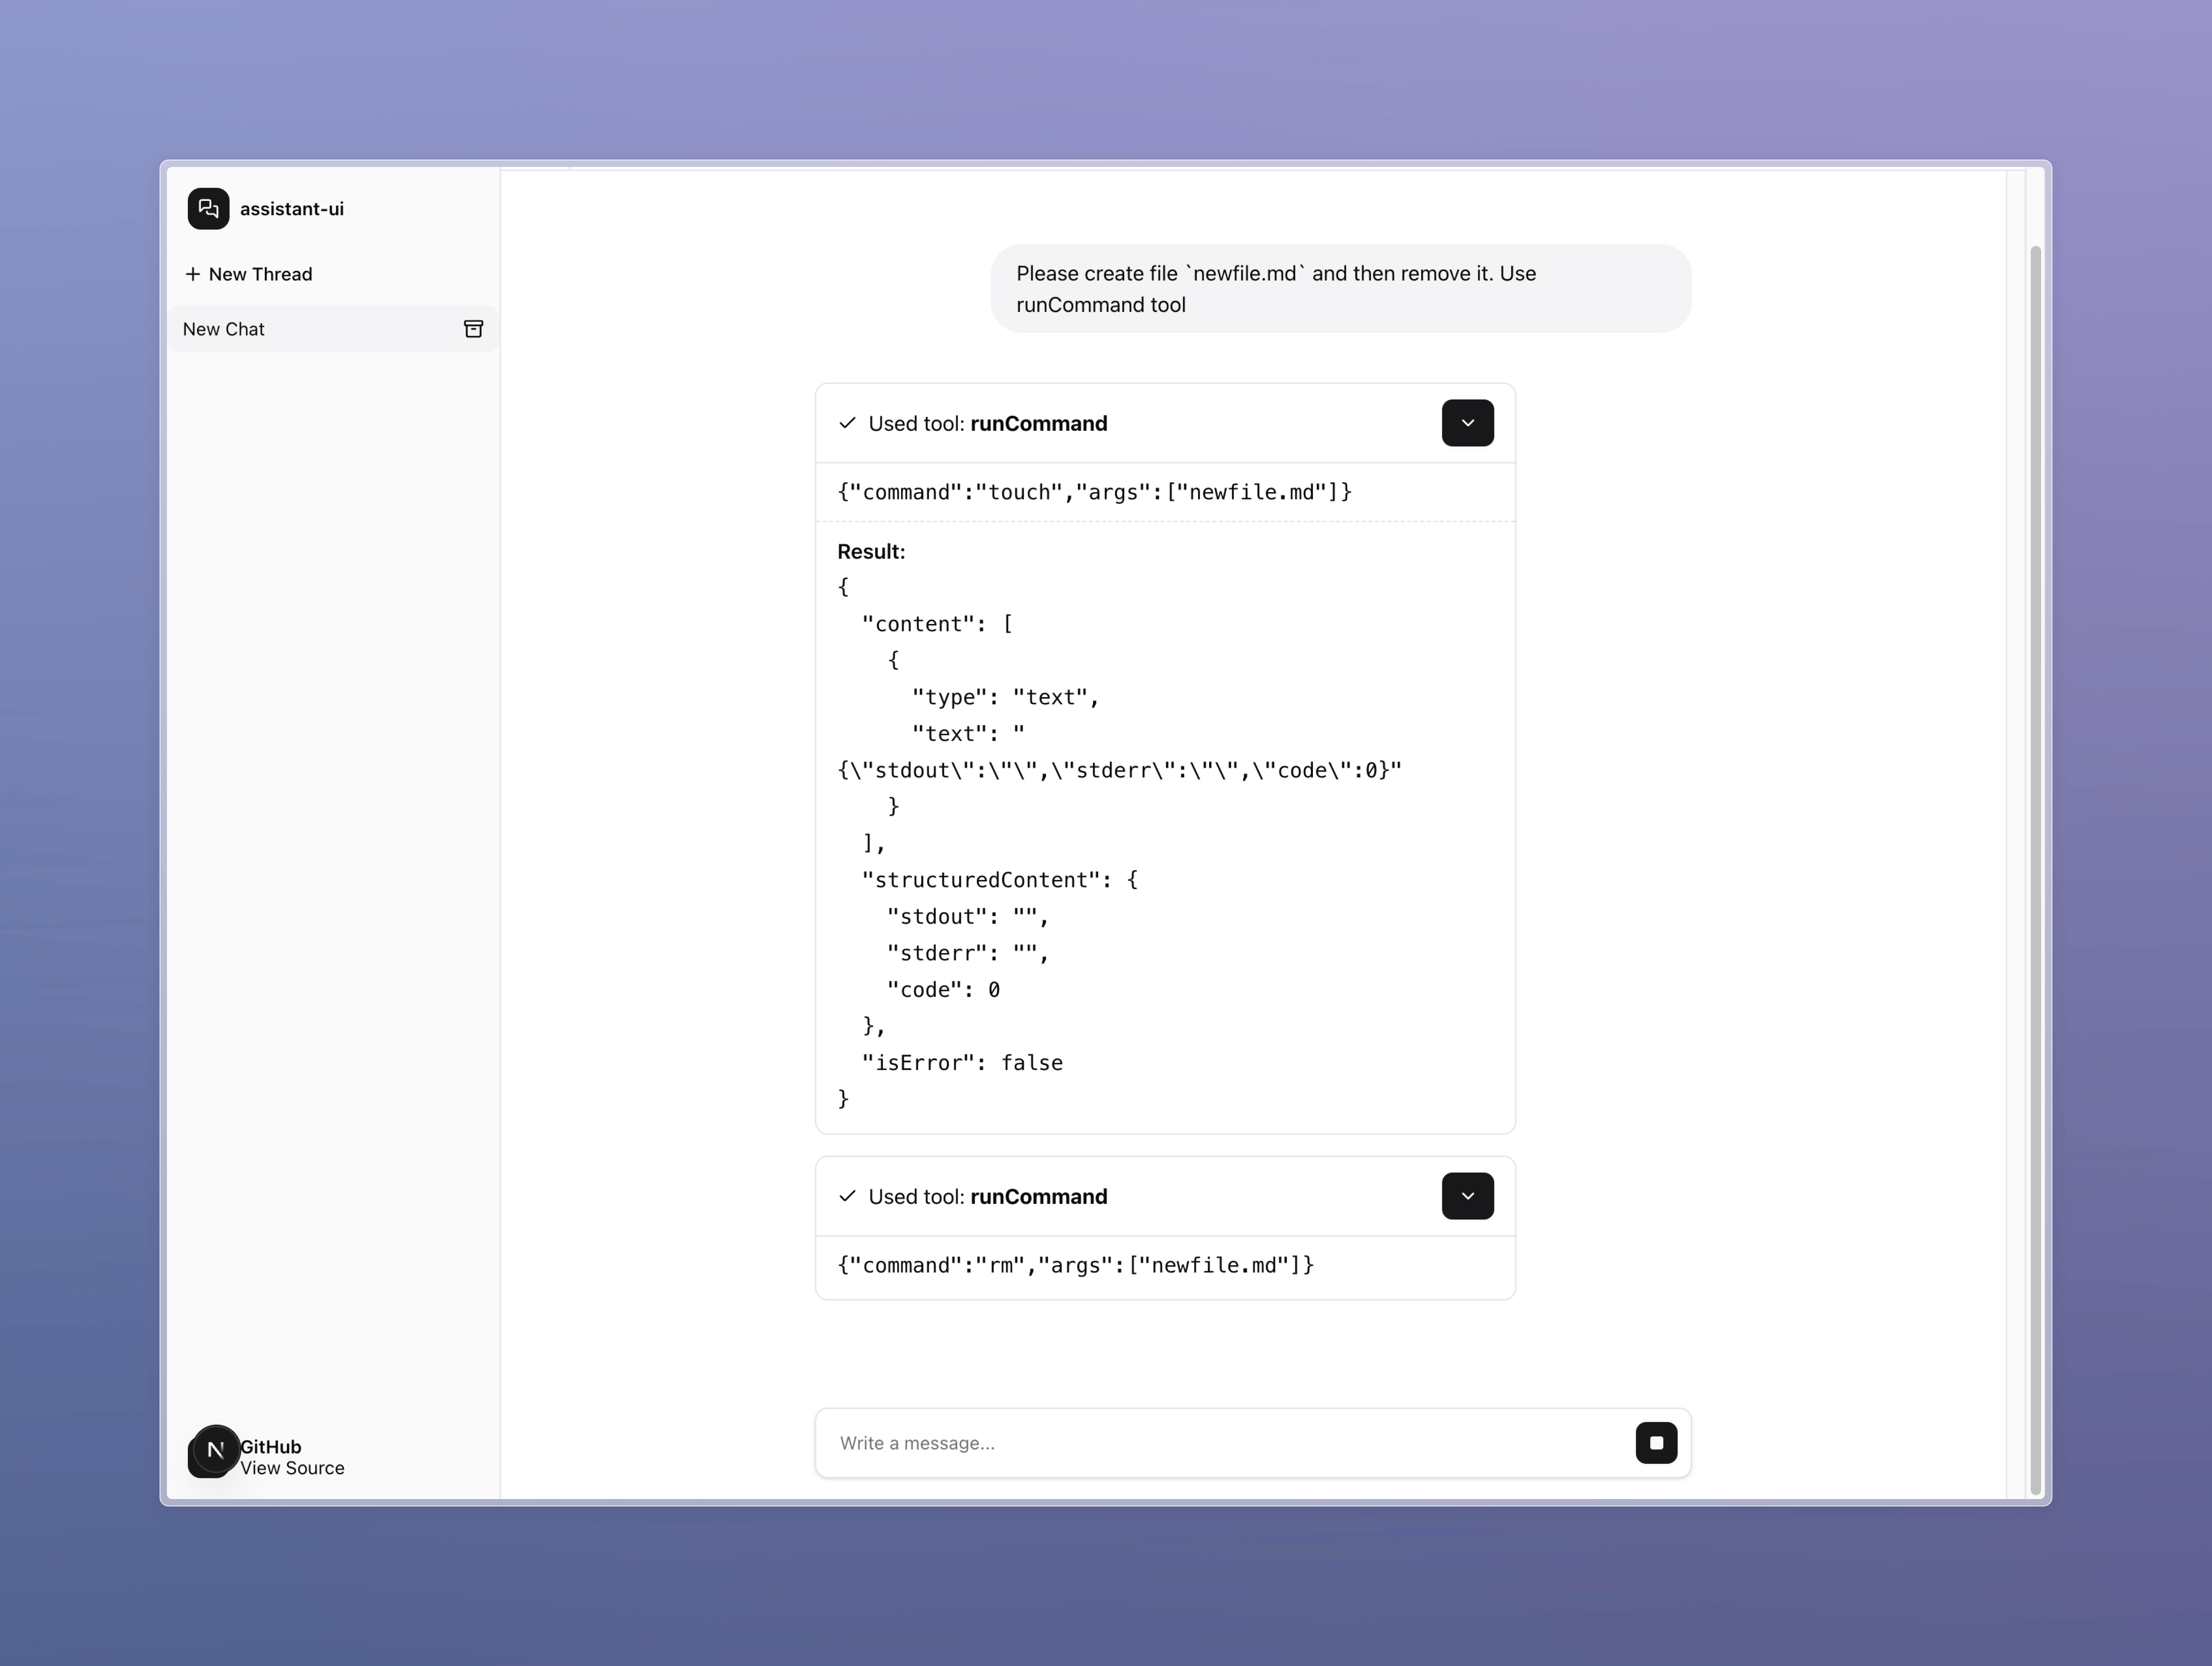
// existing codeHere, we subscribe to elicitation events coming from our MCP server and implement a 10-second wait before automatically rejecting the request.
We can now test whether the agent executes a safe command (such as creating a file), while it pauses for 10 seconds when faced with a dangerous command (like deleting a file). After this timeout period, it will indicate that the command was not allowed:
That approach works, but we now need to show the confirmation UI to the user. Unfortunately, it’s not quite that simple. HTTP streaming only allows data to flow in one direction — from the server to the client.
While the agent is busy responding, executing tools, and waiting for a reply from the MCP server, the frontend can’t send anything back over the same connection.
Because of this limitation, most frameworks require the current thread to be terminated when a tool prompts the user for confirmation. Once the user responds, a new request is sent to the agent, including the user input as the result of the tool. However, this method won't work for our case.
With MCP’s elicitation mechanism, the server is still expecting for a response from the backend via a Promise. The user’s confirmation isn’t considered the tool result — the real result will come later from MCP. If we close the thread, we risk losing the connection to MCP, causing its response to be dropped.
Therefore, we need to devise a custom workaround — something that steps outside the usual assistant-ui or AI SDK flow.
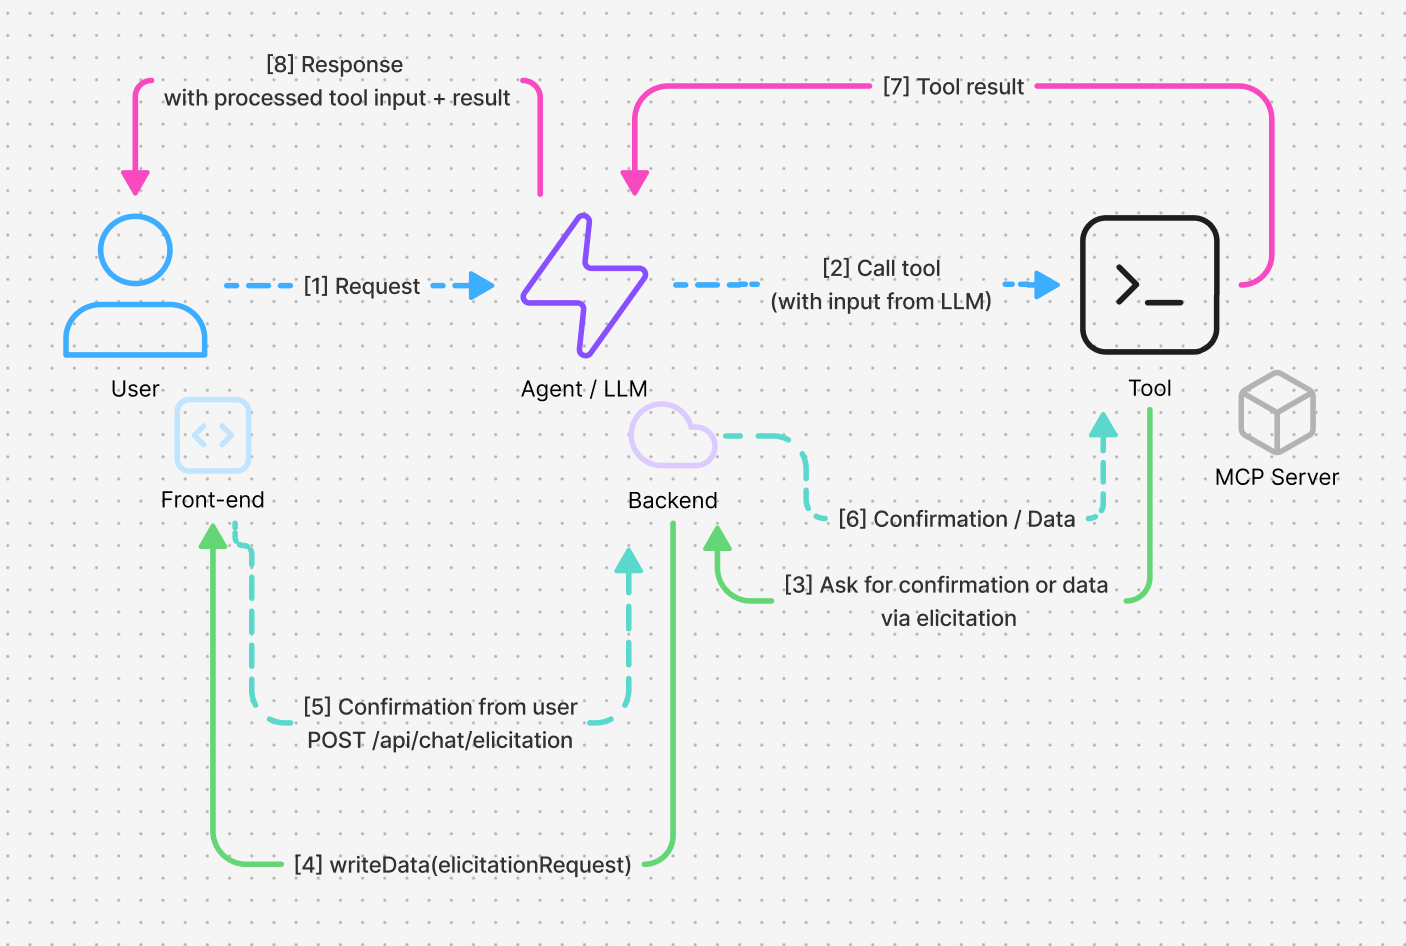
Here’s How I’m Solving It:
When an elicitation request comes in, the backend captures the request data within the current thread. On the frontend, I’ll create a generative UI tool that shows the status of the tool and, if necessary, renders confirmation buttons. When a user clicks one of those buttons, it will trigger a separate request to a dedicated backend endpoint. The backend will maintain a shared storage of elicitation Promises, so when a response comes in, it can resolve the right one and continue the original MCP execution smoothly.
Let's Get Started:
First, let's create a generative UI component for our Run Command tool: @/components/assistant-ui/run-command-tool.tsx
import { ToolCallContentPartComponent, useMessage } from '@assistant-ui/react';
import { useState } from 'react';

import type { JSONValue } from 'ai';

type ElicitationData = {
    type: 'elicitation';
    toolCallId: string;
    message: string;
    requestedSchema: JSONValue;
};

export const RunCommandTool: ToolCallContentPartComponent = ({
    toolCallId,
    status,
    args,
    result,
}) => {
    const elicitation = useMessage(
        m => (m.metadata.unstable_data as ElicitationData[])?.find(
            d => d.type === 'elicitation' && d.toolCallId === toolCallId
        )
    );
    const content = result?.structuredContent;
    const [isSubmitting, setIsSubmitting] = useState(false);
    const [submitResult, setSubmitResult] = useState<string | null>(null);
    const isRunning = status.type === 'running';

    function handleElicitationResponse(action: 'accept' | 'decline') {
        setIsSubmitting(true);
        setSubmitResult(null);

        fetch('/api/chat/elicitation', {
            method: 'POST',
            headers: { 'Content-Type': 'application/json' },
            body: JSON.stringify({
                toolCallId,
                action,
                content: {
                    confirm: action === 'accept',
                },
            }),
        }).then(async(res) => {
            const data = await res.json();

            setSubmitResult(data.success ? 'Submitted!' : 'Failed to submit');
        }).catch((err) => {
            setSubmitResult(`Error: ${ err.message }`);
        }).finally(() => {
            setIsSubmitting(false);
        });
    }

    return (
        <div className="flex flex-col gap-3 py-3 mb-4 w-full rounded-lg border">
            <div className="flex gap-2 items-center px-4">
                <code className="font-mono text-sm font-semibold">
                    { `${ args.command }${ (Array.isArray(args.args) && args.args.length > 0) ? ` ${ args.args.join(' ') }` : '' }` }
                </code>
            </div>

            {/* Elicitation while running, show button to accept or decline */}
            {(isRunning && elicitation != null) && (
                <div className="flex flex-col gap-2 px-4 pt-2 text-xs border-t border-dashed">
                    <pre className="whitespace-pre-wrap">
                        {elicitation.message}
                    </pre>
                    <div className="flex gap-2 mt-2">
                        <button
                            className="px-3 py-1 text-gray-800 bg-gray-200 rounded border border-gray-300 hover:bg-gray-300"
                            onClick={ () => handleElicitationResponse('accept') }
                            disabled={ isSubmitting }
                        >
                            Accept
                        </button>
                        <button
                            className="px-3 py-1 text-gray-800 bg-gray-200 rounded border border-gray-300 hover:bg-gray-300"
                            onClick={ () => handleElicitationResponse('decline') }
                            disabled={ isSubmitting }
                        >
                            Decline
                        </button>
                        {isSubmitting && <span className="ml-2">Submitting...</span>}
                        {submitResult && <span className="ml-2">{submitResult}</span>}
                    </div>
                </div>
            )}

            {/* Show the result of the tool call */}
            {content != null && (
                <div className="flex flex-col gap-2 px-4 pt-2 text-xs border-t border-dashed">
                    <pre className="whitespace-pre-wrap">
                        {typeof content === 'string'
                            ? content
                            : JSON.stringify(content, null, 2)}
                    </pre>
                </div>
            )}
        </div>
    );
};
In the component, we display the command and its result. If the current thread includes an active elicitation request, we also show Accept and Decline buttons. Selecting either option sends a separate request to our backend at /api/chat/elicitation.
Finally, we register the thread so that assistant-ui can make use of it: @/components/assistan-ui/thread.tsx
<MessagePrimitive.Content
    components={ {
        ...
        tools: {
            by_name: {
                runCommand: RunCommandTool,
            },
            Fallback: ToolFallback,
        },
    } }
/>
Now, let’s update our elicitation handler on the backend to pass the data through to the frontend:
@/app/api/chat/route.ts
import { addElicitation, rejectElicitation } from './elicitation/elicitationStore';

...
async execute(dataStream) {
  let currentToolCallId: string | null = null;

  // Set up elicitation handler to respond to tool confirmation requests from the server
  await mcp.elicitation.onRequest(MCP_SERVER_NAME, async(request) => {
      const toolCallId = currentToolCallId;

      if (!toolCallId) {
          throw new Error('No tool call ID found');
      }

      const { promise, resolve, reject } = Promise.withResolvers<{
          action: 'accept' | 'decline' | 'cancel';
          content: {
              confirm: boolean;
          };
      }>();

      // Store the resolver globally for cross-request resolution
      addElicitation(toolCallId, resolve, reject);

      // Cancel the elicitation request after 60 seconds
      const timeout = setTimeout(() => {
          rejectElicitation(toolCallId, 'Timeout: elicitation cancelled');
      }, 60_000);

      dataStream.writeData({
          type: 'elicitation',
          toolCallId: currentToolCallId,
          message: request.message,
          requestedSchema: typeof request.requestedSchema?.toJSON === 'function'
              ? request.requestedSchema.toJSON()
              : request.requestedSchema,
      });

      return promise.catch((err) => {
          return {
              action: 'cancel',
              content: {
                  error: err.message,
              },
          };
      }).finally(() => {
          clearTimeout(timeout);
      });
  });

  // Run the agent and stream its response to the client
  const agentStream = await agent.stream(messages, {
      system,
      toolsets: {
          ...(await mcp.getToolsets()),
      },
      // Add any client-side tools
      clientTools: frontendTools(tools),
      onChunk: ({ chunk }) => {
          // Track the current tool call ID
          if ('toolCallId' in chunk) {
              currentToolCallId = chunk.toolCallId;
          }
      },
  });

  // Merge the agent's output into the HTTP data stream
  agentStream.mergeIntoDataStream(dataStream);
}
I use the writeData method to send additional information that the Run Command tool component uses to show the Accept and Reject buttons.
Now, all that’s left is to add the confirmation handler on the backend: @/app/api/chat/elicitation/route.ts
import { resolveElicitation } from './elicitationStore';

export async function POST(req: Request) {
    const { toolCallId, action, content } = await req.json();
    const success = resolveElicitation(toolCallId, { action, content });

    return new Response(JSON.stringify({ success }), { status: 200 });
}
As well as a store for responsible for handling active elicitation requests:
@/app/api/chat/elicitation/elicitationStore.ts
type ElicitationResolver = (value: any) => void;
type ElicitationRejecter = (reason?: any) => void;

interface ElicitationEntry {
    resolve: ElicitationResolver;
    reject: ElicitationRejecter;
}

const elicitationMap = globalThis.elicitationMap || new Map<string, ElicitationEntry>();

if (!globalThis.elicitationMap) {
    globalThis.elicitationMap = elicitationMap;
}

export function addElicitation(toolCallId: string, resolve: ElicitationResolver, reject: ElicitationRejecter) {
    elicitationMap.set(toolCallId, { resolve, reject });
}

export function resolveElicitation(toolCallId: string, value: any) {
    const entry = elicitationMap.get(toolCallId);

    if (entry) {
        entry.resolve(value);
        elicitationMap.delete(toolCallId);

        return true;
    }

    return false;
}

export function rejectElicitation(toolCallId: string, reason?: any) {
    const entry = elicitationMap.get(toolCallId);

    if (entry) {
        entry.reject(reason);
        elicitationMap.delete(toolCallId);

        return true;
    }

    return false;
}
Keep in mind that in a real application, you may be running in an edge environment where this approach is not feasible, or your backend may span multiple threads — or even multiple servers. In those cases, you can't simply store Map of promises in memory; you'll need an external coordination layer such as Redis with pub/sub, or a dedicated WebSocket server. Still, the example above is sufficient for this article to illustrate the core concept.
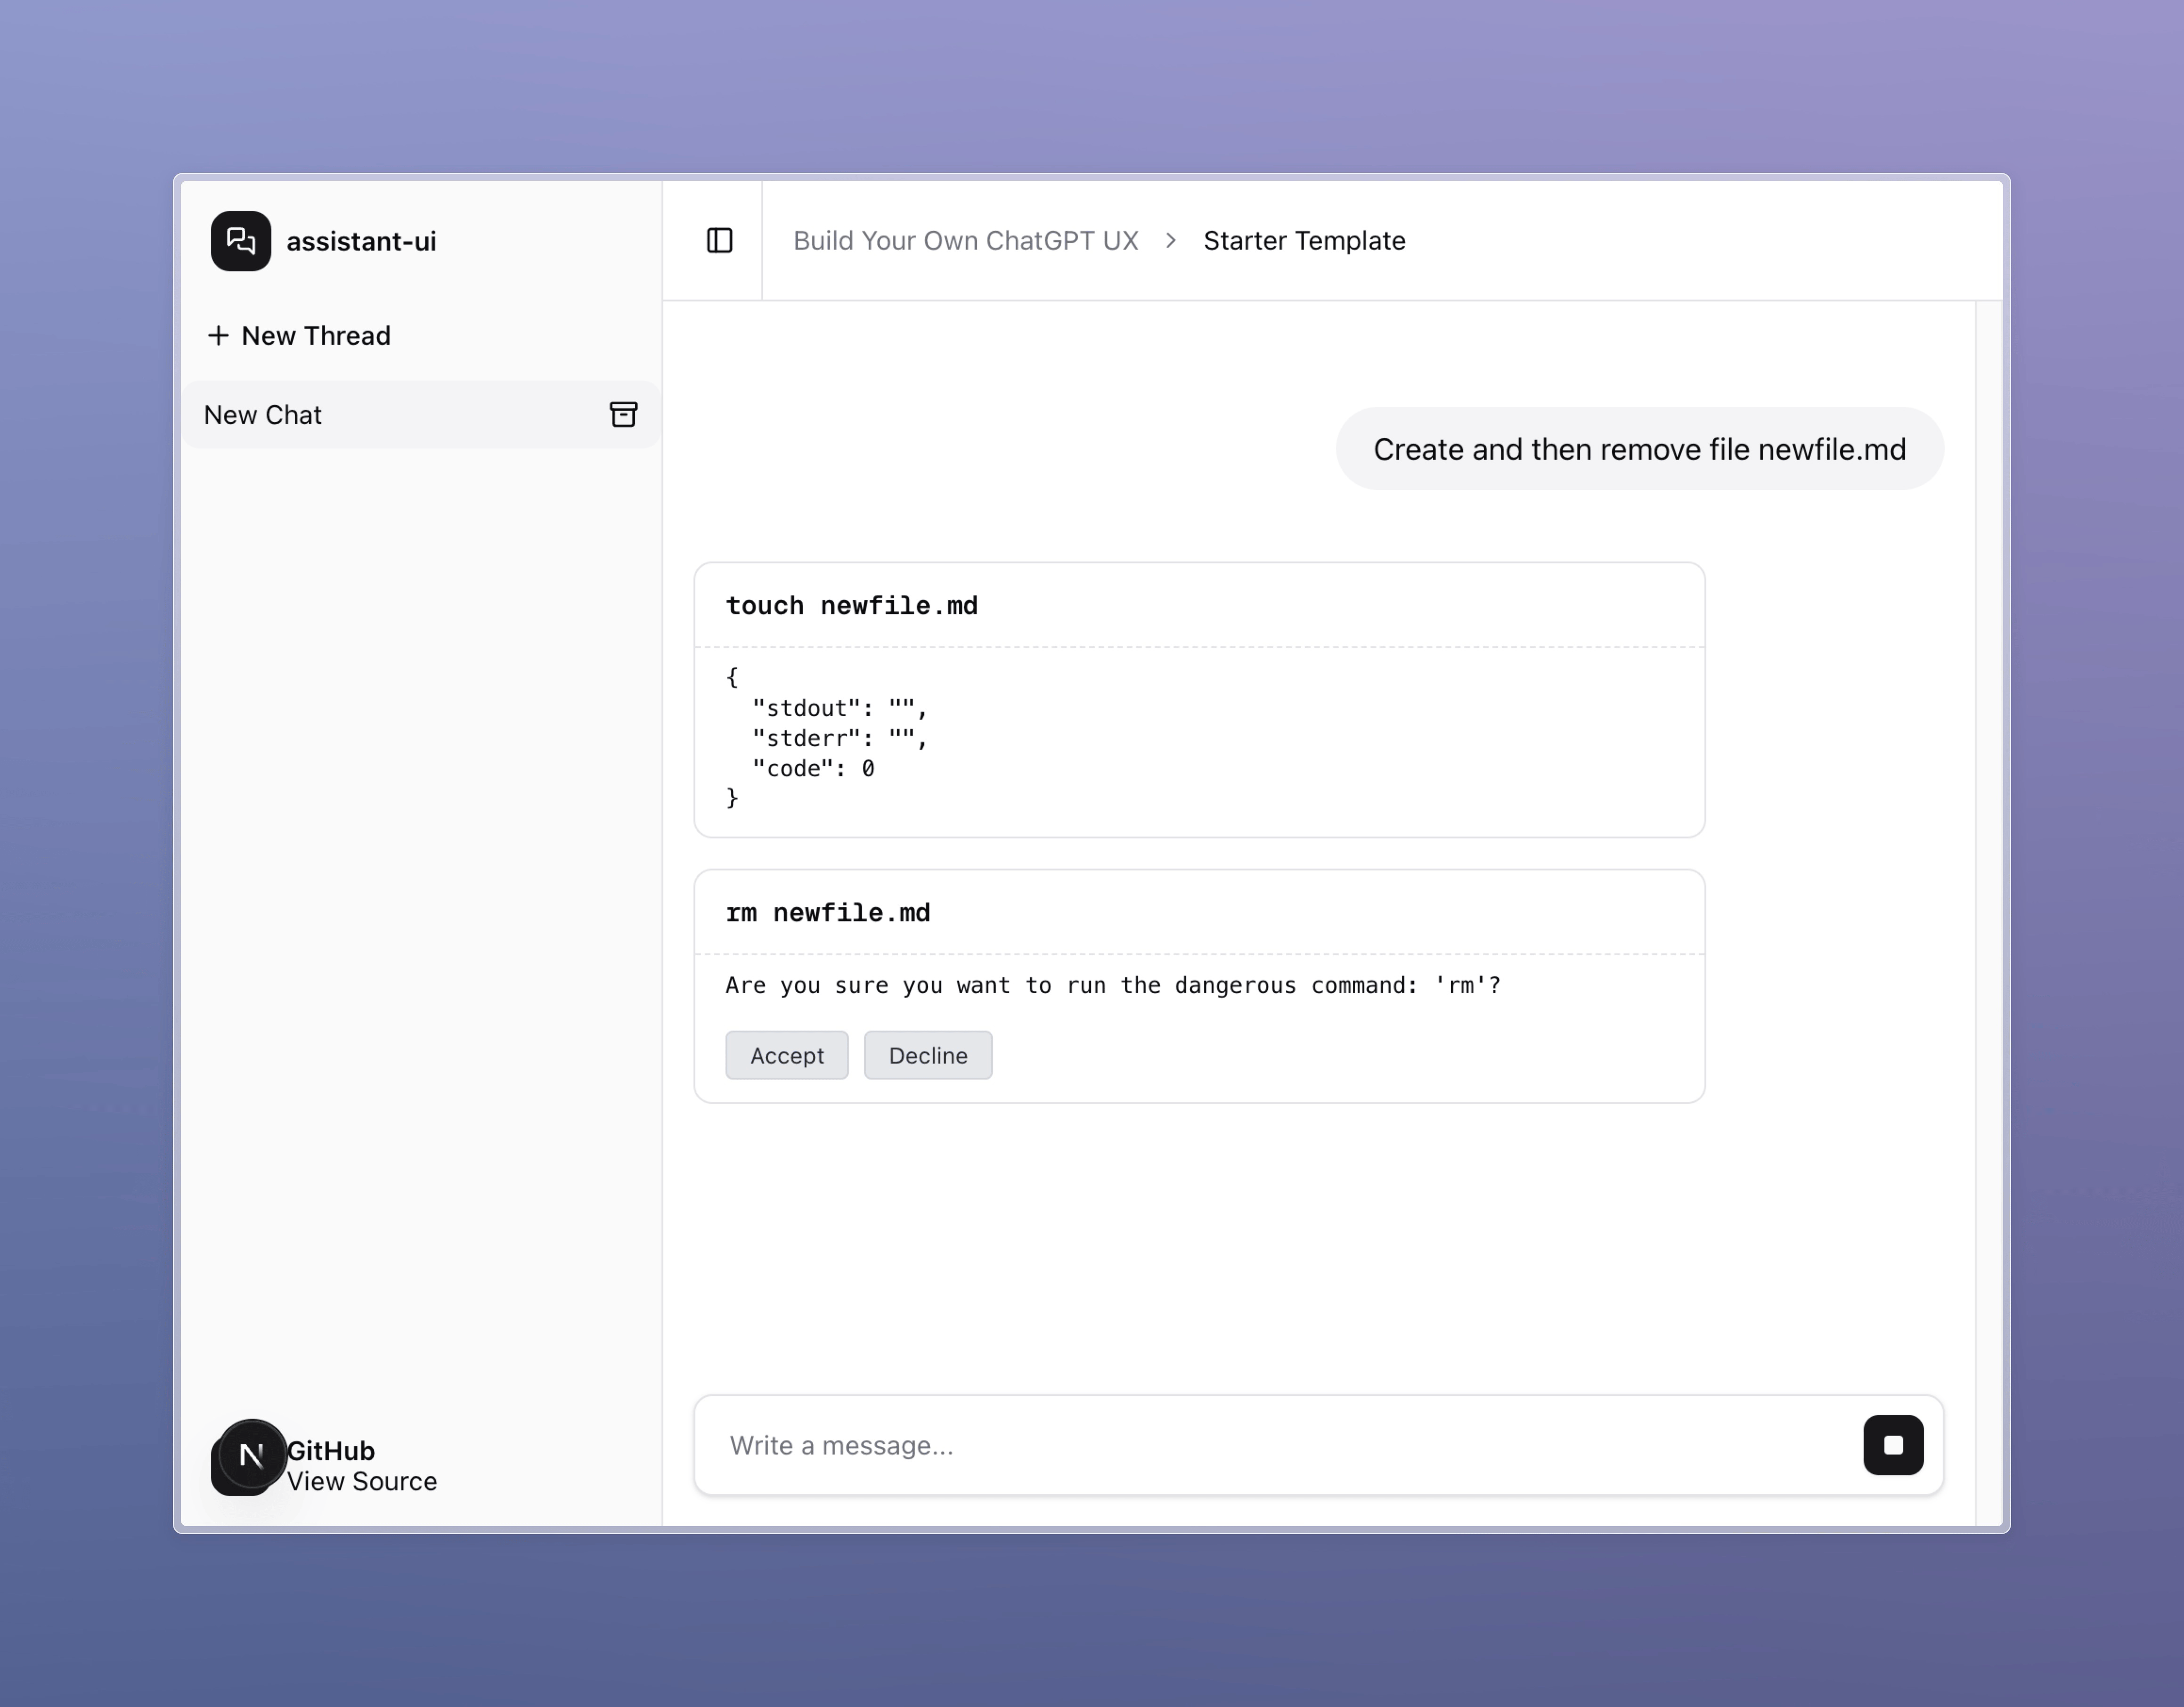
Here's the Result:
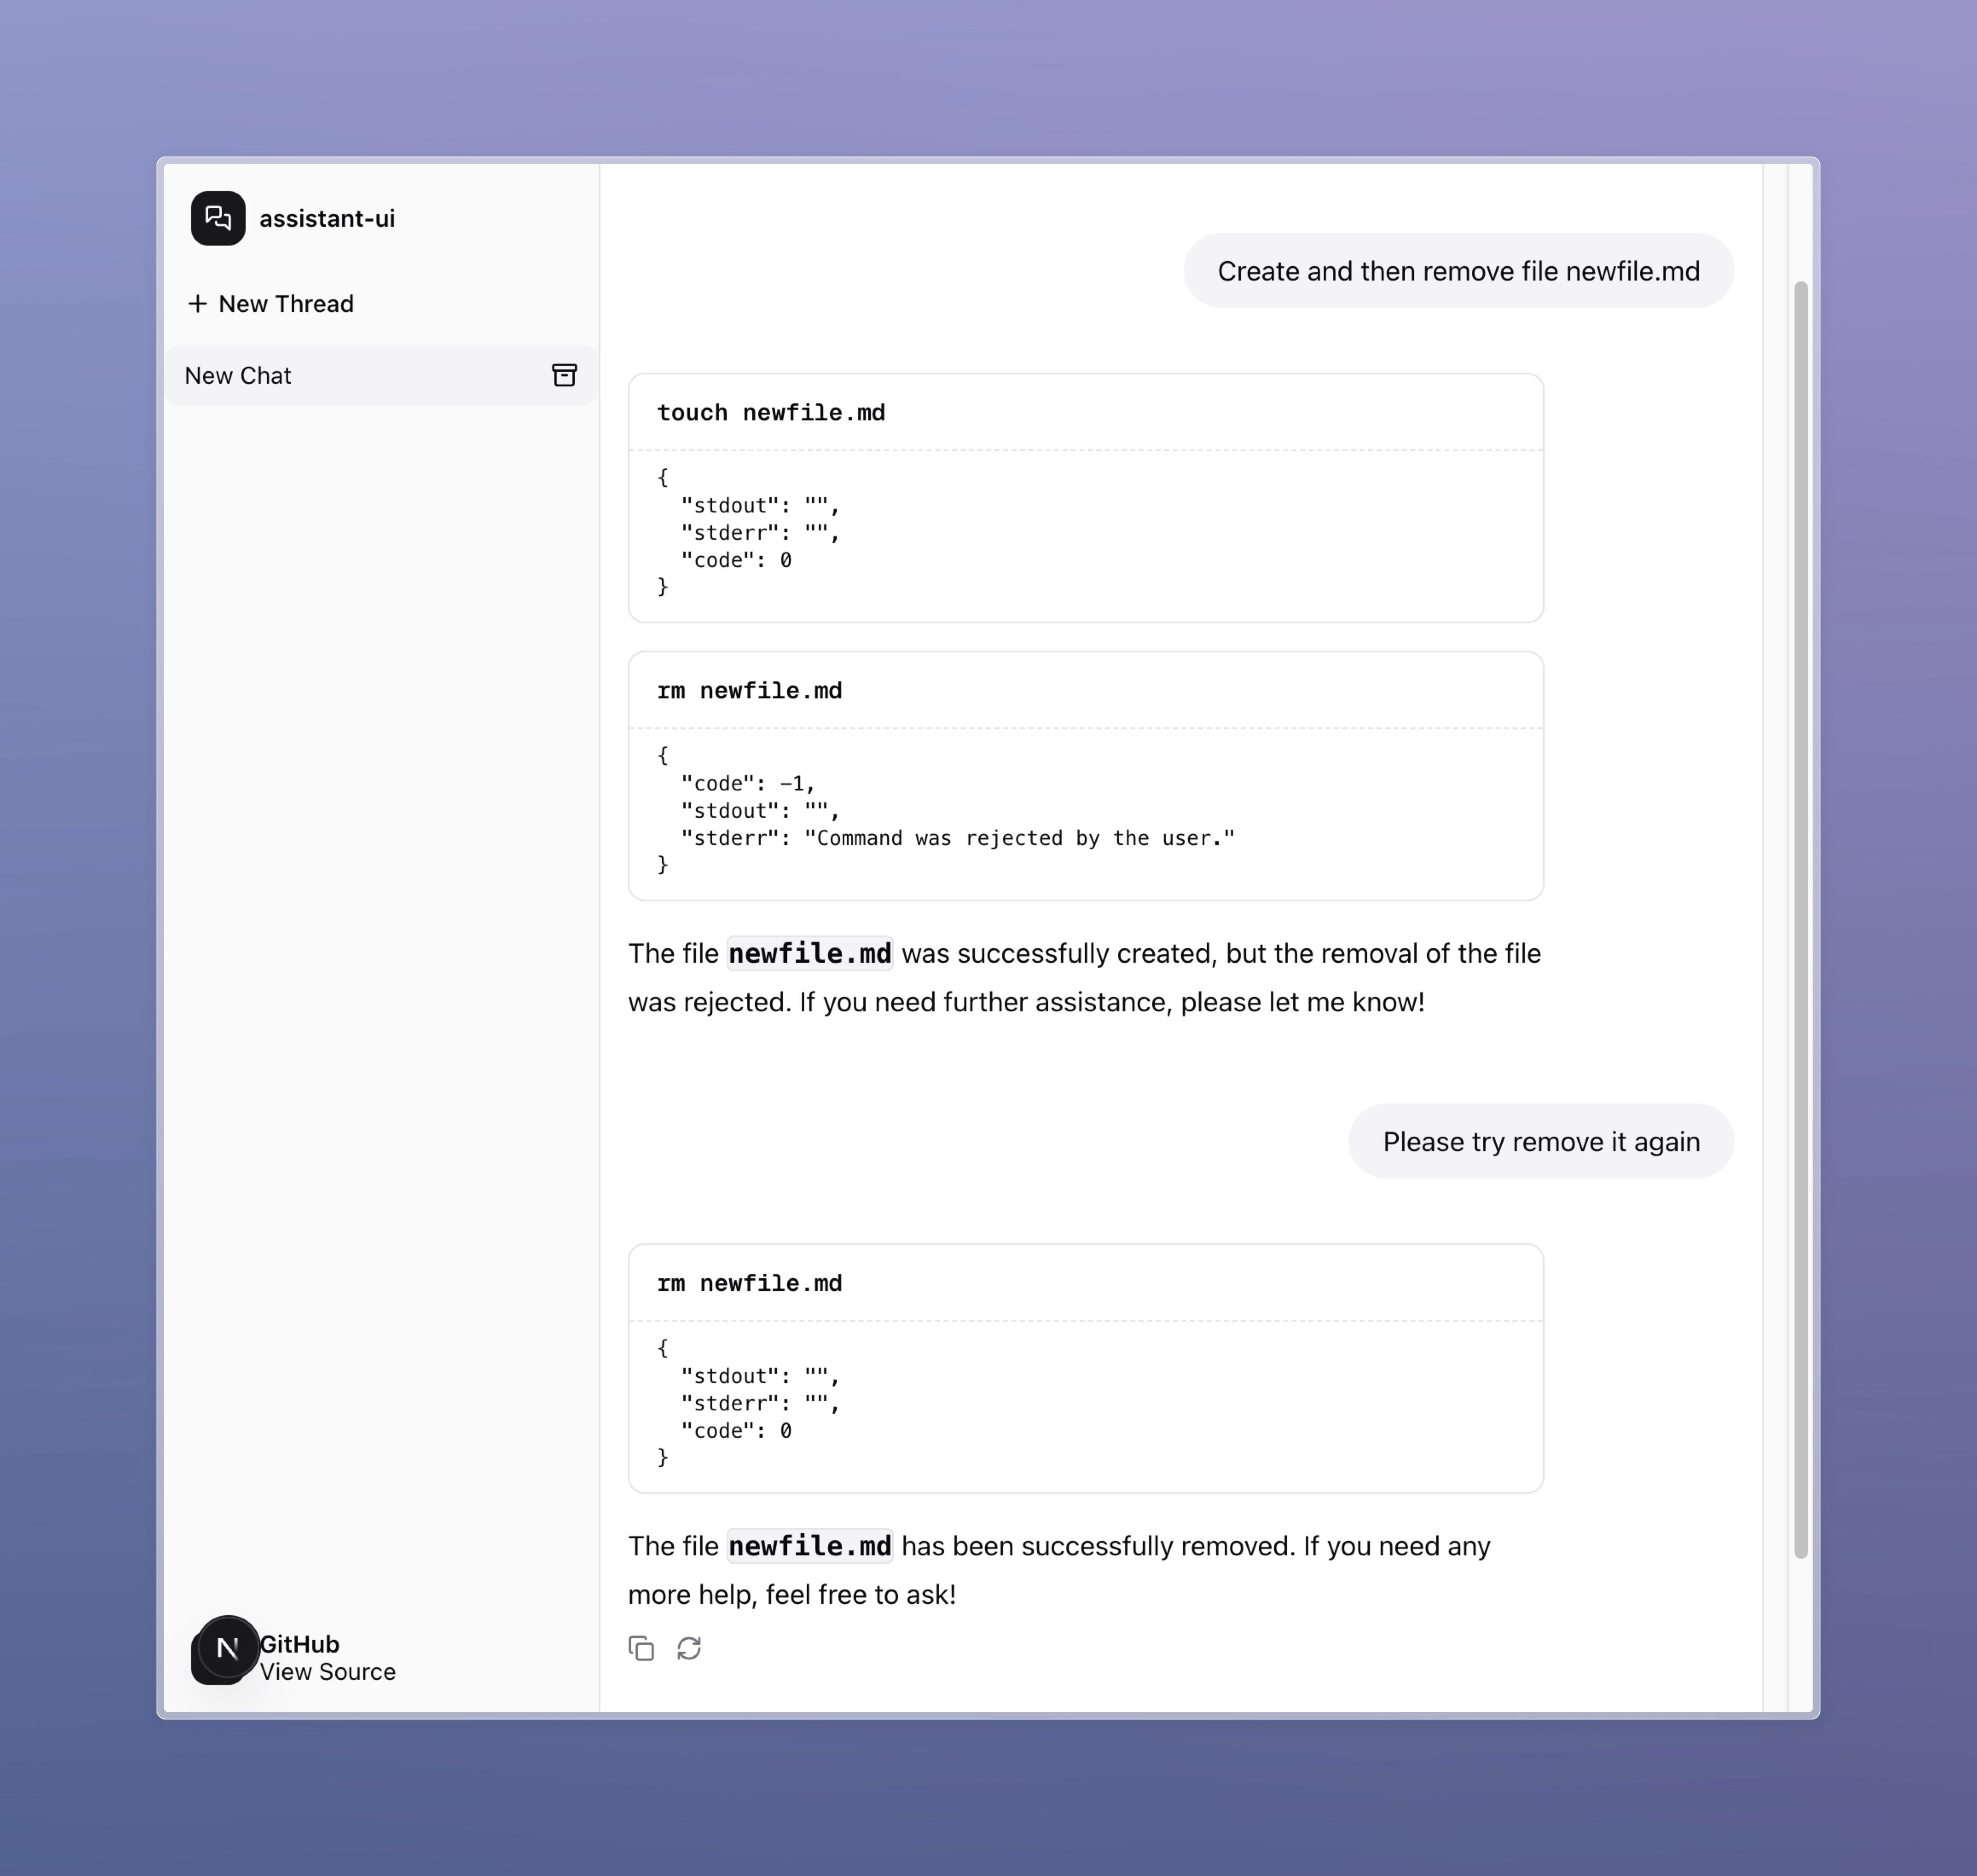
On the first request, I'm prompted to create and then immediately delete newfile.md. I click Decline, so the deletion is blocked. On the second attempt, I click Accept, and the file is successfully deleted.
Conclusion
Elicitation fills a critical gap in the LLM agent architecture — it brings real user interaction into the loop without breaking flow or context. With elicitation, MCP servers can do more than just respond — they can ask. That’s a significant shift.
Framework support is still limited, but it’s only a matter of time. Frontend tooling will catch up as well — and when it does, building rich, dynamic agent workflows will become far simpler.
You now have the core concepts. Go build something with it!
Opinions expressed by DZone contributors are their own.
Comments