Monitoring RabbitMQ with the ELK Stack and Logz.io Part One
A tutorial on monitoring RabbitMQ.
Join the DZone community and get the full member experience.
Join For Free
 RabbitMQ is an open-source message broker that was built to implement AMQP in 2007, and over the past twelve years has grown to include HTTP, STOMP, SMTP and other protocols via an ever-growing list of plugins. Currently, it’s the main competitor is Apache’s Kafka, which we have written about in the past:

Source: Google Trends
As with all things operations, a crucial part of ensuring that your messages arrive at their final destinations is to ensure that the broker and its components are all functioning correctly. To do this, I will be taking a look at how to send RabbitMQ’s logs and metrics into both the ELK Stack and Logz.io.
In the first part of this series, I’ll focus on building the RabbitMQ data pipeline.
Are you ready? Let’s get started!
Which Log(s)?
It’s important to know that starting with version 3.7.0, released 29 November 2017, RabbitMQ logs to a single log file. Prior to that, there were two log files. In this post, I’m using RabbitMQ version 3.7.9 – so the contents of one log file will be shipped to Elasticsearch. If you are using an earlier version of RabbitMQ, particularly older than 3.7.0, please refer to the documentation for additional information about the two different log files.
Additionally, for the current releases of RabbitMQ, you can specify where RabbitMQ will save its log file in rabbitmq.conf, which I’ll show as part of the setup.
Prerequisites
In order to follow along with this blog post you’ll need to have:
- A running ELK
- A running RabbitMQ cluster
- An application sending/consuming messages to/from the queue
If you do not have an existing environment and would still like to follow along, please follow the setup instructions below for CentOS 7 for both RabbitMQ and a demo app, courtesy of RabbitMQ. These setup steps are also scripted, with additional information / common issues, in this Github repo.
RabbitMQ Setup on CentOS 7
In order to run RabbitMQ on CentOS 7, you’ll need to have Erlang version 21.3+ or 22.0+ installed. Since this is more recent than what CentOS uses by default, you’ll need to create the following rabbitmq-erlang.repo file and put it in /etc/yum.repos.d:
[rabbitmq_erlang]
name=rabbitmq_erlang
baseurl=https://packagecloud.io/rabbitmq/erlang/el/7/$basearch
repo_gpgcheck=1
gpgcheck=0
enabled=1
gpgkey=https://packagecloud.io/rabbitmq/erlang/gpgkey sslverify=1
sslcacert=/etc/pki/tls/certs/ca-bundle.crt metadata_expire=300
[rabbitmq_erlang-source]
name=rabbitmq_erlang-source
baseurl=https://packagecloud.io/rabbitmq/erlang/el/7/SRPMS
repo_gpgcheck=1
gpgcheck=0
enabled=1
gpgkey=https://packagecloud.io/rabbitmq/erlang/gpgkey
sslverify=1 sslcacert=/etc/pki/tls/certs/ca-bundle.crt
metadata_expire=300
After you create the above file can you install Erlang along with the other dependencies / required packages:
sudo yum install -y epel-release socat logrotate erlang And finally, install and setup RabbitMQ itself, setting an administrator user and password:
wget
https://github.com/rabbitmq/rabbitmq-server/releases/download/v3.7.9/rabbitmq-server-3.7.9-1.el7.noarch.rpm
sudo rpm --import
https://www.rabbitmq.com/rabbitmq-signing-key-public.asc

sudo rpm -Uvh rabbitmq-server-3.7.9-1.el7.noarch.rpm

sudo systemctl start rabbitmq-server
sudo systemctl enable rabbitmq-server
ADMINUSER="rabbitadmin"
ADMINPASS="password"
sudo rabbitmq-plugins enable rabbitmq_management
sudo chown -R rabbitmq:rabbitmq /var/lib/rabbitmq/
sudo rabbitmqctl add_user ${ADMINUSER} ${ADMINPASS}
sudo rabbitmqctl set_user_tags ${ADMINUSER} administrator
sudo rabbitmqctl set_permissions -p / ${ADMINUSER} ".*" ".*" ".*"
Once RabbitMQ is installed you can check that your server is running by going to the instance IP address (or localhost) and port 15672:
http://[rabbitmq-instance-ip]:15672/ To configure the log level and logging file, make sure that the following values are set in /etc/rabbitmq/rabbitmq.conf:
/etc/rabbitmq/rabbitmq.conf:

log.dir = /var/log/rabbitmq
log.file = rabbit.log
log.file.level = info
If you need to change the rabbitmq.conf file makes sure to restart the rabbitmq-server process:
sudo service rabbitmq-server restart Demo Application Setup
In order to utilize the above RabbitMQ setup, I will be using RabbitMQ’s JMS Client Demo on Spring Boot App. This can be set up using the instructions in the README with either the Spring CLI or using a Java JAR file. I had success with the latter, using Java 8:
$ java -version openjdk version "1.8.0_212"
  OpenJDK Runtime Environment (build 1.8.0_212-b04)
  OpenJDK 64-Bit Server VM (build 25.212-b04, mixed mode) $ mvn clean
  package $ java -jar target/rabbit-jms-boot-demo-${VERSION}-SNAPSHOT.jar
(Note that mvn clean package is a chatty command, output not shown above for brevity.)
You’ll immediately see messages like the following in the queue:
$ java -jar target/rabbit-jms-boot-demo-1.2.0-SNAPSHOT.jar

  .   ____          _            __ _ _
 /\\ / ___'_ __ _ _(_)_ __  __ _ \ \ \ \
( ( )\___ | '_ | '_| | '_ \/ _` | \ \ \ \
 \\/  ___)| |_)| | | | | || (_| |  ) ) ) )
  '  |____| .__|_| |_|_| |_\__, | / / / /
 =========|_|==============|___/=/_/_/_/
 :: Spring Boot ::        (v1.5.8.RELEASE)

2019-07-23 03:18:24.210  INFO 57303 --- [           main] com.rabbitmq.jms.sample.StockQuoter      : Starting StockQuoter v1.2.0-SNAPSHOT on ip-172-31-90-202.ec2.internal with PID 57303 (/home/quintessence/code/rabbitmq-jms-client-spring-boot-trader-demo/target/rabbit-jms-boot-demo-1.2.0-SNAPSHOT.jar started by quintessence in /home/quintessence/code/rabbitmq-jms-client-spring-boot-trader-demo)
2019-07-23 03:18:24.213  INFO 57303 --- [           main] com.rabbitmq.jms.sample.StockQuoter      : No active profile set, falling back to default profiles: default
...
Suggestion: Use TMUX
If you would like to see the output of the demo app while setting up OSS ELK and/or configuring the relevant files, I recommend using TMUX which can be installed here:
sudo yum install tmux -y Ham Vocke has a nice TMUX tutorial, here. When setting up the demo environment for this post I used a named session and had different windows for the installation and setup of RabbitMQ as well as separate windows for tailing the Filebeat and Logstash logs and system messages.
Shipping the Log File to Elasticsearch
Now that you have a Rabbit and an ELK Stack, let’s ship some logs!
Shipping Configuration
In order to ship the logs into Elasticsearch, configure Filebeat (/etc/filebeat/filebeat.yml) to grab any files in the logging directory:
filebeat.inputs:

- type: log
  fields:
    log_type: rabbitmq-server
  paths:
    - /var/log/rabbitmq/*log
  fields_under_root: true
  encoding: utf-8
  ignore_older: 3h

registry_file: /var/lib/filebeat/registry

output:
  logstash:
    hosts: ["localhost:5044"]
I have the above example using a wildcard so that you can name your logging file however you choose. Alternatively, you can explicitly use the name you chose for your file.
In Logstash (/etc/logstash/conf.d/logstash.conf) I used a basic grok pattern to split out the timestamp, log level, and message from the original message and send the output to Elasticsearch, specifying the index. The complete logstash.conf file should look something like this:
input {
  beats {
    port => 5044
    host => "0.0.0.0"
  }
}
filter {
  grok {
    match => { "message" => ["%{TIMESTAMP_ISO8601:timestamp} \[%{LOGLEVEL:log_level}\] \<%{DATA:field_misc}\> %{GREEDYDATA:message}"] }
  }
}
output {
  elasticsearch {
      hosts => "localhost:9200"
      index => "%{[@metadata][beat]}-%{[@metadata][version]}-%{+YYYY.MM.dd}"
  }
}
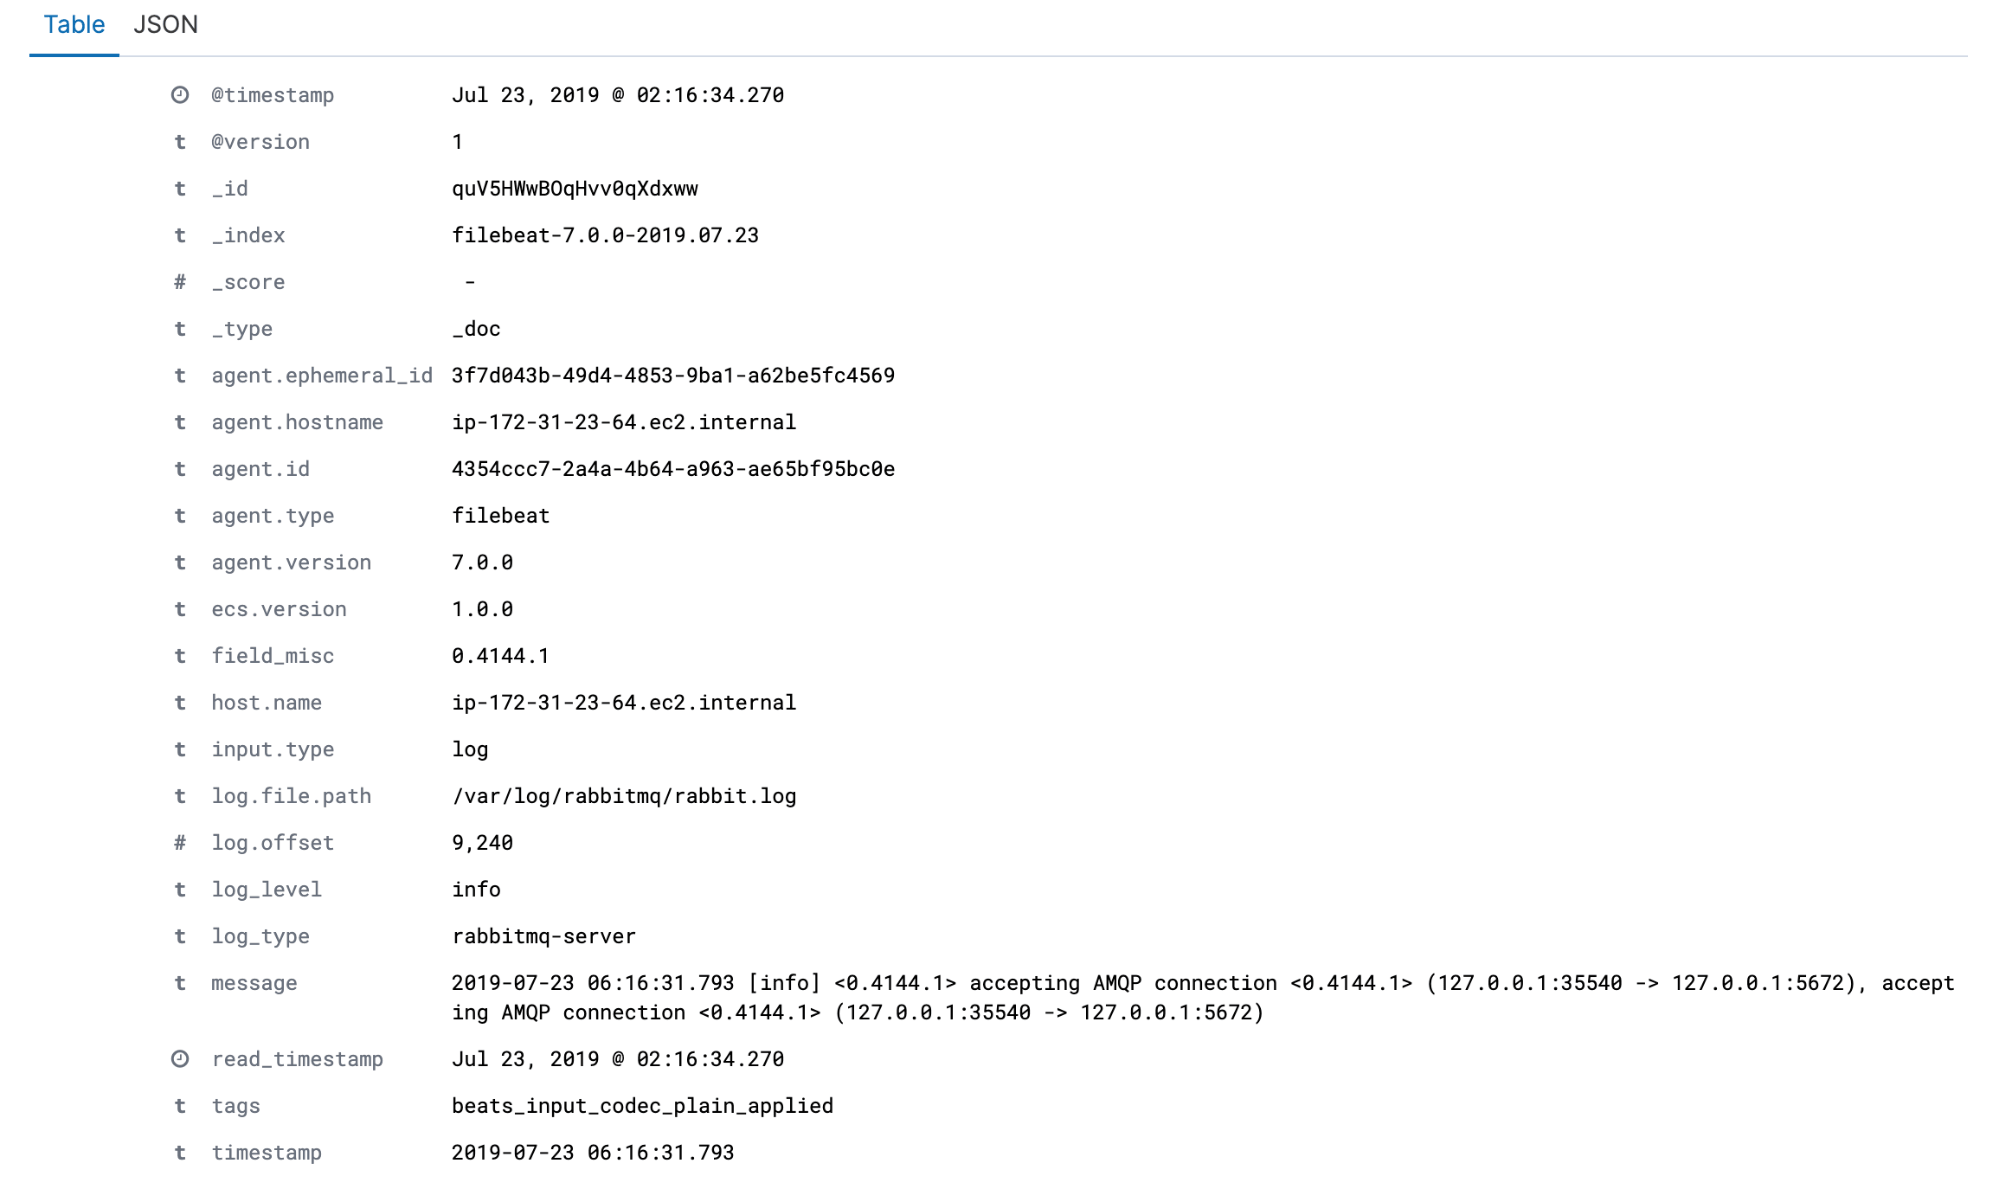
Once you restart the Logstash service, take a look in Kibana – you should see the logs appear:

Switching Over to Logz.io
Since I am still using Logstash to ship to the Logz.io platform, I’ll only need to make some adjustments to the Logstash configuration file. Specifically, I need to change the output to Logz.io and add a mutate statement to add my account token. The final file should look like:
input {
  beats {
    port => 5044
    host => "0.0.0.0"
  }
}
filter {
  grok {
    match => { "message" => ["%{TIMESTAMP_ISO8601:timestamp} \[%{LOGLEVEL:log_level}\] \<%{DATA:field_misc}\> %{GREEDYDATA:message}"] }
  }
  mutate {
    add_field => { "token" => "REPLACEWITHYOURTOKEN" }
  }
}
output {
  tcp {
      host => "listener.logz.io"
      port => 5050
     codec => json_lines
  }
}
As always, since the configuration file was edited make sure to restart Logstash service and verify the service is running:
sudo service logstash restart
sudo service logstash status
Now hop into the Logz.io platform, and let’s see those logs:
Shipping Metrics via Metricbeat
In addition to shipping the RabbitMQ logs, in order to fully monitor our RabbitMQ cluster we’ll need to monitor its overall health and status. Luckily, Metricbeat has a module that simplifies this process for us. Let’s set it up!
Configure Metricbeat to Ship Directly to Elasticsearch
In order to ship the logs directly to Elasticsearch, you’ll first need to enable the RabbitMQ module, like so:
sudo metricbeat modules enable rabbitmq You can verify that the RabbitMQ module is successfully enabled, and see a full list of modules, by using the list subcommand:
sudo metricbeat modules list Then, edit Metricbeat’s configuration file ( /etc/metricbeat/metricbeat.yml ) to include the RabbitMQ module configuration and set the output to Elasticsearch. A simple file should look roughly like this:
metricbeat.config.modules:
  path: ${path.config}/modules.d/*.yml
  reload.enabled: false

## RabbitMQ Module Configuration
metricbeat.modules:
- module: rabbitmq
  metricsets: ["node", "queue", "connection"]
  enabled: true
  period: 10s
  hosts: ["localhost:15672"]

setup.template.settings:
  index.number_of_shards: 1
  index.codec: best_compression
processors:
  - add_host_metadata: ~
  - add_cloud_metadata: ~

## Output Configuration
output.elasticsearch:
  hosts: ["localhost:9200"]
Once you have made the above changes, save the file and restart Metricbeat:
sudo service metricbeat restart
sudo service metricbeat status Configuring Kibana
In order to see the metrics in Kibana, you’ll need to add the index pattern. To do this, go to Management -> Index Patterns:
Then “Create index pattern”:

Then “Create index pattern”:

Since Metricbeat uses metricbeat as a prefix, you can use that to match your indices:

Set the timestamp:

And done:

When you go back to Kibana, select the Metricbeat index pattern:

Since my setup is currently shipping system and RabbitMQ metrics, I have filtered the dashboard for only where event.module is rabbitmq:

Configure Metricbeat to Ship to Logstash
Since we’re already shipping metrics, all we need to do here is change the endpoint from Elasticsearch to Logstash, like so:
metricbeat.config.modules:
  path: ${path.config}/modules.d/*.yml
  reload.enabled: false

## RabbitMQ Module Configuration
metricbeat.modules:
- module: rabbitmq
  metricsets: ["node", "queue", "connection"]
  enabled: true
  period: 10s
  hosts: ["localhost:15672"]

setup.template.settings:
  index.number_of_shards: 1
  index.codec: best_compression
processors:
  - add_host_metadata: ~
  - add_cloud_metadata: ~

## Output Configuration
output.logstash:
  hosts: ["localhost:5044"]
You’ll also need to make sure that your Logstash configuration file is shipping to your OSS Elasticsearch instance. As a reminder, the file should look similar to:
input {
  beats {
    port => 5044
    host => "0.0.0.0"
  }
}
filter {
  grok {
    match => { "message" => ["%{TIMESTAMP_ISO8601:timestamp} \[%{LOGLEVEL:log_level}\] \<%{DATA:field_misc}\> %{GREEDYDATA:message}"] }
  }
}
output {
  elasticsearch {
      hosts => "localhost:9200"
      index => "%{[@metadata][beat]}-%{[@metadata][version]}-%{+YYYY.MM.dd}"
  }
}
(Note that the grok statement isn’t required for metrics, but with this configuration, we’re still shipping the log entries from Filebeat.) Same as before, you will see the metrics in the Kibana UI:

Note that if you already have a functioning logstash.conf from the earlier sections, you do not need to make any changes to the configuration file to ship the metrics.
Configure Metricbeat to Ship to Logz.io
Similar to when we were only shipping logs in an earlier section, in order to ship to the Logz.io platform you’ll need to add in your token and change the endpoint to Logz.io. This should look similar to:
metricbeat.config.modules:
  path: ${path.config}/modules.d/*.yml
  reload.enabled: false

## RabbitMQ Module Configuration
metricbeat.modules:
- module: rabbitmq
  metricsets: ["node", "queue", "connection"]
  enabled: true
  period: 10s
  hosts: ["localhost:15672"]

setup.template.settings:
  index.number_of_shards: 1
  index.codec: best_compression
processors:
  - add_host_metadata: ~
  - add_cloud_metadata: ~

## Output Configuration
output.logstash:
  hosts: ["localhost:5044"]
Since I’m still shipping system and rabbitmq metrics, note that I filtered the output above to only show RabbitMQ metrics from Metricbeat.
Next Steps
Now that the RabbitMQ metrics are shipping into your platform of choice, you can create visualizations that will keep you apprised of all the relevant facts of your cluster, including how many nodes are up, how many system resources are being used, and so on. If you are using our platform, you can even set up alerts to let you know when too many nodes are offline or if the cluster is running out of memory.
Part two of this series will explore these and other analysis and visualization techniques so you can easily query data and create beautiful dashboards.
Interested in learning more? Reach out to our support team using the Intercom button to the lower right of the page and let us know!
Published at DZone with permission of Quintessence Anx. See the original article here.
Opinions expressed by DZone contributors are their own.
Comments