MQTT Client Load Balancing With RabbitMQ and Spring Cloud
Expand your knowledge of MQTT Client and load balancing.
Join the DZone community and get the full member experience.
Join For FreeIntroduction
MQTT is a machine-to-machine (M2M), IoT connectivity protocol. It was designed as an extremely lightweight publish and subscribe messaging transport. It is useful for connections with remote locations where a small code footprint is required and/or network bandwidth is at a premium.
Each MQTT client subscribes to certain topics and receives messages when the publisher starts pushing messages on those topics.
How to Scale Out?
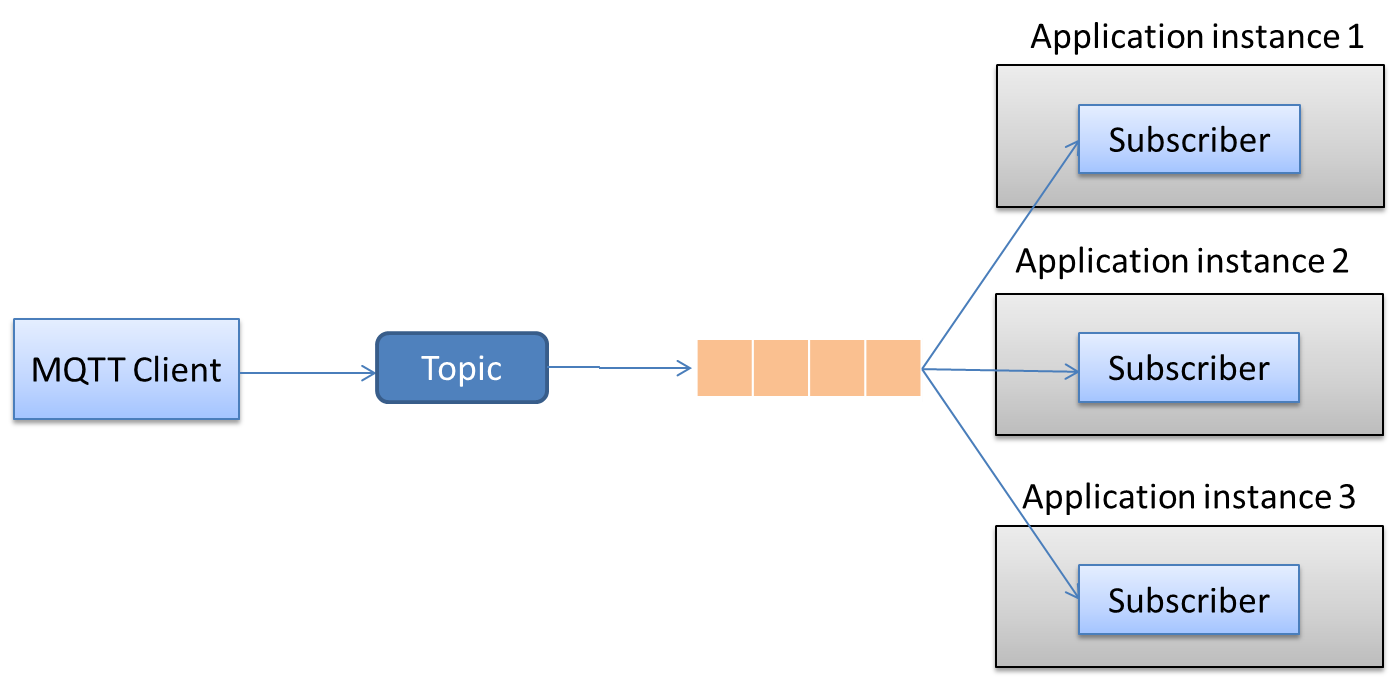
The purpose of horizontal scaling is to distribute the load between multiple instances of the same application. If the MQTT clients in those instances are subscribed to the same topic, then the same MQTT message will be delivered to each instance, which is not the desired behavior.

Competing Consumers
Spring Cloud Stream defines the concept of "Consumer Groups" as the following:
"While the publish-subscribe model makes it easy to connect applications through shared topics, the ability to scale up by creating multiple instances of a given application is equally important. When doing so, different instances of an application are placed in a competing consumer relationship, where only one of the instances is expected to handle a given message."
Based on this definition, Spring Cloud Stream allows distributing the load for a topic across multiple clients, as shown in the next figure.
Example
In this example, an MQTT client will publish messages to one topic in RabbitMQ, and multiple consumers will share the messages of that topic.
Install RabbitMQ and MQTT Plugin
First, we will run an instance of RabbitMQ using a Docker image. Then, we will install the MQTT plugin.
> docker run -d --hostname vs29 --name vs29 -p 8081:15672 -p 5672:5672 -p 1883:1883 rabbitmq:3-management
Now, let's check the startup logs of that container:
>docker ps
CONTAINER ID        IMAGE                     COMMAND                  CREATED             STATUS              PORTS                                                                                                               NAMES
fbd443154bf6        rabbitmq:3-management     "docker-entrypoint.s…"   6 seconds ago       Up 2 seconds        4369/tcp, 0.0.0.0:1883->1883/tcp, 5671/tcp, 15671/tcp, 0.0.0.0:5672->5672/tcp, 25672/tcp, 0.0.0.0:8081->15672/tcp   vs29

>docker logs fbd443154bf6 -f
....
....
...

2019-02-03 07:34:16.709 [info] <0.198.0>
node : rabbit@vs29
home dir : /var/lib/rabbitmq
config file(s) : /etc/rabbitmq/rabbitmq.conf
cookie hash : O+z+vUDvSh3J1vK/lV08Xw==
log(s) : <stdout>
database dir : /var/lib/rabbitmq/mnesia/rabbit@vs29
The last few lines of the log indicate that the server is read now. Now, let's install the MQTT plugin:
Navigate to the container first:
> docker exec -u 0 -it fbd443154bf6 /bin/bash

Enable the plugin now:
root@vs29:/#rabbitmq-plugins enable rabbitmq_mqtt
Add New User in RabbitMQ
Let's add a new user in RabbitMQ using the administration UI. Open the URL http://RabbitMQhost:8081/ then navigate to the tab 'Admin' (the default credentials in RabbitMQ is guest/guest).
To create a new user:
- Add the user name in the field 'Username.' Then, let's add the user 'client1.' Set the password in the field 'Password', let's set the password to 'client1'
- Click on 'Add user'
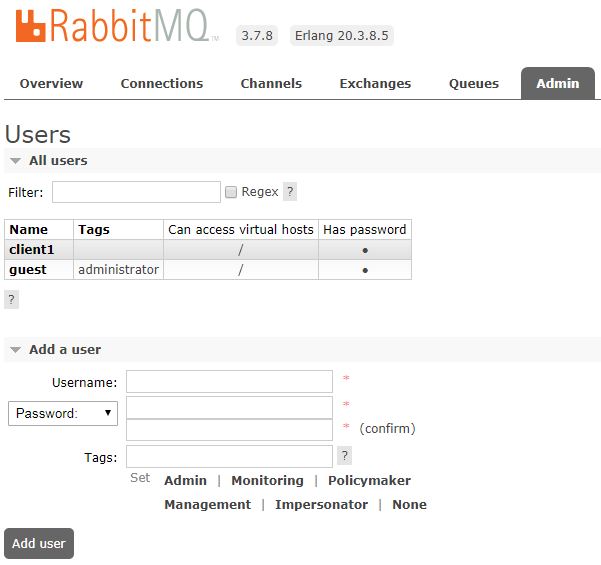
- The default user has no access to any virtual host. Click on 'client1' to edit the permissions of this user. In the new page, click on 'Set Permissions' to give the user access to all virtual hosts.
- To verify that everything is working fine, use an MQTT client to push data to our new server. In this tutorial, we will use the commands 'mosquitto_pub' and 'mosquitto_sub' that are provided by the Mosquitto server. First, let's subscribe to all topics in the server. Second, we will push some data to the server.
..>mosquitto_pub -h xxx.xxx.xxx.xxx -t /my/topic -m "Hello World" -u client1 -P client1 -p 1883..>mosquitto_sub -h xxx.xxx.xxx.xxx -t "#" -u client1 -P client1
Hello WorldIf everything goes fine, you should receive 'Hello World'
Create the Message Receiver Service
The objective of this tutorial is to distribute the load between multiple instances of the same application. So, let's create a simple service to consume messages using Spring Boot and Spring Cloud Stream.
- Create a new Spring Boot project. You can use an IDE or Spring Initializer
- Adjust your mvn file to include the following contents :
<parent>
<groupId>org.springframework.boot</groupId>
<artifactId>spring-boot-starter-parent</artifactId>
<version>2.1.2.RELEASE</version>
<relativePath/> <!-- lookup parent from repository -->
</parent>

<properties>
<java.version>1.8</java.version>
<spring-cloud.version>Greenwich.RELEASE</spring-cloud.version>
</properties>

<dependencies>
<dependency>
<groupId>org.springframework.boot</groupId>
<artifactId>spring-boot-starter-amqp</artifactId>
</dependency>
<dependency>
<groupId>org.springframework.cloud</groupId>
<artifactId>spring-cloud-stream</artifactId>
</dependency>
<dependency>
<groupId>org.springframework.cloud</groupId>
<artifactId>spring-cloud-stream-binder-rabbit</artifactId>
</dependency>

<dependency>
<groupId>org.springframework.boot</groupId>
<artifactId>spring-boot-starter-test</artifactId>
<scope>test</scope>
</dependency>
<dependency>
<groupId>org.springframework.cloud</groupId>
<artifactId>spring-cloud-stream-test-support</artifactId>
<scope>test</scope>
</dependency>
</dependencies>

<dependencyManagement>
<dependencies>
<dependency>
<groupId>org.springframework.cloud</groupId>
<artifactId>spring-cloud-dependencies</artifactId>
<version>${spring-cloud.version}</version>
<type>pom</type>
<scope>import</scope>
</dependency>
</dependencies>
</dependencyManagement>

<build>
<plugins>
<plugin>
<groupId>org.springframework.boot</groupId>
<artifactId>spring-boot-maven-plugin</artifactId>
</plugin>
</plugins>
</build>

<repositories>
<repository>
<id>spring-milestones</id>
<name>Spring Milestones</name>
<url>https://repo.spring.io/milestone</url>
</repository>
</repositories>
Now, let's add our Stream Listener:
import org.springframework.cloud.stream.annotation.EnableBinding;
import org.springframework.cloud.stream.annotation.Input;
import org.springframework.cloud.stream.annotation.StreamListener;
import org.springframework.messaging.SubscribableChannel;

@EnableBinding(MessageSink.InputChannel.class)
public class MessageSink {

    @StreamListener(InputChannel.SINK)
    public void handle(String message) {
System.out.println("new message:" + message + ", from worker :" + Thread.currentThread().getName());
        try {
            Thread.sleep(5000);
        } catch (InterruptedException e) {
            e.printStackTrace();
        }
    }

    public interface InputChannel {
        String SINK = "message-sink";

        @Input(SINK)
        SubscribableChannel sink();
    }
}
The next step is to define and configure our Channel (which is the most important part of this tutorial). The configuration will be added in the file application.yml:
spring:
  cloud:
    stream:
      bindings:
        message-sink :
         destination: amq.topic
         binder: rabbit
         group: messages-consumer-group
         consumer :
           concurrency: 1
      rabbit:
        bindings:
          message-sink:
            consumer:
              durableSubscription: true
              declareExchange: true
              exchangeDurable: true
              exchangeType: topic
              queueNameGroupOnly: true
  rabbitmq:
    host: xxx.xxx.xxx.xxx
    password: client1
    username: client1
Let's discuss the important configuration in the application.yml:
- destination: amq.topic is the default Exchange used by the MQTT Plugin, so we need to subscribe to it.
- group: As per Spring Cloud Documents, 'All groups that subscribe to a given destination receive a copy of published data, but only one member of each group receives a given message from that destination'
- consumer.concurrency: The maximum number of threads that can be used to process the received messages in this consumer. We modify this number to any positive value and the concept of 'grouped consumers' is still applied.
- queueNameGroupOnly: As per Spring Cloud Documents, 'When true, consume from a queue with a name equal to the
group. Otherwise, the queue name isdestination.group. This is useful, for example, when using Spring Cloud Stream to consume from an existing RabbitMQ queue.' Indeed, this is a very important configuration. Omitting this property will lead to many errors when starting the service because Spring will generate a queue name that starts with 'amq,' which is not allowed by RabbitMQ. You get more details in this thread
Verify Load Distribution
Let's start two instances of the service and push some data using the MQTT client. First, open a command Shell window, navigate to your project source, and build the project using the command
>mvn clean compile packageSecond, open two command Shell window, navigate to your project folder, and start the service using the command
>java -jar target\balanced_mqtt_client-0.0.1-SNAPSHOT.jarNow, we will push some data from the MQTT client :
>mosquitto_pub -h xxx.xxx.xxx.xxx -t /my/topic -m "message 1" -u client1 -P client1 -p 1883

>mosquitto_pub -h xxx.xxx.xxx.xxx -t /my/topic -m "message 2" -u client1 -P client1 -p 1883

>mosquitto_pub -h xxx.xxx.xxx.xxx -t /my/topic -m "message 3" -u client1 -P client1 -p 1883

>mosquitto_pub -h xxx.xxx.xxx.xxx -t /my/topic -m "message 4" -u client1 -P client1 -p 1883

>mosquitto_pub -h xxx.xxx.xxx.xxx -t /my/topic -m "message 5" -u client1 -P client1 -p 1883
At the consumers' side, the following messages will be seen :
consumer 1:
2019-02-07 10:33:55.848  INFO 14284 --- [           main] o.s.i.a.i.AmqpInboundChannelAdapter      : started inbound.messages-consumer-group
2019-02-07 10:33:55.858  INFO 14284 --- [           main] r.n.cloud.rabbitmq.mqtt.MqttApplication  : Started MqttApplication in 8.824 seconds (JVM running for 9.318)
new message:message 1, from worker :messages-consumer-group-1
new message:message 3, from worker :messages-consumer-group-1
new message:message 5, from worker :messages-consumer-group-1
consumer 2:
O 13832 --- [           main] o.s.i.a.i.AmqpInboundChannelAdapter      : started inbound.messages-consumer-group
O 13832 --- [           main] r.n.cloud.rabbitmq.mqtt.MqttApplication  : Started MqttApplication in 7.8 seconds (JVM running for 8.495)
worker :messages-consumer-group-1
worker :messages-consumer-group-1
As we can see, the messages were distributed between the two consumers.
Conclusion
The tutorial shows how to implement a load-balanced MQTT consumer using RabbitMQ server and the feature 'grouped consumers.' You can download the demo from GitHub.
Opinions expressed by DZone contributors are their own.
Comments