MUnit Framework- Mule Unit Testing
Learn how to use the MUnit framework to write automated unit testing test cases in MuleSoft for your integrations and APIs.
Join the DZone community and get the full member experience.
Join For FreeUnit testing is the method by which individual units of source code can be tested to determine if they are fit for use. For Java programs, coders use the JUnit framework to write test cases. It fits into a CI/CD pipeline and tests your code before your build is deployed onto the server.
Mulesoft has a framework called MUnit that allows you to write automated test cases for your integrations and APIs. It can be integrated with Maven and Surefire and is a perfect fit for your continuous deployment/integration environment.
 MUnit Use Cases
- Create your Mule test by writing Mule code
- Create your Mule test by writing Java code
- Disable flow inbound endpoints
- Disable endpoint connectors
- Mock outbound endpoints
- Mock message processors
- Spy any message processor
- Verify message processor calls
- Create not only unit tests but also integration tests in a local environment — MUnit allows you to start a local FTP/SFTP or DB server
- Call the Mule client from Mule code
- Assert flow exceptions
- Enable or disable particular tests
- See assertion/error reports with Mule stack trace
- Extend the MUnit framework with plugins
- Check visual coverage in Studio
- Debug your tests with Studio
MUnit and Anypoint Studio
MUnit is integrated into Anypoint Studio that allows us to write, design, and run MUnit tests just like you run your Mule applications.
Using MUnit in Anypoint Studio
MUnit is fully integrated with Anypoint Studio. You can use Studio’s graphical interface to:
- Create and design MUnit tests
- Run your tests
- View test results and coverage
- Debug your tests
The MUnit Folder
Using MUnit automatically adds a new folder, src/test/munit, to your project.
Let's Learn How to Write MUnit Test Cases
Creating a New MUnit Test in Studio
MUnit Studio integration is mainly built around XML-based tests. There are two basic ways to create a new MUnit test in Studio:
- Choose a specific flow by right-clicking the flow and selecting MUnit.
- Use the wizard, which allows you to create a test for any flow or application in the workspace.
Flows to Test
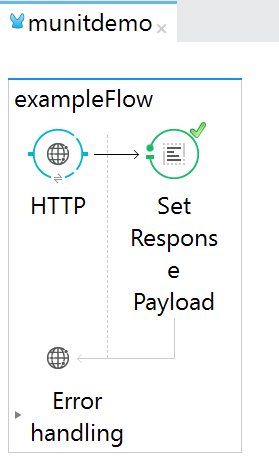
Let's start with a simple flow. In this flow, we are just setting a payload in response to an HTTP request. This is the flow we will be testing in this demo. My assumption is that you know how to write Mule flows, so I will not go into the details of writing a Mule flow.
Please use the Sample Code 1 block if you want to follow the steps to execute the MUnit test cases.
Sample Code 1:
<?xml version="1.0" encoding="UTF-8"?>

<mule xmlns:http="http://www.mulesoft.org/schema/mule/http"
        xmlns:tracking="http://www.mulesoft.org/schema/mule/ee/tracking" xmlns="http://www.mulesoft.org/schema/mule/core"
        xmlns:doc="http://www.mulesoft.org/schema/mule/documentation"
        xmlns:spring="http://www.springframework.org/schema/beans"
        xmlns:xsi="http://www.w3.org/2001/XMLSchema-instance"
        xsi:schemaLocation="http://www.springframework.org/schema/beans http://www.springframework.org/schema/beans/spring-beans-current.xsd
http://www.mulesoft.org/schema/mule/core http://www.mulesoft.org/schema/mule/core/current/mule.xsd
http://www.mulesoft.org/schema/mule/ee/tracking http://www.mulesoft.org/schema/mule/ee/tracking/current/mule-tracking-ee.xsd
http://www.mulesoft.org/schema/mule/http http://www.mulesoft.org/schema/mule/http/current/mule-http.xsd">

    <http:listener-config name="HTTP_Listener_Configuration" host="0.0.0.0" port="8095" doc:name="HTTP Listener Configuration"/>

    <flow name="exampleFlow">
        <http:listener config-ref="HTTP_Listener_Configuration" path="/" allowedMethods="GET" doc:name="HTTP"/>


                   <set-payload value="#['payload_response_1']" doc:name="Set Response Payload"/>

    </flow>
</mule>
MUnit Test Case
To create a test for a specific flow, right-click the flow, then select MUnit > Create new suite.
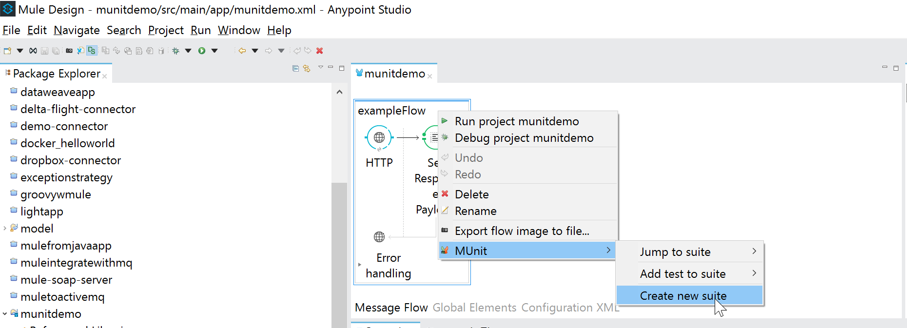
It will create a test suite for you in the src/test/munit folder. For this simple use case, please add an Assert Payload to the MUnit test case.
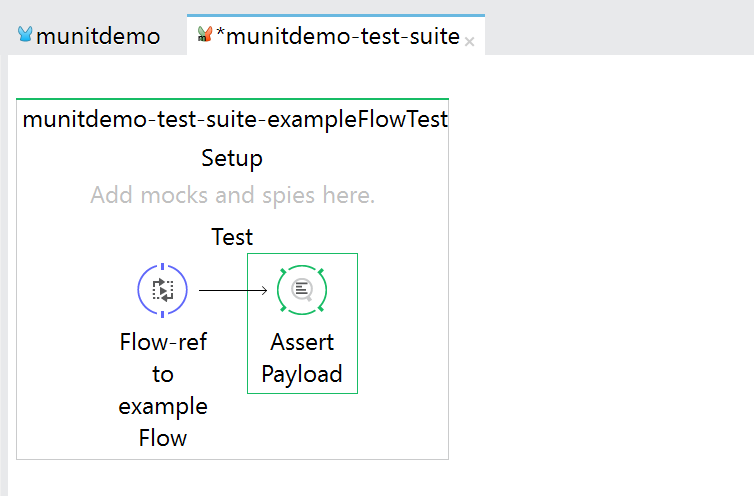
Please replace your Munit code with Sample Code 2 for MUnit flow.
In Assert Payload, I am providing the expected value of the payload. Also, I am providing the test failure message which I would like to see on the dashboard if my test case fails.
Sample Code 2:
<?xml version="1.0" encoding="UTF-8"?>

<mule xmlns:mock="http://www.mulesoft.org/schema/mule/mock" xmlns="http://www.mulesoft.org/schema/mule/core" xmlns:doc="http://www.mulesoft.org/schema/mule/documentation" xmlns:munit="http://www.mulesoft.org/schema/mule/munit" xmlns:spring="http://www.springframework.org/schema/beans" xmlns:core="http://www.mulesoft.org/schema/mule/core" xmlns:xsi="http://www.w3.org/2001/XMLSchema-instance" xsi:schemaLocation="http://www.mulesoft.org/schema/mule/munit http://www.mulesoft.org/schema/mule/munit/current/mule-munit.xsd
http://www.springframework.org/schema/beans http://www.springframework.org/schema/beans/spring-beans-current.xsd
http://www.mulesoft.org/schema/mule/core http://www.mulesoft.org/schema/mule/core/current/mule.xsd
http://www.mulesoft.org/schema/mule/mock http://www.mulesoft.org/schema/mule/mock/current/mule-mock.xsd">
    <munit:config name="munit" doc:name="MUnit configuration"/>
    <spring:beans>
        <spring:import resource="classpath:munitdemo.xml"/>
    </spring:beans>
    <munit:test name="munitdemo-test-suite-exampleFlowTest" description="Test">
        <flow-ref name="exampleFlow" doc:name="Flow-ref to exampleFlow"/>
        <munit:assert-payload-equals expectedValue="#['payload_response_1']" doc:name="Assert Payload" message="oops, wrong payload!!!"/>
    </munit:test>
</mule>
Now, once you write the test case, you can run that test or you can run the entire test suite in case of multiple test cases.
Running a Test
To run a test, right-click the name of the test, then select Run MUnit Test.
Running a Test Suite
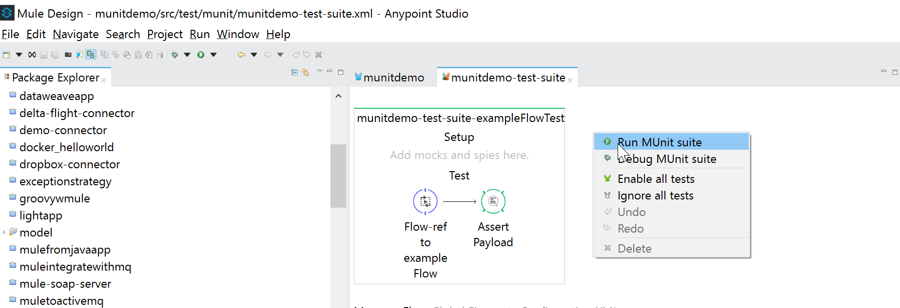
To run a test suite, right-click the empty canvas where the suite resides, then select Run MUnit suite.
Viewing Test Results
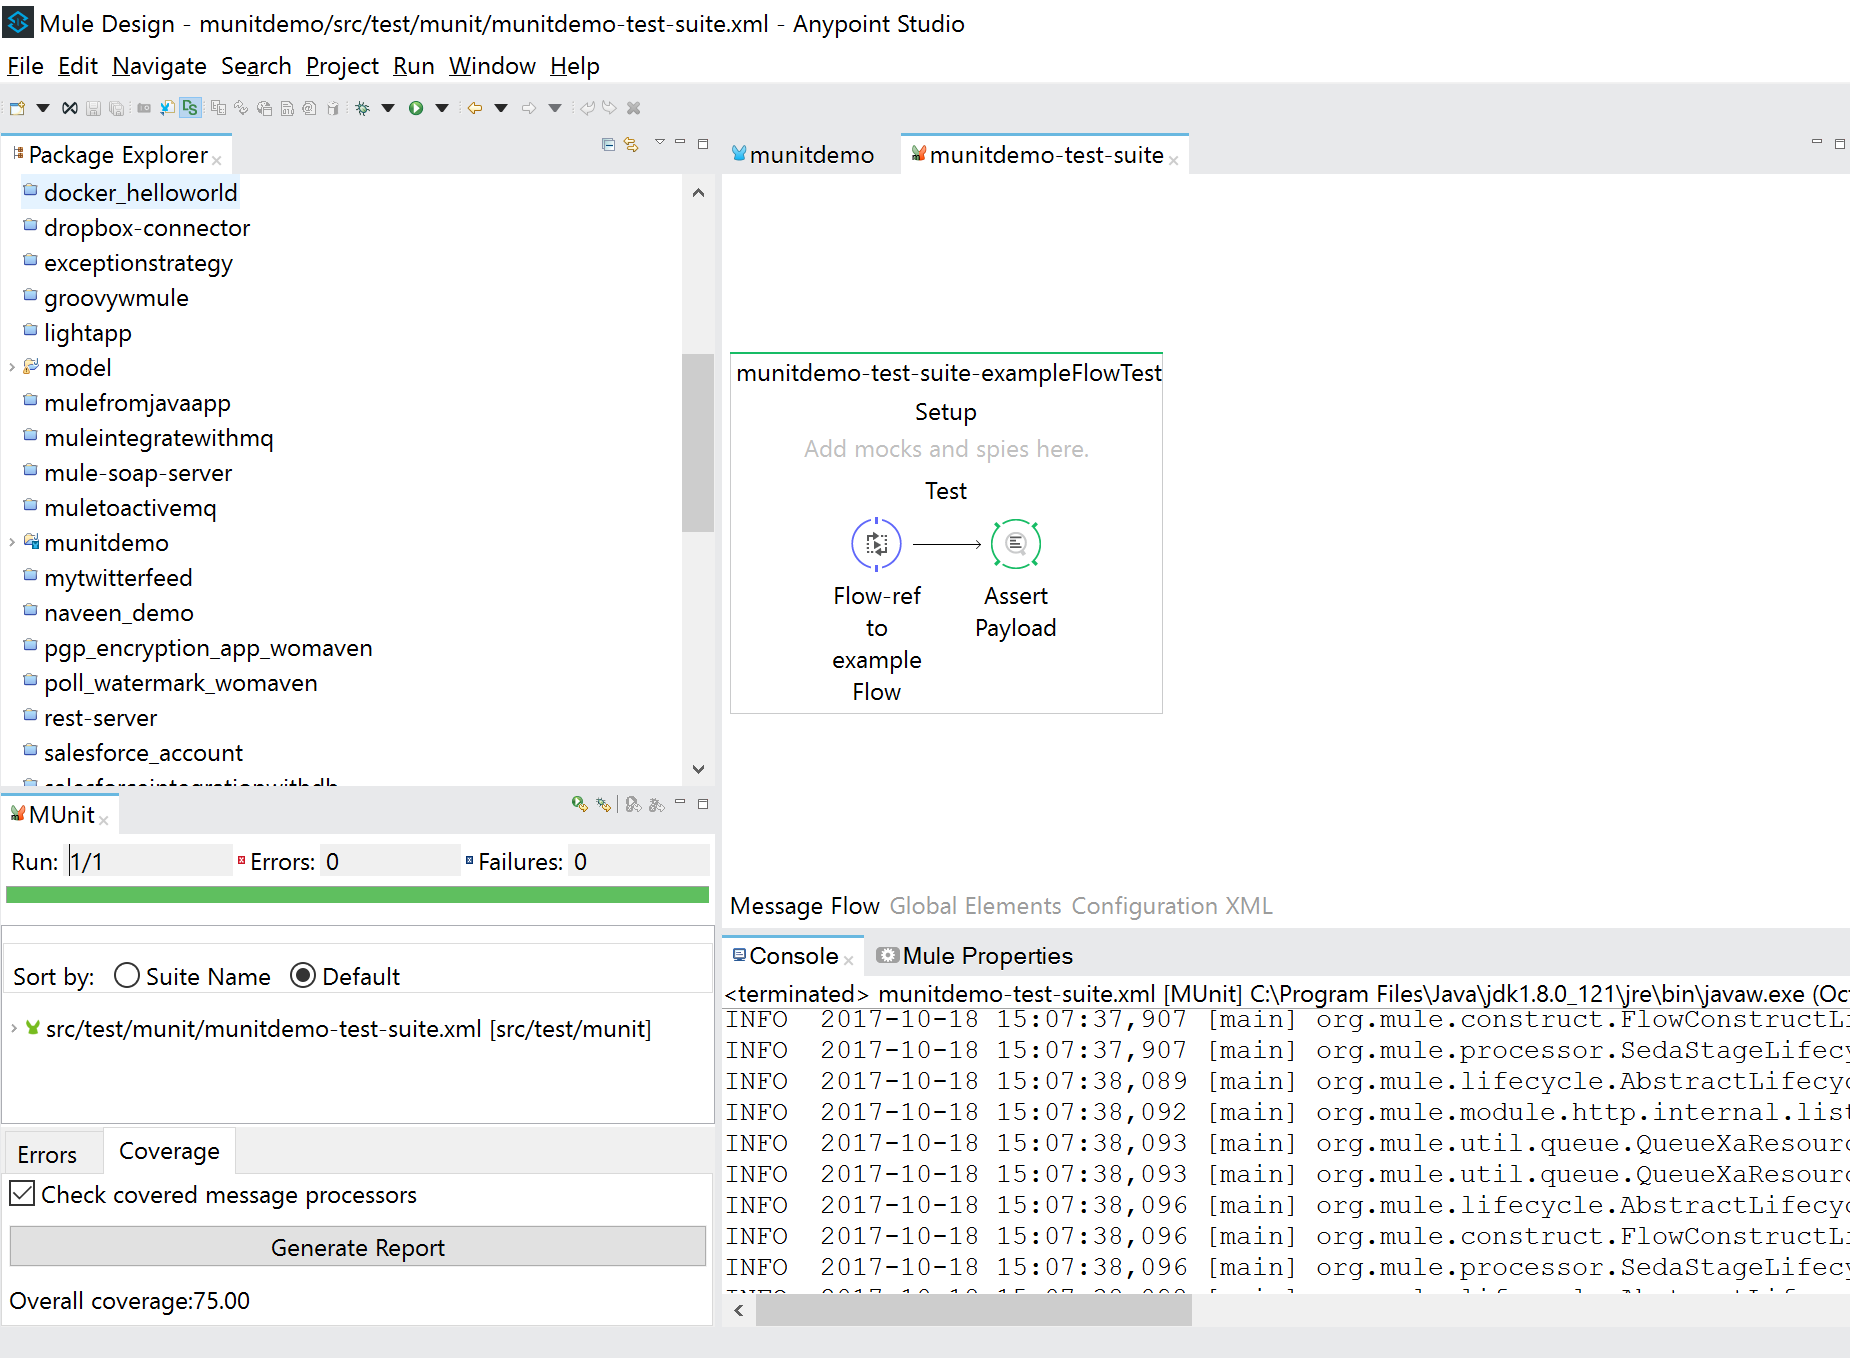
Studio displays MUnit test results in the MUnit tab of the left-hand explorer pane, outlined below:
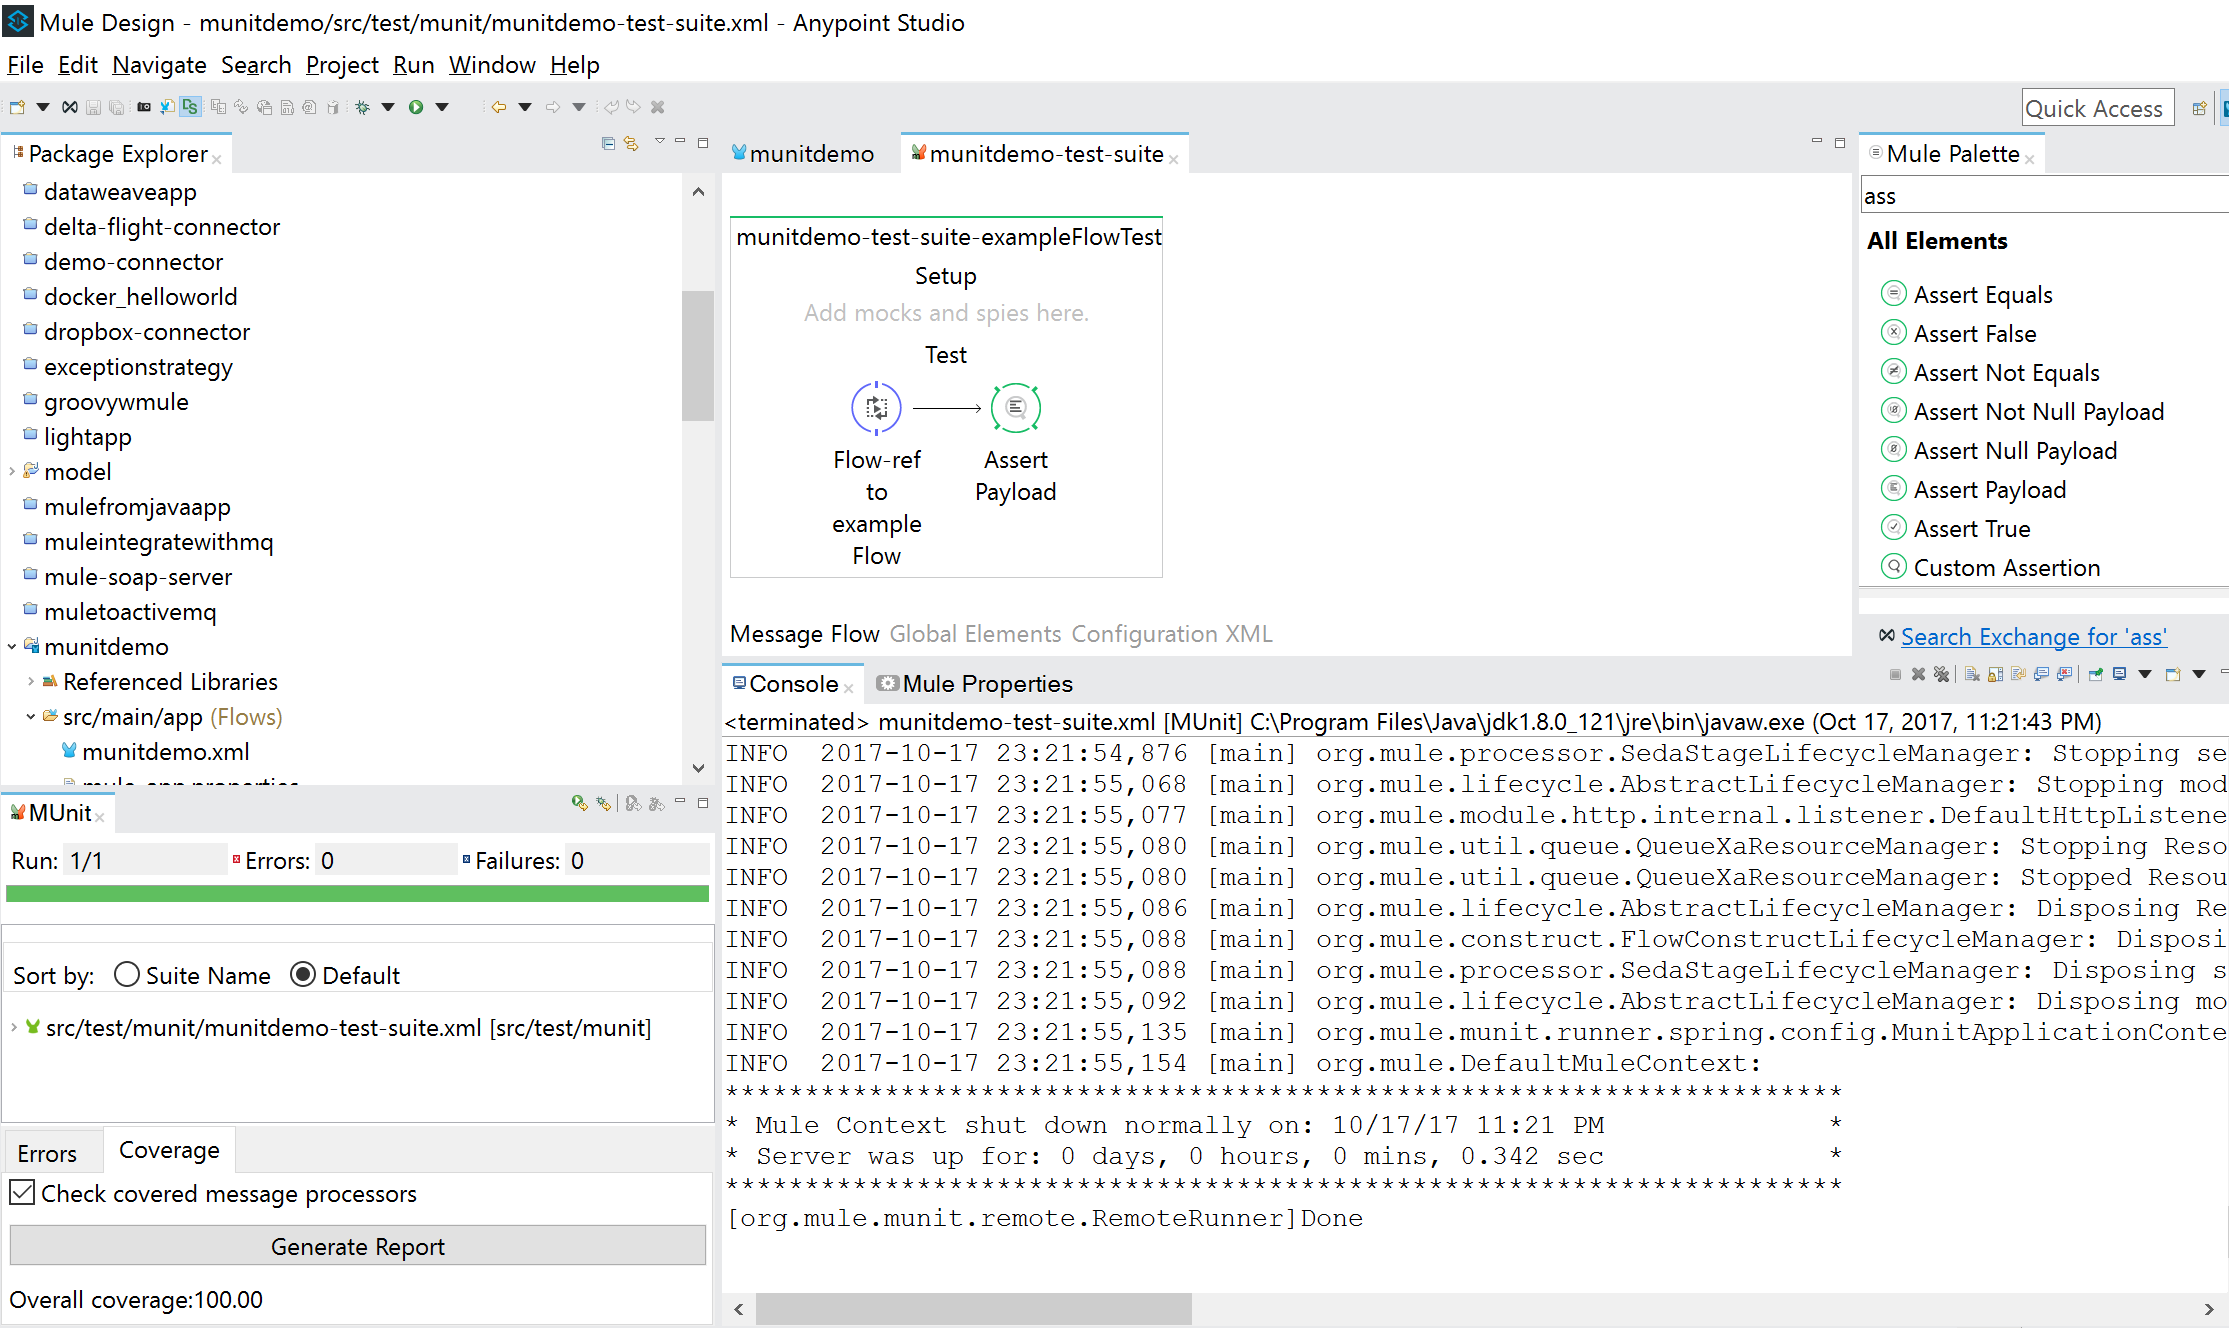
The MUnit tab displays successful tests in green, failed tests in red.
The Coverage button in the image above allows you to see what flow the test covered, and the percentage of message processors in the flow that was covered by the test.
MUnit Test Coverage
For this test case, we have 100% test coverage, as the MUnit test case covers the entire flow.

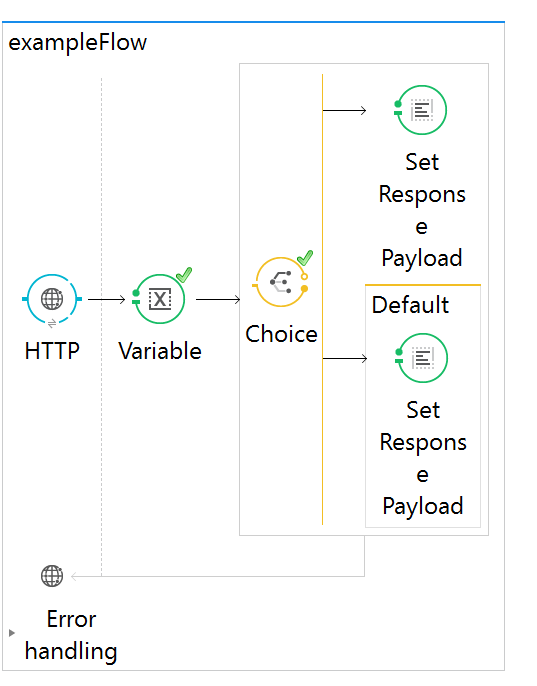
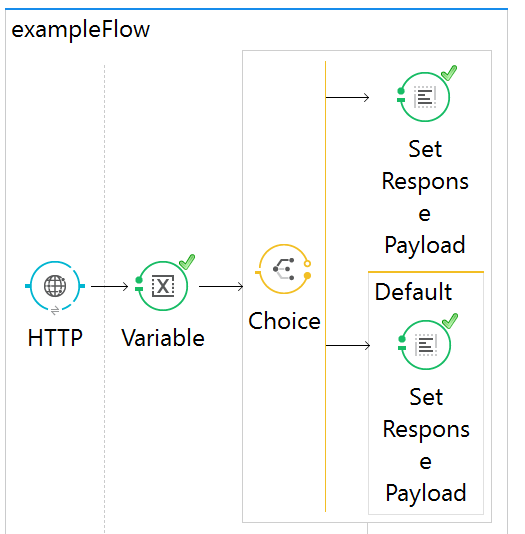
As this flow was very simple, let's add a choice router in the flow, which will route the flow to different payloads based on the value of a flow variable. Please use sample code 3 and update your configuration file with this.
Sample Code 3:
<?xml version="1.0" encoding="UTF-8"?>

<mule xmlns:http="http://www.mulesoft.org/schema/mule/http"
        xmlns:tracking="http://www.mulesoft.org/schema/mule/ee/tracking" xmlns="http://www.mulesoft.org/schema/mule/core"
        xmlns:doc="http://www.mulesoft.org/schema/mule/documentation"
        xmlns:spring="http://www.springframework.org/schema/beans"
        xmlns:xsi="http://www.w3.org/2001/XMLSchema-instance"
        xsi:schemaLocation="http://www.springframework.org/schema/beans http://www.springframework.org/schema/beans/spring-beans-current.xsd
http://www.mulesoft.org/schema/mule/core http://www.mulesoft.org/schema/mule/core/current/mule.xsd
http://www.mulesoft.org/schema/mule/ee/tracking http://www.mulesoft.org/schema/mule/ee/tracking/current/mule-tracking-ee.xsd
http://www.mulesoft.org/schema/mule/http http://www.mulesoft.org/schema/mule/http/current/mule-http.xsd">

    <http:listener-config name="HTTP_Listener_Configuration" host="0.0.0.0" port="8095" doc:name="HTTP Listener Configuration"/>

    <flow name="exampleFlow">
        <http:listener config-ref="HTTP_Listener_Configuration" path="/" allowedMethods="GET" doc:name="HTTP"/>
        <set-variable variableName="my_variable" value="#['var_1']" doc:name="Variable"/>
        <choice doc:name="Choice">
            <when expression="flowVars['my_variable']=='var_1'">
                <set-payload value="#['payload_response_1']" doc:name="Set Response Payload"/>
            </when>
            <otherwise>
                <set-payload value="#['payload_response_2']" doc:name="Set Response Payload"/>
            </otherwise>
        </choice>

    </flow>
</mule>
Running the Test Suite
Just run the test suite again to check the coverage. To run the test suite, right-click the empty canvas where the suite resides, then select Run MUnit suite.

Viewing Test Results
Studio displays MUnit test results in the MUnit tab of the left-hand explorer pane, outlined below:
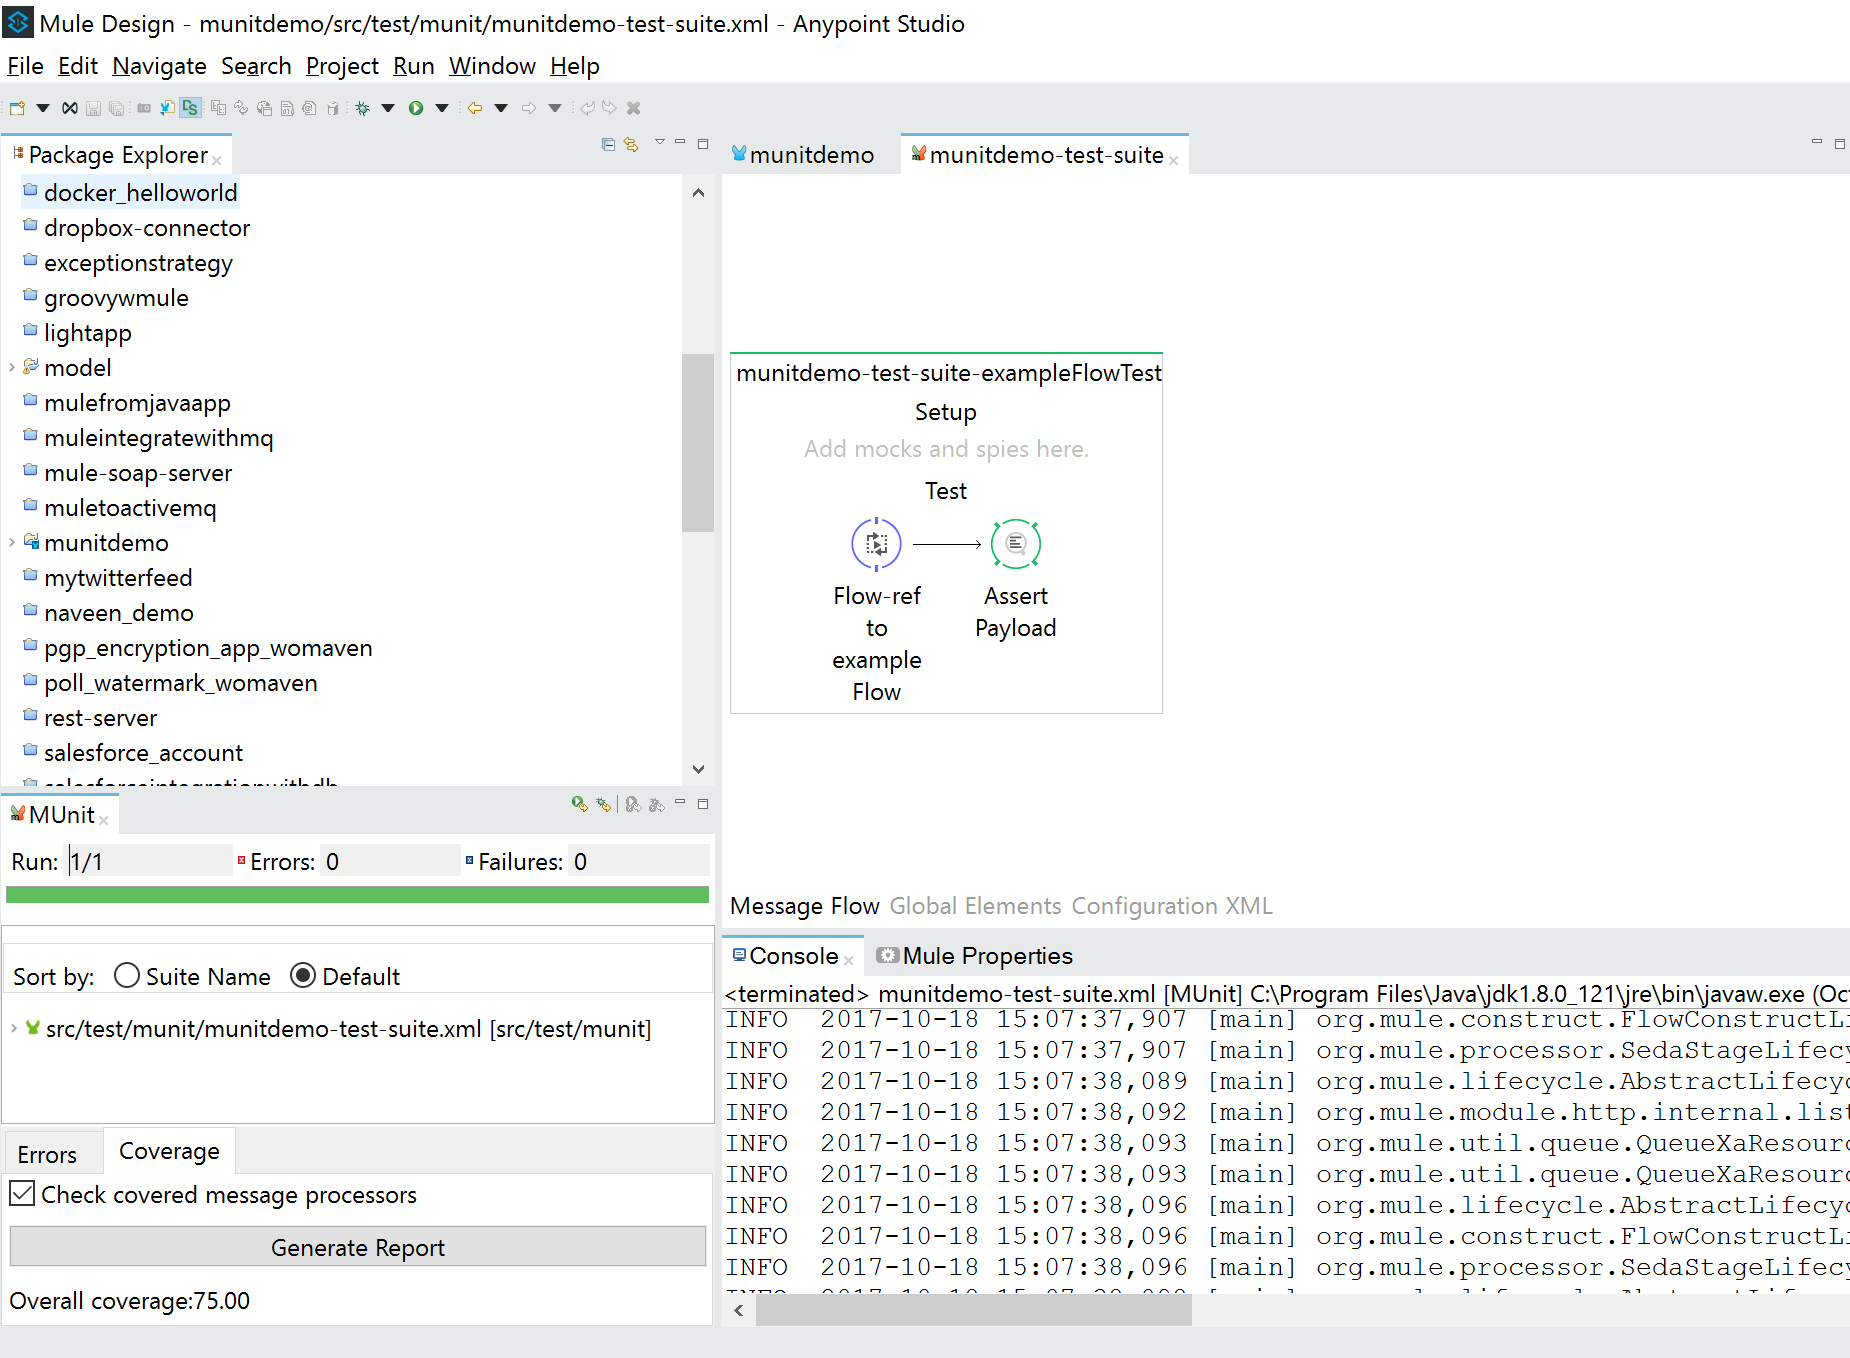
If you see, we just have 75% test coverage as the MUnit test case is not able to cover the second extra message processor which we have added in our Mule flow.
To achieve 100% test coverage, let's add another test case.
Now we are going to mock the data so that our MUnit test cases is able to mock the data, cover the entire flow and all message processors. We will mock the flow variable which is being set up in our sample code 3.
MUnit Test Case 1 With Mocked Data
This is the first test case with mocked data. I am providing the code snippet for this test case for your reference.
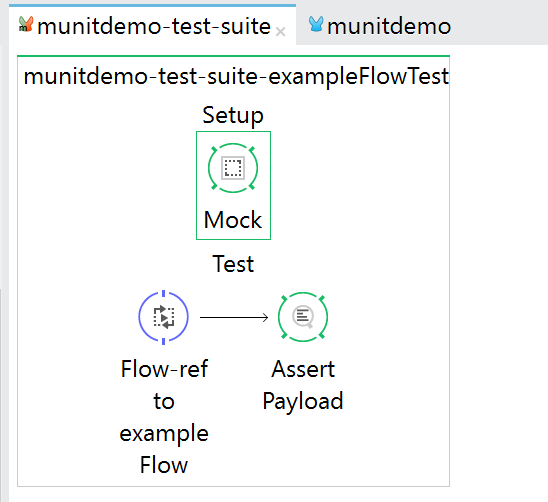
MUnit Code snippet:
<?xml version="1.0" encoding="UTF-8"?>

<mule xmlns:mock="http://www.mulesoft.org/schema/mule/mock" xmlns="http://www.mulesoft.org/schema/mule/core" xmlns:doc="http://www.mulesoft.org/schema/mule/documentation" xmlns:munit="http://www.mulesoft.org/schema/mule/munit" xmlns:spring="http://www.springframework.org/schema/beans" xmlns:core="http://www.mulesoft.org/schema/mule/core" xmlns:xsi="http://www.w3.org/2001/XMLSchema-instance" xsi:schemaLocation="http://www.mulesoft.org/schema/mule/munit http://www.mulesoft.org/schema/mule/munit/current/mule-munit.xsd
http://www.springframework.org/schema/beans http://www.springframework.org/schema/beans/spring-beans-current.xsd
http://www.mulesoft.org/schema/mule/core http://www.mulesoft.org/schema/mule/core/current/mule.xsd
http://www.mulesoft.org/schema/mule/mock http://www.mulesoft.org/schema/mule/mock/current/mule-mock.xsd">
    <munit:config name="munit" doc:name="MUnit configuration"/>
    <spring:beans>
        <spring:import resource="classpath:munitdemo.xml"/>
    </spring:beans>
    <munit:test name="munitdemo-test-suite-exampleFlowTest" description="Test">
        <mock:when doc:name="Mock" messageProcessor="mule:set-variable">
            <mock:then-return payload="#[]">
                <mock:invocation-properties>
                    <mock:invocation-property key="my_variable" value="#['var_1']"/>
                </mock:invocation-properties>
            </mock:then-return>
        </mock:when>
        <flow-ref name="exampleFlow" doc:name="Flow-ref to exampleFlow"/>
        <munit:assert-payload-equals expectedValue="#['payload_response_1']" doc:name="Assert Payload" message="oops, wrong payload!!!"/>
    </munit:test>
</mule>
Running a Test Suite
To run the test suite, again right-click the empty canvas where the suite resides, then select Run MUnit suite.
Viewing Test Results
Studio displays MUnit test results in the MUnit tab of the left-hand explorer pane, outlined below:
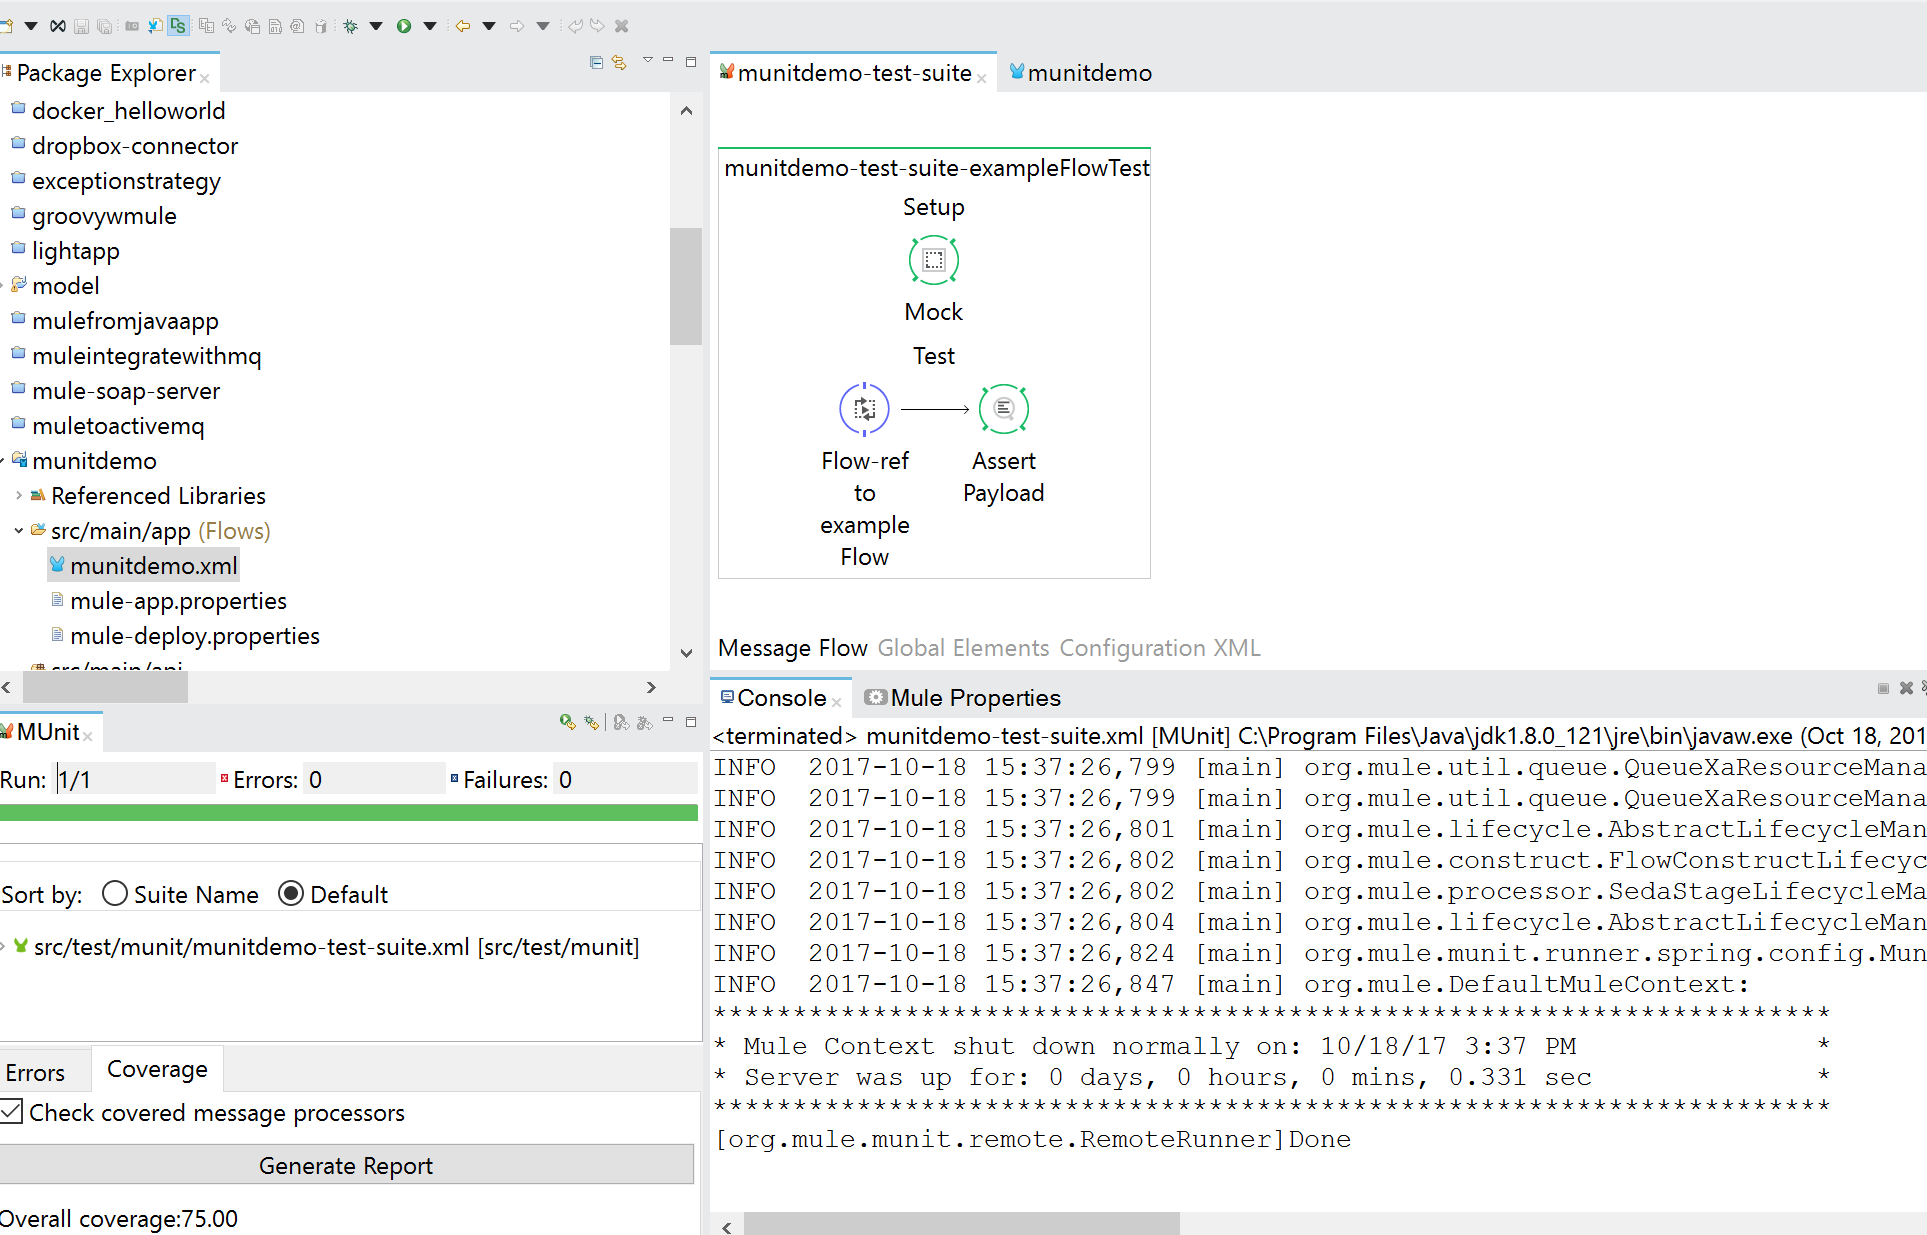
In this case, we have 75% test coverage, as the MUnit test case is not able to cover the message processors. The reason is that we just mocked up the flow variable so that our flow can be tested for one payload.
We have to add another test case to cover the entire flow.
MUnit Test Case 2 With Mocked Data
This is the second test case with mocked data. I am providing the code snippet for this test case for your reference.
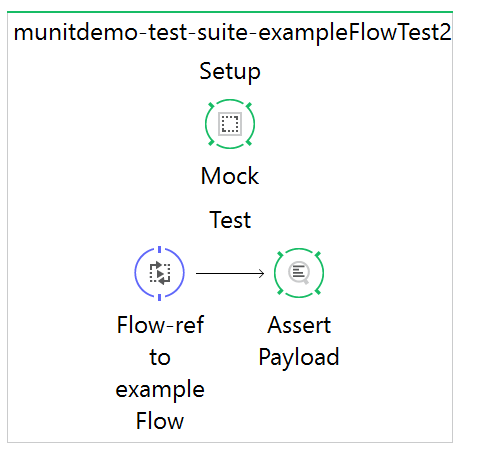
MUnit Code snippet for both test cases:
<?xml version="1.0" encoding="UTF-8"?>

<mule xmlns:mock="http://www.mulesoft.org/schema/mule/mock" xmlns="http://www.mulesoft.org/schema/mule/core" xmlns:doc="http://www.mulesoft.org/schema/mule/documentation" xmlns:munit="http://www.mulesoft.org/schema/mule/munit" xmlns:spring="http://www.springframework.org/schema/beans" xmlns:core="http://www.mulesoft.org/schema/mule/core" xmlns:xsi="http://www.w3.org/2001/XMLSchema-instance" xsi:schemaLocation="http://www.mulesoft.org/schema/mule/munit http://www.mulesoft.org/schema/mule/munit/current/mule-munit.xsd
http://www.springframework.org/schema/beans http://www.springframework.org/schema/beans/spring-beans-current.xsd
http://www.mulesoft.org/schema/mule/core http://www.mulesoft.org/schema/mule/core/current/mule.xsd
http://www.mulesoft.org/schema/mule/mock http://www.mulesoft.org/schema/mule/mock/current/mule-mock.xsd">
    <munit:config name="munit" doc:name="MUnit configuration"/>
    <spring:beans>
        <spring:import resource="classpath:munitdemo.xml"/>
    </spring:beans>
    <munit:test name="munitdemo-test-suite-exampleFlowTest" description="Test">
        <mock:when doc:name="Mock" messageProcessor="mule:set-variable">
            <mock:then-return payload="#[]">
                <mock:invocation-properties>
                    <mock:invocation-property key="my_variable" value="#['var_1']"/>
                </mock:invocation-properties>
            </mock:then-return>
        </mock:when>
        <flow-ref name="exampleFlow" doc:name="Flow-ref to exampleFlow"/>
        <munit:assert-payload-equals expectedValue="#['payload_response_1']" doc:name="Assert Payload" message="oops, wrong payload!!!"/>
    </munit:test>
     <munit:test name="munitdemo-test-suite-exampleFlowTest2" description="Test">
        <mock:when doc:name="Mock" messageProcessor="mule:set-variable">
            <mock:then-return payload="#[]">
                <mock:invocation-properties>
                    <mock:invocation-property key="my_variable" value="#['var_2']"/>
                </mock:invocation-properties>
            </mock:then-return>
        </mock:when>
        <flow-ref name="exampleFlow" doc:name="Flow-ref to exampleFlow"/>
        <munit:assert-payload-equals expectedValue="#['payload_response_2']" doc:name="Assert Payload" message="oops, wrong payload!!!"/>
    </munit:test>
</mule>
Running a Test Suite
To run this test suite, again right-click the empty canvas where the suite resides, then select Run MUnit suite.
Viewing Test Results
Studio displays MUnit test results in the MUnit tab of the left-hand explorer pane, outlined below:
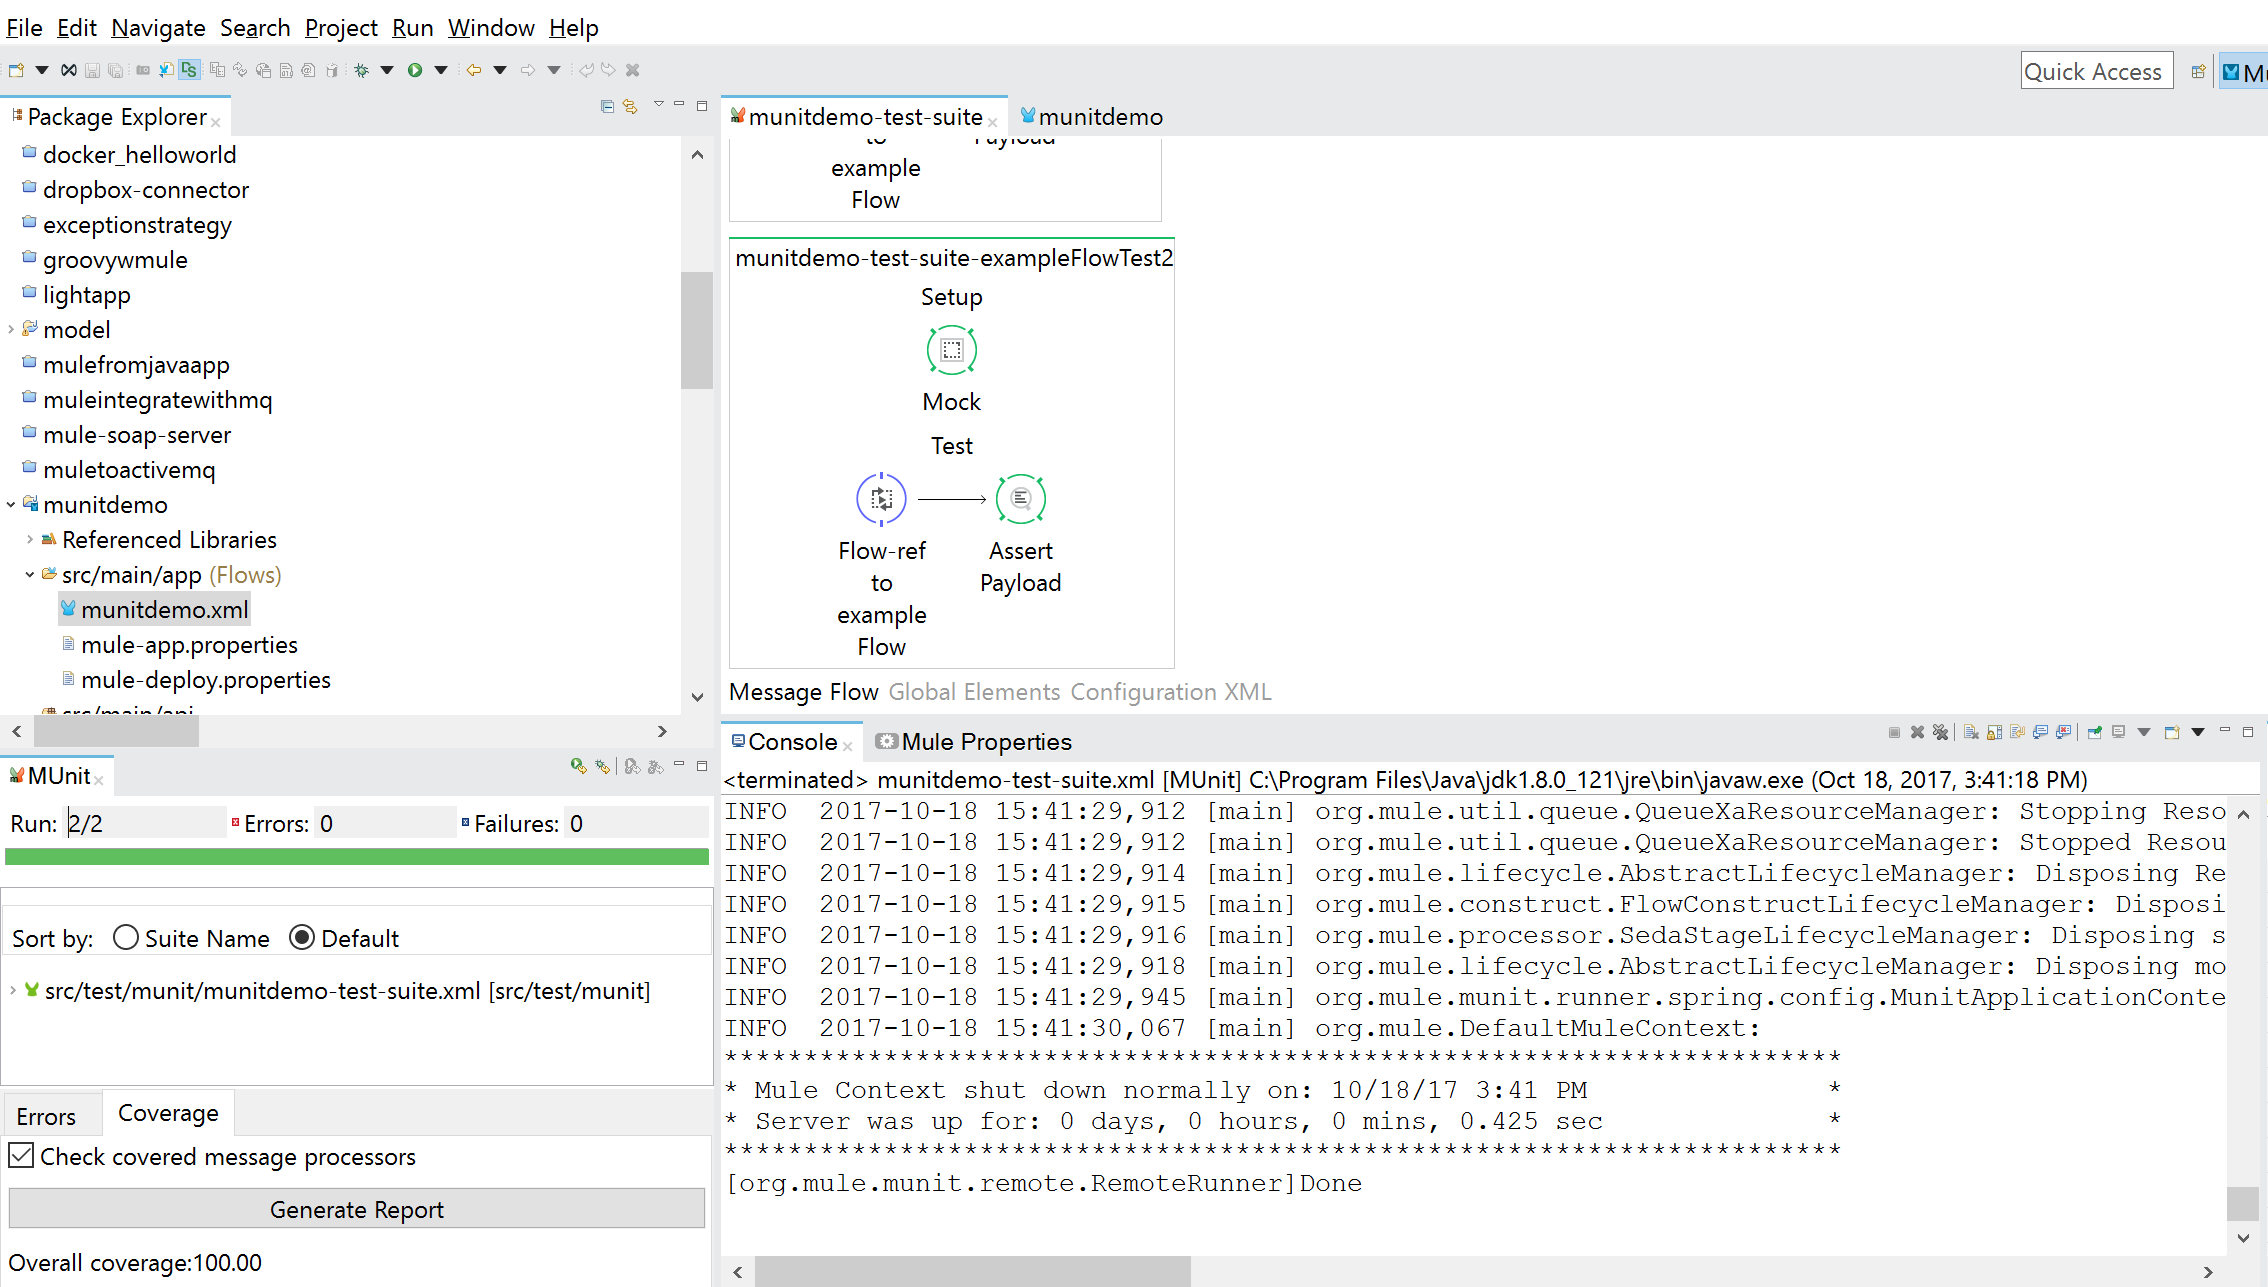
Now we see that coverage is 100%. All message processors are marked as covered, as shown below.
Please see the coverage report for Application and Resources. You can get it by clicking on the Generate Report button under Coverage in MUnit tab.
MUnit Coverage Report
Application Coverage:

Resource Coverage:

I believe this will help Mule developers to learn the MUnit framework. Please share your feedback.
Opinions expressed by DZone contributors are their own.

Comments