Mutual Authentication [Two-Way-SSL] Explained Using Mule Anypoint Platform
In this post, we demonstrate how to implement mutual authentication in order to help you keep your data, application, and network more secure.
Join the DZone community and get the full member experience.
Join For FreeIntroduction
Mutual authentication, sometimes also called two-way SSL, is very popular in server-to-server communication, such as in networked message brokers, business-to-business communications, etc. Technology-wise, it is a very mature protocol.
The main purposes of this article are the following:
- How to generate self-signed certificates using Java keytool.
- How to create a server keystore and truststore.
- How to create a client keystore andt truststore.
- How to create RESTful service with mutual authentication using Anypoint Studio [Mule-ESB].
Mutual Authentication Overview
In our daily access to HTTPS pages, say, https://dzone.com, it is one-way-SSL. Only the client can verify the server's certificates. Servers do not verify the client's certificate. For two-way-SSL, however, the server will verify the client's certificates. This is called mutual authentication. This is used in server to server communication, such as ActiveMQ nodes passing message among themselves in order to route the message [Networked Brokers].
The details of SSL connection negotiations are shown in the following figure. When we run the application, we can see these steps from the log, if we turn the debug on.
-Djavas.net.debug=all or -Djavax.net.debug=ssl:handshake 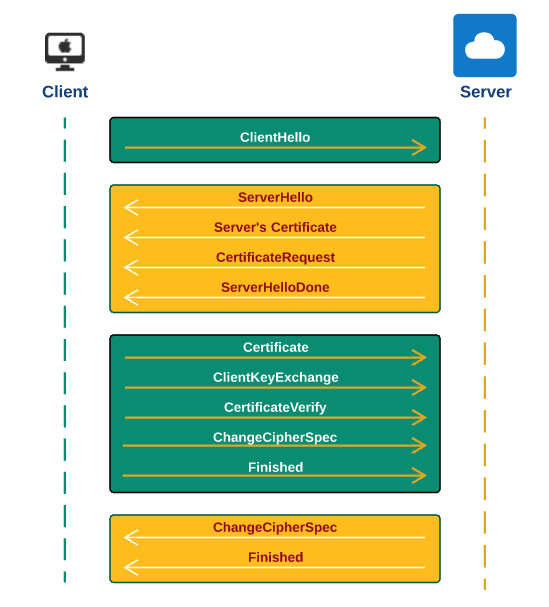
Two-Way-SSL in Action: A Very Simple Case
In this section, I will demonstrate the procedure to expose a RESTful web service using Mule ESB [AnypointPlatform] with two-way-SSL using one keystore. This is the simplest case, just for the purpose of demonstration. To setup HTTPS using Anypoint Platform with keytool, you can refer my blog at the link here.
In my case, I have created a Mule project at:
/Users/Gary2013/mule-dev/advanced-topics/two-way-sslNow cd src/main/resources. We will generate all the keystore and truststore here for the sake of simplicity.
Let's generate the keystore first using the following command:
keytool -genkey -alias mule-server -keyalg RSA -keystore server-keystore.jks
Enter keystore password:
Re-enter new password:
What is your first and last name?
[Unknown]:  localhost
What is the name of your organizational unit?
[Unknown]:  dev
What is the name of your organization?
[Unknown]:  ggl consulting inc
What is the name of your City or Locality?
[Unknown]:  Thousand Oaks
What is the name of your State or Province?
[Unknown]:  Ca
What is the two-letter country code for this unit?
[Unknown]:  US
Is CN=localhost, OU=dev, O=ggl consulting inc, L=Thousand Oaks, ST=Ca, C=US correct?
[no]:  yes

Enter key password for <mule-server>
(RETURN if same as keystore password):
Now, let's configure our HTTP listener as follows:
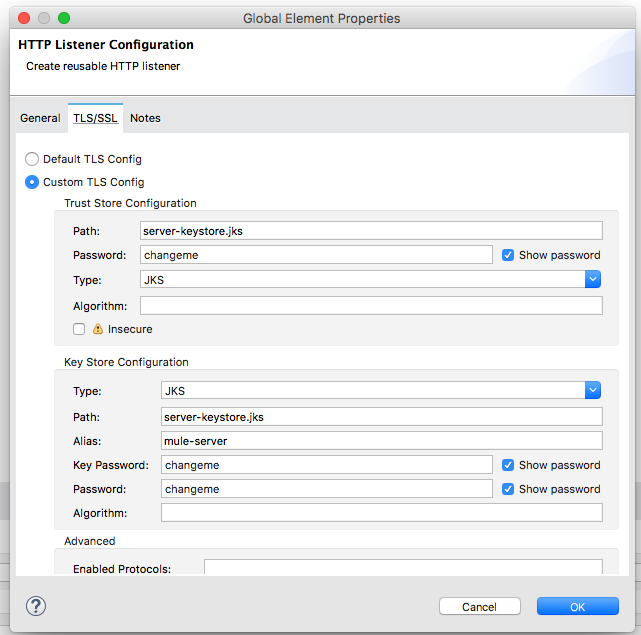
The complete Mule flow code looks like the following:
<?xml version="1.0" encoding="UTF-8"?>

<mule xmlns:http="http://www.mulesoft.org/schema/mule/http" xmlns:tls="http://www.mulesoft.org/schema/mule/tls" xmlns="http://www.mulesoft.org/schema/mule/core" xmlns:doc="http://www.mulesoft.org/schema/mule/documentation"
xmlns:spring="http://www.springframework.org/schema/beans"
xmlns:xsi="http://www.w3.org/2001/XMLSchema-instance"
xsi:schemaLocation="http://www.springframework.org/schema/beans http://www.springframework.org/schema/beans/spring-beans-current.xsd
http://www.mulesoft.org/schema/mule/core http://www.mulesoft.org/schema/mule/core/current/mule.xsd
http://www.mulesoft.org/schema/mule/http http://www.mulesoft.org/schema/mule/http/current/mule-http.xsd
http://www.mulesoft.org/schema/mule/tls http://www.mulesoft.org/schema/mule/tls/current/mule-tls.xsd">
    <http:listener-config name="HTTP_Listener_Configuration" protocol="HTTPS" host="0.0.0.0" port="8443" doc:name="HTTP Listener Configuration">
        <tls:context>
            <tls:trust-store path="server-keystore.jks" password="changeme" type="jks"/>
            <tls:key-store type="jks" path="server-keystore.jks" alias="mule-server" keyPassword="changeme" password="changeme"/>
        </tls:context>
    </http:listener-config>

    <flow name="two-way-sslFlow">
        <http:listener config-ref="HTTP_Listener_Configuration" path="/two-way-ssl" doc:name="HTTP"/>
        <logger level="INFO" doc:name="Logger" message="#[payload]"/>
    </flow>
</mule>
As you can see that we will use the server-keystore.jks as keystore and truststore.
Now, let's start the server in AnypointStudio, and on the terminal, run the following curl command:
curl -X POST -H "Content-Type: application/json" \
     -d '{"name": "Gary Liu"}' \
     https://localhost:8443/two-way-ssl
You will get curl: (60) SSL certificate problem: Invalid certificate chain. This is because we did not pass the client's certification. If you want to test this using the curl command, you need to do the following to setup procedures explained here. If you don't want to go through the procedures, you may use the tool called restClient. You can download the tool here. Once you unpack the file, you can run it like the following:
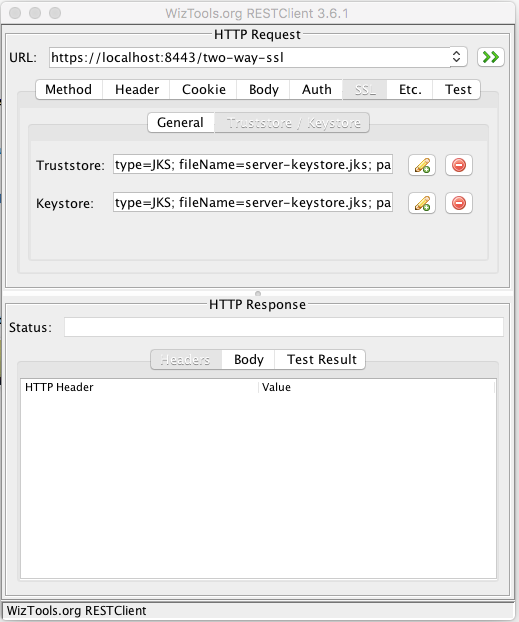
In the body tab, put "String body," type choose "application/json" and you contents should look like the following:
{
"name" : "Gary Liu
}
After running the test, you should see the following:
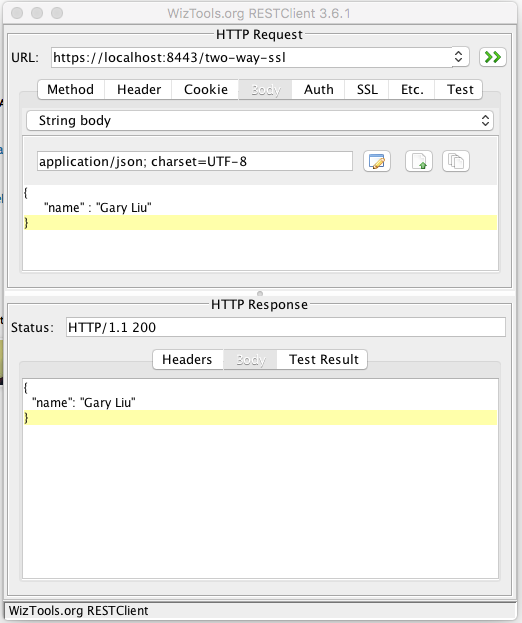
As you can see, it is successful. Now, let's add the runtime argument in the Anypoint studio as follows:
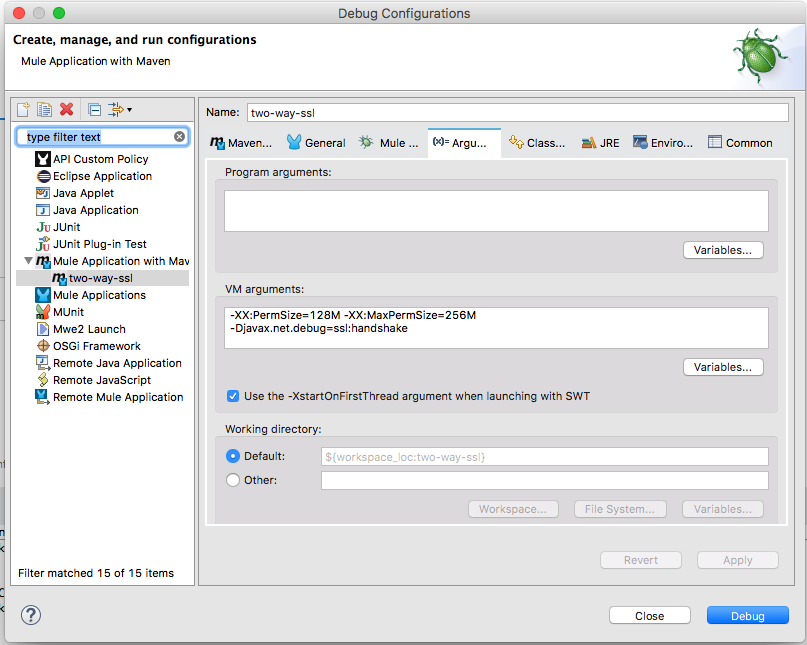
We have added: -Djavax.net.debug=ssl:handshake. This will allow us to see the SSH handshake process in our log. I am not going to copy and paste all the logs here, but you can see that the most import sections all start with three stars *** and end with three stars *** as well. This gives you an idea of how the SSL handshake was broken down by Mule ESB.
*** ClientHello, TLSv1.2

*** Certificate chain

*** ECDH ServerKeyExchange

*** CertificateRequest

*** ServerHelloDone

***

Found trusted certificate:

*** ECDHClientKeyExchange

*** CertificateVerify
Signature Algorithm SHA512withRSA
[two-way-ssl].HTTP_Listener_Configuration.worker.01, READ: TLSv1.2 Change Cipher Spec, length = 1
[two-way-ssl].HTTP_Listener_Configuration.worker.01, READ: TLSv1.2 Handshake, length = 80
*** Finished
verify_data:  { 232, 72, 104, 16, 180, 202, 144, 105, 123, 104, 78, 113 }
***
[two-way-ssl].HTTP_Listener_Configuration.worker.01, WRITE: TLSv1.2 Change Cipher Spec, length = 1
*** Finished
verify_data:  { 158, 159, 255, 157, 141, 148, 114, 81, 153, 104, 59, 226 }
***
[two-way-ssl].HTTP_Listener_Configuration.worker.01, WRITE: TLSv1.2 Handshake, length = 80
Mutual Authentication Setup: More Realistic Case
In the last section, I have demonstrated how mutual authentication works, in particular, how the SSH handshake was done between the client and server. That is not very realistic. In production cases, the server will not give the keystore to the client, as it contains private and public keys, together with server certificates.
In real applications, server admins will only provide the client the server's certificates, which are generated by authorized ca providers. In this section, I want to demonstrate how it can be done by using keytool. The main purpose is to understand the procedures and get insights into the contents of the server truststore and client truststore.
From the example in the last section, we can see that the keystore generated by keytool has a private key, a public key, and self-signed certificates. We know that we cannot share the private keys with other parties, as it is the key to encrypt and decrypt messages.
OK, enough theory. Let's go through the procedures to create truststores for the server and client.
Create Truststores and Keystores for the Client and Server
keytool -export -alias mule-server -keystore server-keystore.jks -file server.crt
keytool -genkey -alias mule-client -keyalg RSA -keystore client-keystore.jks
keytool -export -alias mule-client -keystore client-keystore.jks -file client.crt
keytool -import -alias mule-client -keystore client-truststore.jks client.crt
keytool -import -alias mule-server -keystore client-truststore.jks -file server.crt
keytool -import -alias mule-client -keystore server-truststore.jks -file client.crt
Let's briefly explain what these commands do:
Line 1: Export the server certificate server.crt from the server-keystore.jks.
Line 2: Generate client keystore client-keystore.jks.
Line 3: Export the client certificate client.crt from the client-keystore.jks.
Line 4: Create client truststore client-truststore.jks and import client.crt.
Line 5: Create server truststore and import client.crt to it.
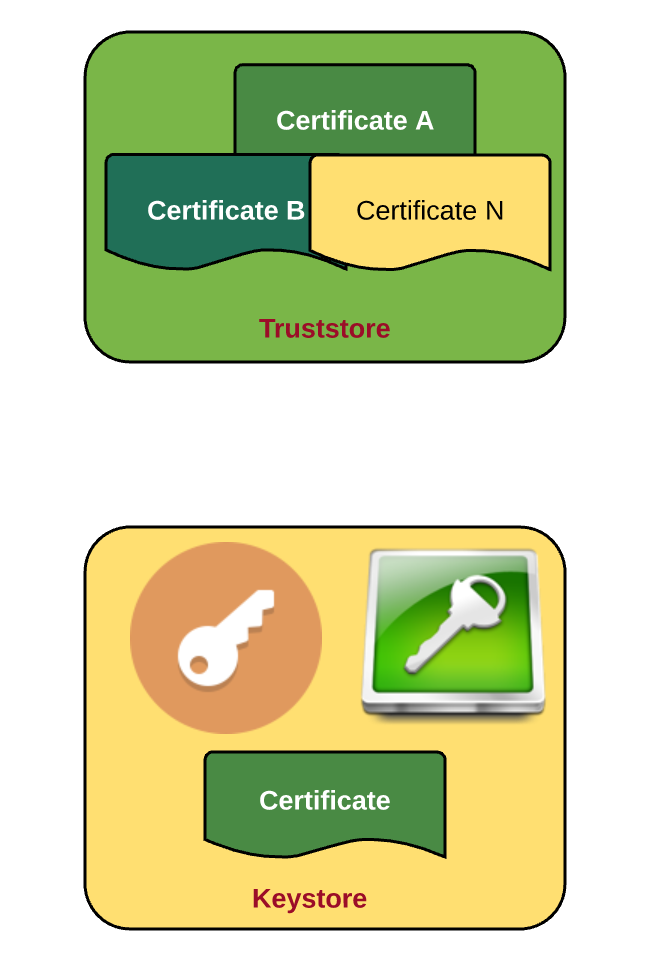
From the above operations, we can see that server has a keystore which contains the private and public keys. It also has a truststore which contains the client's certificate. Note that, in this case, we have only one client. The server's truststore may contain multiple certificates from different clients. In the case of networked message brokers, a server needs to have certificates from all the other servers to which it has connections.
Configure Mule HTTPS Connector
Now we have keystores and truststores for both the client and server. Let's configure the HTTPS connector. The only difference from the one we had before is that we change the name of the server truststore as follows:
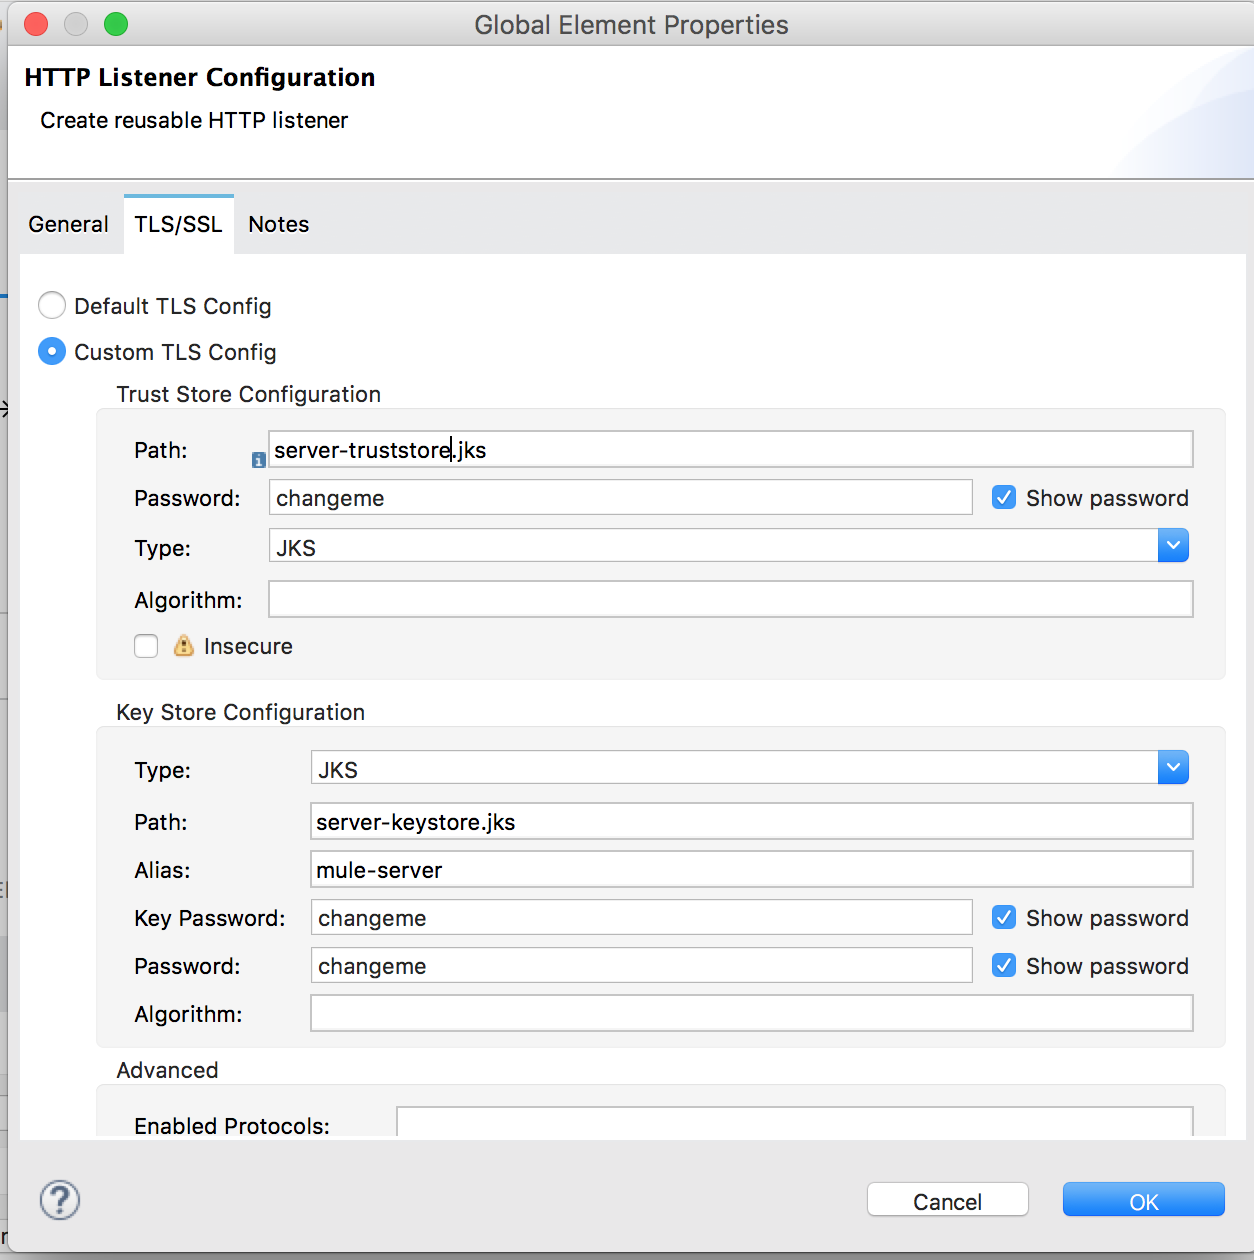
Here is the complete code of Mule flow:
<?xml version="1.0" encoding="UTF-8"?>

<mule xmlns:dw="http://www.mulesoft.org/schema/mule/ee/dw" xmlns:json="http://www.mulesoft.org/schema/mule/json" xmlns:http="http://www.mulesoft.org/schema/mule/http" xmlns:tls="http://www.mulesoft.org/schema/mule/tls" xmlns="http://www.mulesoft.org/schema/mule/core" xmlns:doc="http://www.mulesoft.org/schema/mule/documentation"
xmlns:spring="http://www.springframework.org/schema/beans"
xmlns:xsi="http://www.w3.org/2001/XMLSchema-instance"
xsi:schemaLocation="http://www.springframework.org/schema/beans http://www.springframework.org/schema/beans/spring-beans-current.xsd
http://www.mulesoft.org/schema/mule/core http://www.mulesoft.org/schema/mule/core/current/mule.xsd
http://www.mulesoft.org/schema/mule/http http://www.mulesoft.org/schema/mule/http/current/mule-http.xsd
http://www.mulesoft.org/schema/mule/tls http://www.mulesoft.org/schema/mule/tls/current/mule-tls.xsd
http://www.mulesoft.org/schema/mule/json http://www.mulesoft.org/schema/mule/json/current/mule-json.xsd
http://www.mulesoft.org/schema/mule/ee/dw http://www.mulesoft.org/schema/mule/ee/dw/current/dw.xsd">
    <http:listener-config name="HTTP_Listener_Configuration" protocol="HTTPS" host="0.0.0.0" port="8443" doc:name="HTTP Listener Configuration">
        <tls:context>
            <tls:trust-store path="server-truststore.jks" password="changeme" type="jks"/>
            <tls:key-store type="jks" path="server-keystore.jks" alias="mule-server" keyPassword="changeme" password="changeme"/>
        </tls:context>
    </http:listener-config>

    <flow name="two-way-sslFlow">
        <http:listener config-ref="HTTP_Listener_Configuration" path="/two-way-ssl" doc:name="HTTP"/>
        <dw:transform-message doc:name="Transform Message">
            <dw:set-payload><![CDATA[%dw 1.0
%output application/json
---
payload]]></dw:set-payload>
        </dw:transform-message>
        <logger level="INFO" doc:name="Logger" message="#[message.payloadAs(java.lang.String)]"/>
    </flow>
</mule>
curl -k --cert client.p12:changeme -X POST \
-H "Content-Type: application/json" \
-d '{"name": "Gary Liu"}' \
https://localhost:8443/two-way-sslA Few More Words About Keystore and Truststore
At this moment, we should be very clear about the contents of the truststore and keystore as illustrated in the following figure.
Summary
In this article, I have covered the following topics:
- Procedures to generate keystores and truststores using the JDK tool, keytool.
- Create RESTful services using Mule AnypointStudio.
- SSH handshake protocol for mutual authentication.
- The key contents of the keystore and truststore.
Opinions expressed by DZone contributors are their own.

Comments