MySQL Multi-Source Replication
MySQL replication is a powerful feature that allows you to copy and synchronize data from one server to another. Creating MySQL Shards for backup and recovery.
Join the DZone community and get the full member experience.
Join For FreeMySQL replication is a powerful feature that allows you to copy and synchronize data from one server to another. In this guide, we will explore the concept of multi-source replication in MySQL and learn how to configure and manage this advanced replication technique. Whether you are a seasoned database administrator or a beginner in the world of MySQL, this article will provide you with a deep understanding of multi-source replication and its benefits.
What Is Multi-Source Replication?
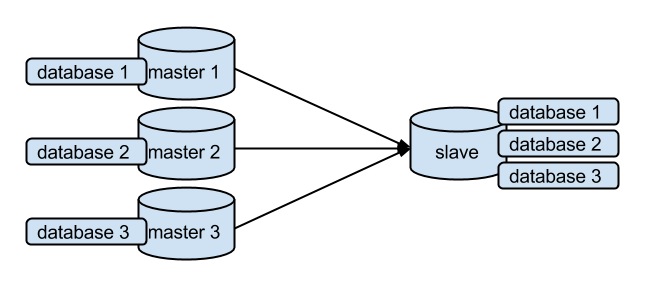
Multi-source replication in MySQL enables a replica server to receive data from multiple source servers. Imagine a scenario where you have a replica server at your workplace and several source servers located in different locations. With multi-source replication, you can directly gather data from these source servers and consolidate it on your replica server.
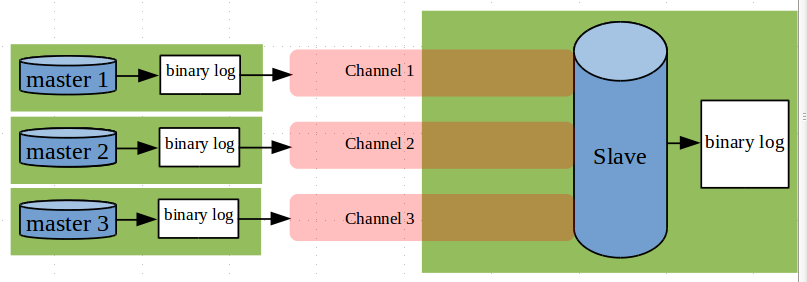
To achieve this, the replica server creates multiple paths or channels, with each path linked to an individual source server. These channels facilitate the transfer of data from multiple sources to the replica server. Each replication path consists of SQL threads, relay logs, and an independent I/O thread that aids in performance and memory management
Purpose:
- Backup: You can take the backup of different MySQL instances in a single replica node.
- Shards: Multi-Source replica allows to store the data from different MySQL instances to a single MySQL Instance. In this way, it will enable the sharding in MySQL.
- Combined query from different MySQL Instance: As you have the data from different MySQL Instances in a single MySQL Instance, you can easily generate the report by joining the database/tables from different MySQL Instances.
Multi-Source Replication Setup — My Environment
To set up multi-source replication in MySQL, you need to configure the necessary connection details for each source server. This includes specifying the hostnames or IP addresses, authentication credentials, and replication options. Here are the steps to follow:
- Set up the source servers: Start by setting up at least two source servers. In this example, we'll configure three source servers and a replica server. The replica server will replicate one database from each source server.
- Configure source servers for binary log position-based replication: You can choose to use either GTID-based replication or binary log position-based replication. For this guide, we'll focus on the latter. Ensure that binary logging is enabled on each source server and assign a unique non-zero server ID to each server.
- Create user accounts for the source servers: To establish a connection between the replica server and the source servers, you need to create user accounts on each source server. You can use the same account on all source servers or create different accounts for each. The account should have the
REPLICATION SLAVEprivilege. - Configure replication paths for each source server: Next, configure replication paths for each source server. This involves setting up essential parameters such as the source hostname, username, password, and the starting position in the binary log file. Each replication path should have a unique name.
- Replicate the desired databases: Specify the databases you want to replicate from each source server to the replica server. This can be done using the
CHANGE REPLICATION FILTERstatement. Define the specific tables or databases you want to replicate for each channel.
I have created 3 Ubuntu Linux boxes for the setup. I installed MySQL 8.0.33.
- Source1
- Source2
- Replica
mysql> select @@Version, @@version_comment;

+-------------------------+-------------------+

| @@Version | @@version_comment |

+-------------------------+-------------------+

| 8.0.33-0ubuntu0.22.04.4 | (Ubuntu)  |

+-------------------------+-------------------+

1 row in set (0.00 sec)
Configure the /etc/hosts to resolve the servers with hostname. For example:
root@source1:~# hostname

source1

root@source1:~#

root@source1:~# cat /etc/hosts | tail -n3

192.168.64.138 source1 source1

192.168.64.139 source2 source2

192.168.64.140 replica replica
root@source2:~# hostname
source2
root@source2:~#
root@source2:~# cat /etc/hosts | tail -n3
192.168.64.138 source1 source1
192.168.64.139 source2 source2
192.168.64.140 replica replicaroot@replica:~# hostname
replica
root@replica:~#
root@replica:~# cat /etc/hosts | tail -n3
192.168.64.138 source1 source1
192.168.64.139 source2 source2
192.168.64.140 replica replicaIn this way, I can resolve/access MySQL through the hostname. For example:
root@replica:~# telnet source2 3306

Trying 192.168.64.139...

Connected to source2.
Note: You can also directly use the “host IP” instead of configuring /etc/hosts.
Multi-Source Replication Setup — Prerequisites
We have the following three requirements to achieve this setup,
- To configure the setup, I would recommend enabling the following parameters in your MySQL config file (my.cnf ) under the group
[mysqld].
[mysqld]

server-id = 101

log_bin = source1

binlog_format = ROW

binlog_row_image = FULL
Server Id should be unique across all nodes, and make sure to change the binary log name by changing the log_bin parameter.
- Make sure you have MySQL port access from the replica to both sources. You can verify this by executing the
telnetcommand.
root@replica:~# telnet source1 3306

Trying 192.168.64.138...

Connected to source1.
root@replica:~#
root@replica:~# telnet source2 3306
Trying 192.168.64.139...
Connected to source2.- Create the replication user on both “source1” and “source2” to authenticate the replication IO thread connections.
Source1:
mysql> select @@hostname;

+------------+

| @@hostname |

+------------+

| source1 |

+------------+

1 row in set (0.00 sec)
mysql> create user 'repl_source1'@'%' identified by 'Repl@321';
Query OK, 0 rows affected (0.03 sec)mysql> grant replication slave, replication client on *.* to 'repl_source1'@'% ';
Query OK, 0 rows affected (0.00 sec)mysql> flush privileges;
Query OK, 0 rows affected (0.01 sec)Source2:
mysql> select @@hostname;

+------------+

| @@hostname |

+------------+

| source2 |

+------------+

1 row in set (0.00 sec)
mysql> create user 'repl_source2'@'%' identified by 'Repl@321';
Query OK, 0 rows affected (0.04 sec)mysql> grant replication slave, replication client on *.* to 'repl_source2'@'%';
Query OK, 0 rows affected (0.01 sec)mysql> flush privileges;
Query OK, 0 rows affected (0.01 sec)Well, we are all set with the prerequisites.
Multi-Source Replication Setup — Configuration
Let's proceed with the configuration on the replica host. As I don't have any data on “source1” and “source2”, I am going to configure the replication from scratch by applying the first binary log and first position from both sources (source1, source2).
At replica, run the CHANGE REPLICATION SOURCE command,
mysql> change replication source to source_host='source1',source_port=3306, source_user='repl_source1', source_password='Repl@321', source_log_file='source1.000001', source_log_pos=4,get_master_public_key=1 for channel 'source1';

Query OK, 0 rows affected, 3 warnings (0.04 sec)
mysql> change replication source to source_host='source2',source_port=3306, source_user='repl_source2', source_password='Repl@321', source_log_file='source2.000001', source_log_pos=4,get_master_public_key=1 for channel 'source2';
Query OK, 0 rows affected, 3 warnings (0.03 sec)As you see here, we executed CHANGE REPLICATION SOURCE commands for two dedicated channels source1 and source2.
Starting Replication
mysql> start replica for channel 'source1';

Query OK, 0 rows affected (0.02 sec)

mysql> start replica for channel 'source2';

Query OK, 0 rows affected (0.01 sec)
Checking Replication Status
mysql> pager grep -i 'running\|behind\|master_host'

PAGER set to 'grep -i 'running\|behind\|master_host''

mysql>

mysql> show slave status for channel 'source1'\G

  Master_Host: source1

 Slave_IO_Running: Yes

 Slave_SQL_Running: Yes

 Seconds_Behind_Master: 0

 Slave_SQL_Running_State: Replica has read all relay log; waiting for more updates

1 row in set, 1 warning (0.00 sec)
mysql> show slave status for channel 'source2'\G
Master_Host: source2
Slave_IO_Running: Yes
Slave_SQL_Running: Yes
Seconds_Behind_Master: 0
Slave_SQL_Running_State: Replica has read all relay log; waiting for more updates
1 row in set, 1 warning (0.00 sec)If you do not provide the for channel <channel_name> at the end of the command, the command will be executed for all the replicas configured. For example, below, I just executed the “show slave status\G ''output without specifying any channel name. It gathers and prints the data from both channels.
mysql> show slave status\G

 Master_Host: source1

 Slave_IO_Running: Yes

 Slave_SQL_Running: Yes

 Seconds_Behind_Master: 0

 Slave_SQL_Running_State: Replica has read all relay log; waiting for more updates

 Master_Host: source2

 Slave_IO_Running: Yes

 Slave_SQL_Running: Yes

 Seconds_Behind_Master: 0

 Slave_SQL_Running_State: Replica has read all relay log; waiting for more updates

2 rows in set, 1 warning (0.00 sec)
In case you execute the stop replica command, it will stop the replication on both sources. To avoid such a situation, it is recommended to use the proper channel name in the command.
Multi-Source Replication Setup — Testing
At source1, I am creating database t1 and, at source2, I am creating database t2, then we will check whether both the databases are replicated or not.
mysql> select @@hostname;

+------------+

| @@hostname |

+------------+

| source1 |

+------------+

1 row in set (0.01 sec)
mysql> create database t1;

Query OK, 1 row affected (0.02 sec)
mysql> select @@hostname;
+------------+
| @@hostname |
+------------+
| source2 |
+------------+
1 row in set (0.00 sec)
mysql> create database t2;

Query OK, 1 row affected (0.02 sec)
mysql> select @@Hostname;
+------------+
| @@Hostname |
+------------+
| replica |
+------------+
1 row in set (0.01 sec)mysql> show databases like 't%';
+---------------+
| Database (t%) |
+---------------+
| t1 |
| t2 |
+---------------+
2 rows in set (0.01 sec)Replica has both the t1 and t2 databases. In this case, we can make sure the replication is happening without any issues.
Multi-Source Replication Setup — Physical Files
Multi-Source replication maintains a dedicated replication environment for each channel. For example:
root@replica:/var/lib/mysql# hostname

replica

root@replica:/var/lib/mysql#

root@replica:/var/lib/mysql# ls -lrth | grep -i relay

-rw-r----- 1 mysql mysql 1.2K Jul 29 20:08 replica-relay-bin-source1.000002

-rw-r----- 1 mysql mysql 503 Jul 29 20:08 replica-relay-bin-source1.000003

-rw-r----- 1 mysql mysql 70 Jul 29 20:08 replica-relay-bin-source1.index

-rw-r----- 1 mysql mysql 1.2K Jul 29 20:08 replica-relay-bin-source2.000002

-rw-r----- 1 mysql mysql 503 Jul 29 20:08 replica-relay-bin-source2.000003

-rw-r----- 1 mysql mysql 70 Jul 29 20:08 replica-relay-bin-source2.index
From the above logs, you can see the Relay logs are available for “source1” as well as “source2”. Those files will be used to store the binary log events from their dedicated sources.
From mysql.slave_master_info, you can find the following output.
mysql> select Master_log_name,Master_log_pos,Host,Channel_name from mysql.slave_master_info;

+-----------------+----------------+---------+--------------+

| Master_log_name | Master_log_pos | Host | Channel_name |

+-----------------+----------------+---------+--------------+

| source1.000001 | 892 | source1 | source1 |

| source2.000001 | 892 | source2 | source2 |

+-----------------+----------------+---------+--------------+

2 rows in set (0.00 sec)
Multi-Source Replication Setup — Multi-Threaded Replica
To enable the Multi-Threaded replica, you can use the option replia_parallel_workers.
mysql> set global replica_parallel_workers=2;
Query OK, 0 rows affected (0.00 sec)
When you enable this option, there will be two SQL threads allocated for each channel to apply the relay log events parallelly.
Conclusion
It is one of the wonderful features of the MySQL community Team. If someone wants to replicate the data from different MySQL instances to a single MySQL instance, this will be really helpful.
Opinions expressed by DZone contributors are their own.
Comments