Nacos as a Config Server
Learn how to get started with Nacos as your config server. In this example, we'll use a Spring Boot microservices app.
Join the DZone community and get the full member experience.
Join For FreeConfig servers are widely used in microservices architectures as placeholders for configurations. They also provide a centralized repository for users to manage configs for multiple applications.
Today, we are going to look at an example of how to use Nacos as a config server with Spring Cloud for Alibaba. The example is a Spring Boot application, running a Nacos server locally.
Prep: Start the Nacos Server
(Works on Linux/Mac)
Download and build the Nacos server:
git clone https://github.com/alibaba/nacos.git
cd nacos/
mvn -Prelease-nacos clean install -U
ls -al distribution/target/

// change the $version to your actual path
cd distribution/target/nacos-server-$version/nacos/bin
Start the Nacos server locally in single node mode (listening to port 8848):
sh startup.sh -m standalone
Nacos Dashboard
In this example, we’ll need to use a Nacos dashboard. The dashboard is started with the Nacos server. The URL for local standalone mode is http://localhost:8848/nacos/index.html .
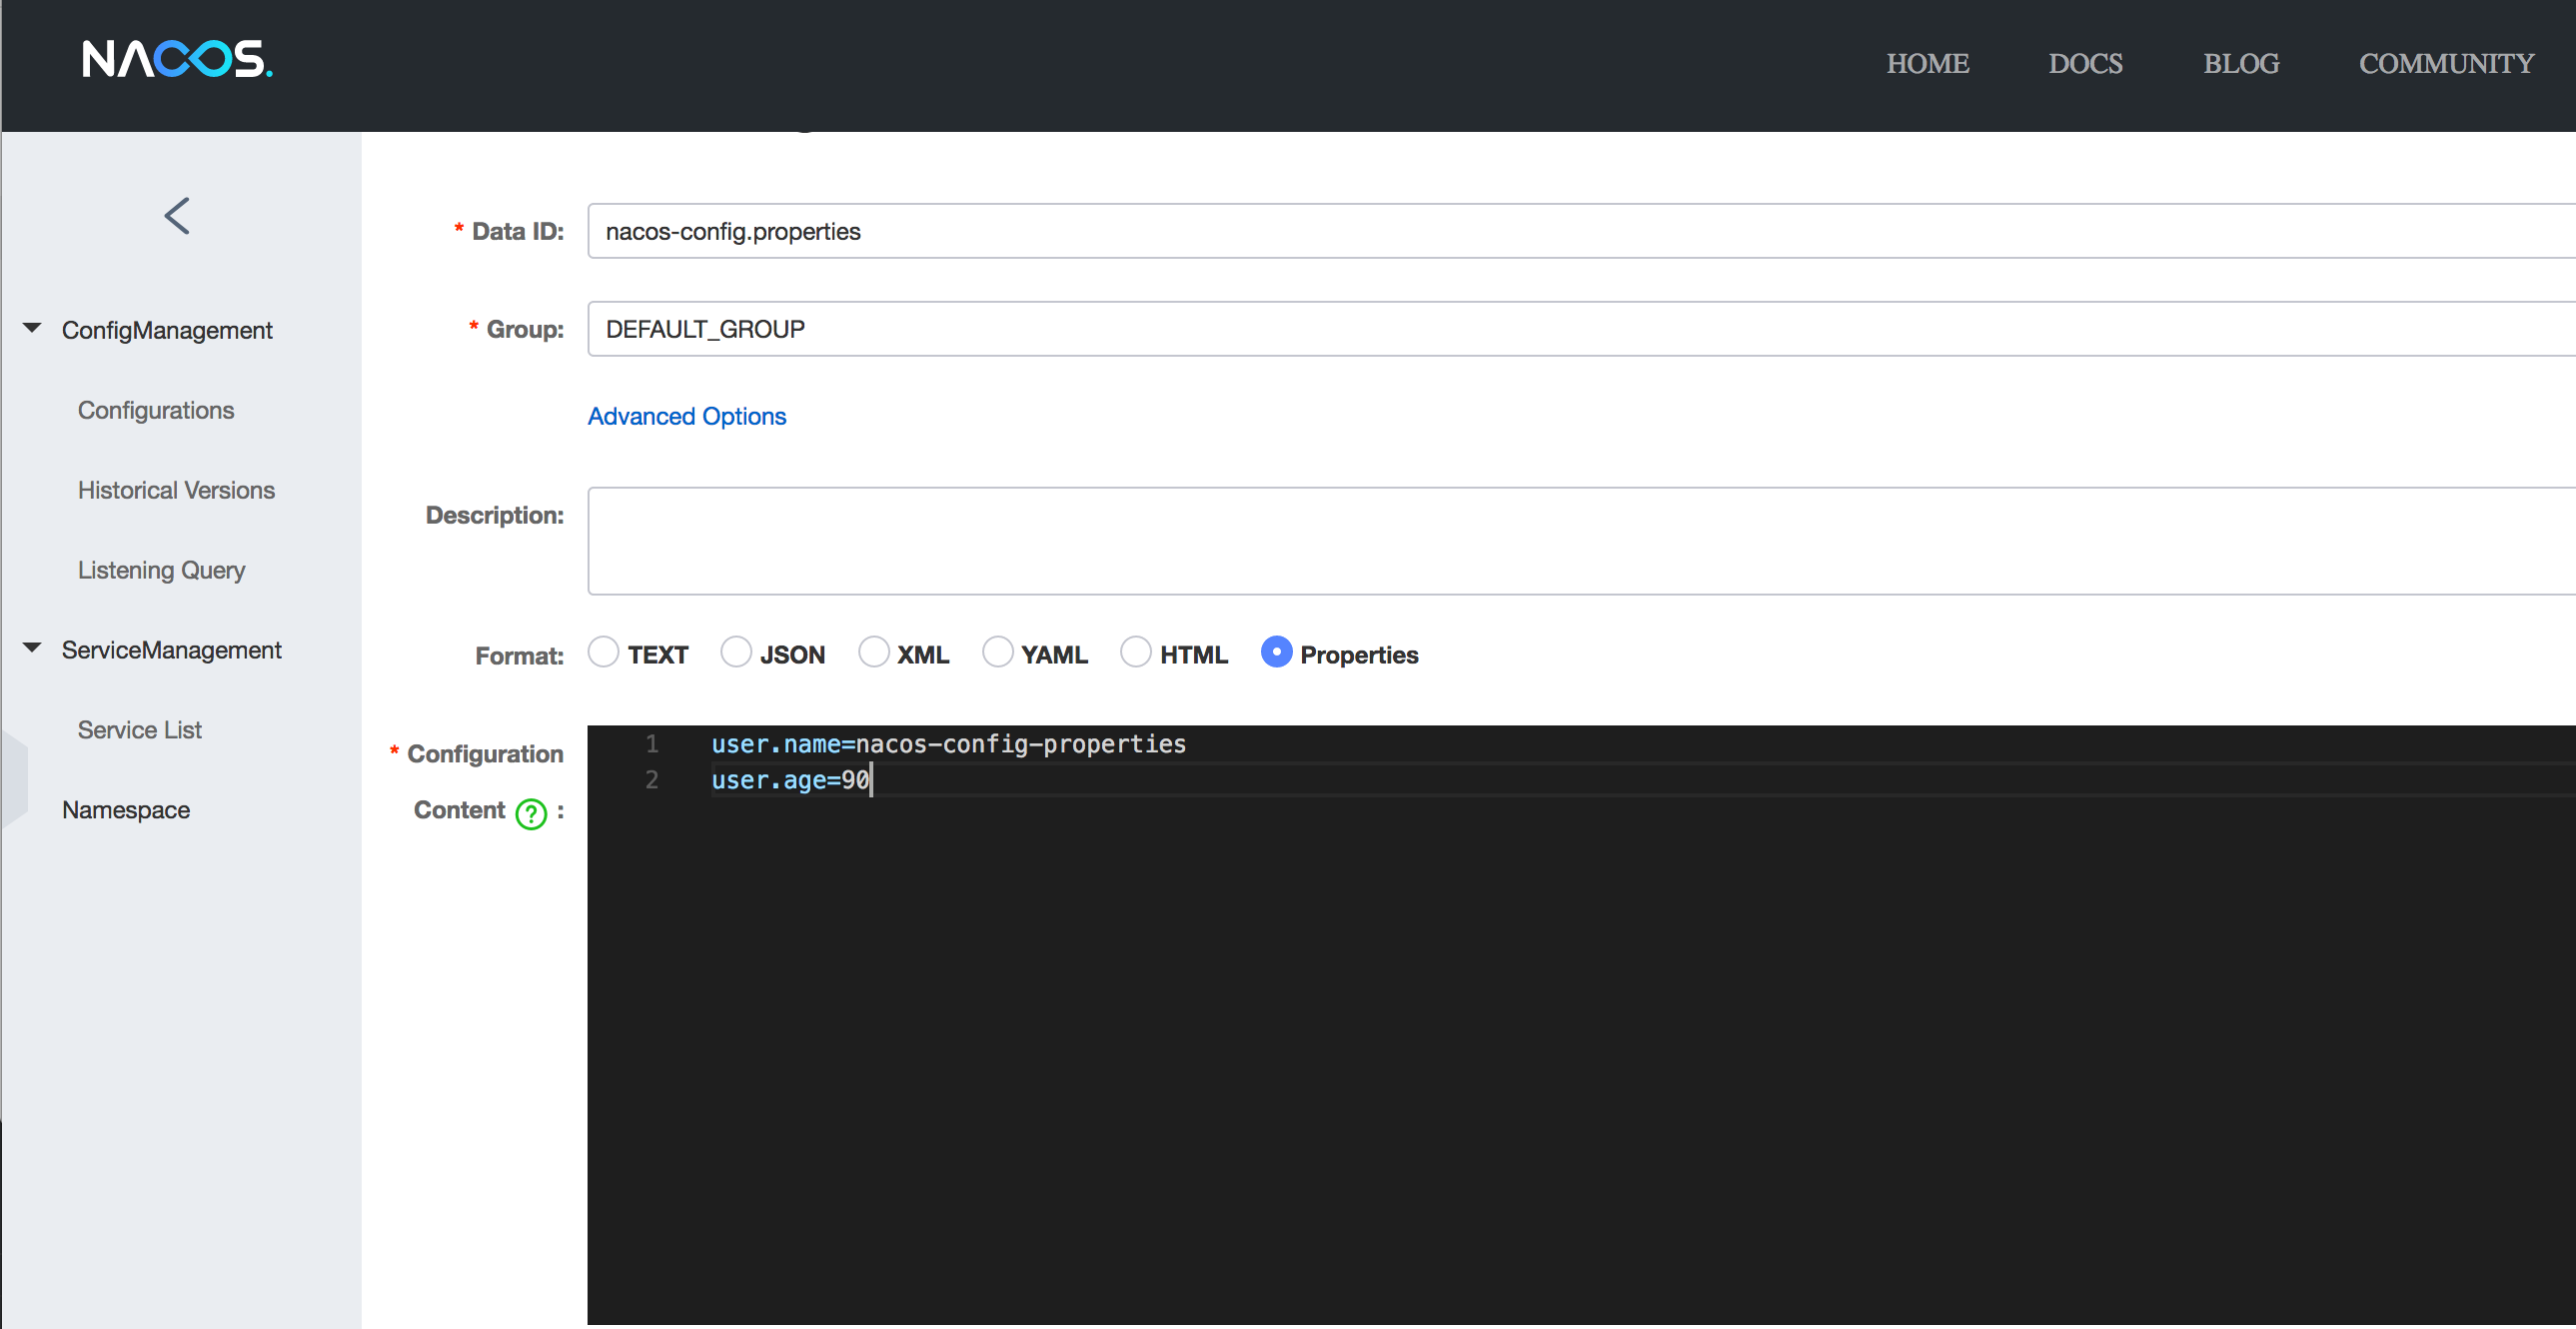
The default username/password is nacos/nacos . Once logged in, click on the + sign on the right side of the configuration panel to add a configuration.
Now we will add a couple of sample configurations.

We’ll explain what those terminologies are later. But for now, let’s create a client to consume the config.
Create a Client
As a Spring Boot application, first, we’ll add the dependency to the pom.xml in the application.
<dependency>
    <groupId>org.springframework.cloud</groupId>
    <artifactId>spring-cloud-starter-alibaba-nacos-config</artifactId>
</dependency>
We also need to modify the bootstrap.properties file to add the Nacos server configuration to the client application.
spring.application.name=nacos-config
spring.cloud.nacos.config.server-addr=127.0.0.1:8848
Now, let’s add the code:
@SpringBootApplication
public class ProviderApplication {

    public static void main(String[] args) {
        ConfigurableApplicationContext applicationContext = SpringApplication.run(ProviderApplication.class, args);
        String userName = applicationContext.getEnvironment().getProperty("user.name");
        String userAge = applicationContext.getEnvironment().getProperty("user.age");
        System.err.println("user name :"+userName+"; age: "+userAge);
    }
}
Run the code, and you should see the print out like this:
2019-06-02 14:24:51.638  INFO 32700 --- [main] c.a.demo.provider.ProviderApplication    : Started ProviderApplication in 14.645 seconds (JVM running for 15.139)
user name :nacos-config-properties; age: 90
2019-06-02 14:24:51.688  INFO 32700 --- [-127.0.0.1:8848] s.c.a.AnnotationConfigApplicationContext : Refreshing org.springframework.context.annotation.AnnotationConfigApplicationContext@a8c5e74: startup date [Fri Nov 02 14:24:51 CST 2018]; root of context hierarchy
Dynamically Update the Config
Sometimes we want change the config after an application has started running. Nacos will make the updates available dynamically. Here is an example. Before we start, Nacos also accepts YAML files as input. So let’s invoke that support from the bootstrap.properties file.
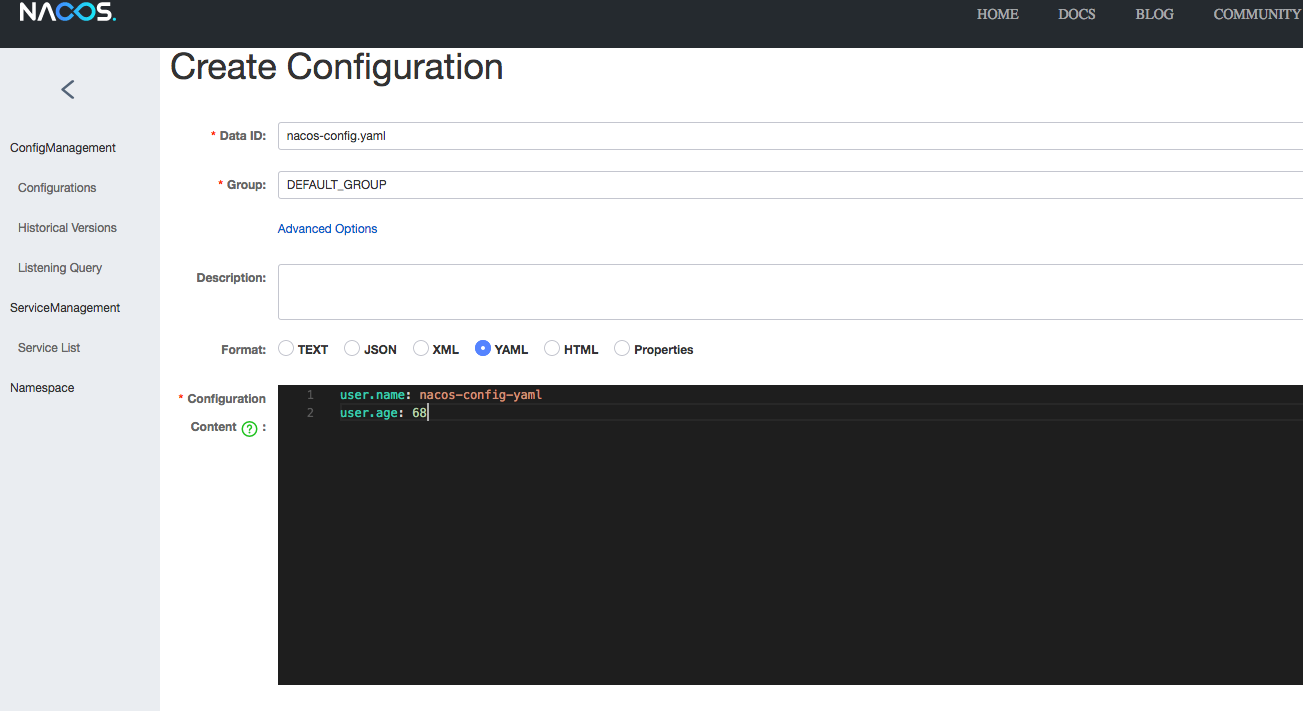
spring.cloud.nacos.config.file-extension=yamlNow go back to the dashboard and create a new data id.

After the update, if we run the client now, we will see the new results:
2019-06-02 14:59:00.484  INFO 32928 --- [main] c.a.demo.provider.ProviderApplication:Started ProviderApplication in 14.183 seconds (JVM running for 14.671)
user name :nacos-config-yaml; age: 68
2019-06-02 14:59:00.529  INFO 32928 --- [-127.0.0.1:8848] s.c.a.AnnotationConfigApplicationContext : Refreshing org.springframework.context.annotation.AnnotationConfigApplicationContext@265a478e: startup date [Fri June 02 14:59:00 CST 2019]; root of context hierarchy
Switch Profiles
Quite often, we have different settings for different environments. For example, under dev or production, the same config (user age) might be different. To enable that feature in Spring Boot, first let's change bootstrap.properties. Add the line:
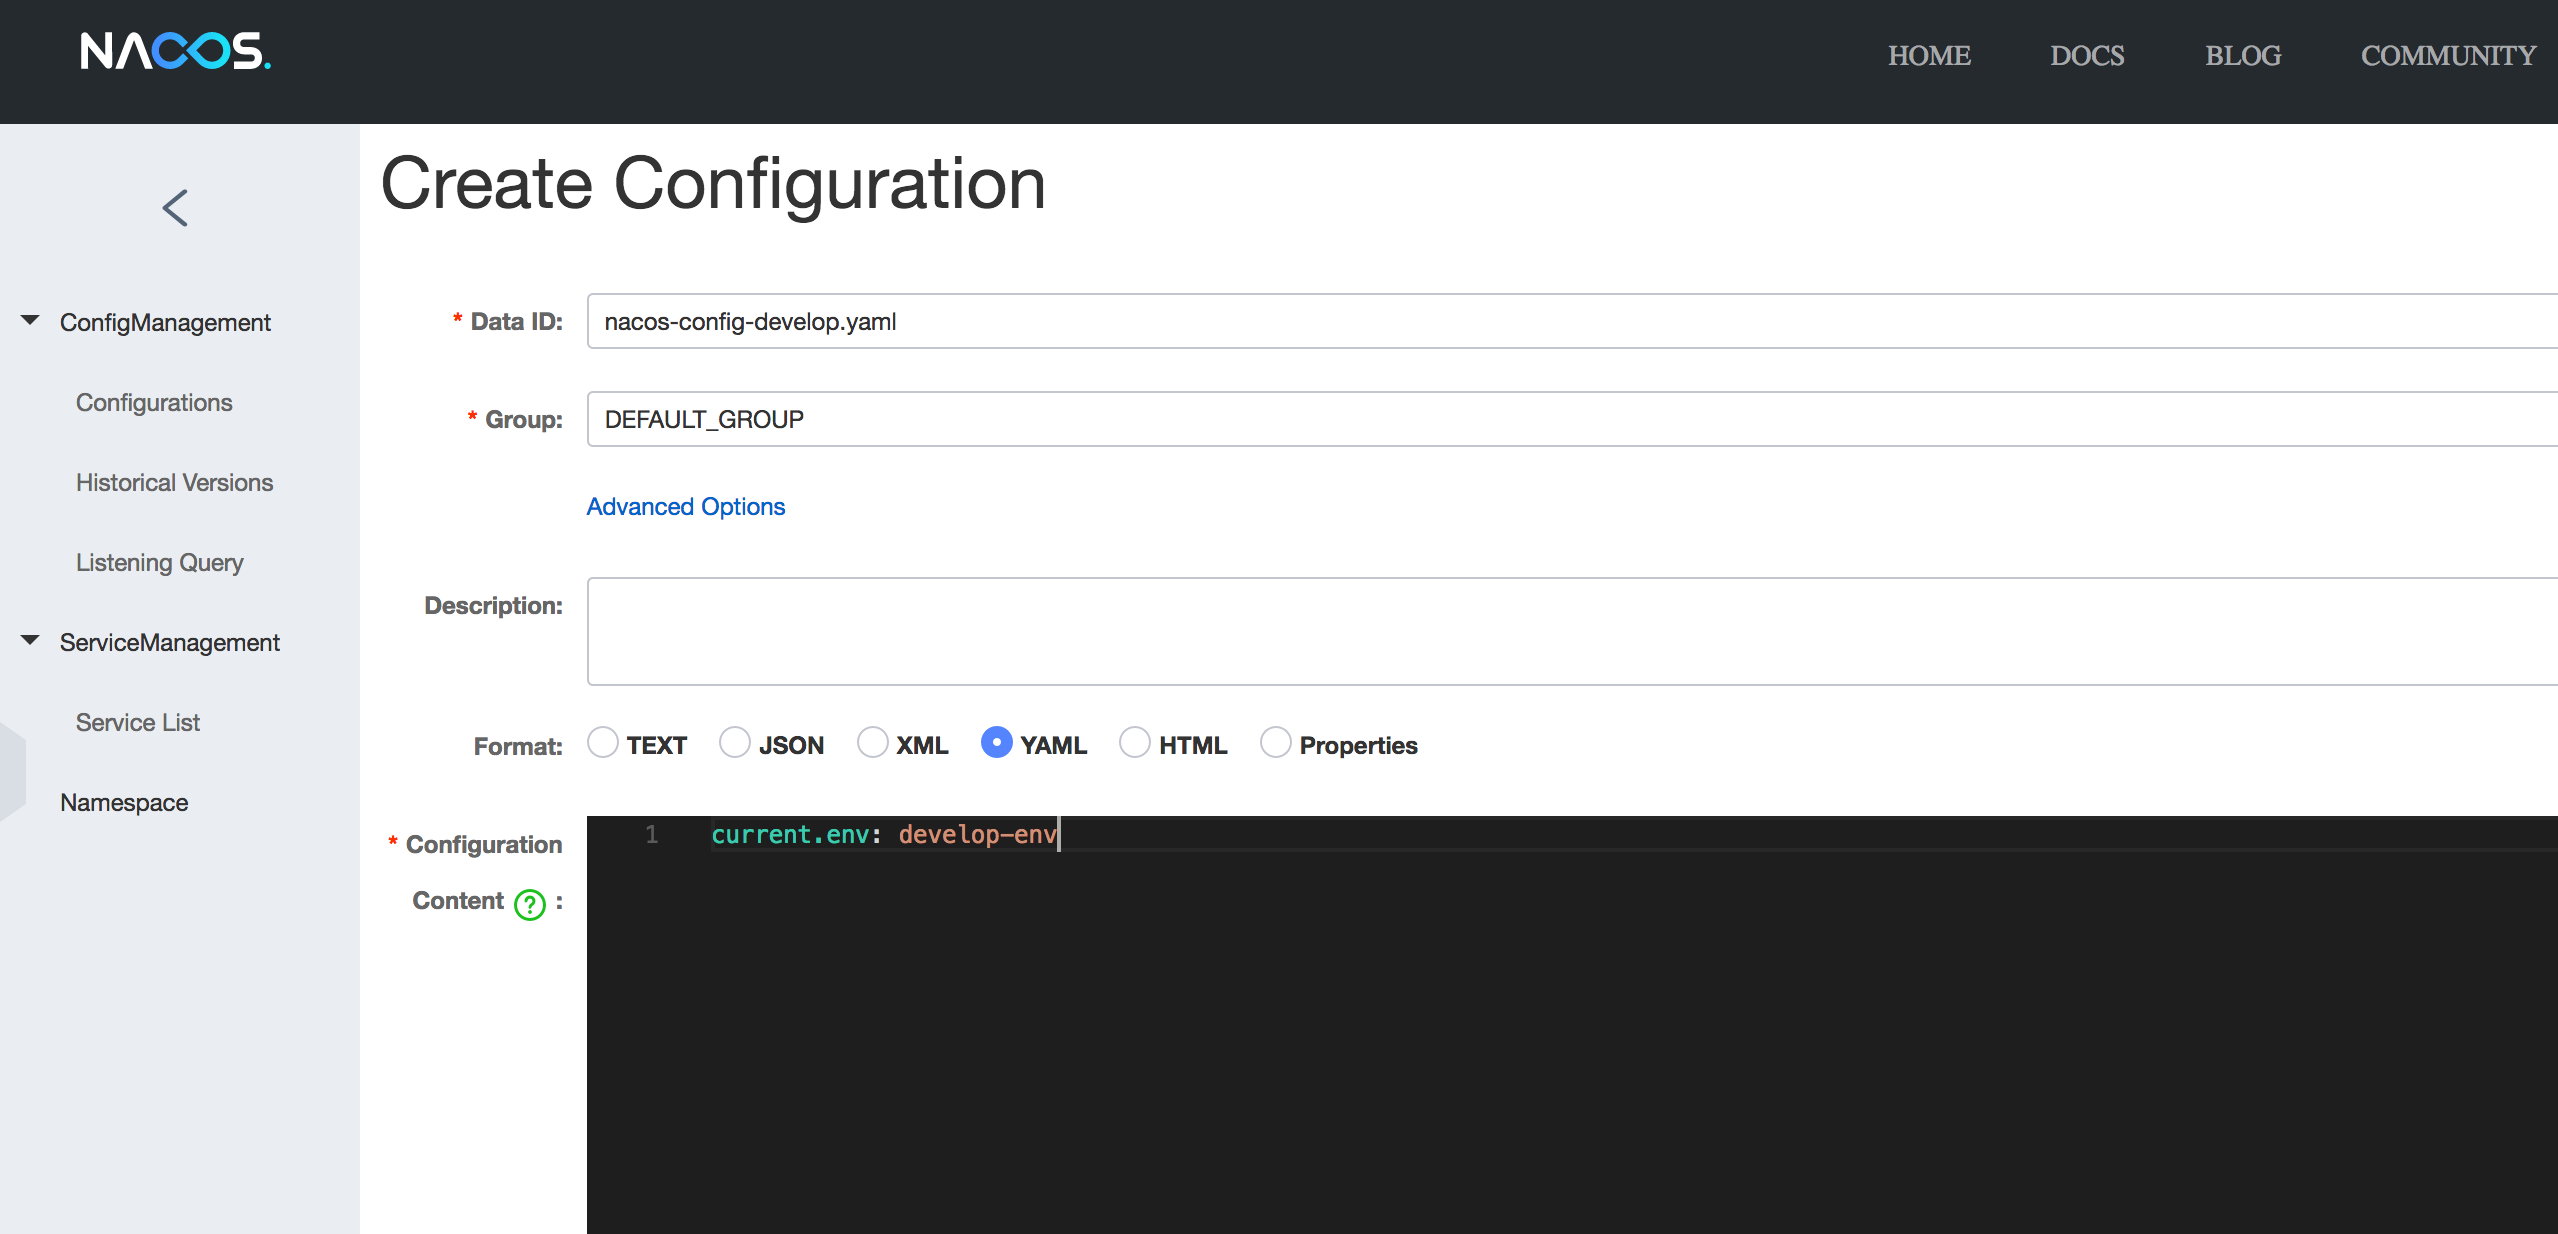
spring.profiles.active=developFor the Nacos config server to support that feature, we need to add another configuration in the dashboard:

Next, we modify the client code to pull the profile info.
@SpringBootApplication
public class ProviderApplication {

    public static void main(String[] args) {
        ConfigurableApplicationContext applicationContext = SpringApplication.run(ProviderApplication.class, args);
        while(true) {
            String userName = applicationContext.getEnvironment().getProperty("user.name");
            String userAge = applicationContext.getEnvironment().getProperty("user.age");

            String currentEnv = applicationContext.getEnvironment().getProperty("current.env");
            System.err.println("in "+currentEnv+" enviroment; "+"user name :" + userName + "; age: " + userAge);
            TimeUnit.SECONDS.sleep(1);
        }
    }
}
After running that we should see:
in develop-env enviroment; user name :nacos-config-yaml-update; age: 68
2019-06-02 15:34:25.013  INFO 33014 --- [ Thread-11] ConfigServletWebServerApplicationContext : Closing org.springframework.boot.web.servlet.context.AnnotationConfigServletWebServerApplicationContext@6f1c29b7: startup date [Fri June 02 15:33:57 CST 2019]; parent: org.springframework.context.annotation.AnnotationConfigApplicationContext@63355449
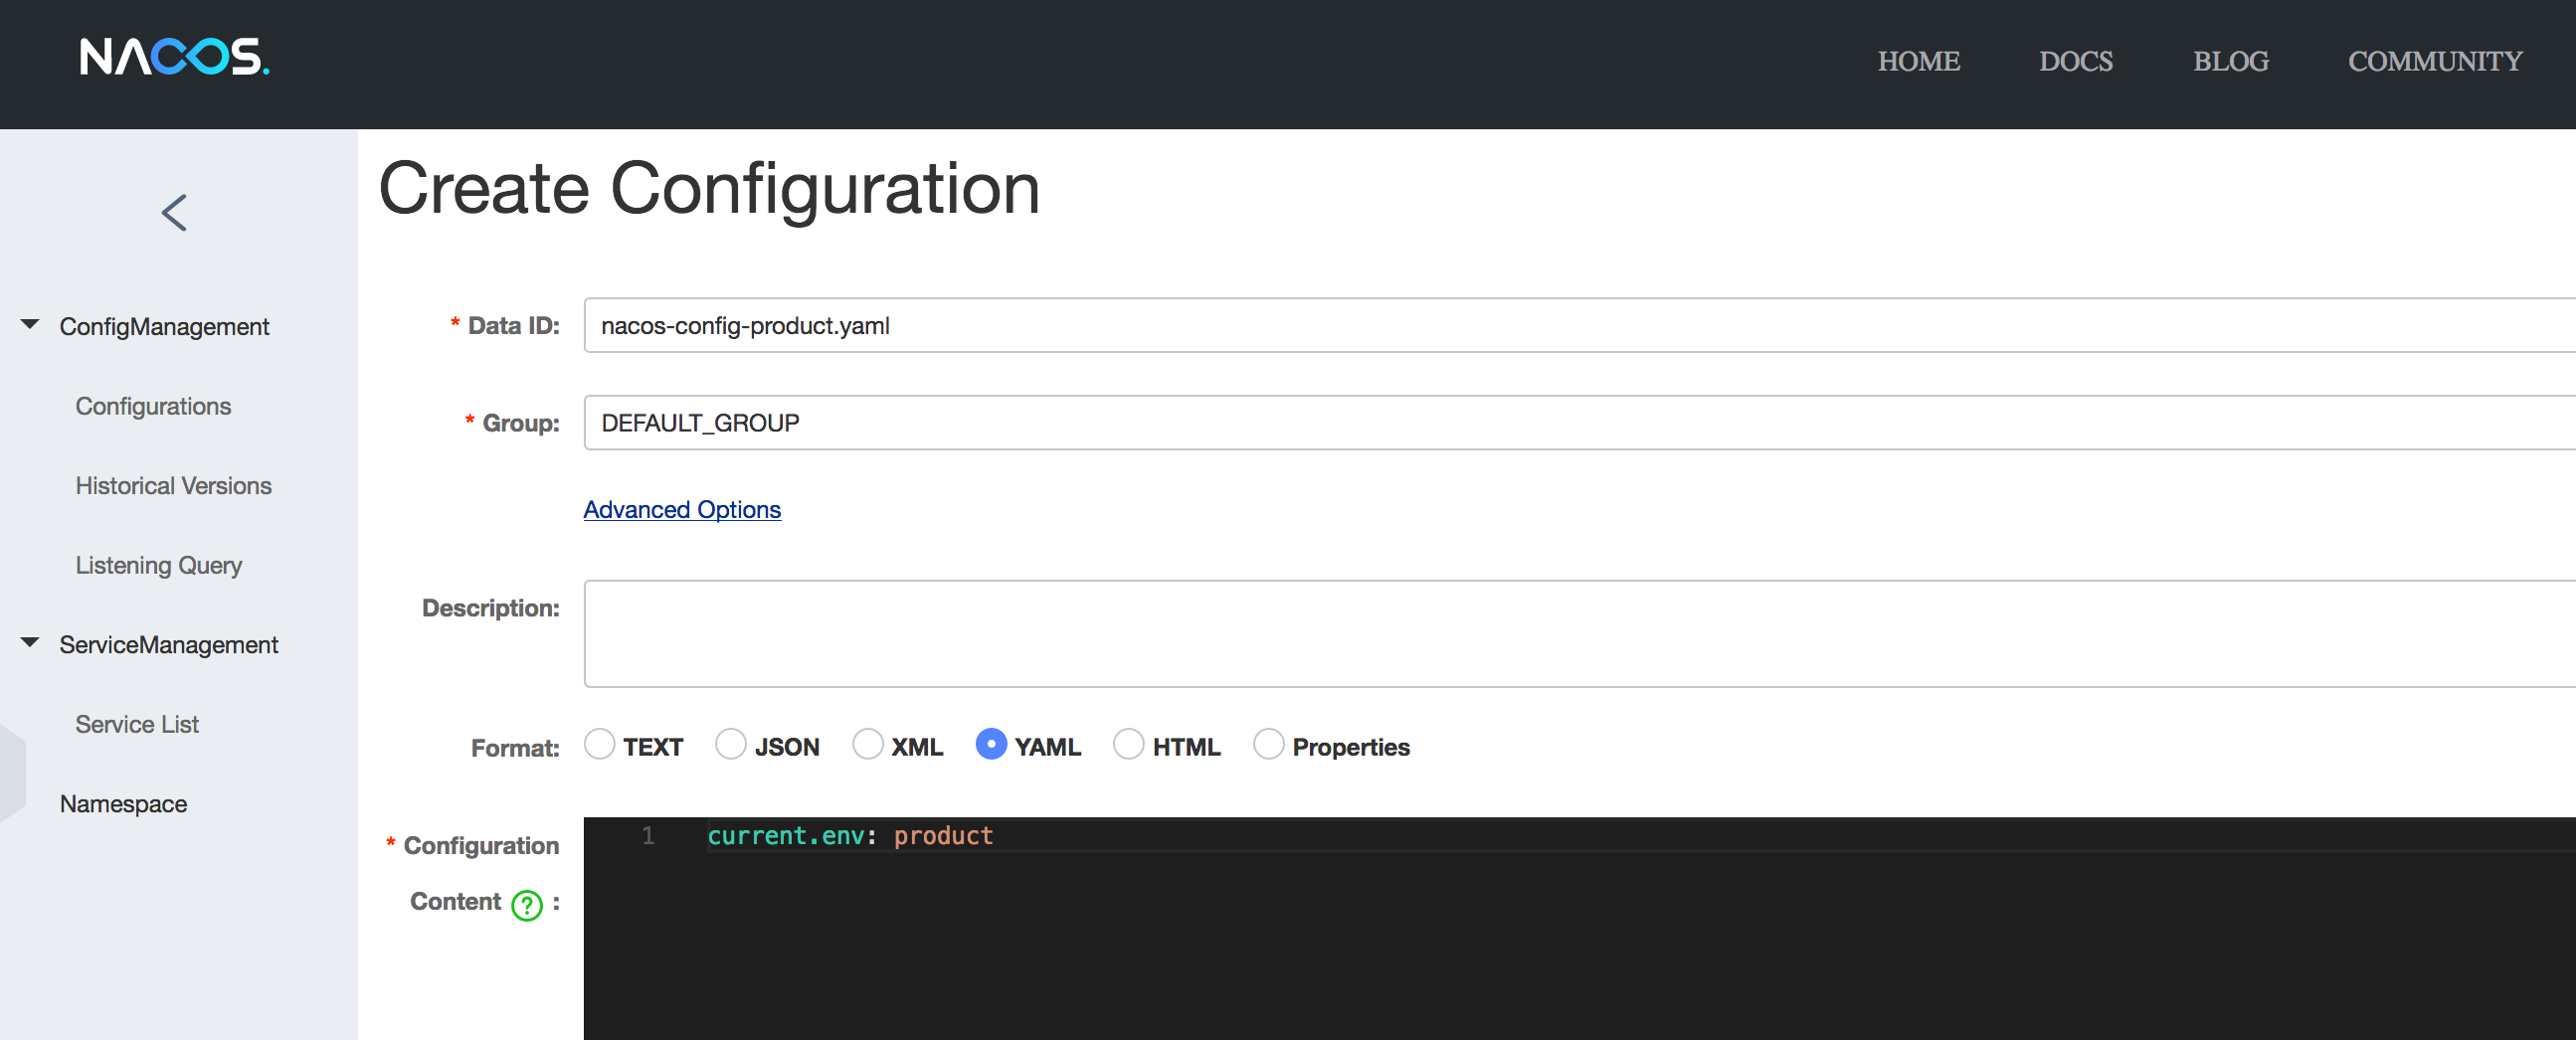
Now let’s switch that environment to production by adding a new config in the dashboard:

Don't forget to modify bootstrap.properties:
spring.profiles.active=productRun the same code again and we will see the change:
in product-env enviroment; user name :nacos-config-yaml-update; age: 68
2019-06-02 15:42:14.628  INFO 33024 --- [Thread-11] ConfigServletWebServerApplicationContext : Closing org.springframework.boot.web.servlet.context.AnnotationConfigServletWebServerApplicationContext@6aa8e115: startup date [Fri June 02 15:42:03 CST 2019]; parent: org.springframework.context.annotation.AnnotationConfigApplicationContext@19bb07ed
Data id
We’ve seen it many times in the GUI, but what is a data id? We are all familiar with key-value pairs, but those are called configuration items in Nacos. A set of configurations, not necessarily related, but grouped together, is called a configuration set. Obviously, this is an arbitrary concept. So how do we tag a configuration item to belong to a set? We usedData ids. Each configuration set has a data id. As seen in our examples, we produced several different data ids, meaning several configuration sets.
Group
Another concept from the GUI is called a group. We simply used the “Default_Group” in the example. Groups are another index or key to differentiate configuration sets when there are duplicate data ids. This is quite useful when we have similar applications in the same deployment. For example, we might have both Postgres and Mysql database configurations in the same deployment. And they both have the same data ids as db.properties.
Conclusion
Nacos is designed for enterprise customers with large applications to manage. The GUI might not be the first choice as an interface for developers, but when you have hundreds to thousands of microservices to manage, that sure comes handy. Nacos also provides different levels of granularity for configurations. This quick demo gives users a taste of what it feels like to use Nacos as the config server. Hopefully, it will encourage you to try it out.
Opinions expressed by DZone contributors are their own.

Comments