Nginx + Node.JS: Perform Identification and Authentication
You can use some powerful solutions for system authorization but if you want to reduce the number of dependencies, you can write something of your own.
Join the DZone community and get the full member experience.
Join For FreeSystem authorization is one of the key parts. You can use some powerful solutions, such as Firebase, or one of the many good libraries. If you want to reduce the number of dependencies or you need some self-education, you can write something of your own.
This is how over time, after several iterations, a solution based on Nginx was developed. Everything described is a very special case of the approach used, in the sense that there are some conditions in which it was required to create a solution, and this solution is good only in those particular conditions.
The wonderful Nginx (probably not only it) has a simple and very effective ability (auth_request) to configure the execution of sub-requests for each request. In other words, when clients contact your API that accepts connections on port (for example) 30000, Nginx will execute auth_request – an authorization sub-request for the port you define (for example) 25000. We launch the application that listens on port 25000, processes the request, and returns data containing everything necessary for authentication in the API of the requestor (client). This part is well known and getting some detailed information won’t cause any problems.
To implement such a scheme using node.js applications, you can use any module that implements an HTTP server. Even the HTTP module built into node.js will do just fine with minimal coding. The example uses a custom module just for convenience. Also, I will not focus on configuring Nginx – in this case, it does not matter. At the very least, the above link contains examples of config and descriptions of directives.
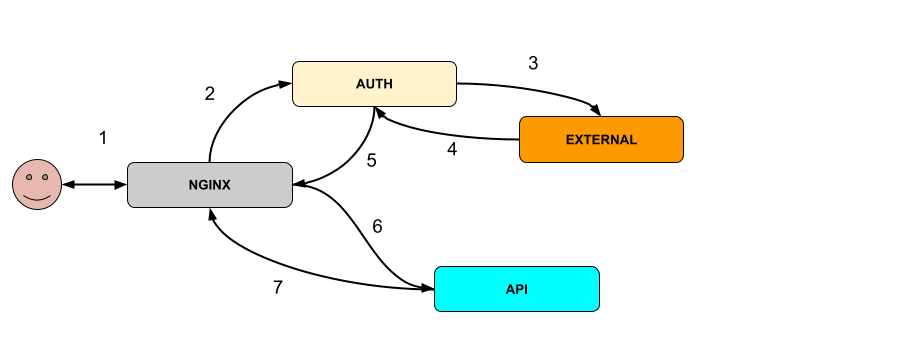
Description
- Nginx gets a request to /API
- Nginx makes a sub-request to /auth
- Auth takes data from the request and performs a number of actions, including (optional) using external modules (for example, decoding the JWT token received in the request cookie)
- The external module returns data to Auth
- Auth returns a response to Nginx which attaches the received data in addition to the main request (auth_request_set)
- Nginx makes an initial API request
- API reads additional data and uses it to authenticate the request, returns a response
That’s it in general terms. Let’s move on to the application. For the convenience and simplicity of demonstration, JSON Web Token (JWT) is used. Only a unique user identifier is stored in the token (again, for simplicity, let it be the user ID from the database, but you’re free to create a session code, hash user ID, or something else).
The processing inside AUTH is a sequence of methods that accept options as input (read about them below), the result of calling the previous one, and module objects of HTTP requests and responses. The very first method also gets a request as data.
After starting and reading the configurations (./configs/.), each path (end-point) gets its processing sequence from the specified methods and options given to them. See the app.js BuildWorkers method for details.
All handler methods are located in ./workers/ and are extremely simple. For example, the config file ./configs/api.config.js
The first reqprops method with the properties:[‘headers’,‘apikey’] parameters will try to read the value from the properties with the specified names, i.e. (the request will be received as input) request.headers, and look for a header named apikey from the received value. If the value is found, it is returned from the method and will be passed to the next method, according to the req configuration.
In turn, the req method, having received the first options argument from the config, will execute the request according to the specified path and port, and pass the second argument (input data). In this case, this is JWT decoding. The module will return the received data from the external JWT decoding service for processing by subsequent modules.
{
	path: "/api/*",
	workers: [
		{
			name: "reqprops", options: { properties: ['headers','apikey']}
		},
		{
			name: "req",
			options: { port: jwt.port, path: jwt.decode_path, data: { secret: jwt_secret }}
		},
		{
			name: "inlist",
			options: { field: "id", list: ["apidev"]}
		},
		{
			name: "reqprops", options: { properties:['body']}
		}
	]
}
Next, the method will be called to check for the presence of a value (in this case, an object with an identifier in the ID field will be returned from JWT) in the list of allowed ones. There is no need to keep the list in the configuration. There may be the same external request to another module or database. And the last method in the chain is the same reqprops but with a different property name: body, which will be read and returned. Since there are no further methods in the configuration, this value will be passed to the next handler of the HTTP server which serves this path – but this is a completely different module.
Since only the data key is stored in the JWT received from the client, this data must be stored somewhere – the Data class (./data.js) is responsible for this. And two methods: for reading and writing data. External applications can read or write this data at any time through the API application (./api/). In the worker methods, there is a getdata method that reads data from Data and then passes it on, and if you put the setdata method next, this very data will be sent to nginx in response to the auth_request request. Further, in Nginx, this data is set in the header and read in the final application that processes the main request.
You can set quite a lot of sequence options exclusively through configs, but even if these workers are not enough, it is easy to add your own. Editing configs through some kind of visual implementation would probably be even easier and more convenient.
Thanks for reading! I hope this approach/solution will be useful to someone.
Opinions expressed by DZone contributors are their own.
Comments