Node.js Unit Testing Automation With Drone CI Using Mocha Framework
Step-by-step directions on how to do a continuous integration using Drone CI, taking a simple Node.js application and Mocha as our unit testing framework.
Join the DZone community and get the full member experience.
Join For FreeUnit testing is an essential practice of any software development lifecycle and can’t be avoided. In today’s modern cloud-native space, automating the testing part is in high demand with so many available platforms and tools. This automation of testing can be done through the continuous integration process. Continuous integration forms an essential method in the DevOps wonderland. It is a process that helps developers test and build their code to make sure nothing is breaking and can be confidently integrated into the main branch with a simple approval by an approver. The continuous integration process can be seamlessly automated with Drone CI to test, build, and give confidence to your developers. With continuous integration, developers can save a lot of time on manual testing and focus their valuable time on building rich features that their customers need. Today, we will see how to do continuous integration using Drone CI, taking a simple Node.js application and Mocha as our unit testing framework.
Prerequisites
Download and install Node.js from the official website
Drone CI Set-Up
Install Docker Desktop
Tutorial
Step 1: Create a Folder for Your Application Files
mkdir myapp
cd myapp
Step 2: Write a Simple Node.js Application
Initialize your project by running the command below:
npm init
This creates a package.json file with all the dependencies you downloaded for your project.
Step 3: Install Express
Note: Express is the Node.js web application framework
npm install express --save
Step 4: Create a File Named app.js With the Following Code
var express = require('express');

var app = express();

app.get('/', function (req, res) {

  res.send('Hello World!');

});

app.listen(3000, function () {

  console.log('Example app listening on port 3000!');

});
Step 5: Run the App
node app.js
Mocha Unit Testing Framework
The Mocha Testing Framework is a JavaScript library used to test JavaScript code. It is an open-source framework and provides a lot of flexibility to the developers. It has a simple API and can be used to test both synchronous and asynchronous code. It also has features like chaining, callbacks, promises, etc. It also provides an API for running tests in parallel, which speeds up the process of writing tests for a large codebase. The Mocha testing framework can be installed by using npm (the Node Package Manager).
Step 6: Add the Test Folder to Your App Directory
Note: This is where all of our tests will reside.
Create a folder named "test," and under that, create a file test.js.
You can install Mocha and Chai as part of the Node.js test framework.
npm install --save-dev mocha
Adds the Mocha as a dependency in the package.json file for the particular project.
Step 7: Add the Following Basic Mocha String Test Spec to Your test.js File
var assert = require('assert');

describe('Basic Mocha String Test', function () {

 it('should return number of charachters in a string', function () {

        assert.equal("Hello".length, 4);

    });

 it('should return first charachter of the string', function () {

        assert.equal("Hello".charAt(0), 'H');

    });

});
Step 8: Check Your package.json File
The package.json file should have the Mocha part included and should look like this:
"scripts": {

   "test": "mocha"

 }
Step 9: Run the Test With Mocha
Go to your app directory and run the following command:
npm test
My output is shared below:
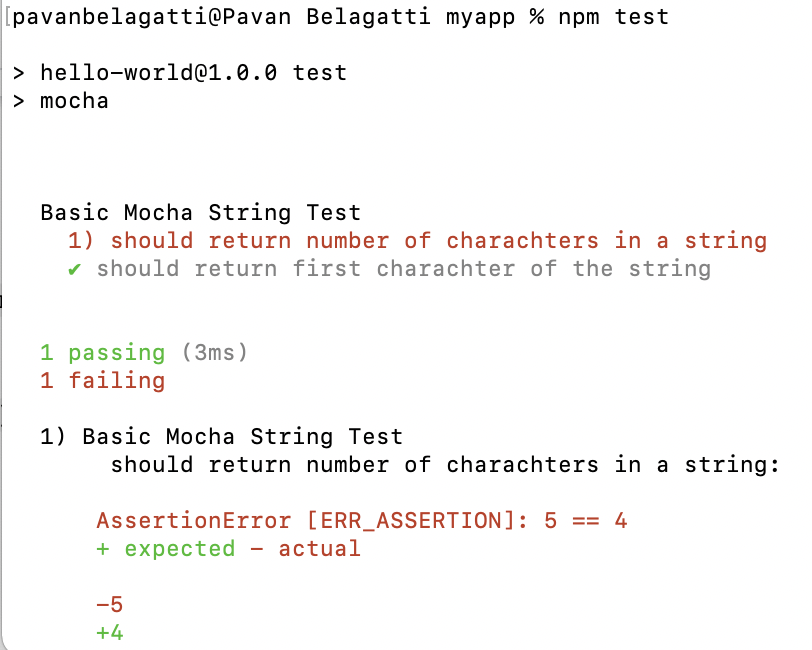
It is failing as there seems to be some error when Mocha ran. You can see one failing.
The source code of the example project is shared here.
Continuous Integration for Node.js Application
Until now, we locally tested the Node.js application, which can be automated through a CI server. Drone CI is our preferred CI platform that we already know how to run locally. It is open-source and easy to install in minutes.
Every time a developer pushes the code to the main branch of the application, using a CI server like Drone helps companies to find bugs and rectify the errors and mistakes before they teach the customers.
Let’s continue with the next steps.
Step 10: Push Your Application to GitHub
We should make sure no file or repository is missing. In our GitHub repository, we still need to add two files:
.drone.ymlas part of the Drone configuration files. Pipelines are configured by placing a.drone.ymlfile in the root of your git repositoryDockerfile to build and publish a Docker image as a step in our build pipeline
Add a simple Dockerfile as it contains instructions to build your container.
FROM node:14-alpine
ENV NODE_ENV development
# Add a work directory
WORKDIR /app
# Cache and Install dependencies
COPY package.json .
RUN npm install
# Copy app files
COPY . .
# Expose port
EXPOSE 3000
# Start the app
CMD [ "node", "app.js" ]
The .drone.yml file looks like this:
kind: pipeline
type: docker
name: default

platform:
 os: linux
 arch: arm64

steps:
- name: test
 image: node
 commands:
 - npm install
 - npm test
 - name: docker
 image: plugins/docker
 settings:
   # registry: docker.io
   repo: pavansa/myapp
   username:
     from_secret: docker_username
   password:
     from_secret: docker_password
   tags:
     - pavans
Pipelines are configured by placing a .drone.yml file in the root of your git repository. The YAML syntax is designed to be easy to read and expressive so that anyone viewing the repository can understand the workflow.
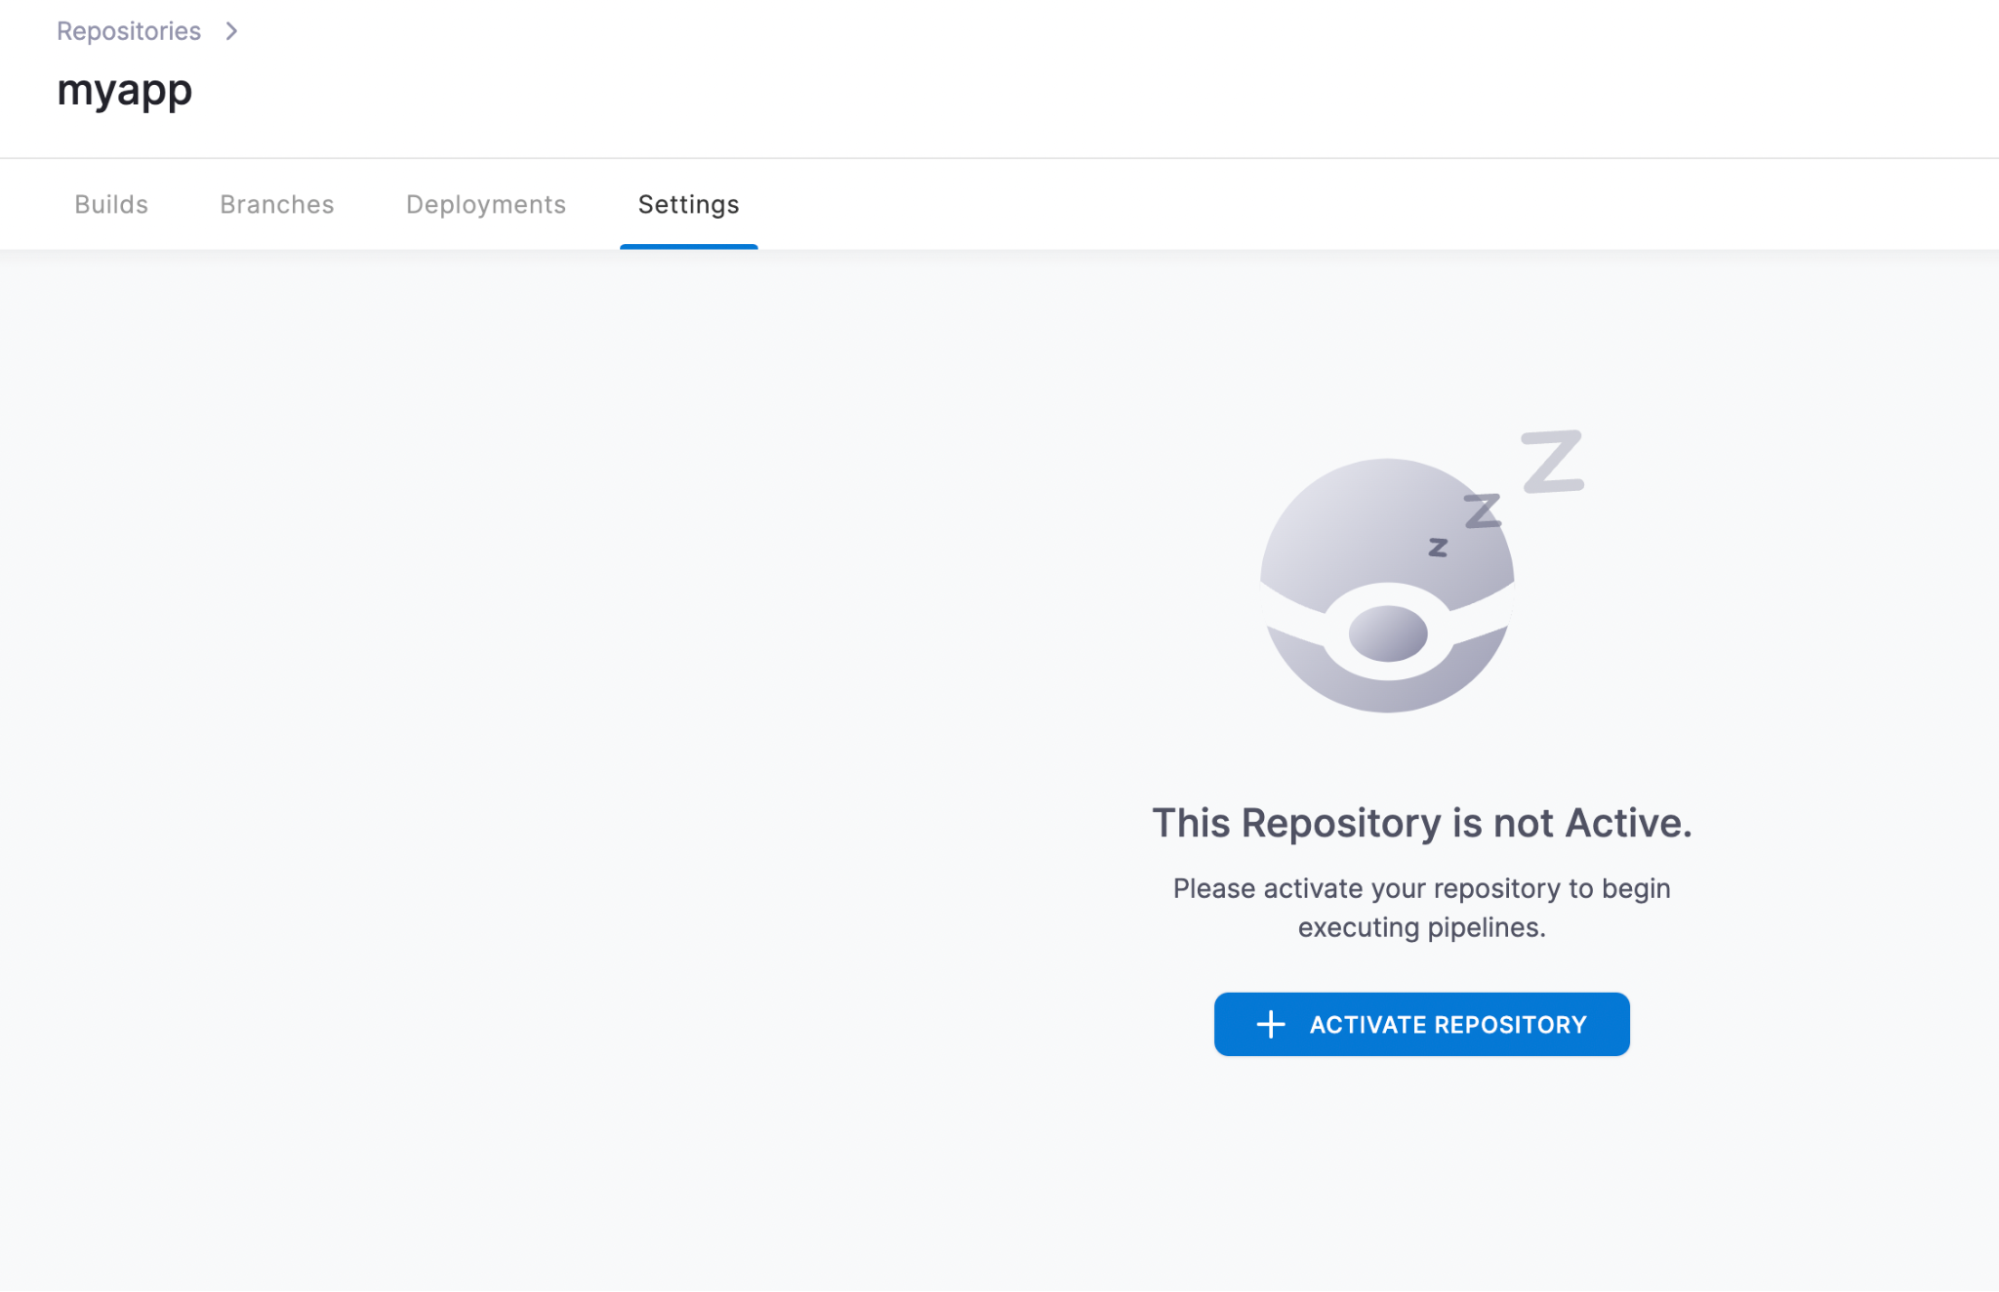
Step 11: Open the Drone Dashboard and Sync Your New Repo
Setup with secrets:

After syncing the repos, you should see all your repos below and pick the one we are building:
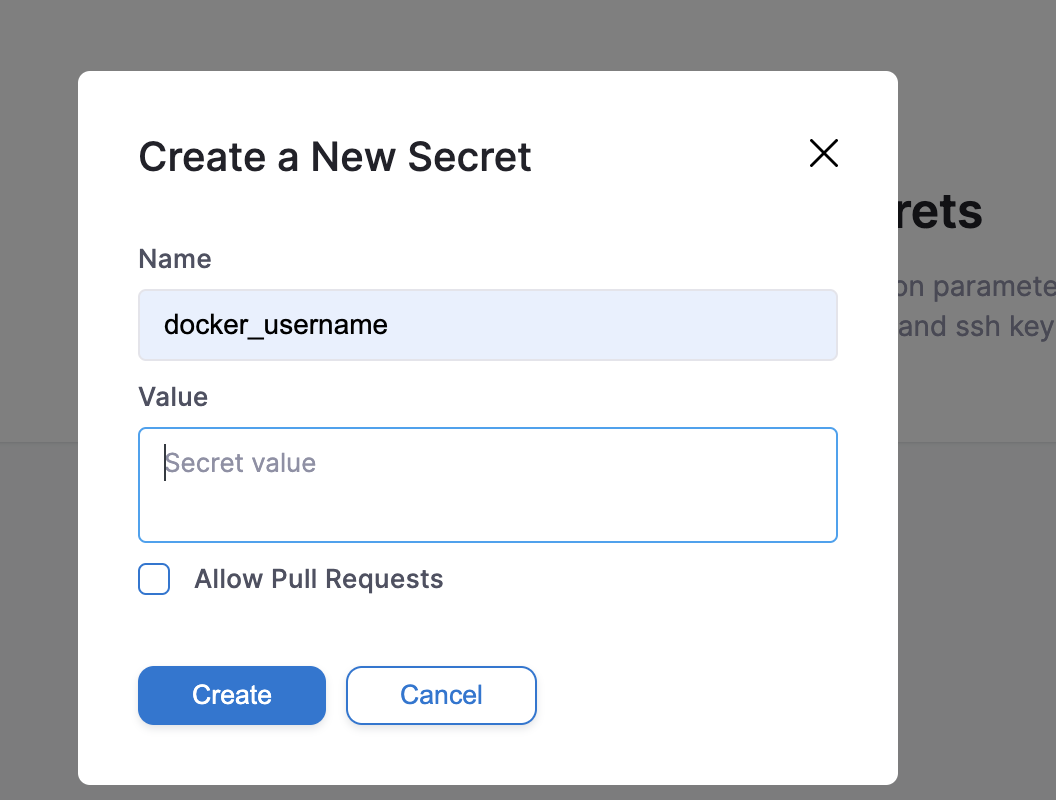
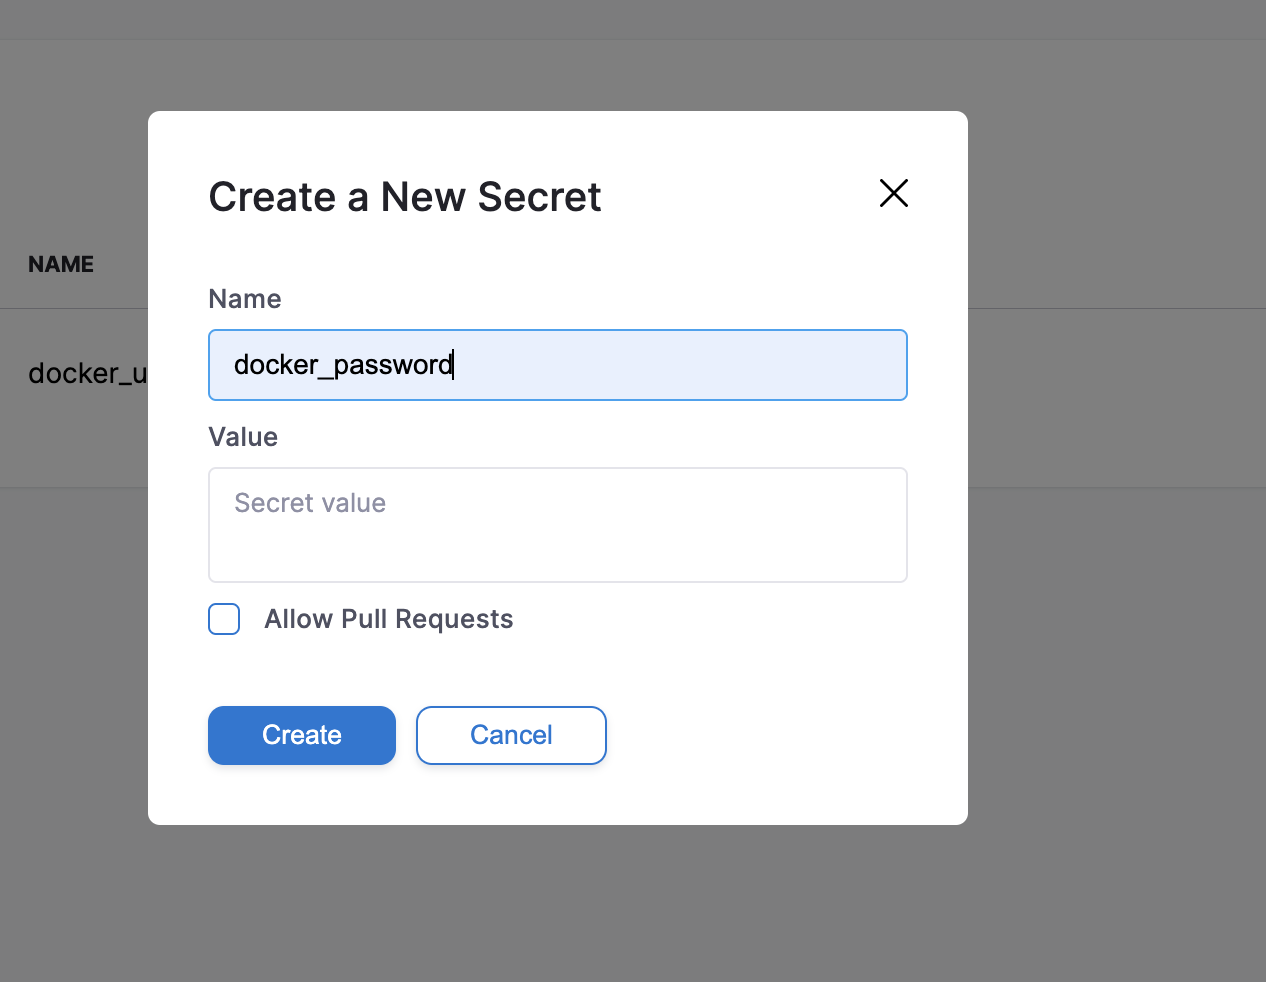
Next, activate the repository by adding secrets:
After all the above steps are done, click on the "NEW BUILD" button, and it starts building the pipeline:

Here you will see Drone doing its magic by building the code and testing it against the tests we specified for our application code.
Remember: We have added a plain Mocha test framework to our application.
If the tests pass, it should go ahead and push a newly built image to our DockerHub, as specified by us in the .drone.yml steps.
And if the test fails, the application pipeline should not build and stop there itself.
Let’s see what happened to our build:
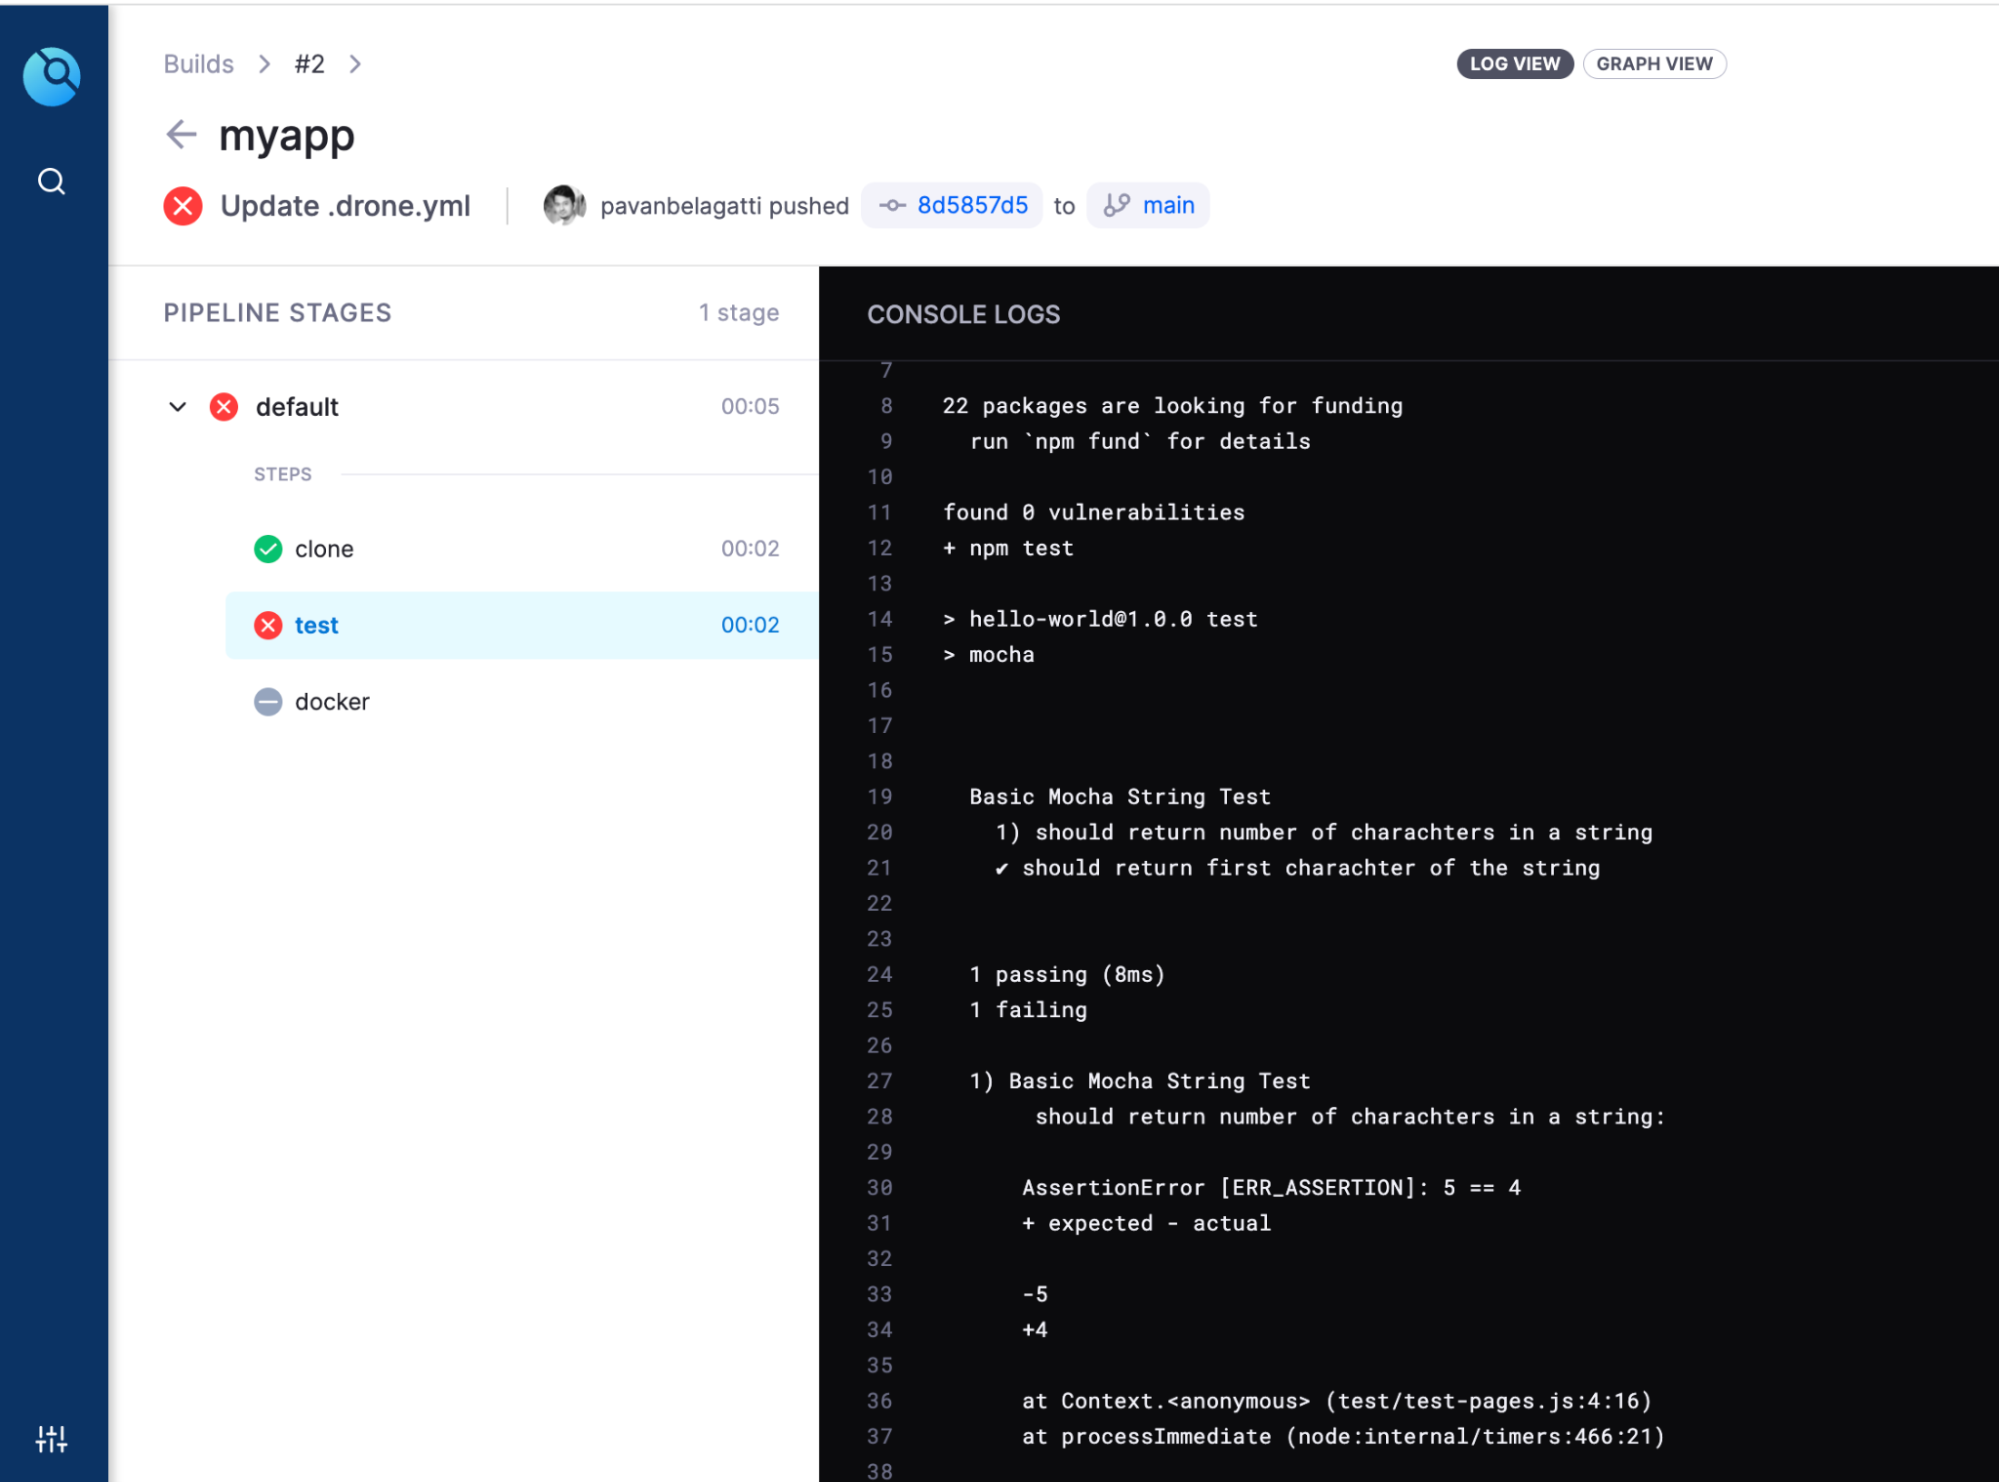
As expected, the pipeline failed without carrying out the next steps.
You can go back and correct the errors, and Drone automatically runs the pipeline; if everything is good, it pushes the new build to Docker Hub as expected.
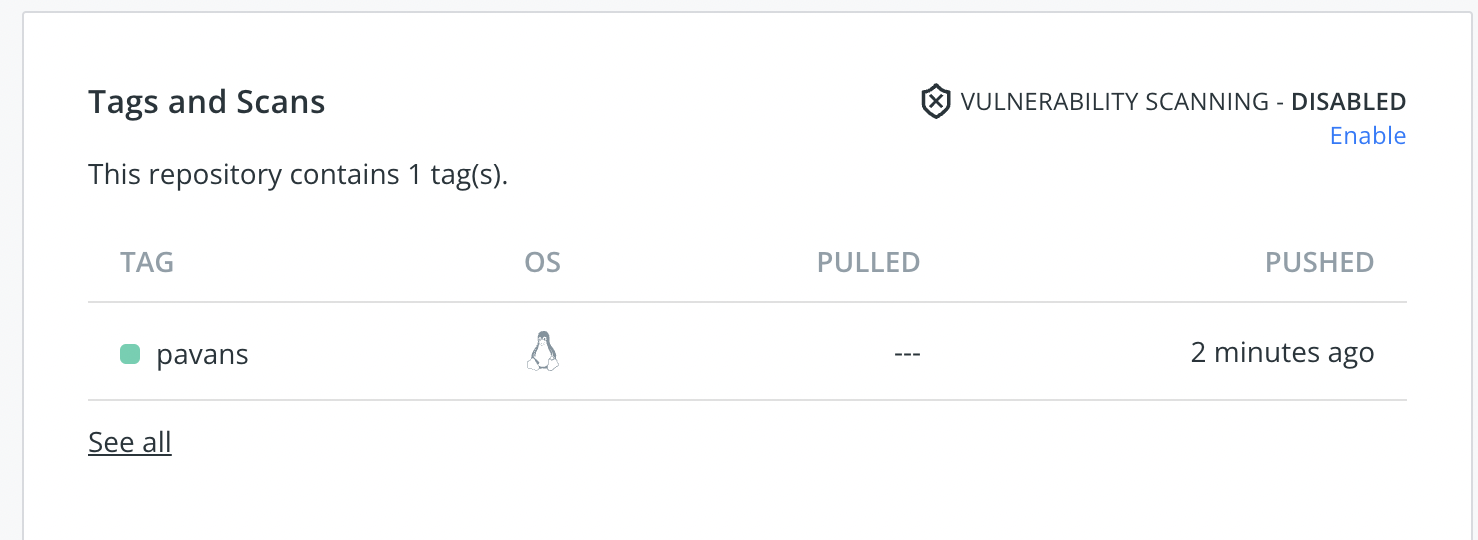
When everything is passed, go check the Docker Hub repo you mentioned in the .drone.yml. It should have pushed the image there. The tag we gave in pavans, and you can see it here.
Congratulations! We have successfully built a simple Node.js application, added a simple Mocha test, used Drone to do continuous integration, and pushed the new image to the Docker Hub.
Drone Desktop
Wait, some of you might wonder if there is a Drone extension you can use instantly without setting up Drone CI on your laptop. Well, we have it for you. You just need to have Docker Desktop installed on your laptop/computer, and using the below command, you can easily set up the Drone extension in a minute.
docker extension install drone/drone-ci-docker-extension:latest
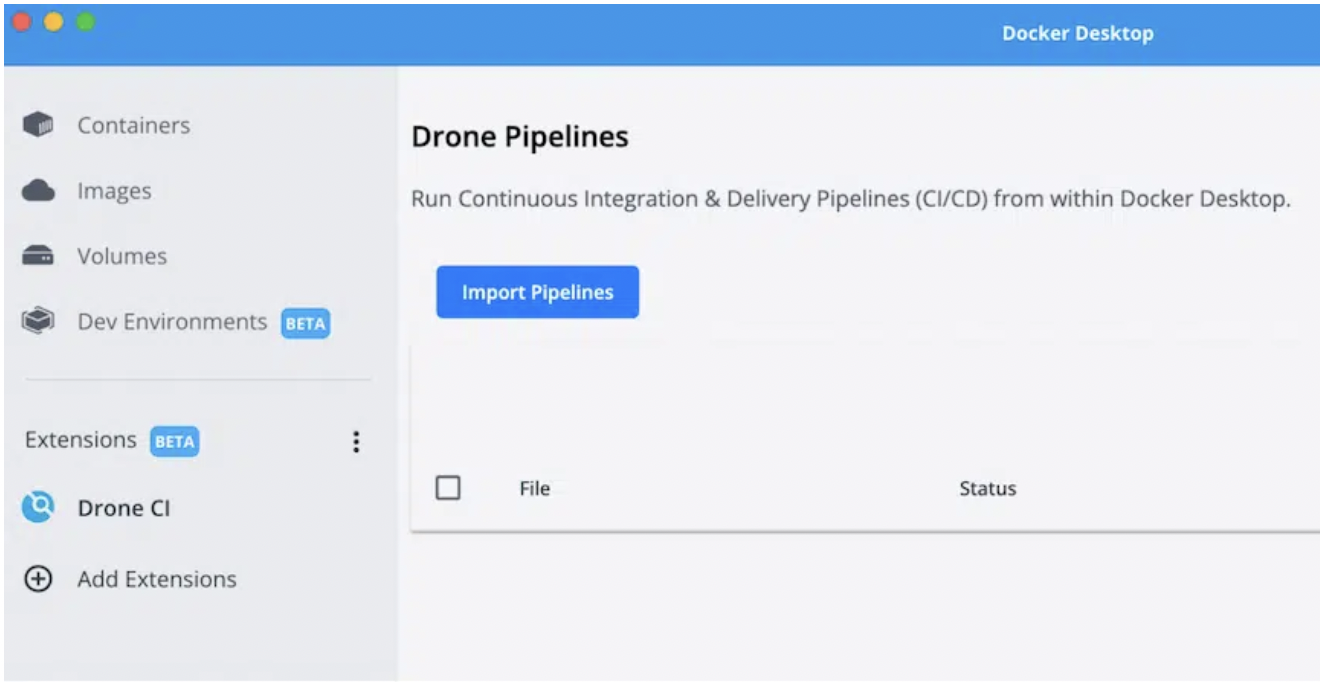
It is very straightforward. Import the pipelines; here, we are going to import our above example.
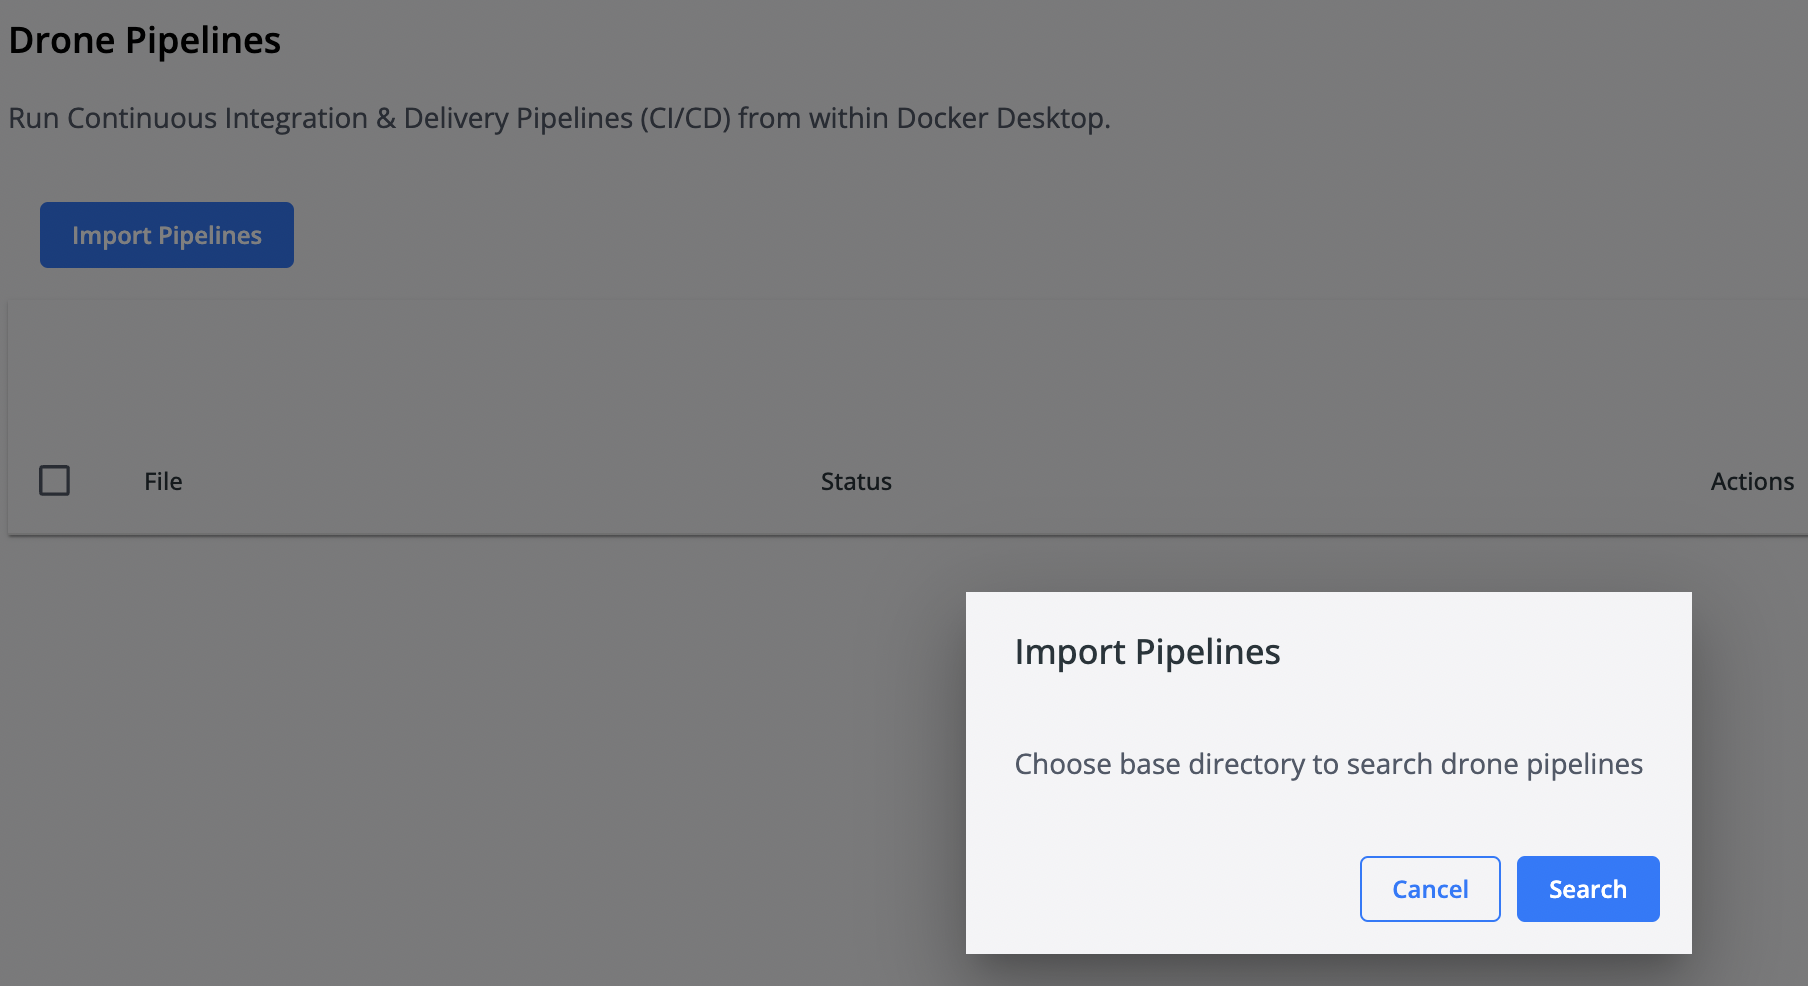
You will be prompted to search and add your repo that has a .drone.ymlfile. So let’s go ahead and add our repo.
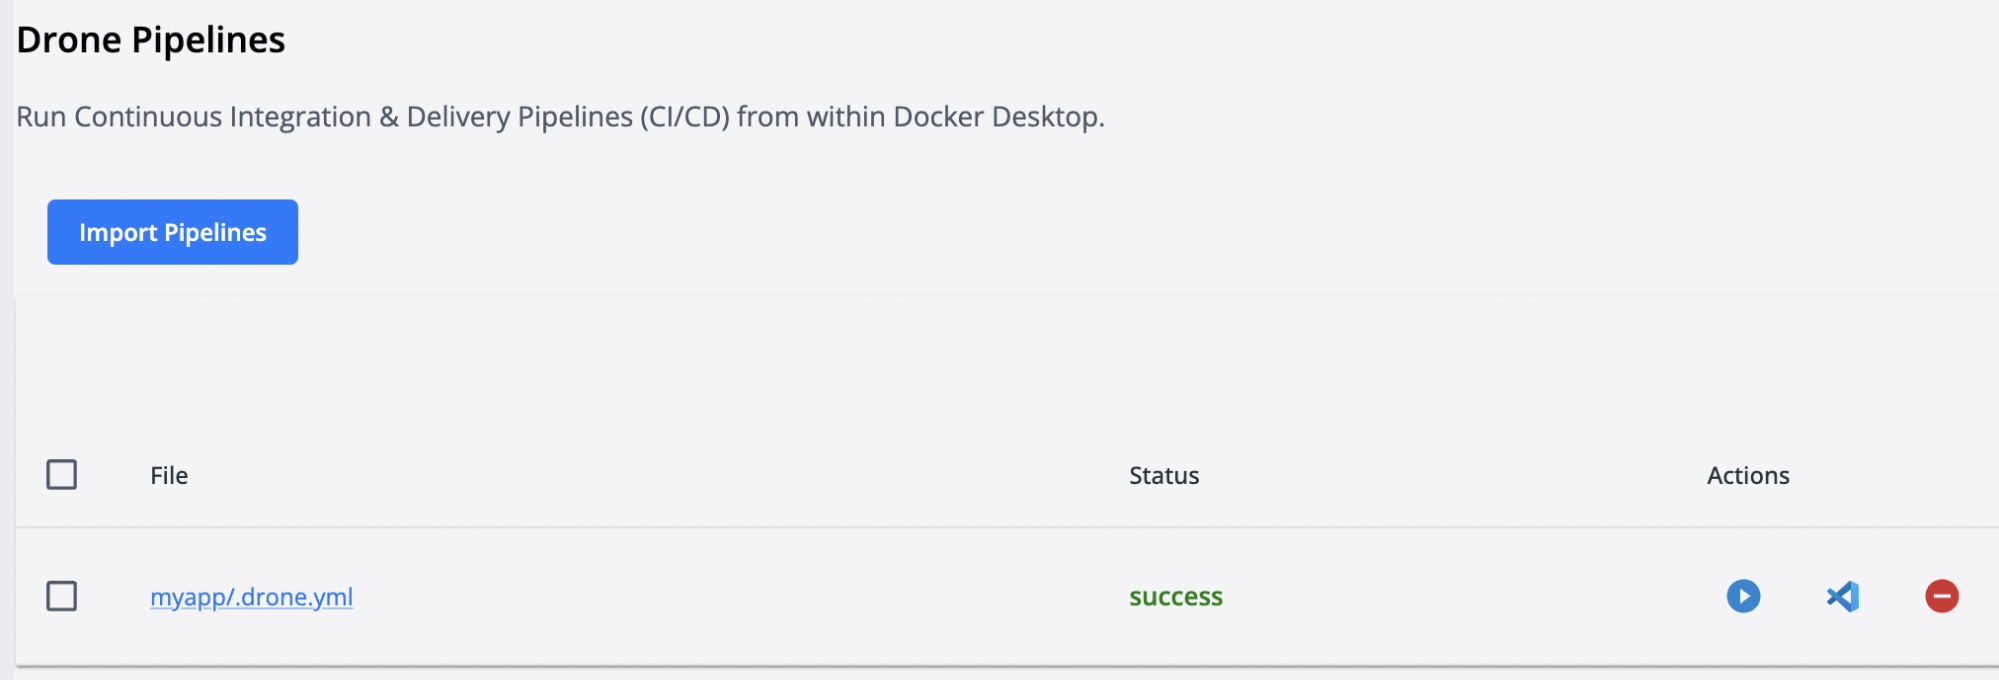
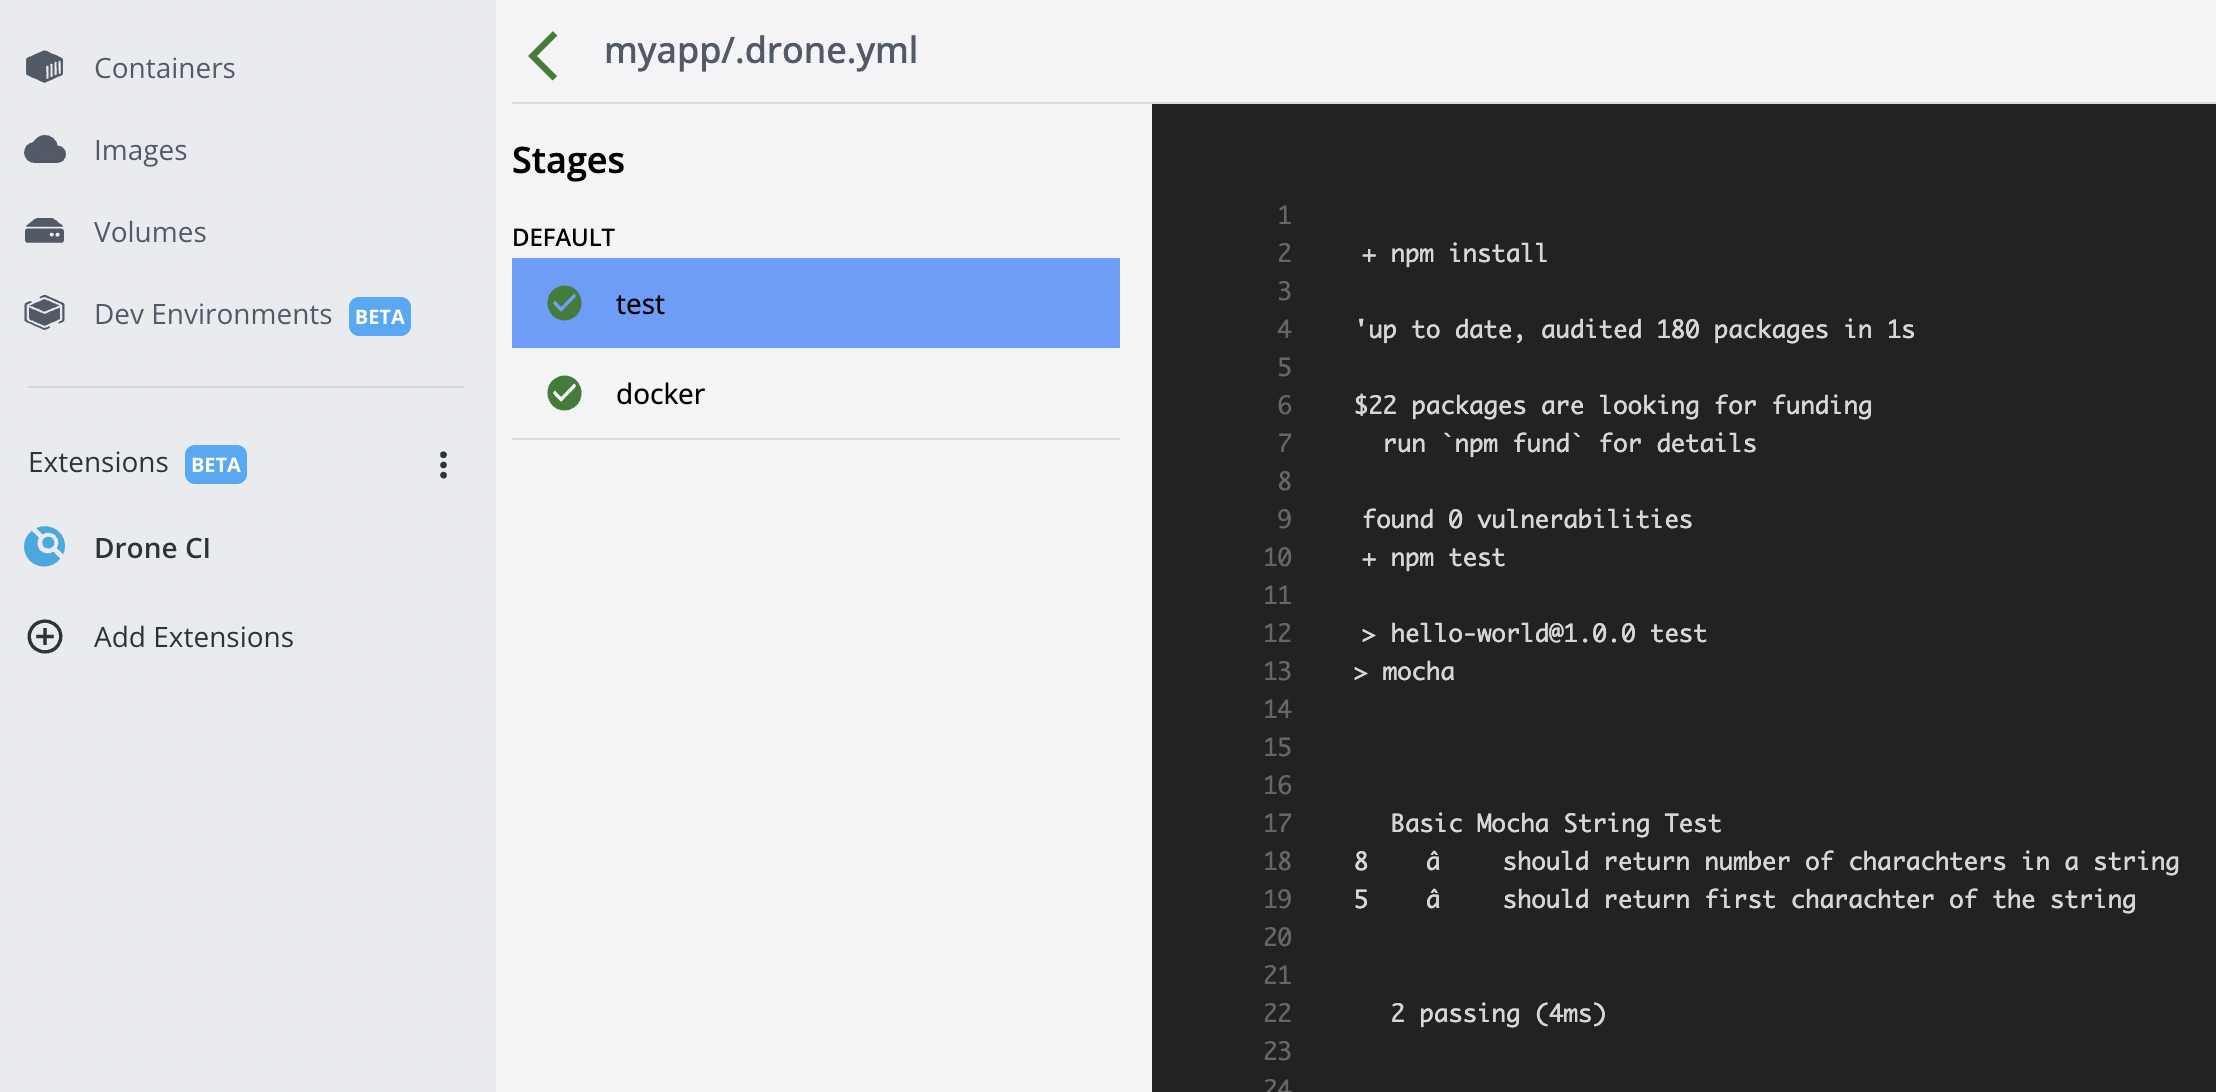
Then, click on the Run Pipeline button under Actions to trigger your pipeline.
Once you click on the Run Pipeline button, you will be prompted to add some information required to run the pipeline, such as the secrets file to be used, environment variables if needed, and the stages to be run by the pipeline.
We have specified two simple steps, i.e, Test and Push to Docker, on the successful passing of the test. We don’t have an environment variables file, so leave it blank, and we have a secret file that has our DockerHub secrets, select it. After selecting the steps as a test, Docker, and the secrets file, click the Run tab.
You will see the pipeline executing successfully if the steps specified pass.

You can also see the steps running in the dashboard.
Congratulations on successfully running your CI pipeline through the Drone CI Docker extension.
Published at DZone with permission of Pavan Belagatti. See the original article here.
Opinions expressed by DZone contributors are their own.
Comments