OpenCV Integration With Live 360 Video for Robotics
Use OpenCV and a 360° camera with Linux to add object recognition to your robot in real-time using 4K 30fps live video and applications in Python or C++.
Join the DZone community and get the full member experience.
Join For FreeAs artificial intelligence gets more advanced, robots are increasingly used to free humans from the risks of inspecting dangerous locations or the drudgery of routine visual surveillance. To provide some degree of autonomous decision, the robot often has cameras connected to an onboard Linux computer such as an NVIDIA Jetson or x86 single-board computer (SBC).
If the application benefits from live 360-degree video, there are two approaches. The first, more difficult approach is to use multiple cameras and stitch the video together on the computer or process each video feed separately. The number of cameras used depends on the field of view of each camera. If the robot uses two fisheye lenses that can show more than 180 degrees, only two cameras are needed. It's common to use three or four cameras.
A simpler approach is to use a consumer 360° camera. On the free and independent theta360.guide developer community, one of the most popular topics developers discuss is how to add 360° vision to their robot prototype and feed the video into OpenCV.
Although there are different ways to get the video from the 360° camera to the Linux computer, the most popular method is to use a USB cable. WiFi and Ethernet are not as popular. The RICOH THETA V, X, and Z1 models can appear as a USB webcam to the Linux computer. However, a bit of work is required on Linux. MacOS computers can use the RICOH THETA camera directly. For Windows, RICOH provides a driver. For Linux, RICOH provides a modified version of libuvc on GitHub called libuvc-theta.
To expose the camera as a video device to OpenCV, RICOH provides a sample program, libuvc-theta-sample. This can be used with v4l2loopback to make a /dev/video* device available to OpenCV.
To test the camera to Linux computer connection, first attach a USB cable from the camera to the Linux computer and run these steps:
git clone https://github.com/ricohapi/libuvc-theta.git
sudo apt install libjpeg-dev
cd libuvc-theta
mkdir build
cd build
cmake ..
make
sudo make install
cd ../..
git clone https://github.com/ricohapi/libuvc-theta-sample.git
cd libuvc-theta-sample/gst
make

# THETA must be plugged into your computer and in
# live streaming mode

./gst_viewer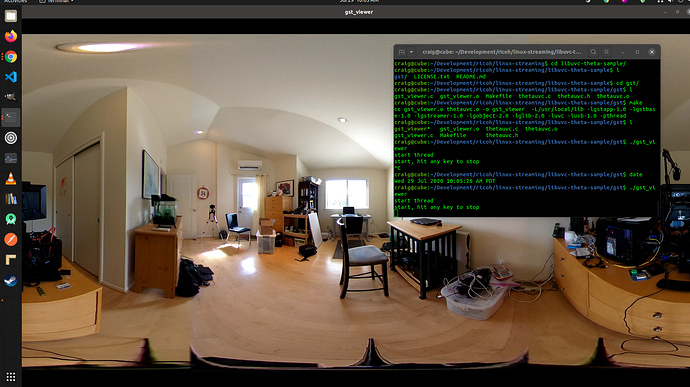
360° video camera displayed with gstreamer
If the build fails, you may need additional gstreamer libraries. This will install all the libraries.
sudo apt-get install \
    libgstreamer1.0-0 \
    gstreamer1.0-plugins-base \
    gstreamer1.0-plugins-good \
    gstreamer1.0-plugins-bad \
    gstreamer1.0-plugins-ugly \
    gstreamer1.0-libav \
    gstreamer1.0-doc \
    gstreamer1.0-tools \
    gstreamer1.0-x \
    gstreamer1.0-alsa \
    gstreamer1.0-gl \
    gstreamer1.0-gtk3 \
    gstreamer1.0-qt5 \
    gstreamer1.0-pulseaudio \
    libgstreamer-plugins-base1.0-dev
Additionally, a Raspberry Pi 4 will not work due to a lack of 4K H.264 hardware decoding support.
Setting Up /dev/video*
To make the libuvc device available as a video device, we can use v4l2loopback. The libuvc-theta-sample application will use gstreamer to sink the video to v4l2.
If you only have a single video camera on your computer, then you should modify this line prior to running the build. The line below is for a computer with the RICOH THETA connected to it as the only webcam:
"v4l2sink device=/dev/video0 sync=false";Access From OpenCV
To test whether or not the camera can be used from OpenCV, let's start with a simple frame resize.
import cv2

cap = cv2.VideoCapture(0)

# Check if the webcam is opened correctly
if not cap.isOpened():
    raise IOError("Cannot open webcam")

while True:
    ret, frame = cap.read()
    frame = cv2.resize(frame, None, fx=0.25, fy=0.25, interpolation=cv2.INTER_AREA)
    cv2.imshow('Input', frame)

    c = cv2.waitKey(1)
    if c == 27:
        break

cap.release()
cv2.destroyAllWindows()
Camera Latency
Latency is a big issue in the community discussions. The THETA camera latency is approximately 350ms. This is too high for many applications that require the robot to react quickly. It is also too high for telepresence if you're controlling a drone that is moving around obstacles. The latency is due to the in-camera stitching of the two lenses. The stitching cannot be disabled on the video feed.
Alternative to v4l2loopback
As v4l2loopback adds complexity and overhead, the gstthetauvc package can be used to access the camera directly from gstreamer.
Here's the same test using gstthetauvc.
import cv2
# pipeline below worked
# cap = cv2.VideoCapture("thetauvcsrc \
#     ! decodebin \
#     ! autovideoconvert \
#     ! video/x-raw,format=BGRx \
#     ! queue ! videoconvert \
#     ! video/x-raw,format=BGR ! queue ! appsink")

# pipeline suggestion thanks to nickel110
# attempt to force hardware acceleration
# tested with NVIDIA 510.73 with old GTX 950 on Ubuntu 22.04
cap = cv2.VideoCapture("thetauvcsrc \
    ! queue \
    ! h264parse \
    ! nvdec \
    ! gldownload \
    ! queue \
    ! videoconvert n-threads=0 \
    ! video/x-raw,format=BGR \
    ! queue \
    ! appsink")

if not cap.isOpened():
    raise IOError('Cannot open RICOH THETA')

while True:
    ret, frame = cap.read()
    frame = cv2.resize(frame, None, fx=0.5, fy=0.5, interpolation=cv2.INTER_AREA)
    cv2.imshow('frame', frame)


    c = cv2.waitKey(1)
    if c == 27:
        break

cap.release()
cv2.destroyAllWindows()
Examples of 360 Video Live Feed
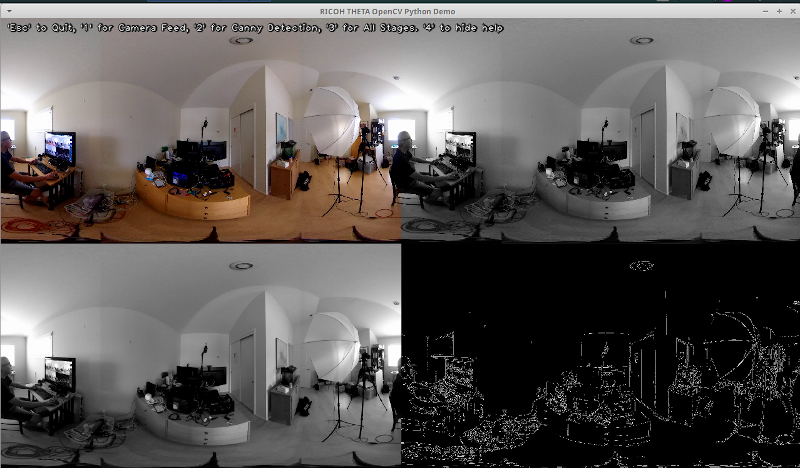
Here are some examples of using OpenCV for color transformation and edge detection.
# Convert to graycsale
img_gray = cv2.cvtColor(img, cv2.COLOR_BGR2GRAY)
# Blur the image for better edge detection
img_blur = cv2.GaussianBlur(img_gray, (3,3), 0)
# Canny Edge Detection
edges = cv2.Canny(image=img_blur, threshold1=100, threshold2=200) # Canny Edge Detection
# Display Canny Edge Detection Image
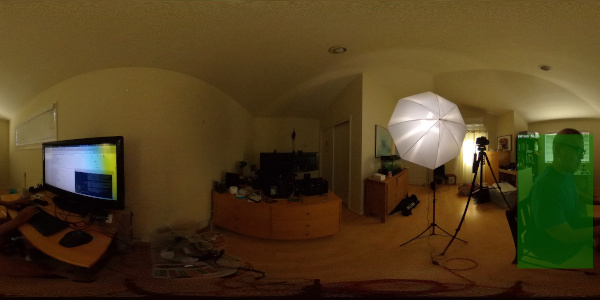
cv2.imshow('Canny Edge Detection', edges) Live person and monitor detection.
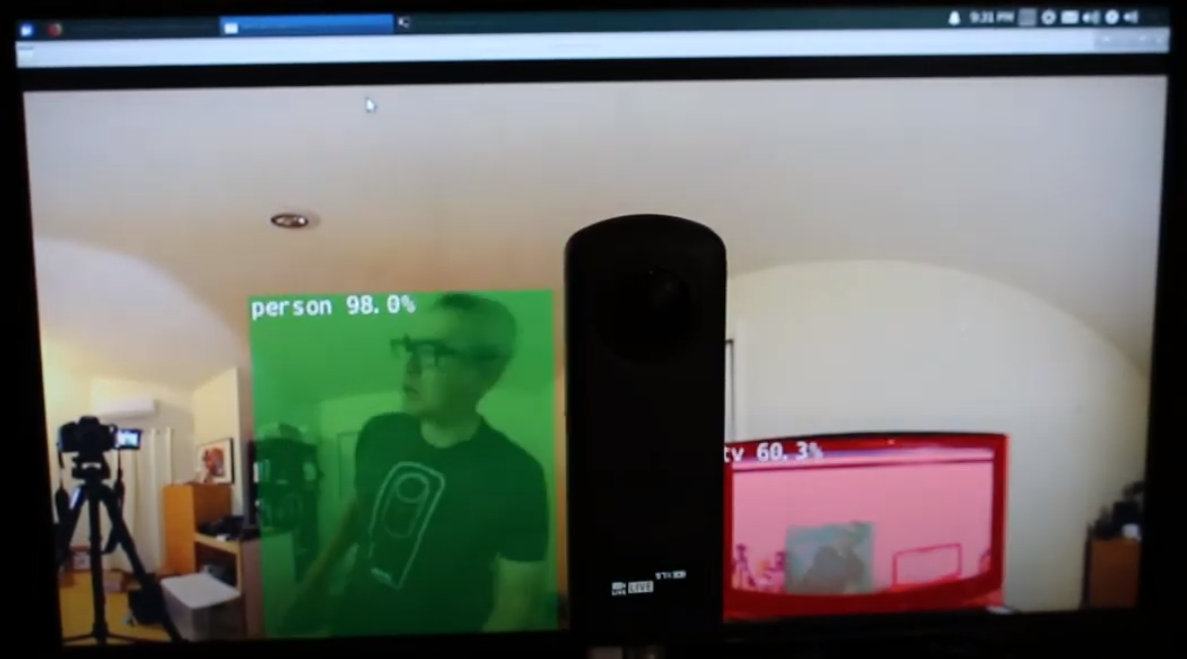
The camera has two lenses. The side opposite the shutter button is the rear lens and is will be placed in the center of the scene. The object detection is most accurate when the object is centered in the equirectangular view.
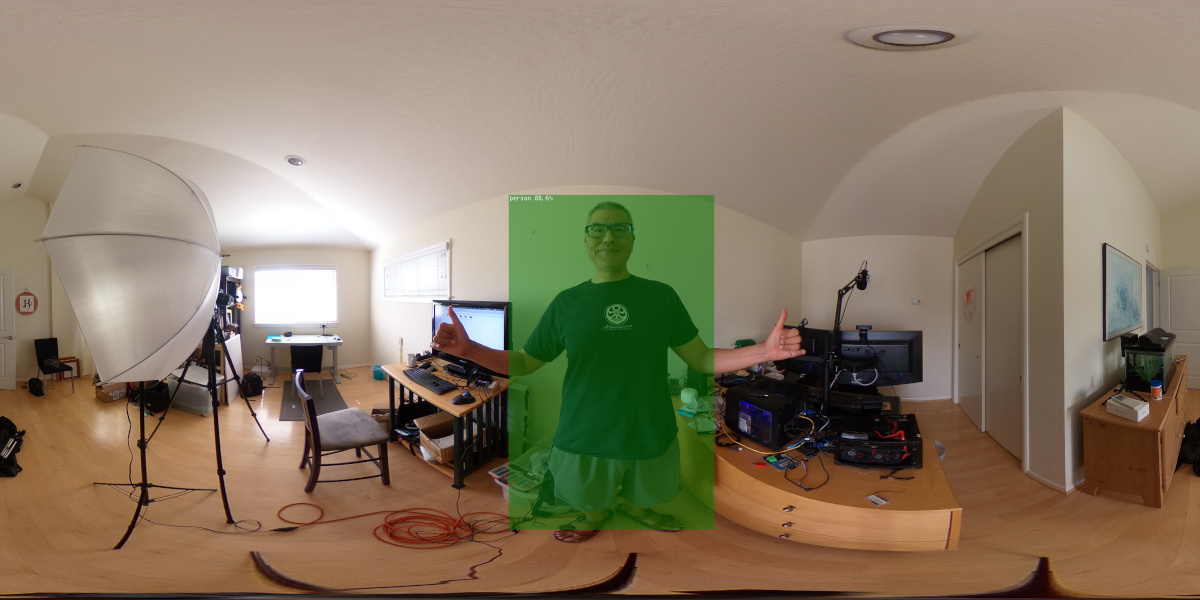
Human centered on rear lens
However, the detection works reasonably well when the human is at the edge of the equirectangular view, even at night. You may need to train your model on a database of fisheye or 360° images.
Human detected on edge of equirectangular view
Improving Detection
Now that you have basic detection working in equirectangular frames from a live 360° video feed, you can experiment with different techniques to improve accuracy. One method is to create multiple flattened scenes from each frame and then detect the object in each scene. The video 360° Object Detect(Yolo) in ROS2 rviz2 and KR260 by misoji engineer provides a good demonstration of this technique. There is also a version of YOLO that has been modified for use with panoramic video. Refer to the paper PV-YOLO: An Object Detection Model for Panoramic Video based on YOLOv4.
Conclusion
Using a consumer off-the-shelf 360° camera, you can fairly easily get the 360° video to appear as a USB webcam to software such as OpenCV. With the 360° video accessible either as a video device or accessed through gstreamer, standard OpenCV or other detection software can be used on the equirectangular frames of the live video. Due to distortion of the image, the object detection algorithm will not work as well as compared to a standard non-360° webcam. However, even without modification, you can still get started with some detection.
To actually use the detection for more than an educational or research project, you will need to look into techniques to improve recognition of the objects in the distorted equirectangular view.
Opinions expressed by DZone contributors are their own.
Comments