Orchestrating Event Driven Microservices With Spring Dataflow
This tutorial will show you how to set up communication between your microservices with event notifications through the Spring Boot platform.
Join the DZone community and get the full member experience.
Join For FreeEvent Driven Microservices is an important pattern in microservices architecture. Although microservices communicate predominantly via APIs, there are cases where communicating via event notifications is a good fit. For instance, with the rise of IoT, we can have "event firehoses" that deal with a large volume of events in real time. Likewise, microservices can notify other microservices about data change events or even send an asynchronous command.
Spring Boot has become more or less the de facto Java platform for building microservices. There are enough book and articles on synchronous microservices available now to choke a horse. But Event Driven microservices are somewhat underserved. The Spring Framework for building such microservices is Spring Cloud Stream (SCS). This was the subject of an earlier post by me, Developing Event Driven Microservices With (Almost) No Code.
To briefly summarize the earlier paper, SCS abstracts away the message producer and consumer code from the message broker specific code. The application communicates with the outside world through input and output channels injected into it by SCS. Channels are connected to external brokers through middleware-specific Binder implementations. Simply by adding the required binding dependency to the code will let SCS to create the connectivity and communications. Kafka and RabbitMQ binders are provided out of the box. It also provides a common abstraction which applies to both RabbitMQ and Kafka for such concepts as Consumer Groups ( to scale the consumers) and Partitioning (to provide message affinity).
We showed in our earlier submission how to use leverage SCS and its coterie of prebuilt app starters. In this companion submission, we show how to orchestrate these services using Spring Data Flow. We show how to do this using both the GUI and using the shell. We also provide some details that deserve to be better known than they are. We start by setting up an example that runs through this paper.
In view of the recent near biblical flooding in Houston, the example simulates the rainfall. The source will generate a random integer to represent the rainfall in inches.
@EnableBinding(Source.class)
@SpringBootApplication
public class SpringCloudDataFlowSrcApplication {

public static void main(String[] args) {
SpringApplication.run(SpringCloudDataFlowSrcApplication.class, args);
}

@Bean
    @InboundChannelAdapter(value = Source.OUTPUT, poller = @Poller(fixedDelay = "1000", maxMessagesPerPoll = "1"))
    public MessageSource<Integer> timeMessageSource() {
              return () -> MessageBuilder.withPayload(randomIn(40, 100)).build();
    }

public int randomIn(int min, int max){

return ThreadLocalRandom.current().nextInt(min, max + 1);

    }

}
The processor will baseline the rainfall by 50 inc
@EnableBinding(Processor.class)
@SpringBootApplication
public class SpringCloudDataFlowProcessorApplication {

private static Logger logger = LoggerFactory.getLogger(SpringCloudDataFlowProcessorApplication.class);

public static void main(String[] args) {
SpringApplication.run(SpringCloudDataFlowProcessorApplication.class, args);
}

@Transformer(inputChannel = Processor.INPUT, outputChannel = Processor.OUTPUT)
    public Object transform(Integer rainFall) {
logger.info("The rain level is "+ rainFall);

        return rainFall -50;
    }
}
The sink logs a message depending on whether the rain fall is of epic proportions and if so it logs a message that global warming is real.
@EnableBinding(Sink.class)
@SpringBootApplication
public class SpringCloudDataFlowProcessorApplication {

private static Logger logger = LoggerFactory.getLogger(SpringCloudDataFlowLoggerApplication.class);

public static void main(String[] args) {
SpringApplication.run(SpringCloudDataFlowLoggerApplication.class, args);
}

 @StreamListener(Sink.INPUT)
    public void logMsg(Integer rainFall) {
                  if(rainFall > 30){
        logger.info("Global warming is REAL!!");
        }
        else{
        logger.info("Global warming is a HOAX");
        }
        }
    }
The fourth application is supposed to represent an analytics application and creates a running average of the rainfall over the days. We blush to provide the trivial code here
These are Spring Boot applications with a Rabbit binding:
<dependency>

                                    <groupId>org.springframework.cloud</groupId>

                                    <artifactId>spring-cloud-starter-stream-rabbit</artifactId>

</dependency>
As Spring Data Flow works with a maven repository, we will do a “mvn clean install” for all these projects and use the local .m2 repository. Download the local dataflow server jar from GitHub.
Start the application: java -jar spring-cloud-dataflow-server-local-1.2.1.jar and in a web browser, invoke the dashboard at http://localhost:9393/dashboard. The dataflow server is just a simple spring boot app:
@EnableDataFlowServer
@SpringBootApplication
public class SpringDataFlowServerApplication {

    public static void main(String[] args) {
        SpringApplication.run(
          SpringDataFlowServerApplication.class, args);
    }
}
And as usual you can customize it with databases , ports, views etc.
Step 1
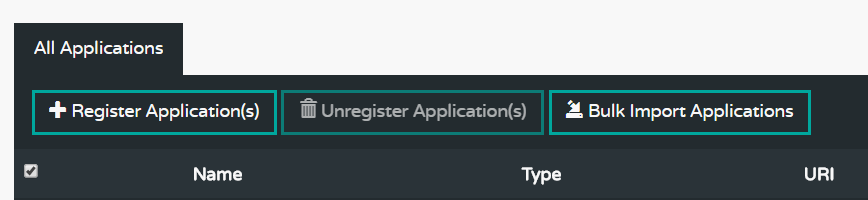
We will now register the applications we developed. Click on Register Applications and enter the application name, type – Source, Sink or Processor, and the maven url which is maven://<GroupId>:<ArtifactID>:jar:<version>. Doing this over and over 4 times can get tedious, so we do it all in bulk. We create a file called dataflow.config:
source.RainSrc=maven://org.tn.dataflow:Spring-Cloud-Data-Flow-src:jar:0.0.1-SNAPSHOT
processor.RainProcessor=maven://org.tn.dataflow:Spring-Cloud-Data-Flow-Processor:jar:0.0.1-SNAPSHOT
sink.Logger=maven://org.tn.dataflow:Spring-Cloud-Data-Flow-Sink:jar:0.0.1-SNAPSHOT
sink.Average=maven://org.tn.dataflow:Spring-Cloud-Data-Flow-Sink-Average:jar:0.0.1-SNAPSHOT
You can import a much more extensive list of pre-built applications from http://bit.ly/Celsius-M1-stream-applications-rabbit-maven for the Rabbit version and there is likewise a Kafka version.

Step 2
Now that we have registered or applications and made the GUI aware of them, it is time to build the flow. Switch to the Streams tab on the top and then pick Create Stream. You will see all your apps on the left pane grouped by type. Now drag and drop the applications and connect them.
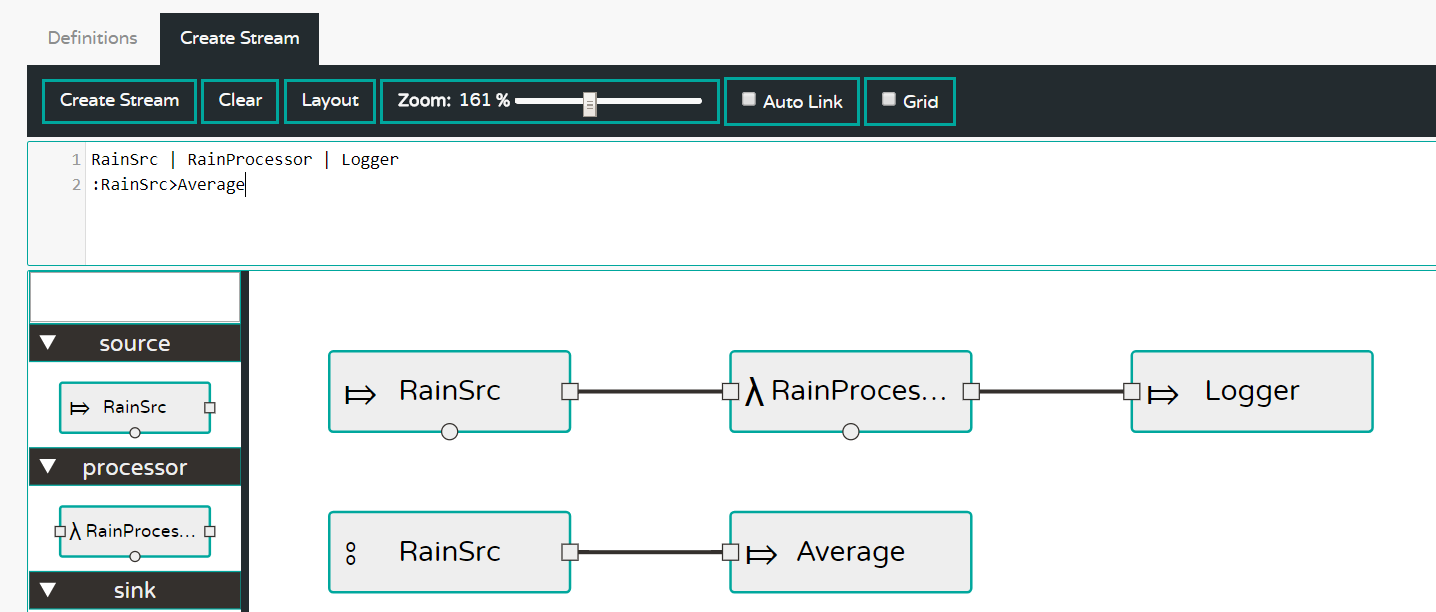
Note that the upper panel shows the DSL corresponding to this flow. We use a ‘named source’ :RainSrc and connect it to the analytics Average via the DSL :RainSrc>Average
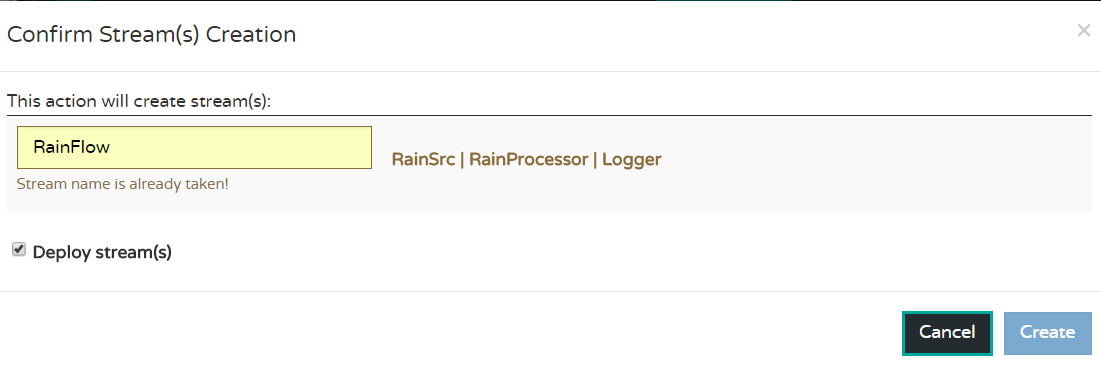
Now click Create Stream sub menu and fill out the name for each stream and optionally ask for the streams to be deployed. You will see a list of the flows you created and if not already deployed then deploy it. Go wash your car or wait for the swallows to come to Capistrano and eventually the legend will turn from ‘deploying’ to ‘deployed’.
Step 3
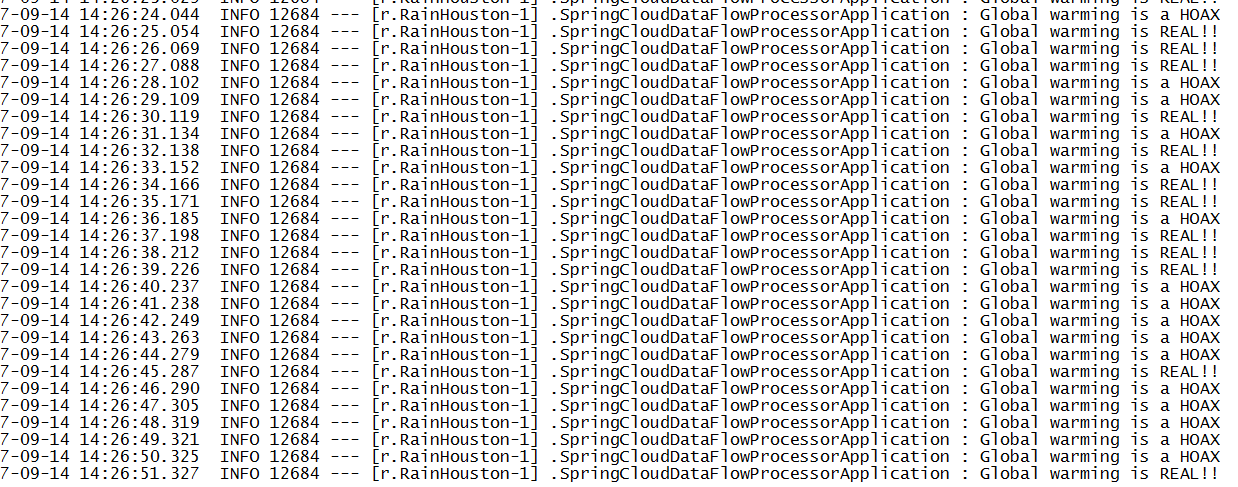
Now go to the RunTime tab and click on the Sink say RainHouston.Logger and you will see the stdout location. Go to that file and see
Now that we have used the GUI to register the applications and build out the streams, let us see how to migrate it to another environment, say QA. I wish I could say that there is way to serialize this configuration but AFAIK there no such action in the GUI. So now we will script everything we have done so far.
First create a file, say dataflowShell.config:
app register --name RainSrc --type source   --uri maven://org.tn.dataflow:Spring-Cloud-Data-Flow-src:jar:0.0.1-SNAPSHOT
app register --name RainProcessor --type processor  --uri maven://org.tn.dataflow:Spring-Cloud-Data-Flow-Processor:jar:0.0.1-SNAPSHOT
app register --name logger --type sink --uri maven://org.tn.dataflow:Spring-Cloud-Data-Flow-Sink:jar:0.0.1-SNAPSHOT
app register --name Average --type sink --uri maven://org.tn.dataflow:Spring-Cloud-Data-Flow-Sink-Average:jar:0.0.1-SNAPSHOT
stream create --name RainInHouston --definition "RainSrc| RainProcessor|logger"  --deploy
stream create --name RainInHoustonAverage --definition ":RainInHouston.RainSrc>Average" --deploy
This is self-explanatory. First, we register the applications and then we create the streams and deploy them in one fell swoop.
Now download the dataflow shell jar from the repo.
Start up the shell as a jar applications – java -jar etc. with the option --dataflow.uri=<uri> where the uri is the uri of the QA server- the default is localhost:9393 which was used above. Shut down that server and start it again.
Now, in the command line of the shell:

On the QA server dashboard, see that the apps are registered under the Apps tab and all the streams are deployed under the Streams tab. We have automated Steps 1 and 2. Just repeat Step 3 with Runtime and see the logs as before.
One drawback with what we have shown is that the definitions are not persisted so that every time you restart the server the dashboard is empty. Given that we can script the flow, it is no big deal, but this is because we are using the default H2 in-memory database. However, you can use a persistent store say, MySQL by starting the local server so:
java -jar spring-cloud-dataflow-server-local-1.0.0.BUILD-SNAPSHOT.jar \
    --spring.datasource.url=jdbc:mysql:<db-info> \
    --spring.datasource.username=<user> \
    --spring.datasource.password=<password> \
    --spring.datasource.driver-class-name=org.mariadb.jdbc.Driver
We have just scratched the surface. We can add analytics, tasks, jobs, etc. See the reference for many more details.
Opinions expressed by DZone contributors are their own.
Comments