Protecting Jaeger UI With a Sidecar Security Proxy
Learn how to up the security performance of your application using a sidecar security proxy that can guard against brute force attacks and more.
Join the DZone community and get the full member experience.
Join For Freein a production deployment of jaeger, it may be advantageous to restrict access to jaeger’s query service, which includes the ui. for instance, you might have internal security requirements to allow only certain groups to access trace data, or you might have deployed jaeger into a public cloud. in a true microservices way, one possible approach is to add a sidecar to the jaeger query service, acting as a security proxy. incoming requests hit our sidecar instead of reaching jaeger’s query service directly and the sidecar would be responsible for enforcing the authentication and authorization constraints.
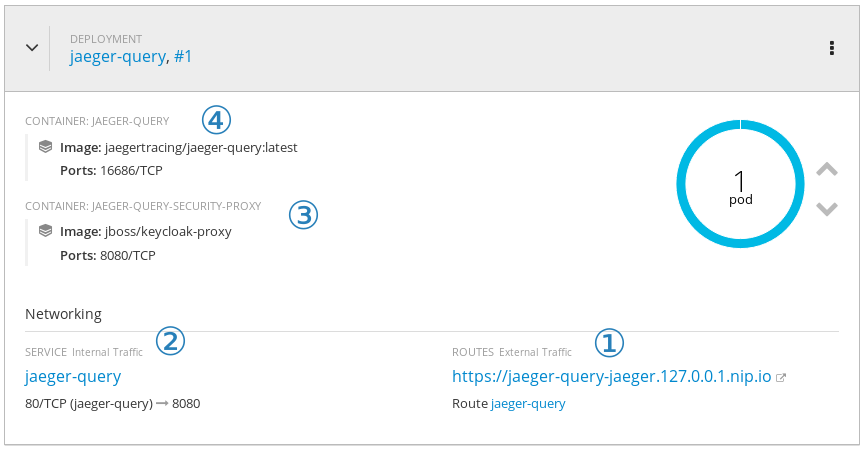
incoming http requests arrive at the route ①, which uses the internal service ② to resolve and communicate with the security proxy ③. once the request is validated and all security constraints are satisfied, the request reaches jaeger ④.
for demonstration purposes, we’ll make use of keycloak as our security solution, but the idea can be adapted to work with any security proxy. this demo should also work without changes to red hat sso . for this exercise, we’ll need:
-
a keycloak (or red hat sso) server instance running. we’ll call its location
${redhat_sso_url} -
an openshift cluster, where we’ll run jaeger backend components. it might be as easy as
oc cluster up - a local clone of the jaeger openshift production template
note that we are not trying to secure the communication between the components, like from the agent to the collector. for this scenario, there are other techniques that can be used, such as mutual authentication via certificates, employing istio , or other similar tools.
preparing keycloak
for this demo, we’ll run keycloak via docker directly on the host machine. this is to stress that keycloak does not need to be running on the same openshift cluster as our jaeger backend.
the following command should start an appropriate keycloak server locally. if you already have your own keycloak or red hat sso server, skip this step.
docker run --rm --name keycloak-server -e keycloak_user=admin -e keycloak_password=password -p 8080:8080 jboss/keycloakonce the keycloak server is up and running, let’s create a realm for jaeger:
-
login into keycloak (
http://<your_ip>:8080/auth/admin/master/console
) with
adminas the username andpasswordas the password. -
in the top left corner, mouse over the
select realmbox and clickadd realm. name itjaegerand clickcreate. -
on
clients, clickcreateand setproxy-jaegeras the name and save it. -
set the
access typetoconfidentialand*asvalid redirect urisand save it. you might want to fine tune this in a production environment, otherwise, you might be open to an attack known as "unvalidated redirects and forwards." -
open the
installationtab and selectkeycloak oidc jsonand copy the json that is shown. it should look like this, but theauth-server-urlandsecretwill have different values.
{
  "realm": "jaeger",
  "auth-server-url": "http://192.168.2.111:8080/auth",
  "ssl-required": "external",
  "resource": "proxy-jaeger",
  "credentials": {
    "secret": "7f201319-1dfd-43cc-9838-057dac439046"
  }
}
and finally, let’s create a role and a user so that we can log into jaeger’s query service:
-
under the
configureleft-side menu, open therolespage and clickadd role. -
as role name, set
userand clicksave. -
under the
manageleft-side menu, open theuserspage and clickadd user. -
fill out the form as you wish and set
email verifiedtoonand click onsave. -
open the
credentialstab for this user and set a password (temporary or not). -
open the
role mappingstab for this user, select the roleuserfrom theavailable roleslist and clickadd selected.
preparing openshift
for this demo, we assume you have an openshift cluster running already. if you don’t, then you might want to check out
tools like
minishift
. if you are running a recent version of fedora, centos, or red hat enterprise linux you might want to install the package
origin-clients
and run
oc cluster up --version=latest
. this should get you a basic openshift cluster running locally.
to make it easier for our demonstration, we’ll add
cluster-admin
rights to our
developer
user and we’ll create the jaeger namespace:
oc login -u system:admin
oc new-project jaeger
oc adm policy add-cluster-role-to-user cluster-admin developer -n jaeger
oc login -u developer
preparing the jaeger openshift template
we’ll use the jaeger openshift production template as the starting point: either clone the entire repository or just get a local version of the template.
the first step is to add the sidecar container to the
query-deployment
object. under the
containers
list, after we specify the
jaeger-query
, let’s add the sidecar:
        - image: jboss/keycloak-proxy
          name: ${jaeger_service_name}-query-security-proxy
          volumemounts:
          - mountpath: /opt/jboss/conf
            name: security-proxy-configuration-volume
          ports:
          - containerport: 8080
            protocol: tcp
          readinessprobe:
            httpget:
              path: "/"
              port: 8080
note that the container specifies a
volumemount
named
security-proxy-configuration-volume
: we’ll use it to store the proxy’s configuration file. you should add the volume under the
spec/template/spec
node for
query-deployment
, sibling to the
dnspolicy
property (it’s probably right under the previous code snippet):
        volumes:
          - configmap:
              name: ${jaeger_service_name}-configuration
              items:
                - key: proxy
                  path: proxy.json
            name: security-proxy-configuration-volume
now, we need to specify the
configmap
, with the proxy’s configuration entry. to do that, we add a new top-level item to the template. as a suggestion, we recommend keeping it close to where it’s consumed. for instance, right before the
query-deployment
:
- apiversion: v1
  kind: configmap
  metadata:
    name: ${jaeger_service_name}-configuration
    labels:
      app: jaeger
      jaeger-infra: security-proxy-configuration
  data:
    proxy: |
      {
          "target-url": "http://localhost:16686",
          "bind-address": "0.0.0.0",
          "http-port": "8080",
          "applications": [
              {
                  "base-path": "/",
                  "adapter-config": {
                    "realm": "jaeger",
                    "auth-server-url": "${redhat_sso_url}",
                    "ssl-required": "external",
                    "resource": "proxy-jaeger",
                    "credentials": {
                      "secret": "the-secret-from-installation-file"
                    }
                  }
            ,
            "constraints": [
                      {
                          "pattern": "/*",
                          "roles-allowed": [
                              "user"
                          ]
                      }
                  ]
              }
          ]
      }
note that we are only allowing users with the role
user
to log into our jaeger ui. in a real world scenario, you might want to adjust this to fit your setup. for instance, your user data might come from ldap, and you only want to allow users from specific ldap groups to access the jaeger ui.
the
secret
within the
credentials
should match the secret we got from keycloak at the beginning of this exercise. our most curious readers will note that we mentioned the template parameter
redhat_sso_url
under the property
auth-server-url
. either change that to your keycloak server or let’s specify a template parameter, allowing us to set this at deployment time. under the
parameters
section of the template, add the following property:
- description: the url to the red hat sso / keycloak server
  displayname: red hat sso url
  name: redhat_sso_url
  required: true
  value: http://the-url-from-the-installation-file:8080/auth
this value should be a location that is reachable by both your browser and by the sidecar, like your host’s lan ip (192.x, 10.x). localhost/127.x is not going to work.
as a final step, we need to change the service to direct requests to the port
8080
(proxy) instead of
16686
. this is done by changing the property
targetport
on the service named
query-service
, setting it to
8080
:
- apiversion: v1
  kind: service
  metadata:
    name: ${jaeger_service_name}-query
    labels:
      app: jaeger
      jaeger-infra: query-service
  spec:
    ports:
    - name: jaeger-query
      port: 80
      protocol: tcp
      targetport: 8080
    selector:
      jaeger-infra: query-pod
    type: loadbalancer
as a reference, here’s the complete template file that can be used for this blog post.
deploying
now that we have everything ready, let’s deploy jaeger into our openshift cluster. run the following command from the same directory you stored the
yaml
file from the previous steps, referenced here by the name
jaeger-production-template.yml
:
oc process -f jaeger-production-template.yml | oc create -n jaeger -f -
during the first couple of minutes, it’s ok if the pods
jaeger-query
and
jaeger-collector
fail, as cassandra will still be booting. eventually, the service should be up and running, as shown in the following image.
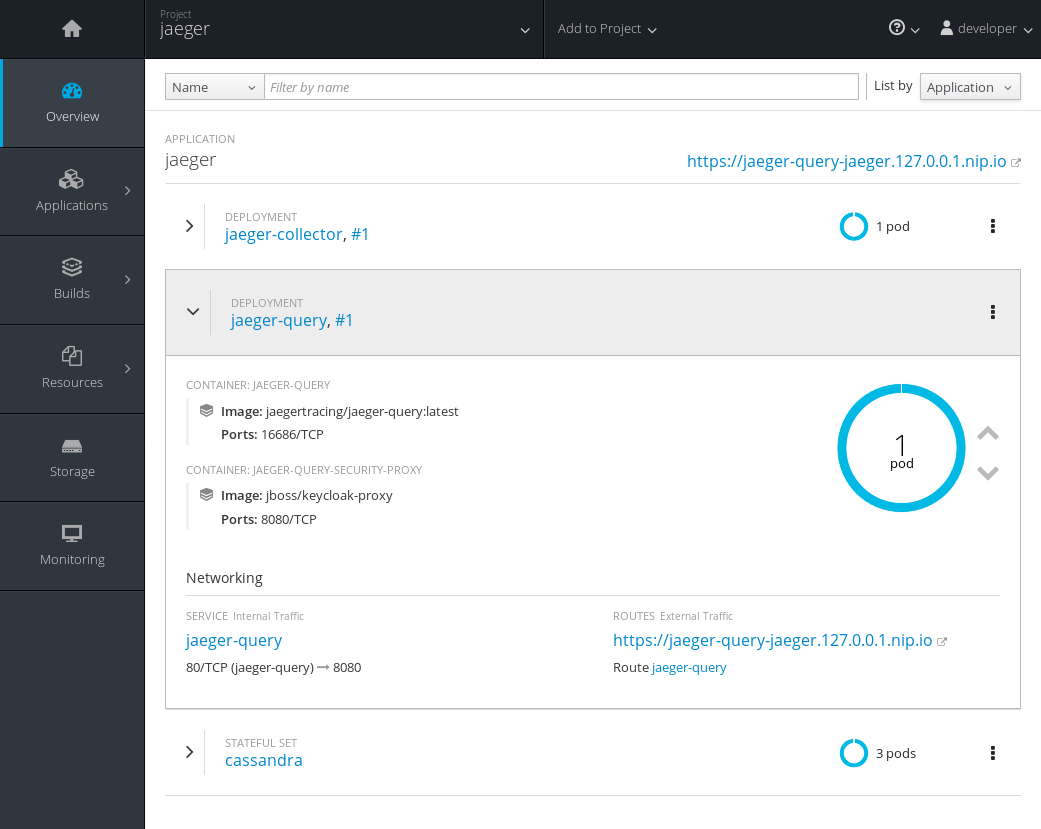
once it is ready to serve requests, click on the url for the route ( https://jaeger-query-jaeger.127.0.0.1.nip.io ). you should be presented with a login screen, served by the keycloak server. login with the credentials you set on the previous steps, and you should reach the regular jaeger ui.
conclusion
in this exercise, we’ve seen how to add a security proxy to our jaeger query pod as a sidecar. all incoming requests go through this sidecar and all features available in keycloak can be used transparently, such as 2-factor authentication, service accounts, single sign-on, brute force attack protection, ldap support, and much more.
Published at DZone with permission of Juraci Paixao Kroehling. See the original article here.
Opinions expressed by DZone contributors are their own.
Comments