Publishing MuleSoft Common Assets or Libraries to Anypoint Exchange and Nexus
In this tutorial, we are going to learn how to publish the MuleSoft common library, assets, or applications to Anypoint Exchange and Nexus repository.
Join the DZone community and get the full member experience.
Join For FreeIntroduction
It is very important to keep common libraries or assets at a central location or repository which can be easily used across multiple applications and maintaining multiple versions of libraries in an efficient manner.
Anypoint Exchange is the MuleSoft provided hub or repositories where you can discover various built-in connectors, assets, templates and even you can store your own libraries, assets, etc. Anypoint Exchange is very much capable of storing and maintaining multiple versions of the same assets, libraries, templates, utilities, etc.
Nexus is the code repository for storing the application, common libraries, assets, or utility binaries. It is very much capable of storing and maintaining multiple versions of the same assets, libraries, templates or utilities, etc.
In this tutorial, we are going to learn how to publish the common library, assets, or applications to Anypoint Exchange and Nexus repository.
Publishing the Assets to Anypoint Exchange
Step 1: Add Anypoint Exchange Credentials Into settings.xml of Your Local .m2 Repository
You need to add the Anypoint Platform username and password in the settings.xml of your local maven repository. Add the below entry with the correct Anypoint username and password in the settings.xml.
<servers>
<server>
<id>MuleRepository</id>
<username>Anypoint_Username</username>
<password>Anypoint_Password</password>
</server>
</servers>
In this case, the serverId defined in settings.xml is very important and we will be using the same Id in pom.xml for distributionManagement and repository.
Step 2: Add Anypoint Exchange Distribution Management in POM.xml of Your Common Library
In this step, you need to define the distributionManagement. Here, you will define the URL of Anypoint Exchange where you need to publish your libraries.
xxxxxxxxxx
<distributionManagement>
<repository>
<id>MuleRepository</id>
<name>Corporate Repository</name>
<url>https://maven.anypoint.mulesoft.com/api/v1/organizations/{orgId}/maven</url>
<layout>default</layout>
</repository>
</distributionManagement>
Theidvalue must be matched with theserverIddefined in the settings.xml of the local maven repository. In this case, the id isMuleRepository.
You need to replace theorgIdin the URL with Anypoint Platform Organization ID. It can be retrieved from Anypoint Platform => Access Management => Click on your organization.
Step 3: Add Classifier as Mule-Plugin for Mule-Maven-Plugin
When you created the MuleSoft application, you will find the mule-maven-plugin in your pom.xml and you need to add a classifier as a mule-plugin.
xxxxxxxxxx
<plugin>
<groupId>org.mule.tools.maven</groupId>
<artifactId>mule-maven-plugin</artifactId>
<version>${mule.maven.plugin.version}</version>
<extensions>true</extensions>
<configuration>
<classifier>mule-plugin</classifier>
</configuration>
</plugin>
There are various classifiers available but in this case, we will be using mule-plugin as the classifier.
Step 4: Update GroupId as OrganizationId in POM.xml
You need to update GroupId in your pom.xml as Anypoint Platform Organization Id and it has been explained above howOrganizationIdcan be retrieved from Anypoint Platform.
Step 5: Publish the Common Library to the Anypoint Exchange
You just need to execute the mvn deploy command to publish any assets or libraries to Anypoint Exchange.
xxxxxxxxxx
mvn deploy
Using Common Libraries or Utilities From Anypoint Exchange Into the Mulesoft Application
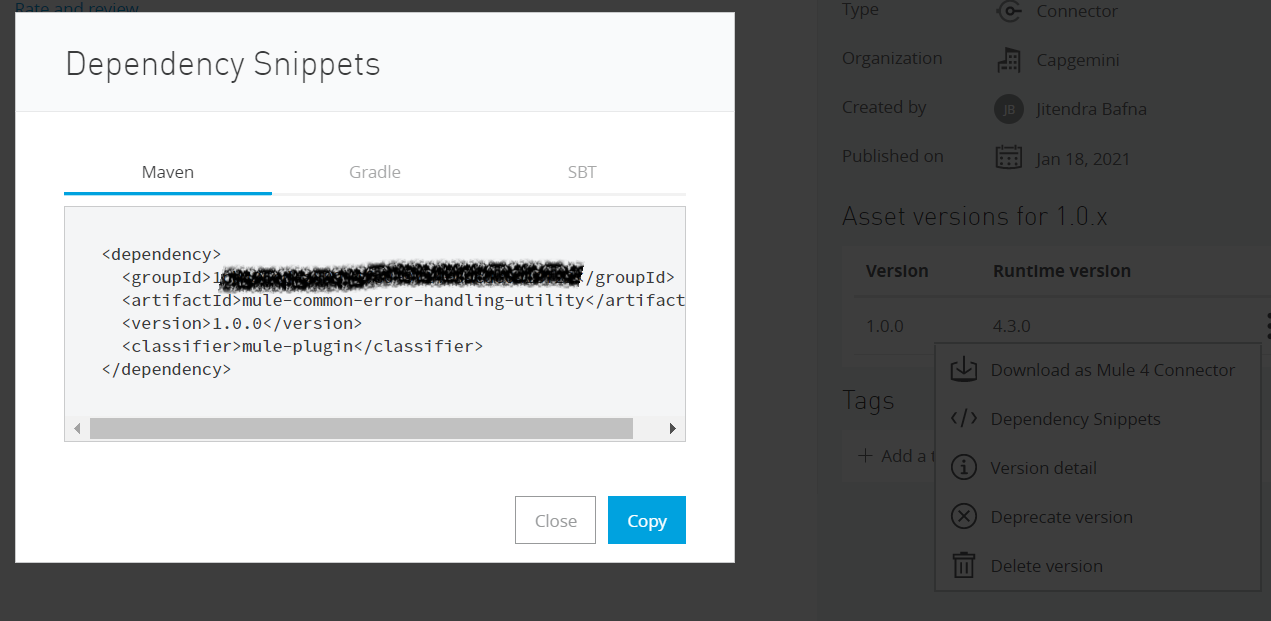
Once you have published the libraries, assets, or utilities in the Anypoint exchange, you can go to Anypoint Exchange and look for your libraries and copy the dependency snippets and add them to the pom.xml of the application.
You need to also add the repository in your application pom.xml:
x
<repository>
<id>MuleRepository</id>
<name>Anypoint Exchange Repository</name> <url>https://maven.anypoint.mulesoft.com/api/v1/organizations/{orgId}/maven</url>
<layout>default</layout>
</repository>
You need to make sure thatidmatches with your settings.xmlserverIdandorgIdcan be extracted from the Anypoint Platform.
Publishing the Common Library to Anypoint Exchange
Step 1: Add Nexus Server Credentials Into settings.xml of Your Local .m2 Repository
You need to add the Nexus repository username and password in the settings.xml of your local maven repository. Add the below entry with the correct Nexus username and password in the settings.xml.
x
<servers>
<server>
<id>NexusRepository</id>
<username>Nexus_Username</username>
<password>Nexus_Password</password>
</server>
</servers>
In this case, theserverIddefined in settings.xml is very important and we will be using the same Id in pom.xml for distributionManagement and repository.
Step 2: Add Nexus Distribution Management in POM.xml of your Common library
In this step, you need to define the distributionManagement. Here, you will define the URL of Nexus where you need to publish your libraries.
xxxxxxxxxx
<distributionManagement>
<repository>
<id>NexusRepository</id>
<name>Nexus Repository</name>
<url>http://localhost:8081/repository/maven-releases/</url>
</repository>
</distributionManagement>
Step 3: Add Maven Plugin in pom.xml
xxxxxxxxxx
<plugin>
<artifactId>maven-deploy-plugin</artifactId>
<version>2.8.1</version>
<executions>
<execution>
<id>default-deploy</id>
<phase>deploy</phase>
<goals>
<goal>deploy</goal>
</goals>
</execution>
</executions>
</plugin>
<plugin>
<groupId>org.apache.maven.plugins</groupId>
<artifactId>maven-deploy-plugin</artifactId>
<version>2.8.1</version>
<configuration>
<skip>true</skip>
</configuration>
</plugin>
<plugin>
<groupId>org.sonatype.plugins</groupId>
<artifactId>nexus-staging-maven-plugin</artifactId>
<version>1.5.1</version>
<executions>
<execution>
<id>default-deploy</id>
<phase>deploy</phase>
<goals>
<goal>deploy</goal>
</goals>
</execution>
</executions>
<configuration>
<serverId>nexus</serverId>
<nexusUrl>http://localhost:8081/nexus/</nexusUrl>
<skipStaging>true</skipStaging>
</configuration>
</plugin>
Step 4: Publish the Common Library to the Anypoint Exchange
You just need to execute themvn deploycommand to publish any assets or libraries to the Nexus.
xxxxxxxxxx
mvn deploy
Using Common Libraries or Utilities From Nexus in the Mulesoft Application
Once you have published the libraries, assets, or utilities in the Anypoint exchange, you can go to Anypoint Exchange and look for your libraries and copy the dependency snippets and add them to the pom.xml of the application.
You need to also add the repository in your application pom.xml:
xxxxxxxxxx
<repository>
<id>NexusRepository</id>
<name>Mule Nexus Repository</name>
<url>http://localhost:8081/repository/maven-releases/</url>
<layout>default</layout>
</repository>
Here are the few videos provided step by step guide about publishing the assets and libraries to Anypoint Exchange and Nexus.
Now you know how to publish the MuleSoft libraries or assets to Anypoint Exchange and Nexus.
Opinions expressed by DZone contributors are their own.
Comments