Using RabbitMQ in Cluster
Clustering and high availability configuration with RabbitMQ are pretty simple. Its UI management console offers good s support in the cluster monitoring process.
Join the DZone community and get the full member experience.
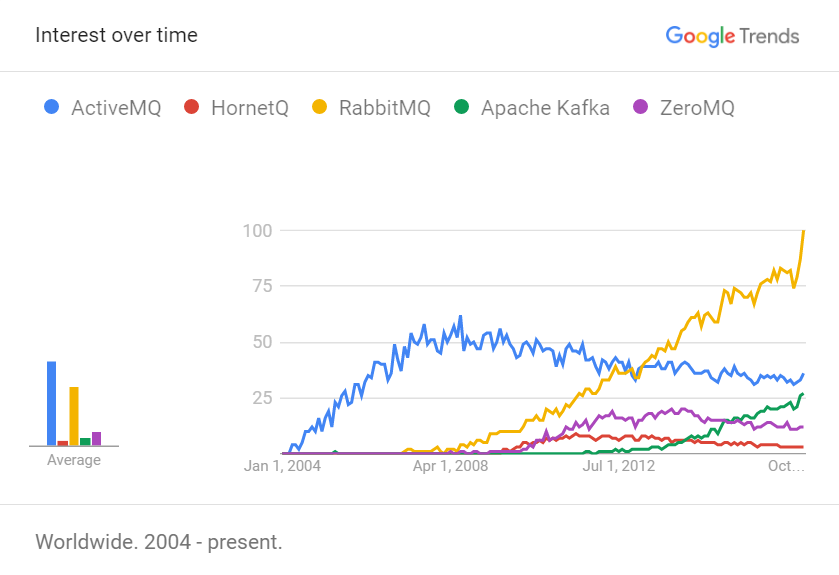
Join For FreeRabbitMQ has grown into the most popular message broker software, which we can see in the picture from Google Trends below. Although it is written in the not-very-popular Erlang language, implements rather complex Advanced Message Queueing Protocol (AMQP) and is not as fast as some of the competing software like Apache Kafka or ZeroMQ its position is second to none. But why?
The answer is that RabbitMQ is a leader in reliability. It has a great support for clustering, high availibility, and failover. All its features are well-documented and it is easy to use and configure — even if we are talking about such mechanisms as clustering or high availability.
In this post, I’m going to show you how to run some instances of RabbitMQ provided in Docker containers in the cluster with highly available (HA) queues. Based on the sample Java application, we’ll see how to send and receive messages from the RabbitMQ cluster and check how this message broker handles a large number of incoming messages.
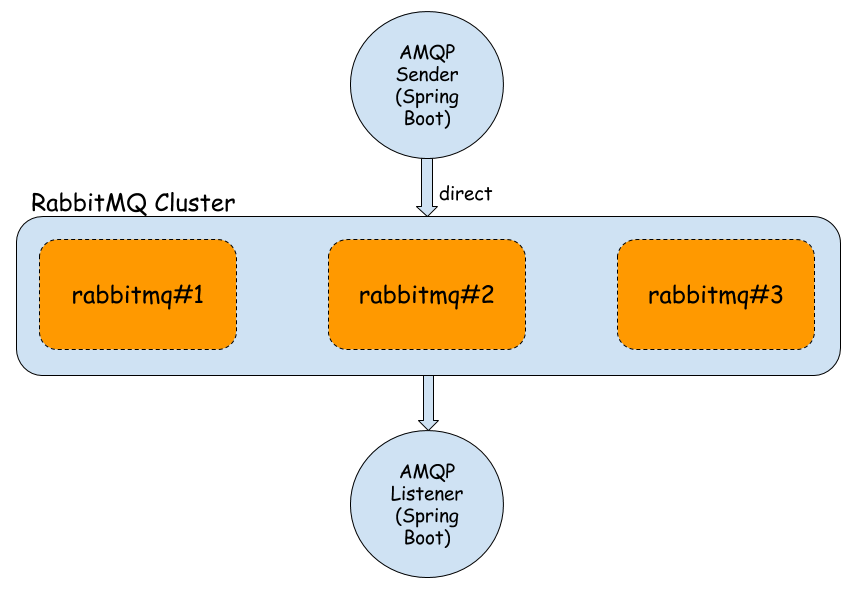
A sample Spring Boot application is available on GitHub. Here is a picture illustrating the architecture of the presented solution.
We use the Docker official repository of RabbitMQ. Here are commands for running three RabbitMQ nodes. The first node is the master of the cluster and the two other nodes will join him. We use container management to enable an UI administration console for each node. Every node has default connection and UI management ports exposed. The important thing is to link the rabbit2 and rabbit3containers to the rabbit1container, as well as rabbit3 to rabbit2. It is necessary while joining to cluster mastering by rabbit1.
docker run -d --hostname rabbit1 --name rabbit1 -e RABBITMQ_ERLANG_COOKIE='rabbitcluster' -p 30000:5672 -p 30001:15672 rabbitmq:managementdocker run -d --hostname rabbit2 --name rabbit2 --link rabbit1:rabbit1 -e RABBITMQ_ERLANG_COOKIE='rabbitcluster' -p 30002:5672 -p 30003:15672 rabbitmq:managementdocker run -d --hostname rabbit3 --name rabbit3 --link rabbit1:rabbit1 --link rabbit2:rabbit2 -e RABBITMQ_ERLANG_COOKIE='rabbitcluster' -p 30004:5672 -p 30005:15672 rabbitmq:managementNow, there are three RabbitMQ running instances. We can go to the UI management console for all of those instances available as docker containers — for example, http://192.168.99.100:30001 (rabbit1). Each instance is available on its independent cluster, like we see in the pictures below. We would like to make all instances working in same cluster, rabbit@rabbit1.


Here, the set of commands runs on the rabbit2 instance for joining cluster rabbit@rabbit1. The same set should be run on the rabbit3 node. In the beginning, we have to connect to the Docker container and run a Bash command. Before running the RabbitMQ join_cluster command, we have to stop the broker.
docker exec -i -t rabbit2 \bash
root@rabbit2:/# rabbitmqctl stop_app
Stopping node rabbit@rabbit2 ...
root@rabbit2:/# rabbitmqctl join_cluster rabbit@rabbit1
Clustering node rabbit@rabbit2 with rabbit@rabbit1 ...
root@rabbit2:/# rabbitmqctl start_app
Starting node rabbit@rabbit2 ...
If everything was successful, we should see cluster name rabbit@rabbit1 in the upper-right corner of the rabbit2 management console. You should also see a list of running nodes in the Nodes section. You can also check cluster status by running on every node command rabbitmqctl cluster_status, which should also display a list of all cluster nodes.

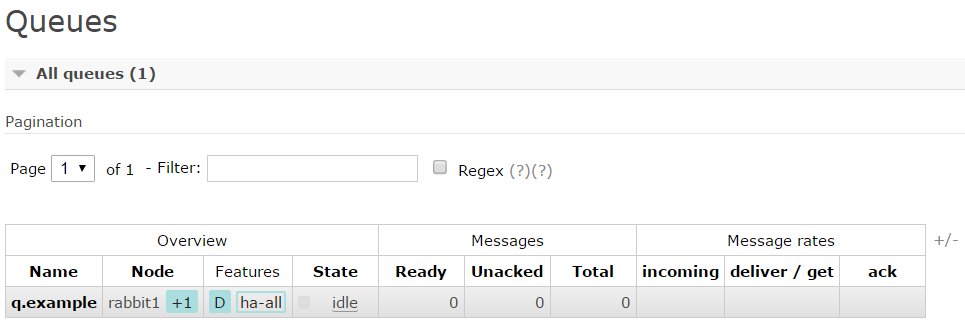
After starting, all nodes go to the UI management console on one of the nodes. Now, we are going to configure high availability for selected queue. It is not important which node you choose because they are in one cluster. In the Queues tab, create a queue with name q.example. Then, go to the Admin tab, select the Policies section, and create a new policy.
In the picture below, you can see policy I have created. I selected ha-mode=all, which means that is mirrored across all nodes in the cluster and when a new node is added to the cluster, the queue will be mirrored to that node. There are also nodes modes, another aspect of RabbitMQ high availability. In the pattern field, enter your queue name and select Queues. If everything was successful, you should see the ha-all feature in the queue row.
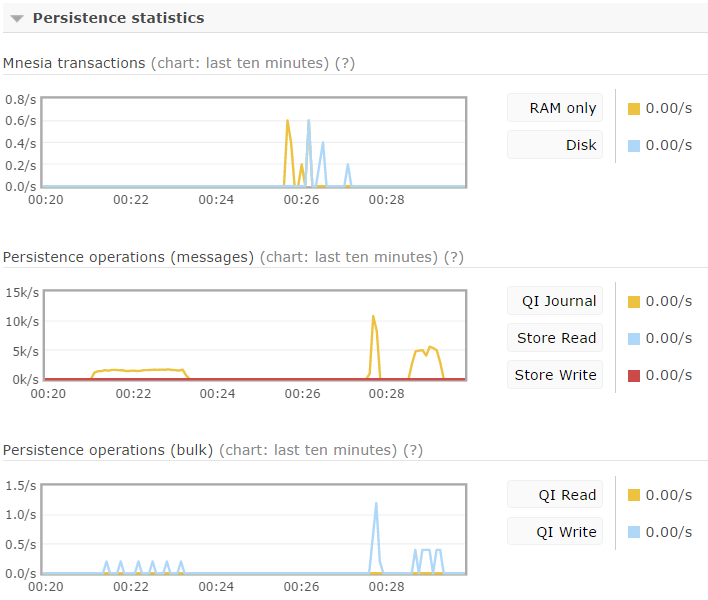
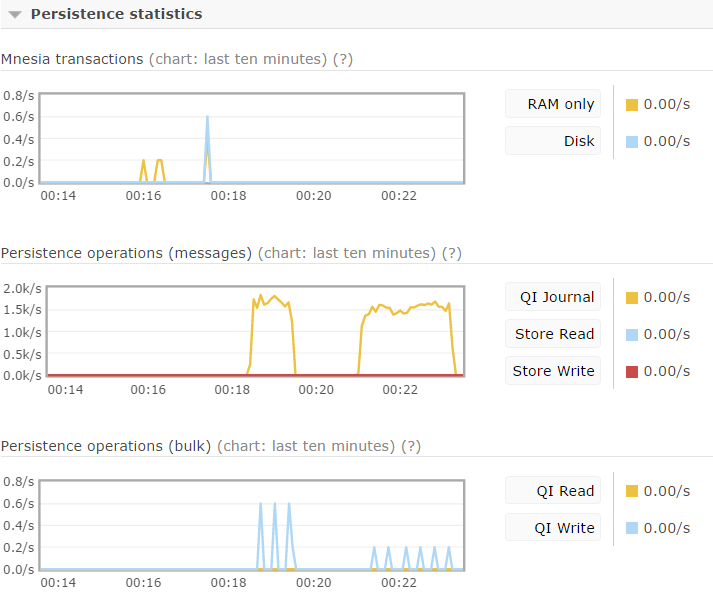
One of the greatest advantages of RabbitMQ is monitoring. You can see many statistics like memory, disk usage, I/O statistics, detailed message rates, graphs, etc. In the pictures below, you can see a comparision of persistence statistics for a single instance of RabbitMQ (on the top) and three clustered instances (on the bottom).
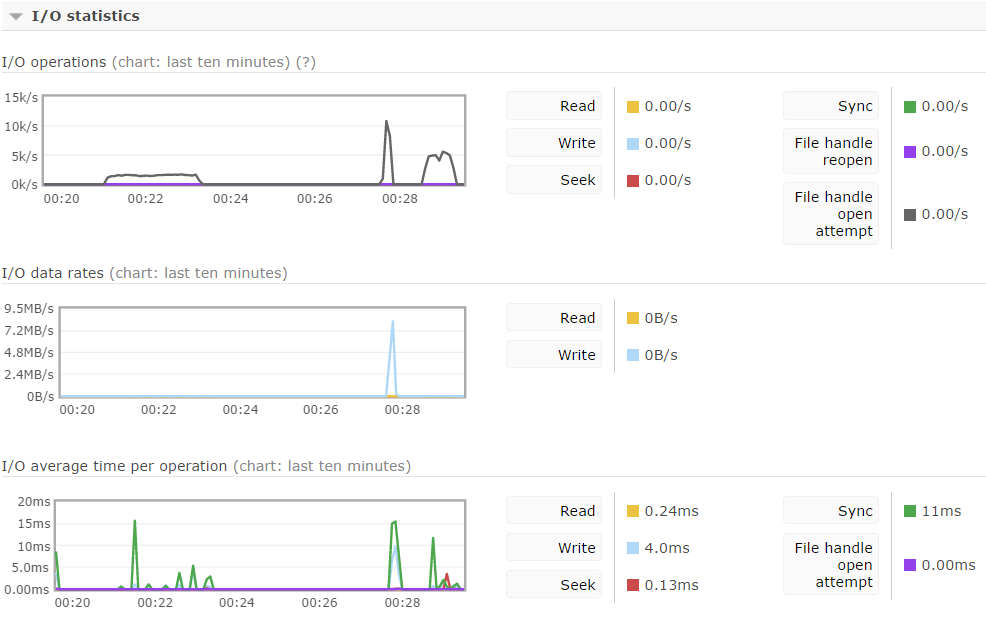
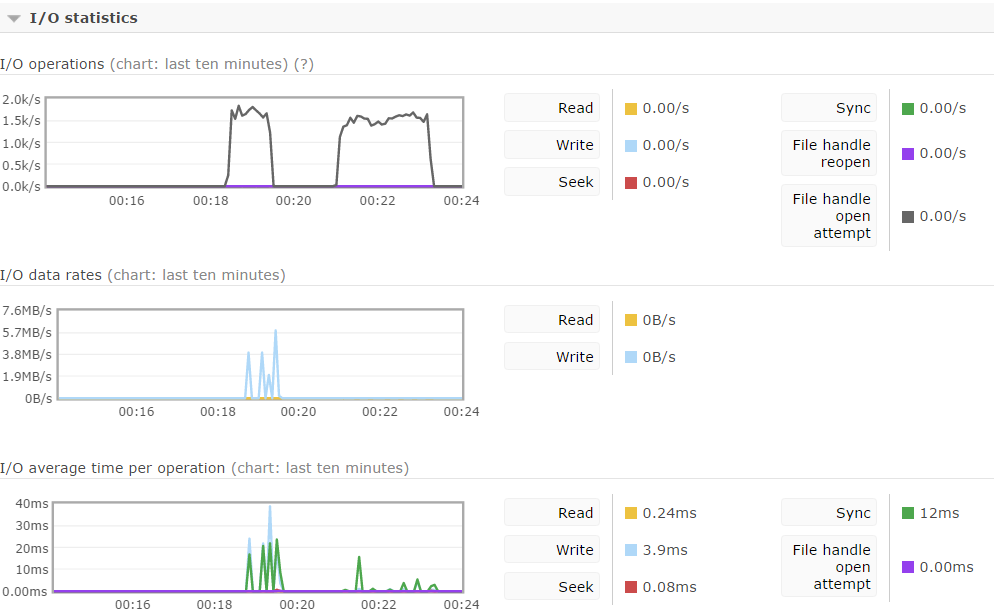
In the next pictures, we have a comparision of I/O statistics also for a single instance (top) and three clustered instances (bottom).
And finally, there are pictures with the visualization of process statistics between a single and three clustered instances. Here, you can see statistics like memory and disk usage.
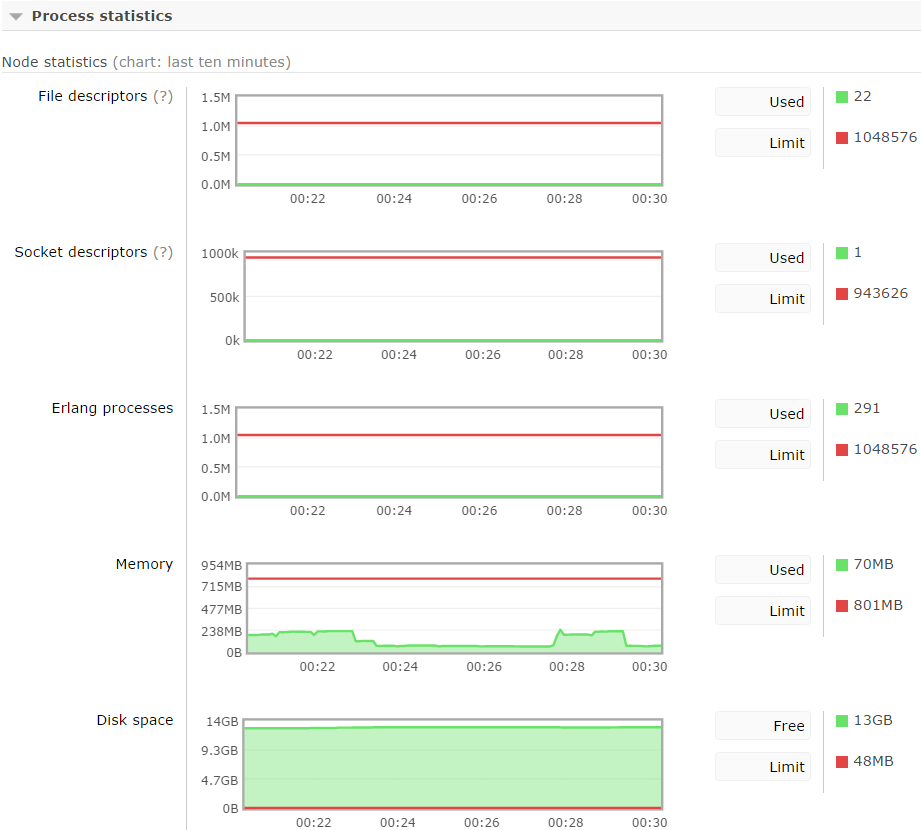
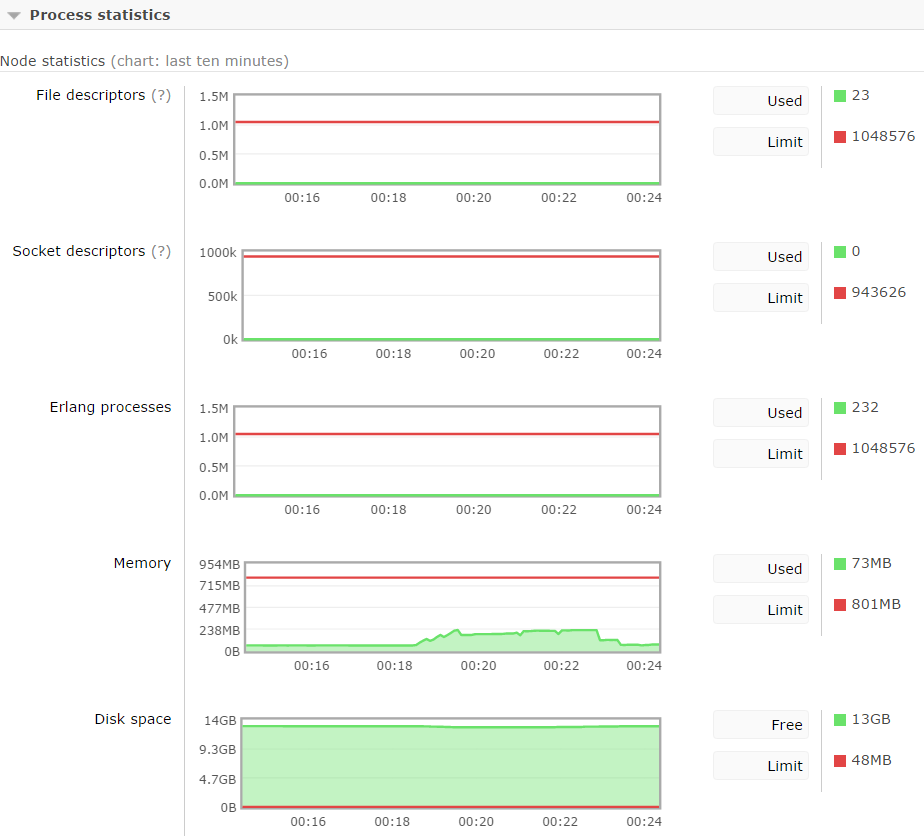
Generally, there are no big differences in the statistics between single standalone instance and three clustered instances. For testing, I used a sample application written Java and Spring that sends 100k messages to the direct exchange and the second application, which listens for incoming messages to the target queue.
The first peak in each graph presents filling the queue with messages sent by the client and the second peak represent them receiving theirs from the queue by the client listener — although there is no big difference in statistics on RabbitMQ server, we could observe them in the client and listener sample application.
Sending 100k messages to the single instance took about 10 seconds, while sending them to the first instance from cluster took about 54 seconds. There is also a huge difference in processing messages on the receiver side. Receiving messages from single standalone queue took about 43 seconds while receiving then from the clustered HA queue took about 132 seconds.
RabbitMQ has a great support in Spring framework. There many projects that use RabbitMQ implementation by default — for example, Spring Cloud Stream, Spring Cloud Sleuth. I’m going to show you a sample Spring Boot application that sends messages to the RabbitMQ cluster and receives them from the HA queue.
Here’s the main class of application. We enable RabbitMQ listener by declaring @EnableRabbit on the class and @RabbitListener on the receiving method. We also have to declare the listened queue, broker connection factory, and listener container factory to allow listener concurrency.
Inside CachingConnectionFactory, we set all three addresses of RabbitMQ cluster instances: 192.168.99.100:30000, 192.168.99.100:30002, 192.168.99.100:30004. In the receiving method, we are only logging incoming message to console and counting time from application startup.
@SpringBootApplication
@EnableRabbit
public class Listener {

  private static Logger logger = Logger.getLogger("Listener");

  private Long timestamp;

  public static void main(String[] args) {
    SpringApplication.run(Listener.class, args);
  }

  @RabbitListener(queues = "q.example")
  public void onMessage(Order order) {
    if (timestamp == null)
      timestamp = System.currentTimeMillis();
    logger.info((System.currentTimeMillis() - timestamp) + " : " + order.toString());
  }

  @Bean
  public ConnectionFactory connectionFactory() {
    CachingConnectionFactory connectionFactory = new CachingConnectionFactory();
    connectionFactory.setUsername("guest");
    connectionFactory.setPassword("guest");
    connectionFactory.setAddresses("192.168.99.100:30000,192.168.99.100:30002,192.168.99.100:30004");
    connectionFactory.setChannelCacheSize(10);
    return connectionFactory;
  }

  @Bean
  public SimpleRabbitListenerContainerFactory rabbitListenerContainerFactory() {
    SimpleRabbitListenerContainerFactory factory = new SimpleRabbitListenerContainerFactory();
    factory.setConnectionFactory(connectionFactory());
    factory.setConcurrentConsumers(10);
    factory.setMaxConcurrentConsumers(20);
    return factory;
  }

  @Bean
  public Queue queue() {
    return new Queue("q.example");
  }

}
Here's sender main class:
@SpringBootApplication
public class Sender {

  private static Logger logger = Logger.getLogger("Sender");

  @Autowired
  RabbitTemplate template;

  public static void main(String[] args) {
    SpringApplication.run(Sender.class, args);
  }

  @PostConstruct
  public void send() {
    for (int i = 0; i < 100000; i++) {
      int id = new Random().nextInt(100000);
      template.convertAndSend(new Order(id, "TEST"+id, OrderType.values()[(id%2)]));
    }
    logger.info("Sending completed.");
  }

  @Bean
  public ConnectionFactory connectionFactory() {
    CachingConnectionFactory connectionFactory = new CachingConnectionFactory();
    connectionFactory.setUsername("guest");
    connectionFactory.setPassword("guest");
    connectionFactory.setAddresses("192.168.99.100:30000,192.168.99.100:30002,,192.168.99.100:30004");
    return connectionFactory;
  }

  @Bean
  public RabbitTemplate template() {
    RabbitTemplate rabbitTemplate = new RabbitTemplate(connectionFactory());
    rabbitTemplate.setExchange("ex.example");
    return rabbitTemplate;
  }

}
Conclusion
Clustering and high availability configuration with RabbitMQ are pretty simple. I like Rabbit MQ for its support in the cluster monitoring process with UI management console. In my opinion, it is user-friendly and intuitive. Sending and receiving messages from an HA-clustered queue is much slower than for a single standalone instance, but is still acceptable.
Published at DZone with permission of Piotr Mińkowski. See the original article here.
Opinions expressed by DZone contributors are their own.
Comments