How to Record Audio in React Native
Join the DZone community and get the full member experience.
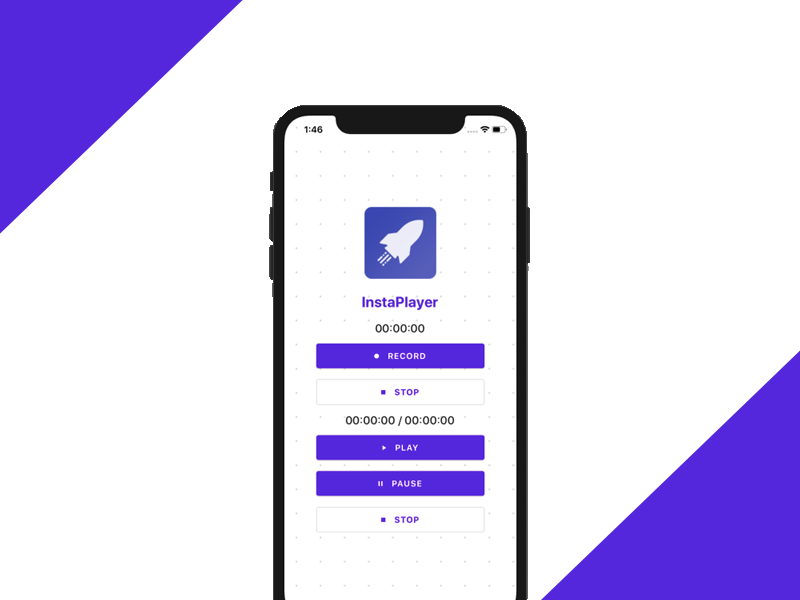
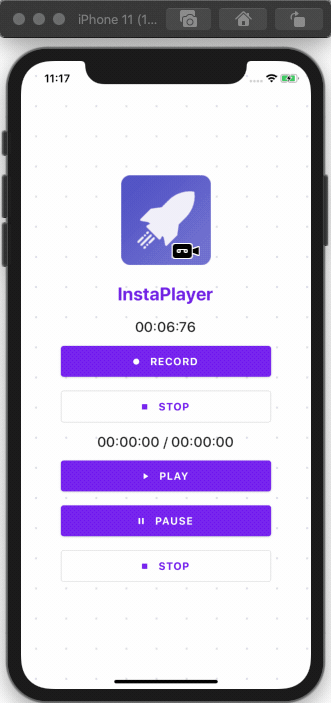
Join For FreeIn this tutorial, we are going to learn how to record and play audio in React Native apps. We are going to build a simple screen that supports features such as recording audio, playing audio files, pausing and resuming, as well as resetting audio streams. The final app will look like the image below.
Recording and playing audio in mobile applications is a very popular feature. Fortunately, to record and play audio in React Native apps can be done easily. This is thanks to the Expo ecosystem that easily supports sound recording to React Native. However, if we need to add any feature that requires us to migrate off the Expo system to React Native CLI, we may need to put much more effort into its configuration.
As a result, we may need to use a third-party package. After much research, I have come up with a package that meets our requirements for recording and playing audio in React Native. The package name is react-native-audio-recorder-player. The package is easy to configure and provides us with robust modules and components to implement an audio recorder and player in React Native applications.
Without further ado, let’s get started!
Prerequisites
In order to go through this tutorial, we need to first prepare our React Native development environment.
Installing and Setting Up the Package
First, we need to install the react-native-audio-recorder-player package using yarn or npm. I prefer using yarn so I am going to use yarn and run the following command in the project Terminal:
yarn add react-native-audio-recorder-player
Then, we need to run the following command in order to run the app in the iOS device or simulator (simply replace ios with android if you are running on Android)
xxxxxxxxxx
react-native run-ios
Preparing the Recorder Component
Here, we start by importing the necessary methods from the react-native-audio-recorder-player package as shown in the code snippet below:
xxxxxxxxxx
import AudioRecorderPlayer, {
AVEncoderAudioQualityIOSType,
AVEncodingOption,
AudioEncoderAndroidType,
AudioSet,
AudioSourceAndroidType,
} from 'react-native-audio-recorder-player';
Then, we need to create a few new states and also initialize a new recorder instance as depicted in the code snippet below:
xxxxxxxxxx
class App extends Component {
constructor(props) {
super(props);
this.state = {
isLoggingIn: false,
recordSecs: 0,
recordTime: '00:00:00',
currentPositionSec: 0,
currentDurationSec: 0,
playTime: '00:00:00',
duration: '00:00:00',
};
this.audioRecorderPlayer = new AudioRecorderPlayer();
this.audioRecorderPlayer.setSubscriptionDuration(0.09); // optional. Default is 0.1
}
Preparing the UI
For the UI implementation, we are going to use components of the react-native-paper package. We already have an idea of how an audio player and recorder should look like. Hence, we can easily implement it on our screen. For a simple UI layout for the app, we can use the code from the following code snippet:
xxxxxxxxxx
return (
<Card style={{ flex: 1, flexDirection: 'row', alignItems: 'center', alignContent: 'center', alignSelf: 'center' }}>
<Background>
<Logo />
<Header>InstaPlayer</Header>
<Title>{this.state.recordTime}</Title>
<Button mode="contained" icon="record" onPress={() => this.onStartRecord()}>
RECORD
</Button>
<Button
icon="stop"
mode="outlined"
onPress={() => this.onStopRecord()}
>
STOP
</Button>
<Divider />
<Title>{this.state.playTime} / {this.state.duration}</Title>
<Button mode="contained" icon="play" onPress={() => this.onStartPlay()}>
PLAY
</Button>
<Button
icon="pause"
mode="contained"
onPress={() => this.onPausePlay()}
>
PAUSE
</Button>
<Button
icon="stop"
mode="outlined"
onPress={() => this.onStopPlay()}
>
STOP
</Button>
</Background>
</Card>
)
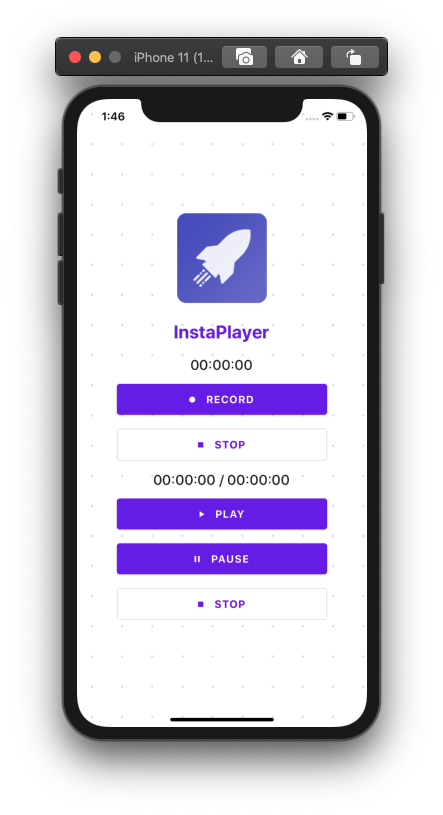
Hence, we will get an audio recorder and an audio player on the same screen as displayed in the simulator screenshot below:
Now, it is time to implement the functions for each button on the screen.
Record Audio in React Native
The first thing we need to do in any recording app is to implement the recording feature. The actual implementation is fairly simple for this. We need to follow these simple steps:
- Firstly, we start by defining an audio file name and extension.
- Secondly, we define the audio format preference.
- Lastly, we start to record audio and add a record time to the state.
The implementation for this is provided in the code snippet below:
xxxxxxxxxx
onStartRecord = async () => {
const path = 'hello.m4a';
const audioSet = {
AudioEncoderAndroid: AudioEncoderAndroidType.AAC,
AudioSourceAndroid: AudioSourceAndroidType.MIC,
AVEncoderAudioQualityKeyIOS: AVEncoderAudioQualityIOSType.high,
AVNumberOfChannelsKeyIOS: 2,
AVFormatIDKeyIOS: AVEncodingOption.aac,
};
console.log('audioSet', audioSet);
const uri = await this.audioRecorderPlayer.startRecorder(path, audioSet);
this.audioRecorderPlayer.addRecordBackListener((e) => {
this.setState({
recordSecs: e.current_position,
recordTime: this.audioRecorderPlayer.mmssss(
Math.floor(e.current_position),
),
});
});
console.log(`uri: ${uri}`);
};
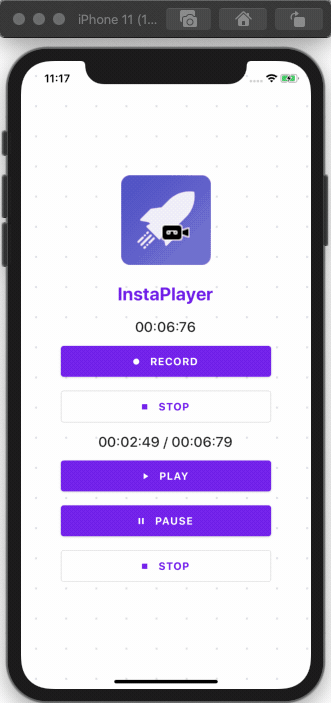
Hence, we will get the result as shown in the demo screenshot of the emulator below (simply press the Record button):
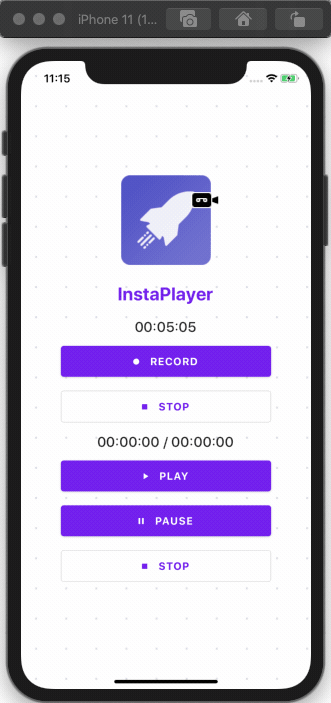
Here, we can see that the timer starts as we tap on the RECORD button.
Stopping Audio Recording
The stop recording feature is easy to implement as well. We just need to call the stopRecorder method and reset the time counter back to zero using the code from the following code snippet:
xxxxxxxxxx
onStopRecord = async () => {
const result = await this.audioRecorderPlayer.stopRecorder();
this.audioRecorderPlayer.removeRecordBackListener();
this.setState({
recordSecs: 0,
});
console.log(result);
};
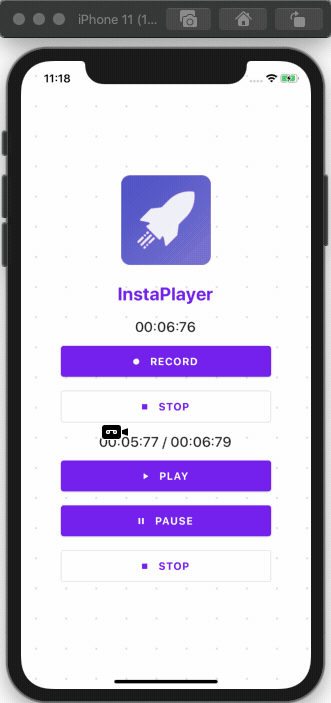
As you can notice we get the result as shown in the demo screenshot below:
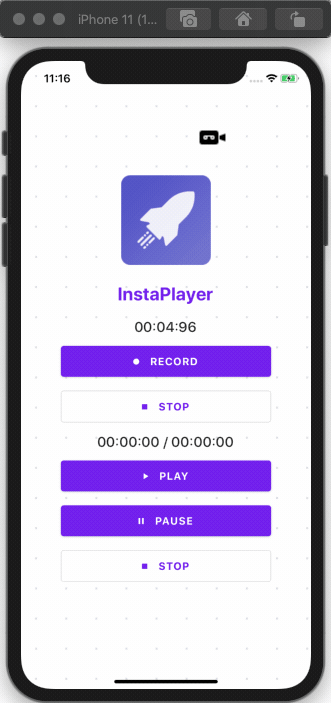
Hence, the timer stops as we tap on the STOP button.
Audio Player to Play Audio in React Native
Since we are done with the recording and stop recording features, we now have an audio file to play. In order to implement the play feature, we need to call the startPlayer method and pass the path to the file that we’ve just recorded. Then, we need to set the volume. Once the audio plays, we need to set a callback function to stop playing when the play counter indicator reaches the completion point. We also need to add current playtime to the state to display the counter properly in the UI. The implementation for this is provided in the code snippet below:
xxxxxxxxxx
onStartPlay = async (e) => {
console.log('onStartPlay');
const path = 'hello.m4a'
const msg = await this.audioRecorderPlayer.startPlayer(path);
this.audioRecorderPlayer.setVolume(1.0);
console.log(msg);
this.audioRecorderPlayer.addPlayBackListener((e) => {
if (e.current_position === e.duration) {
console.log('finished');
this.audioRecorderPlayer.stopPlayer();
}
this.setState({
currentPositionSec: e.current_position,
currentDurationSec: e.duration,
playTime: this.audioRecorderPlayer.mmssss(
Math.floor(e.current_position),
),
duration: this.audioRecorderPlayer.mmssss(Math.floor(e.duration)),
});
});
};
Hence, we will get the result as shown in the demo screenshot below:
As you can see, when we tap the PLAY button, the audio starts playing.
Pausing The Audio Player
Implementing a pause feature is simple. We just need to call the pausePlayer method, when PAUSE button is pressed. We can do this by using the following piece of code:
xxxxxxxxxx
onPausePlay = async (e) => {
await this.audioRecorderPlayer.pausePlayer();
};
Hence, we will get the result as shown in the demo screenshot below:
Here, we can see that when we hit the PAUSE button the player pauses, and when we hit the Play button again it starts to play from the same point where we stopped it.
Stopping the Audio Player in React Native
In order to stop the player, we need to call the stopPlayer method. Then, we need to remove the playback data by calling removePlayBackListener method and reset the counter to zero again. The feature to trigger the stop action is provided as a function in the code snippet below:
xxxxxxxxxx
onStopPlay = async (e) => {
console.log('onStopPlay');
this.audioRecorderPlayer.stopPlayer();
this.audioRecorderPlayer.removePlayBackListener();
};
Hence, we will get the result as shown in the screenshot below:
Here, we can see that when we hit the STOP button the player stops and after hitting the PLAY button, the counter starts from this beginning.
Finally, we have successfully implemented the audio recorder and player in the React Native application along with an intuitive UI layout. Hopefully now you know how to record audio in React Native and how to play the recorded audio files into a React Native audio player.
Conclusion
It has been an interesting feature to get our hands on. Implementing an audio recorder and player in a React Native may sound difficult but in fact, it’s fairly simple thanks to a powerful library. This tutorial provides detailed guidance on each step so that it becomes even simpler. The package that we used for recording and playing audio is pretty robust and easy to implement as well. Make sure to get your hands dirty with it.
Published at DZone with permission of krissanawatt kaewsanmunag. See the original article here.
Opinions expressed by DZone contributors are their own.
Comments