

Real-Time Analytics Using Zero-ETL for MySQL
Learn how to set up a zero-ETL integration from Amazon RDS for MySQL to Amazon Redshift using AWS CLI for real-time analytics without complex pipelines.
Join the DZone community and get the full member experience.
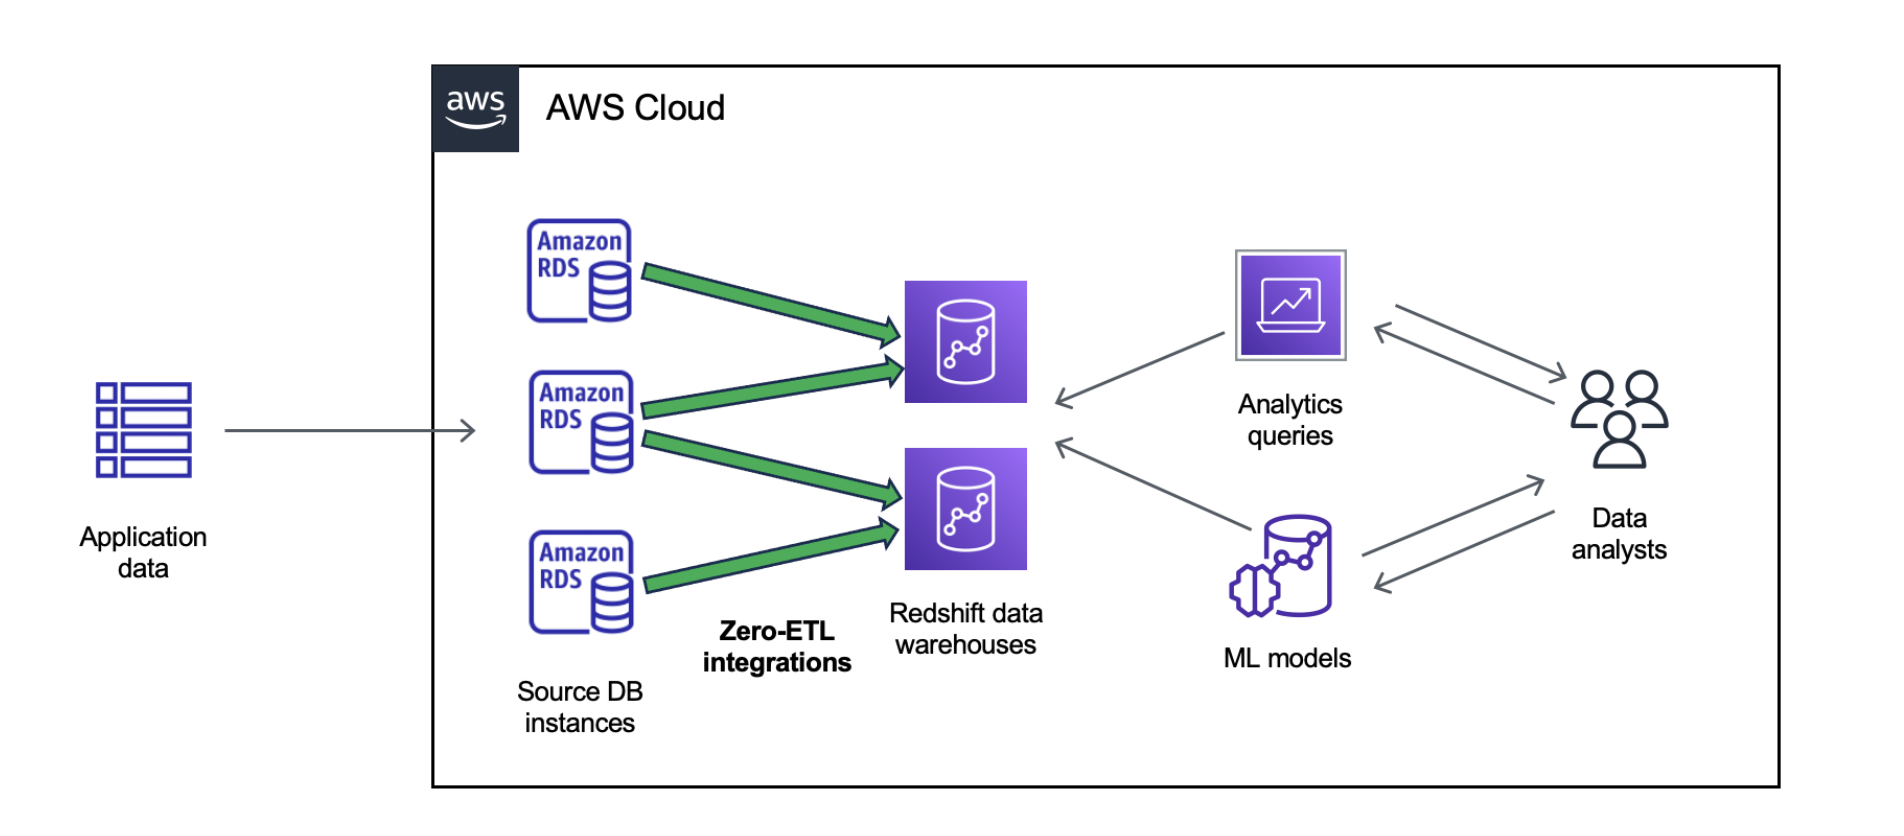
Join For FreeOrganizations rely on real-time analytics to gain insights into their core business drivers, enhance operational efficiency, and maintain a competitive edge. Traditionally, this has involved the use of complex extract, transform, and load (ETL) pipelines. ETL is the process of combining, cleaning, and normalizing data from different sources to prepare it for analytics, AI, and machine learning (ML) workloads. Although ETL processes have long been a staple of data integration, they often prove time-consuming, complex, and less adaptable to the fast-changing demands of modern data architectures. By transitioning towards zero-ETL architectures, businesses can foster agility in analytics, streamline processes, and make sure that data is immediately actionable.
In this post, we demonstrate how to set up a zero-ETL integration between Amazon Relational Database Service (Amazon RDS) for MySQL (source) and Amazon Redshift (destination). The transactional data from the source gets refreshed in near real time on the destination, which processes analytical queries.
Prerequisites
You must have the following prerequisites:
- The AWS Command Line Interface (AWS CLI) v2 is installed and configured with appropriate credentials.
- Sufficient AWS Identity and Access Management (AWS IAM) permissions to create and configure Amazon RDS. For more details, refer to Creating an Amazon RDS DB instance.
- An RDS for MySQL (source) DB instance set up and accessible on its respective SQL port. For this post, we use RDS DB instances with MySQL 8.0.
- An Amazon Elastic Compute Cloud (Amazon EC2) Security group is set up to allow a DB instance port connection to the source and target DB instances.
Step-by-Step Implementation
Create a Custom Amazon RDS DB Parameter Group
Use the following code to create a custom RDS DB parameter group:
aws rds create-db-parameter-group \
--db-parameter-group-name zetl-parameter-group \
--db-parameter-group-family mysql8.0 \
--description "zetl parameter group for mysql" \
--region us-east-1
Modify the binlog_format and binlog_row_image parameter values. The binary logging format is important because it determines the record of data changes that is recorded in the source and sent to the replication targets. For information about the advantages and disadvantages of different binary logging formats for replication, see Advantages and Disadvantages of Statement-Based and Row-Based Replication in the MySQL documentation.
aws rds modify-db-parameter-group \
--db-parameter-group-name zetl-parameter-group \
--region us-east-1
--parameters "ParameterName=binlog_format,ParameterValue=ROW,ApplyMethod=immediate" \
 "ParameterName=binlog_row_image,ParameterValue=full,ApplyMethod=immediate"
Select or Create an Amazon RDS MySQL Database
If you already have an RDS instance, you can use that, or you can create a new instance with the following code:
aws rds create-db-instance \
--engine mysql \
--engine-version 8.0.42 \
--db-instance-class db.r5.large \
--master-username test \
--master-user-password ****** \
--db-parameter-group-name zetl-parameter-group \
--allocated-storage 10 \
--db-instance-identifier zetl-db \
--region us-east-1
Wait for your RDS instance to be in available status. You can make a describe-db-instances API call to verify the DB instance status:
aws rds describe-db-instances --filters 'Name=db-instance-id,Values=zetl-db' | grep DBInstanceStatusLoad Data in the Source RDS Database
Connect to the source MySQL database and run the following commands:
mysql -h zetl-db.************.us-east-1.rds.amazonaws.com  -u test -P 3306 -p


MySQL [(none)]> CREATE DATABASE my_db;

MySQL [(none)]> USE my_db;

MySQL [my_db]> CREATE TABLE books_table (ID int NOT NULL, Title VARCHAR(50) NOT NULL, Author VARCHAR(50) NOT NULL,
Copyright INT NOT NULL, Genre VARCHAR(50) NOT NULL, PRIMARY KEY (ID));

MySQL [my_db]> INSERT INTO books_table VALUES (1, 'The Shining', 'Stephen King', 1977, 'Supernatural fiction');

MySQL [my_db]> commit;
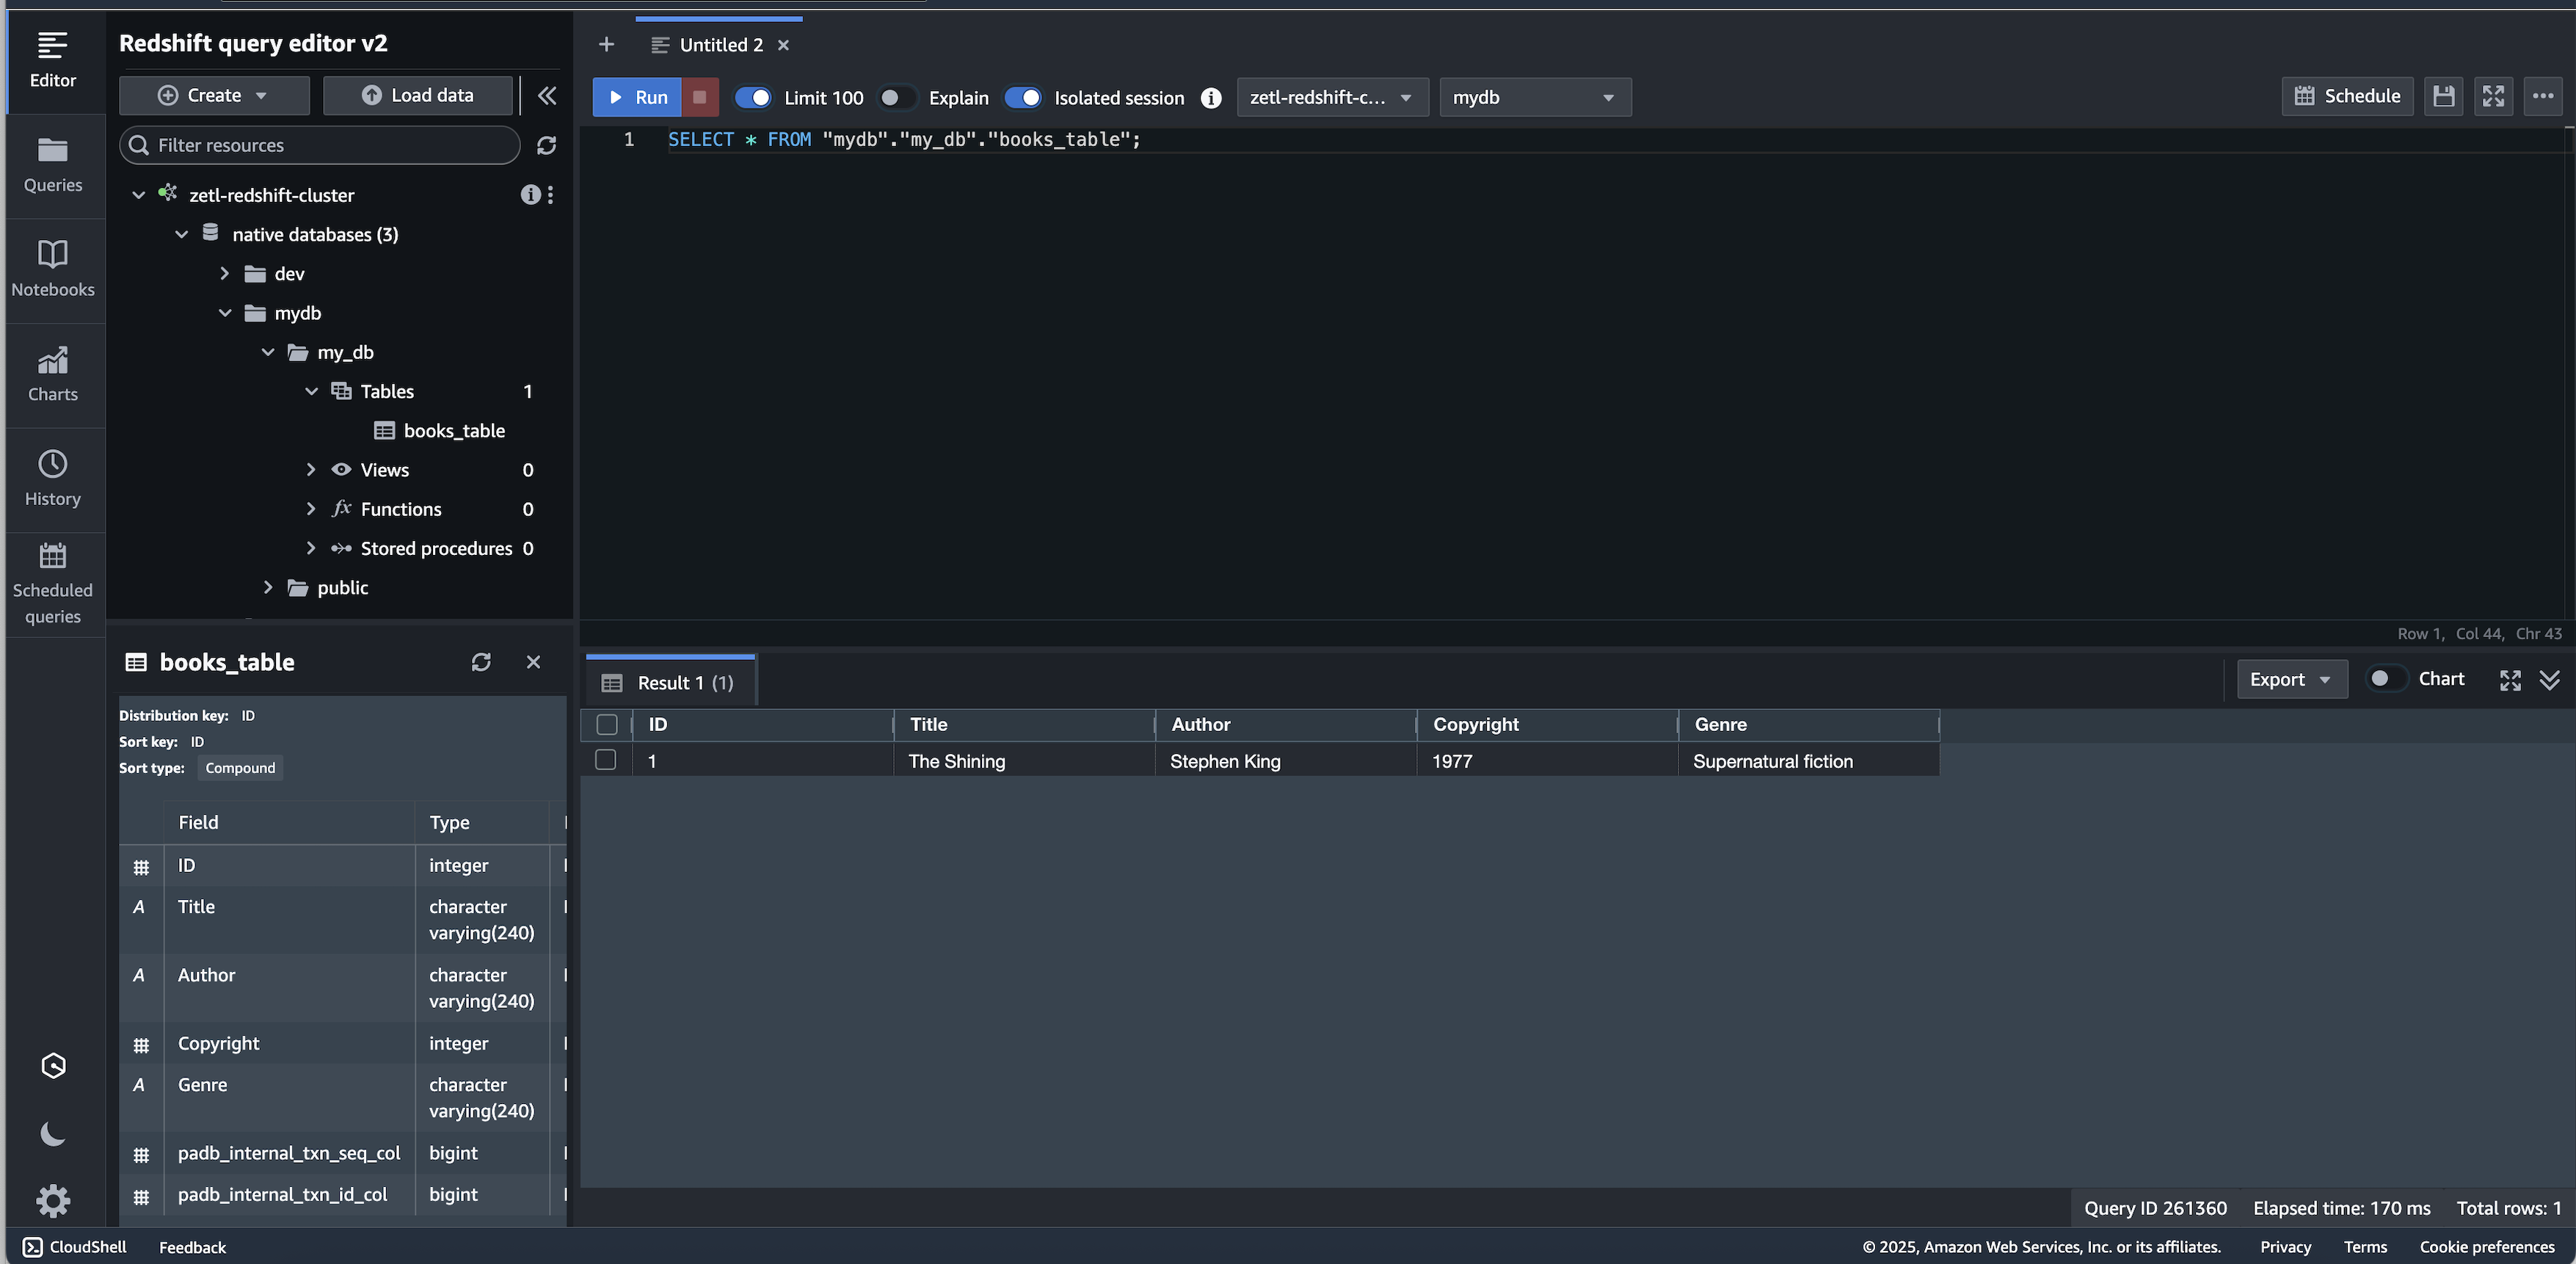
This data will be our historical data. After we create an integration, we will generate new live data.
Create a Subnet Group for the Redshift Cluster
Use the following code to create a cluster subnet group
aws redshift create-cluster-subnet-group \
--cluster-subnet-group-name zetl-subnet-group \
--subnet-ids "subnet-d0437eef" "subnet-*****" "subnet-*****" "subnet-*****"\
--description "subnet group for redshift" \
--region us-east-1
Create a Custom Parameter Group for the Amazon Redshift Cluster
Use the following code to create a custom parameter group for the Redshift cluster:
aws redshift create-cluster-parameter-group \
--parameter-group-name zetl-redshift-parameter-group \
--parameter-group-family redshift-1.0 \
--description "cluster parameter group for zetl" \
--region us-east-1
Modify the enable_case_sensitive_identifier parameter and set its value to ON. This is required to support the case sensitivity of source tables and columns. The enable_case_sensitive_identifier parameter is a configuration value that determines whether name identifiers of databases, tables, and columns are case sensitive. This parameter must be turned on to create zero-ETL integrations in the data warehouse.
aws redshift modify-cluster-parameter-group \
--parameter-group-name zetl-redshift-parameter-group \
--parameters ParameterName=enable_case_sensitive_identifier,ParameterValue=ON \
--region us-east-1
Select or Create the Target Redshift Cluster
If you already have a Redshift cluster, you can use that, or you can create a new cluster with the following code:
aws redshift create-cluster \
--cluster-identifier zetl-redshift-cluster \
--cluster-parameter-group-name zetl-redshift-parameter-group \
--port 5439 \
--master-username test \
--master-user-password *****\
--node-type ra3.xlplus \
--number-of-nodes 2 \
--maintenance-track CURRENT \
--cluster-subnet-group-name zetl-subnet-group \
--region us-east-1
Wait for your cluster to be available. You can make a describe-clusters API call to verify cluster status:
aws redshift describe-clusters --query 'Clusters[?ClusterIdentifier==`zetl-redshift-cluster`]' | grep ClusterStatusConfigure Authorization Using an Amazon Redshift Resource Policy
You can use the Amazon Redshift API operations to configure resource policies that work with zero-ETL integrations.
To control the source that can create an inbound integration into the Amazon Redshift namespace, create a resource policy and attach it to the namespace. With the resource policy, you can specify the source that has access to the integration. The resource policy is attached to the namespace of your target data warehouse to allow the source to create an inbound integration to replicate live data from the source into Amazon Redshift.
aws redshift put-resource-policy \
--resource-arn arn:aws:redshift:us-east-1:123456789012:namespace:fb5d655c-e169-44f4-99f6-7c501e1ca38e \
--policy  "{ \"Version\": \"2012-10-17\", \"Statement\": \
      [ { \"Effect\": \"Allow\",\"Principal\": { \"Service\": \
      \"redshift.amazonaws.com\" } , \"Action\": [ \
      \"redshift:AuthorizeInboundIntegration\"], \
      \"Condition\":{\"StringEquals\":{\"aws:SourceArn\":\"arn:aws:rds:us-east-1:123456789012:db:zetl-db\"}} },\
      {\"Effect\":\"Allow\", \"Principal\":{\"AWS\":\"123456789012\"}, \
      \"Action\":[\"redshift:CreateInboundIntegration\"] }] }" \
--region us-east-1
Create a Zero-ETL integration
In this step, we create an Amazon RDS zero-ETL integration with Amazon Redshift where we specify the source RDS for the MySQL database and the target Redshift data warehouse. You can optionally also provide data filters, an AWS Key Management Service (AWS KMS) key that you want to use for encryption, tags, and other configurations.
aws rds create-integration \
--source-arn arn:aws:rds:us-east-1:123456789012:db:zetl-db \
--target-arn arn:aws:redshift:us-east-1:123456789012:namespace:fb5d655c-e169-44f4-99f6-7c501e1ca38e \
--integration-name zetl-test-integration \
--data-filter "include: *.*" \
--region us-east-1
Monitor the Integration
Make a describe API call to verify the integration is in active status:
aws rds describe-integrations | grep StatusVerify the Solution
To verify the solution, create a database in Amazon Redshift and connect to it. For instructions, see Creating destination databases in Amazon Redshift.
Verify the historical data in Amazon Redshift:
Next, add some new live data on the source database:
MySQL [my_db]> INSERT INTO books_table VALUES (2, 'AWS', 'Jeff', 1960, 'Amazon');Verify the new changes on the source replicated on the target within seconds.
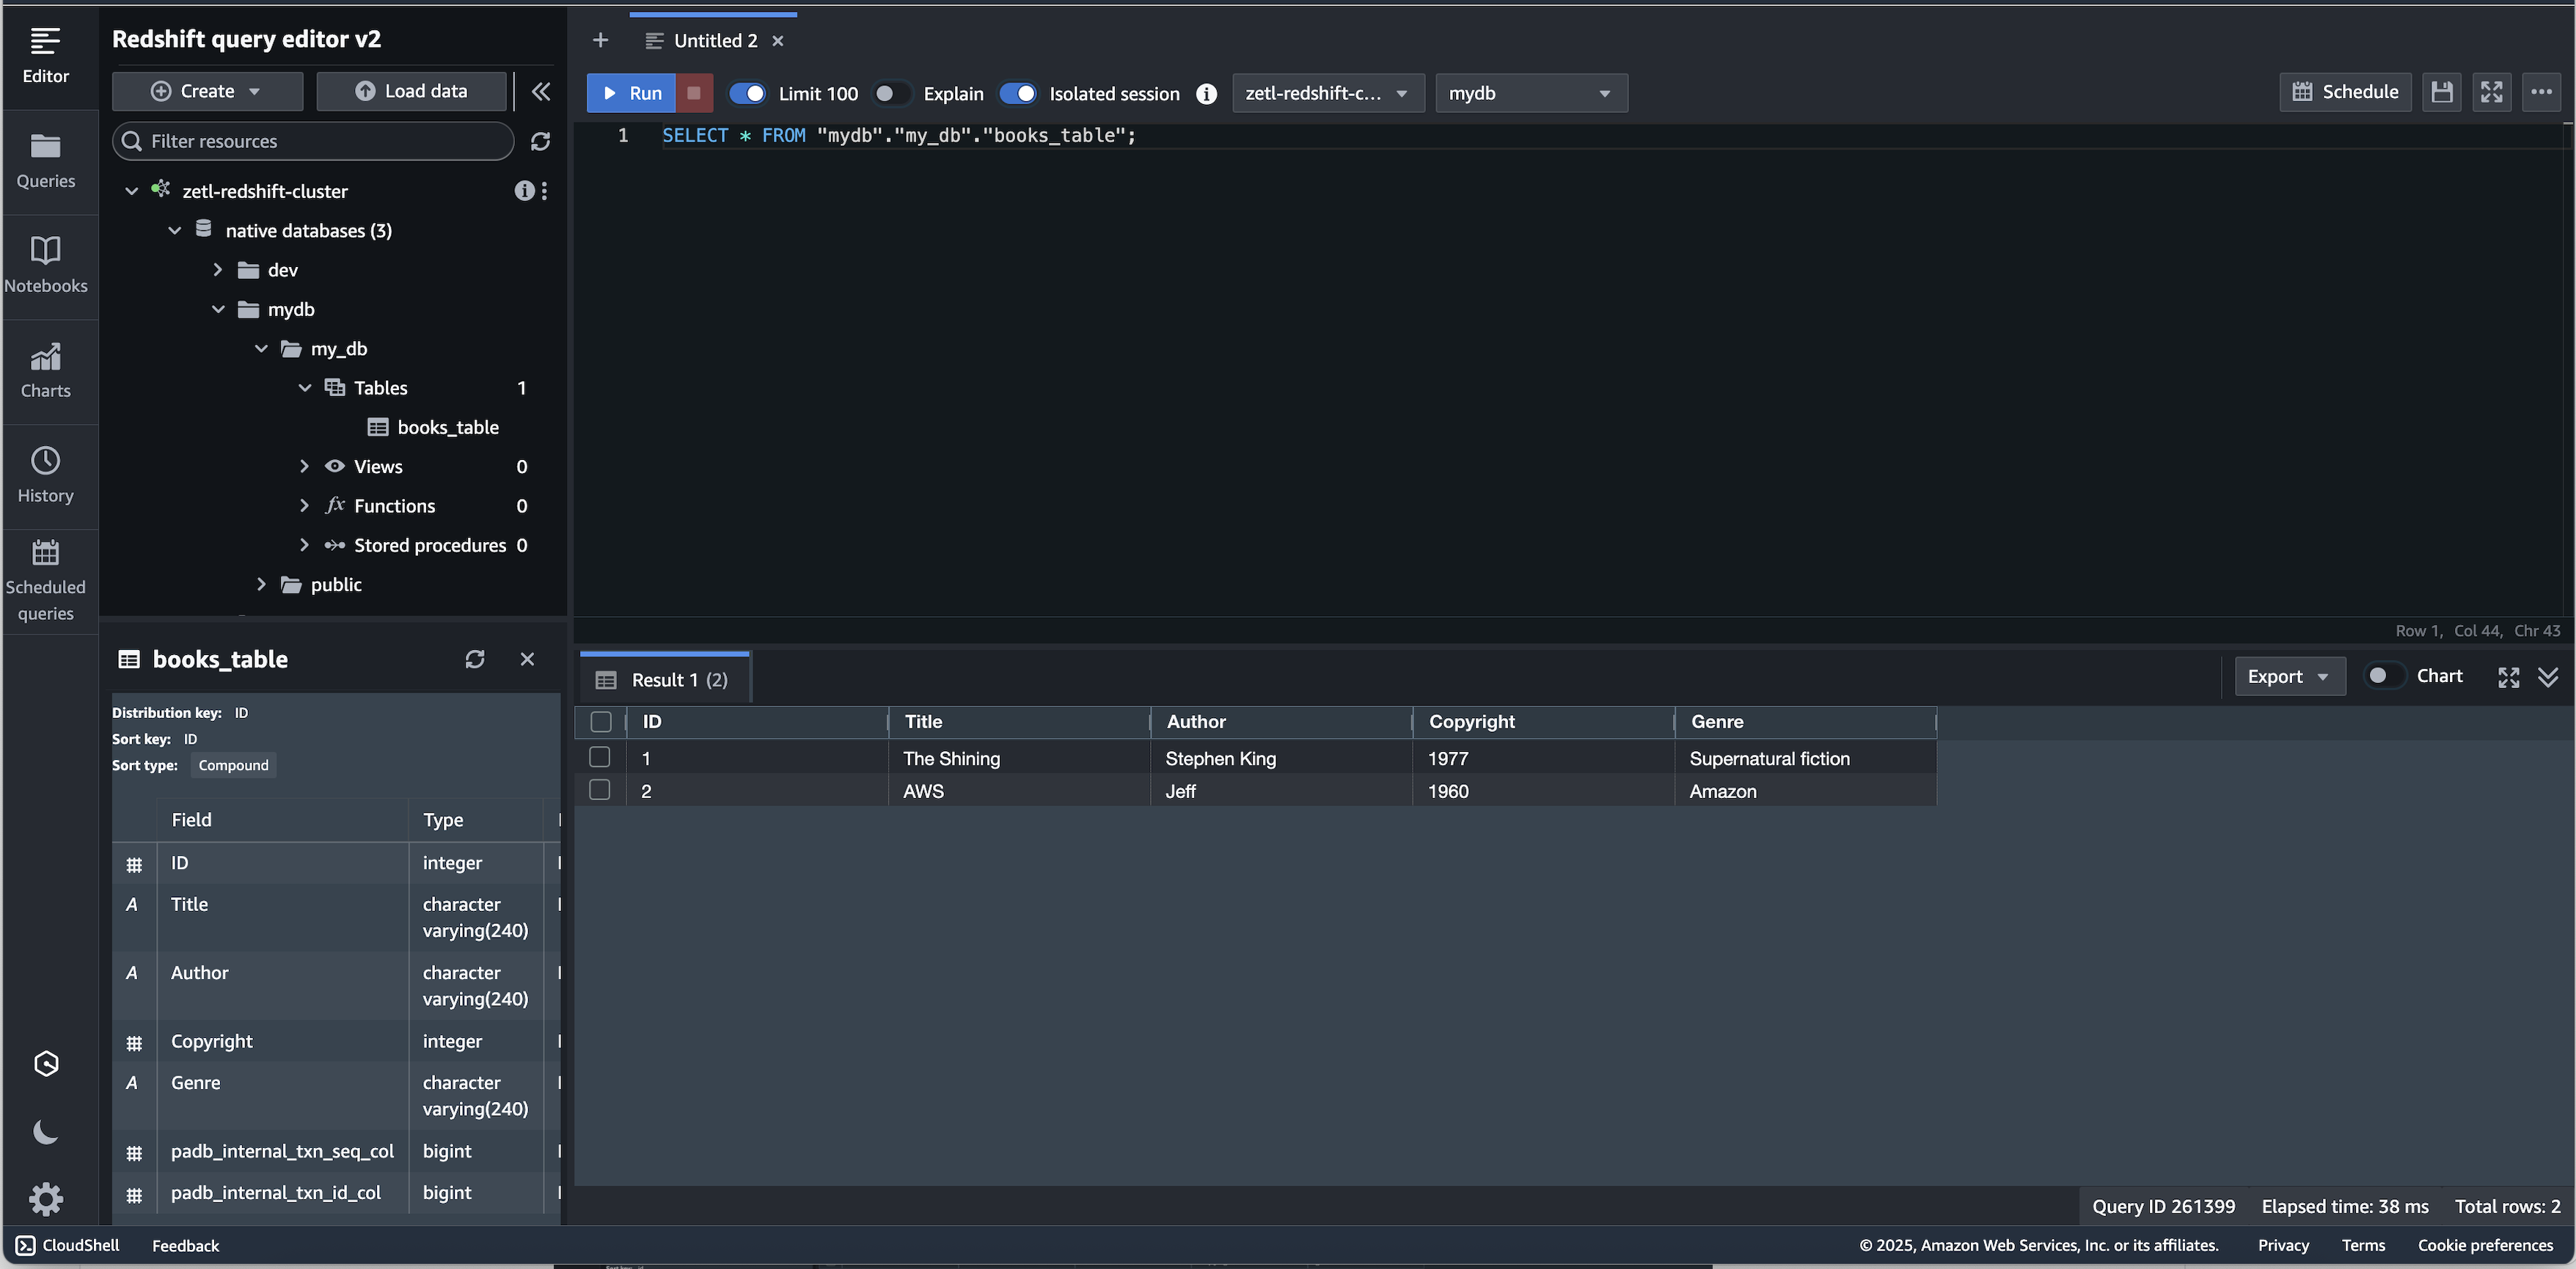
You have successfully configured a zero-ETL integration, and new changes on the source will be replicated to the target. However, there are a few limitations that apply to RDS zero-ETL integrations with Amazon Redshift.
Clean Up
You can clean up after verification is complete:
aws rds delete-integration --integration-identifier arn:aws:rds:us-east-1:123456789012:integration:5bc7602f-61e1-4342-bfae-a69b316e3cfeTo delete the Redshift cluster without taking a final snapshot, use the following code:
aws redshift delete-cluster --cluster-identifier zetl-redshift-cluster --skip-final-cluster-snapshotTo delete the RDS DB instance without taking the final snapshot, you can run the following code:
aws rds delete-db-instance --db-instance-identifier zetl-db --skip-final-snapshotConclusion
In this post, we showed how you can run a zero-ETL integration from Amazon RDS for MySQL to Amazon Redshift using the AWS CLI. This minimizes the need to maintain complex data pipelines and enables near-real-time analytics on transactional and operational data. With zero-ETL integrations, you can focus more on deriving value from your data and less on managing data movement.
As next steps, consider exploring how you can apply this zero-ETL approach to other data sources in your organization. You might also want to investigate how to combine zero-ETL with the advanced analytics capabilities of Amazon Redshift, such as ML integration or federated queries. To learn more about zero-ETL integrations and start implementing them in your own environment, refer to the zero-ETL documentation and begin simplifying your data integration today.
Opinions expressed by DZone contributors are their own.
Comments