The Real-time Data Transfer Magic of Doris Kafka Connector's "Data Package": Part 1
One Man Stands Guard, and Ten Thousand Cannot Pass! Learn all about real-time data import, transformation, and error handling with Doris Kafka Connector.
Join the DZone community and get the full member experience.
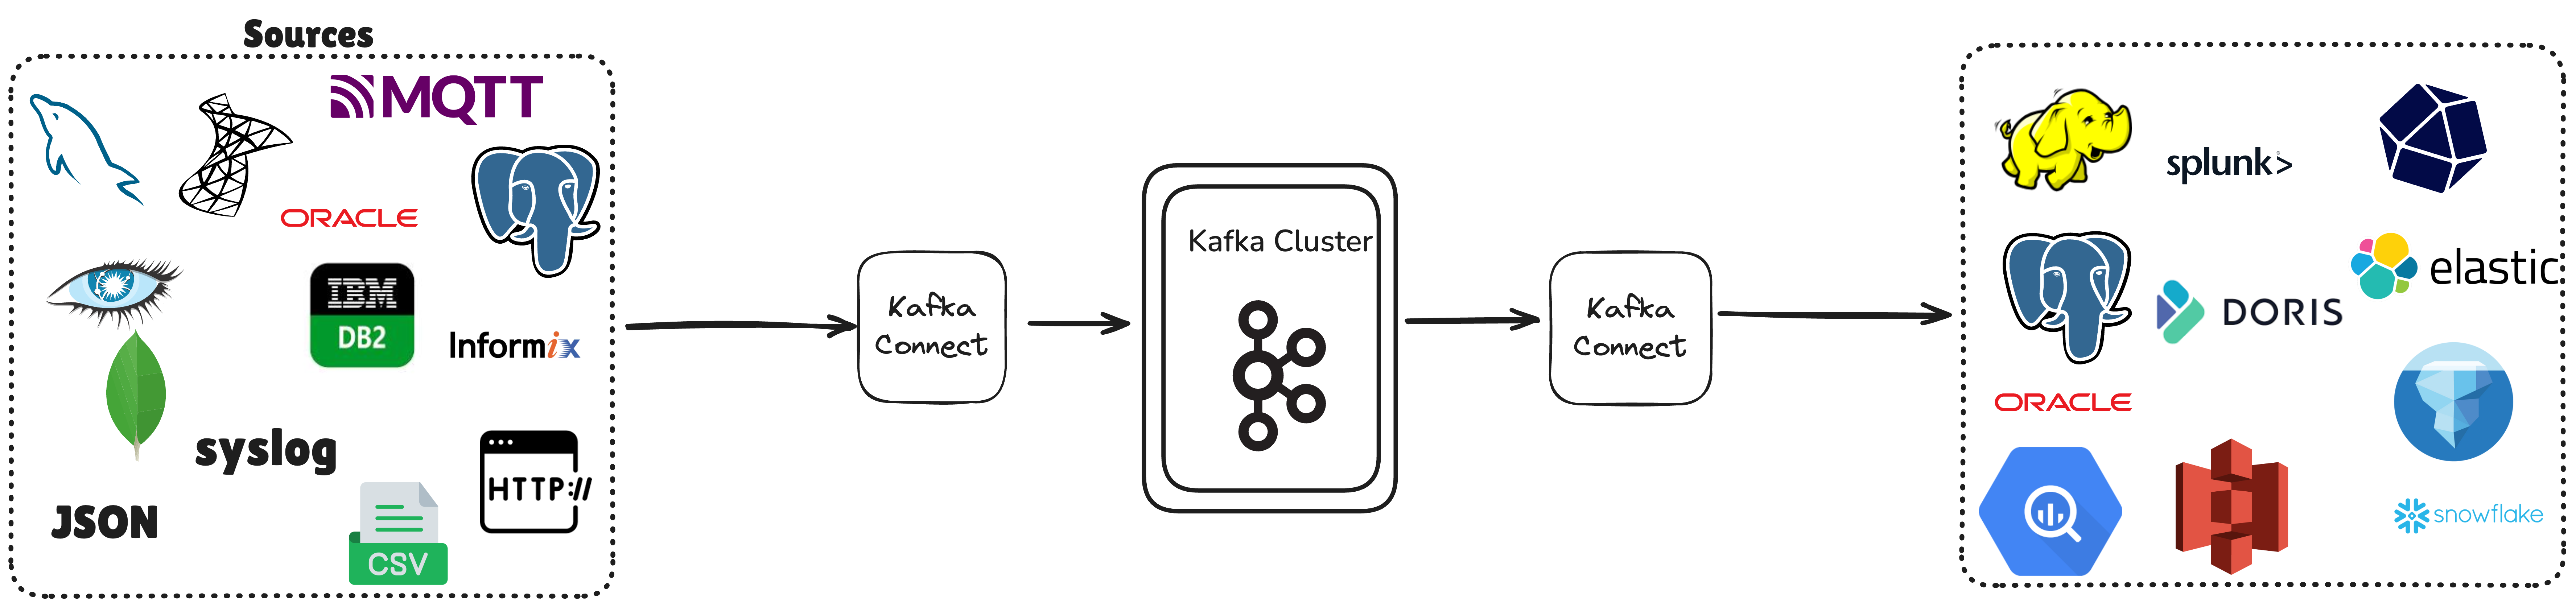
Join For FreeApache Doris provides multi-dimensional data ingestion capabilities. In addition to the built-in Routine Load and Flink's support for reading from Kafka and writing to Doris, the Doris Kafka Connector [1], as an extended component of the Kafka Connect ecosystem, not only supports importing Kafka data into Doris but also relies on the vast Kafka Connect ecosystem to achieve the following features [2]:
Rich Format Support
- Natively parses complex formats such as Avro/Protobuf.
- Automatically registers and converts schemas.
- Optimizes the efficient processing of binary data streams.
Heterogeneous Integration of Multiple Data Sources
- Relational databases: MySQL, Oracle, SQL Server, DB2, Informix, etc.
- NoSQL databases: MongoDB, Cassandra, etc.
- Message queue systems: ActiveMQ, IBM MQ, RabbitMQ, etc.
- Cloud data warehouses: Snowflake, Google BigQuery, Amazon Redshift, etc.
CDC Incremental Expansion
- Supports parsing the data format generated by Debezium to achieve change data capture.
- Can serve as a supplement to the CDC function of the Doris Flink Connector (Currently, Flink CDC does not support capturing databases such as Informix and Spanner).
This article will briefly introduce the main concepts and application practices of the Doris Kafka Connector.
Introduction to Kafka Connect: The Unsung Hero of Data Flow
Kafka Connect is a core open-source component of the Apache Kafka ecosystem, designed as a standardized data integration platform. It enables efficient data flow between heterogeneous systems through a unified abstract interface.
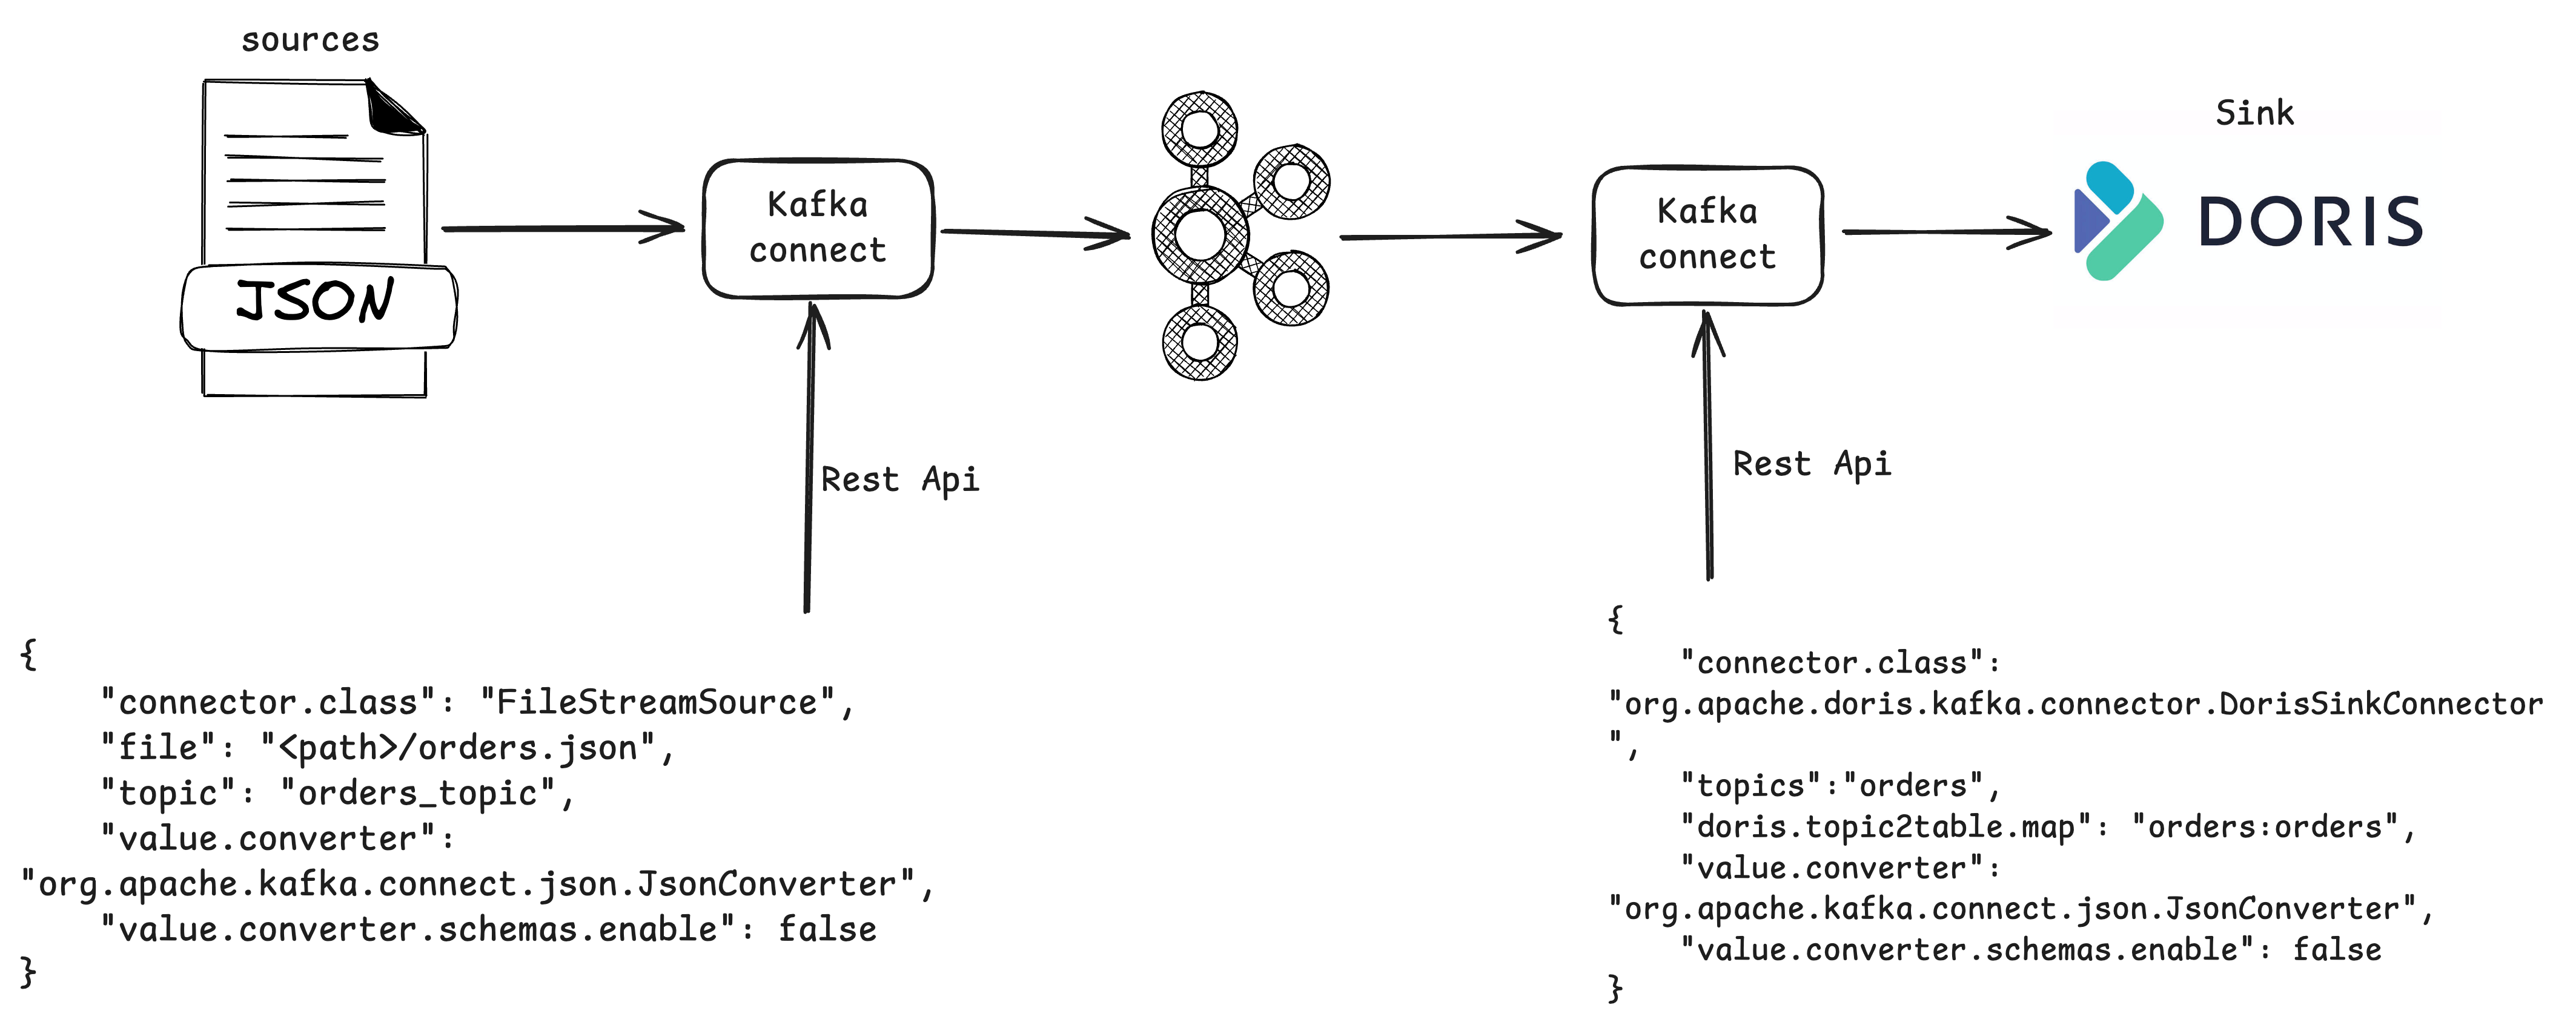
As a scalable distributed architecture, Kafka Connect achieves technical decoupling through a pluggable connector architecture. Users do not need to code the underlying logic of the data pipeline, but can complete end-to-end data synchronization through declarative configuration (as shown below, users can simply configure to import data into Kafka and export it to Doris). This low-code integration mode significantly reduces the technical threshold, allowing data analysts and business architects to focus on data value mining rather than getting bogged down in the implementation details of the transmission mechanism. Its loosely coupled features are reflected in three aspects:
- The upstream and downstream systems are buffered and decoupled through Kafka.
- The standardized interface design ensures that the expansion of the data source and the target end do not affect each other, effectively guaranteeing the maintainability of system evolution.
- Kafka Connect can also perform lightweight transformations on the data as it passes through, avoiding intrusion into the business logic of the source system.
![Kafka Connect]()
Core Concepts of Kafka Connect: The True King of "Connections"
Kafka Connect is typically composed of the following parts:
Connectors: The Super Data Movers
There are two types: source connectors and sink connectors. Source connectors ingest data from databases into Kafka topics, while sink connectors export data from Kafka topics to other systems. The current implementation of Doris Kafka Connect is a SinkConnector, which only supports importing data from Kafka topics into Doris. In addition, Kafka currently provides hundreds of connectors on Confluent Hub, and users can use these connectors to build data pipelines between any systems centered around Kafka.
Tasks
Coordinated by connectors, they are responsible for the actual data replication work. They allow a single job to be broken down into multiple tasks, providing built-in parallel support and scalable data replication capabilities.
Workers
The processes that execute connectors and tasks are divided into two modes: Standalone workers and Distributed workers.
- Standalone mode: A single process is responsible for executing all connections and tasks, which is suitable for the testing and development stages.
- Distributed mode: In the distributed mode, Connect can provide scalability and automatic fault tolerance. By using the same
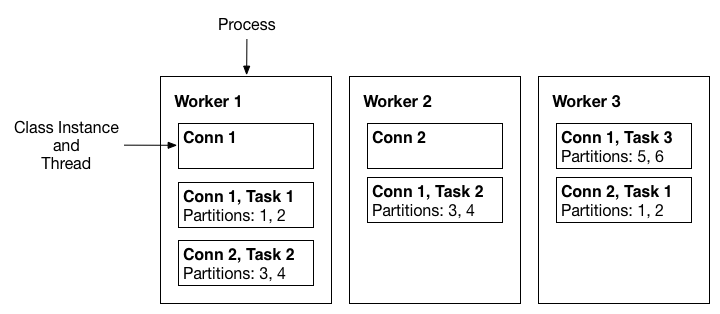
group.id, you can start multiple worker processes, which will automatically coordinate and arrange the execution of connectors and tasks to ensure that these operations can be carried out efficiently across all available worker processes. When a new worker process joins, a worker process is shut down, or a worker process fails unexpectedly, the remaining worker processes will automatically detect this change and quickly coordinate to reassign the connectors and tasks to the updated set of available worker processes, ensuring the stable operation of the entire system and the continuity of data processing. The following figure shows the distributed mode architecture of Kafka Connect [3]. Multiple worker processes run in parallel, and each worker contains different connector instances (such as Conn 1 and Conn 2). Each connector instance is split into multiple tasks, and each task is responsible for processing specific data partitions, thereby achieving horizontal expansion and task parallelism and demonstrating high scalability and load balancing characteristics.![Workers]()
Converters: The "Transformers" of Data
They are used to convert data formats between the systems that Connect sends or receives data from. Commonly used Kafka Connect converters include JsonConverter, StringConverter, and ByteArrayConverter.
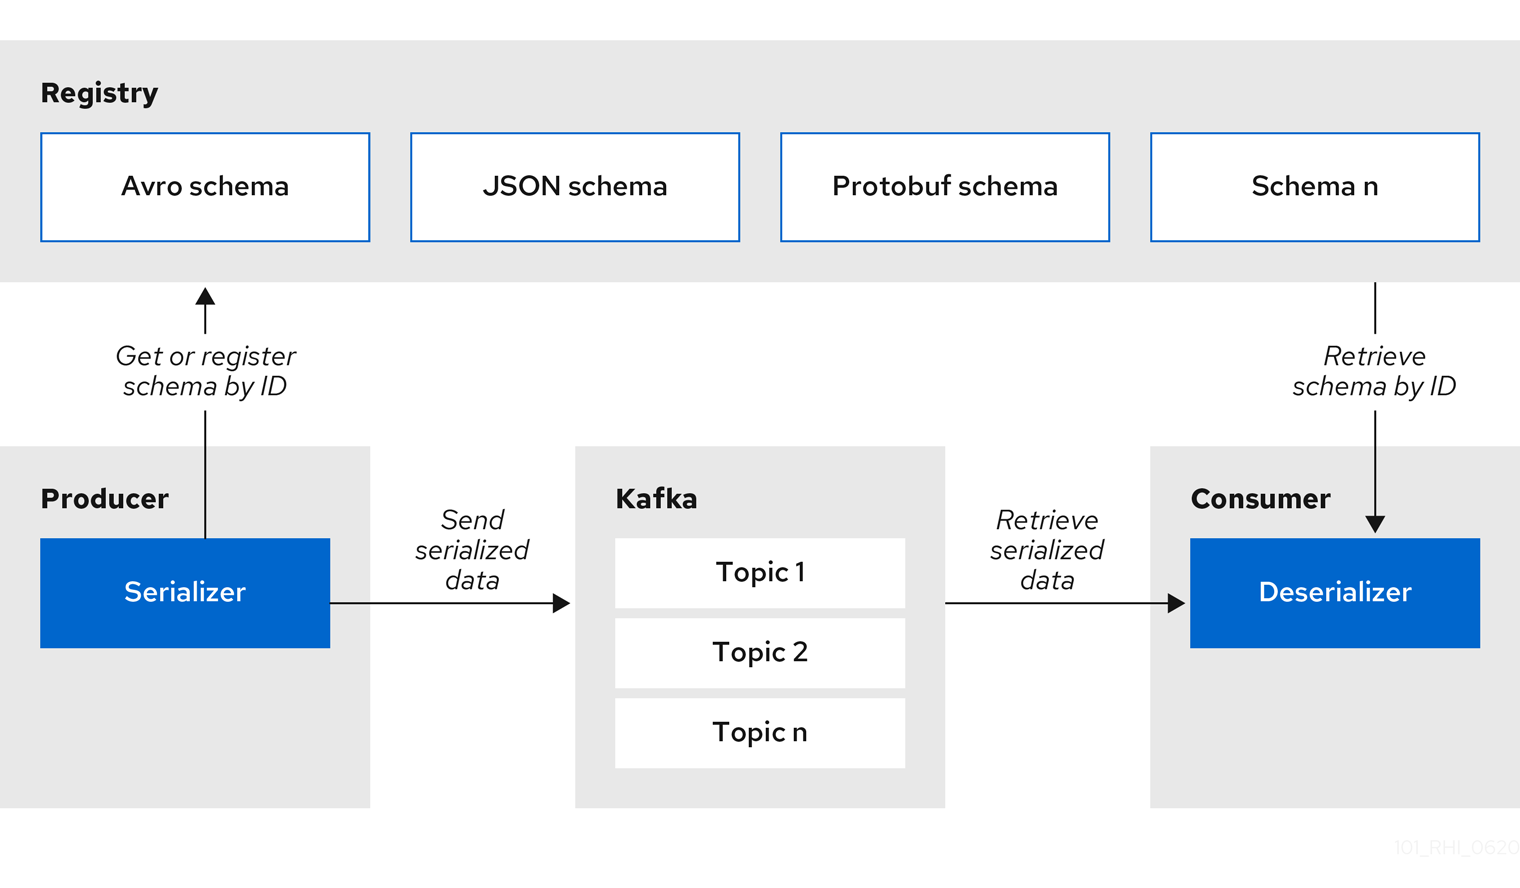
In addition to serializing and deserializing data using Apache Avro, Google Protobuf, and JSON Schema, a schema registry must be deployed to manage the Avro schema information and versions (as shown in the following figure [4], the Schema Registry is used to manage schemas). Commonly used ones include the open-source Apicurio Registry and Confluent Schema Registry.
Transforms: The "Magicians" of Data
They can perform simple modifications and conversions on a single message, and multiple transforms can be configured in a chain within the connector. Common transforms include Filter, ReplaceField, etc. [5].
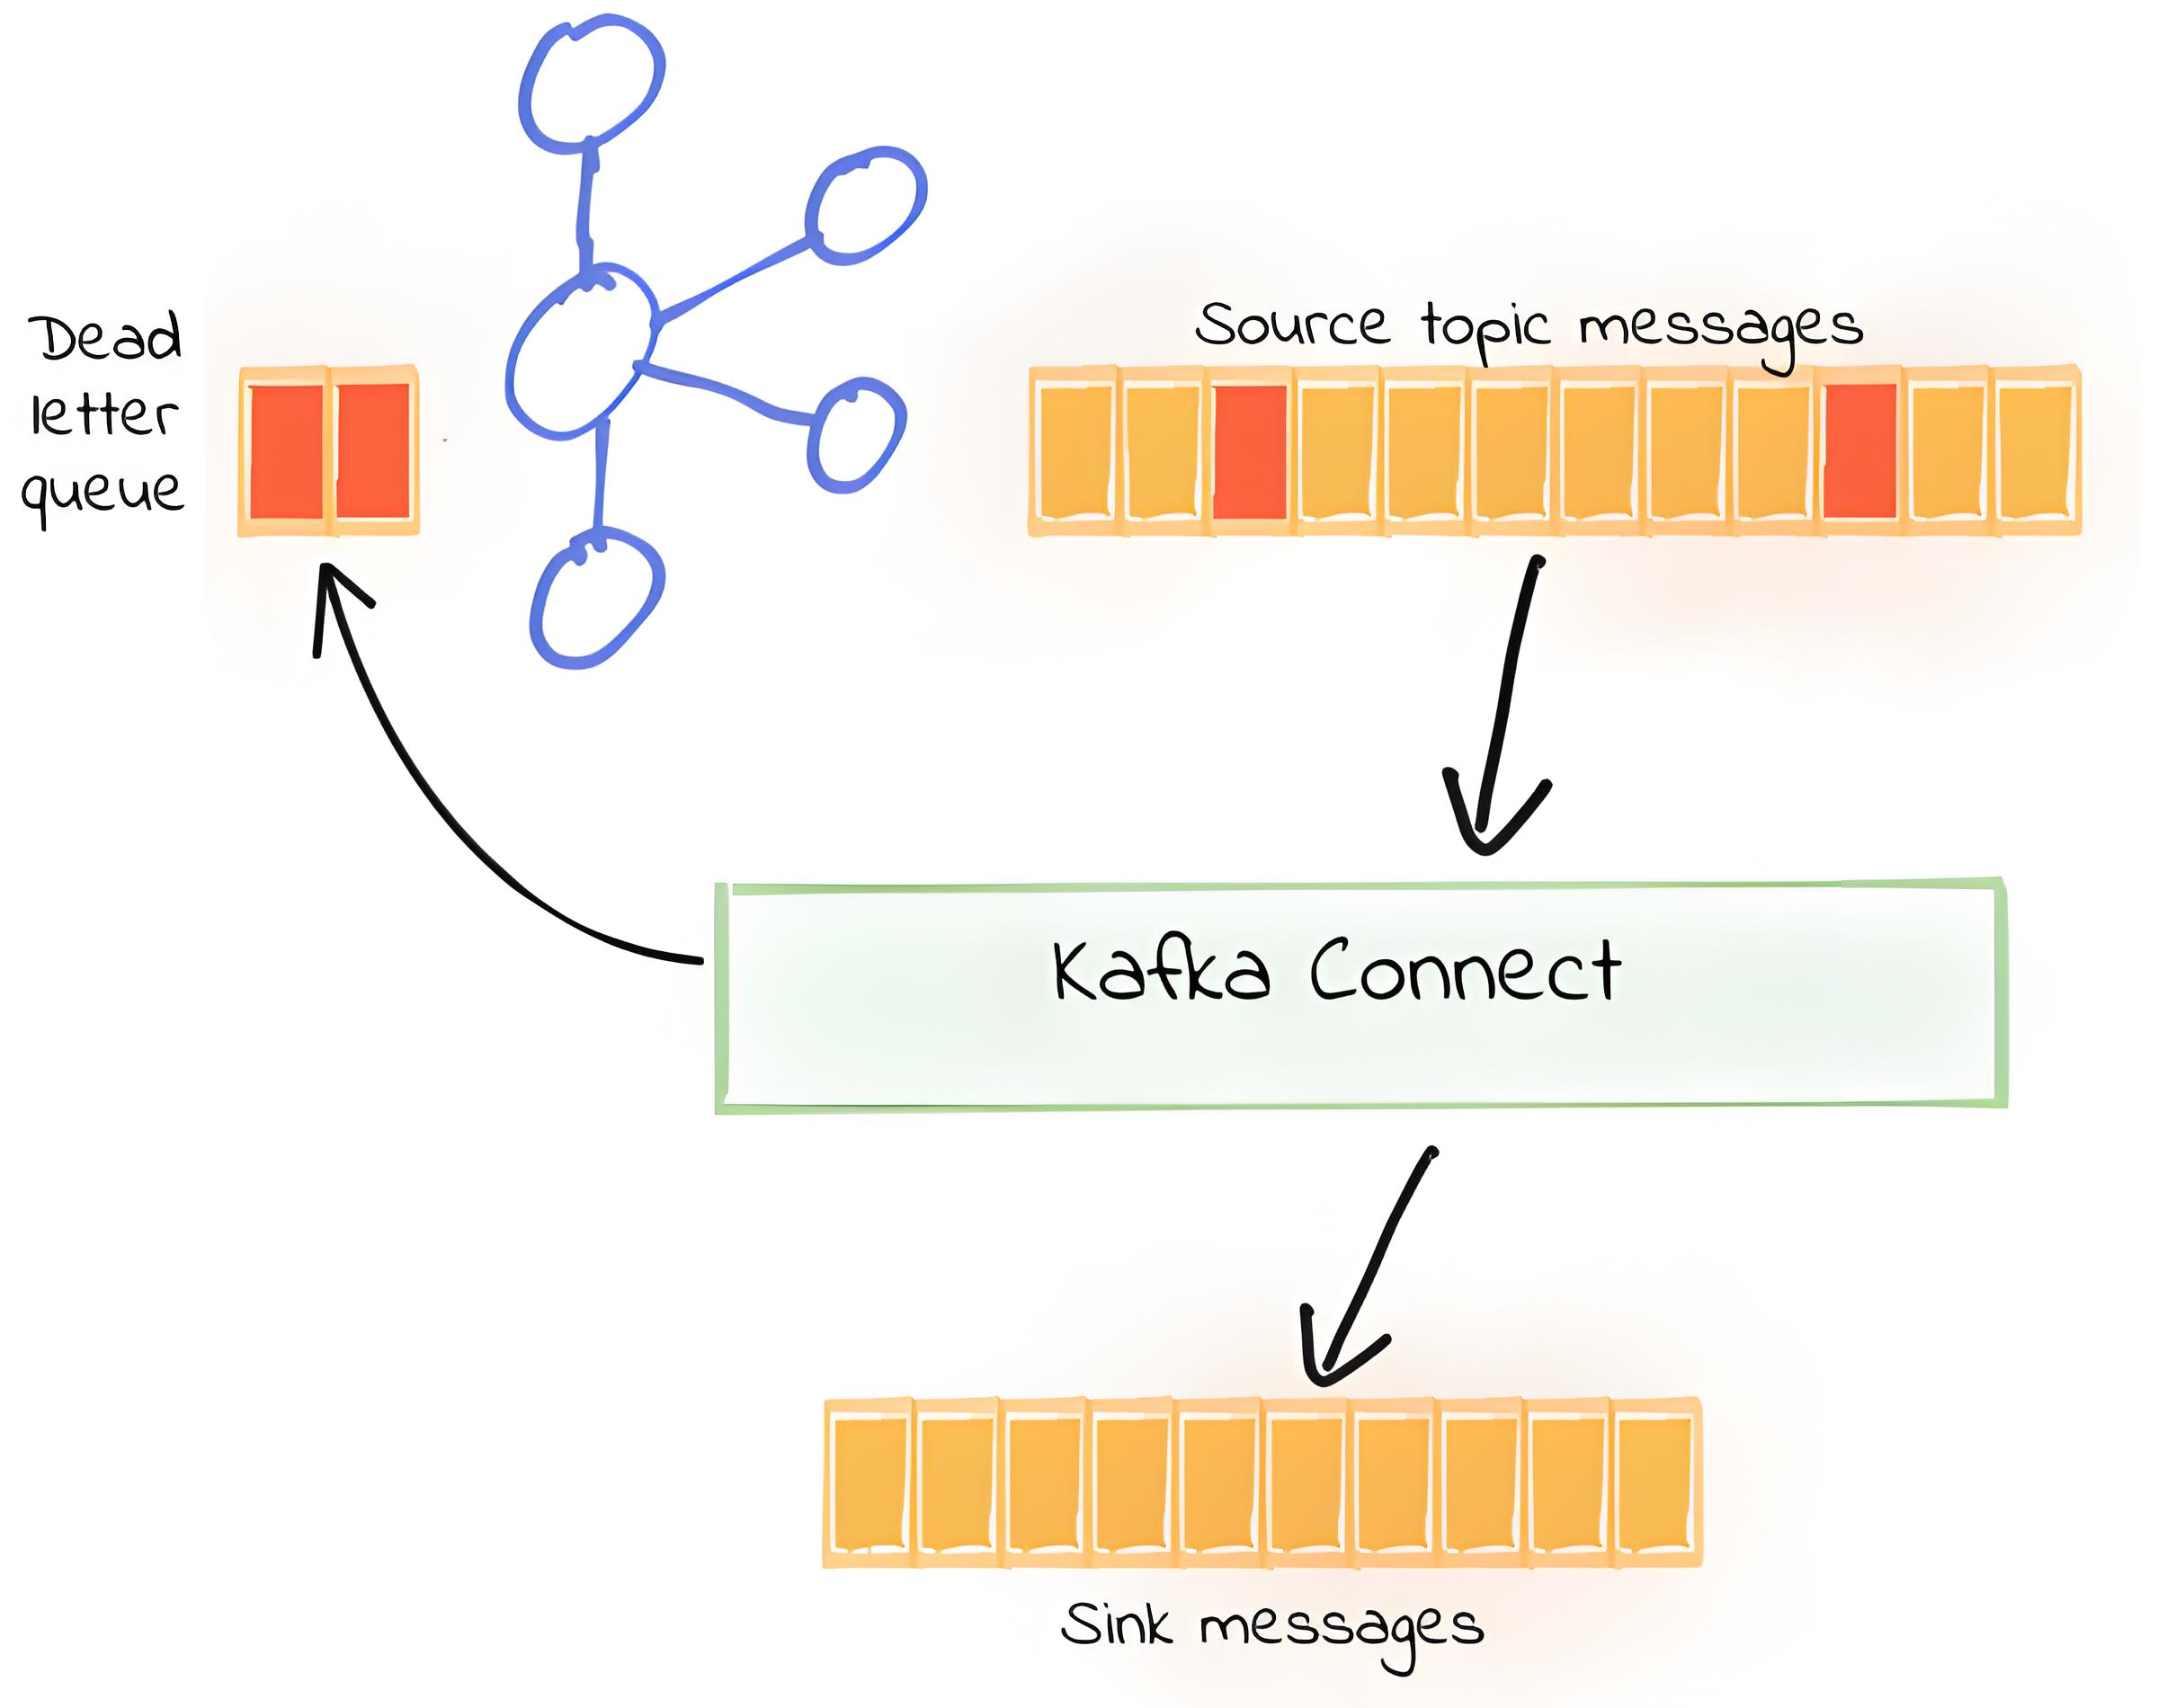
Dead Letter Queue: The "Rest Area" for Erroneous Data
In a data flow processing system, there may be situations where messages cannot be correctly processed due to various reasons (such as format errors or content not meeting requirements). A Dead-letter Queue (DLQ) is a special type of message queue that temporarily stores messages that the software system cannot process due to errors. It is only applicable to sink connectors, and the working process is shown in the following figure.
The errors that can usually be handled by the Kafka Connect dead letter queue are shown in the following table. The dead letter queue provides flexibility by allowing users to set retry strategies, timeouts, and other parameters according to the type of failure, ensuring more precise control over the message flow. For related content, please refer to Errors and Dead Letter Queues and Sink Connector Config.
| Connector Lifecycle Stage | Description | Handled? |
|---|---|---|
| start | When the connector is first started, it will perform the required initialization operations, such as connecting to the data store. | No |
| poll (for source connector) | Reads records from the source data store. | No |
| convert | Reads/writes data to/from a Kafka topic and serializes or deserializes JSON/Avro, etc. | Yes |
| transform | Applies any configured single-message transformations. | Yes |
| put (for sink connector) | Writes records to the target data store. | No |
Installation and Deployment of Kafka Connect: Let's Build Your Data Connection Bridge Together
This article assumes that Apache Kafka has already been installed. If not, you can refer to the Kafka official documentation for the relevant operations. Kafka Connect supports two startup modes: Standalone and Distributed.
Standalone Mode: I Can Handle It Alone
In the Standalone mode, all configurations are stored in the config/connect-standalone.properties file. In essence, this file is like your battle manual, and you can start operations directly after configuring it. The commonly used configuration items include:
# Broker address
bootstrap.servers=<ip:host>

# Offset storage file location
offset.storage.file.filename=./offset_data/offset.connect

# It is recommended to increase the max.poll.interval.ms time of Kafka to more than 30 minutes. The default is 5 minutes.
# To avoid the timeout of data consumption during Stream Load import and the consumer being kicked out of the consumer group.
max.poll.interval.ms=1800000
consumer.max.poll.interval.ms=1800000
offset.flush.interval.ms=10000

# Enable schema support for keys and values
# Used for the structural verification of JSON data
key.converter.schemas.enable=true
value.converter.schemas.enable=true

# Plugin path
plugin.path=./plugins

# Serialization configuration for keys and values
key.converter=org.apache.kafka.connect.json.JsonConverter
value.converter=org.apache.kafka.connect.json.JsonConverter
After the configuration is completed, starting Kafka Connect is as simple as executing one command:
$KAFKA_HOME/bin/connecto-standalone.sh $KAFKA_HOME/bin/connecto-standalone.propertiesDistributed Mode: The Power of Teamwork
In the distributed mode, the worker nodes of Kafka Connect are "fearless". It stores all the status information (including offsets, configurations, and statuses) in Kafka instead of locally. That is to say, even if a node fails, other nodes can recover from the topics in Kafka and continue to work stably! Isn't that cool?
So, if you want to deploy in a large-scale, high-availability environment, the Distributed mode is definitely your best choice. Next, let's see how to implement the deployment.
In practical applications, the Distributed mode is more suitable for large-scale, high-availability production environments. Therefore, in this article, the practice of Doris Kafka Connect mainly focuses on deploying in the Distributed mode.
Deployment Environment: Our Superpower Inventory
| Component | Version | Deployment Node | Description |
|---|---|---|---|
| kafka_2.12-3.7 | 3.7.2 | 10.16.10.6 | Kafka Broker, used for message delivery and storage. |
| OpenJdk | 11 | 10.16.10.6, 172.21.16.12 | Java runtime environment, used to run Kafka and Kafka Connect. |
| Kafka Connect Worker | 3.7.2 | 10.16.10.6, 172.21.16.12 | Distributed worker nodes of Kafka Connect, used for data integration. |
| Doris Kafka Connect | 24.0.0 | 10.16.10.6, 172.21.16.12 | Connector used to synchronize data from Kafka to Doris. |
| Confluent Kafka Connect Avro Converter | 7.8.0 | 10.16.10.6, 172.21.16.12 | Converter used to process data in Avro format. |
| Kafka Connect File | 3.7.2 | 10.16.10.6, 172.21.16.12 | Connector used to read data from files or write data to files. |
| Confluent Kafka Connect Datagen | 0.6.6 | 10.16.10.6, 172.21.16.12 | Connector used to generate test data. |
| Apache Doris | 2.1.8 | 172.21.16.12 |
Deployment Steps: Build Your Kafka Connect Empire
1. Create a personalized configuration.
Configure the connect-distributed.properties file on each deployment node (such as 10.16.10.6 and 172.21.16.12). Here, take 10.16.10.6 as an example, and other nodes are similar, just modify the listeners configuration item.
# Basic configuration
bootstrap.servers=<ip:port>        # Kafka broker address
group.id=connect-cluster               # Worker group ID
key.converter=org.apache.kafka.connect.json.JsonConverter
value.converter=org.apache.kafka.connect.json.JsonConverter

# Storage topic configuration
config.storage.topic=connect-configs    # Configuration storage topic
offset.storage.topic=connect-offsets    # Offset storage topic
status.storage.topic=connect-status     # Status storage topic
config.storage.replication.factor=1     # Configuration topic replication factor
offset.storage.replication.factor=1     # Offset topic replication factor
status.storage.replication.factor=1     # Status topic replication factor

# Worker thread configuration
offset.flush.interval.ms=10000         # Offset flush interval
plugin.path=./plugins  # Plugin path


# REST API configuration
listeners=http://10.16.10.6:8083        # REST API listening address
2. Deploy the plugin.
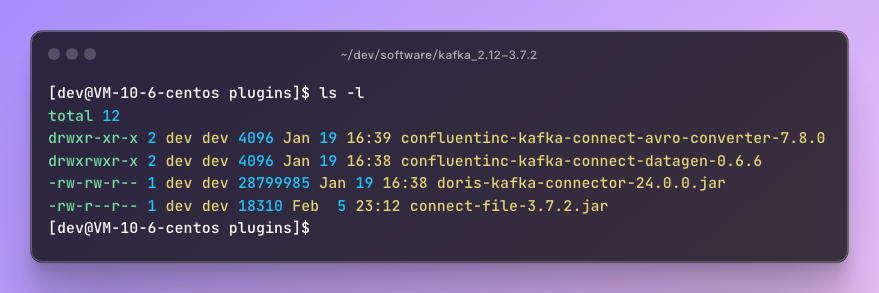
Download the required Kafka Connect plugins and place them in the plugin.path directory specified in the configuration. This is like putting the superhero's equipment into your battle suit pocket, ready to be used at any time.
- Download and extract
confluentinc-kafka-connect-datagenand other plugins. - Place the
doris-kafka-connector-24.0.0.jarin thepluginsdirectory. - In addition, if the
libdirectory of Kafka already contains the JAR files related toconnect-file, you can directly copy these files from thelibdirectory to thepluginsdirectory to ensure that Kafka Connect can correctly load these plugins.
Since Kafka Connect can use various converters, transforms, and connectors, to avoid dependency conflicts between different connectors, Kafka Connect provides the following class isolation mechanisms [7]:
[IMPORTANT]
- Subdirectory containing JAR and its dependencies: Place the plugin and its dependent JAR files in a subdirectory under the
plugin.pathconfiguration path. For example, the two directories ofconfluentinc-kafka-connect.- Uber-JAR containing the plugin and its dependencies: Package the plugin and all its dependencies into a single JAR file. For example,
doris-kafka-connector-24.0.0.jar.- Directory containing the plugin and its dependent class files: Place the class files of the plugin and its dependencies directly in the directory structure that matches the Java package structure.
3. Start Kafka Connect Distributed.
After completing the above operations, execute the following commands on both 172.21.16.12 and 10.16.10.6 to start Kafka Connect:
[dev@VM-16-12-centos kafka_2.12-3.7.2]$ bin/connect-distributed.sh -daemon config/connect-distributed.properties

[dev@VM-10-6-centos kafka_2.12-3.7.2]$ bin/connect-distributed.sh -daemon config/connect-distributed.properties
4. Verify Kafka Connect.
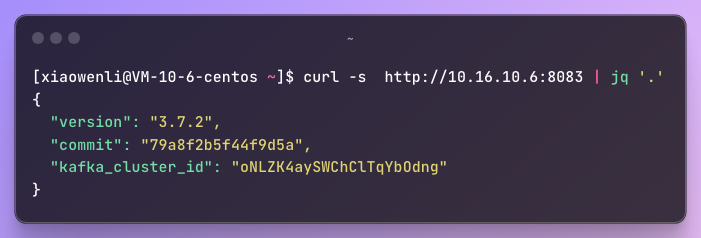
After starting Kafka Connect, you can view the relevant information about Kafka Connect through the Rest Api. For more operations, you can refer to the Kafka Connect Rest API. The following shows how to obtain information about Kafka Connect through the Rest api.
- Check the Kafka Connect version to ensure that you don't fall behind in version updates!
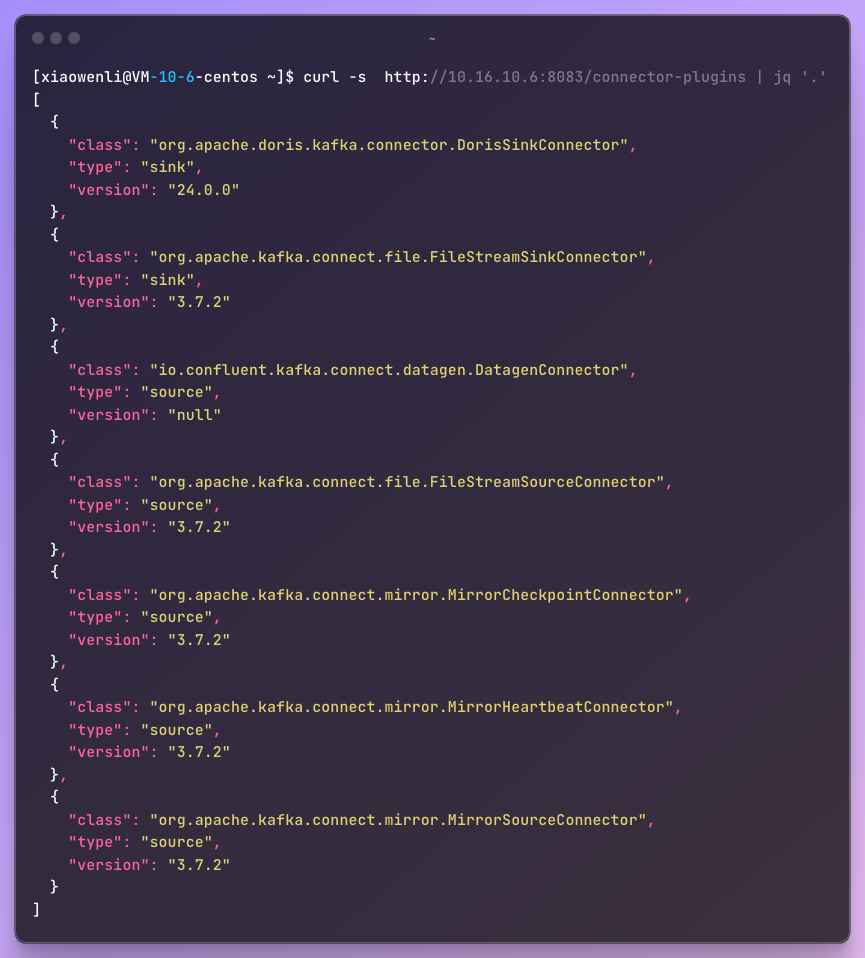
- Check the plugins loaded by the Kafka Connect Cluster to keep it in full combat mode!
The Wonderful Adventure of Data Ingestion With Doris Kafka Connect
The Guide for JSON Beginners: The Simple and Straightforward Import Method (Common JSON Data)
Do you want to play with data streams using Kafka and Doris? Let's embark on a relaxed and enjoyable "import journey"! Today, we will import some common JSON data from the orders Topic in Kafka through the Doris Kafka Connector. Since you are a beginner, get ready, and let's start right away!
1. What Does the JSON Data in Kafka Look Like?
Suppose you already have a Kafka topic (such as orders), and the message format inside is as follows:
{"order_id": "ORDER_0001", "product_id": "PROD_627", "amount": 576.99, "timestamp": "2025-02-07T09:00:36", "order_source": "Online Order"}
{"order_id": "ORDER_0002", "product_id": "PROD_445", "amount": 579.99, "timestamp": "2025-02-07T09:00:36", "order_source": "Offline Order"}
{"order_id": "ORDER_0003", "product_id": "PROD_718", "amount": 264.99, "timestamp": "2025-02-07T09:00:36", "order_source": "Offline Order"}
{"order_id": "ORDER_0004", "product_id": "PROD_276", "amount": 552.99, "timestamp": "2025-02-07T09:00:36", "order_source": "Offline Order"}
It looks like common JSON data, right? That's exactly it! Now we want to bring them into Doris.
2. Create a Table
Let's start with a table creation statement to prepare for receiving data:
CREATE TABLE `orders` (
  `order_id` varchar(20) NULL,
  `product_id` varchar(20) NULL,
  `amount` decimal(19,2) NULL,
  `timestamp` datetime NULL
) ENGINE=OLAP
UNIQUE KEY(`order_id`)
DISTRIBUTED BY HASH(`order_id`) BUCKETS 3
PROPERTIES (
"replication_allocation" = "tag.location.default: 1"
);
The table is created! Now our Doris is ready to receive the JSON data from Kafka.
3. Start the Import
Now, we have entered the key step of the import. Through Kafka Connect, we can easily import the messages in Kafka into Doris. Here are the specific commands to achieve the import operation:
Parameter Analysis
Here are the parameters you need to know and their explanations to ensure that you understand each item clearly:
| Parameter Name | Default Value | Required | Explanation |
|---|---|---|---|
name |
- | Yes | The application name of Kafka Connect, which must be unique. |
connector.class |
- | Yes | The type of the connector. Use the Doris Kafka Sink Connector: org.apache.doris.kafka.connector.DorisSinkConnector |
topics |
- | Yes | The list of Kafka Topics to subscribe to. Multiple Topics are separated by commas: topic1,topic2 |
doris.urls |
- | Yes | The connection addresses of Doris FE (Front End). Multiple addresses are separated by commas: 10.20.30.1,10.20.30.2 |
doris.http.port |
- | Yes | The port for the Doris HTTP protocol. The default value is 8030. |
doris.query.port |
- | Yes | The port for the Doris MySQL protocol. The default value is 9030. |
doris.user |
- | Yes | The username used to connect to Doris. |
doris.password |
- | Yes | The password used to connect to Doris. |
doris.database |
- | Yes | The Doris database to write to. If there are multiple databases, the topic2table.map needs to configure the specific database name. |
doris.topic2table.map |
- | No | The mapping relationship between Kafka Topics and Doris tables. The mapping format for multiple Topics and tables: topic1:db1.tbl1 |
buffer.count.records |
10000 | No | The number of records buffered in memory for each Kafka partition. When this number is reached, the records will be flushed to Doris. The default is 10000. |
buffer.flush.time |
120 | No | The buffer flush time interval, in seconds. The default value is 120 seconds. |
buffer.size.bytes |
5000000 (5MB) | No | The maximum size of the buffer for each Kafka partition, in bytes. The default value is 5MB. |
4. Verify the Import Status
You can verify the task status of Kafka Connect through the following command to see if everything is going smoothly:
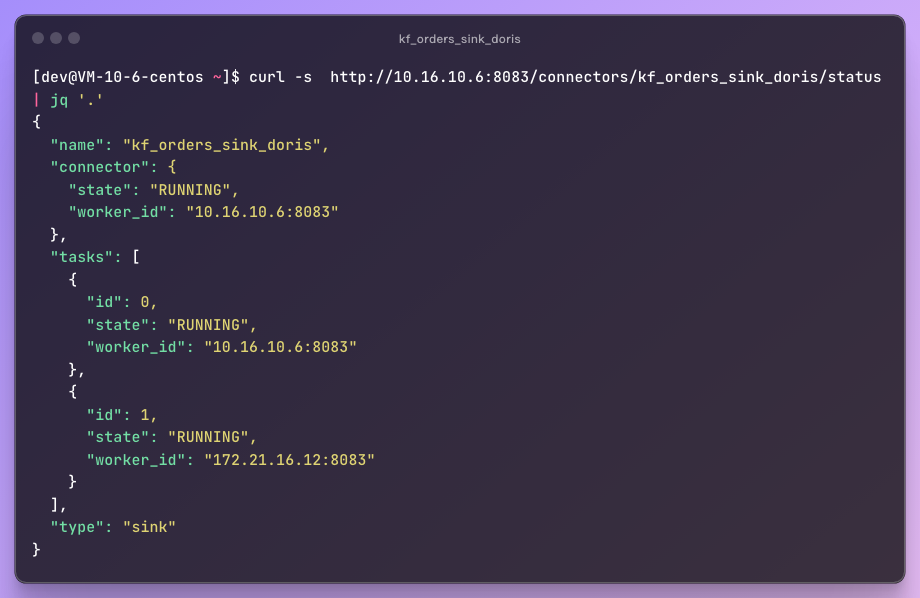
Through this command, you can confirm the running status of the task on the two nodes 10.16 and 172, ensuring that the data is flowing smoothly into Doris.
5. Check the Results in Doris
Finally, query the data in Doris to see if it has arrived as expected:
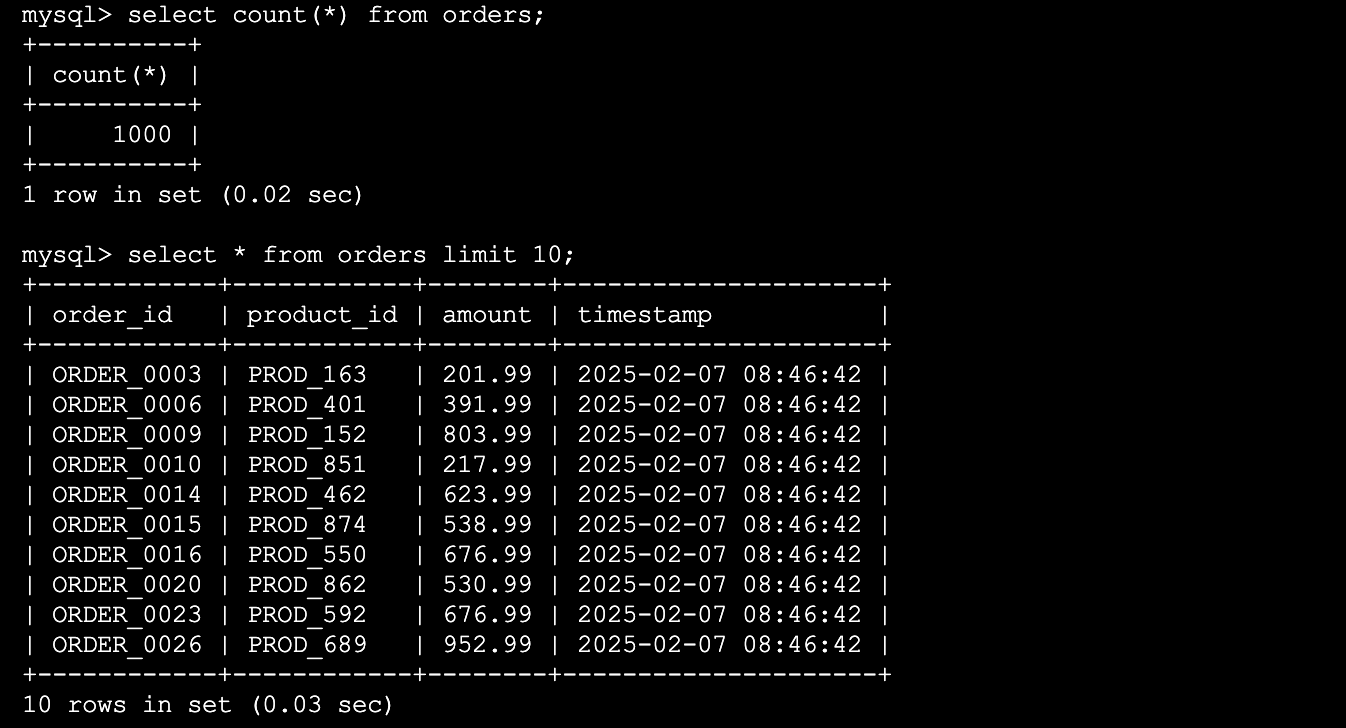
Look, the data has been successfully imported into Doris! Don't you feel like you've transformed from a Kafka novice to a data stream expert in an instant?
The Metamorphosis of Data: The Transformation Spell of the ETL Magician (Using Transform)
Xiaodong is a data development engineer at a large e-commerce platform. Recently, he received a challenging task: to conduct sentiment analysis and user behavior pattern mining based on users' evaluations of products. The problem is that these evaluation data come in various forms - there are texts, images, and even videos! With the continuous emergence of new features, the traditional predefined storage table format is no longer sufficient.
Fortunately, Xiaodong has recently come across the variant data type in Doris. It can store complex data structures of various data types (such as integers, strings, booleans, etc.) without the need to define all columns in the table in advance. It's simply a magic weapon for solving such problems!
1. The Table Structure in Doris: The Variant Type in Action
CREATE TABLE `orders_variant` (
  `order_id` BIGINT NOT NULL AUTO_INCREMENT,
  `order_info` variant
) ENGINE=OLAP
UNIQUE KEY(`order_id`)
DISTRIBUTED BY HASH(`order_id`) BUCKETS 3
PROPERTIES (
  "replication_allocation" = "tag.location.default: 1"
);
However, when he saw the data in the following format, Xiaodong frowned again:
{"order_id": "ORDER_0001", "product_id": "PROD_491", "amount": 119.99, "timestamp": "2025-02-07T14:00:16", "address": "Address_5168"}
{"order_id": "ORDER_0002", "product_id": "PROD_109", "amount": 365.99, "timestamp": "2025-02-07T14:00:16", "address": "Address_8310", "userid": "User_8677", "email": "[email protected]"}
{"order_id": "ORDER_0003", "product_id": "PROD_417", "amount": 275.99, "timestamp": "2025-02-07T14:00:16", "userid": "User_1350"}
{"order_id": "ORDER_0004", "product_id": "PROD_612", "amount": 220.99, "timestamp": "2025-02-07T14:00:16", "address": "Address_1056", "email": "[email protected]"}
{"order_id": "ORDER_0005", "product_id": "PROD_300", "amount": 709.99, "timestamp": "2025-02-07T14:00:16", "address": "Address_6146"}
The problem is: Xiaodong hopes to import the data into Doris without changing the original data format, but he also wants to recombine these JSON strings into a single attribute (such as order_info). In this way, he can make full use of the Variant data type in Doris to ensure that data processing is both efficient and flexible.
Just as Xiaodong was frowning, his good friend Xiaoliang walked over with a smile and said, "Don't worry, leave this to me. The HoistField tranforms operator in Kafka Connect can handle it!"
Xiaodong's eyes lit up. It turned out that Xiaoliang was referring to a very practical converter in Kafka Connect. It can encapsulate the originally flat data into a single field, making it easier for subsequent data processing.
2. Use the HoistField Converter to Easily Reorganize the Data
Following Xiaoliang's suggestion, Xiaodong used the HoistField transform in Kafka Connect. Before the data is imported into Doris, it will package each field of each record into an order_info attribute. Here are the changes in the data before and after:
Data before processing:
{
  "order_id": "ORDER_0001",
  "product_id": "PROD_491",
  "amount": 119.99,
  "timestamp": "2025-02-07T14:00:16",
  "address": "Address_5168"
}
Data after processing:
{
"order_info": {
"order_id": "ORDER_0001",
"product_id": "PROD_491",
"amount": 119.99,
"timestamp": "2025-02-07T14:00:16",
"address": "Address_5168"
}
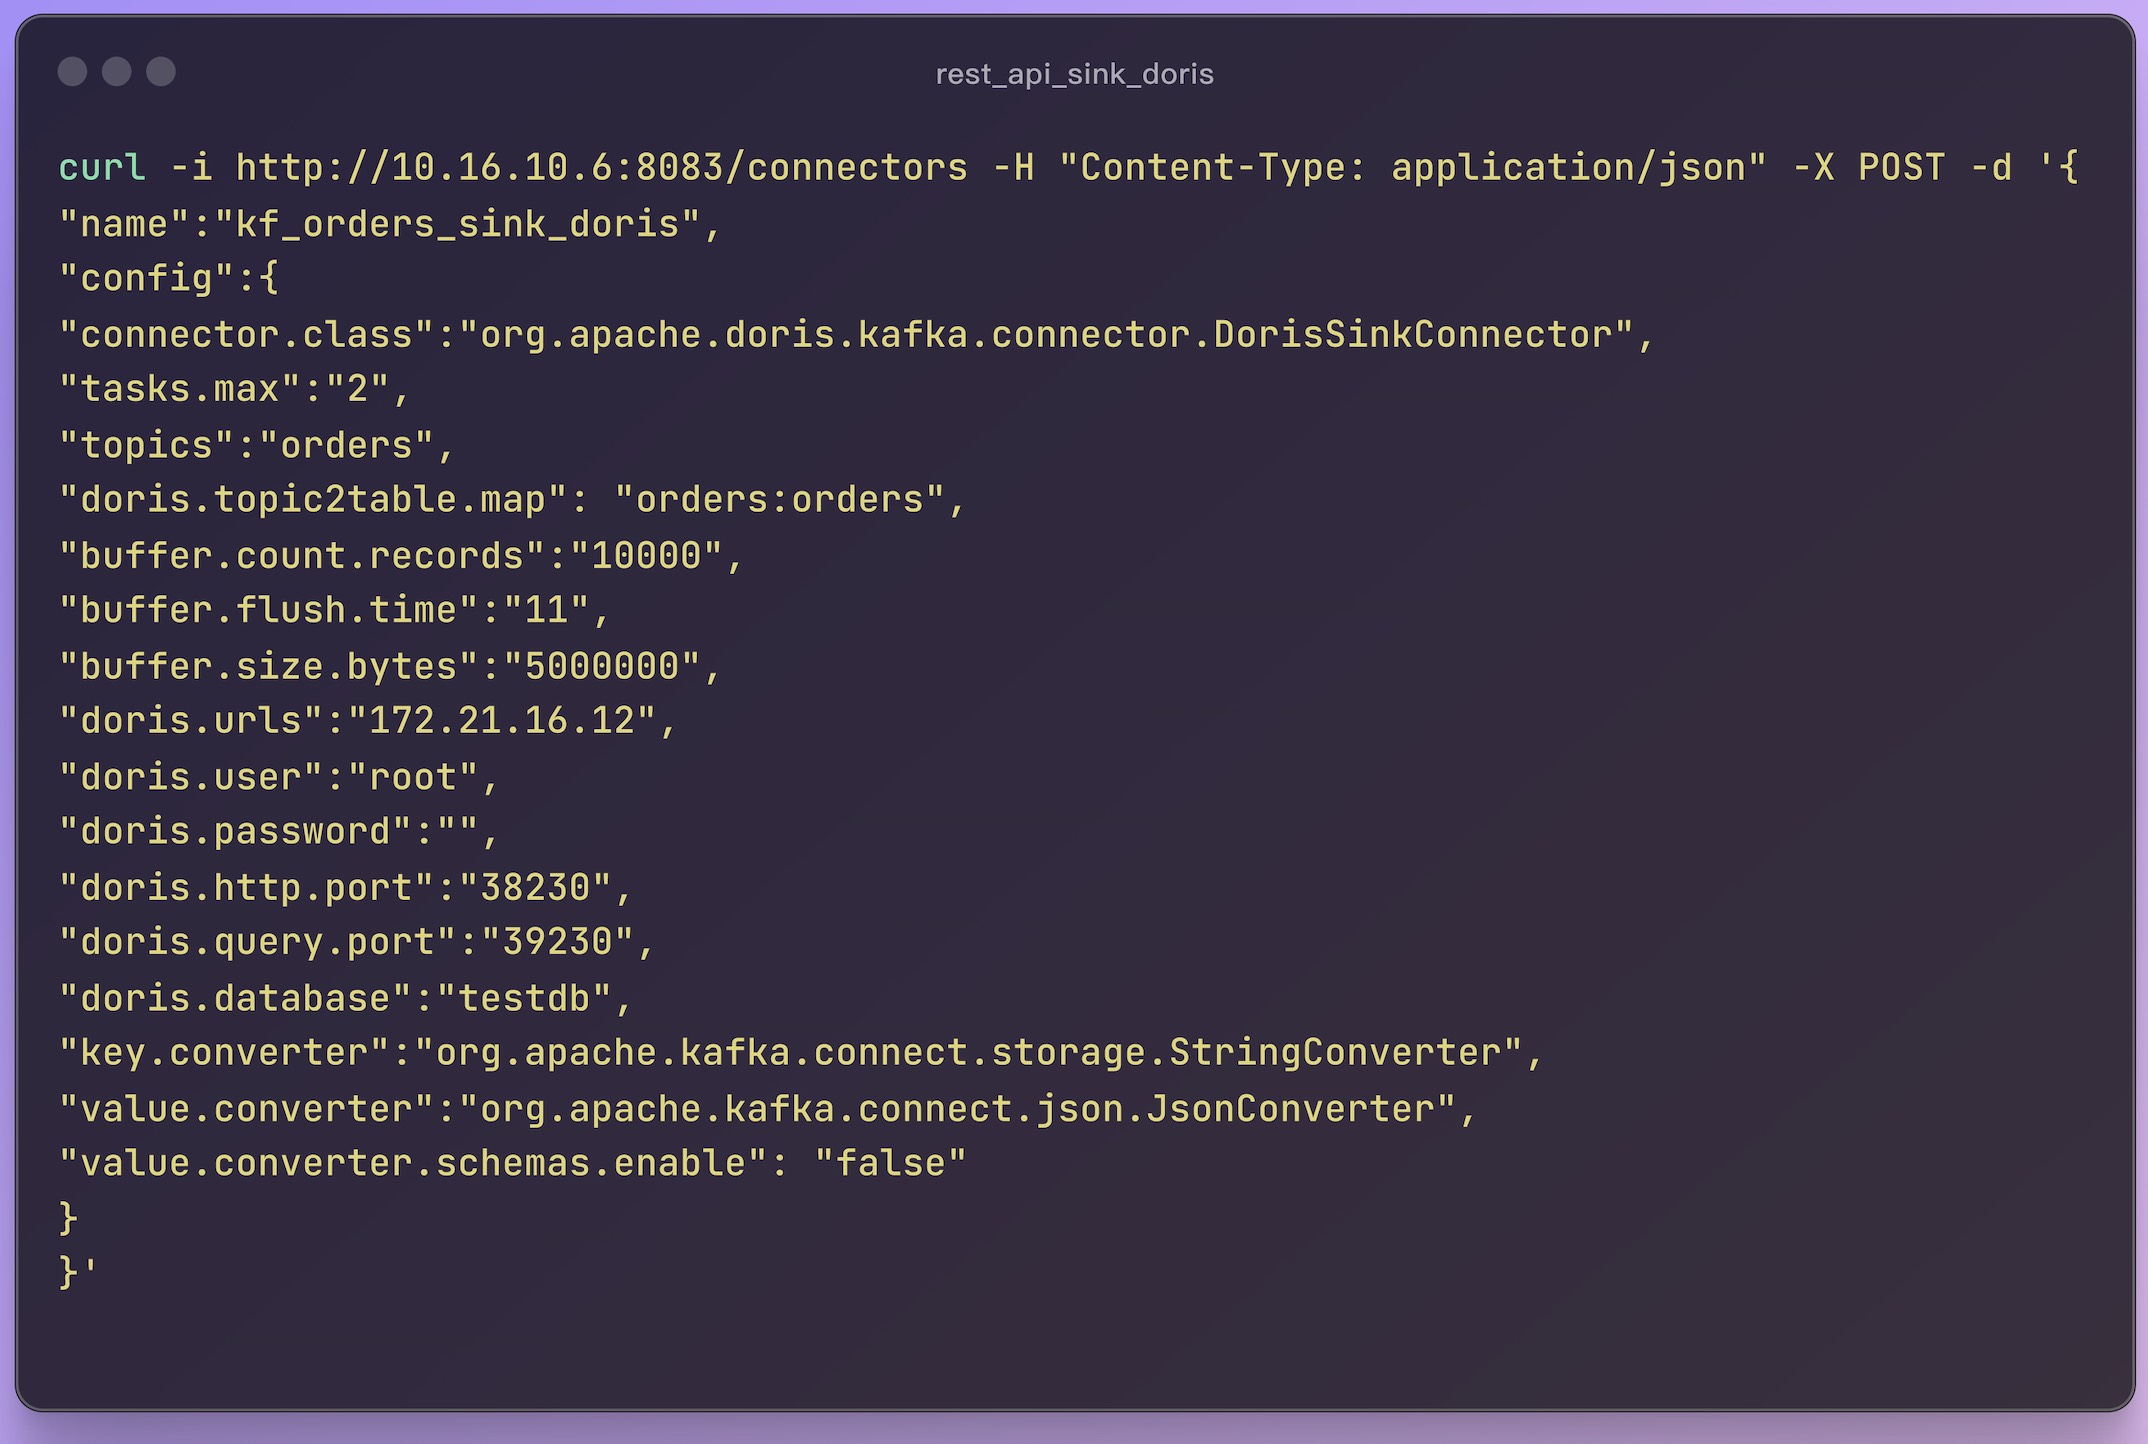
}3. Configure the Kafka Connect Rest API
Xiaodong configured Kafka Connect to import the processed data into Doris. The configuration is as follows
curl -i http://10.16.10.6:8083/connectors -H "Content-Type: application/json" -X POST -d '{
"name":"kf_orders_variant_sink_doris",
"config":{
"connector.class":"org.apache.doris.kafka.connector.DorisSinkConnector",
"tasks.max":"2",
"topics":"orders_variant",
"doris.topic2table.map": "orders_variant:orders_variant",
"buffer.count.records":"10000",
"buffer.flush.time":"11",
"buffer.size.bytes":"5000000",
"doris.urls":"172.21.16.12",
"doris.user":"root",
"doris.password":"",
"doris.http.port":"38230",
"doris.query.port":"39230",
"doris.database":"testdb",
"transforms": "HoistField",
"transforms.HoistField.type": "org.apache.kafka.connect.transforms.HoistField$Value",
"transforms.HoistField.field": "order_info",
"key.converter":"org.apache.kafka.connect.storage.StringConverter",
"value.converter":"org.apache.kafka.connect.json.JsonConverter",
"value.converter.schemas.enable": "false"
}
}'
The result after importing into Doris: Everything went smoothly, and Xiaodong smiled as he looked at the data.
Finally, after the magical processing of the Doris Kafka Connector, the data was successfully imported into Doris. The data was stored as columns and dynamic sub-columns according to the orders_variant JSON keys and their corresponding values, and the format perfectly met the requirements. Here are the results after the import:
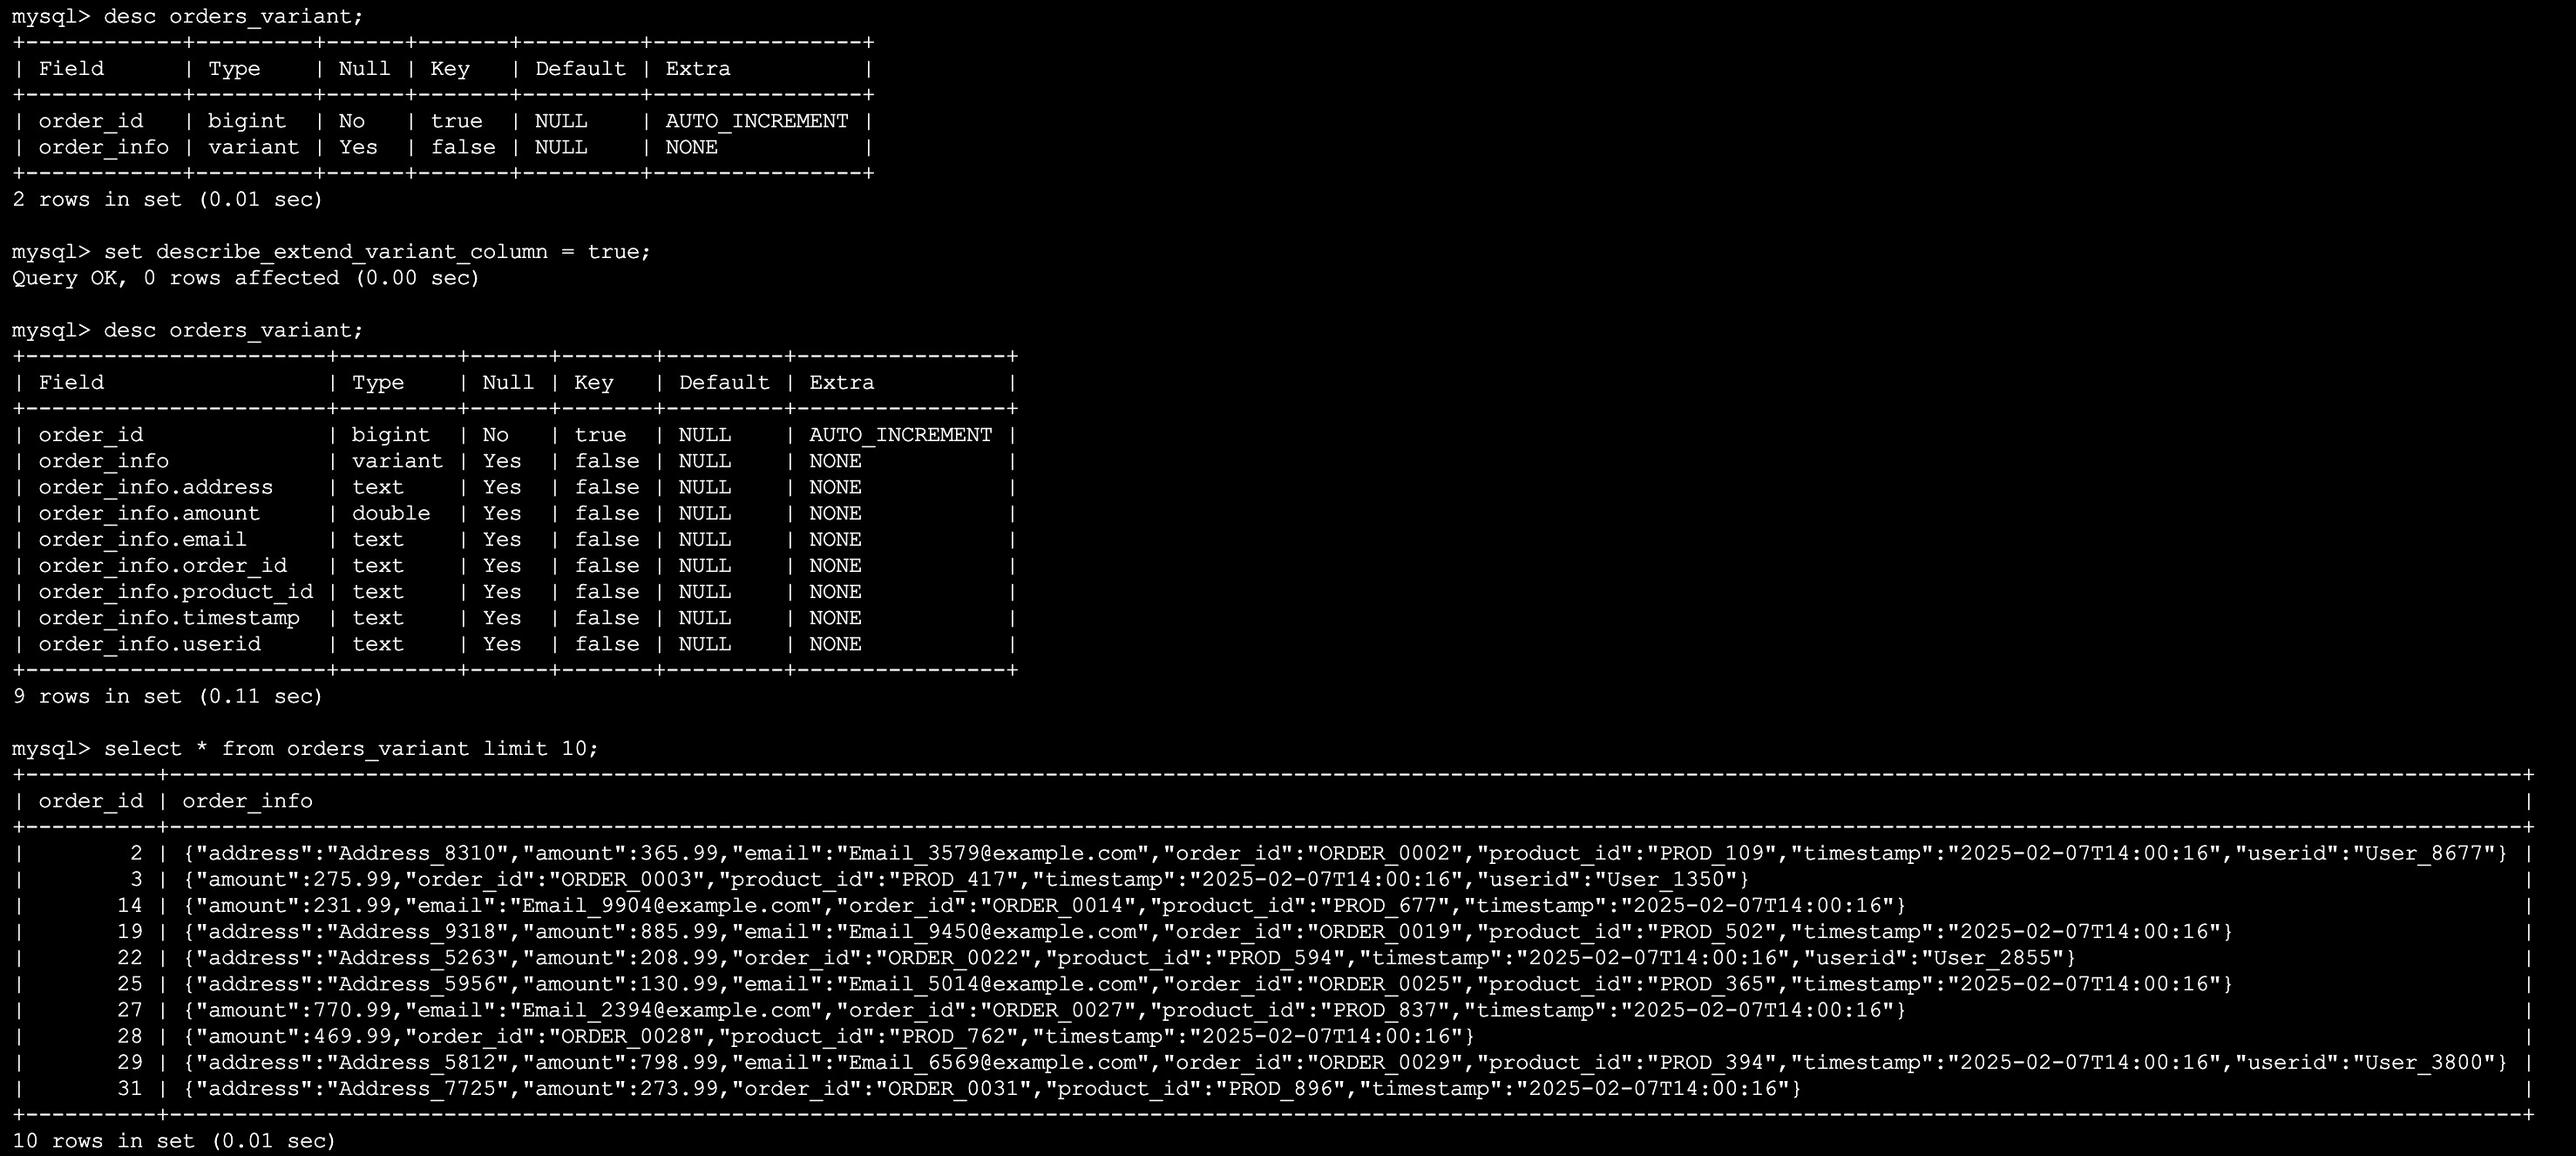
After finishing everything, Xiaodong couldn't wait to learn more about the Kafka Connect transform operators from Xiaoliang. For more information, you can refer to Single Message Transforms.
The Error Recycling Bin: Build a Loving Hut for Lost Data (Dead Letter Queue)
The Doris Kafka Connector supports multiple data serialization formats. However, when the serialization data format of the upstream does not match that of the downstream, the task will stop immediately, and you have to handle it manually and restart.
However, don't panic! We can deal with this gracefully through the Kafka Connect Dead Letter Queue (DLQ). When a data serialization error occurs, the DLQ Topic can store the relevant error information, making it convenient for subsequent troubleshooting. At the same time, with the help of the Topic Header, you can quickly locate the cause of the error. Next, let's happily experience the practical application of the dead letter queue.
1. Example of Error Data
When you expect to import JSON data from the error_orders_json topic as follows into Doris, it is possible that you accidentally insert dirty data. For example, insert an invalid JSON data "invalid-json" into this topic as follows.
echo "invalid-json" | ./bin/kafka-console-producer.sh \
  --bootstrap-server 10.16.10.6:29092 \
  --topic error_orders_json
2. Configure the Dead Letter Queue via the Kafka REST API
To prevent the task from terminating due to a single piece of error data, we can add dead letter queue parameters to the Kafka Connector configuration:
curl -i http://10.16.10.6:8083/connectors -H "Content-Type: application/json" -X POST -d '{
  "name":"kf-error-json-sink-doris",
  "config":{
    "connector.class":"org.apache.doris.kafka.connector.DorisSinkConnector",
    "tasks.max":"2",
    "topics":"error_orders_json",
    "doris.topic2table.map": "error_orders_json:orders_dlq",
    "buffer.count.records":"10000",
    "buffer.flush.time":"11",
    "buffer.size.bytes":"5000000",
    "doris.urls":"172.21.16.12",
    "doris.user":"root",
    "doris.password":"",
    "doris.http.port":"38230",
    "doris.query.port":"39230",
    "doris.database":"testdb",
    "key.converter":"org.apache.kafka.connect.storage.StringConverter",
    "value.converter":"org.apache.kafka.connect.json.JsonConverter",
    "value.converter.schemas.enable": "false",

    "errors.tolerance":"all",
    "errors.deadletterqueue
Explanation of parameters:
| Parameter | Explanation |
|---|---|
errors.tolerance |
Sets the fault tolerance level for message processing. "all" allows skipping error messages, while "none" stops the processing immediately when an error is encountered. |
errors.deadletterqueue.topic.name |
Specifies the name of the Dead Letter Queue (DLQ) Topic. Failed messages will be sent to this Topic. |
errors.deadletterqueue.context.headers.enable |
Determines whether to include context information such as the original Topic, partition, offset, and error information in the dead letter messages. |
errors.deadletterqueue.topic.replication.factor |
Sets the replication factor of the DLQ Topic, which affects the high availability of the data. |
errors.log.enable |
Decides whether to enable error logging, which is convenient for subsequent troubleshooting. |
3. How to Consume Error Messages in the Dead Letter Queue
Error messages will be stored in the orders_dlq Topic. We can use the following command to view detailed error information:
./bin/kafka-console-consumer.sh \
--bootstrap-server 10.16.10.6:29092 \
--topic orders_dlq --from-beginning \
--property print.key=true \
--property print.value=true \
--property print.headers=true
In the orders_dlq, we can find that the message invalid-json-1 was dropped into the dead letter queue due to a format error:
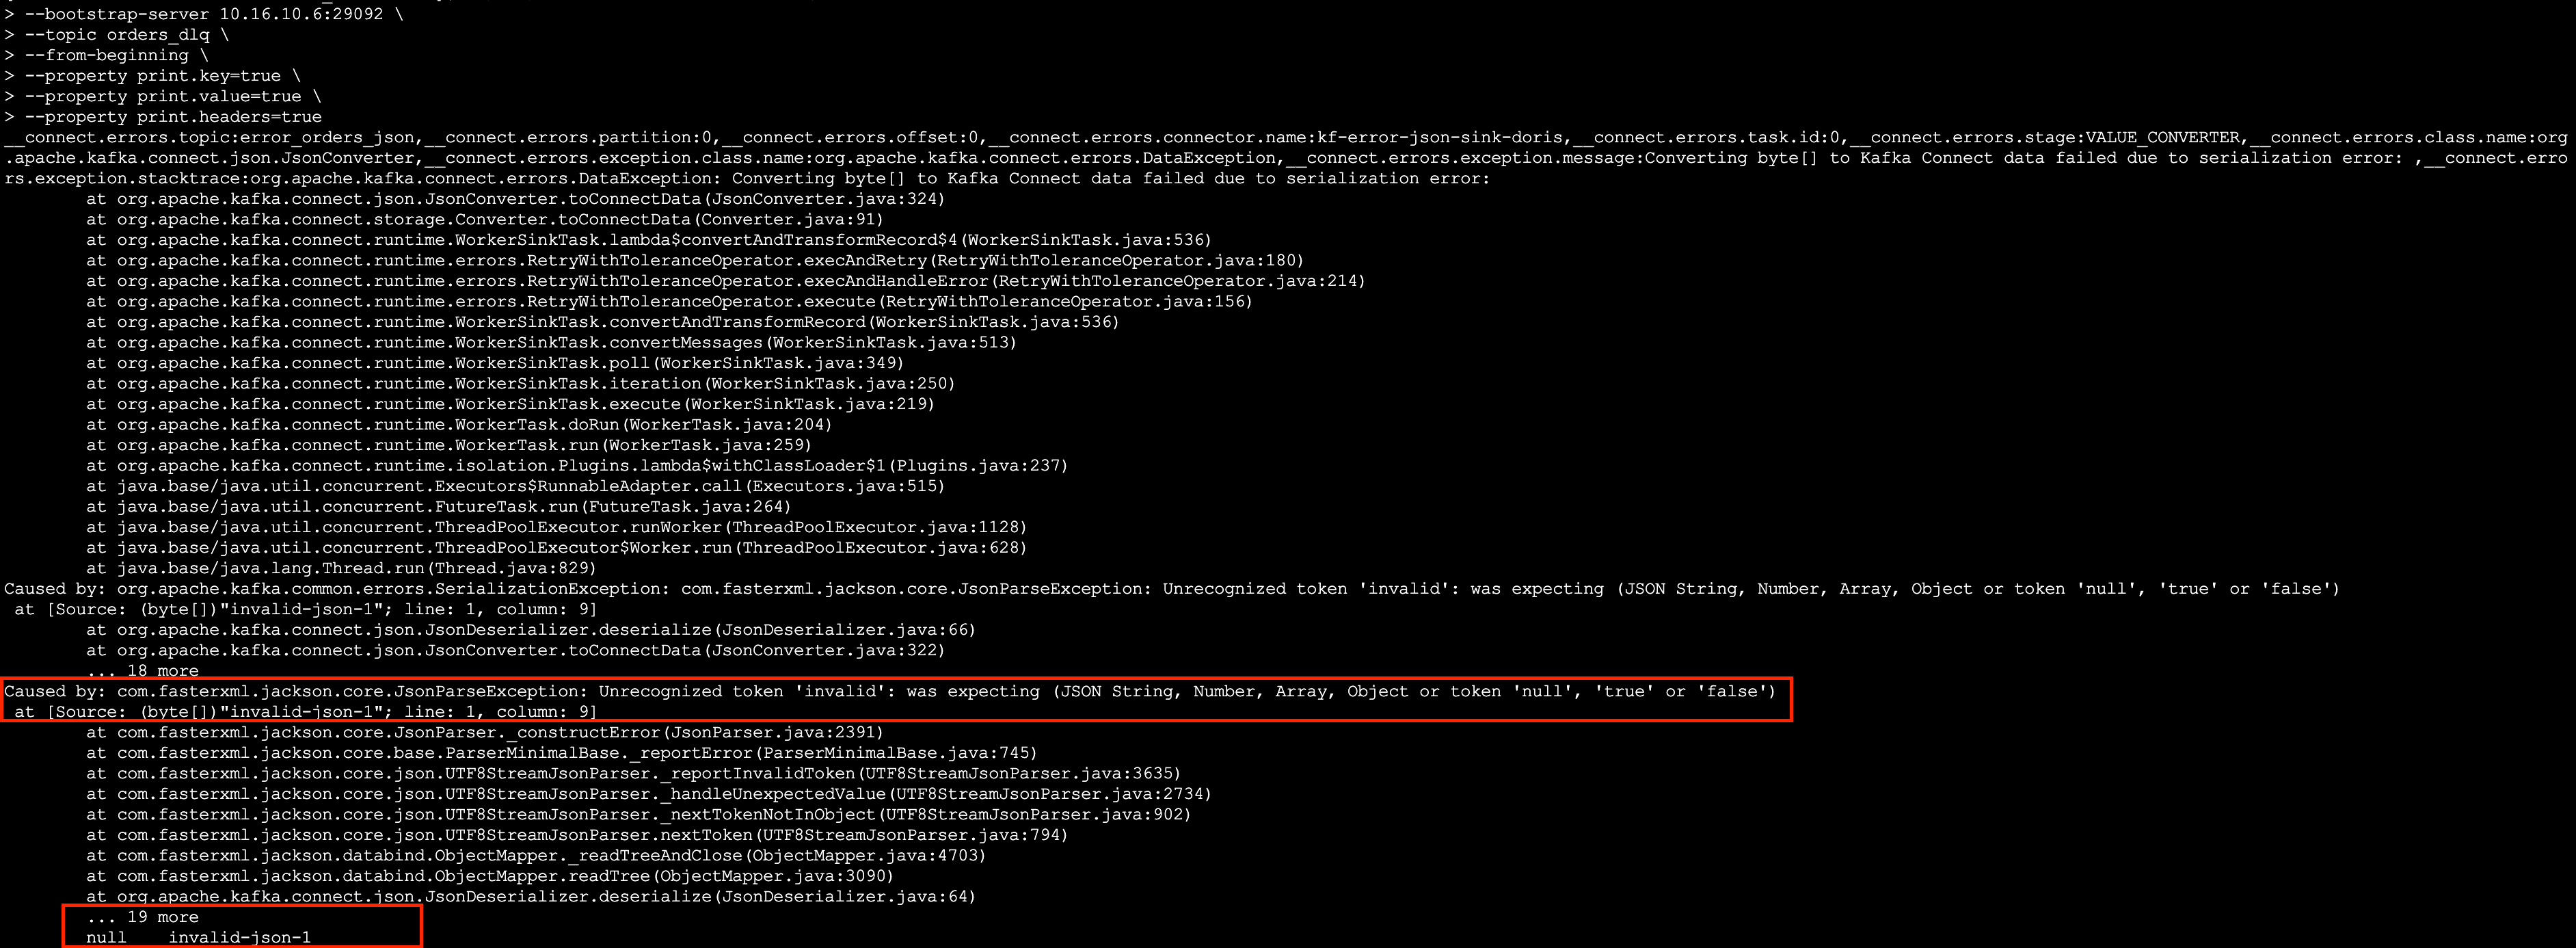
The dead letter queue is like a "protection station for lost children" in the data pipeline, providing a place for error data so that it won't affect the stability of the overall system. By reasonably configuring Kafka Connect, we can centrally manage the error data and take remedial measures at an appropriate time. We hope this small feature can help you and make data processing smoother!
Certainly, the application scenarios of the dead letter queue are not limited to these. There are more "frustrating yet comical" data incidents waiting for you to discover [8]:
- The metamorphosis of data: Schema changes, format mismatches, and the data directly "mutates" and cannot be written in!
- The target system throws a tantrum: Network glitches, full storage, and the data can't get in at the door!
- Dirty data causes trouble: Business logic errors, malicious data playing tricks, leaving the system caught off guard!
Want to make the data flow more stable? Set up the dead letter queue!
Summary of the Article
This article provides a comprehensive analysis of the Doris Kafka Connector's basic composition, working principle, and deployment method. Through three practical scenarios - importing common JSON data, utilizing the Transform operator, and utilizing the dead letter queue - it helps users quickly understand its core value in data flow.
It should be emphasized that this article only covers some application scenarios of the Doris Kafka Connector. As an important component of the Apache Doris ecosystem, it not only efficiently connects the Kafka data stream. Compared with the Apache Doris (up to Apache Doris 2.1.x and Apache Doris 3.0.x) Routine Load import, it supports more diverse data formats (such as Avro, Protobuf, JsonSchema, and ByteArray). At the same time, the CDC function can also serve as a powerful supplement to the Doris Flink Connector, further enhancing Doris's capabilities in the field of real-time data processing. Therefore, we will launch a series of articles to comprehensively demonstrate its powerful applications through more practical cases.
Preview of the Next Issue
In the next issue, we will explore how to use Doris Kafka Connect to import relational database data in real-time, and support multiple data formats such as Avro, Protobuf, ByteArray, as well as the data import form of one stream for multiple tables. Stay tuned! We will deeply analyze the technical details and practical experience of data flow to help you master the core points of data import in Apache Doris.
Message of the Article
Thank this era,It allows us to witness the rapid development of intelligence.In the AI era,Data drives innovation and connects everything.Embrace the future,In the wave of emerging technologies, be the one who cannot be defined.
References
Opinions expressed by DZone contributors are their own.
Comments