Running Code With Spring Cloud Function on AWS Lambda
Spring Cloud Function is here! Let's get a simple function working with the serverless titan that is AWS Lambda and API Gateway.
Join the DZone community and get the full member experience.
Join For FreeEverybody at my workplace knows quite well that I'm a huge fan of both Spring and AWS. It's hard to disguise when you start to smile with joy every time you read about a new Spring project or an upcoming AWS service.
The last one of these smiling moments came from the release of Spring Cloud Function. It only happened a few days ago, so the experience is super fresh — hopefully not only for me but some of you, too. But if somebody missed it, here is a brief summary of what it is good for.
Spring Cloud Function helps you create decoupled functions for serverless hosting providers (like AWS Lambda) or any other runtime target without vendor lock-in. It also enables the usage of Spring Boot features like auto-configuration, dependency injection, etc. on serverless providers.
The full example project for this article is available here. Feel free to clone it and give it a shot yourself.
Now let's see how can we push our first function into the glorious cloud of Amazon. What you should know about AWS Lambda is that it requires you to override one interface called the Lambda Function Handler, and then you are ready to write your functions. The interface comes from the aws-lambda-java-core artifact. Let's do this then.
package com.morethanheroic.uppercase.handler.aws;

import org.springframework.cloud.function.adapter.aws.SpringBootRequestHandler;

import com.morethanheroic.uppercase.domain.UppercaseRequest;
import com.morethanheroic.uppercase.domain.UppercaseResponse;

public class UppercaseFunctionHandler extends SpringBootRequestHandler<UppercaseRequest, UppercaseResponse> {
}
Something is quite strange. Do you see any classes that come from the AWS artifact? Me neither. That's because there is an abstraction layer called 'adapters' provided by Spring Cloud Function specifically for AWS Lambda. The AWS Adapter has a couple of different request handlers you can use like SpringBootRequestHandler, SpringBootStreamHandler, FunctionInvokingS3EventHandler, and so on. If you check the source code of SpringBootRequestHandler, you will see that it instead implements AWS's RequestHandler for us and also propagates the request to our function. The only reason we need to implement it is to specify the type of the input and the output parameters of the function, so AWS can serialize/deserialize them for us.
The next thing to do is implement our function. Let's keep it as simple as possible and implement a function that converts a String to uppercase.
package com.morethanheroic.uppercase;

import java.util.function.Function;

import org.springframework.stereotype.Component;

import com.morethanheroic.uppercase.domain.UppercaseRequest;
import com.morethanheroic.uppercase.domain.UppercaseResponse;
import com.morethanheroic.uppercase.service.UppercaseService;

@Component("uppercaseFunction")
public class UppercaseFunction implements Function<UppercaseRequest, UppercaseResponse> {

    private final UppercaseService uppercaseService;

    public UppercaseFunction(final UppercaseService uppercaseService) {
        this.uppercaseService = uppercaseService;
    }

    @Override
    public UppercaseResponse apply(final UppercaseRequest uppercaseRequest) {
        final UppercaseResponse result = new UppercaseResponse();

        result.setResult(uppercaseService.uppercase(uppercaseRequest.getInput()));

        return result;
    }
}
To make things a little bit more exciting, we are using a service to do the conversion for us.
package com.morethanheroic.uppercase.service;

import java.util.Locale;

import org.springframework.stereotype.Service;

@Service
public class UppercaseService {

    public String uppercase(final String input) {
        return input.toUpperCase(Locale.ENGLISH);
    }
}
As you can see, dependency injections and component scans are supported and working for the function. All that's left for the coding is adding an empty @SpringBootApplication class.
package com.morethanheroic.uppercase;

import org.springframework.boot.SpringApplication;
import org.springframework.boot.autoconfigure.SpringBootApplication;

@SpringBootApplication
public class UpperFunctionApplication {

    public static void main(String[] args) throws Exception {
        SpringApplication.run(UpperFunctionApplication.class, args);
    }
}
After setting up the Maven dependencies and taking care of the Spring Boot plugin that will build the JARs for us, we are ready to run the good old mvn clean install command. An example of this setup is available here. I used the SNAPSHOT versions of some of the required libraries because spring-cloud-function artifacts are not available in the central repo at the writing of this article.
After a successful build, if you navigate to the target directory, you will see two JARs, including one ending with -aws . That's the one you should upload to AWS Lambda. However, we should setup it up first.
Let's fire up the AWS Console and navigate to the Lambda service's page. Click on "Create a Lambda function" and select "Blank Function." We don't need any trigger for the function because it will be triggered by API Gateway and we will setup that later on so for now just click on "Next."
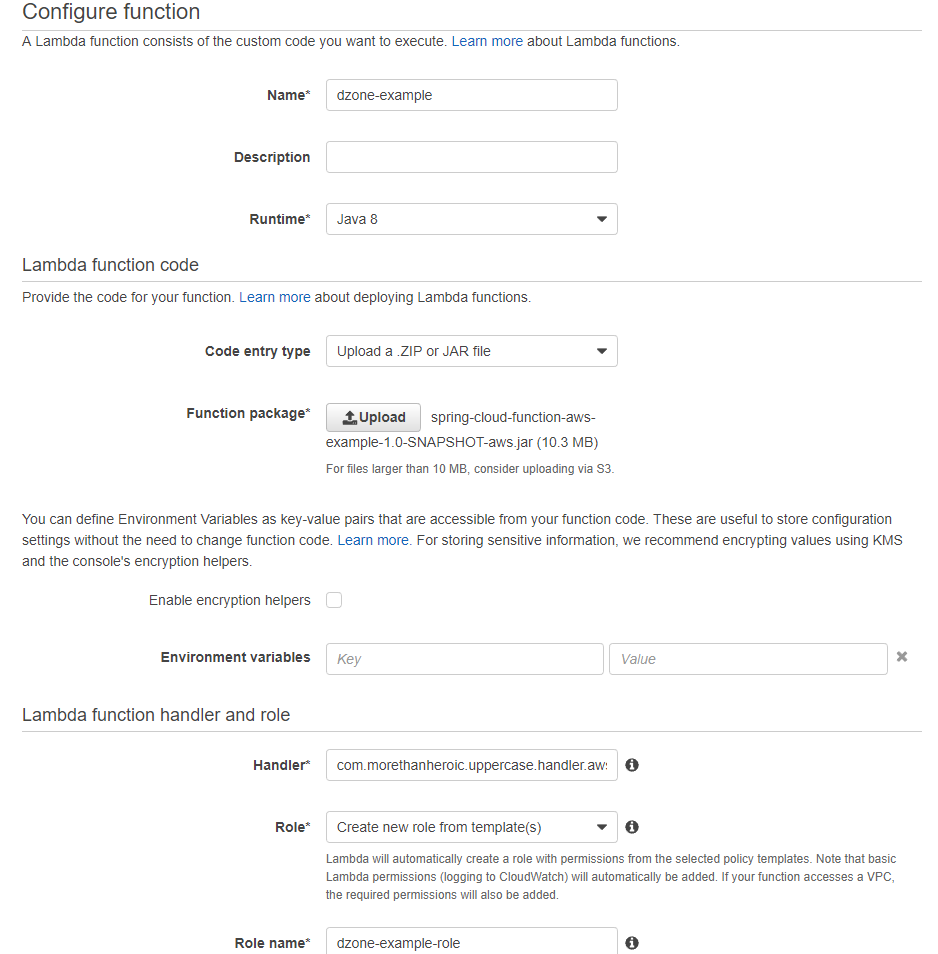
On the next page, you need to give a name for your function. I simply gave it "dzone-example" but you can use anything else. But you need to remember it because it will be required for the setup of API Gateway. For the runtime set "Java 8." Drop the JAR ending with -aws on the upload button. For the lambda function handler, set:
com.morethanheroic.uppercase.handler.aws.UppercaseFunctionHandler
For the role, you can create your own custom role or create one from a template like I did.
You also need to open the advanced option and set the memory to 192 MB and the timeout to 1 minute.

Click "Next" and then "Create function". You can test your newly created function with this JSON:
{
    "input": "Welcome to happy land!"
}
You should get this as the execution result if you did everything right:
{
    "result": "WELCOME TO HAPPY LAND!"
}
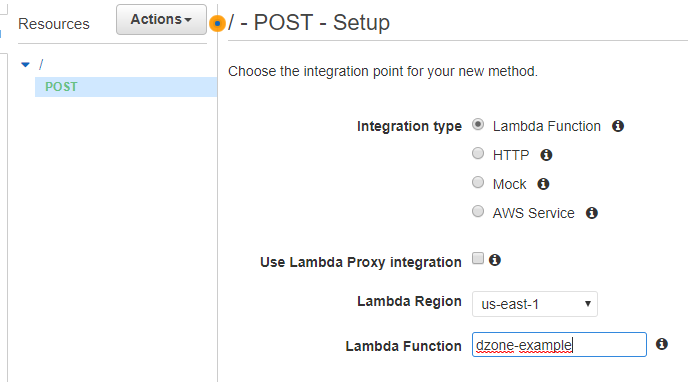
The only thing that's left to set up is the API Gateway. Go to its service page in the AWS Console and click on "Create API." Give a name for your API and then click on "Create." Create a method and set POST as the action. Click on the checkmark, set the integration type to "Lambda function," set the "Lambda region" and the "Lambda function" (dzone-example in my case), and click "Save."

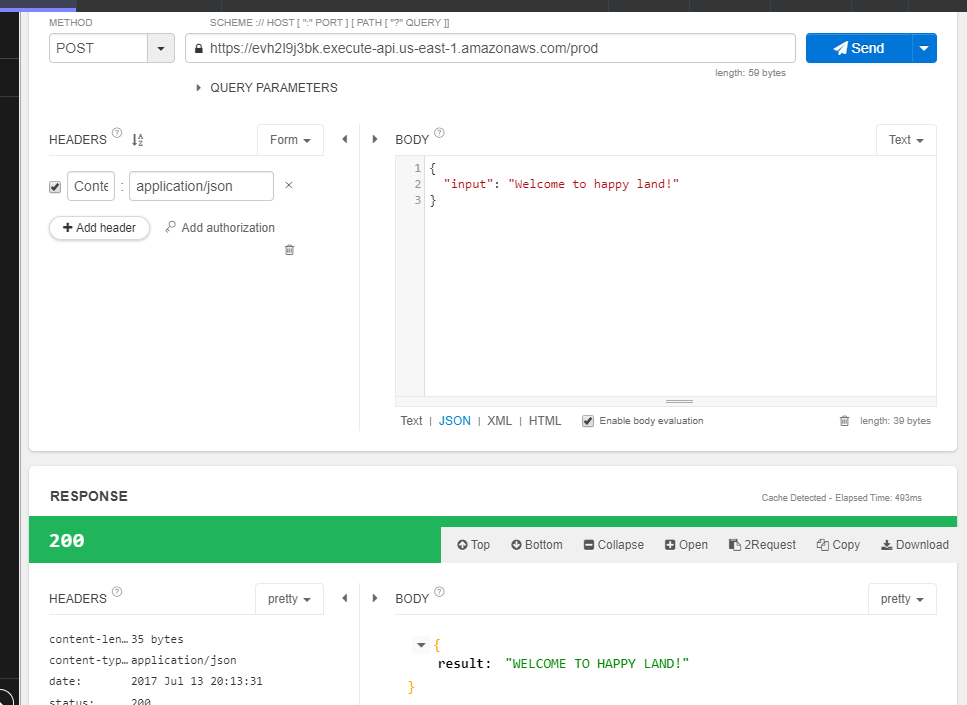
The only thing left is deploying the API. Click on "Action" and then "Deploy API." Fill out the form as you like then click "Deploy." You will see the final invocation URL that you should call to invoke the function.

If you did everything right and call the mentioned URL with POST and the provided test data, you should get the expected response.

Conclusion? There is still a lot to be done, but deploying Spring Boot applications as functions into serverless providers is easier than ever. The one complaint I found is that the function's startup time for the first invocation was around 30 seconds, and that's unacceptable for some real production workloads. However, this could be improved in the future.
The average invocation time is well under 100 ms. That's great news because you need to pay for at least 100ms of time for every invocation. The required memory is 192MB, and that's the second amount available, right above the minimum 128MB. So every request to the function will cost you 0.000000313 USD for the Lambda request and 0.0000035 USD for the API Gateway fees. That's around 262000 requests for 1 USD. Enjoy.
I want to give the Spring Cloud Function team a big shout out for their hard work. It's really great to see both Spring and Java breaking into the serverless space. Keep up the good work guys!
Opinions expressed by DZone contributors are their own.

Comments