Run WSO2 API Manager in OpenShift
Learn how to deploy the WSO2 API manager in OpenShift.
Join the DZone community and get the full member experience.
Join For FreeThe purpose of this article is to show how easily the WSO2 API Manager can be deployed in OpenShift. For simplicity, I am going to explain the deployment process using Minishift.
The following softwares are expected to be present in your system for executing this example.
- Minishift (v1.3)
- Docker
- WSO2 API Manager (2.6.0) zip
- JDK 1.8 zip
Before we start, let's go through a mini introduction of Minishift and its installation. The installation process of Minishift is quite straightforward. Here is a link to the official documentation.
Installing Minishift
I am using Mac and here is the command for its installation:
$ brew cask install minishiftAfter that, you need to configure some virtualization environment. Please refer to this official document regarding this.
Once you are done with that, execute the following command to start the Minishift cluster:
$ minishift startThe following things will happen after successful execution of the command:
- The Minishift Virtual Machine (VM) will be created.
- A Docker daemon (engine) will be started inside the VM.
- OpenShift cluster will be running inside the Docker daemon.
Here is the architecture diagram of Minishift taken from the official documentation.
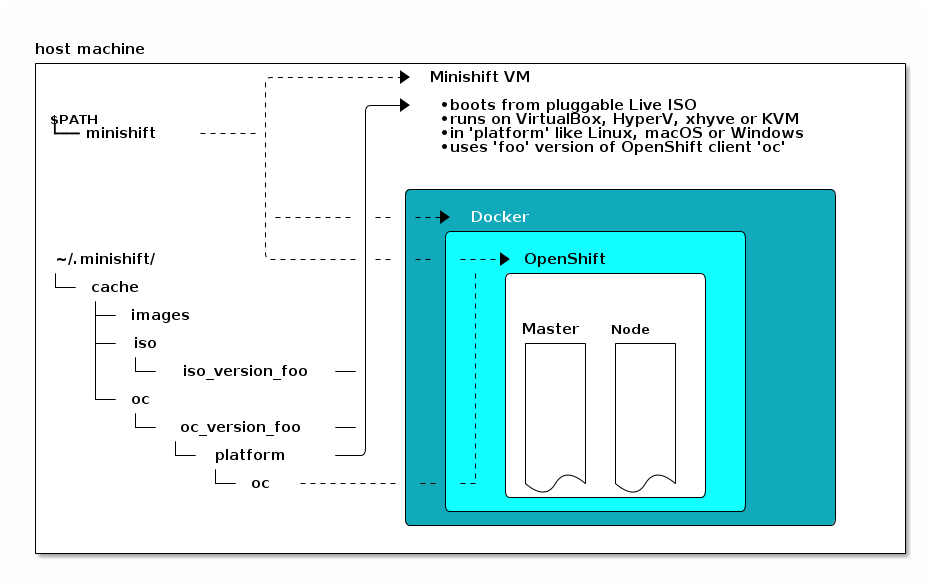
So, it means that you don't need a Docker daemon (Engine) running in your local machine to work with images. Docker client is just enough and we can point the Docker client to the Docker daemon (running in the VM) created by the Minishift.
To verify the Docker daemon (Engine) running in the Minishift VM, execute the following command:
$ minishift docker-envHere is a sample output:
export DOCKER_TLS_VERIFY="1"
export DOCKER_HOST="tcp://192.168.64.2:2376"
export DOCKER_CERT_PATH="/Users/anupamgogoi/.minishift/certs"
# Run this command to configure your shell:
# eval $(minishift docker-env)
To point to the Docker daemon (Engine) running in the Minishift VM just execute the following command,
$ eval $(minishift docker-env)That's it and you can check the containers, images etc that belong to that Docker daemon (Engine).
To check the Minishift GUI, just execute the following command:
$ minishift consoleThe default login and password are developer and developer.
Installing OC (OpenShift Client) CLI
It's not necessary to download the OC CLI separately. Once the Minishift VM is up and running, you can have the information of the OC CLI installed in your local machine.
Execute the following command to check the OC CLI:
$ minishift oc-envHere is the sample output:
export PATH="/Users/anupamgogoi/.minishift/cache/oc/v3.11.0/darwin:$PATH"
# Run this command to configure your shell:
# eval $(minishift oc-env)
Execute the following command to put the OC CLI in PATH variable:
$ eval $(minishift oc-env)Now, to verify the installation, run the command:
$ oc versionFor more information, please go through the official documentation.
Create Docker Image
In this section, we are going to create a Docker image for WSO2 API Manager. The complete Dockerfile can be found on this GitHub URL. It's a very basic Dockerfile for the sake of simplicity. The focus of the article is not exploring Docker.
Here is a snapshot of the simple Dockerfile.
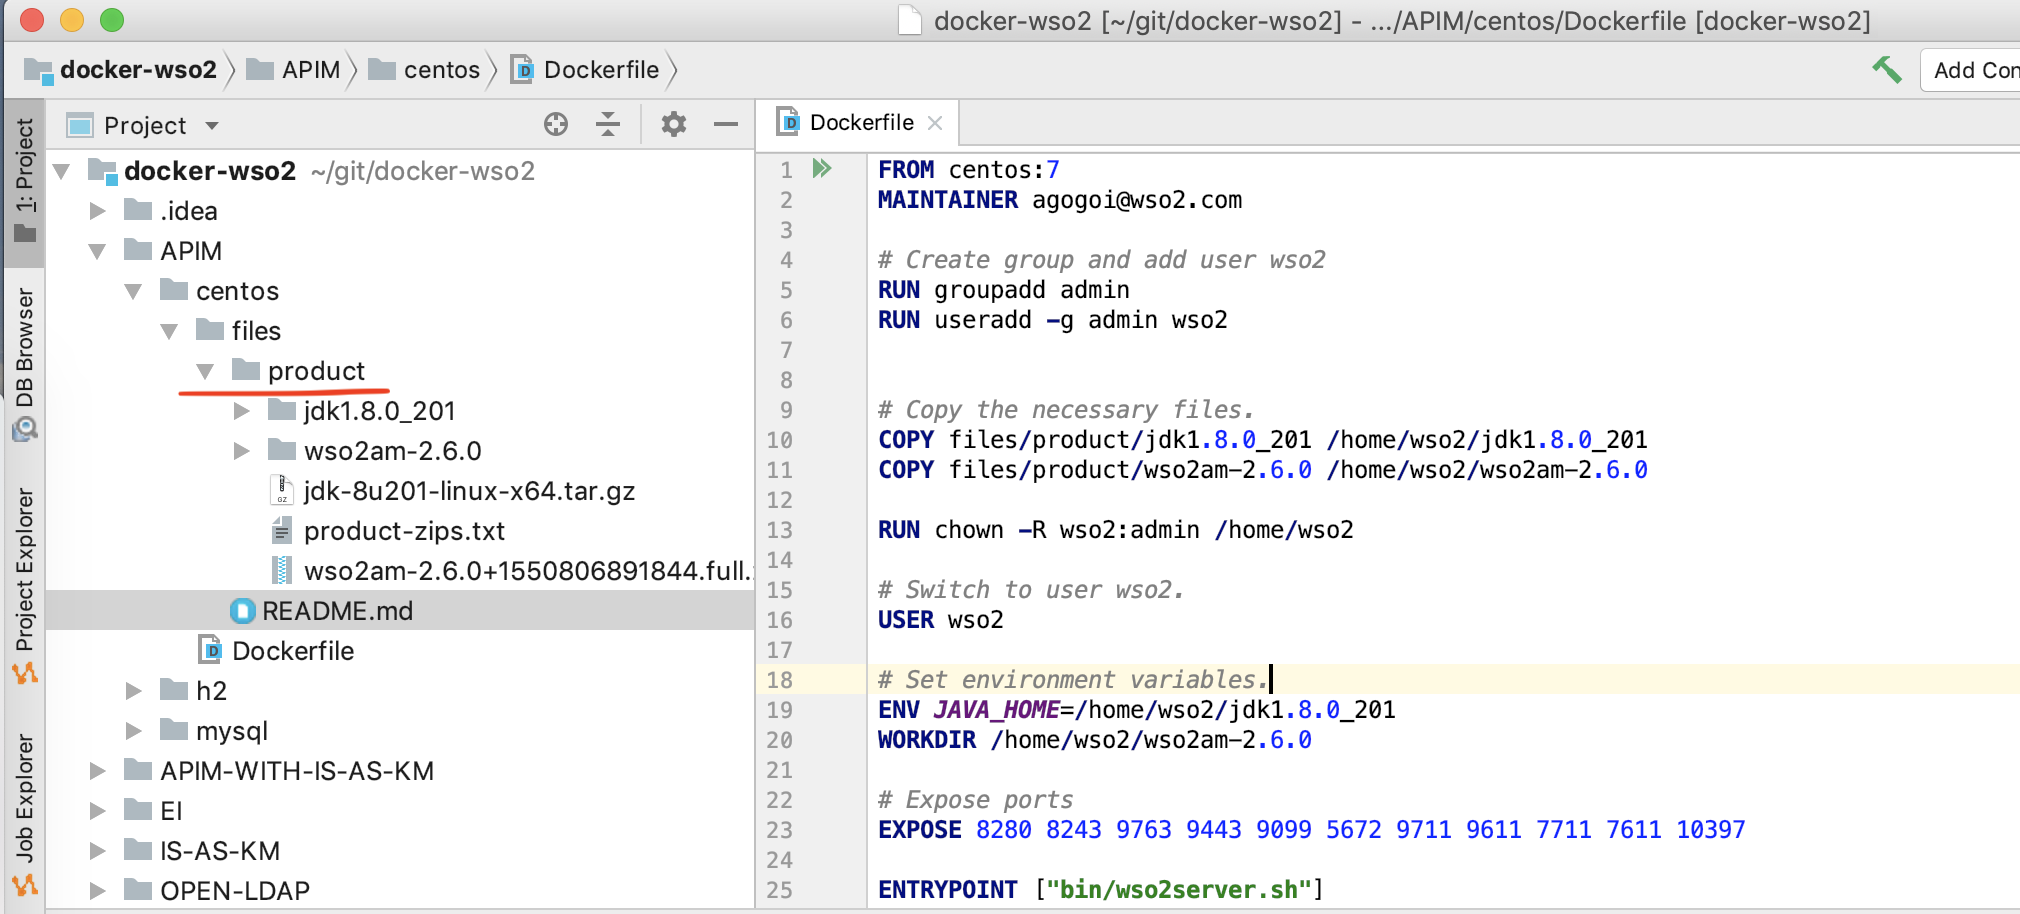
In the folder structure, under the product directory just copy and paste the JDK and WSO2 API Manager zip (tar) files and unzip them. After that, create the image. For example:
$ docker build -t wso2am-centos .You can do a:
$ docker image lsto check the image created. Note that these images are stored in the Docker daemon (Engine) running in the Minishift VM.
Create Project (Namespace) in Minishift
A project (namespace) can be created either by Web Console or OC. Here, I will demonstrate both ways.
By Console
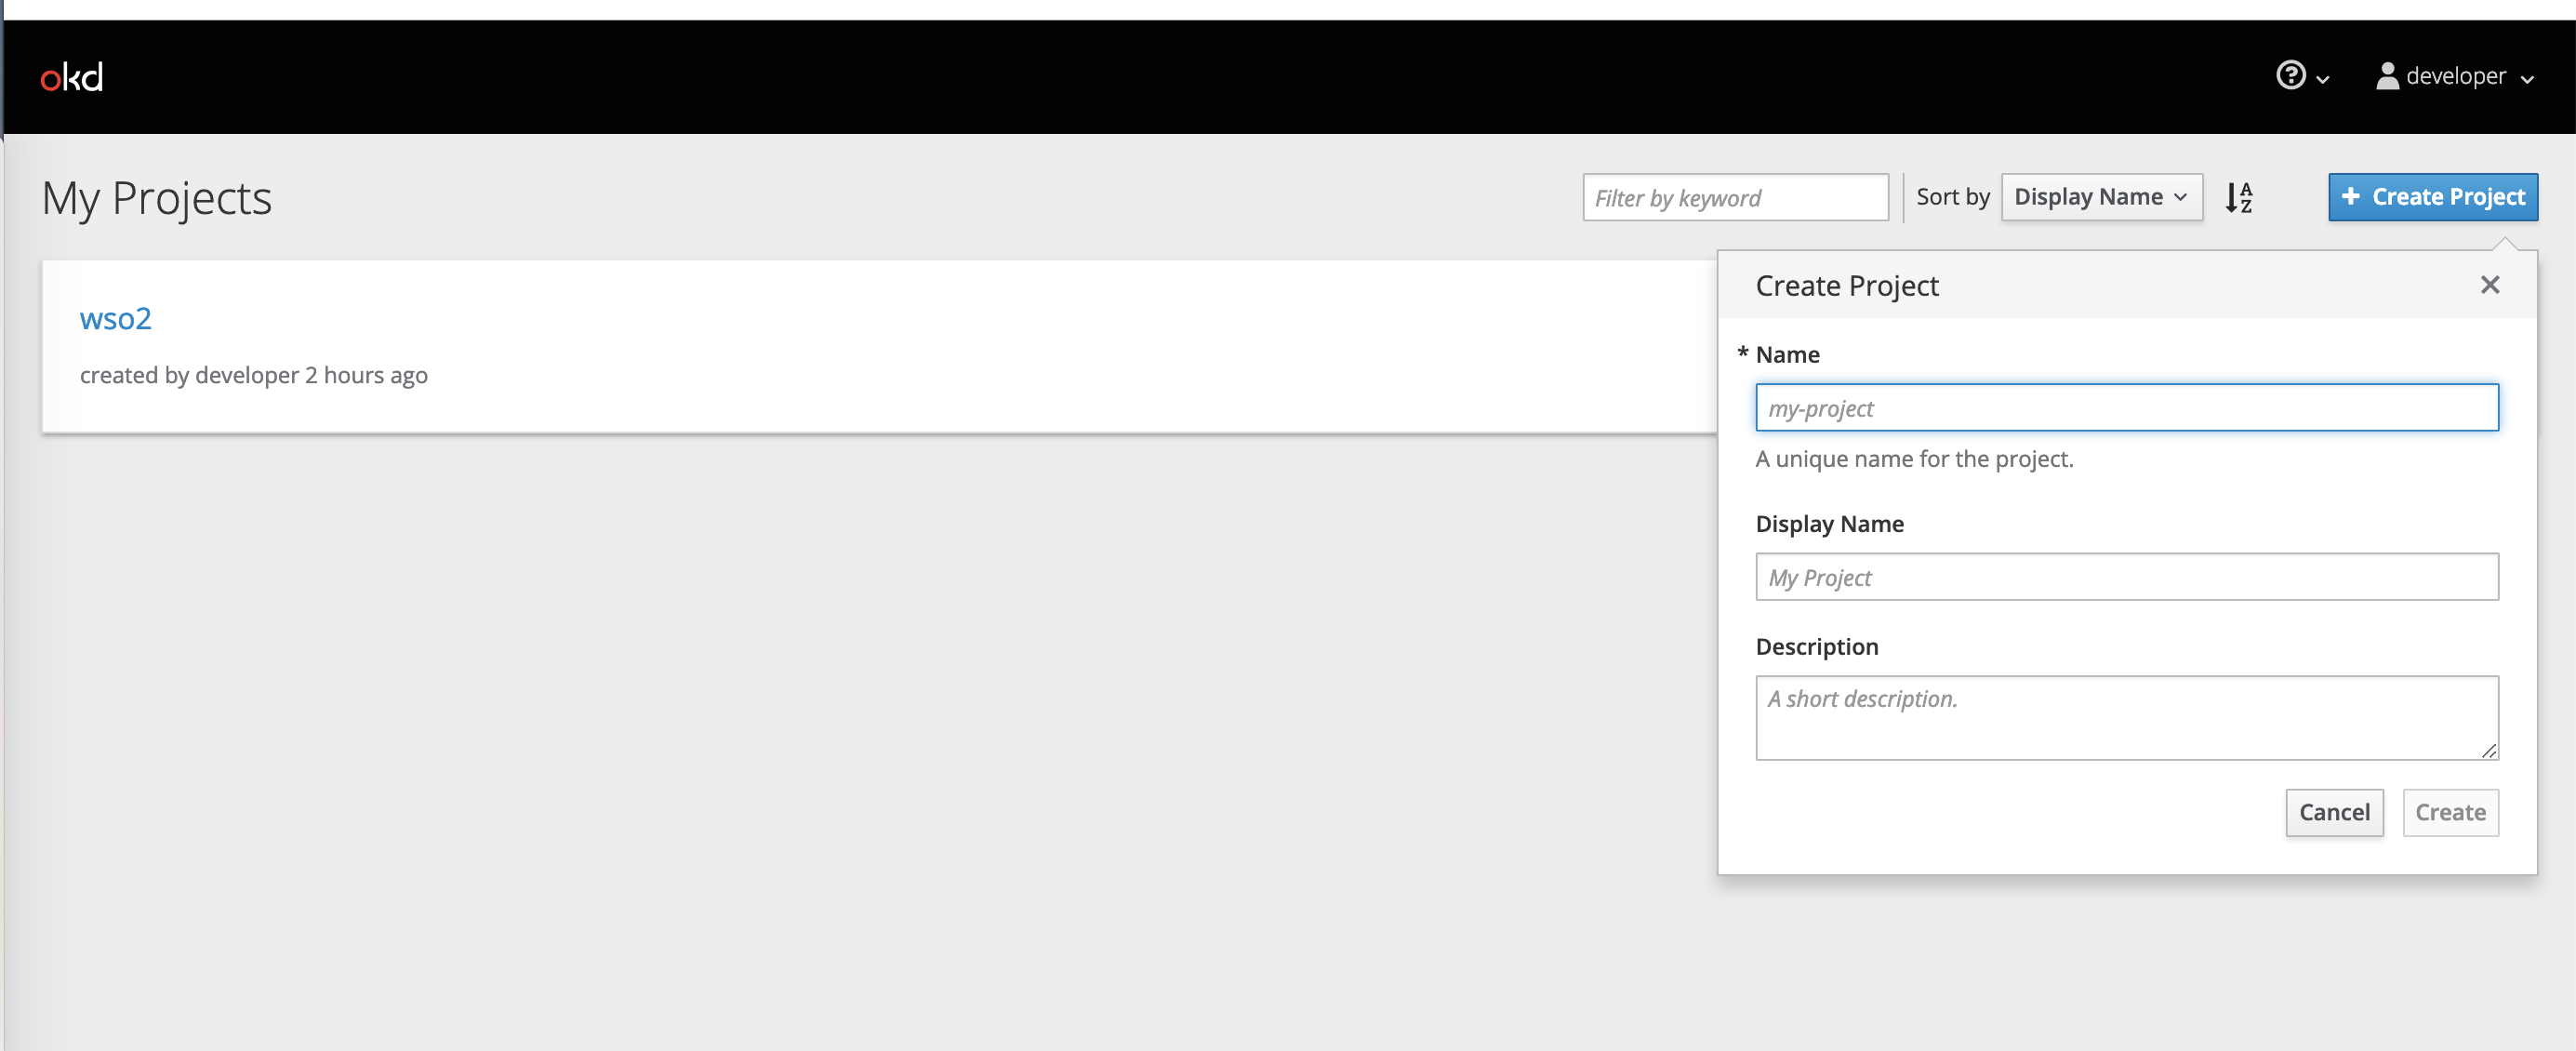
It's quite simple to create a project via the console. To bring in the console, execute the following command.
$ minishift consoleThis will open the web console in the default browser. Click the button Create Project in the pop-up and that's it.
By OC
Execute the following command to create a project using OC CLI,
$ oc new-project wso2Once a project is created, we need to deploy apps (Docker image, etc.) to the project. Here, the focus is deploying an app from a Docker image. For more information, please refer to this official document.
Deploy App (Docker Image)
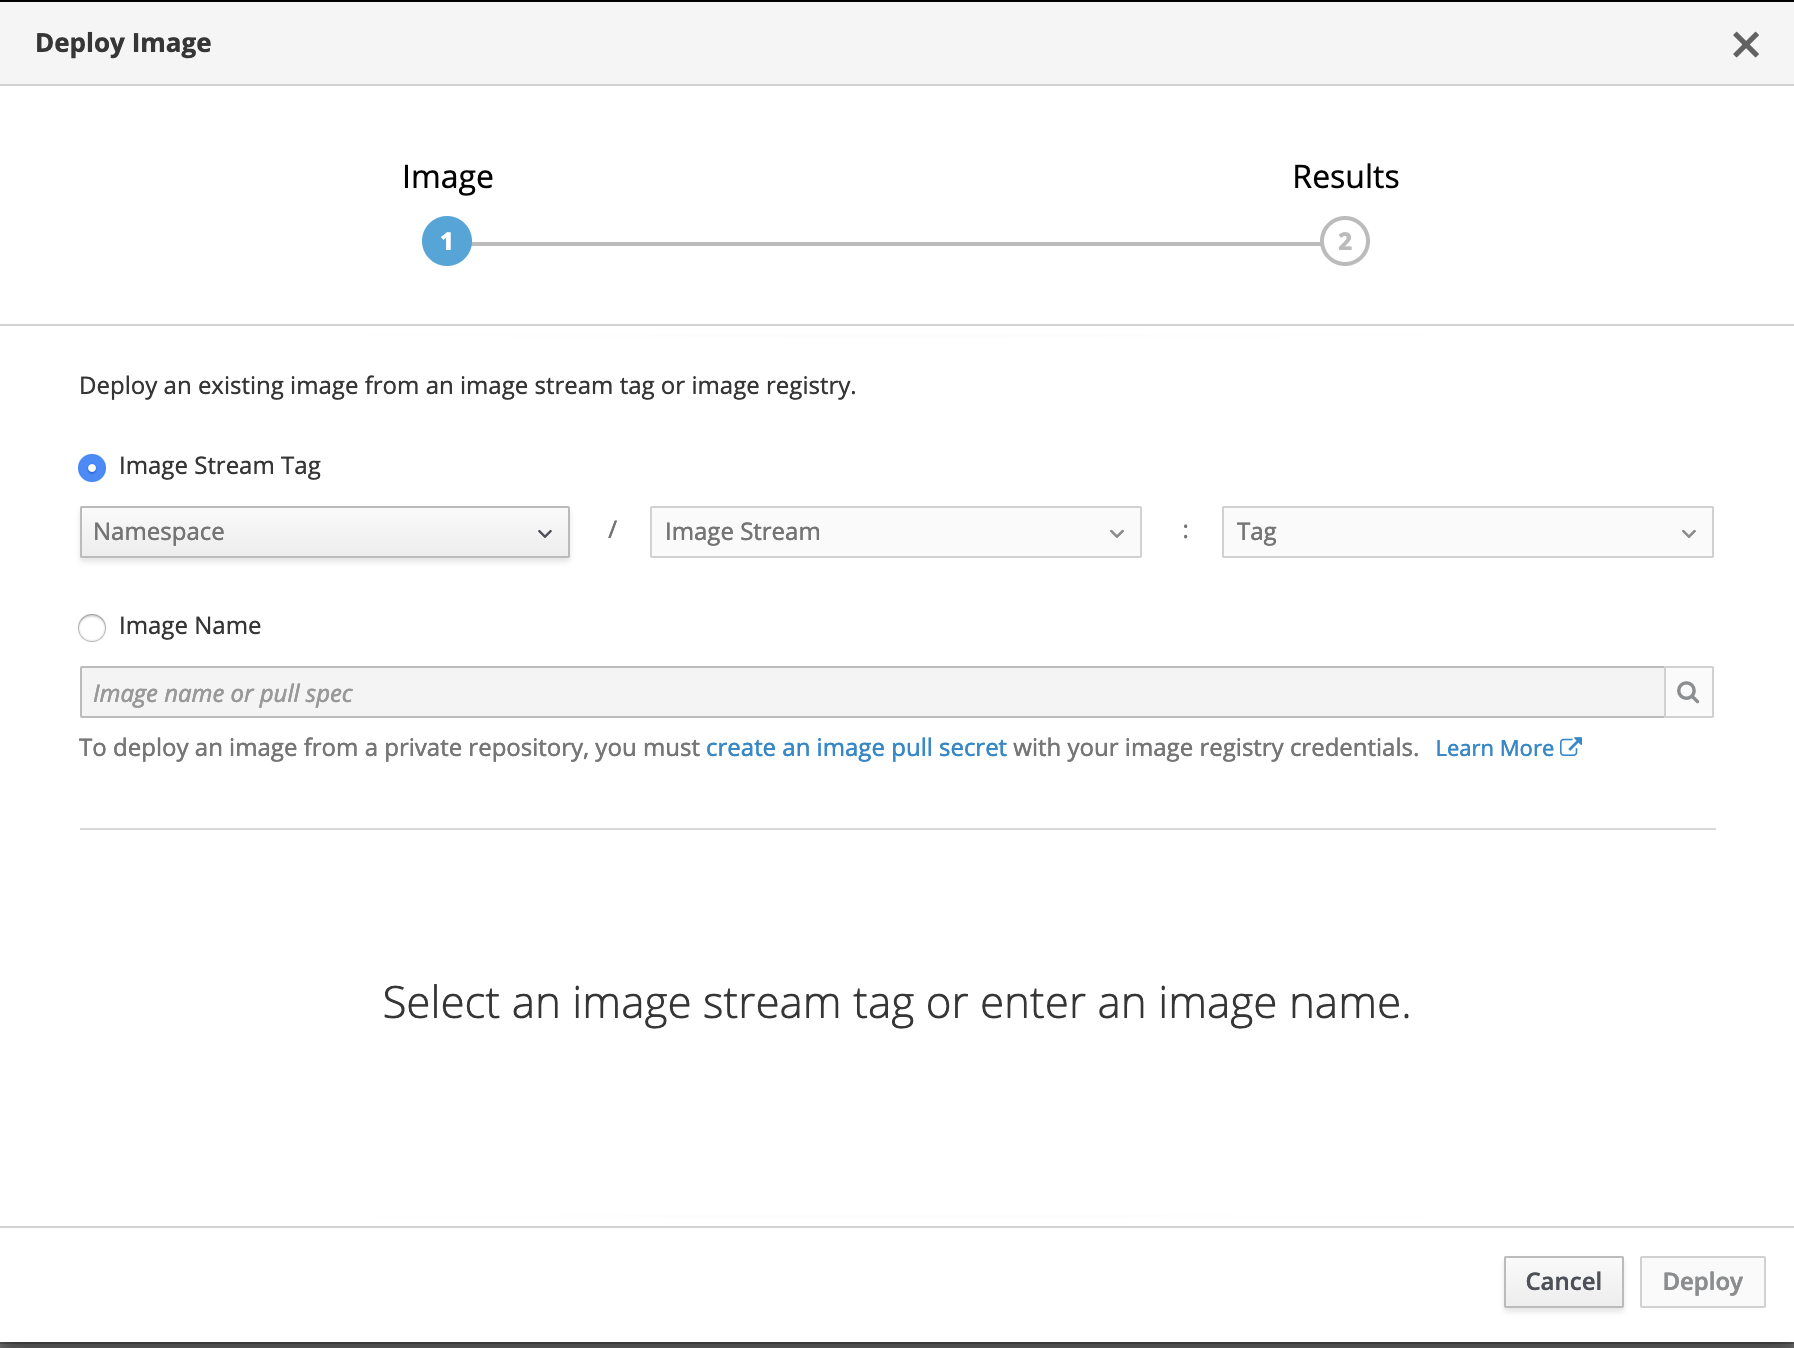
The focus of this article is to deploy an image from Image Stream. An alternative to this is to pull an image from docker registry (Docker Hub, local, or private).
To know more about Image Stream, please read the official documentation.
Here is the complete process to push the docker image to the Minishift docker registry and create an image stream for it.
Create an Image Stream for the Project (Namespace) Created
$ oc create is wso2am -n wso2Here, wso2am is the name of the image stream and wso2 is the project (namespace).
Tag the Docker Image
This is the expected format for tagging the Docker image.
<<DOCKER_REGISTRY>>/<<PROJECT_NAME>>/<<IMAGE_STREAM>>
To find out the Minishift Docker registry, execute the following command:
$ minishift openshift registryHere is a sample output:
172.30.1.1:5000This is the Minishift's internal docker registry host and port.
Now, let's tag our docker image:
$ docker tag wso2am-centos 172.30.1.1:5000/wso2/wso2amRemember that wso2am-centos was the name of the docker image we generated.
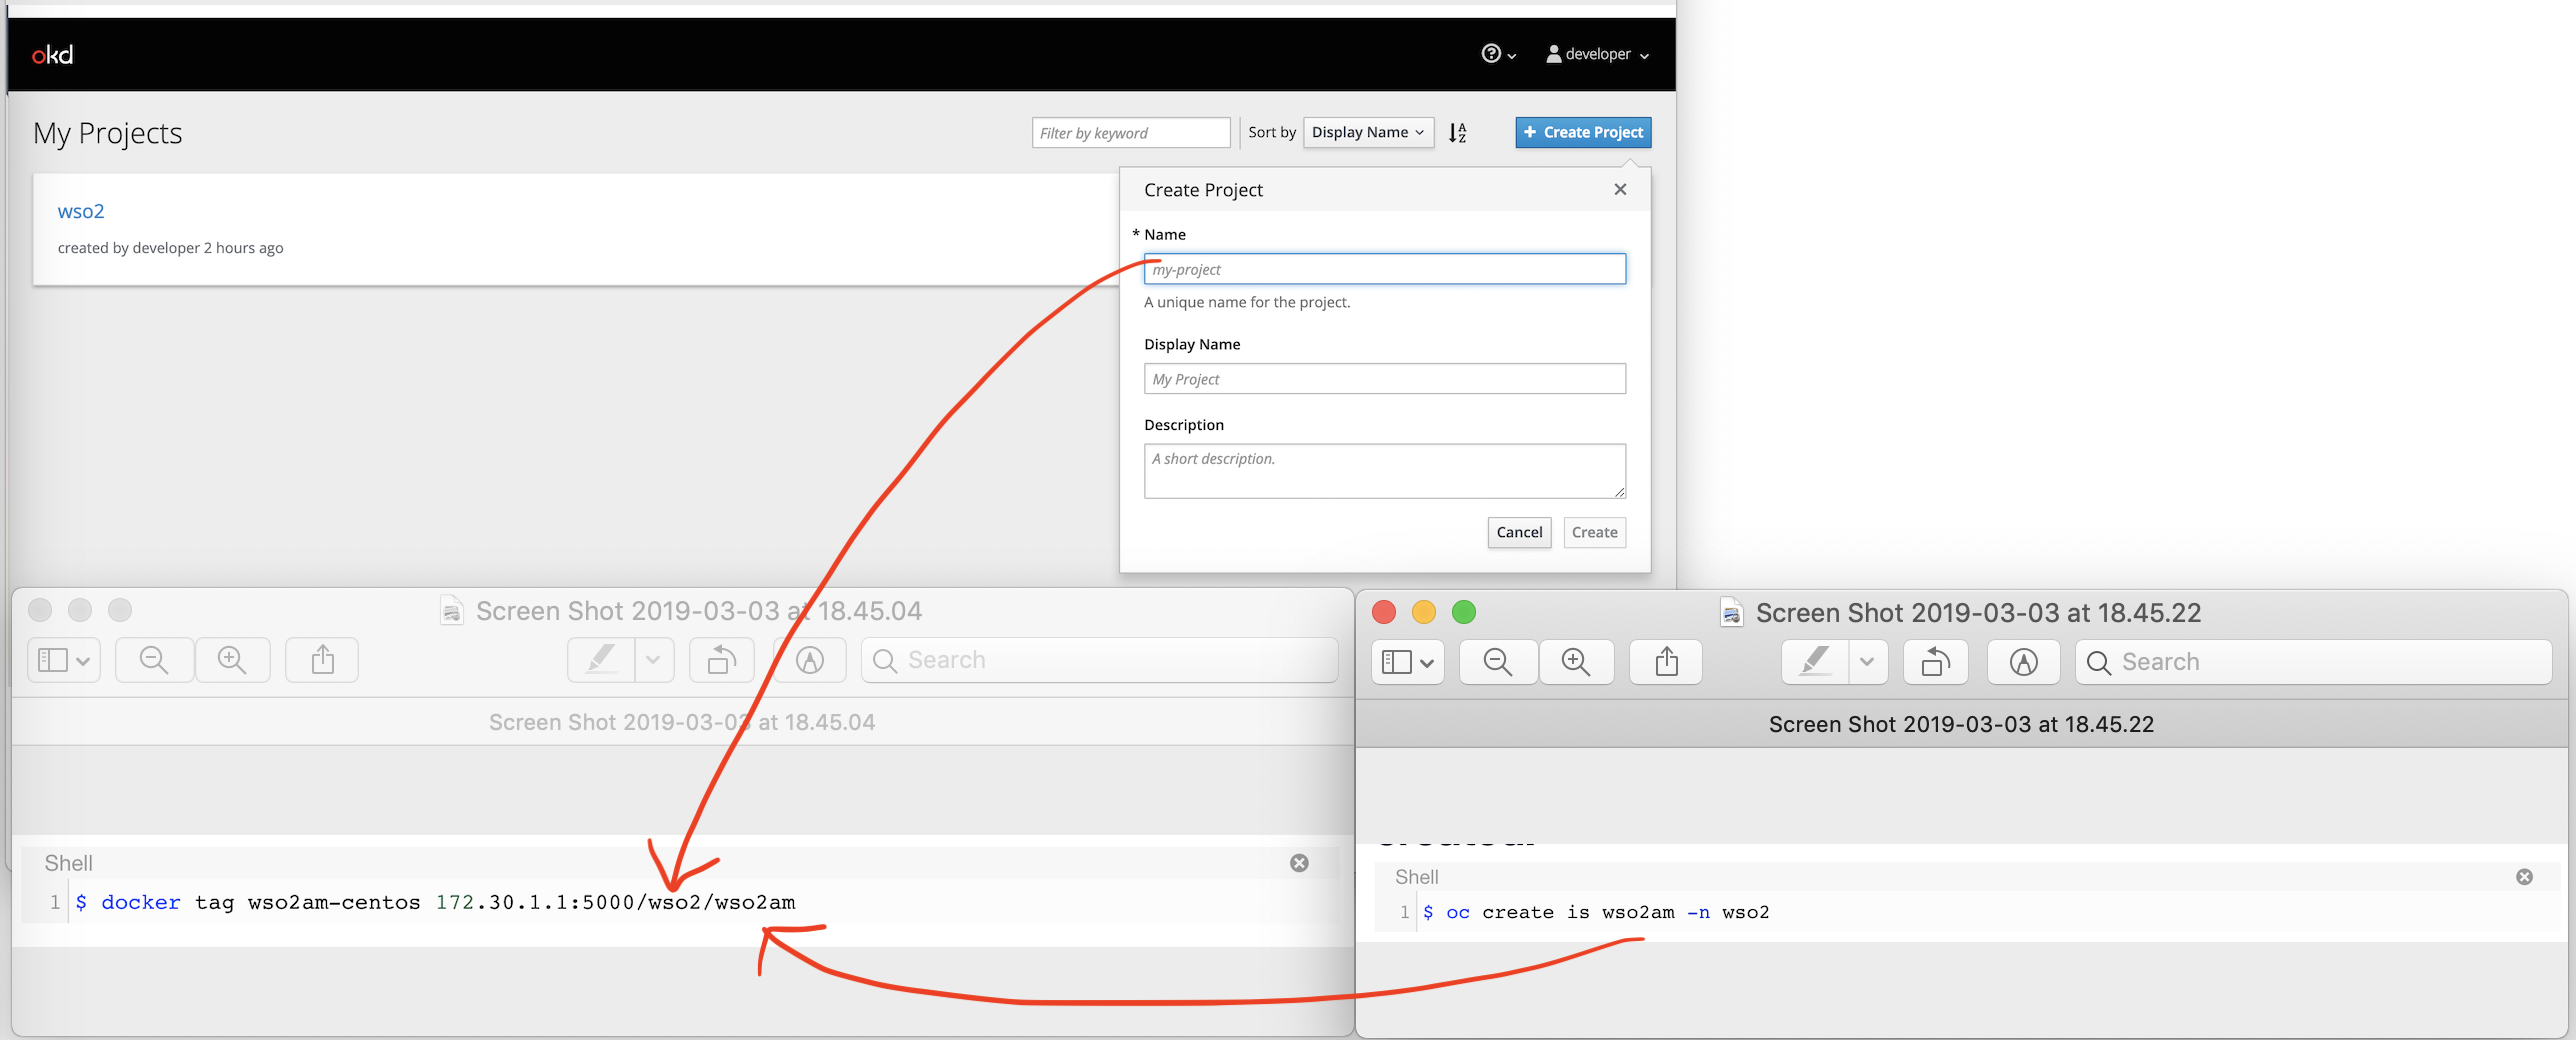
After tagging the Docker image, log in to the Docker registry using the following command:
$ docker login -u developer -p $(oc whoami -t) $(minishift openshift registry)After logging in successfully, push the image to the Docker daemon:
$ docker push 172.30.1.1:5000/wso2/wso2amTo check the Image Stream, execute the following command:
$ oc project wso2 # Select the project.
$ oc get is # List the Image Streams created for the project.
You should see the following output:
NAME      DOCKER REPO                   TAGS           UPDATED
wso2am    172.30.1.1:5000/wso2/wso2am   latest   18 hours ago
At this point, we have done the following things:
- Created a project called wso2.
- Created an Image Stream named wso2am for the project wso2.
- Created a Docker image for WSO2 API Manager and tagged it as 172.30.1.1:5000/wso2/wso2am.
- Pushed the Docker image to the Docker registry.
Now, the next steps will be to pull the image from the Image Stream and create the pod. This is quite straightforward and I am going to use the web console for it. Alternatively, you can use the OC tools for it without any restriction.
Deploy WSO2 API Manager Image
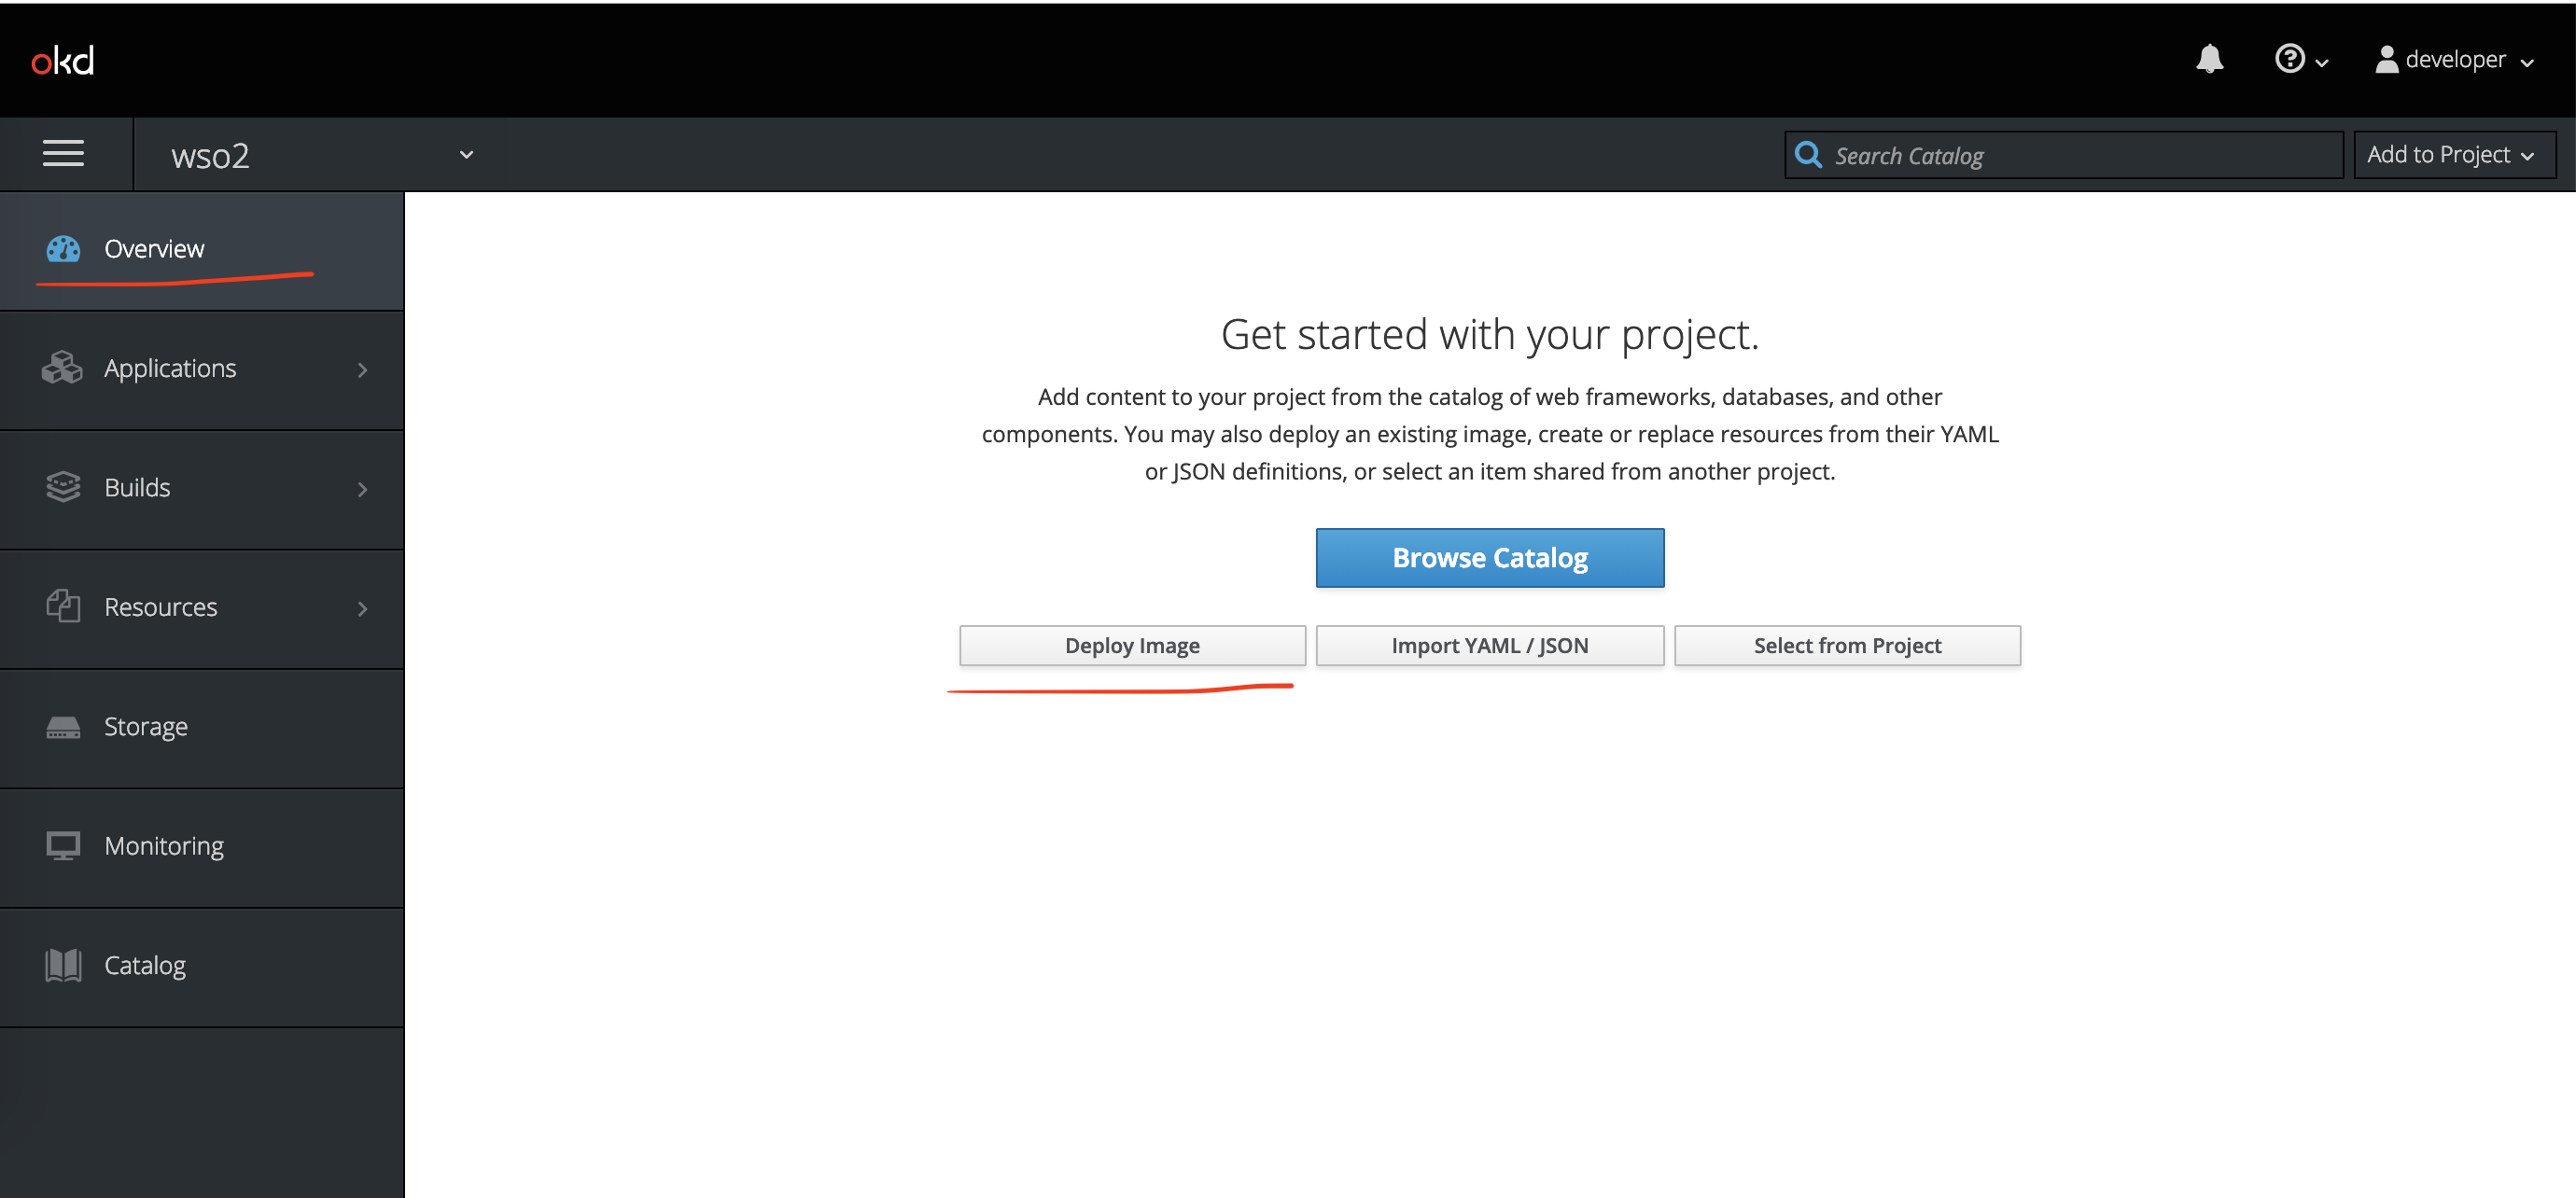
Click the Overview menu of the project and you will be presented this GUI. Then, select the Deploy Image option.
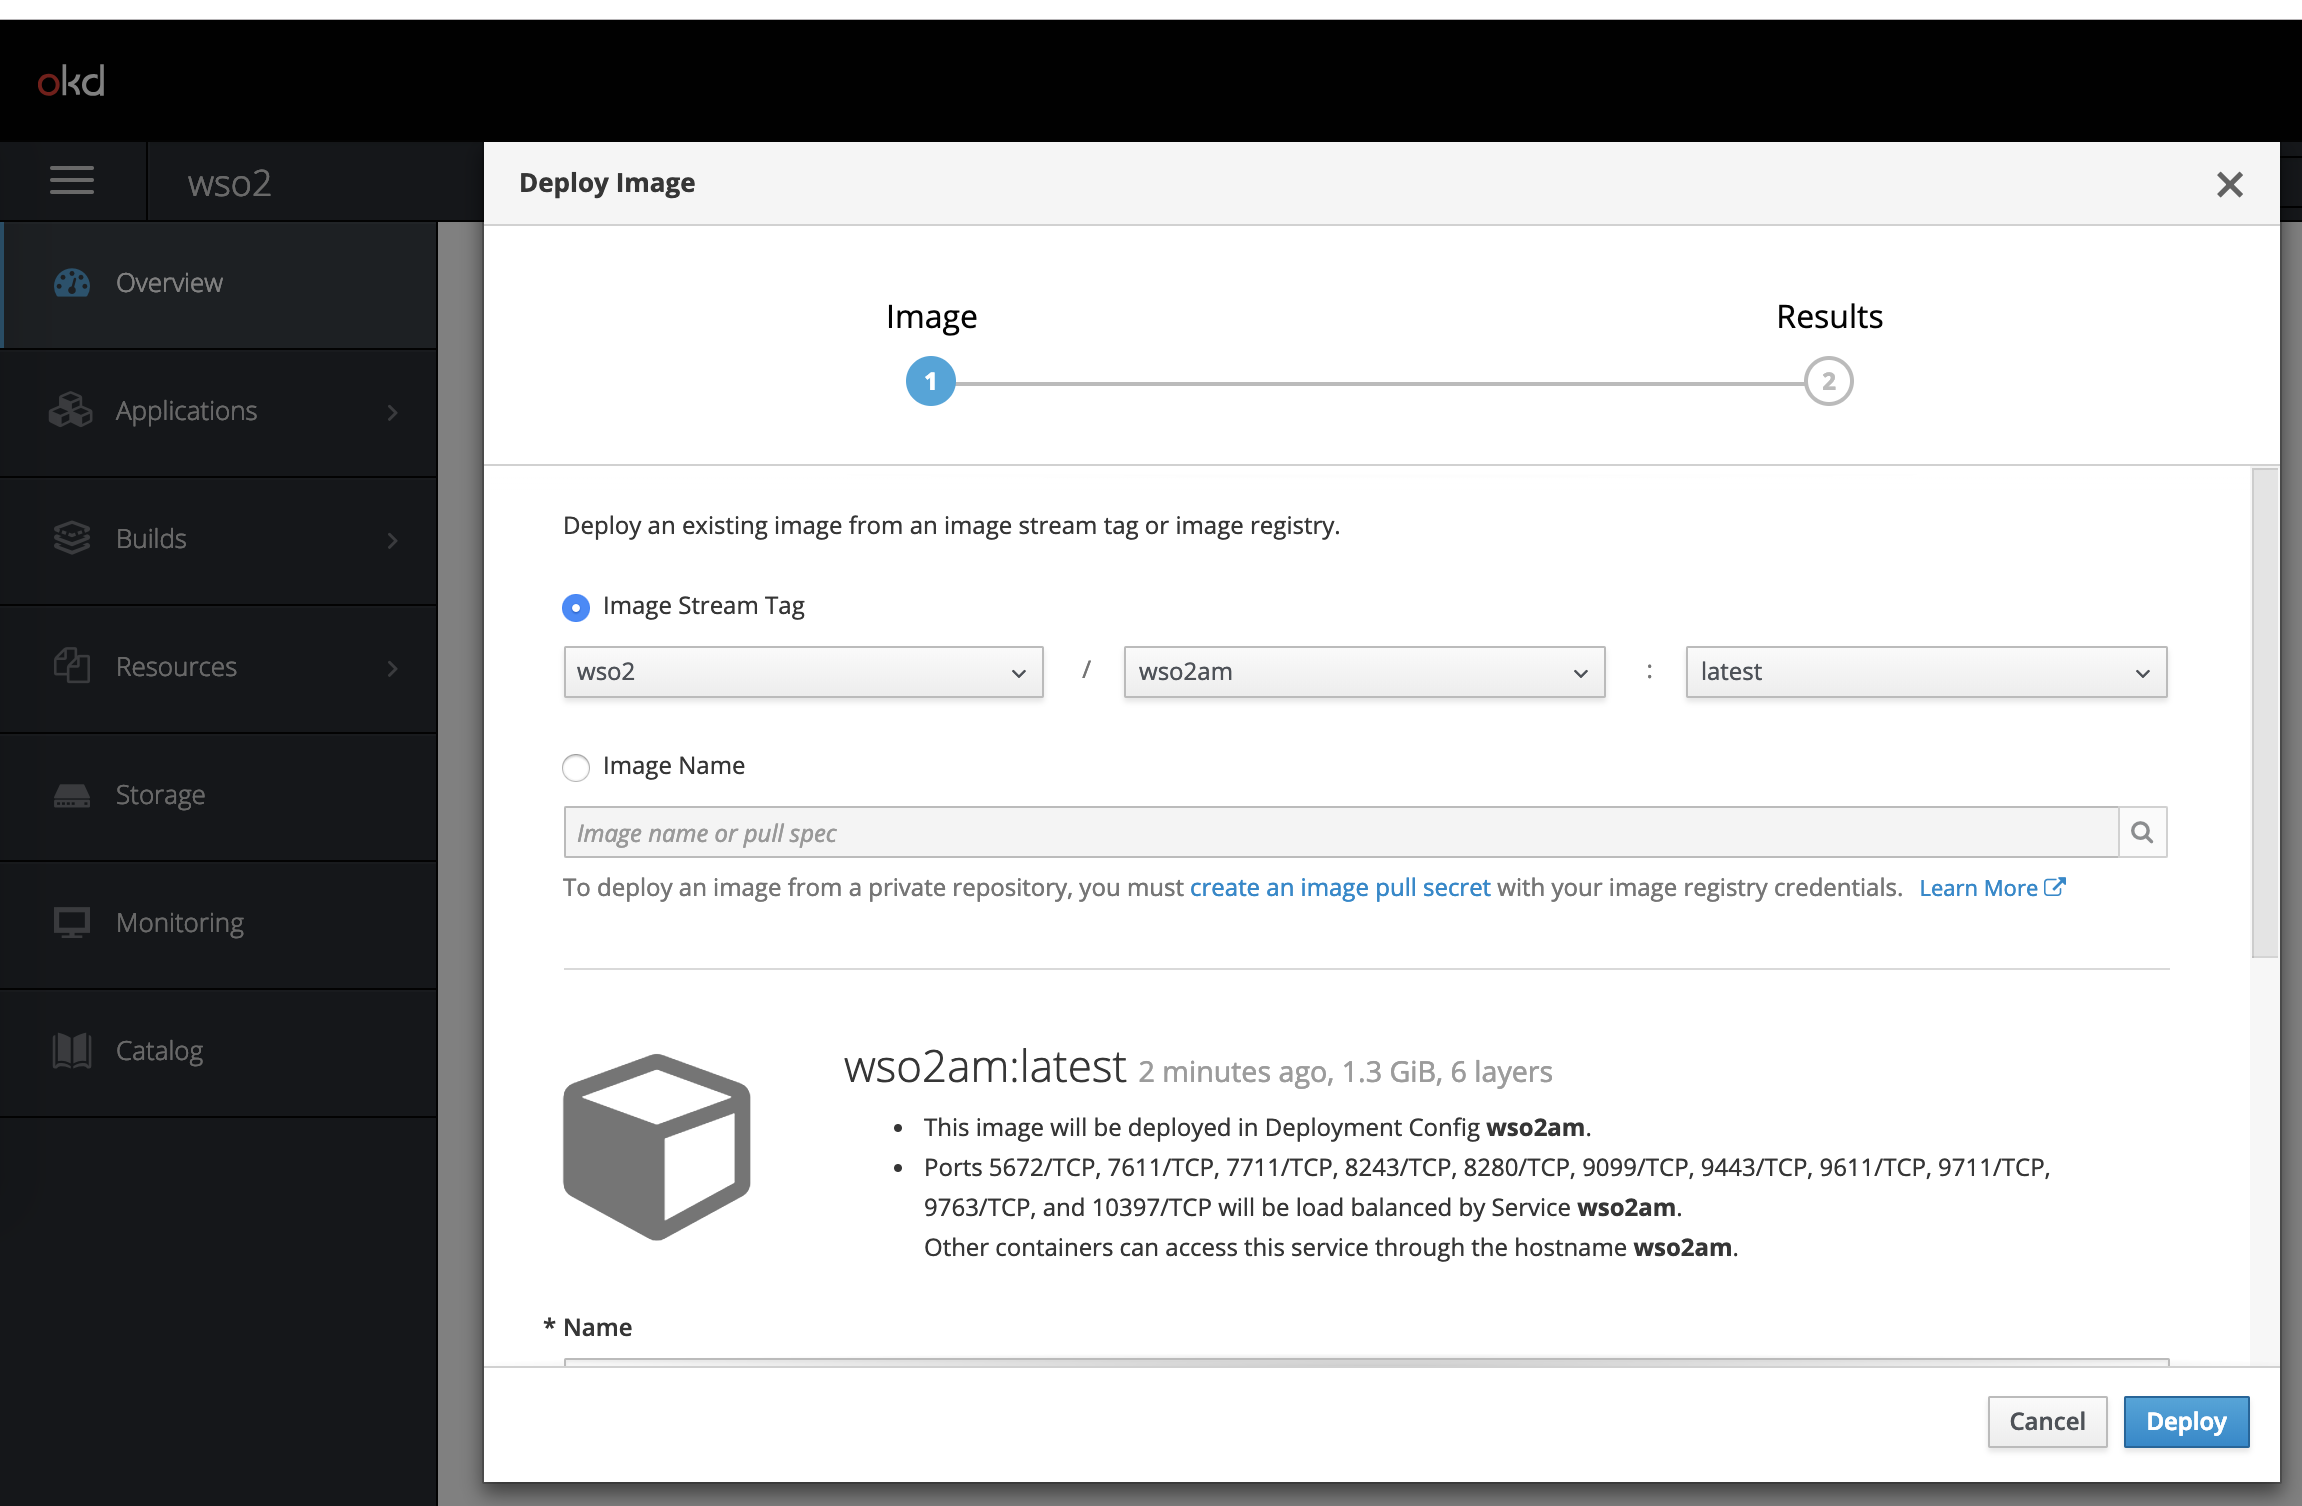
Now, choose the image stream and then click deploy,
Once it's deployed, you can see the following page: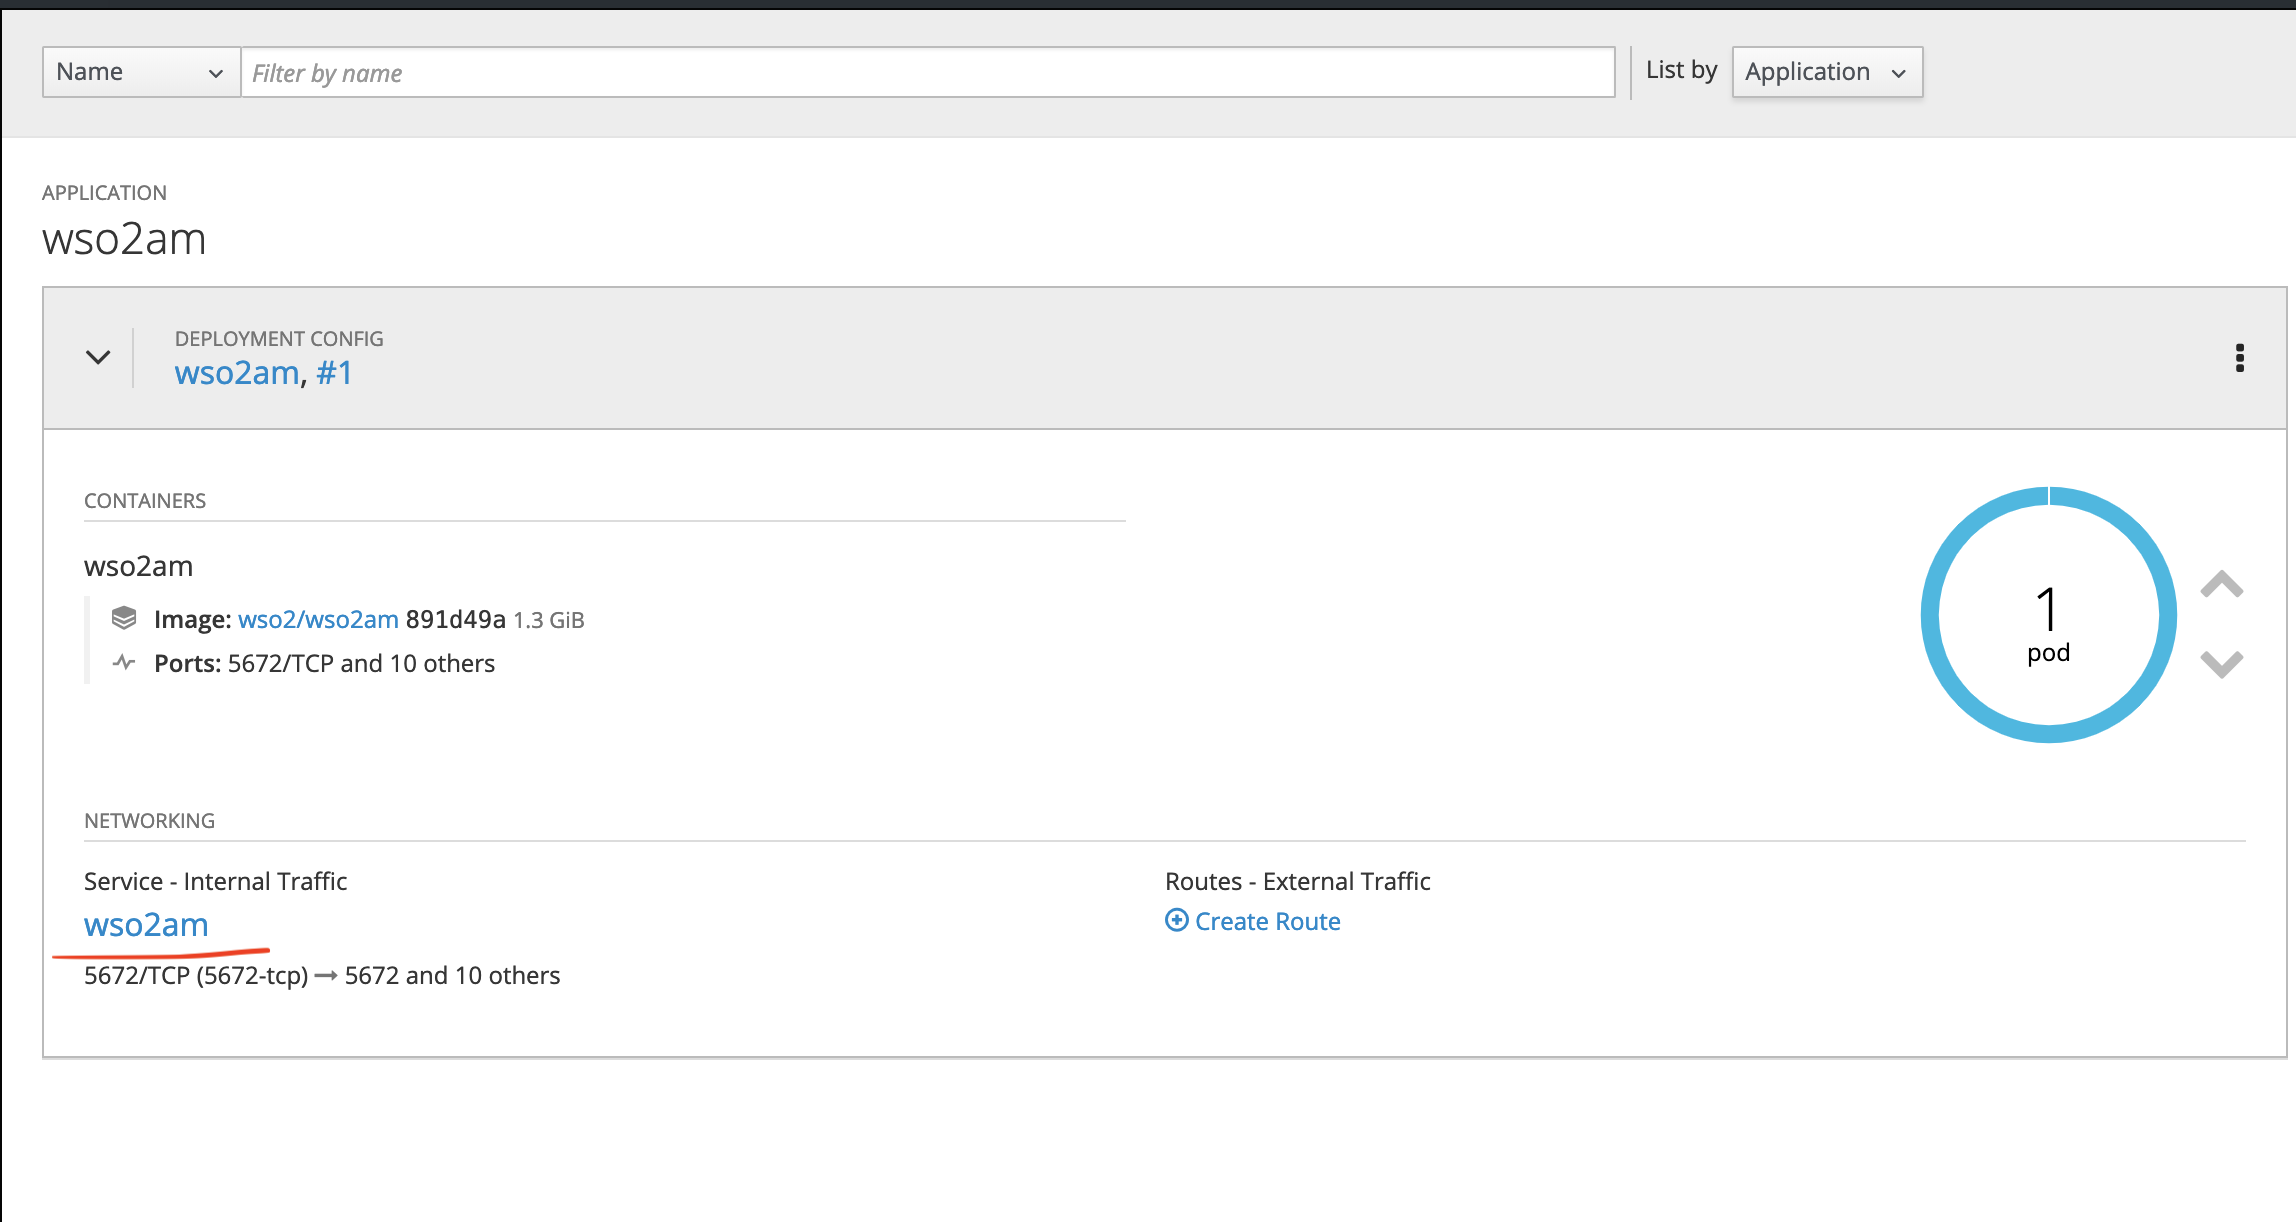
Click the service wso2am (marked in red) under the NETWORKING section and let's create a passthrough route.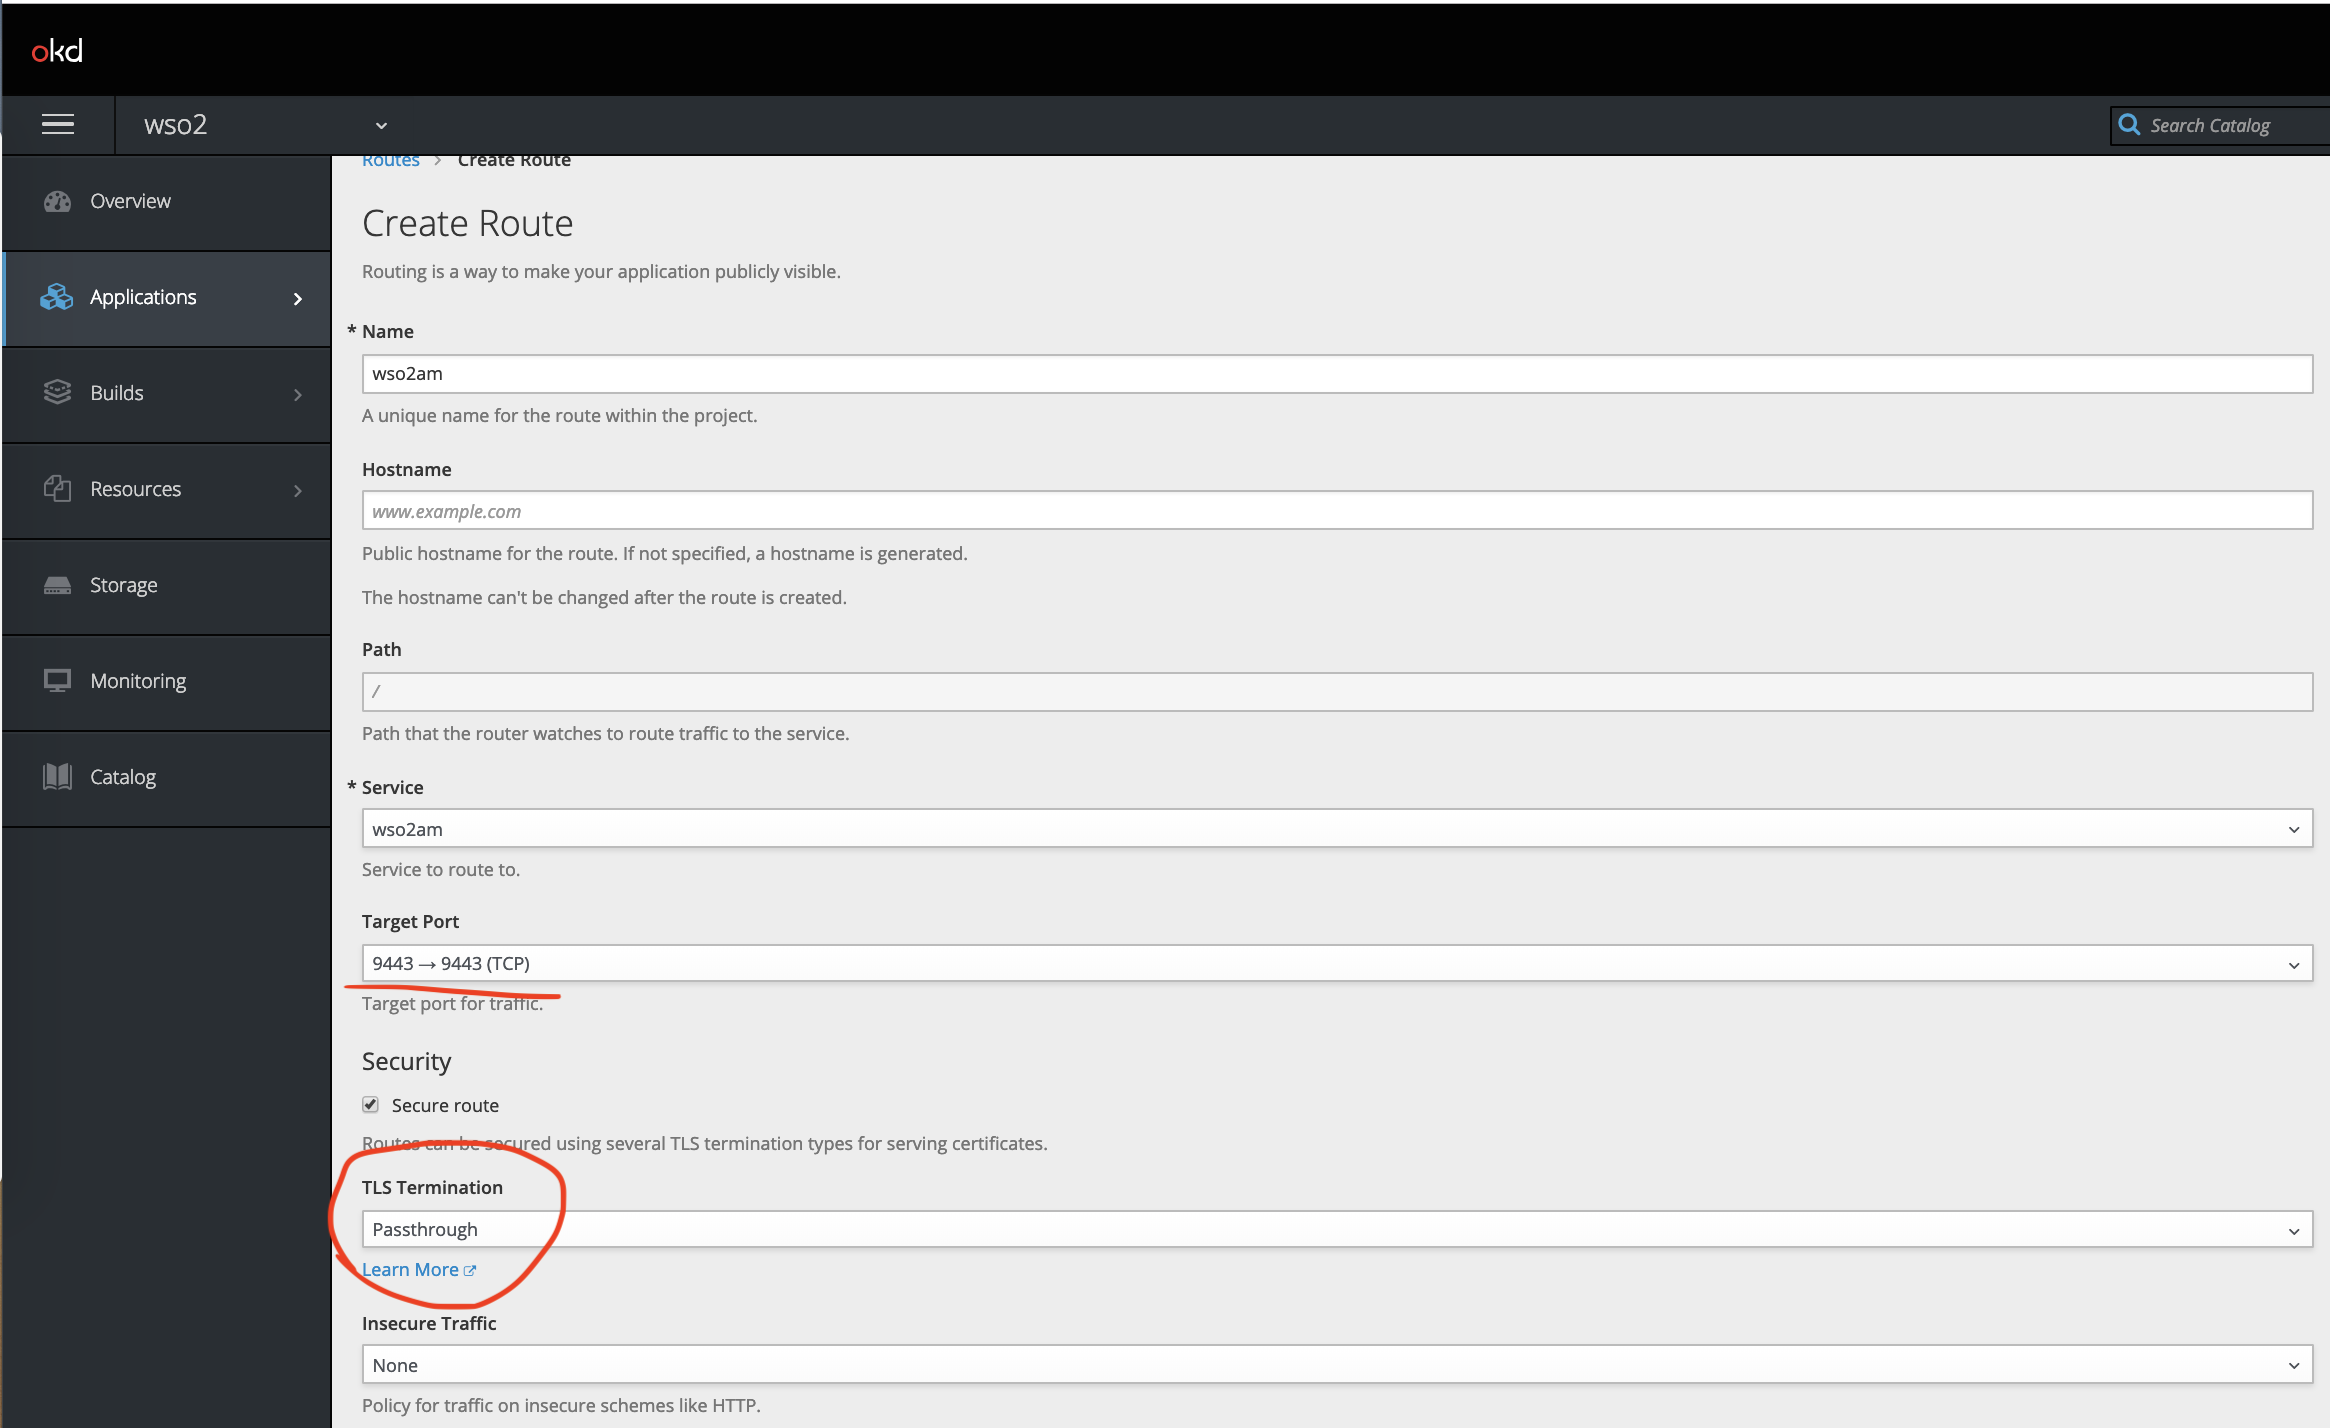
After successfully created the Route, you can view it as shown below,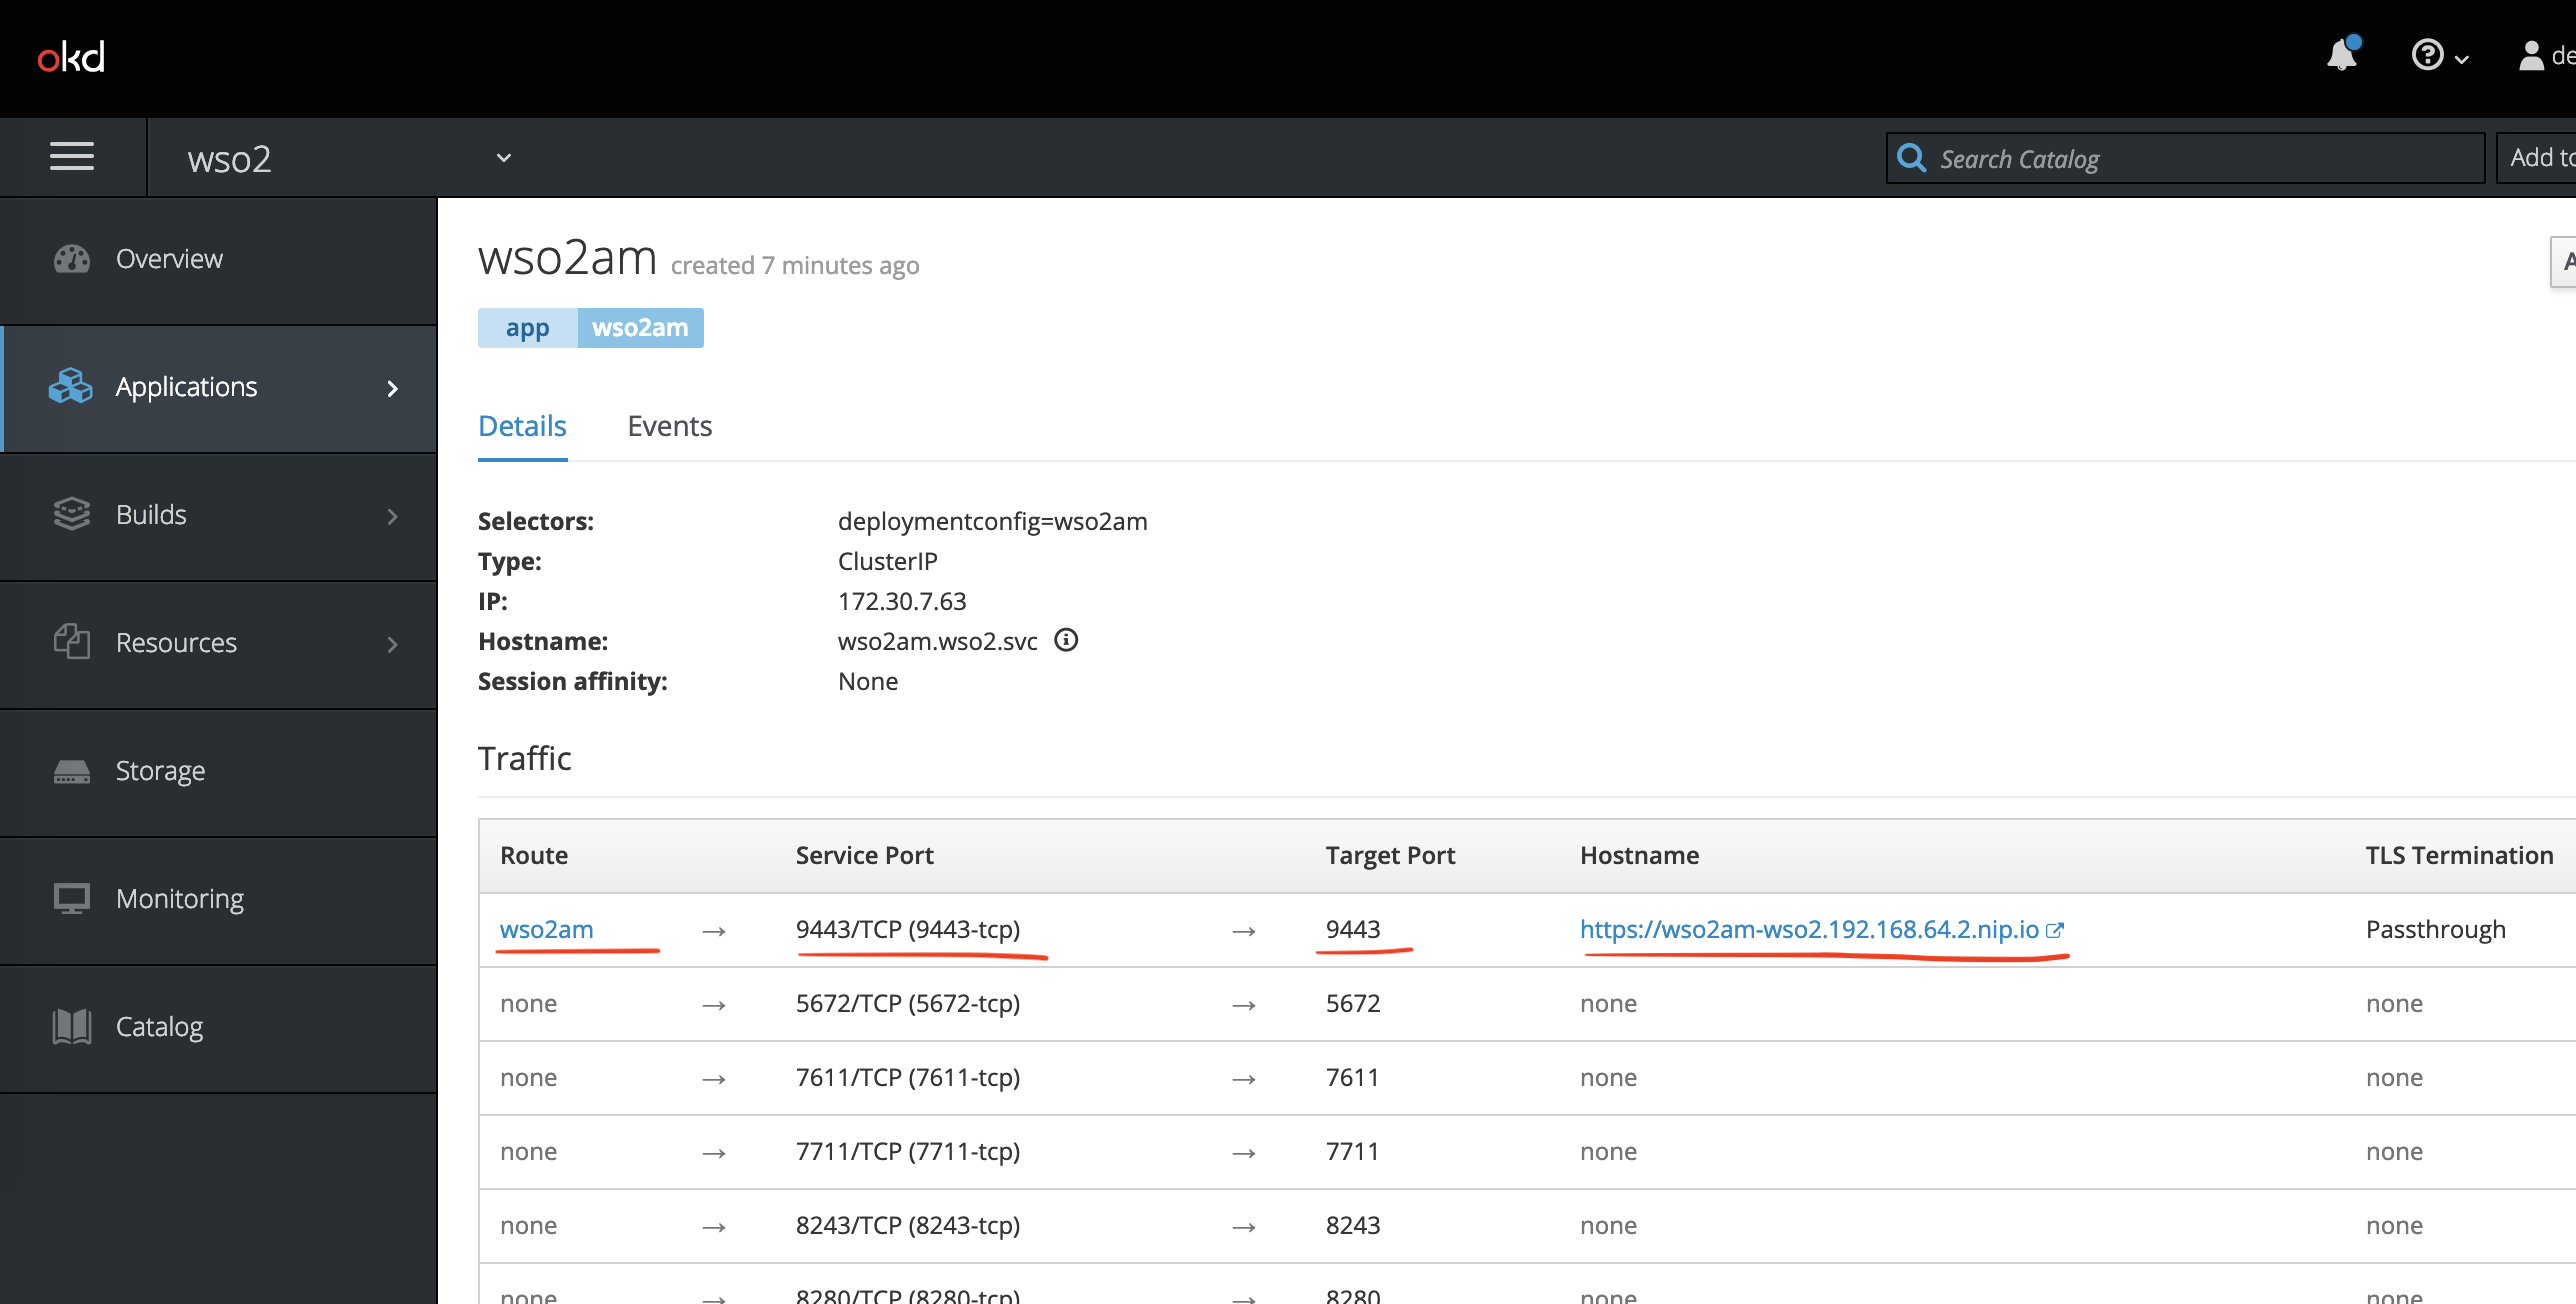
In my case, I will have the following URLs:
Publisher: https://wso2am-wso2.192.168.64.2.nip.io/publisher
Store: https://wso2am-wso2.192.168.64.2.nip.io/store
Admin: https://wso2am-wso2.192.168.64.2.nip.io/admin
Carbon: https://wso2am-wso2.192.168.64.2.nip.io/carbon
Conclusion
In this article, I have explained in a simple fashion how to deploy WSO2 API Manager in Openshift. In the next articles, I will try to add MySQL as a persistent store to the API Manager. Thanks for reading!
Opinions expressed by DZone contributors are their own.

Comments