Salesforce Functions for Caching Expensive Queries
Caching is a strategy that can help you conserve resources and improve performance. In this article, we will walk through the use of Salesforce Functions to cache expensive queries.
Join the DZone community and get the full member experience.
Join For FreeCaching is a strategy that can help you conserve resources and improve performance. When you have an oft-run expensive query with a result that seldom changes, caching is an ideal solution. By caching the result of that query, you can return the cached result when necessary. The result is the same, but you save the need to run the expensive query. Everybody wins.
In this article, we will walk through the use of Salesforce Functions to cache expensive queries. For instance, we want to query for some value across a large number of records, and the page requiring this query is often loaded. However, the result will not change from one query execution to the next.
Introduction to the Problem
In our demo, the example query will be “the number of companies with more than 10,000 employees.” We imagine a use case in which there’s a page that our sales team loads often, and part of the page shows the total number of companies in our Salesforce org that match this condition. Ideally, the expensive query is not run every time the page loads, but instead, we would implement a caching mechanism.
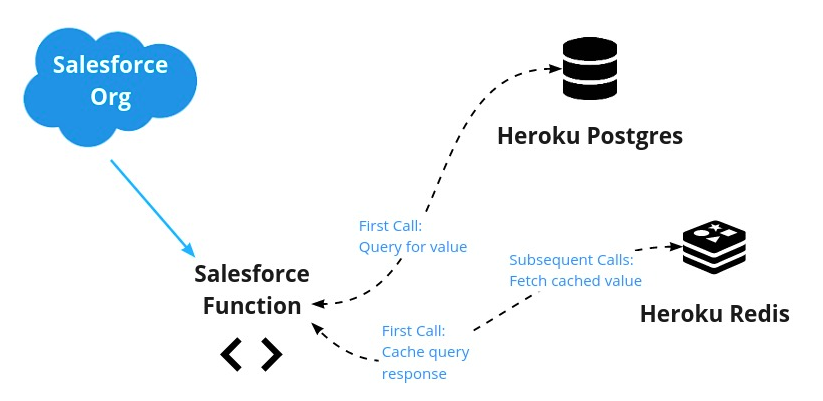
To solve this, we will:
- Leverage Heroku Connect to sync our list of companies from Salesforce to Heroku Postgres (or use a table already in Postgres).
- Create a Salesforce Function to query Postgres and return that count.
- Store the resulting value in Heroku Redis for a specified amount of time.
- Use a Salesforce Function to check for the value in Redis. If the value exists in Redis, then return it. If not, then run the query and store the result in Redis.
The data flow looks like this:
Of course, Apex does have a Platform Cache API for facilitating caching for certain use cases. For our use case—and for demo purposes—we’ll explore this caching solution that uses Salesforce Functions.
Before we proceed, let’s briefly introduce each of the pieces in our system.
- Salesforce Function: A feature of Salesforce that allows you to run some code (JavaScript or Java are currently the supported languages) that is still in the secure area of your Salesforce org, but is not running on your org. This allows you to offload workloads that are heavy or may cause you to exceed limits.
- Heroku Connect: A tool within the Salesforce family for bidirectional data syncing between your Salesforce org and Heroku Postgres. Similar to Salesforce Functions, you can leverage this tool without impacting your Salesforce limits.
- Heroku Postgres: A fully managed instance of PostgreSQL (a relational database) on Heroku.
- Heroku Redis: A fully managed instance of Redis (an in-memory key-value store) on Heroku.
Pre-requisites
To use all of the above components, you must have the following pieces in place:
- A Heroku account
- A Heroku app created, with Postgres and Redis add-ons attached
- A Salesforce org with Functions enabled
- A local Salesforce Functions development environment
- [Optional] Heroku Connect syncing to Postgres (a sample dataset is provided)
With the prerequisites in place, we can start connecting them. First, we’ll walk through connecting the environments. Then, we’ll look at the code needed to make the magic happen.
Accessing Heroku Data Services From a Salesforce Function
With your accounts and access in place, we can move forward with the Function itself. Let’s assume that you are starting a fresh project and have an empty Postgres database.
If you are new to Functions, then we recommend going through this basic process to get a feel for things before you involve additional parts. If you already have a Salesforce project or are syncing the data via Heroku Connect, then you can modify the following commands to suit your needs.
First, create a Salesforce DX project to give your function a home.
sfdx force:project:create -n MyDataProjNext, navigate to the project directory and run the following command to create a fresh JavaScript function.
sf generate function -n yourfunction -l javascript
This will create a /functions folder with a Node.js application template.
Next, associate your Salesforce Function and your Heroku environments by adding your Heroku user as a collaborator to your Function’s compute environment:
sf env compute collaborator add --heroku-user <[email protected]>
The environments can now share Heroku data services.
Next, you will need to obtain the name of the computing environment so that you can attach the data stores to it.
sf env list
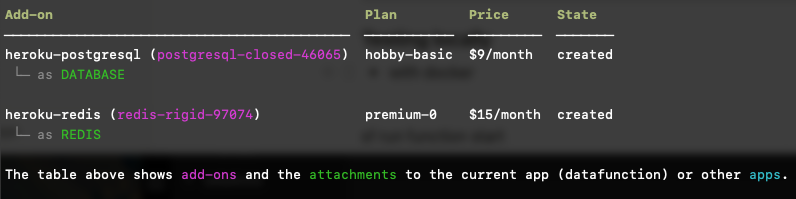
To attach the Heroku datastores, you also need the names of the add-ons. You can get the name of the add-ons with the following command:
heroku addons -a <yourherokuapp>
The output will look similar to the following. The “name” of each add-on is shown in purple (for example, postgresql-closed-46065).
With the names of the computing environment and your add-ons, run the following commands to attach Postgres and Redis to your computing environment:
heroku addons:attach <your-heroku-postgres-name> --app <your-compute-environment-name>

heroku addons:attach <your-heroku-redis-name> --app <your-compute-environment-name>
Now that we have connected our Salesforce Function environment with our Heroku datastores, we can write our Salesforce Function code.
Implementing the Salesforce Function
Before we begin writing the JavaScript for this Salesforce Function, let's set up our local development environment with the necessary libraries. In the deployed environment, our Function will get the data connection information from environment variables. For our local environment, we will use the dotenv node package to read a file named .env with this information. We can create that file with the following command:
heroku config -a <yourherokuapp> --shell > .env
Next, let’s install the packages we need to interact with Postgres and Redis, along with dotenv:
npm install dotenv pg redis
Our project setup is done. Let’s write our function code.
Connect to Heroku Postgres and Redis
Let’s start by adding the code that allows us to read and store data in Heroku Postgres and Heroku Redis. (Note: The Heroku Devcenter has some helpful documentation on connecting to Postgres and Redis from Node.js.)
Our function code will live in the index.js file of the functions folder in our project (for example, MyDataProj/functions/index.js). We open that file and add the following lines to the top. These lines will import the modules we just installed.
import "dotenv/config";
import pg from "pg";
const { Client } = pg;
import { createClient } from 'redis';
The main part of the function is the section that is being exported. The value returned from this block will be returned to the caller of the function.
export default async function (event, context, logger) {
}
To keep our code clean and modular, let’s first write several helper functions at the bottom of the file. We need functions that we can call to manage our connection to Postgres and Redis. Under (and outside of) the exported function, we add the following two helper functions:
/* Helper functions */

// Connect to PostgreSQL
async function pgConnect() {
   const DATABASE_URL = process.env.DATABASE_URL;
   if (!DATABASE_URL) {
     throw new Error("DATABASE_URL is not set");
   }
    const client = new Client({
     connectionString: DATABASE_URL,
     ssl: {
       rejectUnauthorized: false
     }
   });
    await client.connect();
   return client;
 }

// Connect to Redis
async function redisConnect() {
   const REDIS_URL = process.env.REDIS_URL;
   if (!REDIS_URL) {
     throw new Error("REDIS_URL is not set");
   }
    const redis = createClient({
       url: process.env.REDIS_URL,
       socket: {
           tls: true,
           rejectUnauthorized: false
       }
       });
    await redis.connect();
   redis.on('error', err => {
       console.log('Error ' + err);
   });
   return redis;
 }
To keep our example simple, let’s load a small dataset into Postgres. We can create a table called “company” by running the database commands found in the following gist. Download the contents of that gist to a file called company.sql. To run the database commands from the Heroku CLI, do the following:
heroku pg:psql -a <yourherokuapp>

DATABASE=> \i /path/to/company.sql
You can verify that your sample dataset has been loaded by running the following query:
DATABASE=> select * from company;
Write the Main Function
We’re all set up! Now, we have a little bit of code to write for our actual function. The code for our function is available as a gist and looks like this. You can copy this into your index.js file. We’ll step through and explain each section of the code.
export default async function (event, context, logger) {
   logger.info(`Invoking Datafunction with payload ${JSON.stringify(event.data || {})}`);

   const redis = await redisConnect();
   let cached = {};

   // Check Redis for cached entry first
   let big_biz_count = await redis.get(`big_biz`);

    if (big_biz_count) {
       // If cached entry found, return it and be done.
       logger.info(`Found cache entry = ${big_biz_count}`);
       cached = "true"
       redis.quit();

       return { big_biz_count, cached }
   }  else {
      // If cached entry not found, then:
      // 1. Run the Postgres query
      // 2. Store the result in Redis
      // 3. Return the result and be done
       logger.info(`did not find in cache, returned ${big_biz_count}`);
       cached = "false"
       const pg = await pgConnect();
       const { rows } = await pg.query('SELECT COUNT(*) FROM company WHERE employees>10000;');
       big_biz_count = rows[0].count.toString();

       redis.set(`big_biz`, big_biz_count, {
         EX: 30, // seconds to keep before expiring
         NX: true
       });

       // Close the connections
       redis.quit();
       pg.end();

       // Return the value from Postgres, now stored in Redis
       return { big_biz_count, cached }
   }
}
An Explanation of the Code
As mentioned at the beginning of this article, we want to find out how many companies have more than 10,000 employees and return that number. We want to cache the number because it is an “expensive query”. In our example, the table is small, so it is not that expensive. However, it represents an “expensive query” that we may want to run in real life. You get the idea.
Let’s walk through the main sections of our function code.
1) Connect to Redis and see if the value is there.
  const redis = await redisConnect();
  let cached = {};
  let big_biz_count = await redis.get(`big_biz`);
2) If the value is there, meaning it has been cached, then we can return the cached value and be done.
  if (big_biz_count) {
    cached = "true"
    redis.quit();
    return { big_biz_count, cached }
3) If no cached value was found, then we have no choice but to run the query on our Postgres database.
  }  else {
    cached = "false"
    const pg = await pgConnect();
    const { rows } = await pg.query('SELECT COUNT(*) FROM company WHERE employees>10000;');
    big_biz_count = rows[0].count.toString();
4) Then, we store the value returned from our query in Redis.
    redis.set(`big_biz`, big_biz_count, {
      EX: 30, // seconds to keep before expiring
      NX: true
    });
5) Finally, we close our datastore connections, and we return the query result.
    redis.quit();
    pg.end();
    return { big_biz_count, cached }
You might prefer to refactor the code a little bit or add some error handling. However, at this most basic level, that’s all there is to it.
Test the Function
Now that we have a Salesforce Function, we can test it locally. First, we start up the function server.
sf run function start
Then, we invoke the Function with a payload from another terminal.
sf run function -l http://localhost:8080 -p '{"payloadID": "info"}'
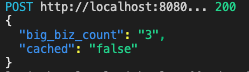
When you invoke the function against the test database for the first time, you should see the following output because there was no value in the cache:
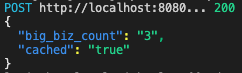
After this first run, however, the value is stored in our Heroku Redis instance. A subsequent run of the Salesforce Function returns the same value, but this time cached is true.
When we added the value to Redis, we set the cache expiration to 10 seconds. This makes it easier to test. However, in a real-world environment, the lifespan of your cache values should make sense for your business use case. For example, if the result changes after a nightly run of a report, then you could set the cache value to expire every 24 hours. Better yet, you can create another Salesforce Function that updates the cache with the new value as soon as the report finishes.
The entire contents of index.js can be downloaded here.
Conclusion
We did it. Caching is an excellent strategy for reducing resource load while providing faster responses. With Salesforce Functions, we can connect our Salesforce org to Heroku datastores (such as Postgres and Redis) and build mechanisms for caching. Salesforce Functions allow us to perform tasks that might ordinarily be load-heavy, cause timeouts, or exceed other limits imposed by Salesforce. Caching is just one use case, but it can yield tremendous benefits, and it’s easy to implement. Now, go have fun with it!
Published at DZone with permission of Michael Bogan. See the original article here.
Opinions expressed by DZone contributors are their own.
Comments