Scheduled Import of Excel Into Database
In this article, learn more about how to achieve a scheduled import and full automation from Microsoft Excel to a database.
Join the DZone community and get the full member experience.
Join For FreeEarlier, we introduced the method of importing Excel into the database with one click, which eliminates the cumbersome steps of importing Excel into the database and solves various problems that may be encountered in the process. We also introduced the method of bulk importing multiple Excel files into the database, which enables unattended bulk import. Now we will introduce how to achieve scheduled import and achieve full automation.
Example
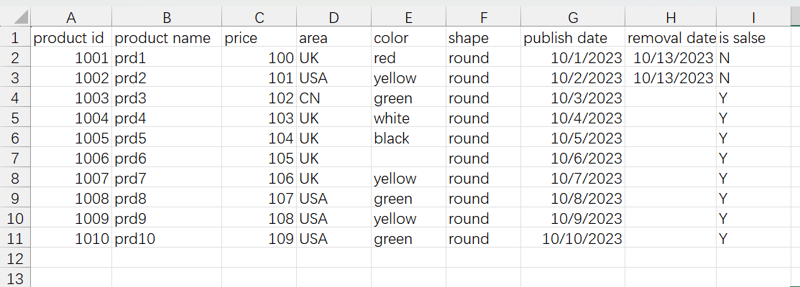
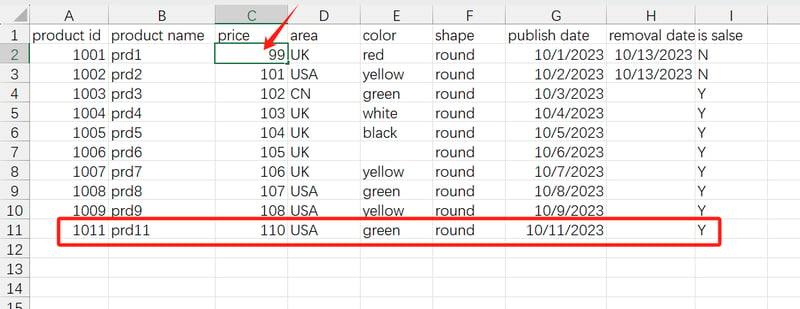
As shown in the figure, we have a table called Product Information, which records all the product information of the company. When there are new products, data will be added to the table. When there are changes in product information, the table data may also be updated.
Now, we need to synchronize the data in this table with the database, and when the Excel data is updated, we can update the data in the database on a regular basis.
Step 1: Create a Product Information Table in the Database
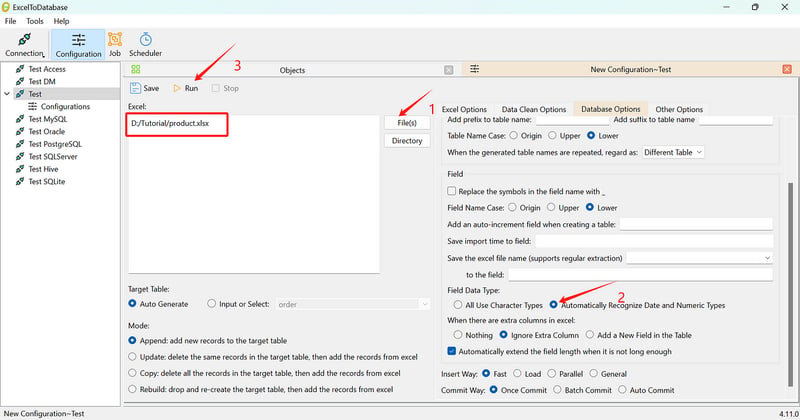
Use the ExcelToDatabase tool to import Excel to the database with one click.
Step 2: Decide on the Update Method
There are generally two ways to update data: full update and incremental update
- Full update: This involves deleting all previously imported data from the database table and then importing all the data from the Excel table. This approach is simple and robust, ensuring consistency between the Excel and database data. However, it can consume more resources and time when the Excel data volume is large or updates are frequent. It is generally suitable for scenarios where the data volume is small or updates are infrequent or where historical data retention is not required.
- Incremental update: Based on the existing data in the database table, only the newly added or modified data in Excel is updated. This method requires a fixed unique identifier for each row of data to distinguish between data, such as the product ID here. Now we will introduce two update methods.
Full Update
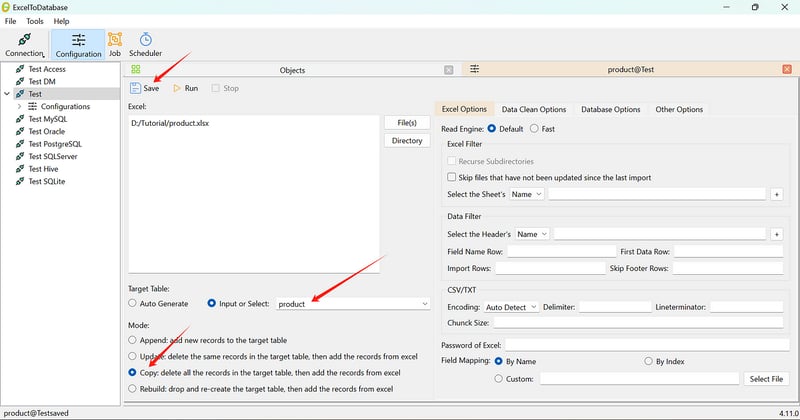
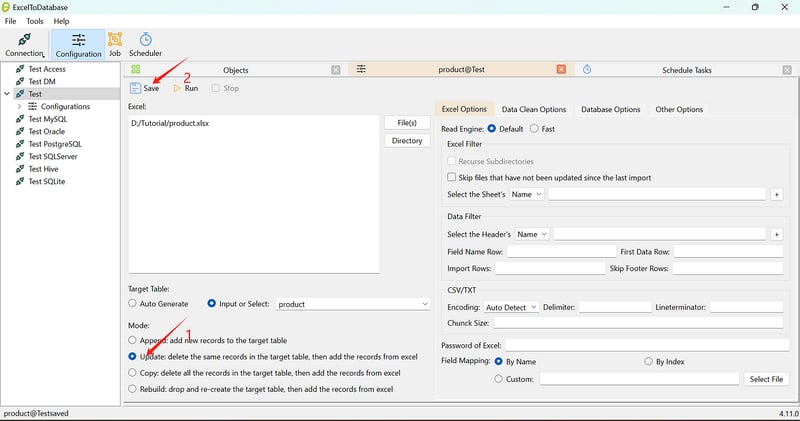
We will first save the import configuration we just created and name it product information. The target table can be the table name we just imported and generated. The import mode can be selected as overwrite. Click save.
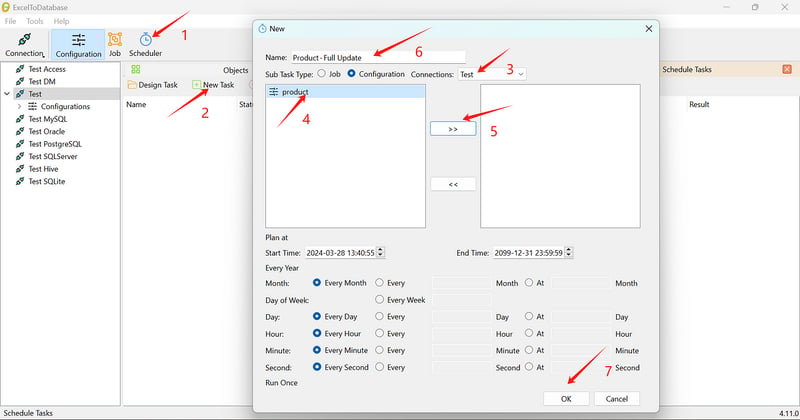
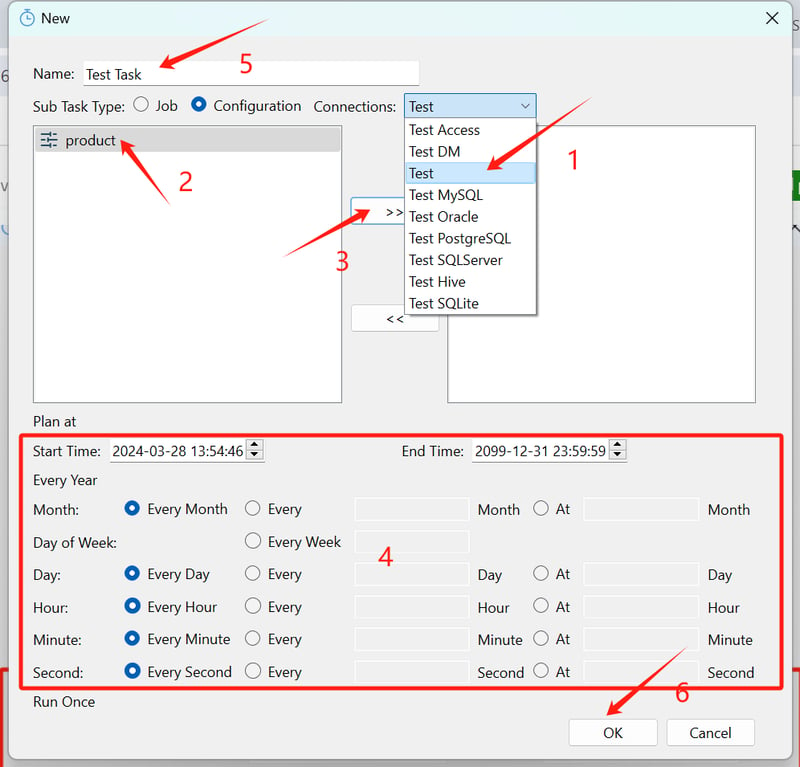
In the software toolbar — scheduled tasks — add a new task, add a scheduled task called product information — full update (here we leave the default settings for the scheduled task and add them later).
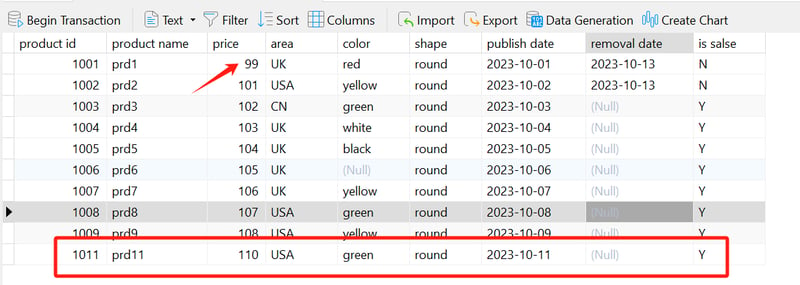
Edit the Excel file by deleting, adding, and modifying a data record to test the effect. The image below shows the data in the database table before modification. We will delete Product 10, change the unit price of Product 1 to 99, and add a new record for Product 11.
Check the database table data again, it has been updated
Incremental Update
If a full update is in progress, stop it first.
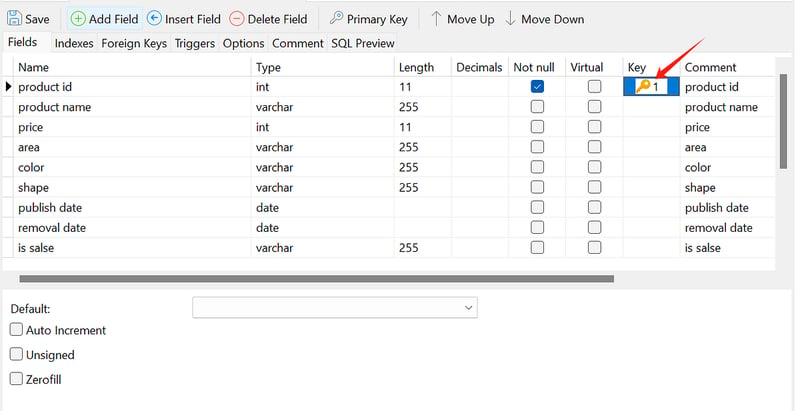
Here, we choose the product id as the unique identifier for the data and set it as the primary key in the database table.
Select the update option for import mode and click Save.
Add a new scheduled task called Product Information — Incremental Update.
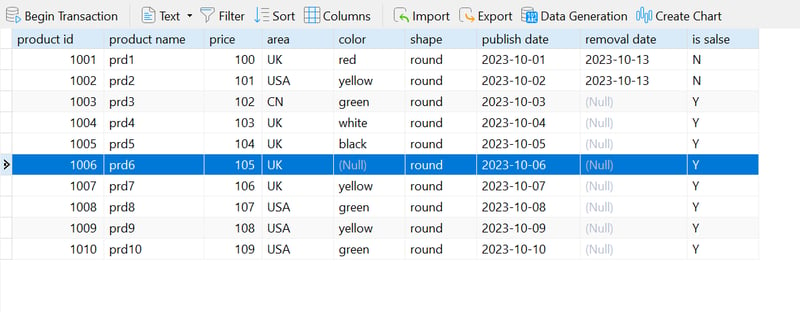
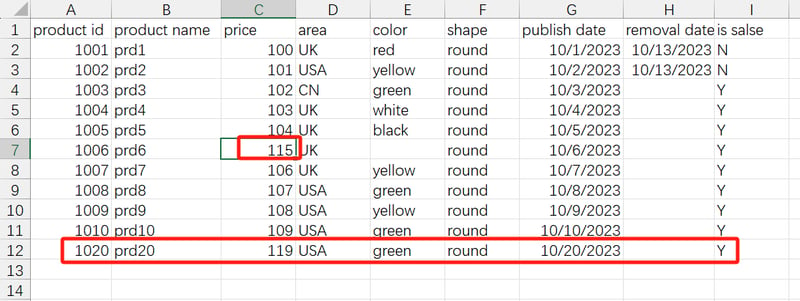
Modify a data record to test the update. Here, we'll change the price for Product 105 to 85 and add a new record for Product 20. Before modification, the database table looks like this:
Modify and save the Excel as shown in the figure.
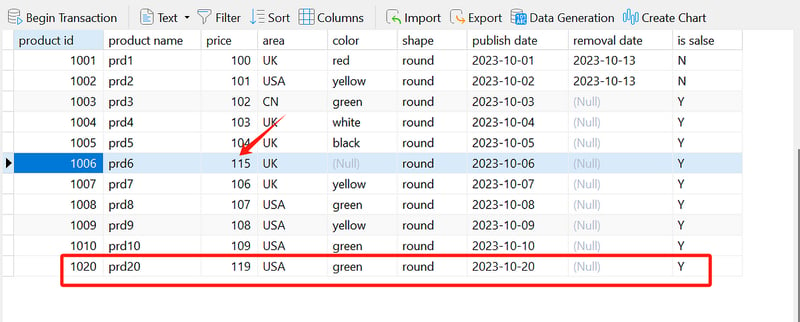
Check the database table again, it has been updated.
Scheduled Task Settings
- Sub-task type: Select the saved task or configuration.
- Start/end time: Specify the effective period of the scheduled task.
- Month: Can be filled from 1 to 12.
- Week: Can be filled from 1 to 7, representing Monday to Sunday.
- Day: Can be filled from 1 to 31.
- Hour: Can be filled from 0 to 23.
- Minute: Can be filled from 0 to 59.
- Second: Can be filled from 0 to 59.
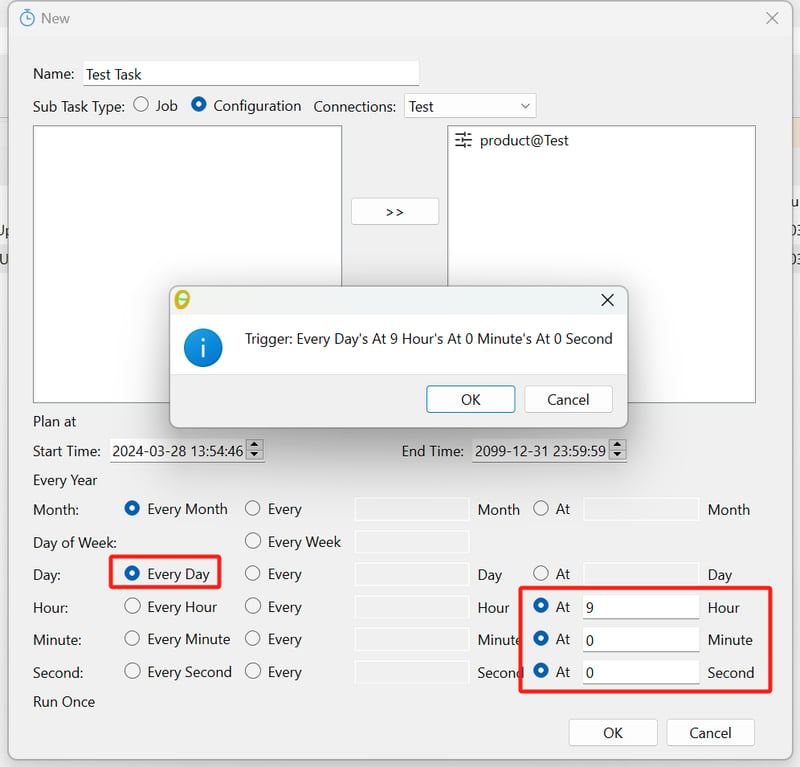
Using minutes as an example:
- Every minute: The task runs every minute, i.e., it runs at every minute from 0 to 59.
- Every n minutes: Enter 3 to run the task every 3 minutes, for example, it runs at the 2nd, 5th, 8th, 11th, etc., minutes.
- At the nth minute: Specify which minute the task should run, such as running at the 0th minute.
For example, to run the task every day at 9:00 AM:
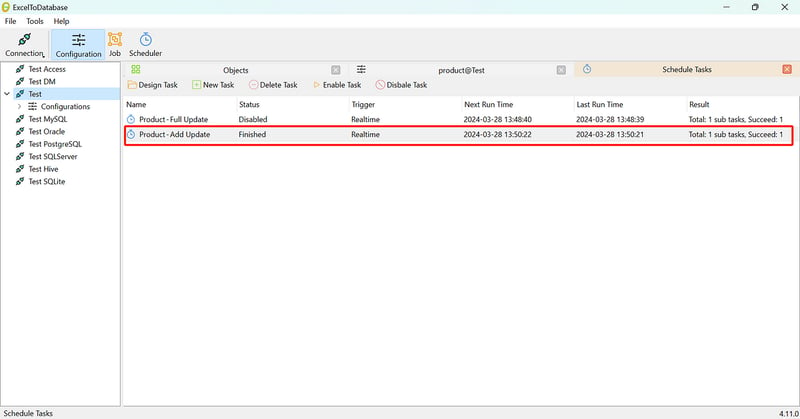
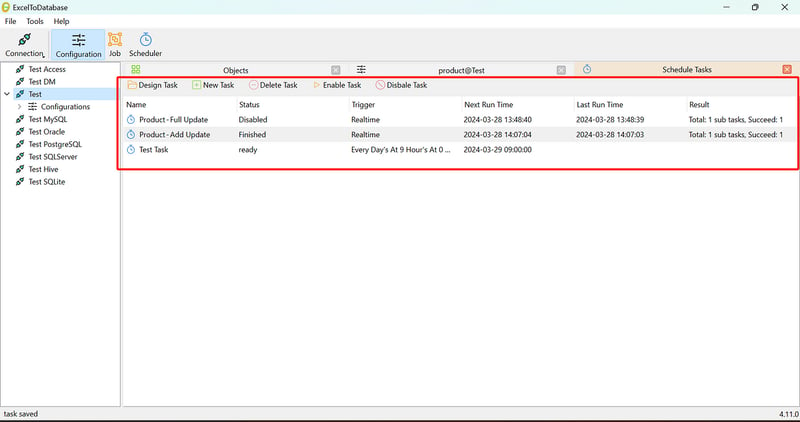
You can view the basic information of real-time scheduled tasks in the scheduled tasks interface:
Note: The scheduled task requires the software to run all the time. When you click x to close the software interface, the software will default to immediately exit and stop the scheduled task. You can check Hide in the tray area instead of directly exiting the program in the software menu bar — Tools — Settings. After hiding, you can right-click the program icon in the tray area and choose Open main interface or Exit program.
How To Add ExcelToDatabase to Boot
Applications that require running scheduled tasks are usually placed on servers that run 24 hours a day without interruption, but if the scheduled tasks are run on your computer, you may need to restart the computer every day. In this case, we can add the program to the startup process, and the scheduled tasks will automatically run after the program is started.
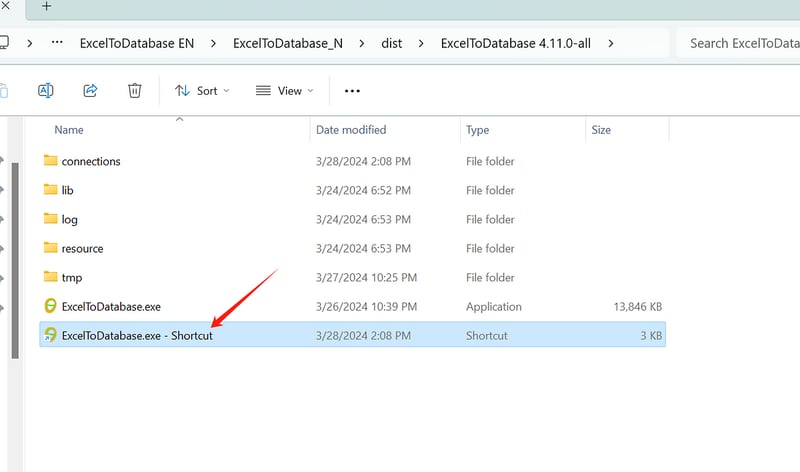
Step 1: Create an Exe Shortcut
Step 2
Place the shortcut in the Windows startup folder, and the program under this file will start up with the computer.
My computer path is: C:\ProgramData\Microsoft\Windows\Start Menu\Programs\StartUp
Other Timing Methods
Using the built-in scheduled tasks of ExcelToDatabase requires keeping the program open, and the scheduled tasks will automatically stop running after exiting the program. If you prefer to run scheduled tasks in the background without opening the program, you can use other dedicated task-scheduling programs to call the API provided by ExcelToDatabase.
For example, Windows’ built-in Task Scheduler provides a non-graphical interface for running tasks in the background and can automatically start with the computer.

You can refer to the following instructions for using the API.
Introduction and Download of ExcelToDatabase
Published at DZone with permission of ryjfgjl xb. See the original article here.
Opinions expressed by DZone contributors are their own.



Comments