Scripting Authenticated Login Within ZAP Vulnerability Scanner
Learn how to use the ZAP scripting language Zest to create authenticated logins and incorporate automated security testing in your web application.
Join the DZone community and get the full member experience.
Join For FreeOWASP Zed Attack Proxy (ZAP) is one of my favorite tools for scanning and performing vulnerability tests on a web application. It has a simple GUI to get started, with a large capability for customization to tailor scans as needed.
Recently, I was faced with the problem of logging in and then scanning the authenticated segments of a web application. Seems easy: pass in the username and password fields and define their parameters. Except that the post request also required a token parameter for added security. This token is obtained from the Javascript header on the landing page.
Below is an excerpt of the code:

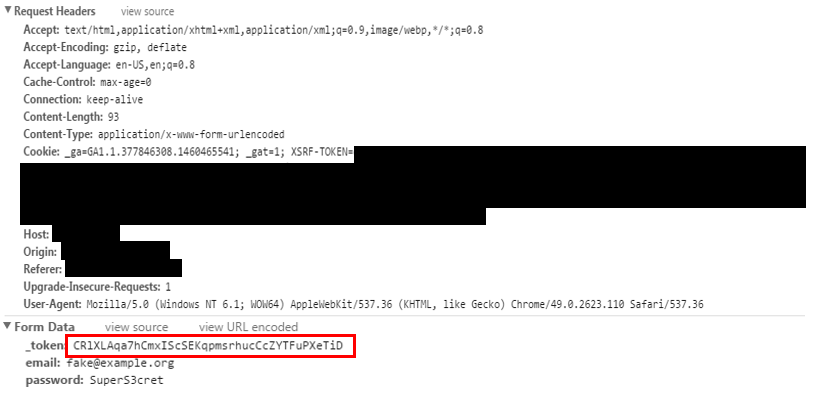
If the token is not included with the login script as a POST parameter, the request will be rejected. A sample request header is shown, with the POST parameters included under the Form Data. To not be rejected, causing a custom 500 error page return, the _token must equal the value of the csrf-token.
This presented a challenge beyond ZAP’s Basic Authentication scripting capabilities. Simply getting ZAP to enter the username and password, as prompted by the application was unsuccessful, as it was unable to automatically extract the token value. In cases where it was able to obtain a token, it was not refreshing the page, so the token obtained was from a previous session. Attempting to spider or access pages requiring authentication resulted in 500 or 405 errors. The application returned a custom 500 error when failing to access a given page. These error codes indicated that ZAP failed to load the correct page.
ZAP scanned only a limited portion of the application, as most of the pages and features required authentication.
ZAP Scripting With Zest
Enter Zest, the ZAP scripting language. This language is built around accomplishing tasks, such as fuzzing data, traversal through a website, or authentication.
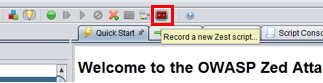
As the authenticated login for my target website was a bit complicated, a custom script was needed. There were several different methods of constructing the Zest scripts to perform the scan. By far the easiest was to Record a new Zest Script.
Clicking the button, shown below, in the top navigation bar brings up a popup menu to record all of the actions performed.
For this script, I began the recording on the landing page of the web application. When ZAP recorded this page, it gathered the token and learned to serve it with the login parameters. This recording extracted the token and automated the login process.
After creating these scripts with Zest, be sure to remove extra steps or page calls to simplify the repeatable process.
In my case, the login steps required only 3 steps: start at the landing page, submit the login, and redirect to the authenticated landing page. Along the way, there were dozens of pages and files accessed to help visually display the page. These page loads were unnecessary for login, so they were removed from the script.
The end result is the script containing the 3 requests shown:

Test the Zest script by pressing the Run button. This executes the script. A 200 HTTP response on the authenticated page indicates the script successfully logged in.

A custom Context is used to apply the Login Script from Zest to run the recorded tasks.

To get the best results, spider the site first using the Context to find all of the authenticated pages that are available. Then an Active Scan is performed on each page identified.
One tip I discovered was to ensure that the Forced User Mode button is not selected.
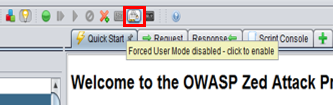
The locked icon needed to be set to unlocked, otherwise, the token became fixated on the value used when creating the Zest script and not renewed with each test execution. This was very frustrating to overlook as it caused the script to succeed, but the login attempts to fail.
Another problem was that the login URL for the Zest script needed to begin at the starting homepage, and not the login page, to work properly. For this web application, the token was set the first time the user accesses the homepage. Therefore, the scripts needed to start at that page to obtain a new token before moving to the login.
To do this, set the LoginURL to the starting page within the Context settings. In this case, I needed to use the LoginURL of the homepage, https://[myapp], instead of the login page at https://[myapp]/auth/login.
With these steps applied, automated security testing was incorporated into the application's DevOps process and tools. These fast automated scans were able to run after each code change to identify common security issues, which can then be addressed by the development team.
500 error page return
Published at DZone with permission of Ben Pick. See the original article here.
Opinions expressed by DZone contributors are their own.
Comments