Secure Discovery With Spring Cloud Netflix Eureka
Learn how to secure communications between microservices using Spring Cloud Netflix Eureka, with considerations for both client and server sides.
Join the DZone community and get the full member experience.
Join For FreeBuilding a standard discovery mechanism based on Spring Cloud Netflix Eureka is a rather easy thing to do. But the same solution built over secure SSL communication between the discovery client and server may be a slightly more advanced challenge. I haven’t found any complete examples of such an application on the web. Let’s try to implement it, beginning with a server-side application.
1. Generate Certificates
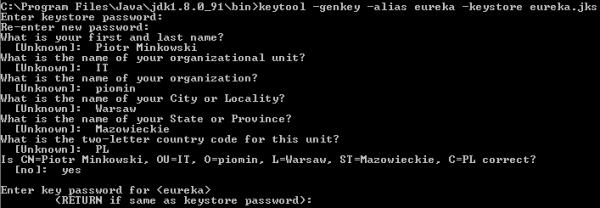
If you've developed Java applications for some years, you have probably heard about keytool. This tool is available in your ${JAVA_HOME}\bin directory and is designed for managing keys and certificates. We'll begin by generating a keystore for a server-side Spring Boot application. Here’s the appropriate keytool command that generates certificates stored inside a JKS keystore file named eureka.jks.

2. Setting Up a Secure Discovery Server
Since the Eureka server is embedded in the Spring Boot application, we need to secure it using standard Spring Boot properties. I placed the generated keystore file eureka.jks in the application’s classpath. Now the only thing that has to be done is to prepare some configuration settings inside application.yml that point to the keystore file location, type, and access password.
server:
  port: 8761
  ssl:
    enabled: true
    key-store: classpath:eureka.jks
    key-store-password: 123456
    trust-store: classpath:eureka.jks
    trust-store-password: 123456
    key-alias: eureka
3. Setting Up Two-Way SSL Authentication
We will complicate our example a little. A standard SSL configuration assumes that only the client verifies the server certificate. We will force the client’s certificate authentication on the server-side. It can be achieved by setting the property server.ssl.client-auth to need.
server:
  ssl:
    client-auth: need
That’s not all, because we also have to add the client’s certificate to the list of trusted certificates on the server side. So first, let’s generate the client’s keystore using the same keytool command as for the server’s keystore.

Now we need to export certificates from generated keystores for both client and server sides.

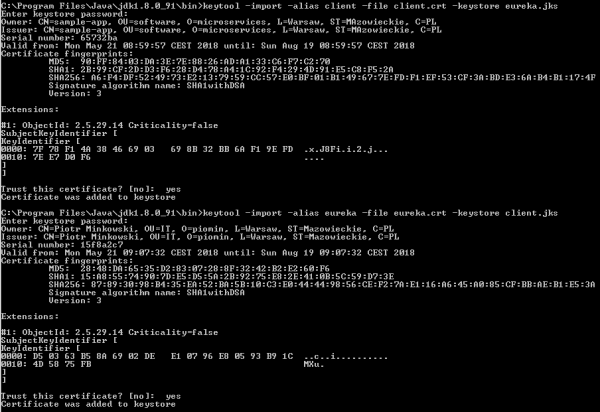
Finally, we import the client’s certficate to the server’s keystore and the server’s certficate to the client’s keystore.

4. Running a Secure Eureka Server
The sample applications are available on GitHub in the repository sample-secure-eureka-discovery. After running the discovery-service application, Eureka is available under the address https://localhost:8761. If you try to visit its web dashboard, you get the following exception in your web browser. It means the Eureka server is secured.

Well, the Eureka dashboard is sometimes a useful tool, so let’s import the client’s keystore to our web browser to be able to access it. We have to convert the client’s keystore from JKS to PKCS12 format. Here’s the command that performs the mentioned operation.
$ keytool -importkeystore -srckeystore client.jks -destkeystore client.p12 -srcstoretype JKS -deststoretype PKCS12 -srcstorepass 123456 -deststorepass 123456 -srcalias client -destalias client -srckeypass 123456 -destkeypass 123456 -noprompt5. Client’s Application Configuration
When implementing a secure connection on the client side, we generally need to do the same as in the previous step – import a keystore. However, it is not a very simple thing to do because Spring Cloud does not provide any configuration property that allows you to pass the location of an SSL keystore to a discovery client.
What’s worth mentioning is that the Eureka client leverages a Jersey client to communicate with server-side applications. It may be a little surprising that it is not a Spring RestTemplate, but we should remember that Spring Cloud Eureka is built on top of a Netflix OSS Eureka client, which does not use Spring libraries.
Basic HTTP authentication is automatically added to your Eureka client if you include security credentials to the connection URL, for example http://piotrm:12345@localhost:8761/eureka.
For a more advanced configuration, like passing an SSL keystore to an HTTP client, we need to providea @Bean of type DiscoveryClientOptionalArgs.
The following fragment of code shows how to enable SSL connection for our discovery client. First, we set the location of our keystore and truststore files using the javax.net.ssl.* Java system property. Then, we provide a custom implementation of a Jersey client based on Java SSL settings and set it for the DiscoveryClientOptionalArgs bean.
@Bean
public DiscoveryClient.DiscoveryClientOptionalArgs discoveryClientOptionalArgs() throws NoSuchAlgorithmException {
    DiscoveryClient.DiscoveryClientOptionalArgs args = new DiscoveryClient.DiscoveryClientOptionalArgs();
    System.setProperty("javax.net.ssl.keyStore", "src/main/resources/client.jks");
    System.setProperty("javax.net.ssl.keyStorePassword", "123456");
    System.setProperty("javax.net.ssl.trustStore", "src/main/resources/client.jks");
    System.setProperty("javax.net.ssl.trustStorePassword", "123456");
    EurekaJerseyClientBuilder builder = new EurekaJerseyClientBuilder();
    builder.withClientName("account-client");
    builder.withSystemSSLConfiguration();
    builder.withMaxTotalConnections(10);
    builder.withMaxConnectionsPerHost(10);
    args.setEurekaJerseyClient(builder.build());
    return args;
}
6. Enabling HTTPS on the Client Side
The configuration provided in the previous step applies only to communication between discovery client and Eureka server. What if we also would like to secure HTTP endpoints exposed by the client-side application? The first step is pretty much the same as for the discovery server: We need to generate a keystore and set it using Spring Boot properties inside application.yml.
server:
  port: ${PORT:8090}
  ssl:
    enabled: true
    key-store: classpath:client.jks
    key-store-password: 123456
    key-alias: client
During registration, we need to “inform” Eureka server that our application’s endpoints are secured. To achieve that, we should set the property eureka.instance.securePortEnabled to true, and also disable the non-secure port, which is enabled by default with the nonSecurePortEnabled property.
eureka:
  instance:
    nonSecurePortEnabled: false
    securePortEnabled: true
    securePort: ${server.port}
    statusPageUrl: https://localhost:${server.port}/info
    healthCheckUrl: https://localhost:${server.port}/health
    homePageUrl: https://localhost:${server.port}
  client:
    securePortEnabled: true
    serviceUrl:
      defaultZone: https://localhost:8761/eureka/
7. Running the Client’s Application
Finally, we can run the client-side application. After launching the application, it should be visible in the Eureka dashboard.

All the client application’s endpoints are registered in Eureka under the HTTPS protocol. I have also overrode the default implementation of the Actuator endpoint /info, as shown in the code fragment below.
@Component
public class SecureInfoContributor implements InfoContributor {

    @Override
    public void contribute(Builder builder) {
        builder.withDetail("hello", "I'm secure app!");
    }

}
Now, we can try to visit the /info endpoint one more time. You should see the same information as below.

Alternatively, if you try to set on the client-side the certificate, which is not trusted by the server side, you will see the following exception while starting your client application.

Conclusion
Securing a connection between microservices and a Eureka server is only the first step of securing the whole system. We need to think about a secure connection between microservices and the config server and also between all microservices during inter-service communication with @LoadBalancedRestTemplate or an OpenFeign client. You can find the examples of such implementations and many more in my book Mastering Spring Cloud.
Published at DZone with permission of Piotr Mińkowski, DZone MVB. See the original article here.
Opinions expressed by DZone contributors are their own.

Comments